Panasonic EBX300 Istruzioni per l'uso
- Categoria
- Cellulari
- Tipo
- Istruzioni per l'uso
Questo manuale è adatto anche per

Operating Instructions Part 1
Digital Cellular Phone
Before operating this handset, please read these
instructions (parts 1 and 2) completely.
Mobile
Phone

Contents i
Contents
Getting Started .................. 1
Your phone................................. 1
Key functions.............................. 2
Displays......................................4
Fitting and removing
the battery ................................ 6
Fitting and removing the SIM ..... 7
Charging the battery................... 7
Battery level indicator................. 8
Low battery power warning ........ 8
Symbols used in this manual...... 8
Basic Operations .............. 9
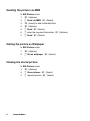
Switching the phone on/off ......... 9
Making a call .............................. 9
Answering a call ....................... 11
In-call operations ...................... 12
Incoming call while on a call..... 14
DTMF ....................................... 16
Text entry .................................17
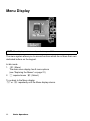
Menu Display............................ 20
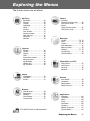
Exploring the Menus....... 21
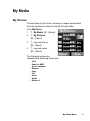
My Phone Menu............... 22
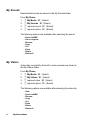
My Media.................................. 23
Sounds ..................................... 26
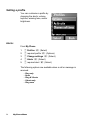
Display...................................... 28
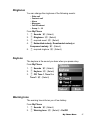
Language ................................. 31
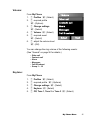
Alerts ........................................ 32
Profiles ..................................... 33
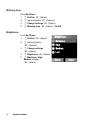
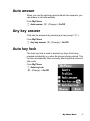
Auto answer ............................. 37
Any key answer ........................ 37
Auto key lock ............................ 37
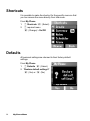
Shortcuts .................................. 38
Defaults .................................... 38
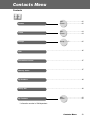
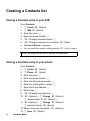
Contacts Menu ................ 39
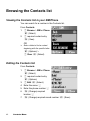
Browsing the Contacts list........ 40
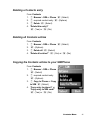
Creating a Contacts list ............ 44
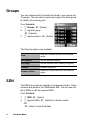
Groups...................................... 46
SDN..........................................46
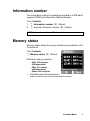
Information number .................. 47
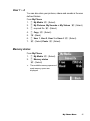
Memory status..........................47
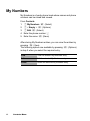
My Numbers .............................48
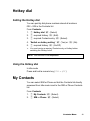
Hotkey dial................................49
My Contacts .............................49
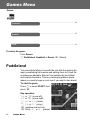
Games Menu.................... 50
Puddleland ...............................50
Quadball ...................................51
Exode .......................................51
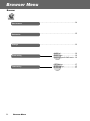
Browser Menu ................. 52
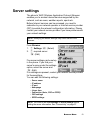
Server settings .........................53
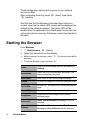
Starting the Browser.................54
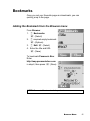
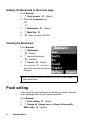
Bookmarks ...............................55
Push setting..............................56
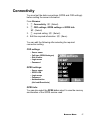
Connectivity..............................57
Camera Menu................... 58
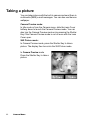
Your camera.............................59
Taking a picture........................60
Camera settings .......................63
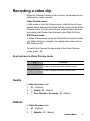
Recording a video clip ..............67
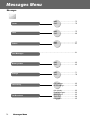
Messages Menu............... 70
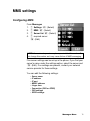
MMS settings............................ 71
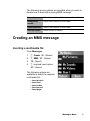
Creating an MMS message...... 73
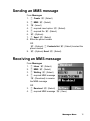
Sending an MMS message ......75
Receiving an MMS message....75
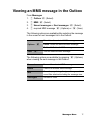
Viewing an MMS message
in the Outbox..........................77
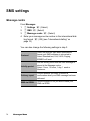
SMS settings ............................ 78
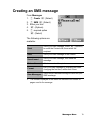
Creating an SMS message ...... 79
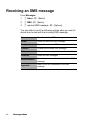
Receiving an SMS message .... 80
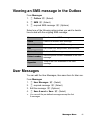
Viewing an SMS message
in the Outbox..........................81
User Messages ........................81
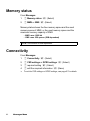
Memory status..........................82
Connectivity..............................82
Cell Broadcast ..........................83
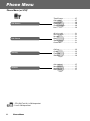
Phone Menu..................... 86
Call Service ..............................87
Call Diverts ...............................91
Security .................................... 92

ii Contents
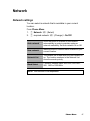
Network.....................................97
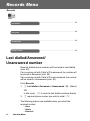
Records Menu ................. 98
Last dialled/Answered/
Unanswered number ..............98
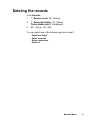
Deleting the records..................99
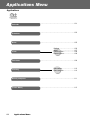
Applications Menu ........ 100
Calendar .................................101
Scheduler................................103
Notes ......................................105
Clock.......................................106
Calculator................................109
Currency .................................110
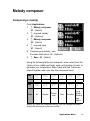
Melody composer ...................111
Phone Menu ...........................112
Accessory ...................... 113
CD-ROM.................................113
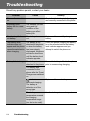
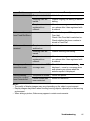
Troubleshooting............ 114
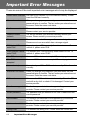
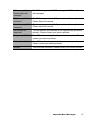
Important Error
Messages ..................... 116
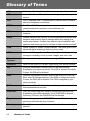
Glossary of Terms......... 118
Index............................... 120

Getting Started 1
Getting Started
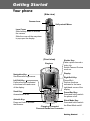
Your phone
(Side view)
(Front view)
Camera Lens
Lens Cover:
Slide halfway down to activate
the camera.
Slide the cover all the way down
to pop open the display.
Earpiece
Display
Shutter Key:
Take a picture/record a
video clip.
Switch Camera Preview
mode on.
Navigation Key:
Scroll/move through menus.
Right Soft Key:
Cancel/Exit.
Perform functions
indicated in the lower
right-hand corner of the
display.
Power/End Key:
Press and hold to switch
the phone on/off.
Silent Mode Key:
Press and hold to switch
the Silent Mode on/off.
Charging Connector/
Personal Hands free Connector
Asterisk Key:
Press and hold to activate
the Browser.
Send Key:
Answer/make a call.
Left Soft Key:
Perform functions indicated
in the lower left-hand corner
of the display.
Self-portrait Mirror

2 Getting Started
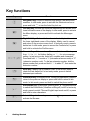
Key functions
Key Function
4
Navigation Key: Scroll or move through menus, text and phone
numbers. In idle mode, press to activate the Shortcuts menus or
press and hold
1 to turn the Auto Key lock on.
A
Left Soft Key: Perform the functions indicated by text shown in the
lower left-hand corner of the display. In idle mode, press to activate
the Menu display, or press and hold to activate the Messages
menu.
@
Right Soft Key: Perform the functions indicated by text shown in
the lower right-hand corner of the display. Mainly used to cancel
and return to the previous menu level. In text entry mode, press to
delete text. In idle mode, press to access the Contacts list, or press
and hold to activate the Profiles menu.
# ~ ,
Numeric Keys: Enter numbers. Press and hold one of the keys
from
% to , for Hotkey dialling, or $ for voice message
setting. In text entry mode, enter text, numbers and characters.
Press and hold
# to enter a “+” (international access code) or “P”
(extension number code). To dial an extension number, dial the
phone number first, press and hold
# to add a “P”, then enter the
extension number.
C
Send Key: Make a call or answer a call. In idle mode, press to
check the last dialled list. In text entry mode, press to switch
between input methods.
D
Power/End Key: End/reject a call. During key operations, press to
return to the previous display or press and hold to return to idle
mode. In idle mode, press and hold to switch the phone on/off.
!
Silent Mode Key: In idle mode, press to enter “#”, or press and hold
to switch the Silent Mode (Vibration on/Ring off) on/off. In text entry
mode, press to switch T9 smart English input mode on/off, or press
and hold to enter characters.
"
Asterisk Key: In idle mode, press to enter “ ”, or press and hold to
activate the Browser.
"

Getting Started 3
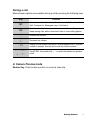
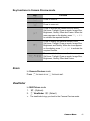
During a call
Minimal menu options are available during a call by pressing the following keys.
In Camera Preview mode
Shutter Key: Press to take a picture or record a video clip.
Key Function
A
Activate Hands free/Hand held, Conference call, Call transfer, End,
Split, Contacts list, Messages menu, Call status.
@
Put the call on hold or resume while connected to a calling party.
Swap among calls while connected to two or more calling parties.
1
Increase the volume.
5
Decrease the volume.
C
Display the last dialled records list. Answer another call. If a phone
number is entered, hold the active call and call the number.
#~,
!"
Send DTMF. Press and hold ! to switch the Hands free speaker
on/off.

4 Getting Started
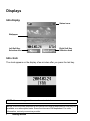
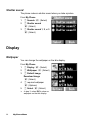
Displays
Idle display
Idle clock
The clock appears on the display a few minutes after you press the last key.
NOTE: All screen images in this manual are simulated.
NOTE: Some services described in this manual are network dependent or may only be
available on a subscription basis. Some functions are SIM dependent. For more
information, contact your service provider.
Status icons
Right Soft Key
Selection Area
Left Soft Key
Selection Area
Wallpaper

Getting Started 5
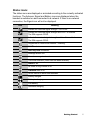
Status icons
The status icons are displayed or animated according to the currently activated
functions. The Antenna, Signal and Battery icons are displayed when the
handset is switched on and connected to a network. If there is no network
connection, the Signal icon will not be displayed.
Icon Meaning
Indicate the received signal strength – No CPHS.
Indicate the received signal strength and Line 1 is enabled.
The SIM supports CPHS.
Indicate the received signal strength and Line 2 is enabled.
The SIM supports CPHS.
Registered to a non-home network – roaming.
Call Diverts is on.
Auto key lock is enabled.
Message area is full.
Unread message is stored.
Voice mail indicator (voice mail has been received)
Alarm is set.
All tones or ring volume is off.
Vibration alert is on.
GPRS service is active and available.
Battery charged.
Battery is charging.
Low battery
Abnormal charging

6 Getting Started
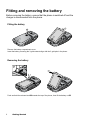
Fitting and removing the battery
Before removing the battery, ensure that the phone is switched off and the
charger is disconnected from the phone.
Fitting the battery
Remove the battery compartment cover.
Insert the battery, ensuring the 3 gold contacts align with the 3 gold pins in the phone.
Removing the battery
Push and hold the release latch ➊ towards the top of the phone, then lift the battery out ➋.

Getting Started 7
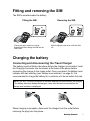
Fitting and removing the SIM
The SIM is inserted under the battery.
Charging the battery
Connecting and disconnecting the Travel Charger
The battery must be fitted in the phone before the charger is connected. Insert
the Charging Connector into the socket at the base of the phone before
connecting the charger to the mains outlet. Once connected, the Battery level
indicator will start scrolling (see “Battery level indicator” on page 8). It is
recommended to charge the battery for a minimum of 4 hours before first use.
When charging is complete, disconnect the charger from the outlet before
removing the plug from the phone.
NOTE: DO NOT force the connector as this may damage the phone and/or the charger.
If the battery has been deeply discharged, it may take several minutes before the
Battery level indicator is displayed.
Fitting the SIM Removing the SIM
Ensure the gold contacts are facing
downwards before sliding the SIM into the
SIM holder.
Whilst holding the tab down, slide the SIM
out.

8 Getting Started
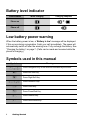
Battery level indicator
Low battery power warning
When the battery power is low, a “Battery is low” message will be displayed.
If this occurs during conversation, finish your call immediately. The power will
automatically switch off after the warning tone. Fully recharge the battery. See
“Charging the battery” on page 7. (Calls can be made and received while the
phone is charging.)
Symbols used in this manual
Phone Status While charging Charging complete
Phone on
>
Phone off
Symbols Meaning
154
Press Navigation Key in the direction indicated by the arrow.
A
Press Left Soft Key.
@
Press Right Soft Key.
#~,
Press Numeric Keys.
C
Press Send Key.
D
Press Power/End Key.
"
Press Asterisk Key.
!
Press Silent Mode Key.

Basic Operations 9
Basic Operations
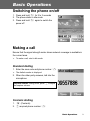
Switching the phone on/off
1. Press and hold D for 2 to 3 seconds
2. The phone starts in idle mode
3. Press and hold
D again to switch the
power off
Making a call
Ensure that the signal strength meter shows network coverage is available in
the current area.
➣ To make a call, start in idle mode.
Standard dialling
1. Enter the area code and phone number C
➣ The dialled number is displayed.
2. When the other party answers, talk into the
microphone
Contacts dialling
1. @ (Contacts)
2. 4 required phone number C
Earpiece volume: During a call, press 4 to adjust
the earpiece volume.

10 Basic Operations
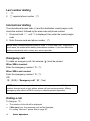
Last number dialling
1. C
2. 4 required phone number C
International dialling
The international access code (+) and the destination country/region code
should be entered, followed by the area code and phone number.
1. Press and hold
# until “+” is displayed, then enter the country/region
code
2. Enter the area code and phone number
C
Emergency call
To make an emergency call, the antenna ( ) must be present.
When SIM is inserted:
Enter the emergency number 112
C
When SIM is not inserted:
Enter the emergency number 112
C
OR
@ (SOS) > “Emergency call” A (Yes)
Ending a call
To hang up, D
➣ The duration of the call will be displayed.
➣ If Max cost is on, the remaining units will be displayed.
For setting “Max cost”, please refer to page 90.
NOTE: Many countries/regions include an initial “0” in the area code. This should, in
most cases, be omitted when dialling international numbers. If you have difficulties
making international calls, contact your service provider.
NOTE: Most countries support the international emergency number 112. If you find the
number does not work on your phone, please call your service provider. Making
emergency calls without a SIM is country or network operator dependent.

Basic Operations 11
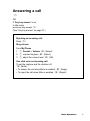
Answering a call
C
OR
If “Any key answer” is on,
In idle mode
press any key except
D
(See “Any key answer” on page 37.)
Rejecting an incoming call:
Press
D
Ring volume:
From My Phone
1. 4 Sounds > Volume A (Select)
2.
4 required ringtone A (Select)
3. 4 adjust the volume level A (OK)
One click mute on incoming call:
To set the ringtone and the vibration off,
@ (Mute)
• To answer the call when Mute is enabled,
A (Reply)
• To reject the call when Mute is enabled,
@ (Reject)

12 Basic Operations
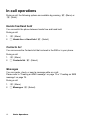
In-call operations
During a call, the following options are available by pressing A (Menu) or
@ (Hold).
Hands free/Hand held
You can switch the phone between hands free and hand held.
During a call:
1. A (Menu)
2.
4 Hands free or Hand held A (Select)
Contacts list
You can access the Contacts list that is stored in the SIM or in your phone.
During a call:
1. A (Menu)
2.
4 Contacts list A (Select)
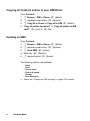
Messages
You can create, check, or send a message while on a call.
Please refer to “Creating an MMS message” on page 73 or “Creating an SMS
message” on page 79.
During a call:
1. A (Menu)
2.
4 Messages A (Select)

Basic Operations 13
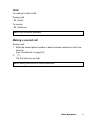
Hold
You can put a call on hold.
During a call:
@ (Hold)
To resume:
@ (Retrieve)
Making a second call
During a call:
1. Enter the second phone number or select a phone number from the Con-
tacts list
(see “Contacts list” on page 12)
2.
C
The first call is put on hold
NOTE: Hold is network dependent.
NOTE: Making a second call is network dependent.

14 Basic Operations
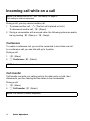
Incoming call while on a call
During a call, you may receive another call.
1. To answer another call,
C (The first call is placed on hold.)
To disconnect another call, @ (Reject)
2. During a conversation with a second caller, the following options are availa-
ble by pressing
A (Menu) or @ (Swap):
Conference
To create a conference call, you must be connected to more than one call.
In a conference call, you can talk with up to 5 parties.
During a call:
1.
A (Menu)
2. 4 Conference A (Select)
Call transfer
Call transfer connects your calling party to the other party on hold, then
disconnects your line, leaving the two callers in the conversation.
During a call:
1.
A (Menu)
2.
4 Call transfer A (Select)
NOTE: Call waiting must be on – see “Call waiting” on page 87.
Call waiting is network dependent.
NOTE: Conference is network dependent.
NOTE: Call transfer is network dependent.

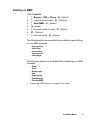
Basic Operations 15
End
You can select one of the calls to disconnect while in a conference call.
During a call:
1. A (Menu)
2. 4 End A (Select)
Split
You can separate an individual from the active conference call.
During a call:
1. A (Menu)
2.
4 Split A (Select)
Call status
Call status allows you to disconnect the line or put a call on hold with the active
party. You can also activate a call that is put on hold.
During a call:
1.
A (Menu)
2. 4 Call status A (Select)
3.
4 required active call A (Select)
4.
A (End) to disconnect the line
OR
@ (Hold) to put the call on hold
• To resume,
@ (Back).
• You can activate the required inactive call by pressing
A (Join) in step 3.
NOTE: Split is network dependent.

16 Basic Operations
Swap
When you are connected to two calls, you can switch between the active call
and the held call.
During a call:
@ (Swap) to switch to the other call on hold
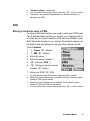
DTMF
DTMF can be sent during a conversation. These are often used to access voice
mail, paging and computerised home banking. For example, you may need to
enter a number to remotely access voice mail messages. A phone number may
be stored in the Contacts together with a DTMF sequence, allowing the number
to be dialled upon recall and the DTMF sequence to be sent automatically.
To send DTMF during a call:
Enter digits (
# ~ ,, ! or ").
Pause dial
Using pauses allows you to send DTMF automatically.
1. Enter the phone number
2. Press and hold
# until a “P” is displayed at the end of the phone number
entered
3. Enter the DTMF digits after the pause, e.g. enter the number to access
voice mail messages
4. C
➣ When the call is connected, the DTMF sequence will be sent after 3 seconds.

Basic Operations 17
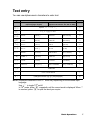
Text entry
You can use alphanumeric characters to enter text:
NOTE: Displayed characters in the T9
®
mode vary depending on the selected input
language.
Use
! to toggle T9
®
on/off.
In T9
®
mode, press A repeatedly until the correct word is displayed. When “-”
is reached, press
@ to spell the word you require.
Key Text mode Numeric
T9
®
(T9abc, T9Abc, T9ABC)
(Input language: English)
Multi tap
(Input mode indicator: abc, Abc or ABC)
(0 ~ 9)
#
Space 0. , ? ! + - = : ¿ ¡ ” ’ ; _ 0
$
1 / ( ) < > [ ] { } % ~ € & 1
%
A B C 2 - (a b c 2 -) A B C 2 Ä (a b c 2 ä à ç) 2
&
D E F 3 - (d e f 3 -) D E F 3 É (d e f 3 é è) 3
'
G H I 4 - (g h i 4 -) G H I 4 (g h i 4 ì) 4
(
J K L 5 - (j k l 5 -) J K L 5 (j k l 5) 5
)
M N O 6 - (m n o 6 -) M N O 6 Ö Ñ (m n o 6 ö ñ ò) 6
*
P Q R S 7 - (p q r s 7 -) P Q R S 7 (p q r s 7 ß) 7
+
T U V 8 - (t u v 8 -) T U V 8 Ü (t u v 8 ü ù) 8
,
W X Y Z 9 - (w x y z 9 -) W X Y Z 9 Æ Ø Å (w x y z 9 æ ø å) 9
C
Shift mode
"
* Γ ∆ Θ Λ Ξ Π Σ Φ Ψ Ω *
!
(Hold) Space # £ $ ¥ ¤ @ \ §
^
I (new paragraph) #
La pagina sta caricando ...
La pagina sta caricando ...
La pagina sta caricando ...
La pagina sta caricando ...
La pagina sta caricando ...
La pagina sta caricando ...
La pagina sta caricando ...
La pagina sta caricando ...
La pagina sta caricando ...
La pagina sta caricando ...
La pagina sta caricando ...
La pagina sta caricando ...
La pagina sta caricando ...
La pagina sta caricando ...
La pagina sta caricando ...
La pagina sta caricando ...
La pagina sta caricando ...
La pagina sta caricando ...
La pagina sta caricando ...
La pagina sta caricando ...
La pagina sta caricando ...
La pagina sta caricando ...
La pagina sta caricando ...
La pagina sta caricando ...
La pagina sta caricando ...
La pagina sta caricando ...
La pagina sta caricando ...
La pagina sta caricando ...
La pagina sta caricando ...
La pagina sta caricando ...
La pagina sta caricando ...
La pagina sta caricando ...
La pagina sta caricando ...
La pagina sta caricando ...
La pagina sta caricando ...
La pagina sta caricando ...
La pagina sta caricando ...
La pagina sta caricando ...
La pagina sta caricando ...
La pagina sta caricando ...
La pagina sta caricando ...
La pagina sta caricando ...
La pagina sta caricando ...
La pagina sta caricando ...
La pagina sta caricando ...
La pagina sta caricando ...
La pagina sta caricando ...
La pagina sta caricando ...
La pagina sta caricando ...
La pagina sta caricando ...
La pagina sta caricando ...
La pagina sta caricando ...
La pagina sta caricando ...
La pagina sta caricando ...
La pagina sta caricando ...
La pagina sta caricando ...
La pagina sta caricando ...
La pagina sta caricando ...
La pagina sta caricando ...
La pagina sta caricando ...
La pagina sta caricando ...
La pagina sta caricando ...
La pagina sta caricando ...
La pagina sta caricando ...
La pagina sta caricando ...
La pagina sta caricando ...
La pagina sta caricando ...
La pagina sta caricando ...
La pagina sta caricando ...
La pagina sta caricando ...
La pagina sta caricando ...
La pagina sta caricando ...
La pagina sta caricando ...
La pagina sta caricando ...
La pagina sta caricando ...
La pagina sta caricando ...
La pagina sta caricando ...
La pagina sta caricando ...
La pagina sta caricando ...
La pagina sta caricando ...
La pagina sta caricando ...
La pagina sta caricando ...
La pagina sta caricando ...
La pagina sta caricando ...
La pagina sta caricando ...
La pagina sta caricando ...
La pagina sta caricando ...
La pagina sta caricando ...
La pagina sta caricando ...
La pagina sta caricando ...
La pagina sta caricando ...
La pagina sta caricando ...
La pagina sta caricando ...
La pagina sta caricando ...
La pagina sta caricando ...
La pagina sta caricando ...
La pagina sta caricando ...
La pagina sta caricando ...
La pagina sta caricando ...
La pagina sta caricando ...
La pagina sta caricando ...
La pagina sta caricando ...
La pagina sta caricando ...
La pagina sta caricando ...
La pagina sta caricando ...
-
 1
1
-
 2
2
-
 3
3
-
 4
4
-
 5
5
-
 6
6
-
 7
7
-
 8
8
-
 9
9
-
 10
10
-
 11
11
-
 12
12
-
 13
13
-
 14
14
-
 15
15
-
 16
16
-
 17
17
-
 18
18
-
 19
19
-
 20
20
-
 21
21
-
 22
22
-
 23
23
-
 24
24
-
 25
25
-
 26
26
-
 27
27
-
 28
28
-
 29
29
-
 30
30
-
 31
31
-
 32
32
-
 33
33
-
 34
34
-
 35
35
-
 36
36
-
 37
37
-
 38
38
-
 39
39
-
 40
40
-
 41
41
-
 42
42
-
 43
43
-
 44
44
-
 45
45
-
 46
46
-
 47
47
-
 48
48
-
 49
49
-
 50
50
-
 51
51
-
 52
52
-
 53
53
-
 54
54
-
 55
55
-
 56
56
-
 57
57
-
 58
58
-
 59
59
-
 60
60
-
 61
61
-
 62
62
-
 63
63
-
 64
64
-
 65
65
-
 66
66
-
 67
67
-
 68
68
-
 69
69
-
 70
70
-
 71
71
-
 72
72
-
 73
73
-
 74
74
-
 75
75
-
 76
76
-
 77
77
-
 78
78
-
 79
79
-
 80
80
-
 81
81
-
 82
82
-
 83
83
-
 84
84
-
 85
85
-
 86
86
-
 87
87
-
 88
88
-
 89
89
-
 90
90
-
 91
91
-
 92
92
-
 93
93
-
 94
94
-
 95
95
-
 96
96
-
 97
97
-
 98
98
-
 99
99
-
 100
100
-
 101
101
-
 102
102
-
 103
103
-
 104
104
-
 105
105
-
 106
106
-
 107
107
-
 108
108
-
 109
109
-
 110
110
-
 111
111
-
 112
112
-
 113
113
-
 114
114
-
 115
115
-
 116
116
-
 117
117
-
 118
118
-
 119
119
-
 120
120
-
 121
121
-
 122
122
-
 123
123
-
 124
124
-
 125
125


Panasonic EBX300 Istruzioni per l'uso
- Categoria
- Cellulari
- Tipo
- Istruzioni per l'uso
- Questo manuale è adatto anche per