
USER MANUAL
FORNIREF

1. Manuale d’uso
Installazione
Avvertenze
Consigli per l’uso
Manutenzione e pulizia
Cottura
Risoluzione anomalie
Garanzia
2. User manual
Installation
Caution
User guide
Maintenance and cleaning
Cooking
Troubleshooting
Warranty information
2
4
5
5
6
6
7
2
8
9
9
10
10
11
SOMMARIO / SUMMARY

6
7
8
9
10
ITA
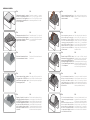
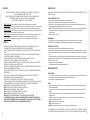
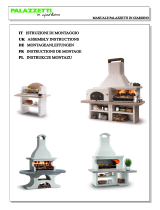
Dopo aver montato la cupola e l’even-
tuale arco, controllare che i vari pezzi
siano ben assestati.
ENG
After mounting the dome and pos-
sible arch, make sure the pieces are
fully settled.
ITA
Dopo aver bagnato le giunture tra i vari
pezzi che compongono la cupola, sten-
dere all’esterno un cordolo di REFRAX
di 5 cm. Se si vuole avere una maggiore
inerzia termica, si consiglia di gettare uno
strato di REFRAX su tutta la cupola con
spessore variabile no a 6 cm. Nei forni
più grandi si deve porre nel REFRAX una
rete metallica sottile.
ENG
After wetting the joints between the
various pieces that make up the
dome, spread 5 cm of Refrax on the
outside. If you want to have greater
thermal inertia, it is recommended
to cast a layer of Refrax all over the
dome of a thickness of up to 6 cm.
In larger ovens, a thin wire mesh must
be added to Refrax.
ITA
Passato lo strato di REFRAX, isolare
termicamente il forno poggiando sulla
cupola più strati di FIBRA CERAMICA.
Si consiglia di poggiarne almeno 4 da
2,5 cm di spessore oppure 8 strati da
1,3 cm di spessore.
ENG
After the layer of Refrax, thermally
insulate the oven by placing multiple
layers of ceramic bre on the dome.
We recommend an initial 2/4 cm layer
of ceramic ber followed by a 10/15
cm layer of vermiculite, expanded clay
or rock wool for high temperatures.
ITA
Se si vuole mantenere la forma sferica
del forno a vista, si può fare una get-
tata di 3-4 cm di sabbia e cemento
sopra l’isolante esterno, su cui è stato
poggiato preventivamente uno strato
di rete metallica.
ENG
If you want to maintain the spherical
shape of the open-view oven, you can
make a 3/4 cm casting of sand and
cement to place above the outer insu-
lation, on which a layer of metal mesh
has been positioned previously.
ITA
Se il forno viene montato all’esterno,
è necessario proteggerlo da pioggia e
umidità.
N.B: il forno nel disegno è stato instal-
lato con cupola a vista ma le finiture
possono variare a seconda del gusto
del cliente. Si raccomanda di utilizza-
re sempre materiali ignifughi, anche in
caso di installazione ad incasso.
ENG
If the oven is installed outside, it must
be protected from rain and moisture.
N.B: the oven in the design has been
installed with the dome in sight but the
nishing touches vary according to
the customers liking. It is recommen-
ded to always use reproof materials,
also in the case of built-in installation.
1
2
3
4
5
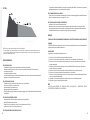
ITA
Realizzare due appoggi in muratura
alti circa 75 cm per ottenere un piano
fuoco alto circa 110 cm. Poggiare una
soletta portante in calcestruzzo, di cir-
ca 15 cm di spessore.
ENG
Create two supports in masonry
about 75 cm high to get a re oor
about 110 cm high. Place a concrete
load-bearing slab about 15 cm thick.
ITA
Realizzare un piano alto circa 15 cm in
pannelli di cemento cellulare leggero o
in calcestruzzo alleggerito, a base di
argilla espansa o vermiculite.
ENG
Create a oor about 15 cm high with
panels made of light cellular concrete
or concrete lightened with expanded
clay or vermiculite.
ITA
Posizionare il davanzale dell’uscita
fumi e successivamente l’archetto.
ENG
Place the sill of the exhaust fume and
then the arch.
ITA
Dopo aver bagnato il piano, stendere
un leggero strato di REFRAX con
spatola dentata per adagiare i pezzi
che compongono il piano.
ENG
After wetting the oor, spread a thin
layer of Refrax with a toothed spatula
to lay down the pieces composing the
oor.
ITA
Bagnare gli interstizi tra i pezzi che
compongono il piano fuoco e stuccare
con il REFRAX, avendo cura di tenere
la stuccatura leggermente più bassa
del piano, per evitare urti della pala
forno. Lo spazio tra il piano e le pareti
della cupola va lasciato vuoto e non
va stuccato.
ENG
Wet the interstices between the pie-
ces that make up the re oor and ll
them with Refrax, taking care to keep
the lling slightly lower than the oor,
to avoid impacts from the oven peel.
The space between the oor and the
walls of the dome should be left undi-
sturbed and should not be plastered.
installazione / installation

1
2
3
4
5
ITA
Realizzare due appoggi in muratura
alti circa 75 cm per ottenere un piano
fuoco alto circa 110 cm. Poggiare una
soletta portante in calcestruzzo, di cir-
ca 15 cm di spessore.
ENG
Lay insulation material over the oven
base. Acceptable materials: insulating
rebrick, calcium-silicate boards or
foam glass.
ITA
Realizzare un piano alto circa 15 cm
in pannelli di cemento cellulare leg
-
gero o in calcestruzzo alleggerito, a
base di argilla espansa o vermiculite.
ENG
Minimum recommended thickness
for this materials 2” It is also possible
to use vermiculite concrete ( 1 part
Portland cement : 4 -5 parts coarse
vermiculite) poured ahead to be fully
cured before oven install. Minimum
recommended thickness for this is 3”
ITA
Dopo aver bagnato il piano, stendere
un leggero strato di REFRAX con
spatola dentata
ENG
Floor pieces can be laid in either pro
-
vided Refrax or in clay mortar ( 1 part
powder clay to 3 parts sand) Refrax
is not very plastic, so would need to
be mixed soft.
ITA
Bagnare gli interstizi tra i pezzi che
compongono il piano fuoco e stuccare
con il REFRAX, avendo cura di tenere
la stuccatura leggermente più bassa
del piano, per evitare urti della pala
forno. Lo spazio tra il piano e le pareti
della cupola va lasciato vuoto e non
va stuccato.
ENG
Set oven dome on top making
sure it is centered over the oor.
Gap between oor and dome should
either be left empty or can be lled
with clay mortar. No other mortar can
be used to ll that joint as the ller
must be soft enough to compress
when oor expands.
7
8
9
10
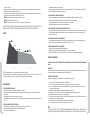
ITA
Stendere all’esterno un cordolo di RE-
FRAX di 5 cm. Se si vuole avere una
maggiore inerzia termica, si consiglia
di gettare uno strato di REFRAX su
tutta la cupola con spessore variabi-
le no a 6 cm. Nei forni più grandi si
deve porre nel REFRAX una rete me-
tallica sottile.
ENG
I recommend to always parge over in-
sulation blanket to make a tight enclo-
sure. That would prevent any smoke
leakage should mini cracks ever de-
velop.
ITA
Passato lo strato di REFRAX, isolare
termicamente il forno poggiando sulla
cupola più strati di FIBRA CERAMICA.
Si consiglia di poggiarne almeno 4 da
2,5 cm di spessore oppure 8 strati da
1,3 cm di spessore.
ENG
For this, wrap the insulation blanket
loosely with chicken or similar wire
and parge over with standard ma
-
sonry cement mix with a bit of acrylic
addmix or a bit of tile thinset mortar
mixed in.
ITA
Se si vuole mantenere la forma sferica
del forno a vista, si può fare una get
-
tata di 3-4 cm di sabbia e cemento
sopra l’isolante esterno, su cui è stato
poggiato preventivamente uno strato
di rete metallica.
ENG
doing facing do not mortar bricks di-
rectly to the oven dome. Use some
ceramic ber blanket to provide space
between facing brick and oven dome.
ITA
A questo punto potete procedere con
l’installazione della canna fumaria.
ENG
Now you can proceed with the instal
-
lation of the chimney.
ITA
Adagiare i pezzi che compongono il
piano.
ENG
Lay oor pieces ( make sure to posi
-
tion them properly counting for thick-
ness of the dome and insulation
around the oor).
installazione / installation
CUPOLINO 60 - CUPOLINO 70 - CUPOLINO 80
6
ITA
Dopo aver montato la cupola control-
lare che i vari pezzi siano ben asse-
stati.
ENG
After mounting the dome make sure
the pieces are fully settled.
11
ITA
Una volta posizionata potete fissarla
utilizzando del silicone ad alta tempe-
ratura, procedete quindi a coibentate-
la utilizzando la fibra ceramica.
ENG
Once positioned, you can x it using
high temperature silicone, then pro-
ceed to insulate it using ceramic ber.
12
ITA
Se il forno viene montato all’esterno,
è necessario proteggerlo da pioggia
e umidità.
N.B: le finiture possono variare a se-
conda del gusto del cliente. Si racco-
manda di utilizzare sempre materiali
ignifughi, anche in caso di installazio-
ne ad incasso.
ENG
Once faced with bricks and if there
is space for extra insulation, one can
use mineral wool insulation blanket or
vermiculite over the parged oven.”

6 7
SEGUIRE QUESTI SEMPLICI PASSI PER UN USO CORRETTO E PER IL MIGLIOR FUNZIONAMENTO DEL TUO
FORNO ALFA PIZZA.
COME ACCENDERE IL FUOCO
1. Accendere il forno Alfa Pizza utilizzando legna di piccolo taglio e secca.
2. Posizionare il cumulo di legna vicino alla bocca per lavorare più comodamente.
3. Quando il fuoco ha preso, spostare la legna all’interno del forno. Aggiungere legna di taglio medio con molta
gradualità appoggiandola delicatamente per non soocare il fuoco.
4. Dopo circa 30/40 minuti di fuoco continuo, mai eccessivo, il forno “sbiancherà” per eetto della temperatura che,
raggiungendo i 250°C, brucia la fuliggine più scura. E’ questo il momento in cui il forno é pronto per
essere utilizzato.
5. Spostare il fuoco da un lato.
CONSIGLI PER L’USO
SPEGNIMENTO
1. Per spegnere il forno chiudere lo sportello e attendere che le braci siano spente e si formi la cenere.
2. Quando il forno si è rareddato si può togliere la cenere, è consigliato l’utilizzo di utensili metallici.
DIFFERENTI TIPI DI LEGNA
- Usare legna di piccolo taglio e molto asciutta soprattutto per l’accensione.
- Ogni tipo di legna dona una fragranza ai cibi in modo diverso, per esempio se si usa legna di alberi da frutta si potrà
donare ai cibi un aroma più gustoso. In modo simile, acero, noce e castagno andranno bene per altri cibi come la
carne.
- Legna trattata, resinosa o avanzi di legna sono da escludere tassativamente. La legna bagnata o non stagionata
(verde) potrà far scaturire scoppiettii che sono conseguenza dell’aumento del volume dell’acqua. Questo produrrà
molto fumo e meno calore.
- Fare attenzione alle accensioni (vedere pag. 4).
- Un uso corretto del forno può far si che questo duri molto di più.
MANUTENZIONE
- Per una corretta manutenzione del forno, assicurarsi prima di accenderlo che la canna fumaria sia libera da
qualsiasi oggetto e che la cenere della cottura precedente sia stata asportata.
- A braci spente è consigliabile togliere la cenere.
PULIZIA
- Quando il fuoco è spento ed il forno non è caldo, raccogliere la cenere della cottura precedente con una spaz-
zola metallica e la paletta.
- Pulire il piano (a forno freddo) con una spazzola e passare delicatamente sul piano con un panno umido, non
bagnato.
- Ogni anno togliere e pulire la canna fumaria; potrebbero annidarsi animali e/o cenere ed ostruire il regolare
assaggio dei fumi.
- Nel caso in cui residui di cottura sporcassero il forno, non c’è problema! La cenere e le amme ad alta
temperatura bruciano questi residui.
- NON usare prodotti chimici per pulire il forno.
- NON pulire il forno quando é in uso.
- NON passare panni umidi sul piano a forno ancora caldo potrebbe causare crepe.
PER IGIENIZZARE, PULIRE E RISCALDARE IL PIANO DI COTTURA, PRIMA DI CUCINARE, SPARGERE
ALL’INTERNO DEL FORNO LA BRACE ROVENTE SU TUTTO IL PIANO E LASCIAR AGIRE PER QUALCHE MINUTO.
MANUTENZIONE E PULIZIA
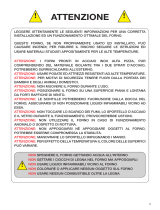
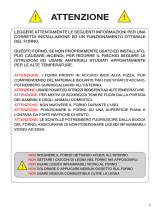
AVVERTENZE
LEGGERE ATTENTAMENTE LE SEGUENTI INFORMAZIONI PER UNA CORRETTA INSTALLAZIONE
ED UN FUNZIONAMENTO OTTIMALE DEL FORNO
QUESTO FORNO, SE NON PROPRIAMENTE USATO ED INSTALLATO, PUÒ CAUSARE INCENDI;
PER RIDURRE IL RISCHIO, SEGUIRE LE ISTRUZIONI ED USARE MATERIALI
STUDIATI APPOSITAMENTE PER LE ALTE TEMPERATURE.
- PRIME ACCENSIONI: Dopo l’installazione, attendere 3 giorni per eettuare la prima accensione.
- PRIMO GIORNO: Il primo giorno di accensione usare molta cautela nel farlo. Non superare i 60°C e mantenerli il
più a lungo possibile (minimo 50/60 minuti). Si consiglia una amma ottenuta da carta-cartone e fogliame.
- SECONDO GIORNO: Il secondo giorno di accensione non superare gli 85°C e mantenerli il più a lungo possibile
(minimo 50/60 minuti). È consigliato l’uso di paglia e rametti.
- TERZO GIORNO: Il terzo giorno superare la temperatura critica di 100°C per arrivare ad un massimo di 130°C -
150°C usando legnetti di piccolo taglio e mantenerla il più a lungo possibile (minimo 50/60 minuti).
- QUARTO GIORNO: Il quarto giorno potrete accendere il forno senza problemi poiché sarà essiccato.
ATTENZIONE
- EVENTUALI VENATURE NEL REFRATTARIO SIA ALL’INTERNO CHE ALL’ESTERNO SONO UTILI ALLA
DILATAZIONE TERMICA E NON NÉ COMPROMETTONO IL BUON FUNZIONAMENTO.
- DOPO UN PERIODO DI INATTIVITÀ SI CONSIGLIA DI USARE LA STESSA CAUTELA DELLE PRIME ACCEN-
SIONI.
- LO SPORTELLO È UN REGOLATORE DI POTENZA MOLTO EFFICACE: CHIUDENDOLO E APRENDOLO SI
PUÒ GESTIRE AL MEGLIO LA TEMPERATURA.
- I FORNI IN MATERIALE REFRATTARIO POTREBBERO SURRISCALDARSI ALL’ESTERNO.
- USARE POSATE ED ATTREZZI RESISTENTI AD ALTE TEMPERATURE.
- PER MOTIVI DI SICUREZZA TENERE FUORI DALLA PORTATA DEI BAMBINI E DEGLI ANIMALI DOMESTICI.
- POSIZIONARE IL FORNO SU UNA SUPERFICIE PIANA .
- LE SCINTILLE POTREBBERO FUORIUSCIRE DALLA BOCCA DEL FORNO; ASSICURARSI DI NON POSIZIO-
NARE LIQUIDI INFIAMMABILI VICINO AD ESSA.
- NON TOCCARE LO SCARICO DEI FUMI E LO SPORTELLO DURANTE IL FUNZIONAMENTO, PROVOCHE-
REBBE USTIONI.
- NON UTILIZZARE IL FORNO IN CASO DI FUNZIONAMENTO ANOMALO O SOSPETTO DI ROTTURA.
- MANOVRARE LO SPORTELLO IMPUGNANDO I MANICI.
- PER EFFETTO DELLA TEMPERATURA IL COLORE DELLE SUPERFICI PUÒ VARIARE.
- IL FORNO A LEGNA ALFA PIZZA NON COMPRENDE ISOLAMENTO NEL REFRATTARIO, QUINDI VA AGGIUN-
TO OBBLIGATORIAMENTE DEL MATERIALE ISOLANTE PER IL SUO CORRETTO FUNZIONAMENTO.
- NON SPEGNERE IL FORNO GETTANDO ACQUA ALL’INTERNO.
- NON GETTARE I CIOCCHI DI LEGNA NEL FORNO MA APPOGGIARLI.
- NON USARE LIQUIDI INFIAMMABILI VICINO AL FORNO.
- NON COLORARE O APPLICARE NESSUN OGGETTO SUL FORNO.
- NON USARE NESSUN COMBUSTIBILE OLTRE LA LEGNA.
- NON ACCENDERE IL FORNO REPENTINAMENTE: PROVOCHEREBBE DANNI AL REFRATTARIO.
- ALLA TEMPERATURA DI 100°C L’ACQUA E/O L’UMIDITÀ RESIDUA DEL REFRATTARIO DIVENTA VA-
PORE. IN QUESTO PROCESSO FISICO L’ACQUA AUMENTA IL SUO VOLUME DI 30 VOLTE CAUSANDO
FORTI LESIONI NEL REFRATTARIO SE L’ACCENSIONE NON È GRADUALE.
ITIT

8 9
GARANZIA
I FORNI ALFA PIZZA SONO PIENAMENTE RISPONDENTI AL PROGETTO DI NORME ITALIANE ED EUROPEE
GARANZIA
I FORNIREF Alfa Pizza sono garantiti per 2 (due) anni. Una buona manutenzione ed un uso corretto possono aiutare
a diminuire la presenza di qualsiasi problematica.
NON GARANTITI
La garanzia non viene applicata nelle seguenti opzioni:
1. Nel caso in cui il forno sia NON propriamente installato ed utilizzato.
2. Nel caso in cui il forno sia stato manomesso in qualsiasi modo, volontariamenteo involontariamente.
3. Nel caso in cui il forno, per qualsiasi causa, sia stato alterato e non sia più nella condizione riscontrata alla
consegna del prodotto.
4. Nel caso in cui NON si sia usato il solo legno come combustibile. NON usare carbone liquido per barbecue,
prodotti chimici o altro combustibile.
5. Nel caso in cui il danno sia il risultato dell’uso di prodotti chimici all’interno o all’esterno del forno.
6. Nel caso in cui non siano state usate le dovute precauzioni per le accensioni.
7. Nel caso in cui il forno presenti venature dopo l’uso, in quanto queste, sono necessarie alla dilatazione termica
e sono una caratteristica del materiale.
8. La garanzia, se non diversamente specicato, si riferisce solo ad un uso domestico dei prodotti.
9. La garanzia non copre il normale logorio del prodotto.
NOTE
ALFA PIZZA NON RISPONDE PER VENATURE, CREPE, CAVILLATURE DEL REFRATTARIO, PERCHÉ
CARATTERISTICA INTRINSECA DI TALE MATERIALE.
- E’ naturale che il materiale refrattario del forno dopo l’uso presenti delle venature. Tali venature sono necessarie
alla dilatazione termica e sono una caratteristica del materiale.
SE LE FIAMME ESCONO DALLA BOCCA
- Evitare di fare un fuoco eccessivo e smorzare subito la amma che fuoriesce poggiando lo sportello sulla bocca
del forno e lasciando aperto solo uno spiraglio di 2 o 3 cm.
SE IL FORNO NON CUOCE COME VOI DESIDERATE
- Assicuratevi che il forno sia alla temperatura giusta.
- Assicuratevi che il forno mantenga la temperatura scelta per tutta la durata della cottura; usate lo sportello
come regolatore di potenza: aprire e chiudere per determinare l’aumento o l’abbassamento della temperatura.
- Contattateci direttamente per un consiglio di un esperto sul sito www.alfapizza.it
COTTURA
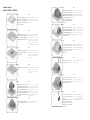
NOTE: I tempi di cottura mostrati nel graco sono da ritenersi indicativi.
* Una volta utilizzato il forno, a amma spenta e con lo sportello chiuso, la temperatura può essere mantenuta no a circa
12-15 ore dall’ultimo utilizzo. Senza riaccendere il fuoco, è possibile continuare a cucinare il giorno seguente pane, dolci,
pasta al forno, patate ed altro ancora.
SE IL FORNO FA FUMO
- Controllare che la legna non sia eccessivamente umida e le braci incombuste.
- Accertarsi che sia stato avviato un fuoco con amma viva, graduale ma costante, al ne di evitare una
combustione incompleta.
- Si consiglia di accostare lo sportello.
- In caso d’installazione interna controllare il dimensionamento della canna fumaria e l’eventuale funzionamento
delle prese d’aria presenti all’interno del locale.
SE IL FORNO NON SI SCALDA
- Controllare che il fuoco sia fatto da un lato del forno, non vicino alla bocca.
- Fare fuoco per 40/50 minuti con amma viva.
- Non ammassare la legna sopra la brace.
- Aggiungere legna sul fuoco gradatamente.
- Se le pareti esterne del forno risultano con temperature maggiori di 60°C probabilmente l’isolamento del forno
é insuciente.
SE IL FORNO SI RAFFREDDA PRESTO
- Potrebbe trattarsi di prima accensione o accensione dopo lunga inattività.
- Vericare l’isolamento esterno del forno.
- Evitare di fare un fuoco repentino a breve, che non scalderebbe a fondo il forno.
- Vericare che nel forno non si inltri umidità e acqua.
SE IL FORNO PRESENTA VENATURE DOPO L’USO
RISOLUZIONE ANOMALIE
ITIT

10 11
CAUTION
READ THE FOLLOWING INFORMATION TO ENSURE THE CORRECT
INSTALLATION AND OPTIMUM PERFORMANCE OF YOUR OVEN.
IF NOT PROPERLY USED AND INSTALLED, THIS OVEN CAN CAUSE FIRES. TO REDUCE THE RISK OF FIRE
FOLLOW THE INSTRUCTIONS CAREFULLY AND USE ONLY DRY WELL SEASONED HARDWOOD FOR FUEL.
ONLY USE COOKING MATERIALS SUITED FOR HIGH COOKING TEMPERATURE SUCH AS CAST IRON AND
TERRACOTTA COOKWARE.
- LIGHTING THE FIRST FIRE: Afters installing the oven, wait at least 3 days before lighting the rst re.
- DAY ONE: When lighting the rst re in the oven, ensure maximum caution is taken so that the heat of the
oven does not exceed 60°C / 140°F (we recommend to use paper-cardboard and leaves). If is possible, try to
maintain the oven at this temperature for as long as possible (minimum 50/60 minutes).
- DAY TWO: Light the oven so that the temperature does not exceed 85°C / 185°F (we recommend to use straw
and sprigs). Try to maintain the oven at this temperature for as long as possible (minimum 50/60 minutes).
- DAY THREE: Light the oven to a temperature of 130°C / 150°C - 260°F / 300°F (we recommend to use small
sticks wood). If is possible, try to maintain the oven at this temperature for as long as possible (minimum 50/60
minutes).
- DAY FOUR: You may light a normal re in the oven and begin cooking, as the small res on the previous days
will have suciently dried out the oven and prepared it for higher temperatures.
WARNING
- IT IS POSSIBLE THAT OVER THE COURSE OF TIME, SMALL VEIN LIKE CRACKS WILL DEVELOP ON THE
SURFACE (INSIDE OR OUTSIDE THE OVEN) OF THE REFRACTORY. THESE MICRO VEINS IN NO WAY COM-
PROMISE THE PROPER FUNCTIONING OF THE OVEN.
- AFTER PERIODS OF INACTIVITY, IT IS RECOMMENDED THAT YOU USE THE SAME DEGREE OF CAUTION
WHEN LIGHTING YOUR OVEN AS REQUIRED FOR FIRST FIRES.
- THE OVEN DOOR IS AN EFFICIENT HEAT REGULATOR: OPENING OR CLOSING THE OVEN DOOR YOU CAN
ADJUST TEMPERATURE.
- THE EXTERNAL SURFACES OF REFRACTORY OVENS COULD OVERHEAT.
- ALWAYS USE HEAT RESISTANT UTENSILES WHILE COOKING. PLASTIC SPOONS, FORKS, TONGS ETC
AND OTHER SIMILAR MATERIALS WILL NOT WITHSTAND THE HIGH TEMPERATURES IN YOUR OVEN AND
SHOULD BE AVOIDED.
- ALWAYS KEEP CHILDREN AND PETS AWAY FROM THE OVEN DURING USE. THE OVEN TEMPERATURES
CAN BE EXTREMELY HIGH AND CAN CAUSE SEVERE BURNS.
- ALWAYS PLACE THE OVEN ON A LEVEL SURFACE.
- FLAMES CAN EXIT VIA THE OVEN MOUTH. BE SURE NOT TO KEEP ANY FLAMMABLE LIQUIDS OR
MATERIALS NEAR THE OVEN MOUTH.
- NO CONTACT SHOULD BE MADE WITH THE EXIT FLUE AND THE OVEN DOOR DURING OPERATION TO
AVOID BURNS.
- DO NOT USE THE OVEN IN CASE OF MALFUNCTION.
- MOVE THE OVEN DOOR HOLDING THE WOOD HANDLES.
- THE COLOUR OF OVEN SURFACES CAN CHANGE DUE TO HIGH TEMPERATURES.
- THE REFRACTORY PIECES OF WOOD FIRED OVENS ARE NOT INSULATED AND A CORRECT INSTALLATION OF
THE OVEN REQUIRES THE ADDITION OF INSULATING MATERIALS AROUND THE OVEN TO ALLOW THE PROPER
OPERATION.
- DO NOT EXTINGUISH FIRES USING WATER.
- DO NOT THROW LOGS, PLACE THEM CAREFULLY INSTEAD.
- DO NOT USE ANY FLAMMABLE LIQUIDS NEAR THE OVEN.
- DO NOT PAINT OR APPLY ANYTHING ON THE OVEN.
- DO NOT USE ANY ARTIFICIAL LOGS OR OTHER SYNTHETIC FUELS.
- DO NOT FIRE THE OVEN IF IT IS WET OR DAMP IN ORDER TO AVOID DAMAGES.
- AT TEMPERATURES EXCEEDING 100°C / 212°F ANY RESIDUAL WATER AND/OR HUMIDITY IN THE
REFRACTORY MATERIALS WILL BECOME STEAM AND INCREASE IN VOLUME 30 TIMES CAUSING SE-
RIOUS DAMAGE TO THE REFRACTORY IF THE FIRES ARE NOT LIT GRADUALLY.
USER GUIDE
FOLLOW THIS GUIDE TO GET MAXIMUM RESULTS FROM YOUR OVEN ALFA PIZZA.
HOW TO LIGHT THE OVEN
1. Light the oven using small and medium sized dry wood.
2. When starting a re, put the wood near the oven mouth in order to be able to attend it more easily.
3. When the re is strong, move the embers towards the inside of the oven. Add medium sized wood gradually so
as not to suocate the re.
4. After aproximately 30-40 minutes of continuous re, the oven will turn white as a result of the high temperatures
(exceeding 250°C / 480°F) and burn any residual soot in the oven. The oven is ready to use at this point. Sized
wood gradually so as not to suocate the re.
5. Move the embers to the side of the oven.
EXTINGUISHING THE FIRE
1. To extinguish the re, close the oven door and wait until the embers are extinguished and the ash is formed.
2. Once the oven has cooled, you can remove the ash, it is recommended to use metal utensils.
DIFFERENT TYPES OF WOOD
- Dry, well seasoned and small hardwood will burn hotter and will heat your oven faster and are more cost
eective and ecient.
- While any dry well seasoned hardwood is best, dierent dishes can be enhance dand complimented by using
dierent types of hard wood. Wood from fruit trees such as apple, cherry, orange and peach to name just a few
can add delicious avours and aromas to your food. Similarly, hickory, maple, mesquite and cedar also work
well and provide dierent avours that go well with dierent meats.
- Treated woods, resinous woods and scrap wood are forbidden at all times.
- If you hear the wood sizzle in the re and see moisture bubbling out of the end of a log, the wood is not dry and
well seasoned. This will produce more smoke, lower temperatures and possibly damage your oven.
- Be careful when lighting the re (see p. 10).
- with correct use , the oven will last signicantly longer.
MAINTENANCE AND CLEANING
MAINTENANCE
- For a correct mainteinance of the oven be sure that before lighting a re the chimney ue and smoke exit are
free of any blockages and that the ash from any previous res has been properly cleared.
- Once the oven is cool always clean out the ash from it.
CLEANING
- When the re has been extinguished and the oven is not very hot, remove the ash from any previous res
using a proper broom and dustpan.
- Clean the oven oor (when it is not hot) with a broom and a humid cloth, passing the cloth gently over the
ENEN

12 13
oven oor, not wet.
- Sweep and clean the chimney and ue every year to ensure it is clean and operates eectively and that soot
and ash or animals do not fall back into the oven.
- If you happen to spill any juices or sauces during cooking don’t worry. Hot temperatures will burn o any resi-
dual drippings or food that might have fallen o your food.
- DO NOT use chemical products to clean any part of the oven.
- DO NOT clean the oven when it is in use.
- DO NOT pass humid cloth on the oven oor if it is still hot: it can cause cracks.
TO SANITIZE THE OVEN BEFORE COOKING, CLEAN AND HEAT THE OVEN FLOOR BY SCATTERING RED HOT
EMBERS ACROSS THE OVEN FLOOR AND LEAVING THEM IN THIS POSITION FOR A FEW MINUTES.
COOKING
NOTE: Cooking times shown in the graph are to be considered indicative.
* After the last use, with the door closed, the temperature can be maintained up to 12-15 hours. In this way, in the
day after, is possible to continue to cook bread, cakes, baked pasta, roast potatos etc.
TROUBLESHOOTING
IF THE OVEN BEGINS TO SMOKE
- Make sure the wood is not humid and therefore incombustible.
- Ensure that the re was made with a gradually increasing constant live ame, in order to avoid incomplete
combustion.
- We suggest to put the oven door near the oven mouth.
- Double check the dimensions of the ue exit and ensure there is a proper ventilation shaft for the smoke to exit
from.
IF THE OVEN DOES NOT HEAT PROPERLY
- Check that the re is placed on the side of the oven away from the oven mouth.
- Make a re with approximately 40-50 minutes of blazing ame.
- Do not use incombustible wood.
ALFA PIZZA OVENS ARE GUARANTEED IN ACCORDANCE WITH ITALIAN AND EUROPEAN COMMUNITY
LAWS.
WARRANTY
Alfa Pizza wood red ovens have a warranty period of 2 (two) years from date of purchase. Good maintenance and
a correct use can help to decrease the presence of future problems.
WARRANTY EXCEPTIONS
Warranty on Alfa products is considered void in the following circumstances:
1. The oven was NOT installed properly or NOT used properly.
2. The oven was damaged or tampered with in any way, both voluntarily and/or involuntarily.
3. The oven, for whatever reasons, was physically altered in any way and is no longer in the same condition it
was in when it left the factory.
4. Combustible material other than wood was used to light res in the oven.
5. Damage to the oven results from the use of chemical products inside or outside of the oven.
6. If appropriate precautions have not been taken during res.
7. Any micro-veins that may occur after oven use. Micro-veins are necessary for thermic dilation and are intrinsi
characteristics of the refractory material.
8. The warranty, unless otherwise specied, refers only to a household use.
9. The warranty does not cover normal wear and tear of the product.
NOTE
ALFA PIZZA DOES NOT REPLY TO QUESTIONS REGARDING MICRO-VEINS, CRACKS, OR BREAKS IN THE
REFRACTORY, BECAUSE THESE ARE INTRINSIC CHARATERISTICS OF THE REFRACTORY MATERIAL ITSELF.
WARRANTY INFORMATION
- Add additional wood to the re gradually.
- If the temperature of the external walls of the oven is higher than 40°C / 104°F, it is likely that the insulation of
the oven is insucient and needs to be improved.
-
IF THE OVEN COOLS DOWN TOO QUICKLY
- The cause could be either from the rst starting or starting the oven after a long period of inactivity.
- Verify the external insulation of the oven. It should be warm but not exceedingly hot.
- Avoid making a small or fast re that would not heat the oven to capacity.
- Verify that water and/or humidity have not inltrated the oven.
IF THE REFRACTORY MATERIALS DEVELOP MICRO-VEINS
- It is natural for refractory to develop small micro-veins after continuous use. These micro-veins are a characte-
ristic of refractory materials and are necessary for the thermal expansion of the oven, and they function as
normal junctures would.
IF FLAMES COME OUT OF THE OVEN MOUTH
- Avoid making excessively large res and dim any re that comes out of the oven mouth by putting the oven
door near the oven mouth leaving it open at around 2- 3 cm (0,78-1,18 In).
IF THE OVEN DOES NOT COOK AS DESIRED
- Check that the oven has reached the right temperature.
- Make sure the oven keeps the desired temperature for the entire cooking time.
- May you need advise from an expert, please feel free to contact us on our web site www.alfapizza.it.
ENEN

Annotazioni personali / Personal notes
Pietanza/Dish
___________________________________________________
___________________________________________________
___________________________________________________
___________________________________________________
___________________________________________________
___________________________________________________
___________________________________________________
___________________________________________________
___________________________________________________
___________________________________________________
___________________________________________________
___________________________________________________
___________________________________________________
___________________________________________________
___________________________________________________
___________________________________________________
___________________________________________________
___________________________________________________
___________________________________________________
___________________________________________________
___________________________________________________
___________________________________________________
___________________________________________________
Temperatura/Temperature
_______________________
_______________________
_______________________
_______________________
_______________________
_______________________
_______________________
_______________________
_______________________
_______________________
_______________________
_______________________
_______________________
_______________________
_______________________
_______________________
_______________________
_______________________
_______________________
_______________________
_______________________
_______________________
_______________________
Tempo/Time
_______________________
_______________________
_______________________
_______________________
_______________________
_______________________
_______________________
_______________________
_______________________
_______________________
_______________________
_______________________
_______________________
_______________________
_______________________
_______________________
_______________________
_______________________
_______________________
_______________________
_______________________
_______________________
_______________________
NOTE

V.20200225
-
 1
1
-
 2
2
-
 3
3
-
 4
4
-
 5
5
-
 6
6
-
 7
7
-
 8
8
-
 9
9
-
 10
10


Alfa Network FRCUPL80 Manuale utente
- Tipo
- Manuale utente
- Questo manuale è adatto anche per
in altre lingue
- English: Alfa Network FRCUPL80 User manual
Documenti correlati
Altri documenti
-
 Alfa Pizza Traditional 100 with Vent & Support Manuale utente
-
 Alfa Pizza Forno 5 - Copper Manuale utente
-
 Alfa Pizza Forno Ciao - Green Guida utente
-
Alfa CIAO Manuale utente
-
 Forno Venetzia FVBEL200C Manuale utente
-
 Alfa Pizza Forno 4 - Natural Gas Guida utente
-
Palazzetti PIANO CICLADI Istruzioni per l'uso
-
 LaToscana CAPRI 2 Istruzioni per l'uso


