Moog Videolarm AMS90CT Installation And Operation Instructions Manual
- Categoria
- Accessori per telecamere di sicurezza
- Tipo
- Installation And Operation Instructions Manual

www.videolarm.com
A M S 9 0 C T & A M S 1 8 0 C T
Vandal-Resistant Housings
Installation and Operation Instructions for the following models:
AMS90CT Vandal-Resistant indoor 14-gauge Steel housing, corner mount, with security
access lock plus WindowGuard™ Paint Shield (s) -3 clear and 2 tinted, for a
xed camera; MCL 8” (Includes mounting hardware)
AMS180CT Vandal-Resistant indoor 14-gauge Steel housing, wall mount, with security
access lock plus WindowGuard™ Paint Shield (s) -3 clear and 2 tinted, for
a xed camera; MCL 8” (Includes mounting hardware)
Before attempting to connect or operate this product, please read these instructions completely.
81-IN5190
12-21-2011
© 2011, Moog Videolarm, Inc. All Rights Reserved

IMPORTANT SAFEGUARDS SAFETY PRECAUTIONS
UNPACKING
SERVICE
1 Read these instructions.
2 Keep these instructions.
3 Heed all warnings
4 Follow all instructions.
5 Do not use this apparatus near water.
6 Clean only with damp cloth.
7 Do not block any of the ventilation openings. Install in accordance with the
manufacturers instructions.
8 Cable Runs- All cable runs must be within permissible distance.
9 Mounting - This unit must be properly and securely mounted to a supporting
structure capable of sustaining the weight of the unit.
Accordingly:
a. The installation should be made by a qualied installer.
b. The installation should be in compliance with local codes.
c. Care should be exercised to select suitable hardware to install the unit, taking into
account both the composition of the mounting surface and the weight of the unit.
10 Do not install near any heat sources such as radiators, heat registers, stoves, or other
apparatus ( including ampliers) that produce heat.
11 Do not defeat the safety purpose of the polarized or grounding-type plug. A
polarized plug has two blades with one wider than the other. A grounding type
plug has two blades and a third grounding prong. The wide blade or the third
prong are provided for your safety. When the provided plug does not t into your
outlet, consult an electrician for replacement of the obsolete outlet.
12 Protect the power cord from being walked on or pinched particularly at plugs,
convenience receptacles, and the point where they exit from the apparatus.
13 Only use attachment/ accessories specied by the manufacturer.
14 Use only with a cart, stand, tripod, bracket, or table specied by the manufacturer,
or sold with the apparatus. When a cart is used, use caution when moving the cart/
apparatus combination to avoid injury from tip-over.
15 Unplug this apparatus during lighting storms or when unused for long periods of time.
16 Refer all servicing to qualied service personnel. Servicing is required when the
apparatus has been damaged in any way, such as power-supply cord or plug is
damaged, liquid has been spilled of objects have fallen into the apparatus, the
apparatus has been exposed to rain or moisture, does not operate normally, or
has been dropped.
Be sure to periodically examine the unit and the supporting structure to make sure that the integrity
of the installation is intact. Failure to comply with the foregoing could result in the unit separating
from the support structure and falling, with resultant damages or injury to anyone or anything struck
by the falling unit.
Unpack carefully. Electronic components can be
damaged if improperly handled or dropped. If an item
appears to have been damaged in shipment, replace
it properly in its carton and notify the shipper.
Be sure to save:
1 The shipping carton and packaging material.
They are the safest material in which to make future
shipments of the equipment.
2 These Installation and Operating Instructions.
If technical support or service is needed, contact us at
the following number:
The lightning ash with an arrowhead symbol,
within an equilateral triangle, is intended to
alert the user to the presence of non-insulated
“dangerous voltage” within the product’s
enclosure that may be of sufcient magnitude
to constitute a risk to persons.
Este símbolo se piensa para alertar al usuario a la presencia
del “voltaje peligroso no-aisIado” dentro del recinto de los
productos que puede ser un riesgo de choque eléctrico.
Ce symbole est prévu pour alerter I’utilisateur à la presence
“de la tension dangereuse” non-isolée dans la clôture de
produits qui peut être un risque de choc électrique.
Dieses Symbol soll den Benutzer zum Vorhandensein der
nicht-lsolier “Gefährdungsspannung” innerhalb der
Produkteinschließung alarmieren die eine Gefahr des
elektrischen Schlages sein kann.
Este símbolo é pretendido alertar o usuário à presença “di
tensão perigosa non-isolada” dentro do cerco dos produtos
que pode ser um risco de choque elétrico.
Questo simbolo è inteso per avvertire I’utente alla presenza
“di tensione pericolosa” non-isolata all’interno della
recinzione dei prodotti che può essere un rischio di scossa
elettrica
.
The exclamation point within an equilateral
triangle is intended to alert the user to
presence of important operating and
maintenance (servicing) instructions in the
literature accompanying the appliance.
Este símbolo del punto del exclamation se piensa para
alertar al usuario a la presencia de instrucciones importantes
en la literatura que acompaña la aplicación.
Ce symbole de point d’exclamation est prévu pour alerter
l’utilisateur à la presence des instructions importantes dans
la littérature accompagnant l’appareil.
Dieses Ausruf Punktsymbol soll den Benutzer zum
Vorhandensein de wichtigen Anweisungen in der Literatur
alarmieren, die das Gerät begleitet.
Este símbolo do ponto do exclamation é pretendido alertar o
usuário à presença de instruções importantes na literatura
que acompanha o dispositivo.
Questo simbolo del punto del exclamaton è inteso per
avvertire l’utente alla presenza delle istruzioni importanti nella
letteratura che accompagna l'apparecchio.
TECHNICAL SUPPORT
AVAILABLE 24 HOURS
1- 800 - 554 -1124
RISK OF ELECTRIC SHOCK
DO NOT OPEN
CAUTION
CAUTION: TO REDUCE THE RISK OF
ELECTRIC SHOCK, DO NOT REMOVE
COVER ( OR BACK). NO USER- SERVICE-
ABLE PARTS INSIDE. REFER SEVICING
TO QUALIFIED SERVICE PERSONNEL.

Limited Warranty for Moog Videolarm Products
Moog Videolarm warrants these products to be free from defects in material or workmanship as follows:
PRODUCT CATEGORY PARTS \ LABOR
All Enclosures and Electronics* Five (5) Years
Poles/PolEvators™/CamEvator Three (3) Years
Warrior Series™/Q-View™/IR Illuminators Five (5) Years
SView Series™ Five (5) Years **6 months if used in auto scan/tour operation
Controllers Five (5) Years
Power Supplies Five (5) Years
EcoKit Three (3) Years
Accessory Brackets Five (5) Years
Liberty Dome Three (3) Years
*DeputyDome™, NiteTrac™, Igloo Dome, PurgeDome™ Three (3) Years **6 months if used in auto scan/tour operation
During the labor warranty period, to repair the Product, Purchaser will either return the defective product, freight prepaid, or deliver it to Moog Videolarm
Inc. Decatur GA. The Product to be repaired is to be returned in either its original carton or a similar package affording an equal degree of protection with
a RMA # (Return Materials Authorization number) displayed on the outer box or packing slip. To obtain a RMA# you must contact our Technical Support
Team at 800.554.1124, extension 101. Moog Videolarm will return the repaired Product freight prepaid to Purchaser. Moog Videolarm is not obligated to
provide Purchaser with a substitute unit during the warranty period or at any time. After the applicable warranty period, Purchaser must pay all labor and/or
parts charges.
The limited warranty stated in these product instructions is subject to all of the following terms and conditions.
TERMS AND CONDITIONS
1. NOTIFICATION OF CLAIMS: WARRANTY SERVICE: If Purchaser believes that the Product is defective in material or workmanship, then written notice with an
explanation of the claim shall be given promptly by Purchaser to Moog Videolarm. All claims for warranty service must be made within the warranty period.
If after investigation Moog Videolarm determines the reported problem was not covered by the warranty, Purchaser shall pay Moog Videolarm for the cost of
investigating the problem at its then prevailing per incident billable rate. No repair or replacement of any Product or part thereof shall extend the warranty period
of the entire Product. The speci c warranty on the repaired part only shall be in effect for a period of ninety (90) days following the repair or replacement of that
part or the remaining period of the Product parts warranty, whichever is greater.
2. EXCLUSIVE REMEDY: ACCEPTANCE: Purchaser’s exclusive remedy and Moog Videolarm’s sole obligation is to supply (or pay for) all labor necessary to repair any
Product found to be defective within the warranty period and to supply, at no extra charge, new or rebuilt replacements for defective parts.
3. EXCEPTIONS TO LIMITED WARRANTY: Moog Videolarm shall have no liability or obligation to Purchaser with respect to any Product requiring service during the
warranty period which is subjected to any of the following: abuse, improper use, negligence, accident, lightning damage or other acts of God (i.e., hurricanes,
earthquakes), modi cation, failure of the end-user to follow the directions outlined in the product instructions, failure of the end-user to follow the maintenance
procedures recommended by the International Security Industry Organization, written in product instructions, or recommended in the service manual for the
Product. Furthermore, Moog Videolarm shall have no liability where a schedule is speci ed for regular replacement or maintenance or cleaning of certain parts
(based on usage) and the end-user has failed to follow such schedule; attempted repair by non-quali ed personnel; operation of the Product outside of the
published environmental and electrical parameters, or if such Product’s original identi cation (trademark, serial number) markings have been defaced, altered,
or removed. Moog Videolarm excludes from warranty coverage Products sold AS IS and/or WITH ALL FAULTS and excludes used Products which have not
been sold by Moog Videolarm to the Purchaser. All software and accompanying documentation furnished with, or as part of the Product is furnished “AS IS”
(i.e., without any warranty of any kind), except where expressly provided otherwise in any documentation or license agreement furnished with the Product. Any
cost associated with removal of defective product and installation of replacement product is not included in this warranty.
4. PROOF OF PURCHASE: The Purchaser’s dated bill of sale must be retained as evidence of the date of purchase and to establish warranty eligibility.
DISCLAIMER OF WARRANTY
EXCEPT FOR THE FOREGOING WARRANTIES, Moog Videolarm HEREBY DISCLAIMS AND EXCLUDES ALL OTHER WARRANTIES, EXPRESS OR IMPLIED,
INCLUDING, BUT NOT LIMITED TO ANY AND/OR ALL IMPLIED WARRANTIES OF MERCHANTABILITY, FITNESS FOR A PARTICULAR PURPOSE AND/OR
ANY WARRANTY WITH REGARD TO ANY CLAIM OF INFRINGEMENT THAT MAY BE PROVIDED IN SECTION 2-312(3) OF THE UNIFORM COMMERCIAL
CODE AND/OR IN ANY OTHER COMPARABLE STATE STATUTE. Moog Videolarm HEREBY DISCLAIMS ANY REPRESENTATIONS OR WARRANTY THAT
THE PRODUCT IS COMPATIBLE WITH ANY COMBINATION OF NON-Moog Videolarm PRODUCTS OR NON-Moog Videolarm RECOMMENDED PRODUCTS
PURCHASER MAY CHOOSE TO CONNECT TO THE PRODUCT.
LIMITATION OF LIABILITY
THE LIABILITY OF Moog Videolarm, IF ANY, AND PURCHASER’S SOLE AND EXCLUSIVE REMEDY FOR DAMAGES FOR ANY CLAIM OF ANY KIND
WHATSOEVER, REGARDLESS OF THE LEGAL THEORY AND WHETHER ARISING IN TORT OR CONTRACT, SHALL NOT BE GREATER THAN THE ACTUAL
PURCHASE PRICE OF THE PRODUCT WITH RESPECT TO WHICH SUCH CLAIM IS MADE. IN NO EVENT SHALL Moog Videolarm BE LIABLE TO PURCHASER
FOR ANY SPECIAL, INDIRECT, INCIDENTAL, OR CONSEQUENTIAL DAMAGES OF ANY KIND INCLUDING, BUT NOT LIMITED TO, COMPENSATION,
REIMBURSEMENT OR DAMAGES ON ACCOUNT OF THE LOSS OF PRESENT OR PROSPECTIVE PROFITS OR FOR ANY OTHER REASON WHATSOEVER.

AMS90
Note: DO NOT EXPOSE ENCLOSURE TO RAIN OR MOISTURE
Clase 2 Solamente
24VAC.
Herramientas: Destornillador de Philips, 7/16” llave
Nota: NO EXPONGA EL RECINTO A LA LLUVIA O A LA HUMEDAD
Classe 2 Seulement
24VCA.
Outils : Tournevis de Philips, 7/16” clé
Note : N'EXPOSEZ PAS LA CLÔTURE À LA PLUIE OU À L'HUMIDITÉ
Kategorie 2 Nur
24VAC
Werkzeuge: Philips Schraubenzieher, 7/16” Schlüssel
Anmerkung: SETZEN SIE EINSCHLIESSUNG NICHT REGEN ODER
FEUCHTIGKEIT AUS
Classe 2 Somente
24VAC.
Ferramentas: Chave de fenda de Philips, 7/16” de chave
Nota: NÃO EXPONHA O CERCO À CHUVA OU À UMIDADE
Codice categoria 2 Soltanto
24VCA.
Attrezzi: Cacciavite di Philips, 7/16” di chiave
Nota: NON ESPONGA LA RECINZIONE A PIOGGIA O AD UMIDITÀ
Electrical Specifications
Class 2 Only
24VAC
Tools: Philips Screwdriver, 7/16” wrench
!!
Français
Deutsch
Italiano
Portuguese
Español
English
Content of Box

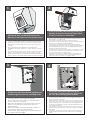
Open the lid of the unit with the barrel lock key.
NOTE: Key is removable only when the lid is locked.
• Abra la tapa de la unidad con la llave de cerradura del barril. NOTA:
La llave es desprendible solamente cuando la tapa es bloqueada.
• Ouvrez le couvercle de l'unité avec la clé de verrouillage de baril.
NOTE : La clef est démontable seulement quand le couvercle est
verrouillé.
• Öffnen Sie die Kappe der Maßeinheit mit der Faßsperrtaste.
ANMERKUNG: Schlüssel ist entfernbar, nur wenn die Kappe verschlos-
sen ist.
• Abra a tampa da unidade com a chave de fechamento do tambor.
NOTA: A chave é removível somente quando a tampa é locked.
• Apra il coperchio dell'unità con la chiave di catenaccio del barilotto.
NOTA: La chiave è smontabile soltanto quando il coperchio è locked.
To access the inside of the unit during mounting and
adjusting, the lid can be temporarily propped open
by using a screw driver or similar object.
• Tener acceso al interior de la unidad durante el montaje y el ajuste,
la tapa puede estar abierta temporalmente apoyado usando un
destornillador o un objeto similar.
• Pour accéder à l'intérieur de l'unité pendant le support et
l'ajustement, le couvercle peut être ouvert temporairement étayé en
employant un tournevis ou un objet semblable.
• Um das Innere der Maßeinheit während der Montage und der
Justage zugänglich zu machen, kann die Kappe propped geöffnetes
sein vorübergehend indem sie einen Schraubenzieher oder einen
ähnlichen Gegenstand verwendet.
• Para alcançar o interior da unidade durante a montagem e o ajuste,
a tampa pode estar aberta temporariamente sustentado usando
uma chave de fenda ou um objeto similar.
• Accedere alla parte interna dell'unità durante il montaggio e la
registrazione, il coperchio può essere aperto temporaneamente
propped usando un cacciavite o un oggetto simile.
Position the unit in the desired location and
mark the spots for the four mounting holes.
• Coloque la unidad en la localización deseada y marque
los puntos para los cuatro agujeros de montaje.
• Placez l'unité dans l'endroit désiré et marquez les taches
pour les quatre trous de support.
• Bringen Sie die Maßeinheit in der gewünschten Position in
Position und kennzeichnen Sie die Punkte für die vier
Entlüftungslöcher.
• Posicione a unidade na posição desejada e marque os
pontos para os quatro furos de montagem.
• Posizioni l'unità nella posizione voluta e contrassegni i punti
per i quattro fori di montaggio.
Pass electrical and video cables through the
access hole on the back of the unit, then secure
the unit in place with appropriate hardware.
• Pase eléctrico y los cables video a través del agujero de acceso en
la parte posteriora de la unidad, entonces aseguran la unidad en
lugar con hardware apropiado.
• Passez élém. élect. et les câbles visuels par l'ouverture d'accès sur le
dos de l'unité, fixent alors l'unité en place avec le matériel approprié.
• Führen Sie elektrisches und videokabel durch das Zugangsloch auf
der Rückseite der Maßeinheit, sichern dann die Maßeinheit im Platz
mit passenden Kleinteilen.
• Passe elétrico e os cabos video através do furo de acesso na parte
traseira da unidade, fixam então a unidade no lugar com ferragem
apropriada.
• Passi elettrico ed i video cavi attraverso il foro di accesso sulla parte
posteriore dell'unità, allora assicurano l'unità sul posto con fissaggi
adatti.
3
4
1
2

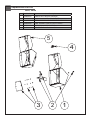
Complete electrical and video connections for
the camera, then attach the camera to the
camera bracket.
• Termine las conexiones eléctricas y video para la cámara
fotográfica antes de unir la cámara fotográfica al soporte de
la cámara fotográfica.
• Accomplissez les raccordements électriques et visuels pour
l'appareil-photo avant d'attacher l'appareil-photo à la
parenthèse d'appareil-photo.
• Vor der Befestigung der Kamera zum Kamerahaltewinkel
führen Sie die elektrischen und videoanschlüsse für die
Kamera durch.
• Termine conexões elétricas e video para a câmera antes de
unir a câmera ao suporte da câmera.
• Completi i collegamenti elettrici e video per la macchina
fotografica prima del fissaggio della macchina fotografica
alla staffa della macchina fotografica.
Attach camera, using the hardware pro-
vided in the packet, assemble as shown.
• Una la cámara fotográfica, usando el hardware proporcio-
nado en el paquete, monte según lo demostrado.
• Attachez l'appareil-photo, à l'aide du matériel fourni dans le
paquet, réunissez comme montré.
• Bringen Sie Kamera mit den Kleinteilen, die im Paket bereit-
gestellt werden an, bauen Sie, wie gezeigt zusammen.
• Una a câmera, usando a ferragem fornecida no pacote,
monte-a como mostrado.
• Fissi la macchina fotografica, per mezzo dei fissaggi forniti nel
pacchetto, monti come indicato.
Hex bolt
Lock washer
Flat washer
Bracket
O-ring
To achieve the desired camera position, adjust the hex bolt
and slotted screw with proper tools. The (3) directions shown
are the positions the camera and bracket can be maneuvered.
• Para alcanzar la posición deseada de la cámara fotográfica, ajuste el perno de la
tuerca hexagonal y el tornillo ranurado con las herramientas apropiadas. (3) las
direcciones demostradas son las posiciones la cámara fotográfica y el soporte
puede ser maniobrado.
• Pour réaliser la position désirée d'appareil-photo, ajustez le boulon de sortilège et la
vis encochée avec les outils appropriés. (3) les directions montrées sont les positions
l'appareil-photo et la parenthèse peut être manoeuvrée.
• Um die gewünschte Kameraposition zu erzielen, justieren Sie den Hexagonschraub-
bolzen und die gekerbte Schraube mit korrekten Werkzeugen. Die (3) gezeigten
Richtungen sind die Positionen die Kamera und Haltewinkel kann manövriert
werden.
• Para conseguir a posição desejada da câmera, ajuste o parafuso do hex e o
parafuso entalhado com ferramentas apropriadas. (3) os sentidos mostrados são as
posições a câmera e o suporte pode ser manobrado.
• Per realizzare la posizione voluta della macchina fotografica, registri il bullone del
hex e la vite scanalata con gli attrezzi adeguati. (3) i sensi indicati sono le posizioni la
macchina fotografica e la staffa può essere manovrata.
After tightening all fasteners, close and lock
the lid to complete the installation.
• Después de apretar todos los sujetadores, el cierre y
traba la tapa para terminar la instalación.
• Après serrage de toutes les attaches, la fin et ferment le
couvercle pour accomplir l'installation.
• Nach dem Festziehen aller Befestiger, verriegeln Ende
und die Kappe, um die Installation durchzuführen.
• Após ter apertado todos os prendedores, o fim e trava
a tampa para terminar a instalação.
• Dopo il fissaggio de tutti i fermi, la fine e blocca il
coperchio per completare l'installazione.
Lock and
remove key
5 6
7
8

To restore the clarity of the viewing window in the event of vandalism involving spray paint or other view-blocking
agents, remove the damaged shield and replace it with one of the extra shields provided.
• Para restaurar la claridad de la ventana de visión en el acontecimiento del vandalismo que implica la pintura de aerosol u otros
agentes de vista-bloqueo, quitar el protector dañado y substituirlo por uno de los protectores adicionales proporcionados.
• Reconstituer la clarté de la fenêtre de visionnement en cas du vandalisme impliquant la peinture de jet ou d'autres agents
deblocage, enlever le bouclier endommagé et le remplacer avec un des boucliers supplémentaires a fourni.
• Die Klarheit des Betrachtung Fensters im Falle des Vandalismus wieder herzustellen Sprayfarbe oder andere Ansicht-blockierende
Mittel mit einbeziehend, das beschädigte Schild zu entfernen und es mit einem der Extraschilder zu ersetzen stellte zur Verfügung.
• Para restaurar a claridade da janela de visão no evento do vandalism que envolve a pintura de pulverizador ou outros agentes
deobstrução, para remover o protetor danificado e para substitui-lo com um dos protetores extra fornecidos.
• Ristabilire la chiarezza della finestra di visualizzazione in caso di vandalismo che coinvolge la vernice di spruzzo o altri agenti
vista-ostruenti, rimuovere lo schermo danneggiato e sostituirlo con uno degli schermi supplementari ha fornito.
NOTE : For
convenience,
the extra window
shields may be
stored in the unit
Window shield
Viewing window
Star washer
and hex nut
(6 each)
General Dimensions/ Mounting Hole & Cable Access Hole Location Diagrams
AMS90 / AMS180
8.50"
215.9mm
8.25"
209.6mm
3.25"
82.6mm
2.38"
60.3mm
2.23"
56.7mm
3.30"
83.7mm
5.50"
139.7mm
1.50"
38.1mm
2.50"
63.5mm
.88"*
22.2mm*
Knockout
Hole (2)
.63"*
15.9mm*
Open Hole (1)
.25"*
6.4mm*
Mounting Hole (4)
* INDICATES DIAMETER
OF HOLE
OR KNOCKOUT
AMS90
8.25"
209.6mm
.88"*
22.2mm*
Knockout
Hole (1)
.63"*
15.9mm*
Open Hole (1)
.25"*
6.4mm*
Mounting Hole (4)
5.50"
139.7mm
3.25"
82.6mm
1.50"
38.1mm
2.50"
63.5mm
3.00"
76.2mm
2.00"
50.8mm
8.50"
215.9mm
AMS180
* INDICATES DIAMETER
OF HOLE
OR KNOCKOUT
(FOR REFERENCE USE ONLY AS ACTUAL DIMENSIONS MAY VARY SLIGHTLY FROM UNIT TO UNIT)
9

AMS90/ AMS180
Replacement Parts List
1
2
3
4
5
noitpircseDrebmuNtraP
1 RPAMS8010 AMS180 WALL MOUNT HOUSING
2 RPAMS8020 NMS90/ 180 CAMERA BRACKET KIT
3 RCAMS90/180 REPLACEMENT WINDOW FOR THE AMS90/ 180
4 RPAMS8040 BARREL LOCK KIT (key not shown)
5 RPAMS9050 AMS90 WALL MNT HOUSING
N/S RP27SHNMS PROTECTIVE WINDOW SHIELDS
NMS

Product Registration/Warranty
Thank you for choosing Moog Videolarm. We value your patronage and are solely committed to providing you with the highest
quality products available and superior customer service.
Should a problem arise, rest assure that Moog Videolarm stands behind its products by offering impressive warranty plans: 3 Years on all Housings, Poles,
Power Supplies, and Accessories and 5 Years on camera systems (SView, QView, Warriors), and InfraRed Illuminators.
Register Your Products Online
Take a few moments and validate your purchase via the Online Product Registration Form at
www.videolarm.com/productregistration.jsp
Register your recent Moog Videolarm purchases and benet from the following:
• Simple and Trouble-Free RMA process
• Added into customer database to receive product updates / news
• Eliminate the need to archive original purchase documents:
Receipts, Purchase Orders, etc…
-
 1
1
-
 2
2
-
 3
3
-
 4
4
-
 5
5
-
 6
6
-
 7
7
-
 8
8
-
 9
9


Moog Videolarm AMS90CT Installation And Operation Instructions Manual
- Categoria
- Accessori per telecamere di sicurezza
- Tipo
- Installation And Operation Instructions Manual
in altre lingue
- English: Moog Videolarm AMS90CT
- español: Moog Videolarm AMS90CT
Documenti correlati
-
Moog Videolarm RHP75C2N Manuale utente
-
-
-
-
-
-
-
Moog Videolarm SM75CF2N Installation And Operation Instructions Manual
-