TELE System TS SMV13 Guida utente
- Categoria
- TV LCD
- Tipo
- Guida utente


ITALIANO
Ingressi e Uscite
1. USB 2.0 (x2): porte USB2.0 per funzione Mediaplayer
2. Uscita Cuffie: jack 3,5mm.
3. CI/CI+: alloggiamento per moduli Common Interface di tipo CI/CI+.
4. Audio Out: uscita audio digitale.
5. HDMI1, HDMI2, HDMI3 (v.1.4) per la connessione di una sorgente AV.
6. RF IN (T2/C): ingresso antenna (IEC) per digitale terrestre (DVB-T/T2) o cavo (DVB-C).
7. RF IN (S2): ingresso Antenna SATELLITE RF (tipo F).
8. RCA: ingresso audio-video per connessione di apparecchi RCA (CVBS + Stereo LR).
9. LAN: porta Ethernet (RJ45) necessaria alle funzioni SmartTV/HbbTV.
10. Alimentazione (230VAC, 50Hz)
Telecomando
Inserire 2 batterie AAA (non in dotazione) nel vano del telecomando rispettando le corrette
polarità. Le batterie esaurite dovranno essere smaltite separatamente dai rifiuti domestici
portandole ad un qualsiasi punto vendita o di raccolta.
AVVERTENZE
In caso di prolungato inutilizzo rimuovere le pile per evitare che la perdita di liquido
corrosivo danneggi il telecomando. Non usare batterie diverse o batterie scariche e nuove
allo stesso tempo.
Prima installazione
Collegare il cavo antenna (terrestre e/o satellite) ed il cavo ethernet (se disponibile).
Dopo aver acceso il TV eseguire la prima installazione come da procedura guidata, utilizzare
i tasti frecce e OK per la selezione e conferma:
Passo 1. Scelta Lingua del menu
Passo 2 Connessione alla rete (via cavo o wireless);
a. Cavo: il collegamento alla rete è stabilito senza nessun tipo di intervento;
b. Wireless: scegliere la rete WiFi cui si vuole collegare il TV ed immettere la
password (premere OK per richiamare tastiera virtuale). Il TV supporta il
protocollo WPS (selezionare il tasto WPS per avviare la procedura).
Passo 3. Scelta del Paese di utilizzo;
Passo 4, 5. Condizioni ed accettazione termini di utilizzo (è possibile saltare questi passi,
ma alcuni servizi non saranno disponibili).
Passo 6. Scelta modalità di utilizzo. Una volta scelto TV come sorgente principale, il
dispositivo propone la scansione canali;
Passo 7 Impostazione e conferma PIN* (da ricordare).
ATTENZIONE!
*Il sistema non accetta il valore “0000” come password.

TELE System
Passo 8 TV propone la scansione dei canali televisivi (terrestre e/o satellite). Per la
descrizioni delle impostazioni per la funzione scansione canali, far riferimento al paragrafo
1.1.
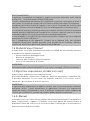
Funzioni principali
1.1 Scansione canali TV
Per accedere alla Ricerca canali: Menu – Impostazioni – Canale – Scansione Automatica
(immettere PIN):
1. Scegliere modalità di ricezione (Satellite, Antenna (DVB-T), Cavo). È possibile
effettuare una scelta multipla;
2. Satellite:
a. Scegliere operatore TIVUSAT o Standard
b. Scegliere sistema antenna sat: Singolo, DiSEqC, Unicable
c. Selezionare satellite (default per TIVUSAT: Hotbird 13 E )
3. Terrestre:
a. Scegliere tipo ordinamento (digitale terrestre = LCN)
b. Modalità Scansione: DTV
4. Avviare la scansione
NOTA
Scegliendo di utilizzare la funzione LCN (terrestre) o TivùSat (satellitare), al termine della
ricerca verrà creata una lista canali con un ordinamento predefinito.
La visione dei canali criptati richiede l’impiego di un modulo d’accesso condizionato
dedicato (CAM) e relativa tessera (Smart-card) attiva, da acquistare separatamente.
1.2 Lista canali
Al termine della scansione verrà creata una lista canali, con il tasto CH.LIST è possibile
visualizzare e gestire la lista in uso; ad esempio, creare una lista favoriti, aggiungere alcuni
canali alla HOMEPAGE, ricercare tramite filtri un gruppo di canali e modificare (spostando
e/o eliminando alcuni canali) la lista stessa.
Nel caso, si siano salvati sia i canali terrestri che i canali satellitari, tramite lista canale è
possibile passare da una modalità di ricezione all’altra: con tasto freccia DESTRA, appare il
menu Lista canali con le opzioni disponibili, selezionare e confermare la modalità
desiderata e tornare alla lista con il tasto SINISTRA, quindi selezionare il canale desiderato
per la sua riproduzione.
Il menu lista canali è accessibile anche da menu principale
1.3 Configurazione impianto d’antenna (satellite)
Le impostazioni di default prevedono la configurazione di un impianto d’antenna fisso con
singolo LNB, ricezione del segnale dal satellite Hotbird 13°E.
Nel caso di diverso impianto d’antenna è necessario modificare la configurazione,
cambiando i parametri nel menu Canali/Scansione/LNB.

ITALIANO
NOTE E AVVERTENZE
Il televisore è compatibile con impianti a singolo convertitore universale, multi-satellite
DiSEqC (1.0 - 1.2) e multi-utenza SCR/dCSS/Unicable.
L’errata configurazione dell’antenna può comportare il mancato caricamento di alcuni o
tutti i canali. si consiglia di rivolgersi ad un installatore professionista per l’installazione.
Gli indicatori di Livello e Qualità del segnale si riferiscono al Trasponder del satellite scelto
indicato a schermo. Accertarsi quindi che esso sia valido/aggiornato e realmente attivo.
Si sconsiglia di evitare di collegare il televisore al segnale satellitare tramite il connettore
antenna passante (LNB Out/Loop Through) di un ricevitore satellitare esterno in quanto
entrambi gli apparecchi non possono funzionare contemporaneamente.
In caso di impianto con LNB SCR: ogni televisore/ricevitore collegato allo stesso impianto
deve usare un Canale SCR diverso.
Per il collegamento di più apparecchi riceventi ad un impianto SCR, non utilizzare
l’eventuale connessione antenna passante (loop through) di un ricevitore satellitare
esterno, ma servirsi di un partitore di segnale esterno dedicato.
1.4 Modalità Smart (Home)
Il menu Home, accessibile direttamente anche da tasto HOME del telecomando, permette
di accedere alle seguenti funzionalità:
- Gestione ed utilizzo delle applicazioni;
- Browser di navigazione,
- Selezione delle sorgenti d’ingresso/modalità:
- Accesso alle impostazioni di sistema
AVVERTENZE
Per usufruire delle funzionalità SMART TV, è necessario collegare il TV alla rete internet.
1.5 Ripristino impostazioni di fabbrica (reset)
Riporta tutte le impostazioni alla condizione iniziale.
Accessibile dal Menu > Impostazioni > Supporto > Ripristino impostazioni > immettere PIN.
È possibile mantenere la lista canali con eventuali modifiche e liste canali favoriti,
spuntando l’opzione prima di avviare il ripristino.
AVVERTENZA
Il ripristino delle impostazioni di fabbrica cancella tutte le personalizzazioni effettuate
dall’utente, inclusi i canali memorizzati, le applicazioni scaricate e le impostazioni
modificate. Inoltre, confermando il reset, il televisore eseguirà un riavvio completo del
sistema, poi visualizzerà a schermo la procedura guidata di prima installazione.
1.6 E-Manual
Il manuale esteso con la descrizione completa delle funzioni/menu/opzioni è disponibile in
Menu > Impostazioni > Supporto > E-Manual. La versione digitale del manuale esteso è
disponibile tramite QR code (icona in alto a destra dello schermo) per la visualizzazione o
download tramite dispositivo mobile.

TELE System
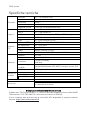
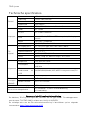
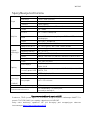
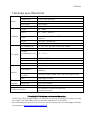
Specifiche tecniche
Pannello
Formato
27” - 16:9 wide (69 cm)
Risoluzione
1920 x 1080 (Full HD)
Contrasto
4000:1
Luminosità
200 (cd/m2)
Angolo di visione
178°/178° (Orizzontale/Verticale)
Ingressi
HDMI
x3 - HDMI
A/V in
x1 - CVBS+Audio LR
USB
x2 - USBv2.0, compatibile FAT32 e NTFS, Mediaplayer
Audio output
OPTICAL + uscita cuffie (jack 3,5mm)
LAN
x1 - RJ45, Ethernet 10/100
Segnale
TV
RF input (DTT)
x1- 75 Ω, tipo IEC, VHF/UHF 7MHz/8MHz
RF input (SAT)
x1 - 75 Ω, tipo F
Common Interface
x1 - CI / CI+
Video
MPEG-2, MPEG-4, H.265
Audio
MPEG-1 layer 1/2, MPEG-2 layer 2/AC3/EAC3
Generali
Speaker
2 x 3 W
Alimentazione
100-240V, 50/60Hz
Consumo
<0,5W in Stand.by
40W Max
Formati supportati
via USB
AVI/MP4/MKV,WenM,3GPP,MPEG transport stream, FLV
Wi-Fi
IEEE b/g/n, 2,4GHz
Misure TV
(LxAxP)
con supporti
637 x 411 x 186 mm
senza supporti
637 x 379 x 62 mm
Standard supporto a muro
VESA 100
Accessori
x1 telecomando standard, x1 EASY telecomando
x1 manuale di istruzioni
Dichiarazione di Conformità EU semplificata
Il fabbricante, TELE System Digital s.r.l., dichiara che il tipo di apparecchiatura radio SMART
TV denominata TS27 FHD SMV13 è conforme alla direttiva 2014/53/UE.
Il testo completo della dichiarazione di conformità UE è disponibile al seguente indirizzo
Internet: https://www.telesystem.it/CE

ENGLISH
Product description
Connections
The following inputs and outputs are available behind the TV:
1. USB 2.0 (x2): USB2.0 ports for Mediaplayer function
2. Headphone output: 3.5mm jack.
3. CI/CI: CI/CI Common Interface module slot.
4. Audio Out: Digital audio output.
5. HDMI1, HDMI2, HDMI3 (v.1.4): to connect an AV source.
6. RF IN (T2/C): Antenna input (IEC) for terrestrial (DVB-T/T2) or cable (DVB-C).
7. RF IN (S2): Satellite RF Antenna Input (type F).
8. RCA: Audio-video input for connection of RCA devices (CVBS - Stereo LR).
9. LAN: Ethernet port (RJ45) required for SmartTV/HbbTV functions.
10. Power (230VAC, 50Hz)
Remote Control
Place 2 AAA batteries (not supplied) in the remote control compartment respecting the
correct polarities. Exhausted batteries must be disposed of separately from household
waste and bring to any point of sale or collection.
WARNINGS
To prevent corrosive liquid leakage from damaging the remote control, it is advisable to
remove the batteries if you believe you will not use the device for a long time.
Avoid using different types of batteries such as new and used batteries at the same time.
First installation
Connect the antenna cable (terrestrial and/or satellite) and the ethernet cable (if available).
After turning on the TV, perform the first installation as from wizard, use the arrows and OK
keys to select and confirm:
Step 1. Select the OSD Language;
Step 2. Connecting to the network (cable or wireless)';
a. Cable: the connection to the network is established without any kind of
intervention;
b. Wireless: Select use WiFi, then choose the WiFi network you want to connect to
the TV and enter the password (press OK to invoke virtual keyboard), confirm
selecting Connect;
Step 3. Select the Country;
Step 4, 5. Terms of service and Conditions (it is possible to skip those steps, but some
functionalities could be not available);
Step 6. Select the operative mode. In case of TV selection, TV will ask to set the channel
scanning;
Step 7. Set and confirm PIN (the PIN is requested in some setting submenus);

TELE System
WARNINGS
The system does not accept the value "0000" as the password.
Step 8. TV asks the channel scanning (terrestrial and/or satellite). Please refer to par. 1.1 .
Main functions
1.1 Channel scanning
In order to enter in Channel Search menu: Menu – Settings – Channel – Auto Scan (enter
PIN):
1) Select the source from the Antenna Type (Earth, Cable, or Satellite). Multiple selection
is allowed;
2) Satellite:
a) Select the operator (Tivusat or Standard)
b) Select antenna system (Single LNB, DiSEqC, Unicable)
c) Select satellite (ITALY default value: Hotbird 13°East)
3) Terrestrial:
a) Select the channel ordering (LCN)
b) Scanning mode: DTV
4) Start scanning
NOTE
If you choose to use the LCN (terrestrial) or TivùSat (satellite) function, a channel list with a
predefined sort order will be created at the end of the search.
Viewing encrypted channels requires the use of a dedicated conditional access module
(CAM) and its smart-card (CA) to be purchased separately.
1.2 Channel list
At the end of the scan a channel list will be created (for each front-end), pressing CH.LIST
button, the user can navigate and edit the channel list; for example, create a FAV list, add
some channels to HOMEPAGE, filter the channel list and edit it (moving or deleting).
If both terrestrial and satellite channels has been scanned and saved, via channel list it is
possible to move from a TV mode (terrestrial) to the other (satellite): press RIGHT arrow
key, the available options will be listed, select and confirm the wanted one, back to the
channel list with LEFT arrow key and select a wanted channel for its watching.
The Channel list menu is available also from OSD user menu (menu button).
1.3 Antenna system configuration (Sat)
The default settings include the configuration of a single LNB fixed antenna system,
receiving the signal from the Hotbird 13-E satellite.
In the case of different antenna system, you need to change the configuration, modifing the
parameters in the Channels/Scan/LNB menu.
NOTES AND WARNINGS
The TV is compatible with universal single converter, multi-satellite DiSEqC (1.0 - 1.2) and
multi-user SCR/dCSS/Unicable systems.

ENGLISH
Incorrect antenna configuration can result in some or all channels not loading. we
recommend that you contact a professional installer for installation.
The Signal Level and Quality indicators refer to the selected satellite Trasponder on the
screen. Make sure that it is valid/updated and really active.
It is not recommended to avoid connecting the TV to the satellite signal via the via-the-radar
antenna connector (LNB Out/Loop Through) of an external satellite receiver because both
devices cannot operate at the same time.
In the case of a system with LNB SCR: each TV/receiver connected to the same system must
use a different SCR channel.
To connect multiple receiving devices to an SCR system, do not use the loop through
antenna connection of an external satellite receiver, but use a dedicated external signal
party.
1.4 Smart (Home) mode
The Home menu, also accessible directly from the Home button of the remote control,
allows you to access the following features:
- Application management and use;
- Navigation browser,
- Selection of input sources/modes:
- Access to the system settings
WARNINGS
To take advantage of SMART TV features, you need to connect your TV to the internet.
1.5 Factory reset (reset)
Resets all settings to the initial condition.
Accessible from the Home menu > Settings > Support > Reset to Factory Default > enter
PIN.
The user can keep the channel list with the personal preference/modification and /or the
FAVORITE list flagging the option before the restoring.
WARNING
Restoring factory settings clears all customizations made by the user, including stored
channels, downloaded applications, and changed settings. In addition, confirming the reset,
the TV will perform a full system restart, then display the first installation wizard on screen
1.6 E-Manual
The extended user manual is available in MENU > Setting > Support > E-Manual. The digital
version is reachable via QR code (on the top-right corner) for the reading or downloading on
your mobile device.

TELE System
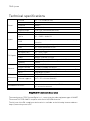
Technical specifications
Panel
Format
27” – 16:9 wide (69 cm)
Resolution
1920 x 1080 (full HD)
Contrast
4000:1
Brightness
200 (cd/m2)
Viewing angle
178°/178° (Horizontal/Vertical)
Inputs
HDMI
x3 – HDMI
A/V in
x1 – CVBS + Audio LR
USB
x2 - USBv2.0, compatible FAT32e NTFS, Media player
function
Audio output
OPTICAL + headphone (jack3,5mm)
LAN
x1 - RJ45, Ethernet 10/100
TV Signals
RF input (DTT)
x1- 75 Ω, type IEC, VHF/UHF 7MHz/8MHz
RF input (SAT)
x1 - 75 Ω, F type
Common Interface
x1 - CI / CI+
Video
MPEG-2, MPEG-4, H.265
Audio
MPEG-1 layer 1/2, MPEG-2 layer 2/AC3/EAC3
Speaker
3W x2
General
Power Supply
100-240V, 50/60Hz
Power Consum
<0,5W in Standby; 40 W max
USB supported
AVI/MP4/MKV,WenM,3GPP,MPEG transport stream, FLV
Wi-Fi
IEEE b/g/n, 2,4GHz
TV
dimension
s
with supports
637 x 411 x 186 mm (WxHxD)
without supports
637 x 379 x 62 mm (WxHxD)
Standard wall bracket
VESA 100
Included Accessories
x1 standard remote control, x1 EASY remote control unit,
x1 instruction manual
Simplified EU conformity declaration
The manufacturer, TELE System Digital s.r.l., states that the radio equipment type of SMART
TV named TS27 FHD SMV13 complies with the 2014/53/EU directive.
The full text of the EU compliance declaration is available at the following Internet address:
https://www.telesystem.it/CE

FRANÇAIS
Entrées et sorties
1. USB 2.0 (x2) : ports USB 2.0 pour la fonction de lecteur multimédia
2. Sortie casque : jack 3,5 mm.
3. CI / CI + : emplacement pour modules d'interface commune de type CI / CI +.
4. Sortie audio : sortie audio numérique.
5. HDMI1, HDMI2, HDMI3 (v.1.4) pour connecter une source AV.
6. RF IN (T2/C) : entrée antenne (IEC) pour numérique terrestre (DVB-T/T2) ou câble
(DVB-C).
7. RF IN (S2) : entrée d'antenne RF SATELLITE (type F).
8. RCA : entrée audio-vidéo pour connecter des appareils RCA (CVBS + Stéréo LR).
9. LAN : Port Ethernet (RJ45) requis pour les fonctions SmartTV / HbbTV.
10. Alimentation (230VAC, 50Hz)
Télécommande
Insérez 2 piles AAA (non fournies) dans le compartiment de la télécommande en respectant
la polarité. Les piles épuisées doivent être éliminées séparément des ordures ménagères,
en les rapportant à n'importe quel point de vente ou de collecte.
AVERTISSEMENTS
En cas d'inutilisation prolongée, retirez les piles pour éviter que la perte de liquide corrosif
n'endommage la télécommande. N'utilisez pas des piles différentes ou des piles anciennes
et neuves en même temps.
Première mise en place
Connectez le câble d'antenne (terrestre et/ou satellite) et le câble Ethernet (si disponible).
Après avoir allumé le téléviseur, effectuez la première installation selon l'assistant, utilisez
les flèches et OK pour sélectionner et valider :
Étape 1. Choisissez la langue du menu
Étape 2 Connectez-vous au réseau (filaire ou sans fil) ;
a. Câble : la connexion au réseau est établie sans aucune intervention ;
b. Sans fil : choisissez le réseau Wi-Fi auquel vous souhaitez connecter le
téléviseur et saisissez le mot de passe (appuyez sur OK pour faire apparaître
le clavier virtuel). Le téléviseur prend en charge le protocole WPS
(sélectionnez le bouton WPS pour lancer la procédure).
Etape 3. Choix du pays d'utilisation ;
Étape 4, 5. Conditions et acceptation des conditions d'utilisation (il est possible de sauter
ces étapes, mais certains services ne seront pas disponibles).
Étape 6. Choix du mode d'utilisation. Une fois TV et TV choisis comme source principale,
l'appareil propose de scanner les chaînes ;
Étape 7 Définition et confirmation du code PIN * (à retenir).
ATTENTION!
* Le système n'accepte pas la valeur « 0000 » comme mot de passe.

TELE System
Step 8 TV propose le balayage des chaînes de télévision (terrestre et/ou satellite). Pour les
descriptions des paramètres de la fonction de balayage des canaux, reportez-vous à la
section 1.1.
Fonctions principales
1.1 Rechercher les chaînes de télévision
Pour accéder à la recherche de chaînes : Menu - Paramètres - Chaîne - Balayage
automatique (saisir le code PIN) :
1. Choisissez le mode de réception (Satellite, Antenne (DVB-T), Câble). Vous pouvez faire
un choix multiple ;
2. Satellite:
a. Choisissez TIVUSAT ou Opérateur standard
b. Choisissez le système d'antenne satellite : Single, DiSEqC, Unicable
c. Sélectionnez le satellite (par défaut pour TIVUSAT : Hotbird 13 E)
3. Terrestre:
a. Choisissez le type de tri (numérique terrestre = LCN)
b. Mode de balayage : DTV
4. Lancer l'analyse
REMARQUE
En choisissant d'utiliser la fonction LCN (terrestre) ou TivùSat (satellite), à la fin de la
recherche une liste de chaînes sera créée avec un ordre prédéfini.
La visualisation des chaînes cryptées nécessite l'utilisation d'un module d'accès
conditionné dédié (CAM) et d'une carte active relative (Smart-card), à acheter séparément.
Liste des chaînes
À la fin du balayage, une liste de chaînes sera créée, avec la touche CH.LIST, il est possible
de visualiser et de gérer la liste en cours d'utilisation ; par exemple, créez une liste de
favoris, ajoutez des chaînes à la PAGE D'ACCUEIL, recherchez parmi les filtres un groupe
de chaînes et modifiez (en déplaçant et / ou en supprimant certaines chaînes) la liste elle-
même.
Si les chaînes terrestres et satellites ont été enregistrées, il est possible de passer d'un
mode de réception à l'autre via la liste des chaînes : avec la touche fléchée DROITE, le menu
Liste des chaînes apparaît avec les options disponibles, sélectionnez et confirmez le mode
souhaité et revenir à la liste avec la touche GAUCHE, puis sélectionner la chaîne souhaitée
pour sa lecture.
Le menu de la liste des chaînes est également accessible depuis le menu principal
Configuration du système d'antenne (satellite)
Les paramètres par défaut prévoient la configuration d'un système d'antenne fixe avec un
seul LNB, réception du signal du satellite Hotbird 13 ° E.
Dans le cas d'un système d'antenne différent, la configuration doit être modifiée en
changeant les paramètres dans le menu Canaux / Balayage / LNB.

FRANÇAIS
REMARQUES ET AVERTISSEMENTS
Le téléviseur est compatible avec les convertisseurs universels simples, les systèmes
multi-satellites DiSEqC (1.0 - 1.2) et les systèmes multi-utilisateurs SCR / dCSS / Unicable.
Une configuration d'antenne incorrecte peut entraîner le non chargement de certains ou de
tous les canaux. il est recommandé de contacter un installateur professionnel pour
l'installation.
Les indicateurs de niveau et de qualité du signal se réfèrent au transpondeur du satellite
sélectionné indiqué sur l'écran. Assurez-vous donc qu'il est valide / à jour et vraiment actif.
Il n'est pas recommandé d'éviter de connecter le téléviseur au signal satellite via le
connecteur d'alimentation d'antenne (LNB Out / Loop Through) d'un récepteur satellite
externe car les deux appareils ne peuvent pas fonctionner en même temps.
En cas de système avec LNB SCR : chaque TV / récepteur connecté au même système doit
utiliser un canal SCR différent.
Pour connecter plusieurs appareils de réception à un système SCR, n'utilisez pas la
connexion en boucle possible d'un récepteur satellite externe, mais utilisez un diviseur de
signal externe dédié.
Mode intelligent (maison)
Le menu Accueil, également accessible directement depuis le bouton HOME de la
télécommande, permet d'accéder aux fonctions suivantes :
- Gestion et utilisation des applications ;
- Navigateur de navigation,
- Sélection des sources/modes d'entrée :
- Accès aux paramètres du système
AVERTISSEMENTS
Pour profiter des fonctionnalités SMART TV, vous devez connecter le téléviseur à Internet.
Restaurer les paramètres d'usine (réinitialiser)
Remet tous les paramètres à leur état initial.
Accessible depuis Menu> Paramètres> Assistance> Réinitialiser les paramètres> saisir le
code PIN.
Vous pouvez conserver la liste des chaînes avec toutes les modifications et les listes de
chaînes favorites en cochant l'option avant de commencer la restauration.
ATTENTION
La restauration des paramètres d'usine efface toutes les personnalisations effectuées par
l'utilisateur, y compris les chaînes enregistrées, les applications téléchargées et les
paramètres modifiés. De plus, en confirmant la réinitialisation, le téléviseur effectuera un
redémarrage complet du système, puis le premier assistant d'installation s'affichera à
l'écran.
Manuel électronique
Le manuel détaillé avec une description complète des fonctions/menus/options est
disponible dans Menu> Paramètres> Assistance> Manuel électronique. La version

TELE System
numérique du manuel étendu est disponible via le code QR (icône en haut à droite de l'écran)
pour consultation ou téléchargement via un appareil mobile.
Spécifications techniques
Panneau
Format
27 "- 16: 9 de large (69cm)
Résolution
1920 x 1080 (Full HD)
Contraste
4000: 1
Luminosité
200 (cd/m2)
Angle de vue
178°/178° (Horizontale/Verticale)
Entrées
HDMI
x3-HDMI
Entrée A/V
x1 - CVBS + Audio LR
USB
x2 - USBv2.0, compatible FAT32e NTFS, fonction Mediaplayer
Audio
OPTICAL + headphone
réseau local
x1 - RJ45, Ethernet 10/100
Signal TV
Entrée RF (TNT)
x1- 75 Ω, type CEI, VHF / UHF 7MHz / 8MHz
Entrée RF (SAT)
x1 - 75 Ω, type F
Interface commune
x1 - IC / IC +
Vidéo
MPEG-2, MPEG-4, H.265
l'audio
MPEG-1 couche 1/2, MPEG-2 couche 2 / AC3 / EAC3
Conférencier
2 x 3W
Général
Diète
100-240V, 50/60Hz
Consommation
<0,5W en veille
40W maximum
Formats pris en
charge via USB
Flux de transport AVI/MP4/MKV, WenM, 3GPP,MPEG, FLV
Wifi
IEEE b/g/n, 2,4 GHz
Mesures
de
télévision
(LxHxP)
avec supports
637 × 411 × 186 mm
sans supports
637 x 379 x 62 mm
Support mural standard
VESA 100
Accessoires fournis
x1 télécommande standard + x1 EASY,
x1 mode d'emploi
Déclaration de conformité UE simplifiée
Le fabricant, TELE System Digital srl, déclare que le type d'équipement radio SMART TV nommé
TS27 FHD SMV13 est conforme à la directive 2014/53/UE.
Le texte complet de la déclaration UE de conformité est disponible à l'adresse Internet suivante:
https://www.telesystem.it/CE


TELE System
Ingangen en uitgangen
1. USB 2.0 (x2): USB2.0-poorten voor mediaspelerfunctie
2. Koptelefoonuitgang: 3,5 mm-aansluiting.
3. CI/CI+: slot voor CI/CI+ type Common Interface modules.
4. Audio Out: digitale audio-uitgang.
5. HDMI1, HDMI2, HDMI3 (v.1.4) voor het aansluiten van een AV-bron.
6. RF IN (T2 / C): antenne-ingang (IEC) voor digitale terrestrische (DVB-T / T2) of kabel
(DVB-C).
7. RF IN (S2): SATELLIET RF-antenne-ingang (type F).
8. RCA: audio-video-ingang voor het aansluiten van RCA-apparaten (CVBS + Stereo LR).
9. LAN: Ethernet-poort (RJ45) vereist voor SmartTV / HbbTV-functies.
10. Voeding (230VAC, 50Hz)
Afstandsbediening
Plaats 2 AAA-batterijen (niet meegeleverd) in het afstandsbedieningscompartiment met de
juiste polariteit. Lege batterijen moeten gescheiden van het huisvuil worden weggegooid en
naar elk verkooppunt of inzamelpunt worden gebracht.
WAARSCHUWINGEN
Verwijder bij langdurig niet-gebruik de batterijen om te voorkomen dat het verlies van
bijtende vloeistof de afstandsbediening beschadigt. Gebruik geen verschillende batterijen
of oude en nieuwe batterijen tegelijk.
Eerste installatie
Sluit de antennekabel (terrestrisch en/of satelliet) en de ethernetkabel (indien aanwezig)
aan.
Voer na het inschakelen van de tv de eerste installatie uit volgens de wizard, gebruik de
pijltoetsen en OK om te selecteren en te bevestigen:
Stap 1. Kies Menutaal
Stap 2 Maak verbinding met het netwerk (bedraad of draadloos);
a. Kabel: de verbinding met het netwerk komt tot stand zonder enige
tussenkomst;
b. Draadloos: kies het wifi-netwerk waarmee je de tv wilt verbinden en voer
het wachtwoord in (druk op OK om het virtuele toetsenbord te openen). De
tv ondersteunt het WPS-protocol (selecteer de WPS-knop om de procedure
te starten).
Stap 3. Keuze van het land van gebruik;
Stap 4, 5. Voorwaarden en acceptatie van gebruiksvoorwaarden (het is mogelijk om deze
stappen over te slaan, maar sommige diensten zullen niet beschikbaar zijn).
Stap 6. Keuze van de gebruiksmodus. Zodra TV en TV als hoofdbron zijn gekozen, stelt het
apparaat voor om kanalen te scannen;
Stap 7 PIN instellen en bevestigen * (te onthouden).

NEDERLANDS
AANDACHT!
* Het systeem accepteert de waarde “0000” niet als wachtwoord.
Stap 8 TV stelt het scannen van televisiezenders (terrestrisch en/of satelliet) voor.
Raadpleeg paragraaf 1.1 voor beschrijvingen van de instellingen voor de kanaalscanfunctie.
Hoofdfuncties
1.1 Scannen naar tv-zenders
Om toegang te krijgen tot het zoeken naar zenders: Menu - Instellingen - Kanaal - Auto
Scan (voer de pincode in):
1. Kies ontvangstmodus (Satelliet, Antenne (DVB-T), Kabel). U kunt een meerkeuze
maken;
2. Satelliet:
a. Kies TIVUSAT of Standaard operator
b. Kies satellietantennesysteem: Single, DiSEqC, Unicable
c. Selecteer satelliet (standaard voor TIVUSAT: Hotbird 13 E)
3. terrestrisch:
a. Kies sorteertype (digital terrestrisch = LCN)
b. Scanmodus: DTV
4. Start de scan
OPMERKING
Door ervoor te kiezen om de LCN (terrestrische) of TivùSat (satelliet) functie te gebruiken,
wordt aan het einde van het zoeken een zenderlijst gemaakt met een vooraf gedefinieerde
volgorde.
Voor het bekijken van gecodeerde kanalen is het gebruik van een speciale geconditioneerde
toegangsmodule (CAM) en een relatieve actieve kaart (smartcard) vereist, die afzonderlijk
moeten worden aangeschaft.
Kanalen lijst
Aan het einde van de scan wordt een zenderlijst gemaakt, met de CH.LIST-toets is het
mogelijk om de lijst in gebruik te bekijken en te beheren; maak bijvoorbeeld een
favorietenlijst, voeg wat zenders toe aan de HOMEPAGE, zoek door filters voor een groep
zenders en wijzig (door sommige zenders te verplaatsen en/of te verwijderen) de lijst zelf.
Als zowel terrestrische als satellietzenders zijn opgeslagen, is het via de zenderlijst
mogelijk om van de ene ontvangstmodus naar de andere te gaan: met de pijltoets RECHTS
verschijnt het menu Zenderlijst met de beschikbare opties, selecteer en bevestig de
gewenste modus en keer met de LINKS-toets terug naar de lijst en selecteer vervolgens
het gewenste kanaal om af te spelen.
Het menu met de zenderlijst is ook toegankelijk vanuit het hoofdmenu

TELE System
Configuratie antennesysteem (satelliet)
De standaardinstellingen voorzien de configuratie van een vast antennesysteem met enkele
LNB, ontvangst van het signaal van de Hotbird 13 ° E-satelliet.
In het geval van een ander antennesysteem moet de configuratie worden gewijzigd door de
parameters in het menu Kanalen / Scan / LNB te wijzigen.
OPMERKINGEN EN WAARSCHUWINGEN
De TV is compatibel met een enkele universele converter, DiSEqC multi-satelliet (1,0 - 1,2)
en SCR / dCSS / Unicable multi-user systemen.
Een onjuiste antenneconfiguratie kan ertoe leiden dat sommige of alle kanalen niet worden
geladen. het wordt aanbevolen om contact op te nemen met een professionele installateur
voor installatie.
De niveau- en kwaliteitsindicatoren van het signaal verwijzen naar de transponder van de
geselecteerde satelliet die op het scherm wordt weergegeven. Zorg er dus voor dat deze
geldig / up-to-date is en echt actief is.
Het wordt niet aanbevolen om de tv niet op het satellietsignaal aan te sluiten via de
antennedoorvoerconnector (LNB Out / Loop Through) van een externe satellietontvanger,
aangezien beide apparaten niet tegelijkertijd kunnen werken.
In het geval van een systeem met LNB SCR: elke TV / ontvanger die op hetzelfde systeem is
aangesloten, moet een ander SCR-kanaal gebruiken.
Gebruik voor het aansluiten van meerdere ontvangstapparaten op een SCR-systeem niet de
mogelijke doorlusverbinding van een externe satellietontvanger, maar gebruik een speciale
externe signaalverdeler.
Slimme (Thuis) modus
Het Home-menu, dat ook rechtstreeks toegankelijk is via de HOME-knop op de
afstandsbediening, biedt toegang tot de volgende functies:
- Applicatiebeheer en gebruik;
- Browsen browser,
- De ingangsbronnen / modi selecteren:
- Toegang tot systeeminstellingen
WAARSCHUWINGEN
Om gebruik te kunnen maken van de SMART TV-functies, moet u de tv met internet
verbinden.
Fabrieksinstellingen herstellen (reset)
Zet alle instellingen terug naar hun oorspronkelijke staat.
Toegankelijk via Menu> Instellingen> Ondersteuning> Instellingen resetten> pincode
invoeren.
U kunt de zenderlijst met eventuele wijzigingen en favoriete zenderlijsten behouden door
de optie aan te vinken voordat u het herstel start.

NEDERLANDS
WAARSCHUWING
Het herstellen van de fabrieksinstellingen wist alle aanpassingen die door de gebruiker zijn
gemaakt, inclusief opgeslagen kanalen, gedownloade applicaties en gewijzigde
instellingen. Door de reset te bevestigen, voert de tv bovendien een volledige herstart van
het systeem uit, waarna de eerste installatiewizard op het scherm wordt weergegeven.
E-handleiding
De uitgebreide handleiding met volledige beschrijving van functies / menu's / opties is
beschikbaar in Menu> Instellingen> Ondersteuning> E-Handleiding. De digitale versie van
de uitgebreide handleiding is beschikbaar via QR-code (icoon rechtsboven in het scherm)
om te bekijken of te downloaden via mobiel apparaat.

TELE System
Technische specificaties
Paneel
Formaat
27"- 16: 9 breed (69cm)
Oplossing
1920 x 1080 (Full HD)
Contrast
4000:1
Helderheid
200 (cd/m2)
Kijk hoek
178 ° / 178 ° (Horizontaal / Verticaal)
Ingangen
HDMI
x3 - HDMI
A / V in
x1 - CVBS + Audio LR
USB
x2 - USBv2.0, FAT32e NTFS-compatibel, Mediaplayer-
functie
Audio
OPTICAL + headphone
LAN
x1 - RJ45, Ethernet 10/100
TV-
signaal
RF-ingang (DTT)
x1- 75 Ω, IEC-type, VHF / UHF 7MHz / 8MHz
RF-ingang (SAT)
x1 - 75 , type F
Gewone interface
x1 - CI / CI +
Video
MPEG-2, MPEG-4, H.265
Audio
MPEG-1 laag 1/2, MPEG-2 laag 2 / AC3 / EAC3
Spreker
2 x 3 W
Algemeen
Eetpatroon
100-240V, 50 / 60Hz
Consumptie
<0,5W in stand-by
40W Max
Formaten
ondersteund via
USB
AVI/MP4/MKV,WenM,3GPP,MPEG-transportstroom,FLV
Wifi
IEEE b / g / n, 2,4 GHz
TV-
metingen
(BxHxD)
met steunen
637 x 411 x 186 mm
zonder steunen
637 x 379 x 62 mm
Standaard muurbevestiging
VESA 100
Accessoires meegeleverd
x1 standaard + x1 EASY afstandsbediening,
x1 handleiding
Vereenvoudigde EU-conformiteitsverklaring
De fabrikant, TELE System Digital srl, verklaart dat het type SMART TV-radioapparatuur
met de naam: TS27 FHD SMV13 voldoet aan richtlijn 2014/53/EU.
De volledige tekst van de EU-conformiteitsverklaring is beschikbaar op het volgende
internetadres:https://www.telesystem.it/CE
La pagina si sta caricando...
La pagina si sta caricando...
La pagina si sta caricando...
La pagina si sta caricando...
La pagina si sta caricando...
La pagina si sta caricando...
La pagina si sta caricando...
La pagina si sta caricando...
La pagina si sta caricando...
La pagina si sta caricando...
La pagina si sta caricando...
La pagina si sta caricando...
-
 1
1
-
 2
2
-
 3
3
-
 4
4
-
 5
5
-
 6
6
-
 7
7
-
 8
8
-
 9
9
-
 10
10
-
 11
11
-
 12
12
-
 13
13
-
 14
14
-
 15
15
-
 16
16
-
 17
17
-
 18
18
-
 19
19
-
 20
20
-
 21
21
-
 22
22
-
 23
23
-
 24
24
-
 25
25
-
 26
26
-
 27
27
-
 28
28
-
 29
29
-
 30
30
-
 31
31
-
 32
32


TELE System TS SMV13 Guida utente
- Categoria
- TV LCD
- Tipo
- Guida utente
in altre lingue
- français: TELE System TS SMV13 Mode d'emploi
- Nederlands: TELE System TS SMV13 Gebruikershandleiding
- polski: TELE System TS SMV13 instrukcja
- svenska: TELE System TS SMV13 Användarguide