Joie Spin 360 GTi Manuale utente
- Categoria
- Sedili dell'auto
- Tipo
- Manuale utente

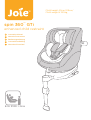
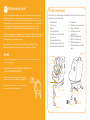
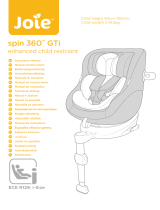
spin 360™ GTi
enhanced child restraint
Child height 40cm-105cm/
Child weight ≤ 19.5kg;
ECE R129: i-Size
Instruction Manual
GB
Manuel d'instructions
FR
Bedienungsanleitung
DE
Instructiehandleiding
NL
Manuale di istruzioni
IT

2
Welcome to Joie™
Congratulations on becoming part of the Joie family! We are so excited
to be part of your journey with your little one. While traveling with the
Joie spin 360™ GTi enhanced child restraint you are using a high qual-
ity, fully certified safety i-Size enhanced child restraint. Please carefully
read this manual and follow each step to ensure a comfortable ride and
best protection for your child.
To use this Joie enhanced child restraint with the i-Size ISOFIX connec-
tions according to the ECE R129 Regulation, your child must meet the
following requirements.
Rearward Facing: Child height 40cm-105cm/ max. 19.5kg;
Forward Facing: Child height 76cm-105cm/ max. 19.5kg;
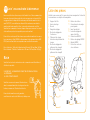
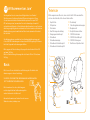
Base
Please read all the instructions in this manual before installing and us-
ing the product.
! IMPORTANT: KEEP FOR FUTURE REFERENCE.
PLEASE READ CAREFULLY.
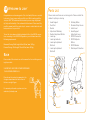
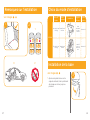
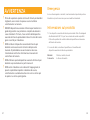
Please keep the instruction manual in the
storage compartment at the bottom of
the base as right figure.
For warranty information, please visit our
website at joiebaby.com
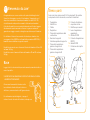
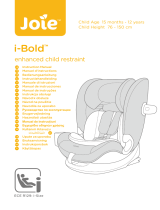
Parts List
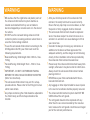
1 Head Support
2 Seat Pad
3 Buckle
4 Adjustment Webbing
5 Recline Adjustment Button
6 Load Leg
7 Load Leg Indicator
8 Load Leg Adjustment
Button A
9 Load Leg Adjustment
Button B
10 Rotating Button
11 Shoulder Strap Covers
12 Infant Insert
13 Head Support
Adjustment Lever
14 ISOFIX Connector
15 ISOFIX Adjuster
Button
16 ISOFIX Guides
17 Side Impact Protection
Please make sure there are no missing parts. Please contact the
retailer if anything is missing.
GB
1
2
3
4
10
8
11
14
13
5
6
7
15
16
12
9
17

1 2
WARNING
! BE cautious that the rigid items and plastic parts of
the enhanced child restraint system shall be so
located and installed that they are not liable to
become trapped by a movable seat or in the door of
the vehicle.
! DO NOT use the rearward facing enhanced child
restraint systems in seating positions where there is
an active frontal airbag installed.
! To use this enhanced child restraint according to the
UN Regulation No.129, your child must meet the
following requirements.
! Rearward Facing: Child height 40cm -105cm / max.
19.5kg
! Forward Facing: Child height 76cm - 105cm / max.
19.5kg
! IMPORTANT - DO NOT USE FORWARD FACING
BEFORE THE CHILD’S AGE EXCEEDS 15 MONTHS
(Refer to instructions).
! The enhanced child restraint may not fit in all ap-
proved vehicles. Please refer to the fitting list includ-
ed for more details.
! Any straps restraining the child should be adjusted to
the child’s body, and that straps should not be
twisted.
WARNING
! After your child is placed in this enhanced child
restraint, the safety belt must be used correctly.
Ensure that any lap strap is worn low down, so that
the pelvis is firmly engaged, shall be stressed.
! This enhanced child restraint should be replaced
when it has been subject to violent stresses in an
accident. An accident can cause damage to it that
you cannot see.
! Consider the danger of making any alterations or
additions to the device without approval of the
adequate authority, and the danger of not following
closely to the installation instructions provided by
the enhanced child restraint manufacturer.
! Please keep this enhanced child restraint away from
sunlight, otherwise it may be too hot for child’s skin.
Always touch the enhanced child restraint before
placing child in it.
! NEVER leave your child unattended with this en-
hanced child restraint.
! Any luggage or other objects liable to cause injuries
in the event of a collision shall be properly secured.
! The enhanced child restraint system shall NOT BE
USED without the soft goods.
! The soft goods should not be replaced with any
other than the one recommended by the manufac-
turer, because the soft goods constitutes an integral
part of the restraint performance.

3 4
WARNING
! Please check if this enhanced child restraint can be
installed properly in your vehicle before you pur-
chase it.
! NO enhanced child restraint can guarantee full
protection from injury in an accident. However,
proper use of this enhanced child restraint will
reduce the risk of serious injury or death to your
child.
! DO NOT install this enhanced child restraint without
following the instructions in this manual or you may
put your child at serious risk of injury or death. The
user shall also be referred to the vehicle manufac-
turer’s handbook.
! DO NOT use this enhanced child restraint if it has
damaged or missing parts.
! DO NOT have your child in large/oversized clothes
because this may prevent your child from being,
properly and securely fastened by the shoulder
harness straps and the crotch strap between the
legs.
Emergency
In case of emergency or accidents, it is most important to have your
child taken care of with first aid and medical treatment immediately.
Product Information
1. This is an i-Size Enhanced Child Restraint System. It is approved
according to UN Regulation No.129, for use in, i-Size compatible
vehicle seating positions as indicated by vehicle manufacturers in
the vehicle users’ manual.
2. If in doubt, consult either the Enhanced Child Restraint System
manufacturer or the retailer.
Materials Plastics, metal, fabrics
Patent No. Patents pending

5 6
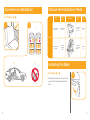
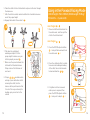
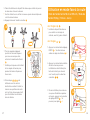
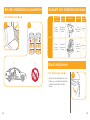
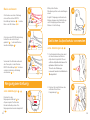
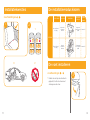
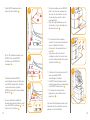
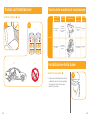
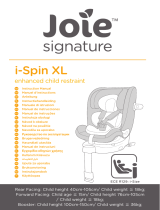
Concerns on Installation
1
24
3
57
6
1
24
3
57
6
1
23
A
I
R
B
A
G
2
1
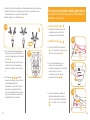
see images 1 - 2
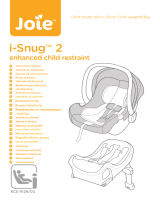
Installation
Mode InstallationReference
Age
Recline
Position
Approx
birth to
4 years
ECE R129
40cm-105cm/
19.5kg
<
Child's
Size
Rear Facing
mode
Forward
Facing
mode
Position
1-5
Position
1-5
15 months
to approx
4 years
76cm-105cm/
19.5kg
<
Choose the Installation Mode
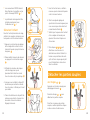
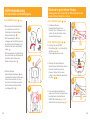
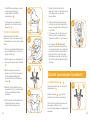
Installing the Base
3
see images 3 - 12
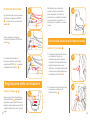
! After placing the base on the vehicle
seat, pull the load leg downward to
floor.

7 8
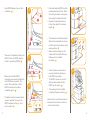
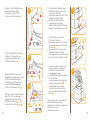
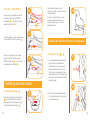
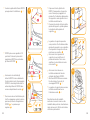
41! After attaching the ISOFIX, pull the
load leg downward to floor. When
the load leg indicator shows green,
the load leg is installed correctly.
! Squeeze the load leg releasing
button, then adjust the load leg
length. 7
! The load leg has multiple positions.
When the load leg indicator shows
red this means the load leg is in the
wrong position. 8
! Make sure the load leg is in full
contact with the vehicle floor pan.
Red means it is installed
incorrectly. 8
! Check to make sure the base is
securely installed by pulling on
both ISOFIX connectors.
! The ISOFIX connectors must be
attached and locked onto the
ISOFIX anchor points. 9 -1
! The load leg must be installed
correctly with green indicator. 9 -2
Please refer to rear facing mode and
recline positions mode in section to
use the child restraint.
7
8
9
1
2
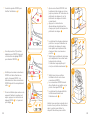
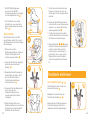
! Insert ISOFIX guides to assist with
installation. 4 -1
! There are 10 adjustable positions for
ISOFIX. Press the ISOFIX adjuster
button to extend the ISOFIX. 5
! Make sure that both ISOFIX
connectors are securely attached to
their ISOFIX anchor points. The
colors of the indicators on both
ISOFIX connectors should be
completely green. 6 -1
! If a tighter install or increased cabin
space is required, then press the
ISOFIX adjuster button 5 -1 and
push to adjust. 6
5
1
2
1
6

910
11
1
2
12
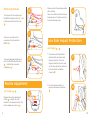
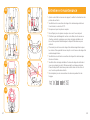
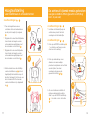
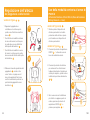
Removing the base
To remove from the vehicle press
the ISOFIX adjuster button 10 -1 and
pull the base back from the seat.
10 -2
Then press and release the
connectors from the vehicle’s
ISOFIX. 11
To prevent damage during transit,
press the ISOFIX adjuster button
12 -1 and fold the connector
completely. 12 -2
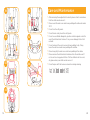
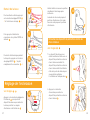
see images 13 - 14
Squeeze the recline adjustment
button 13 , to adjust the child
restraint to the proper position. The
recline angles are shown as 14
Recline Adjustment
14
13
Use Side Impact Protection
Please recheck the load leg position
after reclining.
There are 5 recline positions for rear
facing mode and 5 recline positions
for forward facing mode.
see images 15 - 16
1. The enhanced child restraint is
delivered with removable side
impact protection. This side
impact protection must be used
on the door side of the vehicle for
best protection. Installation
shown in 15 .
2. Press the release button to
remove side impact protection.
16
10
1
2
1
2
15
16
2
1

11 12
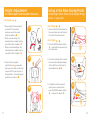
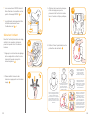
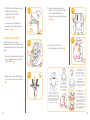
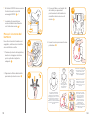
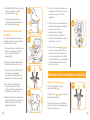
Height Adjustment
for Head Support and Shoulder Harnesses
see images 17 - 19
1. Please adjust the head support
and check if the shoulder
harnesses are at the correct
height according to 17
! When used rear facing, the
shoulder harness height must be
even with child’s shoulders. 17
! When used forward facing, the
shoulder harness height must be
even with child’s shoulders. 17
2. Lift up the head support
adjustment lever 18 , meanwhile
pull up or push down on the head
support until it snaps into one of
the 6 positions. The head support
positions are shown as 19 .
17
18
19
Using in the Rear Facing Mode
(Child height 40cm-105cm/Child weight 19.5kg/
infant - 4 years old)
see images 3 - 9
! Please install the child restraint on
the rear vehicle seat, and then put
the child in the child restraint.
see images 20 - 29
1. Press the ISOFIX adjuster button
20 -1 and pull the base back from
the vehicle seat.
2. Press the rotating button to rotate
for easier side loading/unloading
of the child, then rotate back to
desired direction. 21 &23
3. If a tighter install or increased
cabin space is required, then
press the ISOFIX adjuster button
22 -1 and push to adjust. 22 -2
20
1
2
21
22
1
2

13 14
! The ISOFIX connectors must be
attached and locked onto the
ISOFIX anchor points. 23 -1
! The load leg must be installed
correctly with green indicator.
23 -2
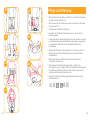
Securing Child
After the child is placed into the
seat, check whether the Shoulder
Harness Straps are at proper height.
1. Press the webbing adjustment
button, while pulling out the
shoulder harnesses to the proper
length.
24
2. Unlock the buckle of the
harnesses by pressing the red
button.
25
24
23
2
1
25
3. Fix the buckles on the both sides
of seat to make placing the child
in rear facing mode more
convenient.
26
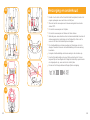
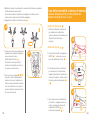
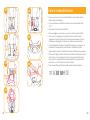
4. Use infant insert is for children’s
protection.
27
27
26
Detach the snaps on
the head support to
remove the head
portion of the insert.
Remove the head support
portion of the infant
insert when the child’s
head no longer fits
comfortably.
Remove the body
portion of the infant
insert when the infant’s
shoulders no longer fit
comfortably.
Remove the infant insert
cushion by detaching the
snaps to allow more space
when the infant does not
fit comfortably. The cushion
can be used separately
without being attached to
the insert to bolster the
infant's back for more
comfort.
1
2
We recommend using the full
infant insert while the baby
is under 60cm and can be
used until they outgrow the
infant insert. The infant insert
increases side impact
protection.

15 16
28
5. Place the child into the child restraint and pass both arms through
the harnesses.
! After the child is seated, recheck whether the shoulder harnesses
are at the proper height.
6. Engage the buckle. Please refer to 28
7. Pull down the adjustment
webbing and adjust it to the
proper length to make sure your
child is properly secured. 29
! Make sure the space between the
child and the Shoulder Harness
Straps is about the thickness of
one hand.
8. If steps 24 &25 &26 are taken when
arriving at your destination whilst
removing the child, then the
harness will be positioned so that
it is out of the way and ready for
loading upon your return to the
vehicle.
29
see images 3 - 9
! Please install the child restraint on
the vehicle seat, and then put the
child in the child restraint.
see images 30 - 37
1. Press the ISOFIX adjuster button
30 -1 and pull the base back from
the vehicle seat. 30 -2
2. Press the rotating button to rotate
for easier side loading/unloading
of the child, then rotate forwards
to desired direction. 31 &33
3. If a tighter install or increased
cabin space is required, then
press the ISOFIX adjuster button
32 -1 and push to adjust. 32 -2
Using in the Forward Facing Mode
(Child height 76cm-105cm/Child weight 19.5kg/
15 months - 4 years old)
30
1
2
31
32
1
2

17 18
33
2
1
! The ISOFIX connectors must be
attached and locked onto the
ISOFIX anchor points. 33 -1
! The load leg must be installed
correctly with green indicator.
33 -2
Securing Child
After the child is placed into the
seat, check whether the shoulder
harness straps are at proper height.
1. Press the webbing adjustment
button, while pulling out the
shoulder harnesses to the proper
length.
34
2. Unlock the buckle of the
harnesses by pressing the red
button.
35
3. Fix the buckles on the both sides
of seat to make placing the child
in forward facing mode more
convenient.
36
4. When installing the child restraint
in the forward facing mode, do
not use the infant insert.
5. Place the child into the child
restraint and pass both arms
through the harnesses. Engage
the buckle.
35
36
34
! After the child is seated, recheck
whether the shoulder harnesses
are at the proper height.
6. Pull down the adjustment webbing
and adjust it to the proper length to
make sure your child is properly
secured.37
! Make sure the space between the
child and the Shoulder Harness
Straps is about the thickness of
one hand.
7. If steps 34 &35 &36 are taken when
arriving at your destination whilst
removing the child, then the
harness will be positioned so that
it is out of the way and ready for
loading upon your return to the
vehicle.
37
see images 38 - 45
Press the red button to disengage the
buckle. 38
Follow steps 39 - 45 to detach soft
goods.
To re-attach the soft goods please
repeat the above steps in the reverse
step.
Detach Soft Goods
goods
38

19 20
40
41
43 44
45
! After removing the wedge from the insert, please store it somewhere
that the child cannot access it.
! Please wash the seat cover and inner padding with cold water under
30°C.
! Do not iron the soft goods.
! Do not bleach or dry clean the soft goods.
! Do not use undiluted detergents, gasoline or other organic solvent to
wash the child restraint or base. It may cause damage to the child
restraint.
! Do not wring out the seat cover and inner padding to dry. It may
leave the seat cover and inner padding with wrinkles.
! Please hang dry the seat cover and inner padding in the shade.
! Please remove the child restraint and base from the vehicle seat if
not in use for a long period of time. Put the child restraint in a cool,
dry place where your child cannot access it.
! Do not tamper with the harness connectors during cleaning.
Care and Maintenance
goods
39
42

21
Joie™ vous souhaite la bienvenue
Nous vous félicitons d’avoir rejoint la famille Joie ! Nous sommes très
heureux de pouvoir faire partie de votre voyage avec votre petit. En
voyageant avec le dispositif de retenue pour enfants amélioré Joie
spin 360™ GTi, vous utilisez un dispositif de retenue pour enfants
amélioré de haute qualité i-Size, à sécurité entièrement certifiée.
Veuillez lire ce manuel et suivre chaque étape pour assurer le confort
et la meilleure protection possible pour votre enfant.
Pour utiliser ce dispositif de retenue pour enfants amélioré Joie avec
les connexions i-Size ISOFIX conformément à la réglementation ECE
R129, votre enfant doit correspondre aux conditions suivantes.
Face à l'arrière : Taille de l'enfant entre 40 cm et 105 cm/Max. 19,5kg ;
Face à l'avant : Taille de l'enfant entre 76 cm et 105 cm/Max. 19,5kg ;
Base
Veuillez lire toutes les instructions de ce manuel avant d'installer et
d'utiliser le produit.
! IMPORTANT : À CONSERVER POUR TOUTE CONSULTATION
ULTÉRIEURE.
À LIRE ATTENTIVEMENT.
Veuillez conserver le manuel d'instructions
dans le compartiment de stockage en bas de
la base, comme sur l'illustration à droite.
Pour des informations sur la garantie,
veuillez visiter notre site Web sur joiebaby.com
Liste des pièces
1 Support de tête
2 Assise de siège
3 Boucle
4 Sangle de réglage
5 Bouton de réglage de
l'inclinaison
6 Piètement de charge
7 Indicateur de piètement de
charge
8 Bouton de réglage du
piètement de charge A
9 Bouton de réglage du
piètement de charge B
10 Bouton de rotation
11 Couvertures de la sangle
pour épaules
12 Insert pour bébé
13 Levier de réglage du
support de tête
14 Connecteur ISOFIX
15 Bouton de réglage ISOFIX
16 Guides ISOFIX
17 Protection contre les
chocs latéraux
Veuillez vous assurer qu’il n’y a pas de pièces manquantes. Contactez
le revendeur en cas de pièces manquantes.
FR
1
2
3
4
10
8
11
14
13
5
6
7
15
16
12
9
17

23 24
AVERTISSEMENT
! VEUILLEZ vous assurer que les éléments rigides et les
pièces en plastique du système de retenue pour enfants
amélioré soient situés et installés de sorte qu'ils ne soient
pas susceptibles de se coincer sous un siège mobile ou
dans la porte du véhicule.
! N'utilisez PAS les systèmes de retenue pour enfants
améliorés face à l'arrière dans des positions d'assise où
un airbag frontal actif est installé.
! Pour utiliser ce dispositif de retenue pour enfants
amélioré conformément à la réglementation UN N°129,
votre enfant doit respecter les conditions suivantes.
! Face à l'arrière : Taille de l'enfant entre 40 cm et 105 cm /
Max. 19,5kg
! Face à l'avant : Taille de l'enfant entre 76cm et 105cm /
Max. 19,5kg
! IMPORTANT - NE PAS UTILISER FACE À LA ROUTE
AVANT QUE L'ÂGE DE L'ENFANT ATTEIGNE 15 MOIS (voir
les instructions).
! Le dispositif de retenue pour enfants amélioré ne s'adapte
peut être pas dans tous les véhicules homologués.
Veuillez vous référer à la liste des accessoires inclus pour
plus de détails.
! Les sangles qui retiennent l'enfant doivent être ajustées
au corps de l'enfant et les sangles ne doivent pas être
entortillées.
AVERTISSEMENT
! Après avoir placé votre enfant dans le dispositif de
retenue amélioré, la ceinture de sécurité doit être utilisée
correctement. Veuillez vérifier que toute sangle sous-
abdominale est installée vers le bas, de manière à ce que
le bassin soit fermement engagé, ceci est important.
! Ce dispositif de retenue pour enfants amélioré doit être
remplacé s'ils a été soumis à des tensions violentes dans
un accident. Un accident peut les endommager, même si
vous ne voyez pas les dommages.
! Soyez conscient du danger d'apporter des modifications
ou des ajouts au dispositif sans l'approbation de l'autorité
concernée ainsi que du danger de ne pas respecter
strictement les instructions d'installation fournies par le
fabricant du dispositif de retenue pour enfants amélioré.
! Veuillez conserver ce dispositif de retenue pour enfants
amélioré à l'écart de la lumière du soleil, car il pourrait
devenir trop chaud pour la peau de l'enfant. Touchez
toujours le dispositif de retenue pour enfants amélioré
avant de placer l'enfant dedans.
! Ne laissez JAMAIS votre enfant sans surveillance avec ce
dispositif de retenue pour enfants amélioré.
! Tout bagage et autres objets susceptibles de causer des
blessures en cas de collision doivent être correctement
sécurisés.
! Le dispositif de retenue pour enfants amélioré NE DOIT
PAS être utilisé sans les pièces souples.

25 26
AVERTISSEMENT
! Les pièces souples ne doivent pas être remplacées par
des pièces autres que celles recommandées par le
fabricant, car les pièces souples font partie intégrante des
performances du dispositif de retenue.
! Veuillez vérifier si ce dispositif de retenue pour enfants
amélioré peut être installé correctement dans votre
véhicule avant de l'acheter.
! AUCUN dispositif de retenue pour enfants amélioré ne
peut garantir une protection complète contre les
blessures en cas d'accident. Cependant, une bonne
utilisation de ce dispositif de retenue pour enfants
amélioré réduira les risques de blessures sérieuses ou de
mort pour votre enfant.
! N'installez PAS ce dispositif de retenue pour enfants
amélioré sans respecter les instructions de ce manuel, ou
vous pourriez exposer votre enfant à un risque élevé de
blessures ou de mort. L'utilisateur doit également se
référer au manuel du constructeur du véhicule.
! N'utilisez PAS ce dispositif de retenue pour enfants
amélioré si des pièces sont endommagées ou
manquantes.
! Ne faites PAS porter à votre enfant des vêtements trop
amples/grands, car cela pourrait l'empêcher d'être bien
attaché par les sangles du harnais pour les épaules et le
harnais entre les jambes.
Urgence
En cas d'urgence ou d'accident, il est très important que votre enfant
soit immédiatement pris en charge par les premiers secours et des
soins médicaux.
Informations sur le produit
1. Il s'agit d'un système de retenue pour enfants amélioré i-Size. Il est
approuvé conformément à la réglementation UN n°129 pour une
utilisation dans des positions de sièges de véhicules compatibles
i-Size comme indiqué par le constructeur dans le manuel de
l'utilisateur du véhicule.
2. En cas de doute, consultez le fabricant du système de retenue pour
enfants amélioré ou le distributeur.
Matériaux Plastiques, métal, tissus
N° de brevet Brevets en attente

27 28
Remarques sur l'installation
1
24
3
57
6
1
24
3
57
6
1
23
A
I
R
B
A
G
2
1
voir images 1 - 2
ECE R129
Choix du mode d'installation
Installation de la base
3
voir images 3 - 12
! Après avoir placé la base sur le
siège du véhicule, tirez le piètement
de charge vers le bas jusqu'au
plancher.
Taille de
l'enfant
Mode
d'installation Installation Âge de
référence
Position
inclinée
40 cm-105 cm/
≤ 19,5kg Mode Face à
l’arrière
Mode face à
l'avant
76 cm-105 cm/
≤ 19,5kg
De la
naissance
à 4 ans
environ
Position 1-5
Position 1-5
entre 15
mois et
environ 4
ans

29 30
41! Après avoir attaché l'ISOFIX, tirez
le piètement de charge vers le bas
jusqu'au plancher. Si l'indicateur du
piètement de charge est vert, le
piètement de charge est installé
correctement.
! Appuyez sur le bouton de
déverrouillage du piètement de
charge, puis ajustez la longueur du
piètement de charge. 7
! Le piètement de charge a plusieurs
positions. Lorsque l'indicateur de
piètement de charge est rouge,
cela signifie que le piètement de
charge est dans une mauvaise
position. 8
! Vérifiez que le piètement de charge
est complètement en contact avec
le plancher du véhicule.
L'indicateur rouge signifie qu'il
n'est pas installé correctement. 8
! Vérifiez que la base est bien
installée en tirant sur les deux
connecteurs ISOFIX.
! Les connecteurs ISOFIX doivent
être attachés et verrouillés sur les
points d'ancrage ISOFIX. 9 -1
! Le piètement de charge doit être
installé correctement avec
l'indicateur vert. 9 -2
Veuillez vous reporter au mode dos à
la route et aux positions d'inclinaison
dans la section pour utiliser le
dispositif de retenue pour enfants.
7
8
9
1
2
! Insérez les guides ISOFIX pour
faciliter l'installation. 4 -1
! Vous disposez de 10 positions
réglables pour l'ISOFIX. Appuyez
sur le bouton de réglage ISOFIX
pour étendre l'ISOFIX. 5
! Vérifiez que les deux connecteurs
ISOFIX sont bien attachés aux
points d'ancrage ISOFIX. Les
indicateurs des deux connecteurs
ISOFIX doivent être complètement
verts. 6 -1
! Si une installation plus serrée ou un
espace d'habitacle supérieur est
requis, appuyez sur le bouton de
réglage ISOFIX 5 -1 et poussez
pour régler. 6
5
1
2
1
6

31 32
11
1
2
12
Retrait de la base
Pour le retirer du véhicule, appuyez
sur le bouton de réglage ISOFIX 10
-1 et tirez la base du siège. 10 -2
Puis appuyez et relâchez les
connecteurs du système ISOFIX du
véhicule. 11
Pour éviter tout dommage pendant
le transport, appuyez sur le bouton
de réglage ISOFIX 12 -1 et pliez
complètement le connecteur. 12 -2
voir images 13 - 14
Appuyez sur le bouton de réglage de
l'inclinaison 13 , pour ajuster le
dispositif de retenue pour enfants à
la bonne position. Les angles
d'inclinaison sont illustrés en 14
Réglage de l'inclinaison
14
13
Utilisation du dispositif de protection contre les
chocs latéraux
Veuillez vérifier à nouveau la position
du piètement de charge après
inclinaison.
Le mode dos à la route propose 5
positions d'inclinaison et le mode
face à la route propose 5 positions
d'inclinaison.
voir images 15 - 16
1. Le dispositif de retenue pour
enfants amélioré est livré avec un
dispositif de protection contre les
chocs latéraux amovible. Ce
dispositif de protection contre les
chocs latéraux doit être utilisé du
côté de la porte du véhicule pour
une protection optimale.
L’installation est indiquée dans 15 .
2. Appuyez sur le bouton
d'ouverture pour retirer le
dispositif de protection contre les
chocs latéraux.16
10
1
2
1
2
15
16
2
1

33 34
Réglage de la hauteur
pour le repose-tête et le harnais pour épaules
voir images 17 - 19
1. Veuillez ajuster le support de tête
et vérifier si les harnais pour
épaules sont à la bonne hauteur
conformément à 17
! En cas d'utilisation dos à la route,
la hauteur des harnais d'épaules
doit être à niveau avec les épaules
de l'enfant. 17
! En cas d'utilisation face à la route,
la hauteur des harnais d'épaules
doit être à niveau avec les épaules
de l'enfant. 17
2. Relevez le levier d’ajustement du
support de tête 18 tout en
soulevant ou poussant le support
pour le positionner sur l’une des 6
positions. Les positions du
support de tête sont illustrées en
19 .
17
18
19
Utilisation en mode face à l’arrière
(Taille de l'enfant entre 40 cm et 105 cm / Poids de
l'enfant 19,5kg/bébé - 4 ans)
voir images 3 - 9
! Il faut installer le dispositif de
retenue pour enfants sur le siège
arrière du véhicule avant d’y
mettre l’enfant.
voir images 20 - 29
1. Appuyez sur le bouton de réglage
ISOFIX 20 -1 et retirez la base
arrière du siège du véhicule.
2. Appuyez sur le bouton de rotation
afin de le tourner pour une
installation/un retrait latéral plus
facile de l'enfant, puis tournez
vers l'arrière jusqu'à la direction
souhaitée. 21 &23
3. Si une installation plus serrée ou
un espace d'habitacle supérieur
est requis, appuyez sur le bouton
de réglage ISOFIX 22 -1 et
poussez pour régler. 22 -2
20
1
2
21
22
1
2

35 36
! Les connecteurs ISOFIX doivent
être attachés et verrouillés sur les
points d'ancrage ISOFIX. 23 -1
! Le piètement de charge doit être
installé correctement avec
l'indicateur vert. 23 -2
Sécuriser l'enfant
Une fois l'enfant placé dans le siège,
vérifiez si les sangles du harnais
pour les épaules sont à la bonne
hauteur.
1. Appuyez sur le bouton de réglage
de la sangle tout en tirant sur les
harnais d'épaules jusqu'à la
bonne longueur. 24
2. Déverrouillez la boucle des
harnais en appuyant sur le bouton
rouge. 25
24
23
2
1
25
3. Attachez les boucles de chaque
côté du siège pour que le
placement de l'enfant en mode
face à l’arrière soit plus pratique.
26
4. Utilisez l’insert pour bébé pour la
protection des enfants. 27
27
26
1
2
Nous conseillons d'utiliser
l'insert intégral pour bébé
lorsque le bébé mesure
moins de 60 cm ou jusqu'à
ce qu'il dépasse de l'insert.
L'insert pour bébé accroît la
protection contre les chocs
latéraux
Détachez les attaches
du support pour la
tête afin de retirer
la partie du support
dédiée à la tête.
Retirez la partie du
support de tête de
l'insert pour bébé
lorsque la tête de
l'enfant ne rentre plus.
Retirez la partie du
support pour bébé
dédiée au corps lorsque
les épaules de l'enfant
ne s'y placent plus
confortablement.
Retirez le coussinet du
support pour bébé en
détachant les fermoirs
pour faire plus de
place lorsque le bébé
ne se place plus de
façon confortable. Le
coussin peut être utilisé
séparément sans être
fixé au support afin de
soutenir le dos du bébé
pour plus de confort.
La pagina si sta caricando...
La pagina si sta caricando...
La pagina si sta caricando...
La pagina si sta caricando...
La pagina si sta caricando...
La pagina si sta caricando...
La pagina si sta caricando...
La pagina si sta caricando...
La pagina si sta caricando...
La pagina si sta caricando...
La pagina si sta caricando...
La pagina si sta caricando...
La pagina si sta caricando...
La pagina si sta caricando...
La pagina si sta caricando...
La pagina si sta caricando...
La pagina si sta caricando...
La pagina si sta caricando...
La pagina si sta caricando...
La pagina si sta caricando...
La pagina si sta caricando...
La pagina si sta caricando...
La pagina si sta caricando...
La pagina si sta caricando...
La pagina si sta caricando...
La pagina si sta caricando...
La pagina si sta caricando...
La pagina si sta caricando...
La pagina si sta caricando...
La pagina si sta caricando...
La pagina si sta caricando...
La pagina si sta caricando...
La pagina si sta caricando...
La pagina si sta caricando...
La pagina si sta caricando...
La pagina si sta caricando...
La pagina si sta caricando...
-
 1
1
-
 2
2
-
 3
3
-
 4
4
-
 5
5
-
 6
6
-
 7
7
-
 8
8
-
 9
9
-
 10
10
-
 11
11
-
 12
12
-
 13
13
-
 14
14
-
 15
15
-
 16
16
-
 17
17
-
 18
18
-
 19
19
-
 20
20
-
 21
21
-
 22
22
-
 23
23
-
 24
24
-
 25
25
-
 26
26
-
 27
27
-
 28
28
-
 29
29
-
 30
30
-
 31
31
-
 32
32
-
 33
33
-
 34
34
-
 35
35
-
 36
36
-
 37
37
-
 38
38
-
 39
39
-
 40
40
-
 41
41
-
 42
42
-
 43
43
-
 44
44
-
 45
45
-
 46
46
-
 47
47
-
 48
48
-
 49
49
-
 50
50
-
 51
51
-
 52
52
-
 53
53
-
 54
54
-
 55
55
-
 56
56
-
 57
57


Joie Spin 360 GTi Manuale utente
- Categoria
- Sedili dell'auto
- Tipo
- Manuale utente
in altre lingue
- English: Joie Spin 360 GTi User manual
- français: Joie Spin 360 GTi Manuel utilisateur
- Deutsch: Joie Spin 360 GTi Benutzerhandbuch
- Nederlands: Joie Spin 360 GTi Handleiding
Documenti correlati
Altri documenti
-
Graco IM-000922E Manuale del proprietario
-
 Jole spin 360™ GTi Manuale utente
-
Graco GC2116ABNVY000 Manuale utente
-
 Jole i-Venture™ R Manuale utente
-
 Jole i-Bold™ Manuale utente
-
Joie signature i-Spin XL Manuale utente
-
 Jole i-Spin™ XL Manuale utente
-
 Jole i-Plenti™ Manuale utente
-
 Jole i-Snug™ 2 Manuale utente


