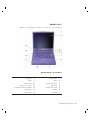
Dell Latitude C800 Guida Rapida
- Categoria
- I Quaderni
- Tipo
- Guida Rapida

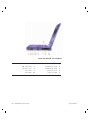
Dell Latitude
Model PP01X
www.dell.com
support.dell.com
Dell™ Latitude™ INFORMACE O SYSTÉMU
Dell™ Latitude™ SYSTEMOPLYSNINGER
Dell™ Latitude™ JÄRJESTELMÄTIEDOT
Dell™ Latitude™ RENDSZERINFORMÁCIÓ
Dell™ Latitude™ SYSTEMINFORMASJON
Dell™ Latitude™ INFORMACJE O SYSTEMIE
Dell™ Latitude™ ÃÀÃ◊›fl‚œ„ À‚…”—flœ‡À„
Dell™ Latitude™ SYSTÉMOVÉ INFORMÁCIE
Dell™ Latitude™ SISTEMSKE INFORMACIJE
Dell™ Latitude™ SYSTEMINFORMATION
Dell™ Latitude™
SYSTEM INFORMATION
Dell™ Latitude™
773MRem1.qxd 06/03/01 19:00 Page 1

www.dell.com
support.dell.com
SYSTEM INFORMATION

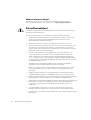
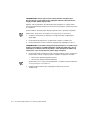
Notes, Notices, and Cautions
Throughout this guide, blocks of text may be accompanied by an icon and printed in
bold type or in italic type. These blocks are notes, notices, and cautions, and they are
used as follows:
NOTE: A NOTE indicates important information that helps you make better use of
your computer system.
NOTICE: A NOTICE indicates either potential damage to hardware or loss
of data and tells you how to avoid the problem.
CAUTION: A CAUTION indicates the potential for bodily harm and tells you
how to avoid the problem.
____________________
Information in this document is subject to change without notice.
© 2000 Dell Computer Corporation. All rights reserved.
Reproduction in any manner whatsoever without the written permission of Dell Computer
Corporation is strictly forbidden.
Trademarks used in this text: Dell, Latitude, AccessDirect,andtheDELL E COM logo are
trademarks of Dell Computer Corporation; Microsoft, and Windows are registered trademarks of
Microsoft Corporation. Intel and Pentium are registered trademarks, and Celeron is a trademark
of Intel Corporation.
Other trademarks and trade names may be used in this document to refer to either the entities
claiming the marks and names or their products. Dell Computer Corporation disclaims any
proprietary interest in trademarks and trade names other than its own.
March 2001 P/N 773MR Rev. A01

support.dell.com Dell Latitude System Information 1-1
DELL CONFIDENTIAL - Preliminary 3/19/01
(Rev. 11/3/98) FILE LOCATION: D:\DTP\10-01682\01-03-19\773MR1s\773MReb1.fm
Dell™ Latitude™
System Information
Your Dell Latitude portable computer accessories box includes a reduced set of paper
documentation. This document contains getting started, safety, and regulatory
information about your Dell computer as well as information about other Dell
documents that are available and how to obtain them.
Other Documents Available
The following documents are provided with your computer:
• The Getting Started placemat, which provides step-by-step instructions for
connecting your computer.
NOTE: The Getting Started placemat is not available in all regions.
• The User’s Guide, which is an HTML document that includes descriptions of
computer features, instructions on installing and configuring drivers and utilities,
information on the system setup program, and instructions for attaching devices
to the connectors on your computer’s back panel. The User’s Guide is located on
your hard drive.
You may also have one or more of the following documents:
• Documentation updates, which are sometimes included with your computer to
describe changes to your computer or software. Always read these updates
before consulting any other documentation because the updates often contain
the latest information.
• Operating system documentation, which is included if you ordered your
operating system software from Dell.
• Documentation included with any options you purchase separately from your
computer. This documentation includes information that you need to configure
and install these options in your Dell computer.

1-2 Dell Latitude System Information
DELL CONFIDENTIAL - Preliminary 3/19/01
(Rev. 11/3/98) FILE LOCATION: D:\DTP\10-01682\01-03-19\773MR1s\773MReb1.fm
Documents on the Web
You can obtain the latest versions of any of the documents on your hard drive
as well as other troubleshooting information from the support site at
http://support.dell.com.
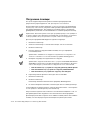
Safety Instructions
Use the following safety guidelines to help protect your computer from potential
damage and to help ensure your own personal safety.
As you use your computer, observe the following safety guidelines:
• Do not allow your Latitude portable computer to operate with the base resting
directly on exposed skin. With extended operation, heat can potentially build up
in the base. Allowing sustained contact with the skin could cause discomfort or,
eventually, a burn.
• Do not attempt to service the computer yourself. Always follow installation
instructions closely.
• Do not carry a battery pack in your pocket, purse, or other container where metal
objects (such as car keys) could short-circuit the battery terminals. The resulting
excessive current flow can cause extremely high temperatures and may result in
damage from burns.
• Be sure that nothing rests on your adapter’s power cable and that the cable is not
located where it can be tripped over or stepped on.
• Place the AC adapter in a ventilated area, such as a desk top or on the floor,
when you use it to run the computer or to charge the battery. Do not cover the
AC adapter with papers or other items that will reduce cooling; also, do not use
the AC adapter inside a carrying case.
• Do not use your computer in a wet environment, for example, near a bath tub,
sink, or swimming pool or in a wet basement.
• Do not push objects into air vents or openings of your computer. Doing so can
cause fire or electric shock by shorting out interior components.
• Use only the Dell PA-6 AC adapter approved for use with this computer. Use of
another AC adapter may present a risk of fire.
• Use only Dell battery modules that are approved for use with this computer. Use
of other types may present a risk of fire or explosion.
• To help prevent electric shock, plug the AC adapter and peripheral power cables
into properly grounded power sources. These cables are equipped with three-
prong plugs to help ensure proper grounding. Do not use adapter plugs or
remove the grounding prong from a cable. If you must use an extension cable,
use a three-wire cable with properly grounded plugs.
• If you use an extension cable with your AC adapter, ensure that the total ampere
rating of the products plugged into the extension cable does not exceed the
ampere rating of the extension cable.

support.dell.com Dell Latitude System Information 1-3
DELL CONFIDENTIAL - Preliminary 3/19/01
(Rev. 11/3/98) FILE LOCATION: D:\DTP\10-01682\01-03-19\773MR1s\773MReb1.fm
• To remove power from the computer, turn it off, remove the battery pack, and
disconnect the AC adapter from the electrical outlet.
• If your computer includes an integrated or optional (PC Card) modem, the cable
used with the modem should be manufactured with a minimum wire size of
26 American wire gauge (AWG) and an FCC-compliant RJ-11 modular plug.
• If your computer includes an integrated or optional (PC Card) modem, disconnect
the modem cable if an electrical storm approaches to avoid the remote risk of
electric shock from lightning via the telephone line.
• To help avoid the potential hazard of electric shock, do not connect or disconnect
any cables or perform maintenance or reconfiguration of this product during an
electrical storm.
• PC Cards may become very warm during normal operation. Use care when
removing PC Cards after their continuous operation.
• Do not dispose of your computer’s lithium-ion battery packs in a fire or along with
household waste. They may explode. Discard used batteries according to the
manufacturers instructions or contact you local waste disposal agency for
disposal instructions.
• Clean your computer with a soft cloth dampened with water rather than with
liquid or aerosol cleaners which may contain flammable substances.
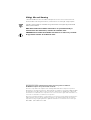
Preparing to Work Inside Your Computer
Observe the following safety guidelines when working inside your computer.
NOTICE: The only time you should ever access the inside of your computer
is when you are installing memory modules.
NOTICE: Wait 5 seconds after turning off the computer before disconnecting
adeviceorremovingamemorymoduletohelppreventpossibledamage
to the system board.
NOTE: For full instructions, see the User’sGuide.
• Turn off your computer and any attached peripherals.
• Disconnect your computer and any attached peripherals from electrical outlets to
reduce the potential for personal injury or shock.
• If the computer is docked, undock it.
• Disconnect any peripherals attached to your computer, including telephone or
telecommunication lines.
• Remove the main battery from the battery bay and, if necessary, the secondary
battery from the modular bay.
• Ground yourself by touching the unpainted metal surface of an input/output (I/O)
connector on the back of the computer.
• While you work, periodically touch the I/O panel to dissipate any static electricity
that might harm internal components.

1-4 Dell Latitude System Information
DELL CONFIDENTIAL - Preliminary 3/19/01
(Rev. 11/3/98) FILE LOCATION: D:\DTP\10-01682\01-03-19\773MR1s\773MReb1.fm
General EMC Guidelines
• Shielded signal cables: Using shielded cables ensures that you maintain the
appropriate EMC classification for the intended environment. For parallel printers,
a cable is available from Dell. If you prefer, you can order a cable from Dell on the
World Wide Web at http://www.dell.com.
• Protecting against electrostatic discharge: Static electricity can harm electronic
components inside your computer. To prevent static damage, discharge static
electricity from your body before you touch any of your computer’s electronic
components, such as a memory module. You can do so by touching an unpainted
metal surface on the computer’s I/O panel.
• Electromagnetic interference (EMI) is any signal or emission, radiated in free
space or conducted along power or signal leads, that endangers the functioning
of a radio navigation or other safety service or seriously degrades, obstructs, or
repeatedly interrupts a licensed radio communications service. Your Dell
computer is designed to comply with applicable regulations regarding EMI.
Changes or modifications not expressly approved by Dell could void your
authority to operate the equipment. Additional regulatory information regarding
your computer can be found in your online User’sGuide.

support.dell.com Dell Latitude System Information 1-5
DELL CONFIDENTIAL - Preliminary 3/19/01
(Rev. 11/3/98) FILE LOCATION: D:\DTP\10-01682\01-03-19\773MR1s\773MReb1.fm
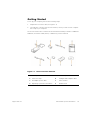
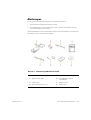
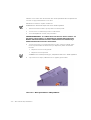
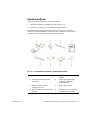
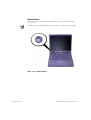
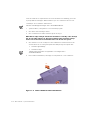
Getting Started
To set up your computer, perform the following steps:
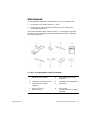
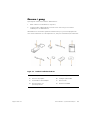
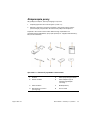
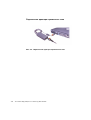
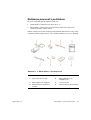
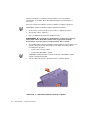
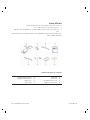
1. Unpack the accessories box (see Figure 1-1).
2. Set aside the contents of the accessories box, which you will need to complete
the setup of your computer.
The accessories box also contains user documentation and any software or additional
hardware (such as PC Cards, drives, or batteries) you have ordered.
Figure 1-1. Accessories Box Contents
1 AC adapter 5 Cable for optional modem
2 Track stick caps 6 TV/digital audio adapter cable
3 AC adapter power cable 7 Travel module
4 Operating system documentation 8 ResourceCD

1-6 Dell Latitude System Information
DELL CONFIDENTIAL - Preliminary 3/19/01
(Rev. 11/3/98) FILE LOCATION: D:\DTP\10-01682\01-03-19\773MR1s\773MReb1.fm
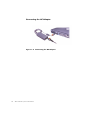
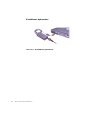
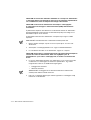
Connecting the AC Adapter
Figure 1-2. Connecting the AC Adapter

support.dell.com Dell Latitude System Information 1-7
DELL CONFIDENTIAL - Preliminary 3/19/01
(Rev. 11/3/98) FILE LOCATION: D:\DTP\10-01682\01-03-19\773MR1s\773MReb1.fm
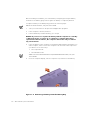
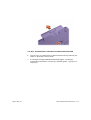
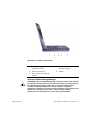
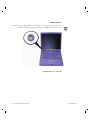
Turning On the Computer
To turn on the computer, open the computer display and press the power button (see
Figure 1-3).
NOTE: Do not dock the computer until it has been turned on and shut down at least
once.
Figure 1-3. Turning On the Computer

1-8 Dell Latitude System Information
DELL CONFIDENTIAL - Preliminary 3/19/01
(Rev. 11/3/98) FILE LOCATION: D:\DTP\10-01682\01-03-19\773MR1s\773MReb1.fm
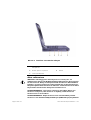
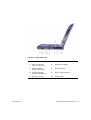
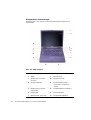
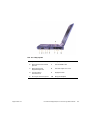
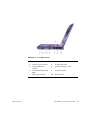
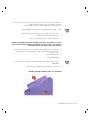
Computer Components
Figures 1-4, 1-5, 1-6, and 1-7 show the locations of the computer’s components.
Figure 1-4. Front View
1 Display latch 8 Touch pad
2 Display 9 Battery
3 System status lights 10 Modular bay
4 Air intake 11 Track stick and touch pad
buttons
5 Keyboard status lights 12 Dell AccessDirect™ key
6 Keyboard 13 Power button
7 Track stick 14 Internal microphone

support.dell.com Dell Latitude System Information 1-9
DELL CONFIDENTIAL - Preliminary 3/19/01
(Rev. 11/3/98) FILE LOCATION: D:\DTP\10-01682\01-03-19\773MR1s\773MReb1.fm
Figure 1-5. Right Side View
1 Speaker 6 IR sensor
2 Optional network connector 7 IEEE 1394 connector
3 Optional modem connector 8 PC Card slots
4 Security cable slot 9 Audio jacks
5 Hard drive bay 10 Air intake

1-10 Dell Latitude System Information
DELL CONFIDENTIAL - Preliminary 3/19/01
(Rev. 11/3/98) FILE LOCATION: D:\DTP\10-01682\01-03-19\773MR1s\773MReb1.fm
Figure 1-6. Back View
1 Fans 5 Docking connector
2 AC power connector 6 Parallel connector
3 PS/2 connector (for mouse,
keyboard, or keypad)
7 Serial connector
4 Video connector 8 USB connectors

support.dell.com Dell Latitude System Information 1-11
DELL CONFIDENTIAL - Preliminary 3/19/01
(Rev. 11/3/98) FILE LOCATION: D:\DTP\10-01682\01-03-19\773MR1s\773MReb1.fm
Figure 1-7. Left Side View
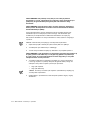
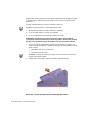
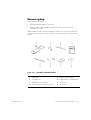
Replacing the Main Battery
CAUTION: Using the wrong battery type may present a risk of fire or
explosion. Replace the battery only with the same or equivalent type
purchased from Dell. You can use your computer’s battery in any Latitude
C-Family computer except for the Latitude CS or CSx computers. Do not
attempt to use the battery in CS or CSx, and do not use a battery from those
computers in your computer.
NOTICE: To avoid data loss, do not replace a battery while the computer is
turned on unless the computer is connected to an electrical outlet or a
second battery is installed.
NOTICE: Only use lithium ion batteries in your computer. The computer
does not support nickel-metal hydride (NiMH) batteries.
1 Fixed optical drive pull-tab 4 Security cable slot
2 Fixed optical drive 5 Speaker
3 S-video TV-out connector

1-12 Dell Latitude System Information
DELL CONFIDENTIAL - Preliminary 3/19/01
(Rev. 11/3/98) FILE LOCATION: D:\DTP\10-01682\01-03-19\773MR1s\773MReb1.fm
Before installing a new battery, check the battery’s charge by pressing the battery
test button. The battery gauge will not light if the battery is completely drained.
To replace a battery in the battery bay, perform the following steps.
NOTE: For full instructions, see your User’s Guide.
1. Save your work and close all open files and application programs.
2. If the computer is docked, undock it.
3. If the modular bay contains a battery, go to step 5.
NOTICE: If you choose to replace the battery with the computer in a standby
or hibernate mode, you have up to 2 minutes to complete the battery
replacement. After 2 minutes, the computer shuts down and you will lose
any unsaved data.
4. If the only battery in the computer is in the battery bay and that is the battery you
want to replace, either connect the computer to an electrical outlet or preserve
your data in one of these ways.
• Use suspend mode.
• Use hibernate mode.
NOTE: For more information about suspend and hibernate modes, see your
User’sGuide.
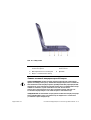
5. Close the computer display, turn the computer over, and remove the battery.
Figure 1-8. Removing a Battery From the Battery Bay

support.dell.com Dell Latitude System Information 1-13
DELL CONFIDENTIAL - Preliminary 3/19/01
(Rev. 11/3/98) FILE LOCATION: D:\DTP\10-01682\01-03-19\773MR1s\773MReb1.fm
6. Slide the new battery firmly into the battery bay. You should hear a click when the
battery is fully seated.
7. Depending on the power management mode the computer is in, press the
power button or open the display to resume normal operation.

1-14 Dell Latitude System Information
DELL CONFIDENTIAL - Preliminary 3/19/01
(Rev. 11/3/98) FILE LOCATION: D:\DTP\10-01682\01-03-19\773MR1s\773MReb1.fm
NOM Information (Mexico Only)
The following information is provided on the device(s) described in this document in
compliance with the requirements of the official Mexican standards (NOM):
Exporter: Dell Computer Corporation
One Dell Way
Round Rock, TX 78682
Importer: Dell Computer de México,
S.A. de C.V.
Paseo de la Reforma 2620 - 11° Piso
Col. Lomas Altas
11950 México, D.F.
Ship to: Dell Computer de México,
S.A. de C.V. al Cuidado de Kuehne
& Nagel de
México S. de R.I.
Avenida Soles No. 55
Col. Peñon de los Baños
15520 México, D.F.
Supply voltage: 100-240 VAC
Frequency: 50-60 Hz
Current consumption
(maximum): 1.5 A
Output voltage 20 VDC
Output current
(maximum)
3.5 A

support.dell.com Dell Latitude System Information 1-15
DELL CONFIDENTIAL - Preliminary 3/19/01
(Rev. 11/3/98) FILE LOCATION: D:\DTP\10-01682\01-03-19\773MR1s\773MReb1.fm
InformaciónparaNOM(únicamente para México)
La información siguiente se proporciona en el dispositivo o en los dispositivos
descritos en este documento, en cumplimiento con los requisitos de la Norma Oficial
Mexicana (NOM):
Exportador: Dell Computer Corporation
One Dell Way
Round Rock, TX 78682
Importador: Dell Computer de México,
S.A. de C.V.
Paseo de la Reforma 2620 - 11° Piso
Col. Lomas Altas
11950 México, D.F.
Embarcar a: Dell Computer de México, S.A. de
C.V. al Cuidado de Kuehne & Nagel
de México S. de R.I.
Avenida Soles No. 55
Col. Peñon de los Baños
15520 México, D.F.
Tensiónalimentación: 100-240 VAC
Frecuencia: 50-60 Hz
Consumo de corriente
(máxima): 1,5 A
Voltaje de salida: 20 VDC
Corriente de salida
(máxima): 3,5 A

1-16 Dell Latitude System Information
DELL CONFIDENTIAL - Preliminary 3/19/01
(Rev. 11/3/98) FILE LOCATION: D:\DTP\10-01682\01-03-19\773MR1s\773MReb1.fm
Getting Help
Dell provides a number of tools to help you if your computer does not perform as
expected. For information on these help tools, see your User’sGuide.
If you have a computer problem and are unable to access the online User’sGuide,
use the Dell Diagnostics to help you determine the cause of the problem and to help
you solve it. The diagnostics are on the ResourceCD that came with your computer.
NOTE: Run the diagnostics before you call Dell’s technical support because the
diagnostic tests provide information you may need when you call.
To start the diagnostics, perform the following steps:
1. Turn off the computer.
2. Undock the computer if you have it docked.
3. Turn on the computer.
4. Press <F2> at the start of the boot routine to access the system setup menu.
NOTE: Write down your current boot sequence in the event that you want to
restore it after running the Dell Diagnostics.
5. Select the following boot sequence.
NOTE: You can boot only from a CD-ROM, CD-RW, or DVD-ROM drive installed
as a fixed optical drive. You cannot boot from one of these modules installed in
the modular bay.
• Boot First Device: Diskette Drive
• Boot Second Device: CD/DVD/CD-RW Drive
• Boot Third Device: Internal HDD
6. Insert the ResourceCD into the CD-ROM drive.
7. Turn the computer off.
8. Turn the computer on.
The computer starts and automatically begins to run the Dell Diagnostics.
9. When you have completed running the diagnostics, remove the ResourceCD
from the CD-ROM drive.
To change the boot sequence, repeat steps 1 through 6, customizing the boot
sequence to fit your needs. Then restart your computer.
When you start the diagnostics, the Dell logo screen appears, followed by a message
telling you that the diagnostics is loading. After the diagnostics loads, the
Diagnostics Menu appears.
To select an option from this menu, highlight the option and press <Enter>, or press
the key that corresponds to the highlighted letter in the option you choose.

www.dell.com
support.dell.com
INFORMACE O SYSTÉMU
La pagina sta caricando ...
La pagina sta caricando ...
La pagina sta caricando ...
La pagina sta caricando ...
La pagina sta caricando ...
La pagina sta caricando ...
La pagina sta caricando ...
La pagina sta caricando ...
La pagina sta caricando ...
La pagina sta caricando ...
La pagina sta caricando ...
La pagina sta caricando ...
La pagina sta caricando ...
La pagina sta caricando ...
La pagina sta caricando ...
La pagina sta caricando ...
La pagina sta caricando ...
La pagina sta caricando ...
La pagina sta caricando ...
La pagina sta caricando ...
La pagina sta caricando ...
La pagina sta caricando ...
La pagina sta caricando ...
La pagina sta caricando ...
La pagina sta caricando ...
La pagina sta caricando ...
La pagina sta caricando ...
La pagina sta caricando ...
La pagina sta caricando ...
La pagina sta caricando ...
La pagina sta caricando ...
La pagina sta caricando ...
La pagina sta caricando ...
La pagina sta caricando ...
La pagina sta caricando ...
La pagina sta caricando ...
La pagina sta caricando ...
La pagina sta caricando ...
La pagina sta caricando ...
La pagina sta caricando ...
La pagina sta caricando ...
La pagina sta caricando ...
La pagina sta caricando ...
La pagina sta caricando ...
La pagina sta caricando ...
La pagina sta caricando ...
La pagina sta caricando ...
La pagina sta caricando ...
La pagina sta caricando ...
La pagina sta caricando ...
La pagina sta caricando ...
La pagina sta caricando ...
La pagina sta caricando ...
La pagina sta caricando ...
La pagina sta caricando ...
La pagina sta caricando ...
La pagina sta caricando ...
La pagina sta caricando ...
La pagina sta caricando ...
La pagina sta caricando ...
La pagina sta caricando ...
La pagina sta caricando ...
La pagina sta caricando ...
La pagina sta caricando ...
La pagina sta caricando ...
La pagina sta caricando ...
La pagina sta caricando ...
La pagina sta caricando ...
La pagina sta caricando ...
La pagina sta caricando ...
La pagina sta caricando ...
La pagina sta caricando ...
La pagina sta caricando ...
La pagina sta caricando ...
La pagina sta caricando ...
La pagina sta caricando ...
La pagina sta caricando ...
La pagina sta caricando ...
La pagina sta caricando ...
La pagina sta caricando ...
La pagina sta caricando ...
La pagina sta caricando ...
La pagina sta caricando ...
La pagina sta caricando ...
La pagina sta caricando ...
La pagina sta caricando ...
La pagina sta caricando ...
La pagina sta caricando ...
La pagina sta caricando ...
La pagina sta caricando ...
La pagina sta caricando ...
La pagina sta caricando ...
La pagina sta caricando ...
La pagina sta caricando ...
La pagina sta caricando ...
La pagina sta caricando ...
La pagina sta caricando ...
La pagina sta caricando ...
La pagina sta caricando ...
La pagina sta caricando ...
La pagina sta caricando ...
La pagina sta caricando ...
La pagina sta caricando ...
La pagina sta caricando ...
La pagina sta caricando ...
La pagina sta caricando ...
La pagina sta caricando ...
La pagina sta caricando ...
La pagina sta caricando ...
La pagina sta caricando ...
La pagina sta caricando ...
La pagina sta caricando ...
La pagina sta caricando ...
La pagina sta caricando ...
La pagina sta caricando ...
La pagina sta caricando ...
La pagina sta caricando ...
La pagina sta caricando ...
La pagina sta caricando ...
La pagina sta caricando ...
La pagina sta caricando ...
La pagina sta caricando ...
La pagina sta caricando ...
La pagina sta caricando ...
La pagina sta caricando ...
La pagina sta caricando ...
La pagina sta caricando ...
La pagina sta caricando ...
La pagina sta caricando ...
La pagina sta caricando ...
La pagina sta caricando ...
La pagina sta caricando ...
La pagina sta caricando ...
La pagina sta caricando ...
La pagina sta caricando ...
La pagina sta caricando ...
La pagina sta caricando ...
La pagina sta caricando ...
La pagina sta caricando ...
La pagina sta caricando ...
La pagina sta caricando ...
La pagina sta caricando ...
La pagina sta caricando ...
La pagina sta caricando ...
La pagina sta caricando ...
La pagina sta caricando ...
La pagina sta caricando ...
La pagina sta caricando ...
La pagina sta caricando ...
La pagina sta caricando ...
La pagina sta caricando ...
La pagina sta caricando ...
La pagina sta caricando ...
La pagina sta caricando ...
La pagina sta caricando ...
La pagina sta caricando ...
La pagina sta caricando ...
La pagina sta caricando ...
La pagina sta caricando ...
La pagina sta caricando ...
La pagina sta caricando ...
La pagina sta caricando ...
La pagina sta caricando ...
La pagina sta caricando ...
La pagina sta caricando ...
La pagina sta caricando ...
La pagina sta caricando ...
La pagina sta caricando ...
La pagina sta caricando ...
La pagina sta caricando ...
La pagina sta caricando ...
La pagina sta caricando ...
La pagina sta caricando ...
La pagina sta caricando ...
La pagina sta caricando ...
La pagina sta caricando ...
La pagina sta caricando ...
La pagina sta caricando ...
La pagina sta caricando ...
La pagina sta caricando ...
La pagina sta caricando ...
La pagina sta caricando ...
La pagina sta caricando ...
La pagina sta caricando ...
La pagina sta caricando ...
La pagina sta caricando ...
La pagina sta caricando ...
La pagina sta caricando ...
La pagina sta caricando ...
La pagina sta caricando ...
La pagina sta caricando ...
La pagina sta caricando ...
La pagina sta caricando ...
La pagina sta caricando ...
La pagina sta caricando ...
-
 1
1
-
 2
2
-
 3
3
-
 4
4
-
 5
5
-
 6
6
-
 7
7
-
 8
8
-
 9
9
-
 10
10
-
 11
11
-
 12
12
-
 13
13
-
 14
14
-
 15
15
-
 16
16
-
 17
17
-
 18
18
-
 19
19
-
 20
20
-
 21
21
-
 22
22
-
 23
23
-
 24
24
-
 25
25
-
 26
26
-
 27
27
-
 28
28
-
 29
29
-
 30
30
-
 31
31
-
 32
32
-
 33
33
-
 34
34
-
 35
35
-
 36
36
-
 37
37
-
 38
38
-
 39
39
-
 40
40
-
 41
41
-
 42
42
-
 43
43
-
 44
44
-
 45
45
-
 46
46
-
 47
47
-
 48
48
-
 49
49
-
 50
50
-
 51
51
-
 52
52
-
 53
53
-
 54
54
-
 55
55
-
 56
56
-
 57
57
-
 58
58
-
 59
59
-
 60
60
-
 61
61
-
 62
62
-
 63
63
-
 64
64
-
 65
65
-
 66
66
-
 67
67
-
 68
68
-
 69
69
-
 70
70
-
 71
71
-
 72
72
-
 73
73
-
 74
74
-
 75
75
-
 76
76
-
 77
77
-
 78
78
-
 79
79
-
 80
80
-
 81
81
-
 82
82
-
 83
83
-
 84
84
-
 85
85
-
 86
86
-
 87
87
-
 88
88
-
 89
89
-
 90
90
-
 91
91
-
 92
92
-
 93
93
-
 94
94
-
 95
95
-
 96
96
-
 97
97
-
 98
98
-
 99
99
-
 100
100
-
 101
101
-
 102
102
-
 103
103
-
 104
104
-
 105
105
-
 106
106
-
 107
107
-
 108
108
-
 109
109
-
 110
110
-
 111
111
-
 112
112
-
 113
113
-
 114
114
-
 115
115
-
 116
116
-
 117
117
-
 118
118
-
 119
119
-
 120
120
-
 121
121
-
 122
122
-
 123
123
-
 124
124
-
 125
125
-
 126
126
-
 127
127
-
 128
128
-
 129
129
-
 130
130
-
 131
131
-
 132
132
-
 133
133
-
 134
134
-
 135
135
-
 136
136
-
 137
137
-
 138
138
-
 139
139
-
 140
140
-
 141
141
-
 142
142
-
 143
143
-
 144
144
-
 145
145
-
 146
146
-
 147
147
-
 148
148
-
 149
149
-
 150
150
-
 151
151
-
 152
152
-
 153
153
-
 154
154
-
 155
155
-
 156
156
-
 157
157
-
 158
158
-
 159
159
-
 160
160
-
 161
161
-
 162
162
-
 163
163
-
 164
164
-
 165
165
-
 166
166
-
 167
167
-
 168
168
-
 169
169
-
 170
170
-
 171
171
-
 172
172
-
 173
173
-
 174
174
-
 175
175
-
 176
176
-
 177
177
-
 178
178
-
 179
179
-
 180
180
-
 181
181
-
 182
182
-
 183
183
-
 184
184
-
 185
185
-
 186
186
-
 187
187
-
 188
188
-
 189
189
-
 190
190
-
 191
191
-
 192
192
-
 193
193
-
 194
194
-
 195
195
-
 196
196
-
 197
197
-
 198
198
-
 199
199
-
 200
200
-
 201
201
-
 202
202
-
 203
203
-
 204
204
-
 205
205
-
 206
206
-
 207
207
-
 208
208
-
 209
209
-
 210
210
-
 211
211
-
 212
212
-
 213
213
-
 214
214
-
 215
215


Dell Latitude C800 Guida Rapida
- Categoria
- I Quaderni
- Tipo
- Guida Rapida
in altre lingue
- slovenčina: Dell Latitude C800 Stručná príručka spustenia
- dansk: Dell Latitude C800 Hurtig start guide
- svenska: Dell Latitude C800 Snabbstartsguide