Siemens Gigaset SL910 Manuale utente
- Categoria
- Telefoni
- Tipo
- Manuale utente

Gigaset SL910 KURZ-BA System / GRC eng / A31008-M2300-T101-1-8U43 / Cover_front.fm / 4/17/12
Version 4.1, 21.11.2007
Congratulations
By purchasing a Gigaset, you have chosen a brand that is fully committed
to sustainability. This product’s packaging is eco-friendly!
To learn more, visit www.gigaset.com.

Gigaset SL910 KURZ-BA System / GRC eng / A31008-M2300-T101-1-8U43 / Cover_front.fm / 4/17/12
Version 4.1, 21.11.2007

el en 1
Gigaset SL910 KURZ-BA System / GRC eng / A31008-M2300-T101-1-8U43 / SL910-QUG-Step2IVZ.fm / 4/17/12
Version 4.1, 21.11.2007
Contents
Contents
Safety precautions . . . . . . . . . . . . . . . . . . . . . . . . . . . . . . . . . . . . . . . . . . . . . . . . . . . . . . . . . . . . . . . . . . . . . . . . 2
Getting started . . . . . . . . . . . . . . . . . . . . . . . . . . . . . . . . . . . . . . . . . . . . . . . . . . . . . . . . . . . . . . . . . . . . . . . . . . . 3
Option slider icons . . . . . . . . . . . . . . . . . . . . . . . . . . . . . . . . . . . . . . . . . . . . . . . . . . . . . . . . . . . . . . . . . . . . . . . 14
Setting options . . . . . . . . . . . . . . . . . . . . . . . . . . . . . . . . . . . . . . . . . . . . . . . . . . . . . . . . . . . . . . . . . . . . . . . . . . 15
Using the telephone . . . . . . . . . . . . . . . . . . . . . . . . . . . . . . . . . . . . . . . . . . . . . . . . . . . . . . . . . . . . . . . . . . . . . 20
Operating the touchscreen . . . . . . . . . . . . . . . . . . . . . . . . . . . . . . . . . . . . . . . . . . . . . . . . . . . . . . . . . . . . . . . 21
Making calls . . . . . . . . . . . . . . . . . . . . . . . . . . . . . . . . . . . . . . . . . . . . . . . . . . . . . . . . . . . . . . . . . . . . . . . . . . . . . 24
Directory . . . . . . . . . . . . . . . . . . . . . . . . . . . . . . . . . . . . . . . . . . . . . . . . . . . . . . . . . . . . . . . . . . . . . . . . . . . . . . . . 27
SMS (text messages) . . . . . . . . . . . . . . . . . . . . . . . . . . . . . . . . . . . . . . . . . . . . . . . . . . . . . . . . . . . . . . . . . . . . . 29
Room monitor . . . . . . . . . . . . . . . . . . . . . . . . . . . . . . . . . . . . . . . . . . . . . . . . . . . . . . . . . . . . . . . . . . . . . . . . . . . 30
Calendar . . . . . . . . . . . . . . . . . . . . . . . . . . . . . . . . . . . . . . . . . . . . . . . . . . . . . . . . . . . . . . . . . . . . . . . . . . . . . . . . . 31
Alarm . . . . . . . . . . . . . . . . . . . . . . . . . . . . . . . . . . . . . . . . . . . . . . . . . . . . . . . . . . . . . . . . . . . . . . . . . . . . . . . . . . . . 31
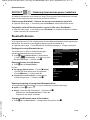
Bluetooth devices . . . . . . . . . . . . . . . . . . . . . . . . . . . . . . . . . . . . . . . . . . . . . . . . . . . . . . . . . . . . . . . . . . . . . . . . 32
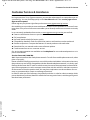
Customer Service & Assistance . . . . . . . . . . . . . . . . . . . . . . . . . . . . . . . . . . . . . . . . . . . . . . . . . . . . . . . . . . . 33
Index . . . . . . . . . . . . . . . . . . . . . . . . . . . . . . . . . . . . . . . . . . . . . . . . . . . . . . . . . . . . . . . . . . . . . . . . . . . . . . . . . . . . 36

2 el en
Gigaset SL910 KURZ-BA System / GRC eng / A31008-M2300-T101-1-8U43 / security.fm / 4/17/12
Version 4.1, 21.11.2007
Safety precautions
Safety precautions
Caution
Read the safety precautions and the user guide before use.
Explain their content and the potential hazards associated with using the device to your children.
Use only the power adapter specified on the devices.
Use only rechargeable batteries that correspond to the specification (see "Technical specifi-
cations), as this could otherwise result in significant health risks and personal injury. Batteries
that are visibly damaged must be replaced.
Using your telephone may affect nearby medical equipment. Be aware of the technical condi-
tions in your specific location e.g., doctor's surgery.
If you use a medical device (e.g., a pacemaker), please contact the device manufacturer. They
will be able to advise you regarding the susceptibility of the device to external sources of high
frequency energy (for information on your Gigaset product, see "Technical specifications").
Do not hold the rear of the handset to your ear when it is ringing or when speaker mode is acti-
vated. Otherwise you risk serious and permanent damage to your hearing.
Your Gigaset is compatible with the majority of digital hearing aids on the market. However,
perfect function with all hearing aids cannot be guaranteed.
The telephone may cause interference in analogue hearing aids (humming or whistling) or
override them. If you require assistance, please contact the hearing aid supplier.
The base and charger are not splashproof. Do not, therefore, place them in damp environments
such as bathrooms or shower rooms.
Do not use the devices in environments with a potential explosion hazard, for example, paint
shops.
If you give your phone to a third party, make sure you also give them the user guide.
Remove faulty devices from use or have them repaired by our Service team, as these could
interfere with other wireless services.
Please note
- The device cannot be used in the event of a power failure. It is also not possible to make emergency
calls.
- Even emergency numbers cannot be dialled if the key/display lock is activated.
O
ƒ

el en 3
Gigaset SL910 KURZ-BA System / GRC eng / A31008-M2300-T101-1-8U43 / starting.fm / 4/17/12
Version 4.1, 21.11.2007
Getting started
Getting started
Checking the package contents
u One Gigaset SL910 base
u One power adapter for the base
u One phone cable (flattened)
u One Gigaset SL910H handset
u One battery cover (rear cover for the handset)
u One battery
u One charger
u One power adapter for the charger
u One poster, one user guide and one CD.
Installing the base and charger
The base and charging cradle are designed for use in dry rooms in a temperature range of +5°C
to +45°C.
¤ Set up the base on a level, non-slip surface at a central point in the building or mount the
base on the wall (
£ page 4).
The phone's feet do not usually leave any marks on surfaces. However, due to the multitude of
different varnishes and polishes used on today's furnishings, the occurrence of marks on the
surfaces cannot be completely ruled out.
Please note:
u Never expose the telephone to the effects of heat sources, direct sunlight or other electrical
devices.
u Protect your Gigaset from moisture, dust, corrosive liquids and fumes.
Please note
Pay attention to the range of the base.
This is up to 300 m in unobstructed outdoor areas and up to 50 m inside buildings. The range
is reduced when Eco Mode is activated.

4 el en
Gigaset SL910 KURZ-BA System / GRC eng / A31008-M2300-T101-1-8U43 / starting.fm / 4/17/12
Version 4.1, 21.11.2007
Getting started
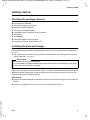
Connecting the base with the phone network and the mains
power supply
¤ Insert the phone cable (cable slightly flattened) into the lower connection socket at the
rear of the base.
¤ Insert the power cable for the power adapter into the upper connection socket at the
rear of the base.
¤ Insert both cables into the appropriate cable channels .
¤ Connect the power adapter and finally the telephone jack .
Please note:
u The power adapter must always be connected, as the phone will not operate without a
power supply.
u Only use the power adapter and phone cord supplied. Pin connections on telephone cables
can vary.
Wall mounting the base (optional)
3
2
1
3
4
5
1
2
3
4 5

el en 5
Gigaset SL910 KURZ-BA System / GRC eng / A31008-M2300-T101-1-8U43 / starting.fm / 4/17/12
Version 4.1, 21.11.2007
Getting started
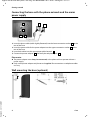
Connecting the handset charger
¤ Connect the flat plug to the power adapter .
¤ Plug the power adapter into the plug socket .
If you have to remove the plug from the charger again:
¤ Disconnect the power adapter from the mains power supply.
¤ Press the release button and disconnect the plug .
Setting up the handset for use
The handset's display and keys are covered with a protective film. Please
remove the protective film!
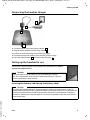
Inserting the battery and closing the battery cover
Caution
Please do not use any touchscreen styli to operate the handset!
Do not use protective cover/film from other manufacturers. This can
restrict operability of your handset.
Caution
Use only rechargeable batteries recommended by Gigaset Communications GmbH, as
doing otherwise could result in significant health risks and personal injury. For example, the
outer casing of the battery could be destroyed or the battery could explode. The phone
could also malfunction or be damaged as a result of using batteries that are not of the rec-
ommended type.
2
1
3
4
1
2
3
4

6 el en
Gigaset SL910 KURZ-BA System / GRC eng / A31008-M2300-T101-1-8U43 / starting.fm / 4/17/12
Version 4.1, 21.11.2007
Getting started
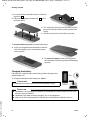
Charging the battery
The battery is supplied with a partial charge. Please charge it com-
pletely before use.
¤ Charge the handset in the charger for 5 hours.
Please note
The handset must only be placed in the designated charger.
Please note
u The battery is also charged if the handset is connected via a USB connection to a PC with
a power supply of 500 mA.
u The battery may heat up during charging. This is not dangerous.
u After a time, the charge capacity of the battery will decrease for technical reasons.
¤ First insert battery with the contact surface fac-
ing down .
¤ Then press the battery downwards until it
clicks into place.
1
2
¤ First, align the protrusions on the side of the bat-
tery cover with the notches on the inside of the
casing.
¤ Then press the cover until it clicks into place.
1
2
¤ To remove the battery, insert your fingernail
into the notch on the casing and pull the battery
upwards.
To reopen the battery cover to replace the battery:
¤ Insert your fingernail into the notch on the bot-
tom of the battery cover and pull the battery
cover upwards.
5 h

el en 7
Gigaset SL910 KURZ-BA System / GRC eng / A31008-M2300-T101-1-8U43 / starting.fm / 4/17/12
Version 4.1, 21.11.2007
Getting started
Registering the handset
Handsets contained in the package have already been registered to the base. If, however, a
handset has not been registered (display "Handset not registered to any base"), please register
it manually. You must initiate registration on the base and on the handset:
1) On the base:
¤Press and hold (for approx. 3 seconds) the registration/paging key.
2) On the handset (within 60 seconds):
¤Press Register and if necessary, enter the system PIN
of the base (default setting: 0000) and confirm with è.
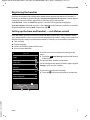
Setting up the base and handset — installation wizard
Once the battery has been inserted, the time and date symbols flash. The installation wizard
starts automatically as soon as you touch one of the flashing symbols. It helps you to configure
the following key settings on the handset and base. These keys are required for operation:
u Time and date
u Display language
u Country in which the phone will be used
u Your own area (dial code)
If you do not want to configure the settings at this
point:
¤ Touch the [ Skip Settings] option at the bottom
of the display.
The handset then switches to idle status.
You can configure the settings at a later stage using the
Settings menu on your handset.
If you want to configure the settings:
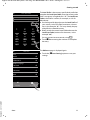
¤ Touch the ’ icon next to the time to set the time.
L
Welcome
Time
00:00
M
Date
01.07.2011 M
Display Language
Deutsch M
Country
Germany M
Area (Dial Code)
(Not configured) M
õ
è
Skip Settings Save Setting
õ

8 el en
Gigaset SL910 KURZ-BA System / GRC eng / A31008-M2300-T101-1-8U43 / starting.fm / 4/17/12
Version 4.1, 21.11.2007
Getting started
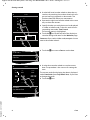
¤ Use the left-hand number wheel to select the cur-
rent hour by touching the number wheel with a fin-
ger and moving it upwards or downwards. The
number wheel will follow your movements.
¤ Operate the right-hand number wheel in the same
way to select the minutes.
¤ Specify whether you wish the time to be displayed
in 12 hrs or 24 hrs mode. To do this, touch the cor-
responding area under Time Format.
The current setting is highlighted.
¤ Touch the ‘ icon (at the top left of the display) to
save the settings and return to the Welcome page.
Comment: If you set the 12 hrs mode, am/pm is shown
next to the number wheels.
¤ Touch the ’ icon next to Date to set the date.
¤ Use the three number wheels to set the current
date. The procedure is the same as for setting the
time.
The current mode for displaying the date is displayed
under Date Order (here: Day Month Year). If you want
to change the mode:
¤ Touch the ’ icon.
L
Time
Time
22 58
23 59
00
:
00
01 01
02 01
Time Format
24 hrs 12 hrs
2
Date
01.07.2011 M
Display Language
Deutsch M
Country
M
L
Date
Date
24 Feb 2014
25 Mar 2013
26. Apr
.
2012
27 May 2011
28 Jun 2010
Date Order
M
Day Month Year

el en 9
Gigaset SL910 KURZ-BA System / GRC eng / A31008-M2300-T101-1-8U43 / starting.fm / 4/17/12
Version 4.1, 21.11.2007
Getting started
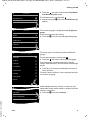
¤ Touch the icon next to the required Day Month
Year/Month Day Year mode.
The selected mode is marked with .
¤ Keep touching the ‘ icon until the Welcome page
appears.
The current language is displayed under Display Lan-
guage.
If you want to change the setting:
¤ Touch the ’ icon next to the displayed language.
This brings up a list containing all the available lan-
guages.
The current language is marked with .
¤ Touch the icon next to the required language.
If your language is not displayed, the list may be
"longer" than the display. You must then scroll through
the list.
¤ To do this, put a finger on the display and move it
slowly upwards.
The lower section of the list is then displayed and you
can select a language.
Under Country enter the country in which you will
operate the phone and for which it is authorised. If the
setting is not correct:
¤ Touch the ’ icon next to Country.
L
Date Order
Day Month Year
²
Month Day Year
±
±
²
L
Welcome
Time
08:30
M
Date
26.04.2012 M
Display Language
Deutsch M
Country
M
L
Display Language
Deutsch
²
English
±
Français
±
Castellano
±
Nederlands
±
Italiano
±
Português
±
Dansk
±
²
±
L
Welcome
Country
Germany M
Area (Dial Code)
(Not configured) M
õ
¿

10 el en
Gigaset SL910 KURZ-BA System / GRC eng / A31008-M2300-T101-1-8U43 / starting.fm / 4/17/12
Version 4.1, 21.11.2007
Getting started
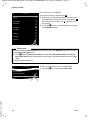
A list of countries is displayed.
The current country is marked with .
¤ If necessary, as mentioned before, you must scroll
through the list to find your country. Touch the
icon next to your country. The mark moves to
this country.
¤ Touch the ‘ icon to save the change and to return
to the Welcome page.
Please note
If you have selected Other Country instead of a country, the Welcome page will also show
the Country (Dial Code) entry.
¤ Touch ’ next to Country (Dial Code) and enter the International Prefix and Interna-
tional Area Code for the international country code, as described below for the area (dial
code).
Proceed as described below.
Finally, you have to enter your area (dial code):
¤ Touch the ’ icon next to Area (Dial Code).
L
Country
China
±
Costa Rica
±
Denmark
±
Germany
²
Ecuador
±
Estonia
±
Finland
±
France
±
²
±
²
L
Welcome
Time
Area (Dial Code)
(Not configured) M

el en 11
Gigaset SL910 KURZ-BA System / GRC eng / A31008-M2300-T101-1-8U43 / starting.fm / 4/17/12
Version 4.1, 21.11.2007
Getting started
The Local Prefix is the country-specific local prefix that
precedes the Local Area Code, when the country code
itself is not given. In England this is "0". The Local Area
Code is then 20 for London, for example, or 161 for
Manchester.
¤ On the keypad displayed, enter the Local Prefix of
your country in the first field (maximum 4 charac-
ters; in the example, "0"). This may already be pop-
ulated for the selected country.
¤ Briefly touch the second input field and enter the
Local Area Code (maximum 8 characters, in the
example "89").
You can correct incorrect entries using $.
¤ Touch è after entering the numbers to complete
the entry.
The Welcome page is displayed again.
¤ Touch the [ è Save Setting] option to save your
settings.
L
Area (Dial Code)
0
89
ç
¿
1 2 3
ABC DEF
4 5 6
GHI JKL MNO
7 8 9
PQRS TUV wxyz
*
0
#
L
Welcome
Time
08:32
M
Date
26.04.2012 M
Display Language
Deutsch M
Country
Germany M
Area (Dial Code)
089 M
õ
è
Skip Settings Save Setting

12 el en
Gigaset SL910 KURZ-BA System / GRC eng / A31008-M2300-T101-1-8U43 / starting.fm / 4/17/12
Version 4.1, 21.11.2007
Getting started
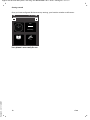
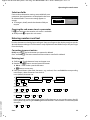
Once you have configured all the necessary settings, your handset switches to idle status.
Your phone is now ready for use.
©
¸
06:00 £
<
Ä Å Ä
>
˜
Call List
Â
Contacts
Apr
26
Thursday

el en 13
Gigaset SL910 KURZ-BA System / GRC eng / A31008-M2300-T101-1-8U43 / starting.fm / 4/17/12
Version 4.1, 21.11.2007
Getting started
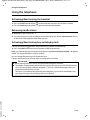
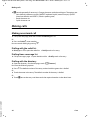
What would you like to do next?
After successfully setting up the phone, you can make calls straight away, customise your
Gigaset according to your requirements or firstly familiarise yourself with the touch display
(
£ Using the telephone, page 20).
Creating your own idle display page
Use your configurable idle display page to collate important functions and phone numbers
that you want to start or dial via the one touch display (
£ attached poster).
Setting ringtones and silent alert
Assign specific tunes to internal and external calls, reminders, wake-up calls and to certain
callers. Use time management for calls.
Menu option v.
¤ Return to the Settings menu page ¤[
ì
Audio Settings]
Registering existing Gigaset handsets to the base
Use these handsets to continue calling from your new base. Transfer directory entries from
these handsets to your new handset. For further information see the user guides for these
handsets.
Activating Eco Mode/Eco Mode+
Reduce the transmission power (emissions) of your phone.
Open the status page. ¤Switch Eco Mode (reduce range)/Eco Mode+ (switch off wireless) on/
off with the applicable switch.
Download your personal ringtones and images to your handset.
Connect your handset to your PC via Bluetooth/USB and download ringtones and images to
your handset with the help of our Gigaset QuickSync software. For the free download and
more information, see
www.gigaset.com/gigasetsl910.
u For more details about your telephone functions, please refer to the user guide on the
CD supplied or online at
www.gigaset.com.
u If you have any questions about using your phone, please read the troubleshooting
tips attached to this user guide or contact our Customer Care team (
£ page 33).

14 el en
Gigaset SL910 KURZ-BA System / GRC eng / A31008-M2300-T101-1-8U43 / menutree.fm / 4/17/12
Version 4.1, 21.11.2007
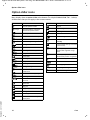
Option slider icons
Option slider icons
Many displays have an option slider at the bottom. This displaA31008-M2300-T101-1-8U43ys
all the actions that you can apply in the current context.
Icon Action
†
Activate speaker mode
† (orange) (Speaker mode is activated)
Deactivate speaker mode
Ž
Speaker profile
–
Deactivate handset microphone
– (orange) Reactivate handset microphone
”
Deactivating the ringer
Setting the volume
—
Open call lists
œ
Opening the directory
¬
Accept number in the directory
Create SMS
Sending an SMS
® Reply to SMS
Opening the draft list
ø
De-registering the handset
‡
Open list of internal callers/make
internal call
d
Create new directory entry
P Initiating a consultation call:
Initiate/end three-way confer-
ence call
¥
Speed dial
Copy list
Copy entry
Editing entries
Show keypad
Determine free memory in the
media pool
R
m
¾
;
T
:
=
N
Q
X
Search
Skip settings
Deleting
è
Save/select
f
Enter new appointment
?
Calendar: Set selected date
to Today
Change order (sort by last name
or first name)
÷
Directory entry:
Delete caller ringtone assign-
ment
\
Directory entry:
Delete caller picture assignment
þ
Delete birthday
ÿ
Trust Bluetooth device found
ž
Initiating ringback
¿ (green) Accepting a waiting call
À (red) Reject a waiting call
Icon Action
j
õ
ü
Y

el en 15
Gigaset SL910 KURZ-BA System / GRC eng / A31008-M2300-T101-1-8U43 / menutree.fm / 4/17/12
Version 4.1, 21.11.2007
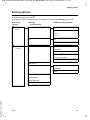
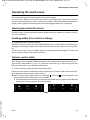
Setting options
Setting options
¤ Briefly press the menu key v.
¤ Drag your finger horizontally across the display to switch to the Settings menu page.
Main menu
Settings
Submenu
Current setting
Additional setting options
â
Date +
Time
Time Time
Time Format
24 hrs
12 hrs
Date Date
Date Order
ì
Audio
Settings
Ringtones Volume
Int Crescendo
Ext
Int. Calls
Ext. Calls
Time Ctrl (Ringer Off)
Anon. Call Silenc.
Silent Alert
Reminder Signal Volume
Crescendo
Sound
Advisory Tones
Confirmations
Battery Warning
Music on Hold

16 el en
Gigaset SL910 KURZ-BA System / GRC eng / A31008-M2300-T101-1-8U43 / menutree.fm / 4/17/12
Version 4.1, 21.11.2007
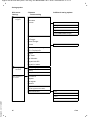
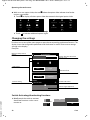
Setting options
g
Display +
Keypad
Screensaver
Activation
Selection Slideshow
Analogue Clock
Digital Clock 1
Digital Clock 2
(List of Screensavers images)
Backlight
In Charger
Out of Charger
Timeout 15 sec. / 30 sec. / 1 min. / 2 min.
Indication of New Messages
LED + Display Info
Keypad
Key Tones
Key Vibration
Keypad with R/P
Keypad w. Letters
°
Language +
Location
Display Language
Country
Area (Dial Code)
É
Handsets +
Base
This Handset
Register
De-register
Rename
Registered Handsets
(List of registered handsets)
Connected to Base Base 1
:
Base 4
Best Base
Main menu
Settings
Submenu
Current setting
Additional setting options

el en 17
Gigaset SL910 KURZ-BA System / GRC eng / A31008-M2300-T101-1-8U43 / menutree.fm / 4/17/12
Version 4.1, 21.11.2007
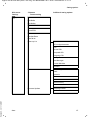
Setting options
Ê
System Eco Mode
Eco Mode
Eco Mode+
Repeater Mode
Security Check
System PIN
Resets
Handset Reset
Base Reset
Clean-up List
Appointments
All Past Appointments
Calls
Missed Calls
Accepted Calls
Outgoing Calls
Messages
Text Messages
Answer Machine
Contacts
Local Network IP Address Type
Static
Dynamic
IP Address
Subnet Mask
Default Gateway
Preferred DNS server
Firmware Update Automatic Check
Update Firmware
Main menu
Settings
Submenu
Current setting
Additional setting options

18 el en
Gigaset SL910 KURZ-BA System / GRC eng / A31008-M2300-T101-1-8U43 / menutree.fm / 4/17/12
Version 4.1, 21.11.2007
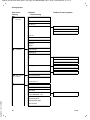
Setting options
ä
Select
Services
Automatic Recall
Withhold Number
Call Waiting
Call Divert When Busy
All Calls
No Answer
Divert to
Call Protection
Unknown Call Rejection
Ringback
Cancel
«
Telephony
Auto Answer
Listening In
Access Code
Use Calls from Call Lists
All Calls
Never
Dialling Mode Tone
Pulse
Recall 80 ms/.../800 ms
μ
SMS Service
Centres
Active Send Centre
Service Centr. 1
:
Service Centr. 4
³
Bluetooth Own Device
Known Devices
Activation
Devices found
(only if Activation = on)
Device Name
Announcement
Advisory Message
Time Control
Main menu
Settings
Submenu
Current setting
Additional setting options
La pagina sta caricando ...
La pagina sta caricando ...
La pagina sta caricando ...
La pagina sta caricando ...
La pagina sta caricando ...
La pagina sta caricando ...
La pagina sta caricando ...
La pagina sta caricando ...
La pagina sta caricando ...
La pagina sta caricando ...
La pagina sta caricando ...
La pagina sta caricando ...
La pagina sta caricando ...
La pagina sta caricando ...
La pagina sta caricando ...
La pagina sta caricando ...
La pagina sta caricando ...
La pagina sta caricando ...
La pagina sta caricando ...
La pagina sta caricando ...
La pagina sta caricando ...
-
 1
1
-
 2
2
-
 3
3
-
 4
4
-
 5
5
-
 6
6
-
 7
7
-
 8
8
-
 9
9
-
 10
10
-
 11
11
-
 12
12
-
 13
13
-
 14
14
-
 15
15
-
 16
16
-
 17
17
-
 18
18
-
 19
19
-
 20
20
-
 21
21
-
 22
22
-
 23
23
-
 24
24
-
 25
25
-
 26
26
-
 27
27
-
 28
28
-
 29
29
-
 30
30
-
 31
31
-
 32
32
-
 33
33
-
 34
34
-
 35
35
-
 36
36
-
 37
37
-
 38
38
-
 39
39
-
 40
40
-
 41
41


Siemens Gigaset SL910 Manuale utente
- Categoria
- Telefoni
- Tipo
- Manuale utente
in altre lingue
- English: Siemens Gigaset SL910 User manual