Electrolux ENB3560S Manuale utente
- Categoria
- Frigo-congelatori
- Tipo
- Manuale utente
Questo manuale è adatto anche per

fridge - freezer / frigorifero - congelatore
INSTRUCTION BOOKLET
ISTRUZIONI PER LUSO
17
ENB3560(S)
214.3641.33
GB
1
I

1
Index
Safety Instructions pág. 2
Installation pág. 3 - 4
Changing the opening
directions of the doors pág. 5
Regulation and Control pág. 6 - 7
How to use your
Fridge-Freezer pág. 8 - 9
Maintenance of your
Fridge-Freezer pág. 10
Something not working pág. 11 - 12
Normal noises when
functioning pág. 13
Guarantee, Service
and Spare Parts pág. 14
Tecnical Features pág. 15

2
m Manufacturers storage recommendations should
be strictly complied with.
m Ice lollies can cause frost burns if consumed
straight away from the freezer.
m Do not use electrical appliances inside the frid-
ge/freezer.
m Do not place carbonate or fizzy drinks in the
freezer as these may explode.
m Whenever you discard and old freezer make
sure to:
m Take off the doors in order to prevent chil-
dren being trapped inside.
Have the gas R600a from the cooling system
removed by an authorised person before
making it into scrap metal.
m
Safety instructions
Warnings for your safety. Carefully read
these instructions before installing and
using the machine
m This appliance is designed to be operated by adults
only. Children should not be allowed to tamper with
the controls or play with the product.
m Any electrical work required to install the appliance
should be carried out by a qualified electrician or
competent person.
m This appliance is heavy. Care should be taken when
moving it.
m Maker sure that the cable is not trapped underneath
the appliance, nor touches the motor.
m Repairs carried out by inexperienced persons may
cause injuries or serious malfunctioning. Refer to
the TECHNICAL OFICIAL SERVICE.
m The appliance should be left for at least 4 hours
after installation before it is turned on in order to
allow the refrigerant to settle.
m This product must only be serviced by an authorized
Technical Oficial Service, and only genuine SPARE
PARTS should be used.
m Before cleaning or reparing the appliance, make
sure it is unplugged.
m It is dangerous to try and alter the specifications or
modify this product in any way.
m These domestic appliances are designed to be used
specifically for the storage and conservation of
food.
m Frozen food must not be re-frozen once it has been
thawed out.

3
Installation
Fig. 1
Fig. 3
Fig. 2
Fig. 4
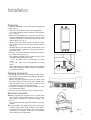
Positioning
Place the refrigerator away from direct sunlight and
heat sources.
Take off at least 50 mm. free over the appliance.
Never put something on the ventilator of the applian-
ce. (see fig. 1).
Make sure the refrigerator is accurately levelled tur-
ning the adjustable feet on the front, in order to avoid
vibrations and noises and to make sure that the doors
shut properly (see fig. 2).
Before placing the plinth cover, pull out the fixing
part of doors used only for security during transport
(see fig. 3).
With the freezer door wide-open, assemble the socle
provided inside the appliance, following the instruc-
tions stuck on it.
Remove the shelves transport fastening red pieces
by sliding them (see fig. 4).
The appliance should not be located in places with
maximum temperatures more than:
+ 32°C for N/SN Class (classification on rating
plate).
+ 43°C for T/ST Class (classification on rating
plate).
If the temperatures are higher than those mentioned
above, the functioning and the safety of the applian-
ce could be affected.
Cleaning the interior
Do not use alcohol or any cleaning produts contai-
ning alcohol because they could damage the plastic
parts of the appliance.
Before using the appliance for the first time, wash
the interior with luke warm water and a neutral soap.
This will help to remove the typical smell of a new
fridge/freezer. Afterwards dry thoroughly.
Do not use detergents or abrasive powders as these
will damage the finish.
Remove security elements used for transportation.
Electrical connection
mBefore plugging the appliance into a socket make
sure that the voltage and frequency shown on the
rating plate correspond to your home supply. (see
fig. 5).
It is essential that the appliance should be properly
earthed.
mFor this purpose the supply cable plug incorporates
a special earth contact. If the sockets of your domes-
tic wiring system are not earthed, have the appliance
connected to a separate earth wire in accordance
with existing safety regulations.

4
Installation
Fig. 5
Fig. 6
door alarm
temperature alarm
fast freeze
on/off
temperature
control fridge
temperature
control freezer
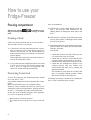
Starting - up
Plug the appliance into the wall socket.
Open the fridge door.
Push the on/off button located in the fridge, conti-
nuosly for 3 seconds. The fridge will start to function
and the internal light will then go on. The on/off but-
ton will be a bright green colour and the fridge/free-
zer controls will ligh up. (see fig. 6).
The temperature alarm (a beeping noise) could go on
during the start up phase. If this happens push the
temperature alarm button. (See section on the tem-
perature control for more details).
You can now close the door.
rating
plate

5
Changing the opening direction
of the doors
Fig. 7
Fig. 8
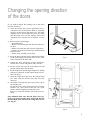
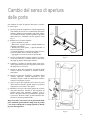
If you wish to change the opening side of the doors
proceed as follows:
1... Open the freezer door. All the appliances have a
ventilation socle at the bottom. Remove it pushing
strongly on the central and upper part. The upper
supports will be loosed takes the piece out. Then,
take the hinge cover off the opposite side of the
ventilation cover and place it as required. (see fig.
7).
2... Removing the central hinge:
Open both doors.
Remove the external pin and then close the free-
zer door.
Remove the other pin and close the fridge door.
Taking care the doors do not fall, pull them off till
bolts are loose.
Put the doors carefully on the floor.
3... Swap the hinge and the corner cupboard and chan-
ge the lower hinge pin and the screw cover of the
centre transom to the other side.
4... Change the door self-closing system, putting the
freezer doors on the fridge door and viceversa.
5... Fit the freezer door into the lower hinge bolt and
put the central hinge into the door.
6... Fit the fridge door into the upper hinge bolt. Pulling
both doors outwards, fit the central hinge bolt too.
Place the doors.
7... Open the fridge door and screw the central hinge
pin. Then, open the freezer door and screw the
other pin.
8... Assemble socle keep the door open, close it up to
the metallic part.
Fit the two lower flaps of the plastic piece into the
metallic one, press down wards the two upper
hooks (without stopping pressing the socle).
Push it to wards the metallic one till they fit per-
fectly.
Once finished make sure that all joints close per-
fectly well all around the door and check that the
internal light turns off when the fridge door closes.
(see Fig. 8)

6
Regulation and Control
I Freezer control knob
Setting the knob at 1 will give you a minimum freezing
temperature. Setting 7 will give you the maximum fre-
ezing temperature. For normal use set the freezer at a
middle setting (The exact setting will depend on your
usage of the freezer).
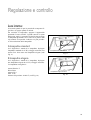
2 The door alarm
If either of the doors is left open for a prolonged period
of time the door alarm will start to beeb and a red flas-
hing light will go on. Pressing the alarm button will
switch the buzzer off and the light will stop flashing,
but remain red. If you simply shut the doors, this will
also switch off the door alarm buzzer and the light
automatically.
3 Temperature alarm
If the internal temperature has risen significantly the
temperature alarm will sound and the light will start to
flash. To switch the alarm off simply press the tempe-
rature alarm button. This will stop the buzzer and the
red light will stop blinking and remain red.
The temperature alarm may go on because:
a.- The doors have been left open.
b.- There has been a power failure.
c.- More than the recomended amount of food has been
put in at one time.
d.- You need to set the temperature controls to a colder
position.
If the alarm goes on constantly you should contact you
TECHNICAL OFICIAL SERVICE.
4 Fast Freeze
This feature is designed to help you freeze your
food more quickly. It is best to press the fast freeze
button before going shopping (preferably 3 houres
in advance) in order to have the freezer in an opti-
mal state to put your food in. If you havent pres-
sed the button prior to purchasing your food you
can of course put your new purchases in, but it will
take longer for the freezer to cool down. (If you put
a lot of fresh food into your freezer you could cause
the temperature alarm to go on. For further infor-
mation see sention on temperature alarm).
5 On/Off button
To make the product work press the ON/OFF but-
ton continuosly for 3 seconds. To switch the pro-
duct off press the button continuously for 3
seconds. When the product has been plugged in and
the button pressed for the 3 seconds, the button will
light up in green. If the ON/OFF button is green the
freezer knob and fridge knob will also be lit up.
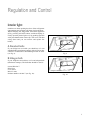
6 Fridge control
Setting the knob to the standby position when the
freezer is working, but the fridge if not being used,
(for example when you go on holiday), will help
you to reduce energy consumption. The fridge door
however must be kept closed.
By turning the knob clockwise you will progressi-
vely cool down the fridge. Position 5 is the coldest
setting possible.
If neither the fridge nor the freezer are being used
(i.e. The appliance switched off), both doors should
be left open. This will help to avoid any possible
smells caused by high levels of humidity.

7
Regulation and Control
Interior light:
Switches on when opening the door of the refrigerator
compartment and switches off when closing the door.
When changing the fridge bulb. Switch the appliance
off by pressong ON/OFF button, and them unplug it.
Firstly open the plastic light cover by pushing upwards
with your thumb on the centre clip. The cover will then
swing down and you can remove and replace the
bulb(s).
A Standard bulbs
If your fridge has two bulbs you should use 25 watt
standard bulbs (maximum wattage) with an E14 socket.
Under no circumstances should halogen bulbs be used.
(see fig. 9).
B Halogen bulb
If your fridge has one bulb use a 25 watt halogen bulb
(Maximum wattage). The bulb that should be used is:
Osram Halolux T
Klar/Clear
E 14 socket
Max 25 watts
Product number: 64 860 T (see fig. 10).
Fig. 9
Fig. 10
2 standard bulbs 25W
1 halogen bulb 25W

8
How to use your
Fridge-Freezer
Once re-established:
A) If the freezer is fully loaded and the power fai-
lure is less than the time indicated on the
«Rating Plate» no damage has been done to the
food.
B) If the freezer is not fully loaded the temperature
will rise more quickly. If thawing has not started
proceed as in point A.
C) If the temperature has risen sufficiently the tem-
perature alarm will sound and the temperature
indicator will blink.
You should:
Check that the doors are shut. If they are not,
you will hear also the door alarm.
Check that you havent overloaded the frid-
ge/freezer with a large amount of new food.
Check that there hasnt been a long power cut.
Check that the fridge/freezer appears to be
working properly and isnt broken. You
should switch the alarm off by pushing the
appropriate button.
If it continues to come back on it is likely that
there is a problem with the product. Advice
then to the Technical Oficial Service.
If thawing has started, consume the food immedia-
tely, or cook it and then freeze it again.
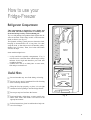
Freezing compartment
This freezer, marked , is suitable for free-
zing food and permits long term storage of frozen
food.
Freezing of food
Food to be frozen should be left for at least 24 hours.
The procedure for this is as follows:
1... If the freezer has been disconnected and is empty,
plug it an and leave for 3 hours before putting any
food in. By pressing the fast freezer button 24
hours before freezing you will help cool down the
freezer quicker.
If the temperature alarm goes on see the earlier sec-
tion on the temperature alarm.
2... It is possible that the temperature alarm will sound
if a lot of new food is put in with existing food.
This is due to a slight rise in temperature. The
alarm will switch itself off automatically.
Conserving frozen food
To store Food properly the inside temperature should
never rise above - 18°C.
An ajustable temperature control regulates this tempe-
rature.
Make sure the thermostat is on a medium setting.
However, it may sometimes be necessary (due to poor
ventilation, high room temperatures, frequent opening
of doors) to regulate the setting of the thermostat.
In the case of an accidental stoppage of the appliance
or a power cut proceed as follows:
Keep the doors closed at all times.
Try to find out how long the loss of power will last
for.

9
Useful Hints
Do not introduce any new food during a freezing.
Do not put any newly introduced food for freezing
near to already frozen food.
Wrap the food up properly or place it in air tight
containers before putting it into the fridge/freezer.
Do not put any hot food into the freezer.
Food and drinks, which have a strong smell, may
affect other foods and drinks if not stored in an
appropriate manner.
Follow instructions given in cookbooks to help con-
serve food longer.
How to use your
Fridge-Freezer
Refrigerator Compartment:
This compartment is designed to store drinks and
fresh food. The inner temperature is normally uni-
form and is kept cool by cold circulating air.
Try to avoid putting food products flush against the air
vents at the back of the fridge as this could cause the
foods to freeze. (see fig. 11).
The dynamic cooling system preserves better the food,
keeping its characteristics for a long time. For that,
wrap the food, so that it does not lose humidity (dehy-
dration, loss of colour). Then, food value and aroma
will also be kept.
Some models might have.:
A crisp and fresh vegetable compartment. If so, it
will also have a moisture filter which helps to keep
moisture levels high and therefore your fruit and
vegetables fresher.
A chiller box. This is an ideal place to store meat,
fish and pre-cooked food.
Fig. 11
DO NOT
BLOCK
DO NOT
BLOCK

10
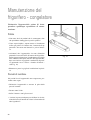
Maintenance of your
Fridge/Freezer
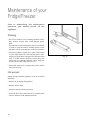
Prior to undertaking any maintenance
operation, you should switch off the
appliance.
Cleaning
Do not use alcohol or any cleaning products contai-
ning alcohol because they could damage plastic
parts.
Use lukewarm water and neutral soap or bicarbonate
of soda to clean the interior and the exterior of the
appliance. Never use detergents or abrasive powders.
Clean the condensor (black wavy grill) at the bottom
of your fridge/freezer by removing the plastic venti-
lation grill (push down and pull out) and then clean
with a vacuum cleaner. However before doing this
make sure to switch the appliance off by using the
on/off switch in the fridge. (see fig. 12).
Afterwards make sure to replace the plastic ventila-
tion grill correctly.
Idle periods
During periods when the appliance is not in use do the
following:
Switch off an unplug the appliance.
Remove all the food.
Clean the interior and all accesories.
Leave the door ajar to allow the air to circulate in the
interior and thus avoid unpleasant smells.
Fig. 12

11
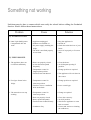
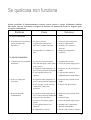
Something not working
Problems may be due to causes which can easily be solved before calling the Technical
Service. Please follow these instructions:
Problem Cause Solution
A) INTERNAL LIGHT
1. Inner Light (Refrigerator Appliance unplugged. Plug the appliance in.
Compartment does not Product not switched on. Switch on.
work. No power supply reaching the Check the main fuse box of your
fridge. house.
The bulb is not fitted properly Screw it in properly or fit a new
or has fused. bulb.
B) PERFORMANCE
1. The appliance does not Doors not properly closed. Close the doors.
cool down sufficiently. A door has been opened Avoid frequent opening if
frequently. possible.
Temperature control in Change position as required.
inappropriate position.
Food has been introduced. The appliance will cool down in
due course.
2. Food gets frozen in the Temperature control in Change position as required.
fridge. incorrect position.
Food too close to ventilation Leave a small gap.
holes at the back.
3. The motor does not stop Temperature control in Change as required.
working. incorrect position.
Door not properly closed. Close door correctly.
Doors opened frequently. Avoid if possible.
Food has been loaded recently. Wait for the appliance to come
back to normal.
Condensor dirty. Clean (read section on cleaning
the condensor).

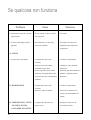
12
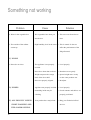
Problem Cause Solution
4. Water in the vegetable box. Wet vegetables have been put This can occur from time to
into the box. time.
5. The outside of the cabinet High humidity level in the room. This is normal. It does no
steams up. affect the performance of the
fridge/freezerd.
C) DOORS
1. Doors do not close. The appliance is not properly Level properly.
levelled.
Doors have been shut too hard. Shut doors more gently.
Weight surpasses the storage Spread weight more evenly
limit of the door shelf. or take some products out.
Doors not properly aligned. Re-adjust.
D) NOISES
Appliance not properly levelled. Level properly.
Something inside may be Check contents and shelves are
vibrating. properly positioned.
E) ALL PRODUCT LIGHTS
Your product has a major fault. Ring your Technical Oficial
START FLASHING AND
Service.
THE ALARM SOUNDS.
Something not working

13
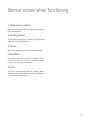
Normal noises when functioning
1. Temperature control.
May cause clicking sounds when the system is connec-
ted or disconnected.
2. Cooling system.
The injected cooling gas may produce a gurgling sound
while passing through the tubes.
3. Motor.
May cause a humbing noise and/or slight bumping.
4. Insulation.
The material used has a tendency to slightly increase
noise levels, however it allows for much better insula-
tion and a lower energy consumption.
5. Fans.
You may occasionally hear the fans working. This is
nothing to worry about. The fans are simply helping the
air to circulate more effectively.

14
Guarantee, Service
and Spare Parts
Together with the appliance you should receive the
follow documentation:
Instruction booklets.
A«Guarantee Card», with the conditions of the
guarantee printed on the back.
You should keep these in a safe place. Should this
appliance be re-sold or transfered to another user, make
sure that this documentation stays with the appliance so
that the new owner can acquaint himself/herself with
the product.
Before calling the Technical Oficial
Service
Read the users instructions and follow the advice
given. In many cases, you will be able to sort out any
problems yourself and thus avoid unnecessary service
calls.
The former section entitled (Something not working)
includes suggestions as to what to do before calling a
repairman. If, after reading the instructions, the
appliance still does not work correctly, cal you nearest.
In the case of an injustified claim, or if the instructions
of this manual have not been applied correctly, the pay-
ment of charges for this repairment will be made by
user, even during guarantee period.
Please make sure you give the model and serial number
of the product. This information can be found on the
rating plate inside the cabinet. (Bottom left hand side
of the freezing compartment).
Service and spare parts
Can be obtained from our Tecnical Oficial Service by
informing about:
Model: . . . . . . . . . . . . . . . . . . . . . . . . . . . . . . . . . . . . . . . . . . . . . . . . . . . . . . . . . . . . . . . . . . . . . . . . . . . . . . . . . . . . . . . . . . .
Product Number: . . . . . . . . . . . . . . . . . . . . . . . . . . . . . . . . . . . . . . . . . . . . . . . . . . . . . . . . . . . . . . . . . . .
Serial Number: . . . . . . . . . . . . . . . . . . . . . . . . . . . . . . . . . . . . . . . . . . . . . . . . . . . . . . . . . . . . . . . . . . . . . . . .
This information is found on the rating plate and in the
guarantee card.
m
Safety
Read the safety instructions at the beginning of this
manual. The manufacture will not accept responsi-
bility if the product is used incorrectly or for pur-
poses other than those specified in the users ins-
tructions.
m
Warning
Dont use the fridge/freezer to store explosive gases
or liquids, e.g. cigarette lighter gas, petrol, ether,
acetone.

15
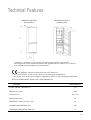
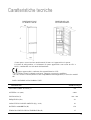
Technical Features
This appliance complies with the following CEE Directives:
73/23 CEE of 19/02/73 (low voltage directive) and subsequent modifications.
89/336 CEE of 03/05/89 (electromagnetic compatibility directive) and subsequent modifications.
DATA IN AGREEMENT WITH «UNE» REQUIREMENTS
DIMENSIONS WITH
DOORS SHUT
DIMENSIONS WITH
DOORS OPEN
Open door : A distance of 56 mm. must exit between the appliance and the wall.
The refrigeration system and the insulation of this appliance do not contain CFCs or HCFCs
as a contribution to the defence of the environment.
«A»
668,5
1.166
595
90°
MODEL
ENB3560(S)
TOTAL GROSS VOLUME (L) 376
HEIGHT «A» (mm) 2.000
VOLTAGE (V) 220 - 240
FREQUENCY(Hz) 50
FREEZING CAPACITY (Kg / 24 h) 10
POWER CONSUMPTION (W) 150
TEMPERATURE RISING TIME (H) 15


17
Indice
Istruzioni relative alla sicurezza pág. 18
Installazione pág. 19 - 20
Cambio del senso di
apertura delle porte pág. 21
Regolazione e controllo pág. 22 - 23
Come usare il
frigorifero - congelatore pág. 24 - 25
Manutenzione del
frigorifero - congelatore pág. 26
Se qualcosa non funziona pág. 27 - 28
Rumorosità normale
durante il funzionamento pág. 29
Garanzia, Servizio di
Assistenza e pezzi di ricambio pág. 30
Caratteristiche tecniche pág. 31

18
m Non surgelare di nuovo i cibi surgelati che si
siano già sgelati.
m Rispettare sempre le indicazioni riportate sulle
confezioni dei cibi.
m I ghiaccioli possono provocare ustioni se si con-
sumano appena estratti dal congelatore.
m Non usare apparecchi elettrici allinterno del
frigorifero - congelatore.
m Non riporre mai nel congelatore bevande friz-
zanti o contenenti anidride carbonica, dato che
potrebbero esplodere.
m Quando sia necessario disfarsi di un frigorifero
vecchio:
m togliere le porte in modo da impedire che i
bambini possano rimanere intrappolati
allinterno;
prima della rottamazione, incaricare ad una
persona autorizzata la rimozione del gas
R600a dal sistema di refrigerazione.
m
Istruzioni sulla sicurezza
Avvertenze relative alla sicurezza. Leggerle
attentamente prima di installare e di usare
questo apparecchio.
m Questo apparecchio deve essere usato solo da per-
sone adulte. Non si deve permettere ai bambini di
trastullarsi con i comandi o di giocare con lappa-
recchio.
m Qualunque intervento di tipo elettrico eventualmen-
te richiesto per linstallazione dellapparecchio
deve essere effettuato da un elettricista qualificato o
da una persona competente.
m Questo apparecchio è pesante. Fare attenzione
quando lo si debba spostare.
m Assicurarsi che il cavo non sia rimasto impigliato
sotto la parte inferiore dellapparecchio e che non
tocchi il motore.
m Le riparazioni effettuate da persone carenti di espe-
rienza possono causare gravi infortuni o danneggia-
menti. Rivolgersi esclusivamente al SERVIZIO
TECNICO AUTORIZZATO.
m Dopo linstallazione, attendere almeno quattro ore
prima di accendere lapparecchio, per permettere
che il liquido refrigerante si stabilizzi.
m Questo apparecchio deve essere riparato esclusiva-
mente presso il SERVIZIO TECNICO UFFICIALE,
usando solo PEZZI DI RICAMBIO ORIGINALI.
m Prima di pulire o riparare lapparecchio, assicurarsi
che la spina sia staccata dalla presa di corrente.
m È pericoloso alterare in qualunque modo le specifi-
che o modificare lapparecchio.
m Questi frigoriferi domestici sono stati costruiti per
essere destinati esclusivamente ad immagazzinare e
conservare i cibi.

19
Installazione
Fig. 1
Fig. 3
Fig. 2
Fig. 4
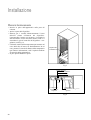
Piazzamento
Situare il frigorifero lontano dai raggi diretti del sole
e da fonti di calore.
Lasciare uno spazio libero di almeno 50 cm. al di
sopra dellapparecchio.
Non ostruire in alcun modo la griglia di ventilazione
dellapparecchio (vedi Fig. 1).
Per evitare rumori e vibrazioni ed assicurare la per-
fetta chiusura delle porte, verificare che lapparec-
chio sia perfettamente livellato ed eventualmente
girare i piedini regolabili (vedi Fig. 2).
Prima di montare lo zoccolo, rimuovere il fissaggio
delle porte inserito solo per ragioni di sicurezza
durante il trasporto (vedi Fig. 3).
Con la porta del congelatore aperta, montare lo zoc-
colo in dotazione allinterno dellapparecchio
seguendo le istruzioni riportate sullo stesso.
Rimuovere, facendoli semplicemente scorrere, i
pezzi rossi di bloccaggio dei ripiani usati per il tras-
porto (vedi Fig. 4).
Questo apparecchio non deve essere sistemato in
locali con una temperatura massima superiore a:
+32º C per gli apparecchi di Classe N/SN (riportata
sulla targhetta delle caratteristiche).
+43º C per gli apparecchi di CLASSE T/ST (riporta-
ta sulla targhetta delle caratteristiche).
Se si superano tali temperature, ne possono risultare
pregiudicati il funzionamento e la sicurezza dellap-
parecchio.
Pulizia dellinterno dellapparecchio
Non usare alcol né prodotti contenenti alcol, dato che
potrebbero danneggiare le parti in plastica dellappa-
recchio.
Prima di usare lapparecchio per la prima volta, lava-
re linterno con acqua tiepida e sapone neutro per eli-
minare il tipico odore di nuovo e quindi asciugare
accuratamente.
Non usare detersivi o polveri abrasive che potrebbe-
ro danneggiare le finiture.
Rimuovere gli elementi di sicurezza impiegati per il
trasporto.
Connessione elettrica
mPrima di collegare la spina dellapparecchio alla
presa di corrente, assicurarsi che il voltaggio e la fre-
quenza riportati sulla targhetta delle caratteristiche
coincidano con quelli dellimpianto domestico (vedi
Fig. 5).
mÈ indispensabile che lapparecchio venga collegato
ad una presa di terra. Per questo uno speciale contat-
to di terra è incorporato alla spina. Se la presa
dellimpianto elettrico domestico non fosse dotata di
messa a terra, collegare lapparecchio ad un impian-
to di terra separato, in adempimento delle norme di
sicurezza vigenti.
La pagina sta caricando ...
La pagina sta caricando ...
La pagina sta caricando ...
La pagina sta caricando ...
La pagina sta caricando ...
La pagina sta caricando ...
La pagina sta caricando ...
La pagina sta caricando ...
La pagina sta caricando ...
La pagina sta caricando ...
La pagina sta caricando ...
La pagina sta caricando ...
-
 1
1
-
 2
2
-
 3
3
-
 4
4
-
 5
5
-
 6
6
-
 7
7
-
 8
8
-
 9
9
-
 10
10
-
 11
11
-
 12
12
-
 13
13
-
 14
14
-
 15
15
-
 16
16
-
 17
17
-
 18
18
-
 19
19
-
 20
20
-
 21
21
-
 22
22
-
 23
23
-
 24
24
-
 25
25
-
 26
26
-
 27
27
-
 28
28
-
 29
29
-
 30
30
-
 31
31
-
 32
32


Electrolux ENB3560S Manuale utente
- Categoria
- Frigo-congelatori
- Tipo
- Manuale utente
- Questo manuale è adatto anche per
in altre lingue
- English: Electrolux ENB3560S User manual
Documenti correlati
Altri documenti
-
REX RC35TAC Manuale utente
-
-
-
-
Hoover HDCN 234 AD Manuale utente
-
Fagor FA3722X Manuale del proprietario
-
Whirlpool BCS 333 A VE I Guida utente
-
-
 Küppersbusch IKE458-44T Manuale utente
-
 Küppersbusch IKE458-44T Manuale utente

