Dometic CoolFreeze CF11, CF16, CF26 Istruzioni per l'uso
- Categoria
- Scatole fresche
- Tipo
- Istruzioni per l'uso

CF11, CF16, CF26
Compressor Cooler
Operating manual . . . . . . . . . . . . . . . . . . . . . 5
Kompressor-Kühlbox
Bedienungsanleitung . . . . . . . . . . . . . . . . .20
Glacière à compression
Notice d’utilisation . . . . . . . . . . . . . . . . . . .36
Nevera por compresor
Instrucciones de uso . . . . . . . . . . . . . . . . . .52
Geleira com compressor
Manual de instruções . . . . . . . . . . . . . . . . .68
Frigorifero a compressore
Istruzioni per l’uso . . . . . . . . . . . . . . . . . . . .84
Compressorkoelbox
Gebruiksaanwijzing. . . . . . . . . . . . . . . . . . 101
Kompressor-køleboks
Betjeningsvejledning . . . . . . . . . . . . . . . . 117
Kylbox med kompressor
Bruksanvisning. . . . . . . . . . . . . . . . . . . . . .133
Kjøleboks med kompressor
Bruksanvisning. . . . . . . . . . . . . . . . . . . . . .148
Kompressori-kylmälaatikko
Käyttöohje . . . . . . . . . . . . . . . . . . . . . . . . . 163
Компрессорный холодильник
Инструкция по эксплуатации . . . . . . . . . 178
Przenośna lodówka
kompresorowa
Instrukcja obsługi . . . . . . . . . . . . . . . . . . . 194
Chladiaci box s kompresorom
Návod na obsluhu. . . . . . . . . . . . . . . . . . . 210
Kompresorový chladicí box
Návod k obsluze . . . . . . . . . . . . . . . . . . . .226
Kompresszor hűtőláda
Használati utasítás. . . . . . . . . . . . . . . . . . . 242
EN
DE
FR
ES
PT
IT
NL
DA
SV
NO
FI
RU
PL
SK
CS
HU
COOLING BOXES
COOLFREEZE
CF11-16-26-O-16s.book Seite 1 Mittwoch, 1. März 2017 4:35 16

CF11-16-26-O-16s.book Seite 2 Mittwoch, 1. März 2017 4:35 16

CoolFreeze
3
POWER
FRIDGE FREEZER
ERROR
12 34 5 6 7
CF 11
1
ERROR
POWER
°
1
34
5 6 7
2
CF 16, CF 26
2
3
1
CF11-16-26-O-16s.book Seite 3 Mittwoch, 1. März 2017 4:35 16

CoolFreeze
4
4
1
1 2 3
4
5
6
5
6
1 2
CF11-16-26-O-16s.book Seite 4 Mittwoch, 1. März 2017 4:35 16

EN
CoolFreeze
5
Please read this operating manual carefully before starting the device.
Keep it in a safe place for future reference. If the device is passed on to
another person, this operating manual must be handed over to the user
along with it.
The manufacturer cannot be held liable for damage resulting from improper usage
or incorrect operation.
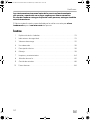
Table of contents
1 Explanation of symbols. . . . . . . . . . . . . . . . . . . . . . . . . . . . . . . . . . . . . . . . . . .6
2 Safety instructions . . . . . . . . . . . . . . . . . . . . . . . . . . . . . . . . . . . . . . . . . . . . . . .6
3 Scope of delivery . . . . . . . . . . . . . . . . . . . . . . . . . . . . . . . . . . . . . . . . . . . . . . .8
4 Intended use . . . . . . . . . . . . . . . . . . . . . . . . . . . . . . . . . . . . . . . . . . . . . . . . . . .9
5 Technical description . . . . . . . . . . . . . . . . . . . . . . . . . . . . . . . . . . . . . . . . . . . .9
6 Operation . . . . . . . . . . . . . . . . . . . . . . . . . . . . . . . . . . . . . . . . . . . . . . . . . . . . 11
7 Cleaning and maintenance. . . . . . . . . . . . . . . . . . . . . . . . . . . . . . . . . . . . . . .16
8 Troubleshooting . . . . . . . . . . . . . . . . . . . . . . . . . . . . . . . . . . . . . . . . . . . . . . .17
9 Disposal . . . . . . . . . . . . . . . . . . . . . . . . . . . . . . . . . . . . . . . . . . . . . . . . . . . . . .18
10 Technical data . . . . . . . . . . . . . . . . . . . . . . . . . . . . . . . . . . . . . . . . . . . . . . . . .18
CF11-16-26-O-16s.book Seite 5 Mittwoch, 1. März 2017 4:35 16

EN
Explanation of symbols CoolFreeze
6
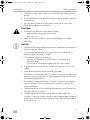
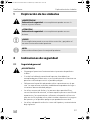
1 Explanation of symbols
!
!
A
I
2 Safety instructions
2.1 General safety
!
WARNING!
• Do not operate the device if it is visibly damaged.
• If this device's power cable is damaged, it must be replaced by the
manufacturer, customer service or a similarly qualified person in order
to prevent safety hazards.
• This device may only be repaired by qualified personnel. Improper
repairs can lead to considerable hazards.
• This device can be used by children aged 8 years or over, as well as by
persons with diminished physical, sensory or mental capacities or a
lack of experience and/or knowledge, providing they are supervised
or have been taught how to use the device safely and are aware of the
resulting risks.
• Cleaning and user maintenance must not be carried out by children
without supervision.
• Children must not play with the device.
WARNING!
Safety instruction: Failure to observe this instruction can cause fatal or
serious injury.
CAUTION!
Safety instruction: Failure to observe this instruction can lead to injury.
NOTICE!
Failure to observe this instruction can cause material damage and impair
the function of the product.
NOTE
Supplementary information for operating the product.
CF11-16-26-O-16s.book Seite 6 Mittwoch, 1. März 2017 4:35 16

EN
CoolFreeze Safety instructions
7
• Children must be supervised to ensure that they do not play with the
device.
• Always keep and use the device out of the reach of children under the
age of 8 years.
• Do not store any explosive substances such as spray cans with a
flammable propellant in the device.
!
CAUTION!
• Disconnect the device from the power supply
– before each cleaning and maintenance
– after every use
• Food may only be stored in its original packaging or in suitable
containers.
A
NOTICE!
• Check that the voltage specification on the type plate corresponds to
that of the energy supply.
• Only connect the device to a DC plug socket in the vehicle (e. g.
cigarette lighter) with the DC cable.
• Only connect the device as follows:
– With the DC cable to a DC plug socket in the vehicle (e. g.
cigarette lighter)
– Or with the AC connection cable to the AC mains supply
• Connect the device with the AC connection cable to the AC mains
supply.
• Never pull the plug out of the socket by the cable.
• If the cooler is connected to the DC socket: Disconnect the cooler and
other power consuming devices from the battery before connecting
the quick charging device.
• If the cooler is connected to the DC socket: Disconnect the cooler or
switch it off when you turn off the engine. Otherwise you may dis-
charge the battery.
• The cooling device is not suitable for transporting caustic materials or
materials containing solvents.
• The cooling device contains inflammable cyclopentane in the
insulation. The gases in the insulation material require special disposal
procedures. Deliver the device at the end of its life-cycle to an appro-
priate recycling.
CF11-16-26-O-16s.book Seite 7 Mittwoch, 1. März 2017 4:35 16

EN
Scope of delivery CoolFreeze
8
2.2 Operating the device safely
!
CAUTION!
• Before starting the device, ensure that the power supply line and the
plug are dry.
A
NOTICE!
• Do not use electrical devices inside the cooler unless they are
recommended by the manufacturer for the purpose.
• Do not place the device near naked flames or other heat sources
(heaters, direct sunlight, gas ovens etc.).
• Danger of overheating!
Ensure at all times that there is sufficient ventilation so that the heat that
arises during operation does not build up. Make sure that the device
is sufficiently far away from walls and other objects so that the air can
circulate.
• Ensure that the ventilation openings are not covered.
• Do not fill the inner container with ice or fluid.
• Never immerse the device in water.
• Protect the device and the cable against heat and moisture.
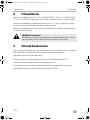
3Scope of delivery
• Compressor cooler
• Connection cable for DC connection
• Connection cable for AC connection
• Operating manual
• Shoulder strap (CF11)
CF11-16-26-O-16s.book Seite 8 Mittwoch, 1. März 2017 4:35 16

EN
CoolFreeze Intended use
9
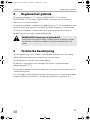
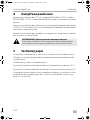
4 Intended use
The compressor cooler CF11 (ref. no. 9600000464), CF16 (ref. no. 9600000465),
CF26 (ref. no. 9600000466) is suitable for refrigerating and freezing foodstuffs.
The compressor cooler has been designed for operation using a 12/24 Vg on-
board socket of a car (DC socket) or caravan as well as an AC mains supply.
The compressor cooler can also be used for camping. The compressor cooler may
not be exposed to rain.
!
5 Technical description
The cooler can chill products, keep them cool as well as freeze them. A
maintenance-free refrigerant circuit with compressor provides the cooling.
The cooler is portable.
For use in vehicles, the cooling device can be secured with a safety belt (CF11).
When used on boats, the cooler can withstand a constant heel (inclination) of 30°.
An integrated battery monitor can be switched on to protect your vehicle battery
from discharging to dangerously low levels (see chapter “Using the battery monitor”
on page 14).
CAUTION! Health hazard!
Please check if the cooling capacity of the compressor cooler is suitable
for storing the food or medicine you wish to cool.
CF11-16-26-O-16s.book Seite 9 Mittwoch, 1. März 2017 4:35 16

EN
Technical description CoolFreeze
10
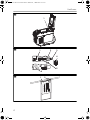
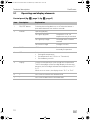
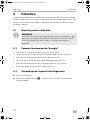
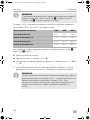
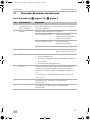
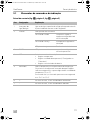
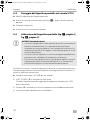
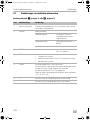
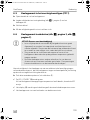
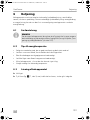
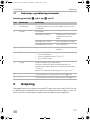
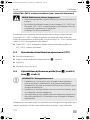
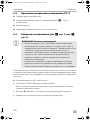
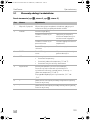
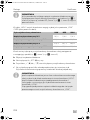
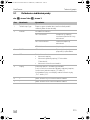
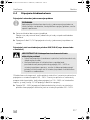
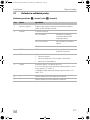
5.1 Operating and display elements
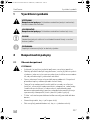
Control panel (fig. 1, page 3, fig. 2, page 3)
Item Description Explanation
1 ON/OFF button Switches the cooling device on or off when the button is
pressed for between one and two seconds
2 POWER Operating display
LED lights up green Compressor is on; set
temperature not yet reached
LED lights up orange Set temperature has been
reached
LED flashes orange Voltage is too low
3 ERROR LED flashes red: Device is switched on but
not ready for operation
4 SET Selects the input mode
• Setting the temperature
• Set temperature unit (°Celsius or °Fahrenheit)
• Set the battery monitor
5 Display Displays the temperature in the refrigerator compartment
The first three digits of the four-digit display show the tem-
perature, the fourth digit indicates the temperature unit (°C
or °F).
When an error occurs, the display shows “Err1” or “Err2”.
6 + Press once to increase the selected value
7 – Press once to decrease the selected value
CF11-16-26-O-16s.book Seite 10 Mittwoch, 1. März 2017 4:35 16

EN
CoolFreeze Operation
11
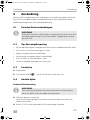
6Operation
The cooling device is equipped with an LED interior light that remains on when the
voltage is applied. The energy consumption of the LED interior light is extremely low
and is negligible compared to the total energy consumption of the device.
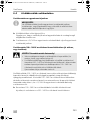
6.1 Before initial use
I
6.2 Energy saving tips
• Choose a well ventilated location which is protected from direct sunlight.
• Allow warm food to cool down first before placing it in the device to keep cool.
• Do not open the cooling device more often than necessary.
• Do not leave the lid open for longer than necessary.
• Defrost the cooling device as soon as a layer of ice forms.
• Avoid unnecessarily low temperature settings.
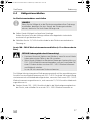
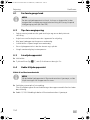
6.3 Locking the cooling device
➤ Close the lid.
➤ Press the latch (fig. 3 7, page 3) down, until it latches in place audibly.
6.4 Connecting the cooling device
Connection to the DC socket
I
➤ Place the cooler on a firm base.
Make sure that the ventilation slots are not covered and that the heated air can be
dissipated.
➤ Connect the 12/24 V connection cable to the DC socket in the vehicle.
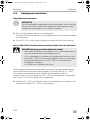
NOTE
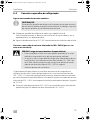
Before starting your new cooler for the first time, you should clean it
inside and outside with a damp cloth for hygienic reasons (see also
chapter “Cleaning and maintenance” on page 16).
NOTE
If you connect the cooler to the DC socket, remember that the ignition
must be turned on to supply it with power.
CF11-16-26-O-16s.book Seite 11 Mittwoch, 1. März 2017 4:35 16

EN
Operation CoolFreeze
12
Connecting to a 100 – 240 V AC mains (e.g. at home or in the office)
D
The cooling device has a built-in multi-voltage mains adapter with a priority circuit for
connecting to a 100 – 240 V AC supply. The priority circuit automatically switches to
mains operation if the appliance is connected to a 100 – 240 V AC supply, even if the
12/24 V cable is still connected.
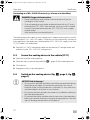
➤ Plug the 100 – 240 V connection cable into the device AC voltage socket and
connect it to the 100 – 240 V AC voltage mains.
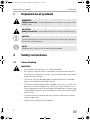
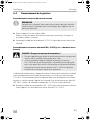
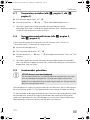
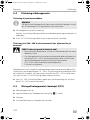
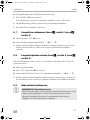
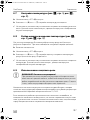
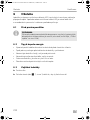
6.5 Secure the cooling device in the vehicle (CF11)
➤ Open the lid of the cooling device.
➤ Place the safety strap into the guide (fig. 4 1, page 4) of the cooling device.
➤ Close the lid.
➤ Engage the safety strap and tighten it.
6.6 Switch on the cooling device (fig. 1, page 3, fig. 2,
page 3)
A
DANGER! Danger of electrocution
• Never handle plugs and switches with wet hands or if you are
standing on a wet surface.
• If you are operating your cooler on board a boat with an AC mains
connection of 100 – 240 V from the land, you must install a residual
current circuit breaker between the 100 – 240 V AC mains supply
and the cooler.
Seek advice from a trained technician.
NOTICE! Risk of damage!
• Always ensure sufficient ventilation so that the heat generated during
operation can dissipate. Ensure that the ventilation slots are not
covered. Make sure that the device is sufficiently far away from walls
and other objects so that the air can circulate.
• Ensure that the items placed in the cooler are suitable for cooling to
the selected temperature.
• Disconnect the cooler and other electric consumers from the battery
before you connect the battery to a quick charging device. Overvolt-
age can damage the electronics of the device.
CF11-16-26-O-16s.book Seite 12 Mittwoch, 1. März 2017 4:35 16

EN
CoolFreeze Operation
13
For safety reasons, the cooler is equipped with an electronic system to prevent the
polarity being reversed.This protects the cooler against reversed polarity when
connecting to a battery and against short circuiting.
➤ Press the ON/OFF button (1) for three seconds.
✓ The “POWER” LED (2) is lit green.
Once the cooling device has reached the saved temperature, the LED lights up
orange.
✓ The display (5) switches on and shows the current cooling temperature.
✓ The cooler starts cooling the interior.
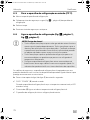
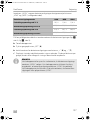
6.7 Setting the temperature (fig. 1, page 3, fig. 2,
page 3)
➤ Press the “SET” (4) button once.
➤ Use the “+” (6) and “–” (7) buttons to set the cooling temperature.
✓ The set cooling temperature then appears in the display for a few seconds. The
display flashes several times before it returns to the current temperature.
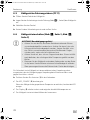
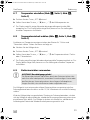
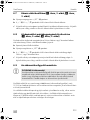
6.8 Selecting the temperature unit (fig. 1, page 3,
fig. 2, page 3)
You can switch the temperature display between Celsius and Fahrenheit. To do this,
proceed as follows:
➤ Switch on the cooler.
➤ Press the “SET” button (4) twice.
➤ Use the “+” (6) or “–” (7) buttons to set the temperature unit °Celsius or
°Fahrenheit.
✓ The selected temperature units then appear in the display for a few seconds. The
display flashes several times before it returns to the current temperature.
CF11-16-26-O-16s.book Seite 13 Mittwoch, 1. März 2017 4:35 16

EN
Operation CoolFreeze
14
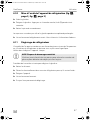
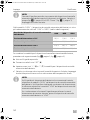
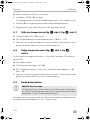
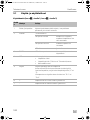
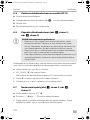
6.9 Using the battery monitor
A
The cooling device is equipped with a multi-level battery monitor that protects your
vehicle battery against excessive discharging when the device is connected to the
12 V vehicle electrics.
If the cooler is operated when the vehicle ignition is switched off, the cooler switches
off automatically as soon as the supply voltage falls below a set level. The cooler will
switch back on once the battery has been recharged to the restart voltage level.
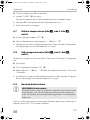
I
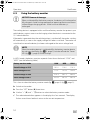
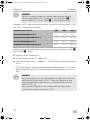
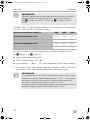
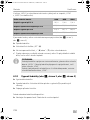
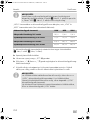
In HIGH mode, the battery monitor responds faster than at the levels “LOW” and
“MED” (see the following table).
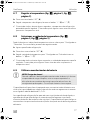
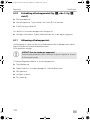
This is how to select the battery monitor mode (fig. 1, page 3, fig. 2, page 3):
➤ Switch on the cooler.
➤ Press the “SET” button (4) three times.
➤ Use the “+” (6) and “–” (7) buttons to select the battery monitor mode.
✓ The selected mode then appears in the display for a few seconds. The display
flashes several times before it returns to the current temperature.
NOTICE! Beware of damage
When switched off by the battery monitor, the battery will no longer be
fully charged. Avoid starting repeatedly or operating electric consumers
without longer charging phases. Make sure that the battery is
recharged.
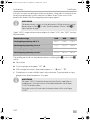
NOTE
When the cooling device is switched off by the battery monitor due to
low voltage, the display (fig. 2 5, page 3) switches off and the “Power”
LED (fig. 2 2, page 3) flashes orange.
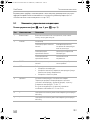
Battery monitor mode LOW MED HIGH
Cut-off voltage at 12 V
10.1 V 11.4 V 11.8 V
Cut-in voltage at 12 V
11.1 V 12.2 V 12.6 V
Cut-off voltage at 24 V
21.5 V 24.1 V 24.6 V
Cut-in voltage at 24 V
23.0 V 25.3 V 26.2 V
CF11-16-26-O-16s.book Seite 14 Mittwoch, 1. März 2017 4:35 16

EN
CoolFreeze Operation
15
I
6.10 Switching off the cooling device (fig. 1, page 3,
fig. 2, page 3)
➤ Empty the cooling device.
➤ Switch the cooling device off: Press the ON/OFF button (1) for three seconds.
➤ Disconnect the plug.
If you do not want to use the cooling device for a longer period of time:
➤ Leave the lid slightly open. This prevents smells from building up.
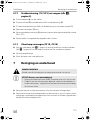
6.11 Defrosting the cooling device
Humidity can form frost in the interior of the cooling device or on the vaporiser. This
reduces the cooling capacity.
Defrost the device in good time to avoid this.
A
To defrost the cooling device, proceed as follows:
➤ Empty the contents.
➤ If necessary, put them in another cooling device to keep them chilled.
➤ Switch off the device.
➤ Leave the lid open.
➤ Wipe off the condensate.
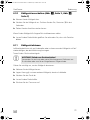
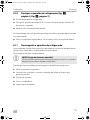
NOTE
When the cooler is supplied by the starter battery, select the battery
monitor mode HIGH. When the cooler is connected to a supply battery,
the battery monitor mode LOW will suffice.
If you wish to operate the cooling device from the AC mains, set the
battery monitor to LOW.
NOTICE! Risk of damage to the device!
Never use hard or sharp tools to remove ice or to free objects frozen
onto the device.
CF11-16-26-O-16s.book Seite 15 Mittwoch, 1. März 2017 4:35 16

EN
Cleaning and maintenance CoolFreeze
16
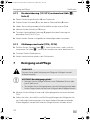
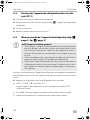
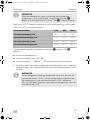
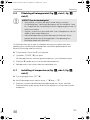
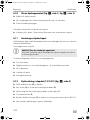
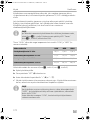
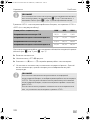
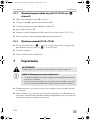
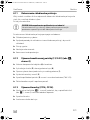
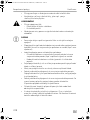
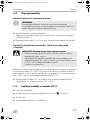
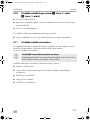
6.12 Replacing the plug fuse (12/24 V) (fig. 5, page 4)
➤ Pull the adapter sleeve (4) off of the plug.
➤ Unscrew the screw (5) out of the upper half of the housing (6).
➤ Carefully lift the upper half of the housing off the lower half (1).
➤ Take out the contact pin (3).
➤ Replace the defective fuse (2) with a new one that has the same rating (T8A 32V).
➤ Re-assemble the plug in the reverse order.
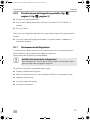
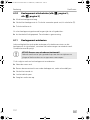
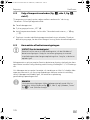
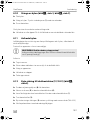
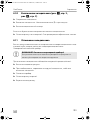
6.13 Replacing the bulb (CF16, CF26)
➤ Press the switch pin (fig. 6 2, page 4) downwards so that the transparent part
(fig. 6 1, page 4) of the lamp can be removed at the front.
➤ Replace the light bulb.
➤ Press the lamp back into the housing.
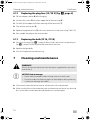
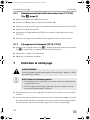
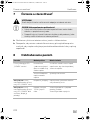
7 Cleaning and maintenance
!
A
➤ Occasionally clean the device interior and exterior with a damp cloth.
➤ Make sure that the air inlet and outlet vents on the device are free of any dust and
dirt, so that heat can be released and the device is not damaged.
WARNING!
Always disconnect the device from the power supply before you clean
and service it.
NOTICE! Risk of damage
• Never clean the cooler under running water or in dish water.
• Do not use abrasive cleaning agents or hard objects during cleaning
as these can damage the cooler.
CF11-16-26-O-16s.book Seite 16 Mittwoch, 1. März 2017 4:35 16

EN
CoolFreeze Troubleshooting
17
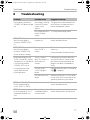
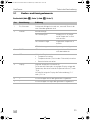
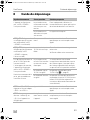
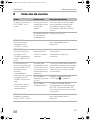
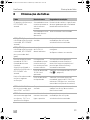
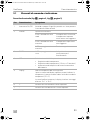
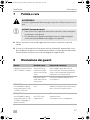
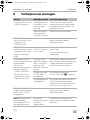
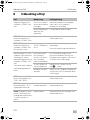
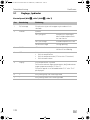
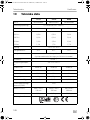
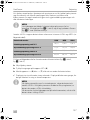
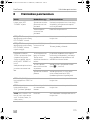
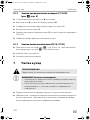
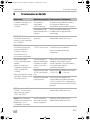
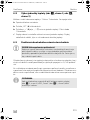
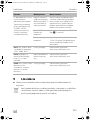
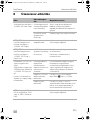
8 Troubleshooting
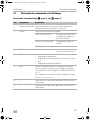
Problem Possible cause Suggested remedy
Device does not function,
“POWER” LED does not light
up.
No voltage is flowing
from the DC power
socket in your
vehicle.
The ignition must be switched on in
most vehicles to supply current to
the on-board power socket.
No voltage present in
the AC voltage
socket.
Try using another plug socket.
CF11, CF26: The device
does not cool (plug is
inserted, “POWER” LED is
lit).
Defective
compressor.
This can only be repaired by an
authorised repair centre.
CF11, CF16: The device
does not cool (plug is
inserted, “POWER” LED
flashes, display is empty).
The voltage is too low
at the 12/24 V
socket.
Check the battery and charge if
necessary.
Check the cables and connections.
When operating from the
12/24 V socket (DC socket):
The ignition is on, the device
is not working and the
“POWER” LED is not lit.
Pull the plug out of the
socket and make the
following checks.
The DC socket is
dirty. This results in a
poor electrical
contact.
If the plug of your cooler becomes
very warm in the DC socket, either
the socket must be cleaned or the
plug has not been assembled cor-
rectly.
The fuse of the
12/24 V plug has
blown.
Replace the fuse of the 12/24 V plug
(fig. 5 2, page 4).
The vehicle fuse has
blown.
Replace the vehicle's 12/24 V socket
fuse (usually 15 A). Please refer to the
operating manual of your vehicle.
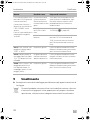
CF11: The “ERROR” LED
flashes and the display
shows “ERR1” or “ERR2”.
Defective device. This can only be repaired by an
authorised repair centre.
CF16: The display shows an
error message (e.g. “Err1”)
and the device does not
cool.
The appliance has
switched off due to
an internal fault.
This can only be repaired by an
authorised customer service centre.
CF11-16-26-O-16s.book Seite 17 Mittwoch, 1. März 2017 4:35 16

EN
Disposal CoolFreeze
18
9Disposal
➤ Place the packaging material in the appropriate recycling waste bins wherever
possible.
M
If you wish to finally dispose of the product, ask your local recycling centre
or specialist dealer for details about how to do this in accordance with the
applicable disposal regulations.
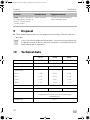
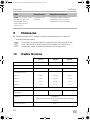
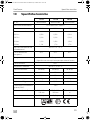
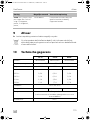
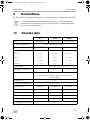
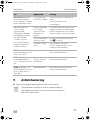
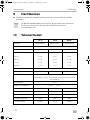
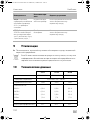
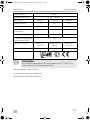
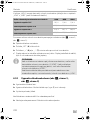
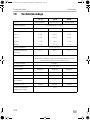
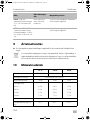
10 Technical data
CF26: “ERROR” LED flashes
for longer than 2 minutes, as
follows: 3 flashes, pause,
3flashes, pause, ..
Defective device. This can only be repaired by an
authorised repair centre.
CF 11 CF16 CF26
Ref. no.: 9600000464 9600000465 9600000466
Voltage: 12/24 Vg and 100 – 240 Vw
Power consumption: 30 W 35 W 35 W
Rated current:
100 Vw: 0.5 A 0.5 A 0.5 A
240 Vw: 0.2 A 0.2 A 0.2 A
12 Vg: 2.2 A 2.9 A 2.9 A
24 Vg: 1.3 A 1.7 A 1.7 A
Cooling range: +10 °C to –18 °C
Energy efficiency class: A++ A++ A++
Category: Category 1
(refrigerator with one or more fresh-food storage
compartments)
Climate class: N or T
Problem Possible cause Suggested remedy
CF11-16-26-O-16s.book Seite 18 Mittwoch, 1. März 2017 4:35 16

EN
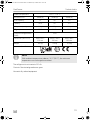
CoolFreeze Technical data
19
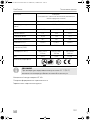
I
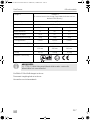
The refrigerant circuit contains R134a.
Contains fluorinated greenhouse gases
Hermetically sealed equipment
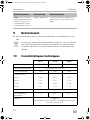
Ambient temperature: +16 °C – +43 °C
Noise emission: 46 dB (A) 48 dB (A) 48 dB (A)
Gross capacity: 11 l 16 l 23 l
Capacity: 10,5 l 15 l 21 l
Refrigerant quantity: 28 g 30 g 28 g
CO
2
equivalent: 0.040 t 0.043 t 0.040 t
Global warming potential
(GWP):
1430
Dimensions (W x H x D): 540 x 352 x
235 mm
549,5 x 366 x
260 mm
550 x 425 x
260 mm
Weight: 8.5 kg 9.5 kg 10.5 kg
Inspection/certification:
NOTE
With ambient temperatures above +32°C (90 °F), the minimum
temperature can no longer be reached.
4
CF11-16-26-O-16s.book Seite 19 Mittwoch, 1. März 2017 4:35 16

DE
CoolFreeze
20
Bitte lesen Sie diese Anleitung vor der Inbetriebnahme sorgfältig durch
und bewahren Sie sie auf. Geben Sie sie im Falle einer Weitergabe des
Kühlgerätes an den Nutzer weiter.
Der Hersteller haftet nicht für Schäden, die durch nicht bestimmungsgemäßen
Gebrauch oder falsche Bedienung verursacht werden.
Inhaltsverzeichnis
1 Erklärung der Symbole . . . . . . . . . . . . . . . . . . . . . . . . . . . . . . . . . . . . . . . . . .21
2 Sicherheitshinweise . . . . . . . . . . . . . . . . . . . . . . . . . . . . . . . . . . . . . . . . . . . .21
3 Lieferumfang . . . . . . . . . . . . . . . . . . . . . . . . . . . . . . . . . . . . . . . . . . . . . . . . . 23
4 Bestimmungsgemäßer Gebrauch . . . . . . . . . . . . . . . . . . . . . . . . . . . . . . . . 24
5 Technische Beschreibung . . . . . . . . . . . . . . . . . . . . . . . . . . . . . . . . . . . . . . 24
6 Bedienung. . . . . . . . . . . . . . . . . . . . . . . . . . . . . . . . . . . . . . . . . . . . . . . . . . . 26
7 Reinigung und Pflege . . . . . . . . . . . . . . . . . . . . . . . . . . . . . . . . . . . . . . . . . . 32
8 Störungsbeseitigung . . . . . . . . . . . . . . . . . . . . . . . . . . . . . . . . . . . . . . . . . . 33
9 Entsorgung . . . . . . . . . . . . . . . . . . . . . . . . . . . . . . . . . . . . . . . . . . . . . . . . . . 34
10 Technische Daten . . . . . . . . . . . . . . . . . . . . . . . . . . . . . . . . . . . . . . . . . . . . . 34
CF11-16-26-O-16s.book Seite 20 Mittwoch, 1. März 2017 4:35 16
La pagina sta caricando ...
La pagina sta caricando ...
La pagina sta caricando ...
La pagina sta caricando ...
La pagina sta caricando ...
La pagina sta caricando ...
La pagina sta caricando ...
La pagina sta caricando ...
La pagina sta caricando ...
La pagina sta caricando ...
La pagina sta caricando ...
La pagina sta caricando ...
La pagina sta caricando ...
La pagina sta caricando ...
La pagina sta caricando ...
La pagina sta caricando ...
La pagina sta caricando ...
La pagina sta caricando ...
La pagina sta caricando ...
La pagina sta caricando ...
La pagina sta caricando ...
La pagina sta caricando ...
La pagina sta caricando ...
La pagina sta caricando ...
La pagina sta caricando ...
La pagina sta caricando ...
La pagina sta caricando ...
La pagina sta caricando ...
La pagina sta caricando ...
La pagina sta caricando ...
La pagina sta caricando ...
La pagina sta caricando ...
La pagina sta caricando ...
La pagina sta caricando ...
La pagina sta caricando ...
La pagina sta caricando ...
La pagina sta caricando ...
La pagina sta caricando ...
La pagina sta caricando ...
La pagina sta caricando ...
La pagina sta caricando ...
La pagina sta caricando ...
La pagina sta caricando ...
La pagina sta caricando ...
La pagina sta caricando ...
La pagina sta caricando ...
La pagina sta caricando ...
La pagina sta caricando ...
La pagina sta caricando ...
La pagina sta caricando ...
La pagina sta caricando ...
La pagina sta caricando ...
La pagina sta caricando ...
La pagina sta caricando ...
La pagina sta caricando ...
La pagina sta caricando ...
La pagina sta caricando ...
La pagina sta caricando ...
La pagina sta caricando ...
La pagina sta caricando ...
La pagina sta caricando ...
La pagina sta caricando ...
La pagina sta caricando ...
La pagina sta caricando ...
La pagina sta caricando ...
La pagina sta caricando ...
La pagina sta caricando ...
La pagina sta caricando ...
La pagina sta caricando ...
La pagina sta caricando ...
La pagina sta caricando ...
La pagina sta caricando ...
La pagina sta caricando ...
La pagina sta caricando ...
La pagina sta caricando ...
La pagina sta caricando ...
La pagina sta caricando ...
La pagina sta caricando ...
La pagina sta caricando ...
La pagina sta caricando ...
La pagina sta caricando ...
La pagina sta caricando ...
La pagina sta caricando ...
La pagina sta caricando ...
La pagina sta caricando ...
La pagina sta caricando ...
La pagina sta caricando ...
La pagina sta caricando ...
La pagina sta caricando ...
La pagina sta caricando ...
La pagina sta caricando ...
La pagina sta caricando ...
La pagina sta caricando ...
La pagina sta caricando ...
La pagina sta caricando ...
La pagina sta caricando ...
La pagina sta caricando ...
La pagina sta caricando ...
La pagina sta caricando ...
La pagina sta caricando ...
La pagina sta caricando ...
La pagina sta caricando ...
La pagina sta caricando ...
La pagina sta caricando ...
La pagina sta caricando ...
La pagina sta caricando ...
La pagina sta caricando ...
La pagina sta caricando ...
La pagina sta caricando ...
La pagina sta caricando ...
La pagina sta caricando ...
La pagina sta caricando ...
La pagina sta caricando ...
La pagina sta caricando ...
La pagina sta caricando ...
La pagina sta caricando ...
La pagina sta caricando ...
La pagina sta caricando ...
La pagina sta caricando ...
La pagina sta caricando ...
La pagina sta caricando ...
La pagina sta caricando ...
La pagina sta caricando ...
La pagina sta caricando ...
La pagina sta caricando ...
La pagina sta caricando ...
La pagina sta caricando ...
La pagina sta caricando ...
La pagina sta caricando ...
La pagina sta caricando ...
La pagina sta caricando ...
La pagina sta caricando ...
La pagina sta caricando ...
La pagina sta caricando ...
La pagina sta caricando ...
La pagina sta caricando ...
La pagina sta caricando ...
La pagina sta caricando ...
La pagina sta caricando ...
La pagina sta caricando ...
La pagina sta caricando ...
La pagina sta caricando ...
La pagina sta caricando ...
La pagina sta caricando ...
La pagina sta caricando ...
La pagina sta caricando ...
La pagina sta caricando ...
La pagina sta caricando ...
La pagina sta caricando ...
La pagina sta caricando ...
La pagina sta caricando ...
La pagina sta caricando ...
La pagina sta caricando ...
La pagina sta caricando ...
La pagina sta caricando ...
La pagina sta caricando ...
La pagina sta caricando ...
La pagina sta caricando ...
La pagina sta caricando ...
La pagina sta caricando ...
La pagina sta caricando ...
La pagina sta caricando ...
La pagina sta caricando ...
La pagina sta caricando ...
La pagina sta caricando ...
La pagina sta caricando ...
La pagina sta caricando ...
La pagina sta caricando ...
La pagina sta caricando ...
La pagina sta caricando ...
La pagina sta caricando ...
La pagina sta caricando ...
La pagina sta caricando ...
La pagina sta caricando ...
La pagina sta caricando ...
La pagina sta caricando ...
La pagina sta caricando ...
La pagina sta caricando ...
La pagina sta caricando ...
La pagina sta caricando ...
La pagina sta caricando ...
La pagina sta caricando ...
La pagina sta caricando ...
La pagina sta caricando ...
La pagina sta caricando ...
La pagina sta caricando ...
La pagina sta caricando ...
La pagina sta caricando ...
La pagina sta caricando ...
La pagina sta caricando ...
La pagina sta caricando ...
La pagina sta caricando ...
La pagina sta caricando ...
La pagina sta caricando ...
La pagina sta caricando ...
La pagina sta caricando ...
La pagina sta caricando ...
La pagina sta caricando ...
La pagina sta caricando ...
La pagina sta caricando ...
La pagina sta caricando ...
La pagina sta caricando ...
La pagina sta caricando ...
La pagina sta caricando ...
La pagina sta caricando ...
La pagina sta caricando ...
La pagina sta caricando ...
La pagina sta caricando ...
La pagina sta caricando ...
La pagina sta caricando ...
La pagina sta caricando ...
La pagina sta caricando ...
La pagina sta caricando ...
La pagina sta caricando ...
La pagina sta caricando ...
La pagina sta caricando ...
La pagina sta caricando ...
La pagina sta caricando ...
La pagina sta caricando ...
La pagina sta caricando ...
La pagina sta caricando ...
La pagina sta caricando ...
La pagina sta caricando ...
La pagina sta caricando ...
La pagina sta caricando ...
La pagina sta caricando ...
La pagina sta caricando ...
La pagina sta caricando ...
La pagina sta caricando ...
La pagina sta caricando ...
La pagina sta caricando ...
La pagina sta caricando ...
La pagina sta caricando ...
La pagina sta caricando ...
La pagina sta caricando ...
La pagina sta caricando ...
La pagina sta caricando ...
La pagina sta caricando ...
La pagina sta caricando ...
La pagina sta caricando ...
-
 1
1
-
 2
2
-
 3
3
-
 4
4
-
 5
5
-
 6
6
-
 7
7
-
 8
8
-
 9
9
-
 10
10
-
 11
11
-
 12
12
-
 13
13
-
 14
14
-
 15
15
-
 16
16
-
 17
17
-
 18
18
-
 19
19
-
 20
20
-
 21
21
-
 22
22
-
 23
23
-
 24
24
-
 25
25
-
 26
26
-
 27
27
-
 28
28
-
 29
29
-
 30
30
-
 31
31
-
 32
32
-
 33
33
-
 34
34
-
 35
35
-
 36
36
-
 37
37
-
 38
38
-
 39
39
-
 40
40
-
 41
41
-
 42
42
-
 43
43
-
 44
44
-
 45
45
-
 46
46
-
 47
47
-
 48
48
-
 49
49
-
 50
50
-
 51
51
-
 52
52
-
 53
53
-
 54
54
-
 55
55
-
 56
56
-
 57
57
-
 58
58
-
 59
59
-
 60
60
-
 61
61
-
 62
62
-
 63
63
-
 64
64
-
 65
65
-
 66
66
-
 67
67
-
 68
68
-
 69
69
-
 70
70
-
 71
71
-
 72
72
-
 73
73
-
 74
74
-
 75
75
-
 76
76
-
 77
77
-
 78
78
-
 79
79
-
 80
80
-
 81
81
-
 82
82
-
 83
83
-
 84
84
-
 85
85
-
 86
86
-
 87
87
-
 88
88
-
 89
89
-
 90
90
-
 91
91
-
 92
92
-
 93
93
-
 94
94
-
 95
95
-
 96
96
-
 97
97
-
 98
98
-
 99
99
-
 100
100
-
 101
101
-
 102
102
-
 103
103
-
 104
104
-
 105
105
-
 106
106
-
 107
107
-
 108
108
-
 109
109
-
 110
110
-
 111
111
-
 112
112
-
 113
113
-
 114
114
-
 115
115
-
 116
116
-
 117
117
-
 118
118
-
 119
119
-
 120
120
-
 121
121
-
 122
122
-
 123
123
-
 124
124
-
 125
125
-
 126
126
-
 127
127
-
 128
128
-
 129
129
-
 130
130
-
 131
131
-
 132
132
-
 133
133
-
 134
134
-
 135
135
-
 136
136
-
 137
137
-
 138
138
-
 139
139
-
 140
140
-
 141
141
-
 142
142
-
 143
143
-
 144
144
-
 145
145
-
 146
146
-
 147
147
-
 148
148
-
 149
149
-
 150
150
-
 151
151
-
 152
152
-
 153
153
-
 154
154
-
 155
155
-
 156
156
-
 157
157
-
 158
158
-
 159
159
-
 160
160
-
 161
161
-
 162
162
-
 163
163
-
 164
164
-
 165
165
-
 166
166
-
 167
167
-
 168
168
-
 169
169
-
 170
170
-
 171
171
-
 172
172
-
 173
173
-
 174
174
-
 175
175
-
 176
176
-
 177
177
-
 178
178
-
 179
179
-
 180
180
-
 181
181
-
 182
182
-
 183
183
-
 184
184
-
 185
185
-
 186
186
-
 187
187
-
 188
188
-
 189
189
-
 190
190
-
 191
191
-
 192
192
-
 193
193
-
 194
194
-
 195
195
-
 196
196
-
 197
197
-
 198
198
-
 199
199
-
 200
200
-
 201
201
-
 202
202
-
 203
203
-
 204
204
-
 205
205
-
 206
206
-
 207
207
-
 208
208
-
 209
209
-
 210
210
-
 211
211
-
 212
212
-
 213
213
-
 214
214
-
 215
215
-
 216
216
-
 217
217
-
 218
218
-
 219
219
-
 220
220
-
 221
221
-
 222
222
-
 223
223
-
 224
224
-
 225
225
-
 226
226
-
 227
227
-
 228
228
-
 229
229
-
 230
230
-
 231
231
-
 232
232
-
 233
233
-
 234
234
-
 235
235
-
 236
236
-
 237
237
-
 238
238
-
 239
239
-
 240
240
-
 241
241
-
 242
242
-
 243
243
-
 244
244
-
 245
245
-
 246
246
-
 247
247
-
 248
248
-
 249
249
-
 250
250
-
 251
251
-
 252
252
-
 253
253
-
 254
254
-
 255
255
-
 256
256
-
 257
257
-
 258
258
-
 259
259
-
 260
260


Dometic CoolFreeze CF11, CF16, CF26 Istruzioni per l'uso
- Categoria
- Scatole fresche
- Tipo
- Istruzioni per l'uso
in altre lingue
- français: Dometic CoolFreeze CF11, CF16, CF26 Mode d'emploi
- Deutsch: Dometic CoolFreeze CF11, CF16, CF26 Bedienungsanleitung
- Nederlands: Dometic CoolFreeze CF11, CF16, CF26 Handleiding
- português: Dometic CoolFreeze CF11, CF16, CF26 Instruções de operação
- slovenčina: Dometic CoolFreeze CF11, CF16, CF26 Návod na používanie
- dansk: Dometic CoolFreeze CF11, CF16, CF26 Betjeningsvejledning
Documenti correlati
-
Dometic CF11, CF16, CF26 Istruzioni per l'uso
-
Dometic CF 11 Manuale utente
-
-
Dometic CF11, CF16, CF26 Manuale utente
-
-
-
-
-
-