TFA 60.2016 Manuale del proprietario
- Categoria
- Sveglie
- Tipo
- Manuale del proprietario
Questo manuale è adatto anche per

Bedienungsanleitung
Instruction manual
Mode d’emploi
Instrucciones de uso
Gebruiksaanwijzing
Istruzioni per l'uso
Kat. Nr. 60.2016
RoHS
TFA_No. 60.2016_Anleitung 26.04.2016 13:43 Uhr Seite 1

3
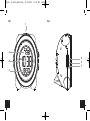
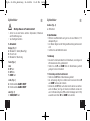
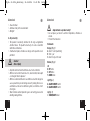
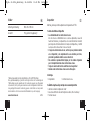
Fig. 1 Fig. 2
D
E
F
B
A
C
I
2
TFA_No. 60.2016_Anleitung 26.04.2016 13:43 Uhr Seite 2

5
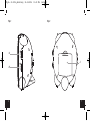
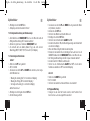
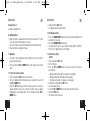
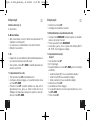
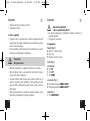
Fig. 3 Fig. 4
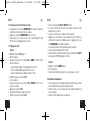
J
G
H
4
TFA_No. 60.2016_Anleitung 26.04.2016 13:43 Uhr Seite 3

76
Digitaler Wecker
Digitaler Wecker
• Snooze-Funktion
• Anzeige von Wochentag und Datum
• Hintergrundbeleuchtung
4. Zu Ihrer Sicherheit
• Das Produkt ist ausschließlich für den oben beschriebenen Einsatz-
bereich geeignet. Verwenden Sie das Produkt nicht anders, als in
dieser Anleitung dargestellt wird.
• Das eigenmächtige Reparieren, Umbauen oder Verändern des Gerä-
tes ist nicht gestattet.
Vorsicht!
Verletzungsgefahr!
• Bewahren Sie das Gerät und die Batterien außerhalb der Reichweite
von Kindern auf.
• Batterien nicht ins Feuer werfen, kurzschließen, auseinander nehmen
oder aufladen. Explosionsgefahr!
• Batterien enthalten gesundheitsschädliche Säuren. Um ein Auslaufen
der Batterien zu vermeiden, sollten schwache Batterien möglichst
schnell ausgetauscht werden. Verwenden Sie nie gleichzeitig alte
und neue Batterien oder Batterien unterschiedlichen Typs.
• Beim Hantieren mit ausgelaufenen Batterien chemikalienbeständige
Schutzhandschuhe und Schutzbrille tragen!
Vielen Dank, dass Sie sich für diese Gerät aus dem Hause TFA entschie-
den haben.
1. Bevor Sie mit dem Gerät arbeiten
• Lesen Sie sich bitte die Bedienungsanleitung genau durch.
So werden Sie mit Ihrem neuen Gerät vertraut, lernen alle Funktionen
und Bestandteile kennen, erfahren wichtige Details für die Inbetrieb-
nahme und den Umgang mit dem Gerät und erhalten Tipps für den
Störungsfall.
• Durch die Beachtung der Bedienungsanleitung vermeiden Sie
auch Beschädigungen des Geräts und die Gefährdung Ihrer gesetz-
lichen Mängelrechte durch Fehlgebrauch.
• Für Schäden, die aus Nichtbeachtung dieser Bedienungsanleitung
verursacht werden, übernehmen wir keine Haftung.
• Beachten Sie besonders die Sicherheitshinweise!
• Bewahren Sie diese Bedienungsanleitung gut auf!
2. Lieferumfang
• Digitaler Wecker • Bedienungsanleitung
3. Einsatzbereich und alle Vorteile Ihres neuen Gerätes auf einen
Blick
• Alarm mit Doppelglocke aus Metall
• 2 verschiedene Weckzeiten (Werktag, Wochenende)
TFA_No. 60.2016_Anleitung 26.04.2016 13:43 Uhr Seite 4

98
Digitaler Wecker
Digitaler Wecker
Gehäuse (Fig. 4)
J: Batteriefach
6. Inbetriebnahme
• Öffnen Sie das Batteriefach und legen Sie drei neue Batterien 1,5 V
AAA polrichtig ein.
• Der Wecker klingelt und die Hintergrundbeleuchtung wird kurz akti-
viert.
• Schließen Sie das Batteriefach wieder.
7. Bedienung
• Das Gerät verlässt automatisch den Einstellmodus, wenn länger als
20 Sekunden keine Taste gedrückt wird.
• Halten Sie die UP oder DOWN Taste im Einstellmodus gedrückt,
gelangen Sie in den Schnelllauf.
7.1 Einstellung von Uhrzeit und Kalender
• Halten Sie die SET Taste im Normalmodus gedrückt.
• Die Jahresanzeige fängt an zu blinken und Sie können mit der UP
oder DOWN Taste das Jahr einstellen.
• Drücken Sie die SET Taste noch einmal und Sie können nun nachein-
ander den Monat, den Tag, die Stunden, die Minuten und das 24-
oder 12-Stunden-Zeitsystem (PM erscheint im Display nach 12 Uhr)
auswählen und mit der UP oder DOWN Taste einstellen.
Wichtige Hinweise zur Produktsicherheit!
• Setzen Sie das Gerät keinen extremen Temperaturen, Vibrationen
und Erschütterungen aus.
• Vor Feuchtigkeit schützen.
5. Bestandteile
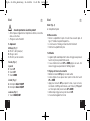
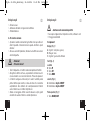
Display (Fig. 1)
A: Weckalarm 1 / Datum (Monat/Tag)
B: Uhrzeit / Jahr
C: Weckalarm 2 / Wochentag
Tasten (Fig. 2)
links
D: UP Taste
E: SET Taste
F: DOWN Taste
rechts (Fig. 3)
G: Schiebeschalter ALARM 1 ON/OFF
H: Schiebeschalter ALARM 2 ON/OFF
oben (Fig. 1)
I: SNOOZE/LIGHT Taste
TFA_No. 60.2016_Anleitung 26.04.2016 13:43 Uhr Seite 5

1110
Digitaler Wecker
Digitaler Wecker
• Sie können nun mit der UP oder DOWN Taste die gewünschte Weck-
zeit (Stunden) einstellen.
• Drücken Sie die SET Taste.
• Stellen Sie die Minuten auf dieselbe Weise ein.
• Bestätigen Sie mit der SET Taste.
• Stellen Sie den Schiebeschalter ALARM 1 auf ON.
• Der Alarm ist aktiviert. ON, die Wochentagsanzeige und die Alarmzeit
erscheinen im Display.
• Wenn der Wecker klingelt, blinkt das Alarmsymbol.
• Beenden Sie den Alarm mit einer beliebigen Taste oder lösen Sie die
SNOOZE-Funktion mit der SNOOZE/LIGHT Taste an der Oberseite aus.
• Die Hintergrundbeleuchtung wird für ein paar Sekunden aktiviert.
• Der Alarm wird für 5 Minuten unterbrochen.
• Stellen Sie den Schiebeschalter ALARM 1 auf OFF, um die Alarm-
Funktion zu deaktivieren. OFF erscheint im Display.
Alarm 2:
• Halten Sie die DOWN Taste gedrückt.
• M-F, S-S blinkt.
• Stellen Sie den Alarm 2 auf dieselbe Weise ein wie Alarm 1.
8. Pflege und Wartung
• Reinigen Sie das Gerät mit einem weichen, leicht feuchten Tuch.
Keine Scheuer- oder Lösungsmittel verwenden!
• Bestätigen Sie mit der SET Taste.
• Im Display erscheint die aktuelle Uhrzeit.
7.2 Hintergrundbeleuchtung und Datumsanzeige
• Durch Drücken der SNOOZE/LIGHT Taste an der Oberseite wird die
Hintergrundbeleuchtung für 8 Sekunden aktiviert.
• Drücken Sie gleich noch einmal die SNOOZE/LIGHT Taste.
• Es erscheint kurz das Datum (Monat, Tag), das Jahr und der
Wochentag (MO, TU, WE, TH, FR, SA oder SU) im Display.
7.3 Einstellung des Weckalarms
Alarm 1:
• Halten Sie die UP Taste gedrückt.
• M-F, S-S blinkt.
• Sie können nun mit der UP oder DOWN Taste einstellen, ob die einge-
stellte Weckzeit von:
• Montag bis Sonntag (M-F, S-S erscheinen im Display)
• Montag bis Freitag (M-F erscheint im Display)
• Samstag und Sonntag (S-S erscheint im Display)
aktiviert werden soll.
• Bestätigen Sie die Eingabe mit der SET Taste.
• Die Uhrzeitanzeige blinkt.
TFA_No. 60.2016_Anleitung 26.04.2016 13:43 Uhr Seite 6

1312
Digitaler Wecker
Digitaler Wecker
10. Entsorgung
Dieses Produkt wurde unter Verwendung hochwertiger Materialien und
Bestandteile hergestellt, die recycelt und wiederverwendet werden kön-
nen.
Batterien und Akkus dürfen keinesfalls in den Hausmüll!
Als Verbraucher sind Sie gesetzlich verpflichtet, ge-
brauchte Batterien und Akkus zur umweltgerechten Ent-
sorgung beim Handel oder entsprechenden Sammelstel-
len gemäß nationaler oder lokaler Bestimmungen
abzugeben.
Die Bezeichnungen für enthaltene Schwermetalle sind:
Cd=Cadmium, Hg=Quecksilber, Pb=Blei
Dieses Gerät ist entsprechend der EU-Richtlinie über die
Entsorgung von Elektro- und Elektronik-Altgeräten
(WEEE) gekennzeichnet.
Dieses Produkt darf nicht mit dem Hausmüll entsorgt
werden. Der Nutzer ist verpflichtet, das Altgerät zur
umweltgerechten Entsorgung bei einer ausgewiesenen
Annahmestelle für die Entsorgung von Elektro- und Elek-
tronikgeräten abzugeben.
• Entfernen Sie die Batterien, wenn Sie das Gerät längere Zeit nicht
verwenden.
• Bewahren Sie Ihr Gerät an einem trockenen Platz auf.
8.1 Batteriewechsel
• Wenn die Funktionen des Weckers schwächer werden, wechseln Sie
bitte die Batterien.
• Öffnen Sie das Batteriefach und legen Sie drei neue Batterien 1,5 V
AAA polrichtig ein.
• Schließen Sie das Batteriefach wieder.
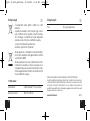
9. Fehlerbeseitigung
Problem Fehlerbeseitigung
Keine Anzeige ➜ Batterien polrichtig einlegen
➜ Batterien wechseln
Unkorrekte Anzeige ➜ Neuinbetriebnahme gemäß Anleitung
➜ Batterien wechseln
Wenn Ihr Gerät trotz dieser Maßnahmen immer noch nicht funktioniert,
wenden Sie sich an den Händler, bei dem Sie das Produkt gekauft
haben.
TFA_No. 60.2016_Anleitung 26.04.2016 13:43 Uhr Seite 7

1514
Digitaler Wecker
Alarm clock
Thank you for choosing this instrument from TFA.
1. Before you use this product
• Please make sure you read the instruction manual carefully.
This information will help you to familiarize yourself with your new
device, to learn all of its functions and parts, to find out important
details about its first use and how to operate it and to get advice in
the event of a malfunction.
• Following and respecting the instructions in your manual will pre-
vent damage to your instrument and loss of your statutory rights
arising from defects due to incorrect use.
• We shall not be liable for any damage occurring as a result of non
following of these instructions.
• Please take particular note of the safety advice!
• Please keep this instruction manual safe for future reference.
2. Delivery contents
• Alarm clock • Instruction manual
3. Range of application and all the benefits of your new instrument
at a glance
• Metal double bell alarm
• 2 different alarm times (weekday, weekend)
11. Technische Daten
Spannungsversorgung: Batterien 3 x 1,5 V AAA
(nicht inklusive)
Gehäusemaße: 106 x 73 x 108 mm
Gewicht: 172 g (nur das Gerät)
TFA Dostmann GmbH & Co.KG, Zum Ottersberg 12, D-97877 Wertheim.
Diese Anleitung oder Auszüge daraus dürfen nur mit Zustimmung von TFA Dost-
mann veröffentlicht werden. Die technischen Daten entsprechen dem Stand bei
Drucklegung und können ohne vorherige Benachrichtigung geändert werden. Die
neuesten technischen Daten und Informationen zu Ihrem Produkt finden Sie unter
Eingabe der Artikel-Nummer auf unserer Homepage.
www.tfa-dostmann.de 04/16
TFA_No. 60.2016_Anleitung 26.04.2016 13:43 Uhr Seite 8

1716
Alarm clock
Alarm clock
Important notes on product safety!
• Do not expose your device to extreme temperatures, vibrations or
shocks.
• Protect it from moisture
5. Elements
Display (Fig. 1)
A: Alarm 1 / date (month/day)
B: Time / year
C: Alarm 2 / day of the week
Buttons (Fig. 2)
left
D: UP button
E: SET button
F: DOWN button
right (Fig. 3)
G: ALARM 1 ON/OFF switch
H: ALARM 2 ON/OFF switch
top (Fig. 1)
I: SNOOZE/LIGHT button
• Snooze function
• Indication of day of the week and date
• Backlight
4. For your safety
• This product is exclusively intended for the range of application
described above. The product should only be used as described
within these instructions.
• Unauthorized repairs, alterations or changes to the product are not
permitted.
Caution!
Risk of injury!
• Keep this instrument and the batteries out of reach of children.
• Batteries must not be thrown into a fire, short-circuited, taken apart
or recharged. Risk of explosion!
• Batteries contain harmful acids. Low batteries should be changed as
soon as possible to prevent damage caused by leaking. Never use a
combination of old and new batteries together, nor batteries of dif-
ferent types.
• Wear chemical-resistant protective gloves and safety glasses when
handling leaking batteries.
TFA_No. 60.2016_Anleitung 26.04.2016 13:43 Uhr Seite 9

1918
Alarm clock
Alarm clock
• Confirm with the SET button.
• The display shows the current time.
7.2 Backlight and date
• Press the SNOOZE/LIGHT button at the top and the backlight will be
activated for 8 seconds.
• Press the SNOOZE/LIGHT button again.
• The date (month, day), the year and the weekday (MO, TU, WE, TH,
FR, SA or SU) appear briefly on the display.
7.3 Alarm time setting
Alarm 1:
• Press and hold the UP button.
• M-F, S-S flashes.
• Press the UP or DOWN button to choose between the three set
alarms below:
• Monday until Sunday (M-F, S-S appear on the display)
• Monday until Friday (M-F appear on the display)
• Saturday and Sunday (S-S appear on the display).
• Confirm the setting with the SET button.
• The hour display flashes.
• Press the UP or DOWN button to adjust the alarm time (hours).
• Press the SET button.
• Set minutes in the same way.
Housing (Fig. 4)
J: Battery compartment
6. Getting started
• Open the battery compartment and insert three new AAA 1.5 V bat-
teries. Ensure the battery polarity is correct.
• The alarm starts to ring and the backlight will be activated briefly.
• Close the battery compartment again.
7. Operation
• The device will automatically quit the setting mode if no button is
pressed for 20 seconds.
• Press and hold the UP or DOWN button in the setting mode for fast
mode.
7.1 Clock and calendar setting
• Press and hold the SET button in normal mode.
• The year indication will be flashing and you can adjust the year with
the UP or DOWN button.
• Press the SET button again and the setting sequence is shown as
follows: Month and day, hours, minutes and 24 or 12 hours display
(PM appears on the display after 12 h) and adjust with the UP or
DOWN button.
TFA_No. 60.2016_Anleitung 26.04.2016 13:43 Uhr Seite 10

2120
Alarm clock
Alarm clock
8.1 Battery replacement
• Change the batteries when the device functions become weak.
• Open the battery compartment and insert three new batteries AAA
1,5 V. Ensure the batteries' polarity are correct.
• Close the battery compartment again.
9. Troubleshooting
Problems Solution
No display ➜ Ensure the batteries' polarity are
correct
➜ Change the batteries
Incorrect indication ➜ Restart the instrument according to
the manual
➜ Change the batteries
If your device fails to work despite these measures contact the retailer
where you purchased the product.
10. Waste disposal
This product has been manufactured using high-grade materials and
components which can be recycled and reused.
• Confirm with the SET button.
• Slide the ALARM 1 ON/OFF switch to ON.
• The alarm is activated. ON - the weekdays and the alarm time appear
on the display.
• Once the alarm rings, the alarm symbol flashes.
• Press any button to stop the alarm or press the top of the instrument
(SNOOZE/LIGHT) to activate the snooze function. The backlight turns
on for a few seconds.
• The alarm will be interrupted for 5 minutes.
• Slide the ALARM 1 ON/OFF switch to OFF to deactivate the alarm.
OFF appears on the display.
Alarm 2:
• Press and hold the DOWN button.
• M-F, S-S flashes.
• Set Alarm 2 in the same way as Alarm 1.
8. Care and maintenance
• Clean the device with a soft damp cloth. Do not use solvents or
scouring agents.
• Remove the batteries if the device will not be used for an extended
period of time.
• Keep the device in a dry place.
TFA_No. 60.2016_Anleitung 26.04.2016 13:43 Uhr Seite 11

2322
Alarm clock
Alarm clock
TFA Dostmann GmbH & Co.KG, Zum Ottersberg 12, D-97877 Wertheim.
No part of this manual may be reproduced without written consent of TFA Dost-
mann. The technical data are correct at the time of going to print and may change
without prior notice. The latest technical data and information about your product
can be found by entering your product number on our homepage.
www.tfa-dostmann.de 04/16
Never dispose of empty batteries and rechargeable batter-
ies with ordinary household waste.
As a consumer, you are required by law to take them to
your retail store or to an appropriate collection site
depending on national or local regulations in order to pro-
tect the environment.
The symbols for the contained heavy metals are:
Cd = cadmium, Hg = mercury, Pb = lead
This product is labelled in accordance with the EU Waste
Electrical and Electronic Equipment Directive (WEEE).
Please do not dispose of this product in ordinary house-
hold waste. As a consumer, you are required to take end-
of-life devices to a designated collection point for the dis-
posal of electrical and electronic equipment, in order to
ensure environmentally-compatible disposal.
11. Specifications
Power consumption: Batteries 3 x AAA 1,5 V (not included)
Housing dimension: 106 x 73 x 108 mm
Weight: 172 g (device only)
TFA_No. 60.2016_Anleitung 26.04.2016 13:43 Uhr Seite 12

2524
Réveil
Réveil
• Affichage du jour de la semaine et de la date
• Éclairage de fond
4. Pour votre sécurité
• Le produit est destiné uniquement à l'utilisation décrite ci-dessus.
N'utilisez jamais l’appareil à d'autres fins que celles décrites dans le
présent mode d'emploi.
• Vous ne devez en aucun cas réparer, démonter ou modifier l'appareil
par vous-même.
Attention!
Danger de blessure!
• Gardez votre appareil et les piles hors de la portée des enfants.
• Ne jetez jamais de piles dans le feu, ne les court-circuitez pas, ne les
démontez pas et ne les rechargez pas. Risques d'explosion!
• Les piles contiennent des acides nocifs pour la santé. Une pile faible
doit être remplacée le plus rapidement possible afin d'éviter toute
fuite. N'utilisez-jamais simultanément de piles anciennes avec des
piles neuves ou des piles de types différents.
• Si vous manipulez des piles qui ont coulé, utilisez des gants de pro-
tection chimique spécialement adaptés et portez des lunettes de pro-
tection!
Nous vous remercions d'avoir choisi l'appareil de la Société TFA.
1. Avant d'utiliser votre appareil
• Veuillez lire attentivement le mode d'emploi.
Vous vous familiariserez ainsi avec votre nouvel appareil, vous
découvrirez toutes les fonctions et tous les éléments qui le compo-
sent, vous noterez les détails importants relatifs à sa mise en service
et vous lirez quelques conseils en cas de dysfonctionnement.
• En respectant ce mode d'emploi, vous éviterez d'endommager
votre appareil et de perdre vos droits légaux en cas de défaut si
celui-ci résulte d’une utilisation non-conforme.
• Nous n'assumons aucune responsabilité pour des dommages qui
auraient été causés par le non-respect du présent mode d'emploi.
• Suivez bien toutes les consignes de sécurité!
• Conservez soigneusement le mode d'emploi!
2. Contenu de la livraison
• Réveil • Mode d'emploi
3. Aperçu du domaine d'utilisation et de tous les avantages de votre
nouvel appareil
• Réveil deux cloches en métal
• 2 alarmes différentes (jour ouvré, weekend)
• Fonction snooze
TFA_No. 60.2016_Anleitung 26.04.2016 13:43 Uhr Seite 13

2726
Réveil
Réveil
Boîtier (Fig. 4)
J: Compartiment à piles
6. Mise en service
• Ouvrez le compartiment à piles et insérez trois nouvelles piles de
type 1,5 V AAA en respectant la polarité +/-.
• Le réveil sonne et l'éclairage de fond est activé brièvement.
• Refermez le compartiment à piles.
7. Utilisation
• L'appareil quitte automatiquement le mode de réglage lorsqu’aucune
touche n’est pressée pendant 20 secondes.
• Si vous maintenez la touche UP ou DOWN appuyée au cours d'un
mode de réglage vous parviendrez à l'affichage rapide.
7.1 Réglage de l'heure et du calendrier
• Maintenez la touche SET appuyée en mode normal.
• L’année clignote et vous pouvez alors l'ajuster à l'aide de la touche
UP ou DOWN.
• Appuyez sur la touche SET pour ajuster le mois, le jour, les heures,
les minutes et l'affichage de 24 heures ou de 12 heures (PM apparaît
sur l'écran après midi) avec la touche UP ou DOWN.
• Validez chaque réglage au moyen de la touche SET.
• L'heure actuelle apparaît sur l’écran.
Conseils importants de sécurité du produit!
• Évitez d’exposer l’appareil à des températures extrêmes, à des vibra-
tions ou à des chocs.
• Protégez-le contre l'humidité.
5. Composants
Affichage (Fig. 1)
A: Réveil 1 / date (mois/jour)
B: Horloge / année
C: Réveil 2 / jour de la semaine
Touches (Fig. 2)
à gauche
D: Touche UP
E: Touche SET
F: Touche DOWN
à droite (Fig. 3)
G: Interrupteur Réveil 1 ON/OFF
H: Interrupteur Réveil 2 ON/OFF
au-dessus (Fig. 1)
I: Touche SNOOZE/LIGHT
TFA_No. 60.2016_Anleitung 26.04.2016 13:43 Uhr Seite 14

2928
Réveil
Réveil
• Poussez l'interrupteur Réveil 1 ON/OFF sur ON.
• Le réveil est activé. ON, les jours de la semaine et l'heure de réveil
apparaissent sur l'écran.
• Lorsque le réveil sonne, le symbole de réveil clignote.
• Appuyez sur une touche de votre choix pour arrêter l'alarme ou
déclenchez la fonction de répétition snooze en appuyant sur la tou-
che SNOOZE/LIGHT sur la partie supérieure.
• L'éclairage de fond est activé pendant quelques secondes.
• L'alarme s'interrompt pendant 5 minutes.
• Pour désactiver la fonction d'alarme, poussez l'interrupteur Réveil 1
sur la position OFF. OFF apparaît sur l'écran.
Réveil 2:
• Maintenez la touche DOWN appuyée.
• M-F, S-S clignote.
• Procédez de la même façon pour le réveil 2 que pour le réveil 1.
8. Entretien et maintenance
• Pour le nettoyage de votre appareil, utilisez un chiffon doux et humi-
de. N’utilisez pas de solvants ou d'agents abrasifs!
• Retirez les piles si vous n'utilisez pas votre appareil pendant une
durée prolongée.
• Conservez votre appareil dans un endroit sec.
7.2 Éclairage de fond et affichage de la date
• En appuyant sur la touche SNOOZE/LIGHT sur la partie supérieure,
l'éclairage de fond est activé pour 8 secondes.
• Appuyez sur la touche SNOOZE/LIGHT encore une fois.
• La date (mois, jour), l'année et le jour de la semaine (MO, TU, WE,
TH, FR, SA ou SU) apparaissent sur l'écran.
7.3 Réglage du réveil
Réveil 1:
• Maintenez la touche UP appuyée.
• M-F, S-S clignote.
• Vous pouvez ajuster avec la touche UP ou DOWN si l'alarme réglée
doit être activée du:
• lundi au dimanche (M-F, S-S) apparaissent sur l'écran
• lundi au vendredi (M-F) apparaissent sur l'écran
• samedi et dimanche (S-S) apparaissent sur l'écran
• Validez au moyen de la touche SET.
• L'heure clignote.
• Vous pouvez ajuster avec la touche UP ou DOWN l'heure de réveil
(heures) souhaitée.
• Appuyez sur la touche SET.
• Procédez de même pour régler les minutes.
• Validez au moyen de la touche SET.
TFA_No. 60.2016_Anleitung 26.04.2016 13:43 Uhr Seite 15

3130
Réveil
Réveil
Les piles usagées ne doivent pas être jetées dans les
détritus ménagers.
En tant qu'utilisateur, vous avez l'obligation légale de rap-
porter les piles et piles rechargeables usagées à votre
revendeur ou de les déposer dans une déchetterie proche
de votre domicile conformément à la réglementation
nationale et locale.
Les métaux lourds sont désignés comme suit:
Cd=cadmium, Hg=mercure, Pb=plomb
Cet appareil est conforme aux normes de l'UE relatives au
traitement des déchets électriques et électroniques
(WEEE).
L'appareil usagé ne doit pas être jeté dans les ordures
ménagères. L’utilisateur s’engage, pour le respect de l’en-
vironnement, à déposer l’appareil usagé dans un centre de
traitement agréé pour les déchets électriques et électroni-
ques.
11. Caractéristiques techniques
Alimentation Piles 3 x 1,5 V AAA (non incluses)
8.1 Remplacement des piles
• Remplacez les piles si les fonctions de l'appareil s'affaiblissent.
• Ouvrez le compartiment à piles et insérez trois nouvelles piles de
type 1,5 V AAA en respectant la polarité +/-.
• Refermez le compartiment à piles.
9. Dépannage
Problème Solution
Aucun affichage ➜ Contrôlez la bonne polarité des piles
➜ Changez les piles
Affichage incorrect ➜ Remettez l'appareil en service,
conformément aux instructions
➜ Changez les piles
Si votre appareil ne fonctionne toujours pas malgré ces mesures,
adressez-vous au vendeur chez qui vous l'avez acheté.
10. Traitement des déchets
Ce produit a été fabriqué avec des matériaux de haute qualité qui peuvent
être recyclés et réutilisés.
TFA_No. 60.2016_Anleitung 26.04.2016 13:43 Uhr Seite 16

3332
Réveil
Orologio sveglia
Vi ringraziamo per aver scelto l'apparecchio della TFA.
1. Prima di utilizzare l'apparecchio
• Leggete attentamene le istruzioni per l'uso.
Avrete così modo di familiarizzare con il vostro nuovo apparecchio,
di scoprirne tutte le funzioni e le componenti, di apprendere impor-
tanti dettagli sulla sua messa in funzione, di acquisire dimestichezza
nel suo utilizzo e di usufruire di alcuni validi consigli da seguire in
caso di guasti.
• Seguendo le istruzioni per l'uso, eviterete anche di danneggiare il
prodotto e di pregiudicare, a causa di un utilizzo scorretto, i diritti
del consumatore che vi spettano per legge.
• Decliniamo ogni responsabilità per i danni derivanti dal mancato
rispetto delle presenti istruzioni per l'uso.
• Prestate particolare attenzione alle misure di sicurezza!
• Conservate con cura queste istruzioni per l'uso.
2. La consegna include
• Orologio sveglia • Istruzioni per l'uso
3. Tutte le applicazioni e tutti i vantaggi del vostro nuovo apparecchio
• Sveglia a due campane in metallo
• 2 orari di sveglia differenti (giorno feriale, fine settimana)
Dimensions du boîtier 106 x 73 x 108 mm
Poids: 172 g (appareil seulement)
TFA Dostmann GmbH & Co.KG, Zum Ottersberg 12, D-97877 Wertheim.
La reproduction, même partielle, du présent mode d'emploi est strictement inter-
dite sans l'accord explicite de TFA Dostmann. Les caractéristiques techniques de
ce produit ont été actualisées au moment de l'impression et peuvent être modi-
fiées sans avis préalable. Les dernières données techniques et des informations
concernant votre produit peuvent être trouvées en entrant le numéro de l'article
sur notre site.
www.tfa-dostmann.de 04/16
TFA_No. 60.2016_Anleitung 26.04.2016 13:43 Uhr Seite 17

3534
Orologio sveglia
Orologio sveglia
Avvertenze sulla sicurezza del prodotto!
• Non esporre l'apparecchio a temperature estreme, vibrazioni e urti.
• Proteggere dall’umidità.
5. Componenti
Display (Fig. 1)
A: Sveglia 1 / data (mese, giorno)
B: Orologio / anno
C: Sveglia 2 / giorno della settimana
Tasti (Fig. 2)
a sinistra
D: Tasto UP
E: Tasto SET
F: Tasto DOWN
a destra (Fig. 3)
G: Commutatore Sveglia 1 ON/OFF
H: Commutatore Sveglia 2 ON/OFF
Parte superiore (Fig. 1)
I: Tasto SNOOZE/LIGHT
• Funzione snooze
• Indicazione della data e del giorno della settimana
• Retroilluminazione
4. Per la vostra sicurezza
• Il prodotto è adatto esclusivamente agli utilizzi di cui sopra. Non uti-
lizzate il prodotto in maniera diversa da quanto descritto in queste
istruzioni.
• Non sono consentite riparazioni, alterazioni o modifiche non autoriz-
zate del dispositivo.
Attenzione!
Pericolo di lesioni!
• Tenete il dispositivo e le batterie lontano dalla portata dei bambini.
• Non gettare le batterie nel fuoco, non polarizzarle in maniera scorret-
ta, non smontarle e non cercare di ricaricarle. Pericolo di esplosione!
• Le batterie contengono acidi nocivi per la salute. Sostituite quanto
prima le batterie quasi scariche, in modo da evitare che si scarichino
completamente. Non utilizzate mai contemporaneamente batterie
usate e batterie nuove né batterie di tipi diversi.
• Quando si maneggiano batterie esaurite indossare sempre guanti
resistenti alle sostanze chimiche e occhiali di protezione.
TFA_No. 60.2016_Anleitung 26.04.2016 13:43 Uhr Seite 18

3736
Orologio sveglia
Orologio sveglia
• Confermare con il tasto SET.
• Sul display viene visualizzato l'ora attuale.
7.2 Retroilluminazione e visualizzazione della data
• Toccando il tasto SNOOZE/LIGHT sulla parte superiore, la retroillumi-
nazione si accende per 8 secondi.
• Premere nuovamente il tasto SNOOZE/LIGHT.
• La data (mese, giorno), l'anno e il giorno della settimana (MO, TU,
WE, TH, FR, SA o SU) appaiono sul display.
7.3 Impostazione della sveglia
Sveglia 1:
• Tenere premuto il tasto UP.
• M-F, S-S lampeggia.
• È possibile impostare con il tasto UP o DOWN i giorni in cui l’allarme
sarà attivato:
• Lunedi a Domenica (M-F, S-S sono visualizzati sul display)
• Lunedi a Venerdì (M-F sono visualizzati sul display)
• Sabato e Domenica (S-S sono visualizzati sul display)
• Confermare con il tasto SET.
• La visualizzazione dell'ora lampeggia.
• È ora possibile impostare l'ora della sveglia desiderata (ore) con il
tasto UP o DOWN.
• Premere il tasto SET.
Struttura esterna (Fig. 4)
J: Vano batteria
6. Messa in funzione
• Aprire il vano batteria e inserire tre batterie nuove tipo AAA da 1,5 V,
rispettando le corrette polarità.
• La sveglia suona e la retroilluminazione si accende brevemente.
• Richiudere il vano batteria.
7. Uso
• L'apparecchio esce automaticamente dalla modalità impostazione se
non si preme alcun tasto per più di 20 secondi.
• Tenere premuto il tasto UP o DOWN in modalità impostazione per
procedere velocemente.
7.1 Impostazione dell’ora e data
• Tenere premuto il tasto SET nella modalità normale.
• L'indicazione dell'anno lampeggia, ed è possibile impostare l'anno
con il tasto UP o DOWN.
• Premendo il tasto SET è possibile modificare uno dopo l'altro le
impostazioni per mese, giorno, ora, minuti e formato 24 o 12 ore
(PM appare sul display dopo mezzogiorno). Impostare i valori desi-
derati con il tasto UP o DOWN.
TFA_No. 60.2016_Anleitung 26.04.2016 13:43 Uhr Seite 19

3938
Orologio sveglia
Orologio sveglia
8.1 Sostituzione delle batterie
• Cambiare le batterie se le funzioni del dispositivo sono più deboli.
• Aprire il vano batteria e inserire tre batterie nuove tipo AAA da 1,5 V,
rispettando le corrette polarità.
• Richiudere il vano batteria.
9. Guasti
Problema Risoluzione del problema
Nessuna indicazione ➜ Inserire le batterie rispettando le
corrette polarità
➜ Sostituire le batterie
Indicazione non corretta ➜ Riavviare il dispositivo secondo le
istruzioni
➜ Sostituire le batterie
Qualora il vostro apparecchio continui a non funzionare nonostante
queste procedure, rivolgetevi al rivenditore presso il quale lo avete
acquistato.
10. Smaltimento
Questo prodotto è stato realizzato utilizzando materiali e componenti di
alta qualità che possono essere riciclati e riutilizzati.
• Inserire i minuti procedendo nello stesso modo.
• Confermare con il tasto SET.
• Spingere l'interruttore Sveglia 1 verso ON.
• La funzione sveglia è attivata. Sul display vengono visualizzati ON, i
giorni della settimana e l'ora della sveglia.
• Quando suona la sveglia, il simbolo della sveglia lampeggia.
• Spegnere il segnale acustico con un tasto qualsiasi o attivare la fun-
zione SNOOZE premendo il tasto SNOOZE/LIGHT sul lato superiore.
• La retroilluminazione si accende per alcuni secondi.
• Il suono della sveglia verrà interrotto per 5 minuti.
• Spingere l'interruttore Sveglia 1 verso OFF, per disattivatare la sve-
glia. Sul display appare OFF.
Sveglia 2:
• Tenere premuto il tasto DOWN.
• M-F, S-S lampeggia.
• Inserire la sveglia 2 procedendo nello stesso modo come sveglia 1.
8. Cura e manutenzione
• Per pulire l'apparecchio utilizzare solo un panno morbido legger-
mente inumidito. Non usare solventi o abrasivi.
• Rimuovere le batterie, se non si utilizza l'apparecchio per un periodo
prolungato.
• Collocare il dispositivo in un luogo asciutto.
TFA_No. 60.2016_Anleitung 26.04.2016 13:43 Uhr Seite 20
La pagina si sta caricando...
La pagina si sta caricando...
La pagina si sta caricando...
La pagina si sta caricando...
La pagina si sta caricando...
La pagina si sta caricando...
La pagina si sta caricando...
La pagina si sta caricando...
La pagina si sta caricando...
La pagina si sta caricando...
-
 1
1
-
 2
2
-
 3
3
-
 4
4
-
 5
5
-
 6
6
-
 7
7
-
 8
8
-
 9
9
-
 10
10
-
 11
11
-
 12
12
-
 13
13
-
 14
14
-
 15
15
-
 16
16
-
 17
17
-
 18
18
-
 19
19
-
 20
20
-
 21
21
-
 22
22
-
 23
23
-
 24
24
-
 25
25
-
 26
26
-
 27
27
-
 28
28
-
 29
29
-
 30
30


TFA 60.2016 Manuale del proprietario
- Categoria
- Sveglie
- Tipo
- Manuale del proprietario
- Questo manuale è adatto anche per
in altre lingue
- français: TFA 60.2016 Le manuel du propriétaire
- español: TFA 60.2016 El manual del propietario
- Deutsch: TFA 60.2016 Bedienungsanleitung
- Nederlands: TFA 60.2016 de handleiding
Documenti correlati
-
TFA Analogue wall clock with the days of the week Manuale utente
-
TFA Digital Alarm Clock with LED Digits Manuale utente
-
-
-
-
-
-
-
TFA Dostmann 60.2529.54 Manuale utente
-