
Quick Start Guide
2x4 DVI-HD Audio/Video Matrix KVMP™ Switch
© Copyright 2012 ATEN
®
International Co., Ltd.
ATEN and the ATEN logo are trademarks of ATEN International Co., Ltd. All rights reserved. All other
trademarks are the property of their respective owners.
This product is RoHS compliant.
Part No. PAPE-1223- 601G Printing Date: 01/2012
CM0264 2x4 DVI-HD Audio/Video Matrix KVMP™ Switch Quick Start Guide
Guide de démarrage rapide du commutateur KVMP matriciel audio-vidéo DVI-HD 2x4 CM0264
CM0264 2x4-KVMP-A/V-Matrix-Switch mit HD-DVI Kurzanleitung
CM0264 Conmutador KVMP de matriz 2x4 con DVI-HD y A/V Guía rápida
Requirements
Console
• AHDcompatiblemonitorcapableofthehighestpossibleresolution
• ADVISingleLinkcompatiblemonitorcapableofthehighestpossibleresolution
• AUSBmouse
• AUSBkeyboard
Note:APS/2keyboardandmousecanbeusedwiththeconverterincludedinthe
CM0264 package.
• Microphoneandspeakers(optional)
Computers
Thefollowingmustbeavailableoneachcomputer:
• AHDportorDVIport
Note: Thequalityofthedisplayisaffectedbythequalityofthedisplaycard.Forbest
results, we recommend you purchase a high quality product.
• USBTypeAport
• Audioports(optional)
Hardware
• 2.0Ghzprocessor
• 1GBRAM
Cables
TwocustomDVI-DSingleLinkKVMcablesetsandtwocustomHDKVMcablesets
are provided with this package.
Note:IftheHDconsolemonitorhasbuilt-inspeakersandsupportsaudiothroughits
HD interface, there is no need to connect the speaker connectors on the console
endsoftheHDcablesets.Themicrophonejackshouldbeconnectedtothe
appropriate location.
Conguration minimale
Console
• UnécrancompatibleHDpermettantlarésolutionlaplusélevéepossible
• UnécrancompatibleDVISingleLinkpermettantlarésolutionlaplusélevéepossible
• UnesourisUSB
• UnclavierUSB
Remarque: vous pouvez utiliser un clavier et une souris PS/2 avec le convertisseur
fourni avec le CM0264.
• Microphoneethaut-parleurs(enoption)
Ordinateurs
Lescomposantssuivantsdoiventêtredisponiblessurchaqueordinateur:
• UnportHDouportDVI
Remarque: laqualitédel’afchageestinuencéeparlaqualitédelacarte
graphique. Pour de meilleurs résultats, il est conseillé d'acheter un
produit de haute qualité.
• PortUSBdetypeA
• Portsaudio(facultatifs)
Système
•Processeurde2,0Ghz
•1GBdeRAM
Câbles
DeuxjeuxdecâblesKVMDVI-DSingleLinkpersonnalisésetdeuxjeuxdecâbles
KVM HD personnalisés sont fournis avec ce produit.
Remarque: si le moniteur de console HD comprend des haut-parleurs intégrés et s'il
prend en charge l'audio à travers son interface HD, il n'est pas nécessaire
d'utiliser les connecteurs pour haut-parleurs situés aux extrémités de
consoledesjeuxdecâblesHD.Leconnecteurdumicrophonedoitêtre
branchésurlaprisecorrespondante.
Voraussetzungen
Konsole
• EinHD-kompatiblerMonitor,derinderLageist,diehöchstmöglicheAuösung
darzustellen
• EinDVI-kompatiblerMonitormitSingleLink,derinderLageist,diehöchstmögliche
Auösungdarzustellen
• EineUSB-Maus
• EineUSB-Tastatur
Hinweis:EinePS/2-Mausund–TastaturkönnenüberdenmitdemCM0264
mitgelieferten Adapter angeschlossen werden.
• MikrofonundLautsprecher(optional)
Computer
FürjedenComputermussFolgendesinstalliertwerden:
• EinHD-bzw.DVI-Port
Hinweis:DieBildqualitäthängtstarkvonderQualitätderverwendetenGrakkarte
ab.FüroptimaleErgebnissesolltenSieggf.einehochwertigeGrakkarte
erwerben.
• USB-AnschlussTypA
• Audioports(optional)
System
•Prozessormit2,0GHz
•1GBRAM
Kabel
ZweiindividuelleDVI-D-Kabelsets(SingleLink)undzweiindividuelleHD-KVM-
KabelsetsgehörenbereitszumLieferumfang.
Hinweis: WennIhrHD-KonsolmonitoreingebauteLautsprecherbesitztunddie
ÜbertragungderTonsignaleüberdenHD-Portunterstützt,müssendie
LautsprechersteckeramKonsolendederHD-Kabelsetsnichtangeschlossen
werden. Der Mikrofonstecker muss mit dem geeigneten Anschluss
verbundenwerden.
Requisitos
Consola
• UnmonitorHDcompatiblecapazdemostrarlaresoluciónmáselevadaposible
• UnmonitorDVISingleLinkcompatiblecapazdemostrarlaresoluciónmáselevada
posible
• UnratónUSB
• UntecladoUSB
Nota:puedeutilizaruntecladoyunratónPS/2conelconvertidorquevieneconel
CM0264.
• Micrófonoyaltavoces(opcional)
Ordenadores
En cada ordenador se tienen que tener instalados los siguientes componentes:
• UnpuertoHDounpuertoDVI
Nota: Lacalidaddeimagenvieneafectadaporlacalidaddelatarjetagráca.Para
obtenerlosmejoresresultados,lerecomendamosqueadquieraunproducto
de alta calidad.
• PuertoUSBdetipoA
• Puertosdeaudio(opcional)
Sistema
•Procesadora2,0GHz
•1GBdememoriaRAM
Cables
EnelpaqueteyaseincluyendosjuegosdecablesKVMDVI-DSingleLink
personalizadosydoscablesKVMHDpersonalizados.
Nota: si el monitor de consola HD lleva incorporados unos altavoces y si admite la
transmisiónde audiomediantesuinterfazHD,noesnecesarioenchufarlos
conectoresdelosaltavocessituadosenlosextremosdeconsoladelosjuegos
decablesHD.Enchufeelconectordelmicrófonoalatomaadecuada.
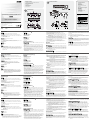
Hardware Review
A
FrontView
1. LED Status Panel
2. PortSelectionPushbuttons
3. ModeSelectionPushbutton
4. Console Audio Ports
5. USB2.0PeripheralPort
Rear View
1.USB2.0PeripheralPort
2. Console Port Section
3. HD KVM Port Section
4. DVI KVM Port Section
5. Power Jack
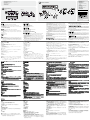
Hardware Installation
B
CableConnection
To set up your CM0264 installation, refer to the installation diagram, and do the
following:
1.PlugyourUSBkeyboardandUSBmouseintotheUSBConsolePortslocatedon
the unit’s rear panel.
2. Plug your DVI display into the Console DVI-I Single Link Port located on the unit’s
rear panel.
3. Plug your HD display into the Console HD Port located on the unit’s rear panel.
4. If you are using an IP phone headset or separate microphone and speakers, plug
them into the analog audio ports on the unit’s front panel. These audio ports have
priority over those on the rear panel.
5. If you are using separate speakers and microphone, plug them into the console
analog audio ports on the unit’s rear panel
6.UsingthecustomDVIKVMcableset,plugtheDVI-DSingleLinkcableconnector
andtheaccompanyingUSBandaudioconnectorstheircorrespondingsocketson
the rear of the switch.
Description de l’appareil
A
Vue avant
1. Voyants d'état
2.Boutonsdesélectiondeport
3.Boutondesélectiondumode
4. Ports audio de console
5.PortpériphériqueUSB2.0
Vue arrière
1.PortpériphériqueUSB2.0
2. Section des ports de console
3. Section des ports KVM HD
4. Section des ports KVM DVI
5. Prise d’alimentation
Installation du matériel
B
Branchementdescâbles
Pourcongurerl’installationdevotreCM0264,reportez-vousauschémad’installation
et procédez comme suit :
1.BranchezlescâblesdevotreclavierUSBetdevotresourisUSBsurlesportsde
consoleUSBsituésàl'arrièredel'appareil.
2.BranchezvotreécranDVIsurleportdeconsoleDVI-DSingleLinksituésurle
panneau arrière de l’appareil.
3.BranchezvotreécranHDsurleportdeconsoleHDsituéàl'arrièredel'appareil.
4. Si vous utilisez un casque pour téléphonie IP ou un microphone et des haut-parleurs
àpart,branchez-lessurlesportsaudioanalogiquessituéssurlepanneauavantde
l'appareil. Ces ports audio ont la priorité sur ceux situés sur le panneau arrière.
5.Sivousutilisezdeshaut-parleursetunmicrophoneàpart,branchez-lessurles
ports audio analogiques de console situés à l'arrière de l'appareil.
6.Àl'aidedujeudecâblesKVMDVIpersonnalisé,branchezleconnecteurducâble
DVI-DSingleLinkainsiquelesconnecteursUSBetaudioassociéssurlesprises
correspondantes à l'arrière du commutateur.
7.Al’autreextrémitéducâble,branchezlesconnecteursDVIetUSBdanslesports
Hardwareübersicht
A
Vorderseitige Ansicht
1. LED-Statusanzeigefeld
2.Portauswahl(Drucktasten)
3.Betriebsmodus-Auswahltaste
4. Konsol-Audioports
5.USB2.0-PortfürPeripheriegeräte
RückseitigeAnsicht
1.USB2.0-PortfürPeripheriegeräte
2.Konsolportabschnitt
3.HD-KVM-Portabschnitt
4.DVI-KVM-Portabschnitt
5.Stromeingangsbuchse
Hardware installieren
B
Kabelverbindung
Zur Installation des CM0264 siehe das folgende Diagramm, und gehen Sie wie folgt
vor:
1.VerbindenSieIhreUSB-TastaturundUSB-MausmitdenUSB-Konsolanschlüssen
aufderRückseitedesGerätes.
2.VerbindenSieIhrDVI-AnzeigegerätmitdemDVI-I-Anschluss(SingleLink)aufder
Geräterückseite.
3.VerbindenSieIhrHD-AnzeigegerätmitdemHD-AnschlussaufderGeräterückseite.
4.WennSieeinHeadsetfürVoIP-TelefonieodereinexternesMikrofonundexterne
Lautsprecher verwenden, schließen Sie diese an die analogen Audioports auf der
Gerätevorderseitean.DieseAudioanschlüsseerhaltenPrioritätgegenüberden
AnschlüssenderGeräterückseite.
5. Wenn Sie separate Lautsprecher und ein externes Mikrofon verwenden, schließen
SiedieseandieanalogenKonsol-AudioportsaufderGeräterückseitean.
6.VerbindenSiedieDVI-D-(SingleLink)unddieUSB-undAudio-Steckerdes
individuellenDVI-KVM-KabelsetsmitdenbetreffendenBuchsenaufderRückseite
des Switches.
7.VerbindenSieamanderenKabelendedieDVI-undUSB-Kabelmitdengeeigneten
Presentación del hardware
A
Vista frontal
1. Panel de indicadores LED
2.Botonesdeseleccióndepuerto
3.Botóndeseleccióndemodo
4. Puertos de consola de audio
5.PuertoUSB2.0paraperiféricos
Vista posterior
1.PuertoUSB2.0paraperiféricos
2.Seccióndepuertosdeconsola
3.SeccióndepuertosKVMHD
4.SeccióndepuertosKVMDVI
5.Entradadealimentación
Instalar el hardware
B
Conexióndecables
ParainstalarelCM0264,véaseeldiagramadeinstalaciónyefectúelospasoslistados
acontinuación:
1.ConecteeltecladoUSByelratónUSBalospuertosdeconsolaUSBubicadosen
el panel posterior del equipo.
2.ConectesupantallaDVIalpuertodeconsolaDVI-ISingleLinkubicadoenelpanel
posterior de la unidad.
3.ConectesupantallaHDalpuertodeconsolaHDubicadoenelpanelposteriordela
unidad.
4.SiempleaunoscascosparatelefoníasobreIPounosaltavocesymicrófono
externos,conéctelosalospuertosdeaudioanalógicosubicadosenelpanelanterior
delaunidad.Estospuertosdeaudiotienenprioridadsobrelosdelpanelposterior.
5.Siempleaaltavocesymicrófonoexternos,conéctelosalospuertosdeaudio
analógicosdeconsolaubicadosenelpanelposteriordelaunidad.
6.MedianteeljuegodecablesKVMHDpersonalizadoincluido,enchufelos
conectoresdelcableDVI-DSingleLinkydemásconectoresUSByaudioalos
puertoscorrespondientesubicadosenlaparteposteriordelconmutador.
7.Attheotherendofthecable,plugtheDVIandUSBcablesintotheirrespectiveports
onthecomputer(s)thatis(are)thesourceofDVIcontent.
8.UsingthecustomHDKVMcableset,plugtheHDcableconnectorsand
accompanyingUSBandaudioconnectors(ifrequired)intotheircorresponding
sockets on the rear of the switch.
Note:IftheHDconsoledisplayhasbuilt-inspeakersandsupportsaudiothroughits
HD interface, there is no need to use the speaker connectors on the custom
HDKVMcablesets.
9.Attheotherendofthecable,plugtheHDandUSBcablesintotheirrespectiveports
onthecomputer(s)/device(s)thatis(are)thesourceofHDcontent.
Note: If the source of HD content is non-PC, such as a DVD player, a male-to-male
HDcablecanbeusedinsteadofthecustomHDKVMcableset.
10.PlugyourUSBperipheralsintothetypeAsockets(oneeasy-accessportislocated
onthefrontforportabledevices;thesecondislocatedontherear).
11. Power on the displays.
12. Plug the power adapter that came with the CM0264 package into an AC power
source,thenplugthepoweradaptercableintotheswitch’spowerjack.
13. Power on the computers/devices.
Operation
There are four convenient methods to access the computers: manual, hotkey, mouse,
andGraphicalUserInterface(GUI).
Manual Switching
TheModeselectionpushbuttonandthepushbuttonsthatcorrespondtoeachporthave
threeicons–KVM,audio,andUSB.TheiconsontheModepushbuttonlightupwhen
theModepushbuttonispressedtoindicatecyclingthroughthecorrespondingKVM,
audio,andUSBmodes.Pressaportselectionpushbuttontobringtheselectedfocus
to the corresponding port.
Note: Manual switching differs slightly for Single and Dual Console operation. Please
seetheUserManualforfulldetails.
KeyboardPortOperation
The CM0264 provides an extensive, easy-to-use hotkey function that makes it
correspondantsdel’ordinateur(desordinateurs)constituantlasourceducontenu
DVI.
8.Àl'aidedujeudecâblesKVMHDpersonnalisé,branchezlesconnecteursducâble
HDainsiquelesconnecteursUSBetaudioassociés(sinécessaire)surlesprises
correspondantes situées à l'arrière du commutateur.
Remarque: si l’écran de console HD comprend des haut-parleurs intégrés et
s'il prend en charge l'audio à travers son interface HD, il n'est pas
nécessaire d'utiliser les connecteurs pour haut-parleurs situés sur les
jeuxdecâblesKVMHD.
9.Al’autreextrémitéducâble,branchezlesconnecteursHDetUSBdanslesports
correspondantsdel’ordinateur(desordinateurs)oudel’appareil(desappareils)
constituant la source du contenu DVI.
Remarque: Si la source du contenu HD n’est pas un ordinateur, par exemple
lorsqu’ils’agitd’unlecteurdeDVD,ilestpossibled’utiliseruncâbleHD
mâle-mâleàlaplacedujeudecâblesKVMHDpersonnalisé.
10.BranchezvospériphériquesUSBsurlesprisesdetypeA(l'uneestsituéeàl'avant
pourenfaciliterl’accèspourlesappareilsportables,tandisquel'autreestà
l'arrière).
11. Allumez les écrans.
12.Branchezl'adaptateursecteurfourniavecvotreCM0264suruneprisedecourant,
puisbranchezlecâbledel’adaptateursecteurdanssurlaprised'alimentationdu
commutateur.
13. Allumez les ordinateurs/appareils.
Utilisation
Il existe quatre méthodes pratiques pour passer accéder aux ordinateurs : la méthode
manuelle, les touches de raccourci, la souris et l'interface graphique utilisateur.
Commutation manuelle
Leboutondesélectiondumodeetlesboutonscorrespondantàchaqueport
présententtroisicônes:KVM,audioetUSB.Lesicônessituéessurleboutondemode
s’allument lorsque l’on appuie sur ce dernier pour indiquer la commutation entre les
modesKVM,audioetUSBcorrespondants.Appuyezsurunboutondesélectionde
port pour passer au port correspondant.
Remarque: La commutation manuelle diffère légèrement selon que l’on est en mode à
BuchsendesComputersbzw.derComputer,diealsDVI-Signalquelleverwendet
werden sollen.
8.VerbindenSiedieHD-undUSB-sowieAudio-Stecker(fallserforderlich)des
individuellenHD-KVM-KabelsetsmitdenbetreffendenBuchsenaufderRückseite
des Switches.
Hinweis:WennIhrHD-KonsolmonitoreingebauteLautsprecherbesitztunddie
ÜbertragungderTonsignaleüberdenHD-Portunterstützt,müssen
dieLautsprechersteckerdesindividuellenHD-KVM-Kabelsetsnicht
angeschlossen werden.
9.VerbindenSieamanderenKabelendedieHD-undUSB-Kabelmitdengeeigneten
BuchsendesComputersbzw.derComputer,diealsHD-Signalquelleverwendet
werden sollen.
Hinweis:FallsSiekeinenPCalsHD-Signalquelleverwendenmöchten(also
z.B.einenDVD-Player),müssenSieanstelledesindividuellenHD-
KVM-KabelsetseinHD-Kabelverwenden,daseinenSteckerdesTyps
„Männlein“proEndebesitzt.
10.VerbindenSieIhreUSB-GerätemitdenTyp-A-Anschlussbuchsen(dieeine
bendetsichaufderGerätevorderseite,dieandereaufder-rückseite).
11. Schalten Sie die Displays ein.
12.VerbindenSiedasmitdemCM0264mitgelieferteNetzteilmiteinerstromführenden
SteckdoseundanschließendmitderStromeingangsbuchseamSwitch.
13.SchaltenSiedieComputerbzw.Geräteein.
Bedienung
EsgibtvierpraktischeMöglichkeiten,aufdieangeschlossenenComputerzuzugreifen:
manuell,perHotkey-Tastenkombinationen,überdieMausundüberdiegrasche
Benutzeroberäche.
Manuelle Portumschaltung
DerDrucktasterzurAuswahlderBetriebsartsowiedieDrucktaster,diejedemPort
zugeordnetsind,sindmitdreiSymbolenverknüpft:KVM,AudioundUSB.DieSymbole
desBetriebsarten-Auswahlschaltersleuchten,wennderDrucktasterzurAuswahl
derBetriebsartgedrücktwird.DamitwirddiezyklischeUmschaltungzwischenKVM-
Steuerung,TonübertragungundUSB-Signalübertragungsignalisiert.DrückenSieeinen
Port-Auswahlschalter,umdieKVM-SteuerungaufdenComputerdesbetreffendes
7.Enelotroextremodelcable,enchufeloscablesDVIyUSBenlospuertos
correspondientes de los ordenadores que desee emplear como fuente de los
contenidos DVI.
8.MedianteeljuegodecablesKVMHDpersonalizadoincluido,enchufelos
conectoresdelcableHDydemásconectoresUSByaudio(sifueranecesario)alos
puertoscorrespondientesubicadosenlaparteposteriordelconmutador.
Nota: si la pantalla de consola HD lleva incorporados unos altavoces y si admite
latransmisióndeaudiomediantesuinterfazHD,noesnecesarioenchufar
los conectores de los altavoces situados en los extremos de consola de los
juegosdecablesKVMHDpersonalizados.
9.Enelotroextremodelcable,enchufeloscablesHDyUSBenlospuertos
correspondientes de los ordenadores o dispositivos que desee emplear como fuente
de los contenidos HD.
Nota: SilafuentedeseñalHDnoesunPC(p.ej.unreproductordeDVD),enlugar
deljuegodecablesKVMHDpersonalizadotendráqueemplearuncableHD
con un conector macho en cada extremo.
10.ConectesusperiféricosUSBalospuertosdetipoA(unodelfácilaccesoubicado
enelpanelanterioryelsegundoenelpanelposteriordelequipo).
11. Encienda las pantallas.
12.ConecteunextremodeladaptadordealimentaciónincluidoconelCM0264auna
tomaeléctricayelotroextremoalaentradadealimentacióndelconmutador.
13. Encienda los ordenadores o dispositivos.
Funcionamiento
Hay cuatro formas muy prácticas de acceder a los ordenadores: manual, por teclas de
accesodirecto,pormediodelratónyatravésdelainterfazgrácadeusuario.
Conmutaciónmanual
Elpulsadordeseleccióndemodoylospulsadoresquecorrespondenacadapuerto
llevantresiconos–KVM,AudioyUSB.Losiconosdelpulsadordeselecciónde
modoseiluminanalaccionarestepulsadorparaindicarlaconmutacióncíclicaentre
elcontrolKVM,latransmisióndeaudioyladedatosUSB.Accioneelpulsadorde
seleccióndepuertosparapasarelcontrolseleccionadoalordenadorconectadoal
puerto correspondiente.
CM0264
convenienttocontrolandcongureyourKVMinstallationfromthekeyboard.Hotkeys
provideindependentswitchingoftheKVM,USBhubandaudiofocus.Youcangive
onecomputertheKVMconsolefocus,anothertheUSBhubfocus,andtheothertwo
the audio focus.
AllportswitchesbeginwithtappingtheScrollLockkeytwice.
Note: If using the Scroll Lock key conflicts with other programs running on the
computer,theCtrlkeycanbeused,instead.ForfulldetailsoftheCM0264’s
hotkey, please see the user manual.
Cursor Shift
The CM0264 offers dual display operation with one DVI display and one HD display.
Whentwo displaysarebeingusedattheconsole,yourconsolemousecursor can
move across from one display to another. This is a port switching function: the display
where the mouse cursor is positioned always has the KVM focus. This feature is only
availablewhenyouareusingadualdisplayconsole.
GUIOperation
The CM0264 has Graphical User Interface (GUI) for convenient, user-friendly
operation.TheGUIprovidesportswitchingviaMatrixWindows,le-transferbetween
PCs,easymonitoring,andotherinnovativedesktopcontrolfunctions.TheGUIcanbe
operatedbywindowsplatformsonly,butotherOScanbeviewedandaccessedusing
theGUI’sfeatures.
Note: ForfulldetailsoftheCM0264GUIoperation,pleaseseetheusermanual.
uneseuleconsoleouenmodedoubleconsole.Reportez-vousaumanuel
d'utilisation pour plus de détails.
Fonctionnementduportclavier
Le CM0264 propose un mode raccourci clavier complet et simple d’utilisation qui
permetdecommanderetdecongureraisémentlecommutateurKVMàpartirdu
clavier. Les raccourcis clavier permettent de sélectionner de manière indépendante
lecontrôleKVM,leconcentrateurUSBetlecontrôleaudio.Vouspouvezdonneràun
ordinateurlecontrôledelaconsoleKVM,àunautrelecontrôleduconcentrateurUSB
et aux deux autres le contrôle audio.
Poursélectionnerunportàl'aidedestouchesderaccourci,vousdevezd'abord
appuyerdeuxfoissurlatoucheArrêtdél.
Remarque:silatoucheArrêtdélcréedesconitsavecd'autresprogrammesactifs,
utilisez la touche Ctrl à la place. Pour plus de détails sur les raccourcis
clavier du CM0264, reportez-vous au manuel d’utilisation.
Déplacement du curseur
LeCM0264proposeunmodedoubleafchageavecunécranDVIetunécranHD.
Lorsque deux écrans sont utilisés avec la console, vous pouvez déplacer le curseur
de la souris de la console d'un écran à l'autre. Il s’agit d’une fonction de commutation
deport:l’écranoùsetrouvelecurseurdelasourisdisposetoujoursducontrôle
KVM.Cettefonctionn’estdisponiblequelorsquevousutilisezuneconsoleàdouble
afchage.
Fonctionnementdel’interfaceutilisateurgraphique
LeCM0264possèdeuneInterfaceutilisateurgraphique(GUI)permettantune
utilisation pratique et conviviale. L’interface utilisateur graphique permet la commutation
deportparlebiaisMatrixWindows,letransfertdechiersentreordinateurs,une
surveillancefacileainsiqued’autresfonctionsdecontrôledebureauinnovantes.
L’interface utilisateur graphique ne peut être contrôlée qu’en passant par une plate-
formeWindowsmaisilesttoutdemêmepossibledevisualiserd’autressystèmes
d’exploitation et d’y accéder en utilisant les fonctionnalités de l’interface utilisateur
graphique.
Remarque: Pour plus de détails sur le fonctionnement de l’interface utilisateur
graphique du CM0264, reportez-vous au manuel d’utilisation.
Ports umzuleiten.
Hinweis:DiemanuellePortumschaltungfüreineeinzigeKonsoleunterscheidetsich
leichtvonderPortumschaltungbeizweiangeschlossenenKonsolen.Für
weitereDetailssiehedasBenutzerhandbuch.
PortüberdieTastaturumschalten
DankderexiblenHotkey-FunktionenkönnenSiedenCM0264bequemüberdie
TastaturIhrerKVM-Konsolesteuern.DieHotkeysermöglicheneinunabhängiges
UmschaltenzwischenKVM,USB-HubundAudiosignal.SokönnenSiez.B.die
KVM-SteuerungaufeinenComputerlegen,denUSB-Hubaufeinenzweitenunddie
TonsignalevoneinemdrittenComputerüberwachen.
DiePortumschaltungerfolgtgrundsätzlichdurchdoppeltesBetätigenderTasteRollen.
Hinweis: WenndieTasteRollenmitanderenProgrammeninKoniktgerät,können
Sie anstelle dessen auch die Taste Strg verwenden. Eine umfassende
BeschreibungallerHotkey-TastenkombinationendesCM0264entnehmen
SiedemBenutzerhandbuch.
CursorüberzweiBildschirmebewegen
DerCM0264unterstütztdenZweischirmbetriebbeigleichzeitigerVerwendungeines
DVI-undeinesHD-Displays.WennSiezweiBildschirmeanIhreKonsoleanschließen,
könnenSiedenMauszeigervoneinemMonitoraufdenanderenbewegen.Dies
bewirktgleichzeitigeinePortumschaltung.DerMonitor,aufdemsichderMauszeiger
bendet,übernimmtdieKVM-Steuerung.DieseFunktionistnurverfügbar,wennSie
zweiBildschirmeanIhreKonsoleangeschlossenhaben.
GrascheBenutzeroberäche
DiegrascheBenutzeroberächeermöglichteineeinfacheundbequemeBedienung
desCM0264.DiegrascheBenutzeroberächeunterstütztdiePortumschaltung
übereineFenstermatrix,dieDateiübertragungzwischenPCs,einfache
Überwachungsmöglichkeitenundweitere,innovativeDesktop-Steuerungsfunktionen.
DiegrascheBenutzeroberächekannnurunterWindowsbedientwerden.DieAnsicht
undderZugriffaufComputermitanderenBetriebssystemenistaberüberdiegrasche
Benutzeroberächemöglich.
Hinweis:EineumfassendeBeschreibungallerFunktionendergraschen
BenutzeroberächedesCM0264entnehmenSiedemBenutzerhandbuch.
Nota:La conmutación manual funcionade manera ligeramentediferente para
consolasindividualesyconsolasdobles.Paramásdetalles,consulteelManual
del usuario.
Conmutacióndepuertosporteclado
ElCM0264ofreceunafuncióndeteclasdeaccesodirectoquepermitecontrolar
ycongurarlainstalaciónKVMatravésdelteclado.Lasteclasdeaccesodirecto
permitenunaconmutaciónindependienteentrecontrolKVM,concentradorUSBy
señalesdeaudio.Porejemplo,podráasignarelcontrolKVMaunordenador,mientras
otrotranserelosdatosdelconcentradorUSByescuchaelsonidoprocedentedeun
tercer ordenador.
Paraseleccionarunpuertomedianteteclasdeaccesodirecto,primerodebepulsar
dosveceslateclaBloqDespl.
Nota: sila teclaBloq Despl esutilizada por otros programasinstalados y crea
conictos,puedeemplearlateclaCtrlensulugar.Paramásinformaciónsobre
las teclas de acceso directo del CM0264, consulte el Manual del usuario.
Conmutaciónpordesplazamientodelratón
El CM0264 admite un funcionamiento a dos pantallas con una pantalla DVI y una
pantalla HD. Cuando tenga conectadas dos pantallas en la misma consola, podrá
moverelpunterodelratóndeconsoladeunapantallaaotra.Éstaeslafunciónde
conmutacióndepuertos:lapantalladondeseencuentreelpunterodelratóneslaque
tieneelcontrolKVM.Estafunciónsolamenteestádisponiblesiutilizaunaconsolade
dos pantallas.
Conmutaciónporinterfazgrácadelusuario
Lainterfazgrácadeusuario(GUI)delCM0264ofreceunmanejoycontrolfáciles
delsistema.Lainterfazgrácadelusuariopermitelaconmutacióndepuertospor
medio de una matriz de ventanas, la transferencia de archivos entre PCs, una fácil
monitorizaciónyotrasfuncionesinnovadorasdecontroldeescritorio.Lainterfaz
grácadelusuariosólofuncionabajoplataformasWindows,peropermitevisualizary
accederaordenadoresquetrabajenconotrossistemasoperativos.
Nota:ParamásinformaciónsobrelainterfazgrácadelCM0264,consulteelManual
del usuario.
The following contains information that
relates to China:
Online Registration
International:
http://support.aten.com
North America:
http://www.aten-usa.com/product_
registration
Technical Phone Support
International:
886-2-86926959
North America:
1-888-999-ATEN Ext: 4988
United Kingdom:
44-8-4481-58923
All information, documentation, and
specicationscontainedinthisQuickStart
Guidearesubjecttochangewithoutprior
notificationbythemanufacturer.Please
visitourwebsitetofindthemostupto
date version.
Patent No.
CN ZL 02824593.8
CN ZL 200810086111.3
TW I220489
TW 203183
TW I350464
US6564275
US6957287
US7340556
US7472217
US7631123
JP 4558319
JP 4651633
4
1
9
11
3 2 7 5
9
7
Rear View
1
4
5
2 23
2 23
32
5
1 3
4 4
1 CM0264 2x4 DVI-HD Audio/Video Matrix KVMP™ Switch
2CustomHDKVMCableSets
2CustomDVI-DKVMCableSets
1 Power Adapter
1USB-to-PS/2Converter
1FootPadSet(4pcs)
1UserInstructions
Package Contents
www.aten.com
www.aten.com
www.aten.com
www.aten.com
Hardware Review
FrontView
A
B
Hardware Installation
2
2
2
2
3
3
3
7
9
4
8
5
4
5
12
10
10
2
1
1
1
5
6
4 4
2 3 3

www.aten.com
サポートお問合せ窓口:+81-3-5615-5811
www.aten.com
技術服務專線:
02-8692-6959
Guida rapida dello switch Matrix 2x4 KVMP DVI-HD Audio/Video CM0264
CM0264
2×4
デジタル オーディオ/ビデオ マトリックスKVMPスイッチ クイックスタートガイド
CM0264 2x4 DVI-HD
音訊/視訊 矩陣式
KVMP™
切換器快速安裝卡
The following contains information that
relates to China:
Online Registration
International:
http://support.aten.com
North America:
http://www.aten-usa.com/product_
registration
Technical Phone Support
International:
886-2-86926959
North America:
1-888-999-ATEN Ext: 4988
United Kingdom:
44-8-4481-58923
4
1
9
11
3 2 7 5
Rear View
1
4
5
2 23
2 23
32
5
1 3
4 4
1 CM0264 2x4 DVI-HD Audio/Video Matrix KVMP™ Switch
2 Custom HD KVM Cable Sets
2 Custom DVI-D KVM Cable Sets
1 Power Adapter
1 USB-to-PS/2 Converter
1 Foot Pad Set (4 pcs)
1 User Instructions
Hardware Review
Front View
A
B
Hardware Installation
2
2
2
2
3
3
3
4
8
5
4
5
12
10
10
2
1
1
1
5
6
4 4
2 3
3
9
7
7
9
Requisiti
Console
• UnmonitorcompatibileHDconlarisoluzionepiùaltapossibile
• UnmonitorcompatibileDVISingleLinkconlarisoluzionepiùaltapossibile
• UnmouseUSB
• UnatastieraUSB
Nota:TastieraemousePS/2possonoessereutilizzaticonilconvertitorecontenuto
nellaconfezionedelCM0264
• Microfonoedaltoparlanti(opzionale)
Computer
In ogni computer deve essere installato il seguente equipaggiamento:
• UnaportaHDoDVI
Nota: Laqualitàdelladisplaycardinuiscesullaqualitàdellavisualizzazione.Per
ottenereilrisultatomigliore,siconsigliadiacquistareunprodottodiqualità
alta.
• PortaUSBtipoA
• Porteaudio(opzionali)
Sistema
•processoreda2.0Ghz
•1GBRAM
Cavi
AllaconfezionesonoacclusiduecaviDVI-DSingleLinkKVMpersonalizzatieduecavi
HDKVMpersonalizzati.
Nota: Se il monitor della console HD è dotato di altoparlanti incorporate e supporta
l’audiopermezzodell’interfacciaHD,iconnettorideglialtoparlantinondevono
essere collegati ai terminali della console dei cavi HD. Collegare il microfono alla
presa appropriata.
必要ハードウェア環境
コンソール
•
使用する解像度を表示可能なHD対応モニター
•
使用する解像度を表示可能なDVIシングルリンク対応モニター
•
USBマウス
•
USBキーボード
注意: 製品同梱のPS/2-USBコンバーターを使用して、PS/2キーボードやPS/2マウ
スも使用可能です。
•
マイク・スピーカー (オプション)
コンピューター
接続する各コンピューターが下記のインターフェースに対応している必要がありま
す。
•
HDまたはDVIビデオポート
注意: ビデオ表示はビデオカードに依存しますので、ご注意ください。
•
USB タイプAポート
•
オーディオポート (オプション)
システム
•
2.0 GHzプロセッサー
•
1GB RAM
ケーブル
DVI-DシングルリンクKVMケーブルが2本と、HD KVMケーブルが2本、製品に同梱
されております。
注意: HDインターフェースはモニターの内蔵スピーカーによるオーディオ出力をサポ
ートしますので、別途オーディオケーブルを接続する必要はありません。マイ
クロフォンは適切なコネクタに接続してください。
A
系統需求
控制端
•
一台HD螢幕,其相容於可能使用的最高解析度
•
一台DVI Single Link螢幕,其相容於可能使用的最高解析度
•
一組USB滑鼠
•
一組USB鍵盤
注意: 可使用CM0264包裝中所提供的轉換器以使用PS/2介面的鍵盤和滑鼠。
•
麥克風和喇叭(選擇性)
電腦
各台電腦必須安裝以下設備:
•
一個HD連接埠或DVI連接埠
注意: 顯示卡會影響顯示的品質;為確保最佳使用效果,建議你購買較高品質的產品。
•
USB Type A 連接埠
•
音訊連接埠 (選擇性)
系統
•
2.0 Ghz 處理器
•
1GB 記憶體
線材
包裝內附有二條特製的DVI-D Single Link KVM線材組和二條特製的HD KVM線材組。
注意: 如果HD控制端螢幕內建喇叭並支援HD介面的音訊,那麼控制端HD線材的另一端不
需連接喇叭連接頭。麥克風插孔應連接至適合的位置。
Hardware
A
Visione anteriore
1.PannellodelLEDdistato
2.Pulsantidiselezionedellaporta
3.Pulsantediselezionedellamodalità
4. Porte di collegamento audio alla console
5. Porta USB 2.0 periferica
Visione posteriore
1. Porta USB 2.0 periferica
2.Sezionedellaportadicollegamentoallaconsole
3.SezionedellaportaHDKVM
4.SezionedellaportaDVIKVM
5.Presad’alimentazione
Installazione dell’hardware
B
Connessione del cavo
PerinstallareilCM0264fareriferimentoall’illustrazionedell’installazioneeprocedere
come segue:
1. Collegare la tastiera ed il mouse USB alle porte USB della console poste sul
pannello posteriore del dispositivo.
2.CollegareilmonitorDVIallaportaDVI-ISingleLinkdellaconsolepostasulpannello
posteriore del dispositivo.
3. Collegare il monitor HD alla porta HD della console posta sul pannello posteriore del
dispositivo.
4.SesiutilizzanounsetdicufaemicrofonoperIPphoneomicrofonoealtoparlanti
separati, collegarli alle porte audio analogiche sul pannello anteriore del dispositivo.
Questeporteaudiohannolaprioritàsuquelledelpannelloposteriore.
5.Sesiutilizzanomicrofonoealtoparlantiseparati,collegarlialleporteaudio
analogiche della console sul pannello posteriore del dispositivo.
ハードウェア概要
A
フロントビュー
1. LEDステータスパネル
2. ポート選択プッシュボタン
3. モード選択プッシュボタン
4. コンソールオーディオ
5. USB 2.0デバイスポート
リアビュー
1. USB 2.0デバイスポート
2. コンソールポート
3. HD KVMポート
4. DVI KVMポート
5. 電源ジャック
ハードウェアセットアップ
B
ケーブルの接続
CM0264をセットアップするには、下記の手順に従って作業してください。
1. USBキーボードとUSBマウスを製品リアパネルにあるコンソールポートのUSBコ
ネクタに接続してください。
2. DVIモニターを製品リアパネルにあるコンソールポートのDVI-Iシングルリンクポー
トに接続してください。
3. HDモニターを製品リアパネルにあるコンソールポートのHDポートに接続してくだ
さい。
4. IPフォンヘッドセットやその他マイク/スピーカーを使用する場合は、製品フロン
トパネルにあるアナログオーディオポートに接続してください。フロントパネルの
アナログオーディオポートは、リアパネルのオーディオポートに優先しています。
A
B
B
硬體檢視
A
前視圖
1. LED狀態面板
2. 連接埠選擇按鍵
3. 模式選擇按鈕
4. 控制端音源連接埠
5. USB 2.0 週邊連接埠
背視圖
1. USB 2.0 週邊連接埠
2. 控制端連接埠區
3. HD電腦連接埠區
4. DVI電腦連接埠區
5. 電源插孔
硬體安裝
B
連接線材
安裝CM0264,請參考安裝連線圖,並執行如下:
1. 請將USB鍵盤及滑鼠,插入KVM切換器後方之USB控制端連接埠。
2. 請將DVI顯示器插入切換器後方控制端的DVI-I Single Link連接埠。
3. 請將HD顯示器插入切換器後方控制端的HD連接埠。
4. 如需使用IP電話耳機或者單獨的麥克風和喇叭,將它們插至前方面板上類比音訊連接
埠。相較於插在切換器後方的麥克風跟喇叭,可優先使用音訊功能。
5. 如需使用到喇叭和麥克風,則將喇叭和麥克風插入切換器後方面板上的控制端類比音
訊埠。
6. 使用特製的DVI KVM線材組時,將DVI-D Single Link線材連接頭和USB、音訊連接頭連
接至相對應切換器的後方插座上。
6.QuandosiutilizzailcavoDVIKVMpersonalizzato,collegareilconnettoredelcavo
DVI-DSingleLinkeiconnettoriaudioeUSBcheloaccompagnanoallerelative
prese sul retro dello switch.
7.All’altraestremitàdelcavo,inserireicaviDVIeUSBnellerispettiveportesul/sui
computer da cui provengono i contenuti DVI.
8.QuandosiutilizzailcavoHDKVMpersonalizzato,collegareiconnettoridelcavoHD
e i connettori audio e USB che lo accompagnano (se necessario) alle relative prese
sul retro dello switch.
Nota: Se il monitor della console HD è dotato di altoparlanti incorporate e supporta
l’audiopermezzodell’interfacciaHD,iconnettorideglialtoparlantinondevono
esserecollegatialcavoHDKVMpersonalizzato.
9.All’altraestremitàdelcavo,inserireicaviHDeUSBnellerispettiveportesul/sui
computer da cui provengono i contenuti HD.
Nota: Se i contenuti HD non proviene da un PC, ma da un dispositivo come un
lettoreDVD,èpossibileutilizzareuncavoHDmaschio-maschioalpostodel
cavo HD KVM.
10. Collegare le periferiche USB alle prese di tipo A (una porta con l’accesso facilitato
si trova sul lato anteriore, per i dispositivi portatili; la seconda è situata sul lato
posteriore).
11. Accendere gli schermi.
12.Inserirelaspinadell’alimentatoreindotazionealCM0264inunapresadicorrente
CA,quindiinserireilcavodell’alimentatorenellapresad’alimentazionedelloswitch.
13. Accendere i computer/dispositivi.
Funzionamento
Esistono quattro metodi per accedere ai computer: manuale, tasto di scelta rapida,
mouse e GUI (Graphical User Interface).
Commutazionemanuale
Il pulsantediselezionedellamodalitàeipulsanticorrispondentiaogniportasono
indicatidatreicone–KVM,audioeUSB.LeiconesulpulsanteModalitàsiaccendono,
quando il pulsante viene premuto, per indicare uno spostamento ciclico fra le relative
5. マイク/スピーカーを使用する場合は、製品リアパネルにあるアナログオーディオポ
ートに接続してください。
6. 同梱のDVI KVMケーブルを製品リアパネルに接続してください。
7. DVI KVMケーブルのもう一端をDVI出力コンピューター/デバイスに接続してくだ
さい。
8. 同梱のDVI KVMケーブルを製品リアパネルに接続してください。
注意: デバイスがHDインターフェース経由のオーディオ出力をサポートしている場
合は、KVMケーブルのオーディオプラグは使用しません。
9. HD KVMケーブルのもう一端をHD出力コンピューター/デバイスに接続してくださ
い。
注意: HD出力デバイスがコンピューターでない場合(DVDプレーヤーなど)は、同梱
のケーブルの代わりに、一般的なHDケーブル(オス-オス)を使用することも可
能です。
10. USB周辺機器はUSBタイプAポートに接続してください。USBポートはフロント/
リアに1つずつ用意されています。
11. モニターの電源をオンにしてください。
12. 製品に同梱されている電源アダプターを使用して、CM0264の電源をオンにして
ください。
13. コンピューター/デバイスの電源をオンにしてください。
操作方法
コンピューターの切替には、4つの方法があります:手動切替、ホットキー、マウス操
作による切替、GUI(グラフィカルユーザーインターフェース)
手動切替
製品にはモード選択プッシュボタン(KVM、オーディオ、USBのアイコン付き)とポ
ート選択プッシュボタンの二つがあります。モード選択プッシュボタン上のアイコン
は、押す度に点灯し、現在の切替モードを表示します。その状態でポート選択プッシ
ュボタンを押すと、対応するポートに切り替わります。
7. 將線材另一端的DVI、USB線材,分別插至來源端電腦相對應的連接埠。
8. 使用特製的HD KVM線材組時,將HD線材連接頭和USB、音訊連接頭(如果需要的話)連
接至相切換器後方相對應的插座上。
注意: 如果HD控制端螢幕內建喇叭並支援HD介面的音訊,那麼即不需要使用到控制端
HD線材的喇叭連接頭。
9. 使用線材另一端的HD和USB線材,分別插至HD來源端電腦相對應的連接埠
注意: 如果HD內容來源端並非個人電腦時,例如DVD光碟機,便會需要一條公頭對公
頭的HD線材即能取代特製的HD KVM線材組。
10. 請將您的USB週邊裝置,連接至USB Type A 週邊連接埠(一個位於前板,另一個位於
背板) 。
11. 開啟顯示器電源。
12. 將包裝所附的電源變壓器,插至AC電源,並將電源變壓器另外一端,插到KVM切換
器上的電源插孔。
13. 開啟電腦/裝置電源。
操作方法
CM0264提供了四種存取電腦的方式: 手動, 熱鍵, 滑鼠, 和GUI。
手動操作
按下模式選擇按鍵以及每個按鍵有三個圖示- KVM , 音源, 和USB對應連接埠按鍵做為存
取方式之一。當按下模式選擇按鍵,模式按鍵圖示亮燈時代表在KVM,音源,和USB之間循
環。按下連接埠選擇按鍵以切換至對應的連接埠上。
注意: 單一和雙重控制端手動切換操作差異性不大。如需更詳細的說明,請參考使用者說
明書。
modalitàKVM,audioeUSB.Premere uninterruttoredi selezionedellaporta per
collegarelamodalitàsceltaallaportacorrispondente.
Nota:La commutazione manualedifferisceleggermenteper ilfunzionamento a
console doppia o singola. Per tutti i dettagli consultare il Manuale per l’utente.
Funzionamentodellaportadellatastiera
LafunzioneTastidisceltarapidadelCM0264consentedicontrollareecongurare
l’installazioneKVMdallatastierainmanierarapidaesemplice.Itastidisceltarapida
consentonodicambiareindipendentementelemodalitàKVM,hubUSBeaudio.È
possibilecommutareuncomputerinmodalitàconsoleKVM,unaltroinmodalitàhub
USBealtridueinmodalitàaudio.
TuttelecommutazionidiportainizianopremendoduevolteiltastoBlocScroll.
Nota:Sel’impiegodeltastoBlocScorrentrainconittoconaltriprogrammiinusosul
computer,èpossibileutilizzareiltastoCtrl.Peridettaglisuitastidisceltarapida
del CM0264, consultare il manuale per l’utente.
Cambio di cursore
IlCM0264un funzionamentoadoppioschermocon unoschermoDVIe unoHD.
Quando sulla console vengono impiegati due schermi, il cursore del mouse può
spostarsidaunoschermoall’altro.Questaèunafunzione delcambiodiporta:Lo
schermoincuièposizionatoilcursoredelmouseèsempreinmodalitàKVM.Questa
funzioneèdisponibilesoloquandosiutilizzaunaconsoleadoppioschermo.
FunzionamentoGUI
IlCM0264èdotatodiunaGraphicalUserInterface(GUI),chegarantiscefacilitàe
praticitàd’uso.LaGUIconsentelacommutazionedellaportatramiteMatrixWindows,
iltrasferimentodilefraPC,unfacilecontrolloealtreinnovativefunzionidicontrollo
deldesktop.PuòesserecontrollatasolodapiattaformeWindows,matramitequesta
funzioneèpossibilevisualizzareeaccedereadaltrisistemioperativi.
Nota: PeridettaglisulfunzionamentodellaGUIdelCM0264,consultareilmanuale
per l’utente.
注意: 手動切替の方法は、シングルコンソールモードとデュアルコンソールモードで
少し異なります。詳細はユーザーマニュアルをご確認ください。
キーボードによる切替(ホットキー)
CM0264はポート切替、本体設定を行うため、キーボードによる便利なホットキー機
能を搭載しています。ホットキー操作ではKVM、USB、オーディオの独立切替を行
うことが可能です。
すべてのホットキー操作は[Scroll Lock] 2度押しで始めます。
注意: [Scroll Lock]キーが他のアプリケーション操作と競合する場合は、代わりに
[Ctrl]キーを使用することが可能です。 ホットキー操作の詳細はユーザーマニュ
アルをご確認ください。
マウス操作による切替
CM0264はDVI&HDのデュアルモニターをサポートしています。二つのモニターが
デュアルモニターとして使われている場合は、マウスカーソルは片方のモニターから
もう一方のモニターへ移動させることができます。個別のモニターとして別々のコン
ピューターを表示させている場合は、KVMフォーカスが合わせられているモニターに
マウスカーソルが表示されています。
GUI操作
CM0264はユーザーフレンドリーなGUI操作が可能です。GUIではマトリックスウィ
ンドウによるポート切替、PC間のファイル転送、簡単なモニタリングなど革新的なデ
スクトップ機能を提供します。GUI操作はWindowsのみをサポートしますが、GUIを
使用して、他のOSのPCへ切り替えることは可能です。
注意: GUI操作の詳細はユーザーマニュアルをご確認ください。
鍵盤操作
CM0264提供容易使用的熱鍵功能, 可透過鍵盤的熱鍵控制和設定KVM。熱鍵提供
KVM,USB週邊和音訊訊號的獨立切換。其功能為讓一台電腦有KVM控制權、, 一台電腦有
USB週邊控制權以及另外兩台電腦有音源的控制權
使用熱鍵切換連接埠,必須先按Scroll Lock按鍵二次。
注意: 如果使用Scroll Lock鍵會衝突到電腦正在執行的其他程式,可將Scroll Lock鍵取代
為Ctrl鍵。如需更詳細的熱鍵說明,請參考使用者說明書。
滑鼠指標移動操作
CM0264提供DVI和HD的雙介面顯示裝置操作。當使用雙螢幕時,可使用控制端的滑鼠將
游標從一顯示裝置橫跨至另外一個顯示裝置。此為連接埠切換功能. 只有在使用雙螢幕
模式下,才能執行此一功能。
GUI 操作
GUI為提供使用者另外一個方便的操作方式。GUI提供了透過矩陣式視窗切換連接埠的
功能,在兩台電腦間做檔案傳輸,容易監控,以及其他多項創新的功能。GUI介面目前僅能在
Windows 執行,其他的作業系統可透過GUI的特性以檢視並存取。
注意: 如需更詳細的GUI操作說明,請參考使用者說明書。
Allinformation,documentation,andspecications
contained inthis QuickStartGuidearesubject
to change without prior notification by the
manufacturer.Pleasevisitourwebsitetondthe
most up to date version.
www.aten.com
www.aten.com Phone: 02-467-6789
-
 1
1
-
 2
2


in altre lingue
- français: ATEN CM0264 Guide de démarrage rapide
- español: ATEN CM0264 Guía de inicio rápido
- Deutsch: ATEN CM0264 Schnellstartanleitung
- 日本語: ATEN CM0264 クイックスタートガイド