
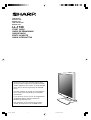
LCD Monitor
Moniteur LCD
Monitor LCD
LCD Farbmonitor
Monitor LCD
LL-173C
START GUIDE
GUIDE DE DÉMARRAGE
GUÍA DE INICIO
ERSTE SCHRITTE
GUIDA INTRODUTTIVA
Please also refer to the operation manual in the
[manual] folder included in the supplied CD-ROM.
Veuillez également vous référer au mode d'emploi
inclus dans le dossier du [manual] du CD-ROM
fourni.
Consulte asimismo el manual de funcionamiento
de la carpeta [manual] incluida en el CD-ROM
suministrado.
Lesen Sie dazu auch in der auf der mitgelieferten
CD-ROM im Ordner [manual] enthaltenen
Bedienungsanleitung nach.
Fate riferimento anche al manuale d'uso della
cartella [manual] inclusa nel CD-ROM fornito.
LL-173C_SG.P65 2005/01/24, 16:591

2
Table of Contents / Table des matières / Índice / Inhaltsverzeichnis / Indice
Notice for Users in the UK . . . . . . . . . . . . . . . . . . . . . . . . . . . . . . . . . . . . . . . . . . . . . . . . . . . . . . . . . . . . . 2
Notice for Users in the USA . . . . . . . . . . . . . . . . . . . . . . . . . . . . . . . . . . . . . . . . . . . . . . . . . . . . . . . . . . . 3
Notice for Users in Europe . . . . . . . . . . . . . . . . . . . . . . . . . . . . . . . . . . . . . . . . . . . . . . . . . . . . . . . . . . . . 4
English . . . . . . . . . . . . . . . . . . . . . . . . . . . . . . . . . . . . . . . . . . . . . . . . . . . . . . . . . . . . . . . . . . 5
Français . . . . . . . . . . . . . . . . . . . . . . . . . . . . . . . . . . . . . . . . . . . . . . . . . . . . . . . . . . . . . . . . . 9
Español . . . . . . . . . . . . . . . . . . . . . . . . . . . . . . . . . . . . . . . . . . . . . . . . . . . . . . . . . . . . . . . . . 13
Deutsch . . . . . . . . . . . . . . . . . . . . . . . . . . . . . . . . . . . . . . . . . . . . . . . . . . . . . . . . . . . . . . . . 17
Italiano . . . . . . . . . . . . . . . . . . . . . . . . . . . . . . . . . . . . . . . . . . . . . . . . . . . . . . . . . . . . . . . . . 21
Notice for Users in the UK
FOR CUSTOMERS IN U.K.
IMPORTANT
The wires in this mains lead are coloured in accordance with the following code:
GREEN-AND-YELLOW : Earth
BLUE : Neutral
BROWN : Live
As the colours of the wires in the mains lead of this apparatus may not correspond with the coloured
markings identifying the terminals in your plug proceed as follows:
• The wire which is coloured GREEN-AND-YELLOW must be connected to the terminal in the plug
which is marked by the letter E or by the safety earth or coloured green or green-and-yellow.
• The wire which is coloured BLUE must be connected to the terminal which is marked with the
letter N or coloured black.
• The wire which is coloured BROWN must be connected to the terminal which is marked with the
letter L or coloured red.
Ensure that your equipment is connected correctly. If you are in any doubt consult a qualified
electrician.
"WARNING: THIS APPARATUS MUST BE EARTHED."
LL-173C_SG.P65 2005/01/24, 16:592

3
Notice for Users in the USA
FCC Statement
WARNING – FCC Regulations state that any unauthorized changes or modifications to this equipment
not expressly approved by the manufacturer could void the user's authority to operate this equipment.
Note: This equipment has been tested and found to comply with the limits for a Class B digital device
pursuant to Part 15 of the FCC Rules.
These limits are designed to provide reasonable protection against harmful interference in a
residential installation. This equipment generates, uses and can radiate radio frequency energy and, if
not installed and used in accordance with the instructions, may cause harmful interference to radio
communications. However, there is no guarantee that interference will not occur in a particular
installation. If this equipment does cause harmful interference to radio or television reception, which
can be determined by turning the equipment off and on, the user is encouraged to try to correct the
interference by one or more of the following measures:
- Reorient or relocate the receiving antenna.
- Increase the separation between the equipment and receiver.
- Connect the equipment into an outlet on a circuit different from that to which the receiver is
connected.
- Consult the dealer or an experienced radio/TV technician for help.
Use nothing but the included cables and AC cord to insure compliance with FCC regulation for Class
B computing equipment.
Declaration of Conformity
SHARP LCD Color Monitor LL-173C-B
This device complies with part 15 of the FCC rules. Operation is subject to the following conditions: (1)
this device may not cause harmful interference, and (2) this device must accept any interference
received, including interference that may cause undesired operation.
Responsible Party: SHARP ELECTRONICS CORPORATION
Sharp Plaza, Mahwah, New Jersey 07430
TEL: 1-800-BE-SHARP
* As an ENERGY STA R
®
Partner, SHARP has determined that this product meets the ENERGY STAR
®
guidelines for energy efficiency.
This product utilizes tin-lead solder, and fluorescent lamp containing a small amount of mercury.
Disposal of these materials may be regulated due to environmental considerations. For disposal or
recycling information, please contact your local authorities or the Electronics Industries
Alliance: www.eiae.org
IMPORTANT:
To aid in reporting in case of loss or theft, please
record the monitor's model and serial numbers in
the space provided. The numbers are located on
the rear of the monitor.
Model No.:
Serial No.:
LL-173C_SG.P65 2005/01/24, 16:593

4
CAUTION:
TO PREVENT ELECTRICAL SHOCK, DISCONNECT THE AC CORD BEFORE SERVICING.
CAUTION:
FOR A COMPLETE ELECTRICAL DISCONNECTION, PULL OUT THE MAIN PLUG.
VORSICHT:
UM DIE STROMZUFUHR VOLLSTÄNDIG ZU UNTERBRECHEN, DEN NETZSTECKER HERAUSZIEHEN
ENTFERNEN.
ATTENTION :
POUR UN ARRET TOTAL DE L'APPAREIL, DEBRANCHEZ LA PRISE DU COURANT SECTEUR.
VARNING:
FÖR TOTAL ELEKTRISK URKOPPLING, KOPPLA UR KONTAKTEN OCH.
PRECAUCION:
PARA UNA COMPLETA DESCONEXION ELECTRICA DESENCHUFE LA CLAVIJA DE LA RED.
PRECAUCION:
A FIN DE EVITAR DESCARGAS ELÉCTRICAS, DESCONECTE EL ENCHUFE DE LA RED ANTES DE
REALIZAR CUALQUIER OPERACIÓN DE SERVICIO.
ATTENZIONE:
PER EVITARE FOLGORAZIONI, SCOLLEGATE IL CAVO DI COLLEGAMENTO ALLA RETE IN
ALTERNATA PRIMA DI EFFETTUARE UN INTERVENTO DI SERVIZIO TECNICO.
ATTENZIONE:
PER UNO SCOLLEGAMENTO ELETTRICO COMPLETO, TIRATE FUORI LA SPINA PRINCIPALE.
Notice for Users in Europe
LL-173C_SG.P65 2005/01/24, 16:594

5
EnglishDeutschFrançaisItalianoEspañolEnglish
Table of Contents
Tips and safety precautions . . . . . . . . . . . . . . . . . . . . . . . . . . . . . . . . . . . . . . . . . . . . . . . . . . . . . . . . . . . . . 5
Product description . . . . . . . . . . . . . . . . . . . . . . . . . . . . . . . . . . . . . . . . . . . . . . . . . . . . . . . . . . . . . . . . . . . 6
Connecting the cables . . . . . . . . . . . . . . . . . . . . . . . . . . . . . . . . . . . . . . . . . . . . . . . . . . . . . . . . . . . . . . . . . 6
Turning the power on . . . . . . . . . . . . . . . . . . . . . . . . . . . . . . . . . . . . . . . . . . . . . . . . . . . . . . . . . . . . . . . . . . 7
Turning the power off . . . . . . . . . . . . . . . . . . . . . . . . . . . . . . . . . . . . . . . . . . . . . . . . . . . . . . . . . . . . . . . . . . 7
Storage . . . . . . . . . . . . . . . . . . . . . . . . . . . . . . . . . . . . . . . . . . . . . . . . . . . . . . . . . . . . . . . . . . . . . . . . . . . . . 7
Troubleshooting . . . . . . . . . . . . . . . . . . . . . . . . . . . . . . . . . . . . . . . . . . . . . . . . . . . . . . . . . . . . . . . . . . . . . . 7
Specifications . . . . . . . . . . . . . . . . . . . . . . . . . . . . . . . . . . . . . . . . . . . . . . . . . . . . . . . . . . . . . . . . . . . . . . . . 8
Tips and safety precautions
- Never rub or tap the monitor with hard objects.
- The LCD panel used in this monitor is made of
glass. Pressure from hands on the LCD panel
could cause damage.
- Do not modify, disassemble, or repair the
monitor by yourself. Doing so may cause a fire,
electric shock, or injury.
- Be careful not to allow your fingers to be
pinched between the display and stand.
Location
-
Do not use the monitor where ventilation is poor,
where there is a lot of dust, where humidity is
high, or where the monitor may come into contact
with oil or steam, as this could lead to fire
.
- The vents and other openings in the cabinet are
designed for ventilation. Do not cover or block
these vents and openings since insufficient
ventilation can cause overheating and/or
shorten the life of the monitor. Do not place the
monitor on a bed, sofa, rug, or other similar
surface, or in an enclosed space since they can
block ventilation openings.
- Ensure that the monitor does not come into
contact with water or other fluids. Ensure that no
objects such as paper clips or pins enter the
monitor as this could lead to fire or electric
shock.
- Do not place the monitor on top of unstable
objects or in unsafe places. Do not allow the
monitor to come into contact with strong shocks
or vibrations. Causing the monitor to fall or
topple over may damage it.
-
Do not use in places where the monitor will be
subject to direct sunlight, near heating equipment
or anywhere else where there is likelihood of high
temperature, as this may lead to generation of
excessive heat and outbreak of fire
.
The power cord
- Do not damage the power cord, place heavy
objects on it, stretch it, or over bend it. Also, do
not add extension cords. Damage to the cord
may result in fire or electric shock.
- Use only the power cord supplied with the
monitor.
- Insert the power plug directly into the AC outlet.
Adding an extension cord may lead to fire as a
result of overheating.
- Do not remove or insert the power plug with wet
hands. Doing so could result in electric shock.
Monitor and accessory checklist
- Please check that the following items are
included in the package.
- LCD monitor (1)
- Base (1)
- Power cord (1)
- Analog signal cable (1)
(model name: 0PD5301010011)
- CD-ROM (1)
- Start guide (1)
Note:
- Use only the cables supplied with the monitor.
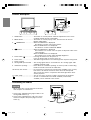
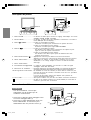
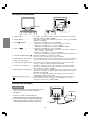
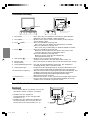
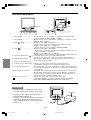
Installing the base
1.Place the base on a flat surface, such as a
desktop, and insert the stand carefully.
Insert the stand until it clicks.
CAUTION!
-
Be careful not to allow your fingers to be pinched
.
- Check that the base is firmly installed before
use. If the installation is not performed
correctly, the monitor may fall down or the
base may drop.
Stand
Base
LL-173C_SG.P65 2005/01/24, 16:595

6
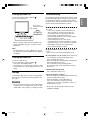
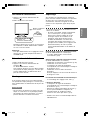
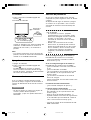
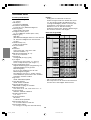
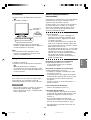
Product description
A
14
78
10
11
9
5
6
2 3
1. AUTO button ............................ This button is used to perform automatic adjustment of the screen
(CLOCK, PHASE, H-POS, and V-POS).
2. MENU button ........................... This button is used to pop-up, select, and close the On Screen
Display (OSD) Menu.
3. / MODE button ..................... When the OSD Menu is displayed:
This button is used to select menu options.
When the OSD Menu is not displayed:
This button is used to set DISPLAY MODE.
4. buttons ............................. When the OSD Menu is displayed:
These buttons are used to select an option or adjust the value of the
selected option.
When the OSD Menu is not displayed:
These buttons are used to adjust backlight brightness.
5. Power button ( ) ..................... Pressing this button turns the power on.
Press the button again to turn the power off.
6. Power LED ...............................
This LED is lit green when in use and orange when in power-saving mode
.
7. Power terminal
8. Analog RGB input terminal ..... The analog signal cable is connected here. The analog signal cable
supplied should be used.
9. Ventilation openings................ Never block the ventilation openings as this may lead to overheating
inside the monitor and result in malfunction.
10. Security lock anchor ................ By connecting a security lock (commercially available) to the security
lock anchor, the monitor is fixed so that it cannot be transported.
The security slot works in conjunction with Kensington Micro Saver
Security Systems.
11. Cable clamp ............................ You can use this to secure the cables connected to the terminals.
A ................................................. An arm or stand based on the VESA standard (commercially
available) can be attached to the monitor.
Connecting the cables
CAUTION!
- When connecting, ensure that both the monitor
and computer are switched off.
1.Connect the supplied analog signal cable to the
analog RGB terminal. (1)
2.Connect the supplied power cord to the power
terminal, and place the power plug into an AC
outlet. (2)
Computer
(1)
(1)
(2)
(2)
LL-173C_SG.P65 2005/01/24, 16:596

7
EnglishDeutschFrançaisItalianoEspañolEnglish
Turning the power on
1.Press the monitor's power button ( ).
2.Turn on the computer.
When a signal is input from the computer, the
power LED lights up green, and the screen is
displayed.
Note:
- For information on screen adjustment, refer to
the operation manual included in the supplied
CD-ROM.
Turning the power off
1.Turn the computer off.
2.Press the monitor's power button ( ).
The power LED will disappear.
If the monitor is not going to be used for a long
period of time, be sure to unplug it from the AC
outlet.
Storage
If the monitor will not be used for a long period of
time, be sure to remove the power plug from the
AC outlet.
CAUTION!
- Do not leave the monitor in contact with rubber
or plastic items for long periods of time as this
could lead to color change or change in shape.
Turn on the
computer power
supply.
ON
Press power button.
Troubleshooting
If you think the monitor may be faulty, please check
the following points before taking it to be repaired.
If afterwards it still does not work, please contact
the shop where you purchased the monitor or your
nearest Sharp authorized Service Center.
The monitor's fluorescent tubes have a limited
life span.
- If the screen darkens, persistently flickers or
does not light up, the fluorescent tube has
reached the end of its operational life span.
Please inquire at the shop where you
purchased the monitor or your nearest Sharp
authorized Service Center.
- In the initial period of use, due to the
characteristics of fluorescent tubes the screen
may flicker. (This is not a malfunction.) Should
this happen, check by first turning off the
power, then turning it on again.
No image appears on the screen (power LED is
not lit).
- Is the power cord connected properly? (p.6)
No image appears on the screen (power LED is lit)
.
- Is the computer connected properly? (p.6)
- Is the computer turned on?
- Does the computer's signal timing correspond to
monitor specifications? (p.8)
- Is the computer in power-saving mode?
Try pressing a key on the keyboard or moving
the mouse.
Control buttons do not work.
- Is the adjustment lock set? (*)
The image appears distorted.
- Does the computer's signal timing correspond to
monitor specifications? (p.8)
- Perform automatic screen adjustment. (*)
- If you can change the refresh rate on the
computer you are using, change the value to a
lower frequency. (p.8)
* Please refer to the operation manual in the
supplied CD-ROM.
LL-173C_SG.P65 2005/01/25, 09:447

8
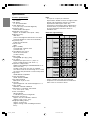
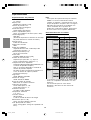
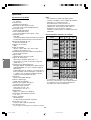
Specifications
Product specifications
Model name
LL-173C-B
LCD display
17" TFT LCD module
Actual display size
17.0" (43.3 cm) measured diagonally
Resolution (max.)
SXGA 1280 x 1024 pixels
Displayable colors (max.)
Approx. 16.19 million colors (6 bit + FRC)
Brightness (max.)
260 cd/m
2
(The screen brightness deteriorates over time.
Constant brightness cannot be maintained.)
Dot pitch (H x V)
0.264 mm x 0.264 mm
Contrast ratio
500:1
Angle of visibility
Left-right 160°; up-down 160°
(contrast ratio > 5)
Screen display size (H x V)
337.9 mm x 270.3 mm
(13.30" x 10.64")
Video signal
Analog RGB (0.7 Vp-p) [75Ω]
Sync signal
Separate Sync (TTL level: +/
–
), Sync on
Green, Composite Sync (TTL level: +/
–
)
Expansion compensation
Digital scaling (Enlarges VGA/SVGA/XGA etc. to
full screen size.)
Scaling to full screen size only is available.
You cannot scale the screen image at 1:1 or with
the aspect ratio (horizontal to vertical ratio) fixed.
Plug & Play
VESA DDC2B compatible
Power management
VESA: based on DPMS
Input signal terminal
Mini D-sub 15 pin, 3 rows
Screen tilt
Upward approx. 0° - 20°; downward approx. 0° - 5°
Power supply
100 VAC - 240 VAC, 50/60 Hz
Temperature of operating environment
5°C - 35°C (41°F - 95°F)
Power consumption
30 W maximum
1.0 W when in power-saving mode
Dimensions (W x D x H)
Approx. 377 mm x 209 mm x 392 mm
(Approx. 14.8" x 8.2" x 15.4")
Weight (Excluding cables.)
Approx. 4.4 kg; 9.7 lb.
(Approx. 3.9 kg; 8.6 lb. excluding stand and
base)
Note:
- As a part of our policy of continuous
improvement, SHARP reserves the right to make
design and specification changes for product
improvement without prior notice. The
performance specification figures indicated are
nominal values of production units. There may
be some deviations from these values in
individual units.
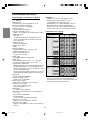
Relevant signal timings
- Recommended resolution is 1280 x 1024.
- All are compliant only with non-interlaced.
- Frequencies for Power Macintosh and the Sun
Ultra series are reference values.
Screen resolution
VESA
US text
Power
Macintosh
series
Sun Ultra
series
Hsync Vsync
Dot
frequency
LL-173C_SG.P65 2005/01/24, 16:598

9
EnglishFrançaisFrançaisItalianoEspañolEnglish
Table des matières
Conseils et mesures de sécurité . . . . . . . . . . . . . . . . . . . . . . . . . . . . . . . . . . . . . . . . . . . . . . . . . . . . . . . . . 9
Description du produit . . . . . . . . . . . . . . . . . . . . . . . . . . . . . . . . . . . . . . . . . . . . . . . . . . . . . . . . . . . . . . . . 10
Connexion des câbles . . . . . . . . . . . . . . . . . . . . . . . . . . . . . . . . . . . . . . . . . . . . . . . . . . . . . . . . . . . . . . . . 10
Activation de l'alimentation . . . . . . . . . . . . . . . . . . . . . . . . . . . . . . . . . . . . . . . . . . . . . . . . . . . . . . . . . . . . 11
Désactivation de l'alimentation . . . . . . . . . . . . . . . . . . . . . . . . . . . . . . . . . . . . . . . . . . . . . . . . . . . . . . . . . 11
Stockage . . . . . . . . . . . . . . . . . . . . . . . . . . . . . . . . . . . . . . . . . . . . . . . . . . . . . . . . . . . . . . . . . . . . . . . . . . 11
Dépannage . . . . . . . . . . . . . . . . . . . . . . . . . . . . . . . . . . . . . . . . . . . . . . . . . . . . . . . . . . . . . . . . . . . . . . . . 11
Caractéristiques techniques . . . . . . . . . . . . . . . . . . . . . . . . . . . . . . . . . . . . . . . . . . . . . . . . . . . . . . . . . . . 12
Conseils et mesures de sécurité
- Ne jamais heurter ou taper sur le moniteur avec
des objets durs.
- Le panneau LCD de cet appareil est en verre.
Appuyer les mains sur le panneau LCD peut
provoquer son endommagement.
- Évitez de modifier, de démonter, ou de réparer le
moniteur vous même. En ce faisant vous risquez
de provoquer un incendie, de vous électrocuter
ou de vous blesser.
- Prendre garde de ne pas se coincer les doigts
entre l'écran et le support.
Lieu d'installation
-
Ne pas utiliser le moniteur dans un endroit
faiblement ventilé, poussiéreux, relativement
humide, ou encore là où il est susceptible d'entrer
en contact avec de l'huile ou de la vapeur car
cela pourrait provoquer un début d'incendie.
- Les ouvertures de ventilation et autres orifices dans
le châssis sont conçus pour la ventilation. Ne pas
couvrir ou bloquer ces ouvertures de ventilations et
orifices car une ventilation insuffisante peut
provoquer une surchauffe et/ou abréger la durée de
vie du moniteur. Ne pas installer le moniteur sur un
lit, un divan, une couverture ou sur d'autres
surfaces similaires ou dans un espace clos car ils
pourraient bloquer les ouvertures de ventilation.
- S'assurer que le moniteur ne sera pas entrer en
contact avec de l'eau ou d'autres fluides.
S'assurer que des agrafes ou des attaches
trombones ne pénètrent pas à l'intérieur du
moniteur car cela pourrait provoquer un début
d'incendie ou des chocs électriques.
- Ne pas installer le moniteur au-dessus d'objets
instables ou dans des endroits peu sûrs. Faire
attention que le moniteur ne reçoive pas de
chocs important ni de vibrations. Laisser tomber
le moniteur peut l'endommager sérieusement.
-
Ne pas utiliser le moniteur dans des endroits où il est
susceptible d'être exposé à la lumière directe du soleil,
à proximité d'une source de chaleur ou partout ailleurs
où il risque d'être soumis à des températures élevées ;
cela peut mener à des dégagements excessifs de
chaleur et conduire à un début d'incendie.
Le cordon d'alimentation électrique
-
Ne pas endommager le cordon d'alimentation, ne
pas déposer d'objets lourds sur le cordon, ne pas
l'étendre ni le plier de manière excessive. Ne pas y
ajouter de rallonge non plus. Tout endommagement
du cordon d'alimentation peut entraîner un début
d'incendie ou des chocs électriques.
- Utilisez uniquement le cordon d'alimentation
fourni avec le moniteur.
- Insérer la prise d'alimentation directement dans
la prise de secteur. Ajouter une rallonge peut
entraîner une surchauffe, voire un début
d'incendie.
- Ne débranchez pas ni ne branchez la prise
d'alimentation avec des mains humides. En le
faisant, vous risquez l'électrocution.
Moniteur et liste des accessoires
- S'assurer que les éléments suivants sont bien
présents dans l'emballage :
- Moniteur LCD (1)
- Base (1)
- Cordon d'alimentation (1)
- Câble de signal analogique (1)
(nom du modèle : 0PD5301010011)
- CD-ROM (1)
- Guide de démarrage (1)
Remarque :
- Utilisez uniquement les câbles fournis avec le
moniteur.
Installation de la base
1.Placez la base sur une surface plane, telle que
celle d'un bureau, et insérez soigneusement le
support.
Insérez le support jusqu'à ce qu'on entende un clic.
ATTENTION !
- Prendre garde de ne pas se coincer les doigts.
- Vérifiez que la base est solidement installée
avant l'emploi. Si l'installation n'est pas
exécutée correctement, le moniteur peut
basculer ou la base peut tomber.
Support
Base
LL-173C_SG.P65 2005/01/24, 16:599

10
Description du produit
A
14
78
10
11
9
5
6
2 3
1. Bouton AUTO............................ Ce bouton est utilisé pour effectuer le réglage automatique sur l'écran
(CLOCK, PHASE, H-POS et V-POS).
2. Bouton MENU .......................... Ce bouton est utilisé pour faire apparaître, sélectionner et refermer le
menu OSD (On Screen Display).
3. Bouton
/ MODE .................... Lorsque le menu OSD est affiché :
Ce bouton est utilisé pour sélectionner les options du menu.
Lorsque le menu OSD n'est pas affiché :
Ce bouton est utilisé pour régler DISPLAY MODE.
4. Boutons
............................. Lorsque le menu OSD est affiché :
Ces boutons sont utilisés pour sélectionner une option ou pour
régler la valeur de l'option sélectionnée.
Lorsque le menu OSD n'est pas affiché :
Ces boutons sont utilisés pour ajuster la luminosité du rétro-
éclairage du moniteur.
5. Bouton d'alimentation (
) ......
Appuyez sur ce bouton pour mettre sous tension le moniteur.
Appuyez à nouveau sur ce bouton pour mettre le moniteur hors tension.
6. Diode d'alimentation................ Cette diode est éclairée en vert lorsque le moniteur est en cours
d'utilisation, et en orange lorsqu'il se trouve en mode d'économie
d'énergie.
7. Borne d'alimentation
8.
Borne d'entrée analogique RVB
...
Le câble de signal analogique est raccordé. Le câble de signal
analogique fourni doit être utilisé.
9. Ouvertures de ventilation ........
Ne jamais obstruer les ouvertures de ventilation car cela peut entraîner une
surchauffe à l'intérieur du moniteur et provoquer un dysfonctionnement.
10.
Ancrage du verrou de sécurité ...
En installant un verrou de sécurité (en vente dans le commerce) sur
l'ancrage du verrou de sécurité, le moniteur reste fixé et ne peut donc
pas être transporté.
Les trous de prévention antivol sont adaptés aux systèmes de
sécurité Kensington Micro Saver.
11.Serre-câble ............................... Vous pouvez utiliser ceci pour fixer les câbles connectés aux bornes.
A ................................................... Un bras ou un support conforme à la norme VESA (en vente dans le
commerce) peut être fixé au moniteur.
Connexion des câbles
ATTENTION !
- Lors du raccordement, s'assurer que
l'alimentation tant du moniteur que de
l'ordinateur est désactivée.
1.Connectez le câble de signal analogique fourni
à la borne analogique RVB. (1)
2.Connectez le cordon d'alimentation fourni à la
borne d'alimentation, et branchez la prise
d'alimentation dans une prise de secteur. (2)
Ordinateur
(1)
(1)
(2)
(2)
LL-173C_SG.P65 2005/01/24, 16:5910

11
EnglishFrançaisFrançaisItalianoEspañolEnglish
Activation de l'alimentation
1.Appuyer sur le bouton d'alimentation du
moniteur ( ).
2.Mettre l'ordinateur sous tension.
Quand un signal arrive en entrée en provenance
de l'ordinateur, la diode d'alimentation s'allume
en vert, et l'écran s'affiche.
Remarque :
- Pour plus d'information sur le réglage de l'écran,
référez vous au mode d'emploi inclus dans le
CD-ROM fourni.
Désactivation de l'alimentation
1.Mettre l'ordinateur hors tension.
2.Appuyer sur le bouton d'alimentation du
moniteur ( ).
La diode d'alimentation s'éteind.
Si le moniteur devait ne pas être utilisé pendant
une période de temps prolongée, s'assurer que
la prise d'alimentation est débranchée de la
prise de secteur murale.
Stockage
Si le moniteur devait ne pas être utilisé pendant
une période de temps prolongée, s'assurer que la
prise d'alimentation est débranchée de la prise de
secteur.
ATTENTION !
- Ne pas laisser le moniteur en contact avec des
objets en caoutchouc ou en plastique pendant
des périodes de temps prolongées car ceux-ci
peuvent décolorer ou altérer le moniteur.
Dépannage
Si le moniteur est jugé défectueux, vérifier les
points suivants avant de l'emmener en réparation.
Si après cela, il ne fonctionne toujours pas
correctement, contacter le magasin où il a été
acheté ou votre réparateur agréé Sharp le plus
proche.
Les lampes fluorescentes du moniteur ont une
durée de vie limitée.
- Si l'écran s'assombrit, scintille constamment
ou ne s'éclaire plus, c'est que la lampe
fluorescente a atteint sa limite de vie. Se
renseigner auprès du revendeur ou du
réparateur agréé Sharp le plus proche.
- Au début de l'utilisation, en raison de la
conception des lampes fluorescentes, il se
peut que l'écran scintille. (Il ne s'agit pas d'un
dysfonctionnement.) Si cela se produit,
essayer d'abord d'éteindre et de rallumer le
moniteur.
Aucune image n'apparaît à l'écran du moniteur
(la diode d'alimentation ne s'éclaire pas).
- Le cordon d'alimentation est-il branché
correctement? (p.10)
Aucune image n'apparaît à l'écran du moniteur
(la diode d'alimentation est éclairée).
- L'ordinateur est-il branché correctement? (p.10)
- L'ordinateur est-il sous tension?
- La fréquence de signal de l'ordinateur
correspond-elle aux caractéristiques techniques
du moniteur? (p.12)
- L'ordinateur est-il en mode d'économie
d'énergie?
Essayez d'appuyer sur une touche du clavier ou
de bouger la souris.
Les boutons de commande ne fonctionnent pas.
- Le verrouillage des réglages est-il actif? (*)
L'image est déformée.
- La fréquence de signal de l'ordinateur
correspond-elle aux caractéristiques techniques
du moniteur? (p.12)
- Effectuez le réglage automatique de l'écran. (*)
- Si vous pouvez modifier la fréquence de
rafraîchissement de l'ordinateur utilisé,
choisissez une valeur plus basse. (p.12)
* Veuillez vous référer au mode d'emploi dans le
CD-ROM fourni.
Mettre l'ordinateur
sous tension.
ON
Appuyer sur
le bouton d'alimentation.
LL-173C_SG.P65 2005/01/25, 14:1411

12
Caractéristiques techniques
Remarque :
- SHARP se réserve le droit d'apporter des
modifications à la présentation et aux
caractéristiques des appareils à fin
d'amélioration. Les valeurs indiquées dans ce
document sont les valeurs nominales des
appareils de série mais de légères différences
peuvent être constatées d'un appareil à l'autre.
Fréquences des signaux
- La résolution recommandée est 1280 x 1024.
- Toutes les fréquences sont non entrelacées.
- Les fréquences pour les séries Macintosh et Sun
Ultra sont des valeurs de référence.
Saisie de texte US
VESA
Résolution de l'écran Hsync Vsync
Bande
passante
Série
Macintosh
Série Sun
Ultra
Caractéristiques techniques du produit
Nom du modèle
LL-173C-B
Moniteur LCD
Module TFT à cristaux liquides de 17 in
Dimension réelle de l'affichage
17,0 in (43,3 cm) en diagonale
Résolution (max.)
SXGA 1280 x 1024 pixels
Couleurs affichables (max.)
Approx. 16,19 millions de couleurs (6 bit + FRC)
Luminosité (max.)
260 cd/m
2
(La luminosité de l'écran se détériore avec le
temps. Une luminosité constante ne peut pas
être maintenue.)
Définition (H x V)
0,264 mm x 0,264 mm
Rapport de contraste
500:1
Angle de visibilité
Gauche-droite : 160° ; Haut-bas : 160°
(Rapport de contraste > 5)
Surface d'affichage (H x V)
337,9 mm x 270,3 mm
Signal vidéo
Analogique RVB (0,7 Vp-p) [75Ω]
Signal sync.
Sync individuel (niveau TTL : +/
–
), type Sync
On Green, Composite Sync (niveau TTL : +/
–
)
Compensation d'extension
Redimensionnement numérique (Élargissement
de VGA/SVGA/XGA, etc. à la taille plein écran.)
Seul le cadrage pour couvrir la totalité de l'écran
de l'écran est disponible.
Vous ne pouvez pas cadrer l'image à 1:1 ou avec un
format de l'image (rapport largeur à la hauteur) fixé.
Plug & Play
VESA : DDC2B compatible
Gestion de l'alimentation
VESA : basé sur le DPMS
Borne d'entrée signal
Mini D-sub à 15 broches sur 3 rangées
Inclinaison du moniteur
Vers le haut approx. 0° - 20°
Vers le bas approx. 0° - 5°
Alimentation
CA 100 V - 240 V, 50/60 Hz
Température recommandée du lieu d'utilisation
5°C - 35°C
Consommation d'électricité
30 W Maximum
1,0 W en mode d'économie d'énergie
Dimensions (L x P x H)
Approx. 377 mm x 209 mm x 392 mm
Poids (Sans les câbles.)
Approx. 4,4 kg (Approx. 3,9 kg sans le support ni
la base)
LL-173C_SG.P65 2005/01/24, 16:5912

13
EnglishDeutschEspañolItalianoEspañolEnglish
Índice
Sugerencias y precauciones de seguridad . . . . . . . . . . . . . . . . . . . . . . . . . . . . . . . . . . . . . . . . . . . . . . . 13
Descripción del producto . . . . . . . . . . . . . . . . . . . . . . . . . . . . . . . . . . . . . . . . . . . . . . . . . . . . . . . . . . . . . . 14
Conexión de los cables . . . . . . . . . . . . . . . . . . . . . . . . . . . . . . . . . . . . . . . . . . . . . . . . . . . . . . . . . . . . . . . 14
Encendido . . . . . . . . . . . . . . . . . . . . . . . . . . . . . . . . . . . . . . . . . . . . . . . . . . . . . . . . . . . . . . . . . . . . . . . . . 15
Apagado . . . . . . . . . . . . . . . . . . . . . . . . . . . . . . . . . . . . . . . . . . . . . . . . . . . . . . . . . . . . . . . . . . . . . . . . . . . 15
Almacenamiento . . . . . . . . . . . . . . . . . . . . . . . . . . . . . . . . . . . . . . . . . . . . . . . . . . . . . . . . . . . . . . . . . . . . 15
Solución de problemas . . . . . . . . . . . . . . . . . . . . . . . . . . . . . . . . . . . . . . . . . . . . . . . . . . . . . . . . . . . . . . . 15
Especificaciones . . . . . . . . . . . . . . . . . . . . . . . . . . . . . . . . . . . . . . . . . . . . . . . . . . . . . . . . . . . . . . . . . . . . 16
Sugerencias y precauciones de seguridad
-
No frote ni golpee jamás el monitor con objetos duros.
- El panel LCD que se utiliza en este monitor es
de vidrio. Si presiona el panel LCD con las
manos podría dañarlo.
- No modifique, desmonte ni repare el monitor
usted mismo. Esto podría ocasionar incendios,
descargas eléctricas o podría herirse.
- Tenga cuidado para que sus dedos no queden
atrapados entre la pantalla y el pedestal.
Ubicación
- No coloque el monitor en lugares mal
ventilados, polvorientos o con un alto grado de
humedad o donde el monitor pueda entrar en
contacto con aceite o vapor, ya que ello podría
provocar un incendio.
- Los orificios de ventilación y otras aberturas de
la caja han sido diseñados para ventilar el
monitor. No cubra ni bloquee estos orificios de
ventilación y aberturas porque la falta de
ventilación puede causar recalentamiento y/o
reducir la duración del monitor. No coloque el
monitor en una cama, sofá, alfombra u otra
superficie similar o en un espacio cerrado ya
que puede tapar los orificios de ventilación.
- Asegúrese de que el monitor no entre en
contacto con agua u otros líquidos. Asegúrese
de que no penetren en el monitor objetos tales
como clips o alfileres ya que ello podría
provocar un incendio o una descarga eléctrica.
- No coloque el monitor sobre objetos inestables
o en lugares inseguros. No permita que el
monitor quede sometido a intensas sacudidas o
vibraciones. La caída o vuelco del monitor
puede provocar la avería del mismo.
-
No coloque el monitor en lugares en los que
quede expuesto directamente a los rayos
solares, ni cerca de equipos de calefacción o
cualquier otro lugar donde se puedan alcanzar
altas temperaturas, ya que ello puede llevar a un
calentamiento excesivo y provocar un incendio.
El cable de alimentación
- No deteriore el cable de alimentación ni
coloque objetos pesados sobre el mismo ni lo
estire o doble excesivamente. No utilice
tampoco cables de prolongación. Si el cable de
alimentación se daña, puede provocar un
incendio o una descarga eléctrica.
- Utilice solamente el cable de alimentación
suministrado con el monitor.
-
Conecte el enchufe de alimentación directamente
a la toma de corriente alterna. El uso de un cable
de prolongación puede provocar un incendio
como resultado de un calentamiento excesivo.
- No quite ni introduzca el enchufe de
alimentación con las manos húmedas. Esto
podría ocasionar una descarga eléctrica.
Lista de comprobación del monitor y sus
accesorios
- Compruebe que el paquete incluye los
siguientes componentes:
- Monitor LCD (1)
- Base (1)
- Cable de alimentación (1)
- Cable de señal analógica (1)
(nombre del modelo: 0PD5301010011)
- CD-ROM (1)
- Guía de inicio (1)
Nota:
- Utilice solamente los cables suministrados con
el monitor.
Instalación de la base
1.
Coloque la base en una superficie plana como un
escritorio e inserte el pedestal cuidadosamente.
Inserte el pedestal hasta que haga "clic".
¡PRECAUCIÓN!
-
Tenga cuidado para que sus dedos no queden
atrapados entre la pantalla y el pedestal.
- Verifique que la base esté instalada
firmemente antes de utilizarlo. Si la instalación
no se realiza correctamente, el monitor o la
base se pueden caer.
Pedestal
Base
LL-173C_SG.P65 2005/01/24, 16:5913

14
Descripción del producto
A
14
78
10
11
9
5
6
2 3
1. Botón AUTO .............................. Este botón se utiliza para hacer un ajuste automático de la pantalla
(CLOCK, PHASE, H-POS y V-POS).
2. Botón MENU............................. Este botón se utiliza para ampliar, seleccionar y cerrar el menú OSD
(On Screen Display).
3. Botón
/ MODE ...................... Cuando el menú OSD se vea en la pantalla:
Este botón se utiliza para seleccionar opciones de menú.
Cuando el menú OSD no se vea en la pantalla:
Este botón se utiliza para seleccionar DISPLAY MODE.
4. Botones
............................. Cuando el menú OSD se vea en la pantalla:
Estos botones se utilizan para seleccionar una opción o ajustar el
valor la opción seleccionada.
Cuando el menú OSD no se vea en la pantalla:
Estos botones se utilizan para regular la luminosidad de la retroiluminación.
5.
Botón de encendido/apagado
( ) .. Si pulsa este botón se enciende el monitor.
Pulse de nuevo el botón para apagar el monitor.
6. LED indicador de conexión ....
Este indicador LED se ilumina de color verde cuando el monitor se encuentra
en uso y naranja cuando se encuentra en el modo de ahorro de energía.
7. Borne de alimentación
8.
Borne de entrada RGB analógica ...
El cable de señal analógica suministrado se conecta aquí. Debe
usarse el cable de señal analógica suministrado.
9. Orificios de ventilación ............ No bloquee jamás los orificios de ventilación, ya que ello puede
llevar a un calentamiento excesivo del interior del monitor y hacer
que funcione de manera anómala.
10.
Anclaje de llave de seguridad .....
Si conecta un cierre de seguridad (de venta en comercios) al anclaje
de llave de seguridad, el monitor queda enclavado de forma que es
imposible transportarlo.
El orificio de seguridad antirrobo actúa junto con los sistemas de
seguridad Kensington Micro Saver.
11.
A
brazadera para cable ............ Puede utilizar esto para sujetar los cables conectados a los bornes.
A ................................................... Puede acoplar al monitor un brazo o un pedestal (de venta en
comercios) conforme al estándar VESA.
Conexión de los cables
¡PRECAUCIÓN!
- Antes de realizar la conexión, asegúrese de que
tanto el monitor como el ordenador están
apagados.
1.Conecte el cable de señal analógica
suministrado al borne de analógica RGB. (1)
2.
Conecte el cable de alimentación suministrado al
borne de alimentación y conecte el enchufe de
alimentación a la toma de corriente alterna. (2)
Ordenador
(1)
(1)
(2)
(2)

15
EnglishDeutschEspañolItalianoEspañolEnglish
Encendido
1.Pulse el botón de encendido/apagado del
monitor ( ).
2.Encienda el ordenador.
Cuando se introduzca una señal procedente del
ordenador, el LED indicador de conexión se
iluminará de color verde, y se visualizará la
pantalla.
Nota:
- Para obtener información acerca del ajuste de
pantalla, consulte el manual de funcionamiento
incluido en el CD-ROM suministrado.
Apagado
1.Apague el ordenador.
2.Pulse el botón de encendido/apagado del
monitor ( ).
El LED indicador de conexión se apagará.
Si no va a utilizar el monitor durante un largo
período de tiempo, asegúrese de desenchufarlo
de la toma de corriente alterna.
Almacenamiento
Si no va a utilizar el monitor durante un largo
período de tiempo, asegúrese de desenchufar el
enchufe de alimentación de la toma de corriente
alterna.
¡PRECAUCIÓN!
- No deje el monitor en contacto con objetos de
caucho o plástico durante períodos
prolongados, ya que esto podría decolorarlo o
deformarlo.
ON
Encienda el
ordenador.
Pulse el botón
de encendido/apagado.
Solución de problemas
Si cree que el monitor pudiera estar averiado,
compruebe los puntos siguientes antes de llevarlo
a reparar.
Si después de ello sigue sin funcionar, póngase
en contacto con su proveedor o con el servicio
autorizado de asistencia técnica de Sharp más
cercano.
Los tubos fluorescentes del monitor tienen una
vida útil limitada.
- Si la pantalla se oscurece, parpadea
persistentemente o no se enciende, el tubo
fluorescente ha llegado al fin de su vida útil.
Consulte a su proveedor o al servicio
autorizado de asistencia técnica de Sharp
más cercano.
- Debido a las características de los tubos
fluorescentes, la pantalla puede reverberar
durante el período inicial de uso. (No se trata
de una anomalía.) Si esto ocurriera, intente
en primer lugar solucionar el problema
apagando y encendiendo el monitor de
nuevo.
Si no se ve ninguna imagen en el monitor (el
LED indicador de conexión no se enciende).
- ¿Está correctamente conectado el cable de
alimentación? (p.14)
Si no se ve ninguna imagen en el monitor (el
LED indicador de conexión está encendido).
- ¿Está el ordenador conectado correctamente?
(p.14)
- ¿Está el ordenador encendido?
- ¿Se corresponde la sincronización de la señal
del ordenador con las especificaciones del
monitor? (p.16)
- ¿Se encuentra el ordenador en el modo de
ahorro de energía?
Intente presionando una tecla del teclado o bien
mueva el mouse.
Los botones de control no funcionan.
- ¿Está activado el bloqueo de ajuste? (*)
La imagen aparece distorsionada.
- ¿Se corresponde la sincronización de la señal
del ordenador con las especificaciones del
monitor? (p.16)
- Haga un ajuste de pantalla automático. (*)
- Si puede cambiar la frecuencia de regeneración
en el ordenador que está utilizando, cambie el
valor a una frecuencia más baja. (p.16)
* Consulte el manual de funcionamiento del CD-
ROM suministrado.
LL-173C_SG.P65 2005/01/25, 09:4415

16
Especificaciones
Nota:
- Como parte de la política de mejoras continuas,
SHARP se reserva el derecho de realizar
cambios en el diseño y especificaciones para la
mejora del producto sin previo aviso. Las figuras
indicadas que especifican el rendimiento son
valores nominales de los aparatos de
producción. Puede haber algunas desviaciones
de estos valores en los aparatos individuales.
Sincronizaciones de las señales
correspondientes
- La resolución recomendada es de 1280 x 1024.
- Todos son compatibles únicamente con «non-
interlace».
- Las frecuencias para las series Power
Macintosh y Sun Ultra son sólo valores de
referencia.
VESA
US text
Series
Power
Macintosh
Series
Sun Ultra
Resolución de la pantalla Hsync Vsync Frecuencia
Especificaciones del producto
Nombre del modelo
LL-173C-B
Display LCD
Módulo TFT LCD de 17 pulg.
Tamaño de pantalla real
17 pulg. (43,3 cm) diagonal
Resolución (máx.)
SXGA 1280 x 1024 píxeles
Colores reproducibles (máx.)
Aprox. 16,19 millones de colores (6 bit + FRC)
Luminosidad (máx.)
260 cd/m
2
(El brillo de la pantalla se deteriora con el tiempo.
No puede mantenerse un brillo constante.)
Retícula (H x V)
0,264 mm x 0,264 mm
Relación de contraste
500:1
Ángulo de visibilidad
Izquierda-derecha 160°; arriba-abajo 160°
(relación de contraste > 5)
Tamaño de pantalla (H x V)
337,9 mm x 270,3 mm
Señal vídeo
Analógica RGB (0,7 Vp-p) [75Ω]
Señales de sincronización
Separate Sync (nivel TTL: +/
–
), Sync on
Green, Composite Sync (nivel TTL: +/
–
)
Compensación de la ampliación
Graduación digital (Amplía VGA/SVGA/XGA, etc.
a tamaño de pantalla completo.)
Sólo se encuentra disponible el escalado al
tamaño de pantalla completa.
No podrá escalar la imagen de la pantalla a 1:1
ni con la relación de aspecto (relación
horizontal/vertical) fija.
Plug & Play
VESA: DDC2B compatible
Gestión de energía
VESA: basada en DPMS
Borne de señales de entrada
Mini D-sub 15 contactos 3 hileras
Inclinación de pantalla
Hacia arriba aprox. 0° - 20°
Hacia abajo aprox. 0° - 5°
Suministro eléctrico
CA 100 V - 240 V, 50/60 Hz
Temperatura ambiental
5°C - 35°C
Consumo eléctrico
30 W máximo
1,0 W en el modo de ahorro de energía
Dimensiones (An. x F x Al.)
Aprox. 377 mm x 209 mm x 392 mm
Peso (Excluyendo los cables.)
Aprox. 4,4 kg (Aprox. 3,9 kg sin el pedestal ni la
base)
LL-173C_SG.P65 2005/01/24, 16:5916

17
EnglishDeutschFrançaisDeutschEspañolEnglish
Inhaltsverzeichnis
Tipp und Sicherheitsvorkehrungen . . . . . . . . . . . . . . . . . . . . . . . . . . . . . . . . . . . . . . . . . . . . . . . . . . . . . . 17
Produktbeschreibung . . . . . . . . . . . . . . . . . . . . . . . . . . . . . . . . . . . . . . . . . . . . . . . . . . . . . . . . . . . . . . . . 18
Anschließen der Kabel . . . . . . . . . . . . . . . . . . . . . . . . . . . . . . . . . . . . . . . . . . . . . . . . . . . . . . . . . . . . . . . 18
Einschalten des Monitors . . . . . . . . . . . . . . . . . . . . . . . . . . . . . . . . . . . . . . . . . . . . . . . . . . . . . . . . . . . . . 19
Ausschalten des Monitors . . . . . . . . . . . . . . . . . . . . . . . . . . . . . . . . . . . . . . . . . . . . . . . . . . . . . . . . . . . . . 19
Lagerung . . . . . . . . . . . . . . . . . . . . . . . . . . . . . . . . . . . . . . . . . . . . . . . . . . . . . . . . . . . . . . . . . . . . . . . . . . 19
Fehlersuche . . . . . . . . . . . . . . . . . . . . . . . . . . . . . . . . . . . . . . . . . . . . . . . . . . . . . . . . . . . . . . . . . . . . . . . . 19
Technische Daten . . . . . . . . . . . . . . . . . . . . . . . . . . . . . . . . . . . . . . . . . . . . . . . . . . . . . . . . . . . . . . . . . . . 20
Tipp und Sicherheitsvorkehrungen
- Der Monitor darf niemals mit harten
Gegenständen abgerieben oder berührt werden.
-
Das in diesem Monitor verwendete LCD-Panel
besteht aus Glas. Durch Druck mit der Hand auf das
LCD-Panel können Schäden hervorgerufen werden.
-
Nehmen Sie am Monitor selbst keine Veränderungen
oder Reparaturen vor und nehmen Sie ihn auch
nicht selbst auseinander. Dies kann zu Bränden,
elektrischen Schlägen oder Verletzungen führen.
- Vorsichtig vorgehen und nicht die Finger
zwischen das Display und den Fuß bringen.
Aufstellort
- Verwenden Sie den Monitor nicht an schlecht
belüfteten Orten mit hoher Staubentwicklung,
hoher Luftfeuchtigkeit oder an Orten, an denen
der Monitor mit Öl oder Dampf in Kontakt
kommen könnte, da dies ein Brandrisiko birgt.
-
Die Belüftungsöffnungen und sonstigen Öffnungen im
Gehäuse dienen der Belüftung des Geräts. Achten Sie
darauf, dass diese Öffnungen nicht blockiert werden,
da eine unzureichende Belüftung eine Überhitzung
und/oder Lebenszeitverkürzung des Monitors zur
Folge haben kann. Stellen Sie den Monitor nicht auf ein
Bett, ein Sofa, einen Teppich oder ähnliche Unterlagen,
da diese die Lüftungsöffnungen blockieren können,
und achten Sie darauf, dass rund um den Monitor
genügend Platz für eine gute Belüftung ist.
-
Achten Sie darauf, dass der Monitor nicht mit Wasser
oder anderen Flüssigkeiten in Berührung kommt.
Achten Sie darauf, dass keinerlei Gegenstände,
beispielsweise Büroklammern oder sonstige spitze
Gegenstände, in den Monitor gesteckt werden. Die
Folge könnte ein Brand oder Stromschlag sein.
-
Stellen Sie den Monitor nicht auf wacklige
Unterlagen oder auf unsichere Stellen. Setzen Sie
den Monitor keinen starken Stößen oder
Erschütterungen aus. Wenn der Monitor herunterfällt
oder umkippt, könnte er Schaden nehmen.
-
Stellen Sie den Monitor nicht an Stellen auf, die
direkter Sonneneinstrahlung ausgesetzt sind, und
nicht in der Nähe von Heizungen oder an anderen
Stellen, an denen hohe Temperaturen auftreten,
da dies zu einer übermäßig starken Erhitzung mit
der Folge eines Brandes führen könnte.
Das Netzkabel
-
Beschädigen Sie das Netzkabel nicht, stellen Sie
keine schweren Gegenstände darauf, und
überdehnen oder knicken Sie es nicht. Verwenden Sie
keine Verlängerungskabel. Ein beschädigtes Kabel
kann einen Brand oder Stromschlag verursachen.
- Nur das mit dem Monitor mitgelieferte Netzkabel
verwenden.
- Stecken Sie den Netzstecker direkt in die
Netzsteckdose. Die Verwendung eines
Verlängerungskabels kann aufgrund von
Überhitzung zu einem Brand führen.
- Den Netzstecker nicht mit nassen Händen
abziehen oder einstecken. Dadurch können
elektrische Schläge verursacht werden.
Checkliste für Monitor und Zubehör
- Prüfen Sie den Kartoninhalt auf Vollständigkeit.
- LCD-Monitor (1)
- Sockel (1)
- Netzkabel (1)
- Analogsignalkabel (1)
(Modellbezeichnung: 0PD5301010011)
- CD-ROM (1)
- Erste Schritte (1)
Hinweis:
- Nur die mit dem Monitor mitgelieferten Kabel
verwenden.
Befestigen des Sockels
1.Legen Sie den Sockel auf eine flache Unterlage,
wie z.B. einen Schreibtisch.
Führen Sie den Fuß vorsichtig in den Sockel ein,
bis er hörbar einrastet.
ACHTUNG!
- Vorsichtig vorgehen und darauf achten, dass
die Finger nicht eingeklemmt werden.
-
Prüfen Sie vor Verwendung des Monitors, ob
der Sockel gut befestigt wurde. Wenn dies
nicht der Fall ist, könnte der Monitor
herunterfallen oder der Sockel könnte abfallen.
Fuß
Sockel
LL-173C_SG.P65 2005/01/24, 16:5917

18
Produktbeschreibung
A
14
78
10
11
9
5
6
2 3
1. Taste AUTO .............................. Diese Taste dient zum Ausführen automatischer Einstellung des
Bildschirms (CLOCK, PHASE, H-POS und V-POS).
2. Taste MENU ............................. Mit dieser Taste öffnen, wählen und schließen Sie das OSD (On
Screen Display) -Menü.
3. Taste / MODE ...................... Wenn das OSD-Menü angezeigt wird:
Diese Taste wird zum Wählen der Menüoptionen verwendet.
Wenn kein OSD-Menü angezeigt wird:
Diese Taste wird zur Einstellung von DISPLAY MODE verwendet.
4. Tasten ............................... Wenn das OSD-Menü angezeigt wird:
Mit diesen Tasten wählen Sie eine Option oder erhöhen oder
verringern den Wert einer ausgewählten Option.
Wenn kein OSD-Menü angezeigt wird:
Mit diesen Tasten stellen Sie die Helligkeit der
Hintergrundbeleuchtung ein.
5. Netzschalter ( ) ...................... Mit dieser Taste schalten Sie den Monitor ein.
Schalten Sie den Monitor über den Netzschalter wieder aus.
6. Betriebs-LED ........................... Diese LED leuchtet im Betrieb grün und im Stromsparmodus orange.
7. Netzanschluss
8.
Analoger RGB-Eingangsanschluss
...
Hier wird der Analogsignalkabel eingesteckt. Das mitgelieferte
Analogsignalkabel sollte verwendet werden.
9. Lüftungsöffnungen ..................
Decken Sie nie die Lüftungsöffnungen ab, da sich das Monitorinnere sonst
zu stark erwärmen würde und dies Funktionsstörungen zur Folge hätte.
10.Sicherheitsverriegelung ..........
Wenn Sie eine Sicherheitsverriegelung anbringen (im Handel erhältlich), wird
der Monitor so befestigt, dass er nicht wegtransportiert werden kann.
Die Diebstahlsicherung wird in Verbindung mit dem Kensington-
Mikrosicherheitssystem eingesetzt.
11.Kabelklammer ......................... Damit können Sie die an den Anschlüssen befestigten Kabel sichern.
A ................................................. Ein Arm oder Fuß basierend auf dem VESA-Standard (im Handel
erhältlich) kann am Monitor angebracht werden.
Anschließen der Kabel
ACHTUNG!
- Bevor Sie den Monitor anschließen, müssen Sie
den Monitor und den Computer ausschalten.
1.Schließen Sie das mitgelieferte
Analogsignalkabel an den analogen RGB-
Anschluss an. (1)
2.Schließen Sie das mitgelieferte Netzkabel an
den Netzanschluss an und stecken Sie den
Netzstecker an einer Netzsteckdose an. (2)
Computer
(1)
(1)
(2)
(2)
LL-173C_SG.P65 2005/01/24, 16:5918

19
EnglishDeutschFrançaisDeutschEspañolEnglish
Einschalten des Monitors
1.Drücken Sie den Netzschalter am Monitor ( ).
2.Schalten Sie den Computer ein.
Wenn ein Signal vom Computer eingegeben
wird, leuchtet die Betriebs-LED grün auf und die
Wiedergabe wird aktiviert.
Hinweis:
- Informationen zur Bildschirmeinstellung finden
Sie in der auf der mitgelieferten CD-ROM
enthaltenen Bedienungsanleitung.
Ausschalten des Monitors
1.Schalten Sie den Computer aus.
2.Drücken Sie den Netzschalter am Monitor ( ).
Die Betriebs-LED erlischt.
Wenn der Monitor längere Zeit nicht verwendet
wird, ziehen Sie den Netzstecker aus der
Netzsteckdose.
Lagerung
Wenn der Monitor längere Zeit nicht verwendet
wird, ziehen Sie den Netzstecker aus der
Netzsteckdose.
ACHTUNG!
- Lassen Sie den Monitor nicht über längere Zeit
mit Gummi- oder Kunststoffgegenständen in
Berührung kommen, da dies Farb- oder
Formveränderungen verursachen kann.
Schalten Sie den
Computer ein.
ON
Netzschalter betätigen.
Fehlersuche
Falls Störungen am Monitor auftreten, prüfen Sie
erst folgende Punkte, bevor Sie sich an den
Kundendienst wenden.
Falls sich die Störung hiermit nicht beheben lässt,
wenden Sie sich an das Geschäft, in dem Sie den
Monitor gekauft haben, oder an die
nächstgelegene autorisierte Sharp-
Kundendienstzentrale.
Die Leuchtstoffröhren des Monitors weisen eine
begrenzte Lebensdauer auf.
- Wenn sich der Bildschirm verdunkelt,
dauernd flackert oder nicht aufleuchtet, hat
die Leuchtstoffröhre das Ende ihrer
Betriebslebensdauer erreicht. Wenden Sie
sich an das Geschäft, in dem Sie den Monitor
gekauft haben, oder an das nächste
autorisierte Sharp-Kundendienstzentrum.
- Am Anfang kann aufgrund der Eigenschaften
der Leuchtstoffröhre Flimmern auftreten. (Es
handelt sich dabei nicht um eine
Funktionsstörung.) Schalten Sie in diesem Fall
probeweise den Monitor aus und wieder ein.
Auf dem Monitor wird nichts angezeigt
(Betriebs-LED leuchtet nicht).
- Ist das Netzkabel richtig angeschlossen? (S.18)
Auf dem Monitor wird nichts angezeigt
(Betriebs-LED leuchtet).
- Ist der Computer richtig angeschlossen? (S.18)
- Ist der Computer eingeschaltet?
- Entspricht der Signaltakt des Computers den
Monitorspezifikationen? (S.20)
- Wurde der Computer in den Stromsparmodus
gesetzt?
Drücken Sie eine Taste an der Tastatur oder
bewegen Sie die Maus.
Die Steuertasten funktionieren nicht.
- Ist die Einstellungssperre aktiviert? (*)
Das Bild wird verzerrt angezeigt.
- Entspricht der Signaltakt des Computers den
Monitorspezifikationen? (S.20)
- Führen Sie die automatische
Bildschirmeinstellung durch. (*)
-
Wenn die Auffrischungsrate im verwendeten
Computer geändert werden kann, sollte der Wert
auf eine tiefere Frequenz geändert werden. (S.20)
* Lesen Sie bitte in der Bedienungsanleitung auf
der mitgelieferten CD-ROM nach.
LL-173C_SG.P65 2005/01/25, 09:4419

20
Technische Daten
Hinweis:
- Bedingt durch fortlaufende technische
Verbesserungen behält sich SHARP das Recht
vor, das Design und die Spezifikationen ohne
vorherige Ankündigung ändern zu können. Die
angegebenen Leistungswerte stellen die
Nennwerte einer in Serienherstellung
produzierten Einheit dar. Geringe Abweichungen
bei einzelnen Geräten sind möglich.
Relevante Signaltakte
- Die empfohlene Auflösung ist 1280 x 1024.
- Alle nur mit Non-Interlace.
- Die Frequenzen für die Serien Power Macintosh
und Sun Ultra sind lediglich Referenzwerte.
VESA
US-Text
Power
Macintosh-
Serie
Sun Ultra-
Serie
Bildschirmauflösung
Hsync
Vsync
Punktfrequenz
Produktspezifikationen
Modellbezeichnung
LL-173C-B
LCD-Display
17-Zoll TFT-LCD-Modul
Tatsächliche Displaygröße
17-Zoll (43,3 cm) Bildschirmdiagonale
Auflösung (max.)
SXGA 1280 x 1024 Pixel
Anzeigbare Farben (max.)
Ca. 16,19 Millionen Farben (6 bit + FRC)
Helligkeit (max.)
260 cd/m
2
(Die Bildschirmhelligkeit nimmt im Laufe der Zeit
ab. Konstane Helligkeit kann nicht bewahrt
werden.)
Punktabstand (H x V)
0,264 mm x 0,264 mm
Kontrastverhältnis
500:1
Blickwinkel
Links-rechts 160°, oben-unten 160°
(Kontrastverhältnis > 5)
Bildschirmanzeigegröße (H x V)
337,9 mm x 270,3 mm
Videosignal
Analog RGB (0,7 Vp-p) [75Ω]
Sync-Signal
Separate Sync (TTL-Pegel: +/
–
), Sync on
Green, Composite Sync (TTL-Pegel: +/
–
)
Erweiterungskompensation
Digitaler Skalierungsgrad (Vergrößerung von
VGA/SVGA/XGA usw. auf gesamte
Bildschirmgröße.)
Es ist nur eine Skalierung auf die volle
Bildschirmgröße möglich.
Das Bild kann nicht auf 1:1 skaliert oder bei
festem Bildformat (horizontales oder vertikales
Verhältnis) verändert werden.
Plug & Play
VESA: DDC2B-kompatibel
Power Management
VESA: basiert auf DPMS
Eingangssignalanschluss
Mini-D-Sub 15-polig mit 3 Reihen
Bildschirmneigung
nach oben ca. 0° - 20°, nach unten ca. 0° - 5°
Stromversorgung
100 VAC - 240 VAC, 50/60 Hz
Umgebungstemperatur
5°C - 35°C
Leistungsaufnahme
30 W max.
1,0 W im Stromsparmodus
Abmessungen (B x T x H)
Ca. 377 mm x 209 mm x 392 mm
Gewicht (Ohne Kabel)
Ca. 4,4 kg (Ca. 3,9 kg ohne Fuß und Sockel)
LL-173C_SG.P65 2005/01/24, 16:5920
La pagina si sta caricando...
La pagina si sta caricando...
La pagina si sta caricando...
La pagina si sta caricando...
La pagina si sta caricando...
La pagina si sta caricando...
La pagina si sta caricando...
La pagina si sta caricando...
La pagina si sta caricando...
La pagina si sta caricando...
La pagina si sta caricando...
La pagina si sta caricando...
-
 1
1
-
 2
2
-
 3
3
-
 4
4
-
 5
5
-
 6
6
-
 7
7
-
 8
8
-
 9
9
-
 10
10
-
 11
11
-
 12
12
-
 13
13
-
 14
14
-
 15
15
-
 16
16
-
 17
17
-
 18
18
-
 19
19
-
 20
20
-
 21
21
-
 22
22
-
 23
23
-
 24
24
-
 25
25
-
 26
26
-
 27
27
-
 28
28
-
 29
29
-
 30
30
-
 31
31
-
 32
32


in altre lingue
- English: Sharp LL-173C Owner's manual
- français: Sharp LL-173C Le manuel du propriétaire
- español: Sharp LL-173C El manual del propietario
- Deutsch: Sharp LL-173C Bedienungsanleitung