
USER GUIDE
GUIDE UTILISATEUR
GUÍA DEL USUARIO
BENUTZERHANDBUCH
GUIDA UTENTE
HANDLEIDING
GUIA DO USUÁRIO


English �����������������������������������������������������������������4
Français ������������������������������������������������������������ 36
Español ������������������������������������������������������������� 68
Deutsch ���������������������������������������������������������� 100
Italiano ����������������������������������������������������������� 132
Nederlands ����������������������������������������������������� 164
Português ������������������������������������������������������� 196
� �������������������������������������������������������� 228

4
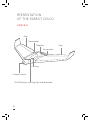
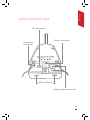
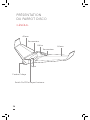
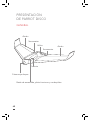
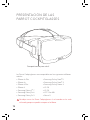
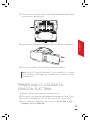
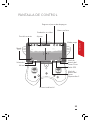
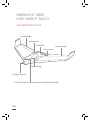
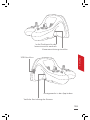
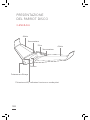
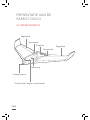
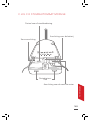
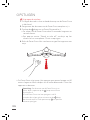
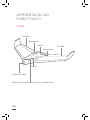
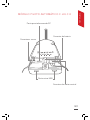
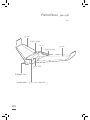
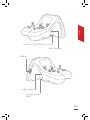
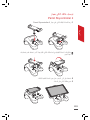
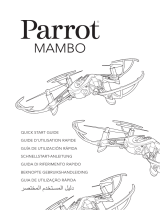
PRESENTATION
OF THE PARROT DISCO
GENERAL
Flap
Servomotor
Propeller
Flap
Servomotor
Cowling
Fisheye camera
On/Off button, warning light and pitot tube

ENGLISH
5
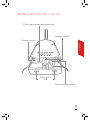
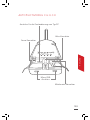
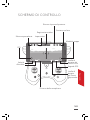
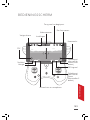
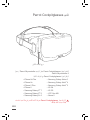
CHUCK AUTOPILOT UNIT
Micro USB port
RC remote port
Battery connector
Servomotor
connectors
Central engine connector

6
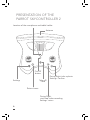
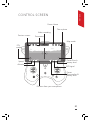
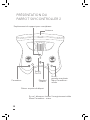
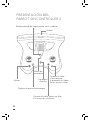
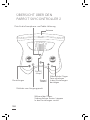
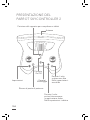
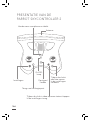
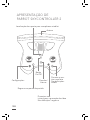
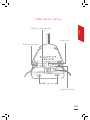
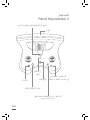
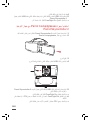
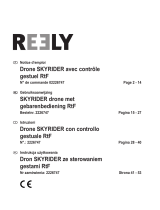
PRESENTATION OF THE
PARROT SKYCONTROLLER 2
Antenna
Location of the smartphone and tablet holder
On/Off
button
Return home
Take off/
Land
During flight:
start/stop video recording
Settings: return
During flight: take a photo
Settings: Confirm
Settings

ENGLISH
7
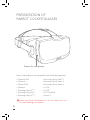
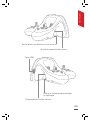
Set the camera exposure
Change the display mode
on the application
Switch to direct view or
immersive view
Vertical orientation of the camera
USB port

8
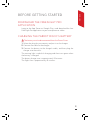
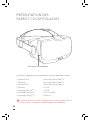
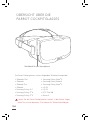
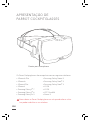
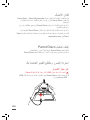
Never leave Parrot Cockpitglasses in the sun when not in use.
This could damage your phone.
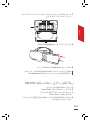
PRESENTATION OF
PARROT COCKPITGLASSES
Drawer for smartphone
Parrot Cockpitglasses are compatible with the following phones:
• iPhone 6s Plus
• iPhone 6s
• iPhone 6 Plus
• iPhone 6
• Samsung Galaxy S
®
7
• Samsung Galaxy S
®
6
• Samsung Galaxy S
®
5
• Samsung Galaxy Note
®
5
• Samsung Galaxy Note
®
4
• Samsung Galaxy Note
®
3
• LG G4
• LG G3
• HTC One M8
• Nexus 5

ENGLISH
9
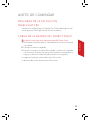
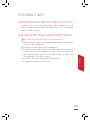
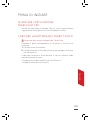
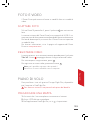
BEFORE GETTING STARTED
DOWNLOAD THE FREEFLIGHT PRO
APPLICATION
Login to the App Store
®
or Google Play
TM
and download the free
FreeFlight Pro application to your smartphone or tablet.
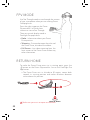
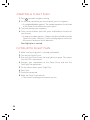
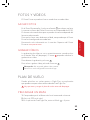
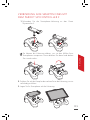
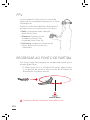
CHARGING THE PARROT DISCO’S BATTERY
The battery must be disconnected from the Parrot Disco.
1. Select the plug for your country and put it on the charger.
2. Connect the cable to the charger.
3. Connect the battery to the charger’s cable, and then plug the
charger into the mains.
The warning light is red while charging and then turns green when
the battery is charged.
The battery charge time is approximately 55 minutes.
The flight time is approximately 45 minutes.

10
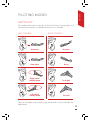
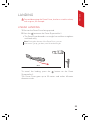
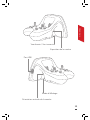
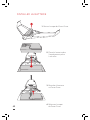
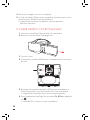
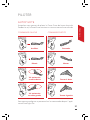
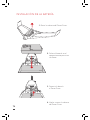
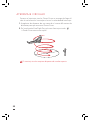
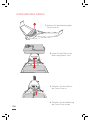
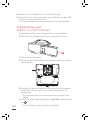
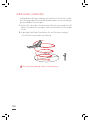
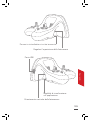
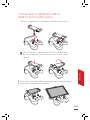
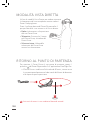
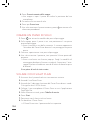
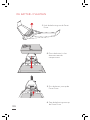
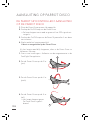
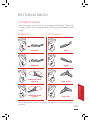
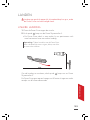
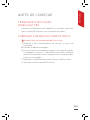
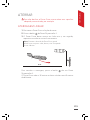
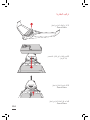
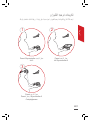
FITTING THE BATTERY
1. Remove the Parrot Disco’s cowling.
2. Place the battery in the
slot provided for this
purpose.
3. Plug the battery into the
Parrot Disco.
4. Close the Parrot Disco’s
cowling.

ENGLISH
11
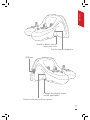
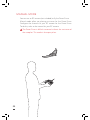
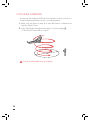
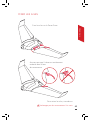
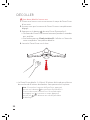
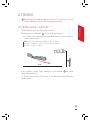
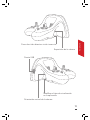
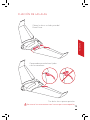
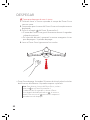
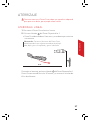
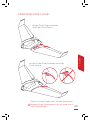
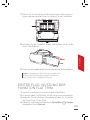
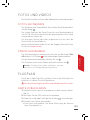
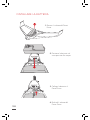
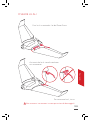
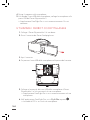
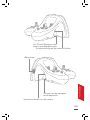
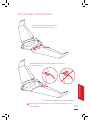
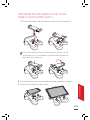
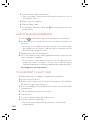
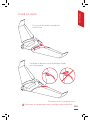
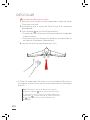
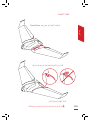
Attach the wings to either side of
the Parrot Disco.
Make sure the wings are properly secured
in the servomotors.
ATTACHING THE WINGS
To remove the wings, pull on them.
Do not move the servomotors with your hand to avoid damaging them.

12
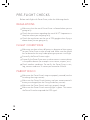
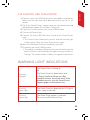
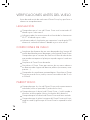
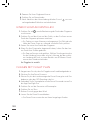
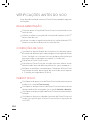
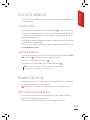
PRE-FLIGHT CHECKS
Before each flight with Parrot Disco, make the following checks:
REGULATIONS
Make sure that the use of Parrot Disco is allowed where you are
going to fly.
Check the restrictions regarding the use of Wi-Fi
®
frequencies in
the place where you are going to fly.
Check the regulations on the use of FPV goggles when flying a
drone where you are going to fly.
FLIGHT CONDITIONS
Make sure you have at least 80 meters in diameter of clear space
for your Parrot Disco to take off and land. Make sure the airfield
has no obstacles that may hinder piloting or prevent visual flight.
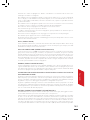
Do not fly the Parrot Disco at night.
Do not fly the Parrot Disco over an urban area or in certain places
in the public domain (for example: train stations, airports, etc.).
Check weather conditions. Do not fly the Parrot Disco in rain,
fog, snow or wind over 12 meters per second or 43 km/h.
PARROT DISCO
Make sure the Parrot Disco’s wings are properly secured (see the
Attaching the wings section).
Make sure the Parrot Disco’s battery and your remote control’s
battery are charged (see the Fitting the battery section).
Make sure the Parrot Disco’s cowling is properly closed.
Make sure the Parrot Disco’s warning light is green. This means
the Parrot Disco has acquired the GPS signal.

ENGLISH
13
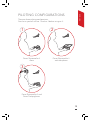
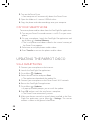
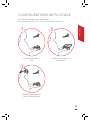
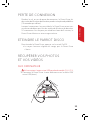
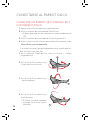
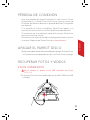
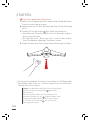
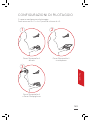
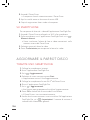
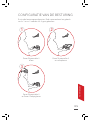
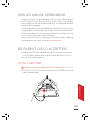
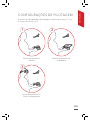
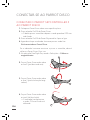
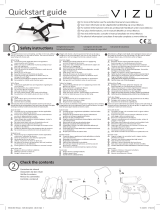
PILOTING CONFIGURATIONS
There are three piloting configurations.
Familiarise yourself with no. 1 and no. 2 before using no. 3.
Parrot Skycontroller 2
alone
Parrot Skycontroller 2 and
Parrot Cockpitglasses
TAKE OFF
GPS 97 %
0 m/s
EMERGENCY
Parrot Skycontroller 2
and smartphone
1 2
3

14
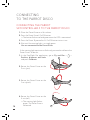
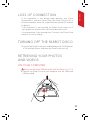
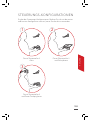
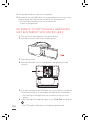
CONNECTING
TO THE PARROT DISCO
CONNECTING THE PARROT
SKYCONTROLLER 2 TO THE PARROT DISCO
1. Place the Parrot Disco on a flat surface.
2. Press the Parrot Disco’s On/Off button.
> The button flashes red and green once the GPS is connected.
3. Press the Parrot Skycontroller 2’s On/Off button to turn it on.
4. Wait until the warning light is a steady green.
You are connected to the Parrot Disco.
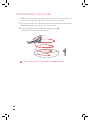
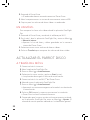
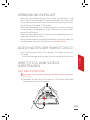
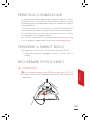
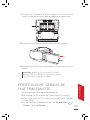
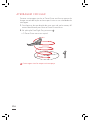
If the warning light continues to flash red, you need to calibrate the
Parrot Disco. To do this:
1. In the FreeFlight Pro application, go to Fly and film > >
Position, distances and limits
and press Calibrate.
2. Rotate the Parrot Disco on the
Z-axis (yaw).
3. Rotate the Parrot Disco on the
Y-axis (pitch).
4. Rotate the Parrot Disco on the
X-axis (roll).
> The warning light flashes
green. The Parrot Disco is
calibrated.
Z
Y
X

ENGLISH
15
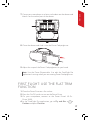
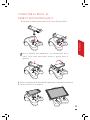
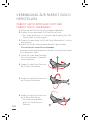
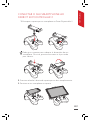
CONNECTING YOUR PARROT
SKYCONTROLLER 2 TO YOUR SMARTPHONE
1. Screw the smartphone holder onto the Parrot Skycontroller 2.
B
A
B
A
You can rotate the holder to fit your smartphone’s dimensions.
To do this, press on it and rotate it to the right.
B
A
B
A
2. Press the right button on the holder to fully open it.
3. Position your smartphone on the holder.
B
A
B
A

16
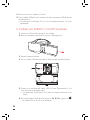
4. Tighten the holder on your smartphone.
5. Using your smartphone’s USB cable, connect your smartphone to the
Parrot Skycontroller 2’s USB port.
> The FreeFlight Pro application starts automatically.
You are connected.
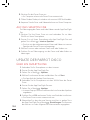
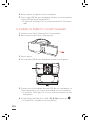
USE THE PARROT COCKPITGLASSES
1. Connect your Parrot Skycontroller 2 to your drone.
2. Pull out the drawer on your Parrot Cockpitglasses.
3. Open the drawer.
4. Pass your smartphone’s USB cable through the opening in the
drawer.
5. Plug one end of your smartphone’s USB cable into the Parrot
Skycontroller 2 and the other end into your smartphone.
> The FreeFlight Pro application will launch automatically on
your smartphone.
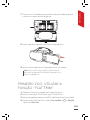
6. In the FreeFlight Pro application, go to Fly & Film and press .
> FPV mode launches on your smartphone.

ENGLISH
17
7. Centre your smartphone in relation to the dots on the drawer and
block it on the central part of the drawer.
8. Close the drawer and slide it into the Parrot Cockpitglasses.
9. Adjust the strap of the Parrot Cockpitglasses on your head.
Note: Use the Parrot Skycontroller 2 to edit the FreeFlight Pro
application’s settings when you are wearing Parrot Cockpitglasses.
GPS
40 %
0.0 m/s
0.000...
?
GPS
40 %
0.0 m/s
0.000...
?
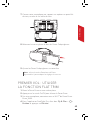
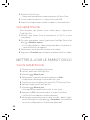
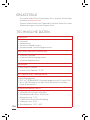
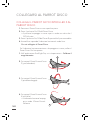
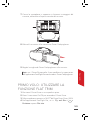
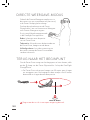
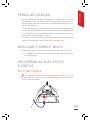
FIRST FLIGHT: USE THE FLAT TRIM
FUNCTION
1. Place the Parrot Disco on a flat surface.
2. Press the On/Off switch to turn on the Parrot Disco.
3. On your smartphone, connect to the Parrot Disco’s Wi-Fi
®
:
Disco_XXXX.
4. In the FreeFlight Pro application, go to Fly and film > >
Position and press Flat trim.

18
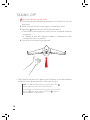
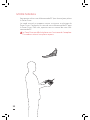
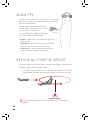
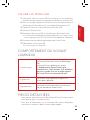
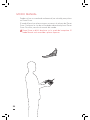
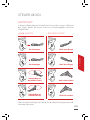
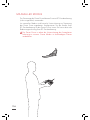
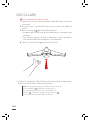
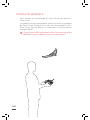
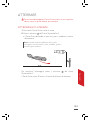
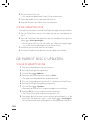
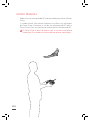
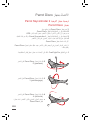
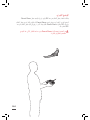
TAKING OFF
You must take off into the wind.
1. Stand facing upwind holding the body of the Parrot Disco with
one hand.
2. Make sure the Parrot Disco’s engine is completely clear.
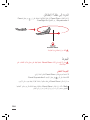
3. Press the button on your Parrot Skycontroller 2.
> The Parrot Disco’s engine will slowly run for 3 seconds and then
accelerate.
> A «Ready to take off» pop-up window is displayed on your
smartphone. You can take off.
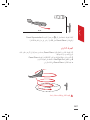
4. Gently toss the Parrot Disco upward.
> The Parrot Disco takes off. It goes up to 50 metres in altitude and then
makes 60-metre diameter circles. Now you can fly it.
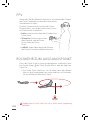
Note: To stop the Parrot Disco’s engine, press the
button again on your Parrot Skycontroller 2.
If you do not toss the Parrot Disco within 10 seconds of
pressing
, the engine shuts off. Press , again to
start a new take off procedure.

ENGLISH
19
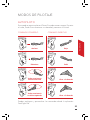
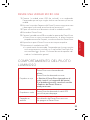
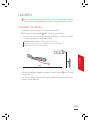
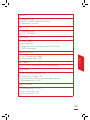
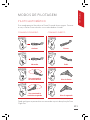
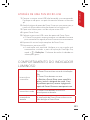
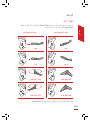
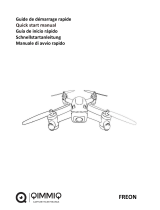
PILOTING MODES
AUTOPILOT
This mode allows you to securely fly the Parrot Disco. During flight, the
Parrot Disco maintains its speed and maintains its altitude.
You can configure and customise the commands in the FreeFlight Pro
application.
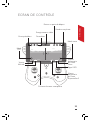
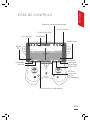
LEFT CONTROL
B
A
B
A
B
A
B
A
B
A
B
A
B
A
B
A
Accelerate
Slow down
RIGHT CONTROL
Go down
Go up
Turn right
Turn left
Right orbital
standby mode
Left orbital
standby mode

20
MANUAL MODE
You can use an RC remote (not included) to fly the Parrot Disco.
Manual mode offers no piloting assistance for the Parrot Disco.
Configure the channels of your RC remote for the Parrot Disco.
To do this, refer to the manual for your RC remote.
The Parrot Disco is difficult to control without the assistance of
the autopilot. This mode is for expert pilots.
La pagina sta caricando ...
La pagina sta caricando ...
La pagina sta caricando ...
La pagina sta caricando ...
La pagina sta caricando ...
La pagina sta caricando ...
La pagina sta caricando ...
La pagina sta caricando ...
La pagina sta caricando ...
La pagina sta caricando ...
La pagina sta caricando ...
La pagina sta caricando ...
La pagina sta caricando ...
La pagina sta caricando ...
La pagina sta caricando ...
La pagina sta caricando ...
La pagina sta caricando ...
La pagina sta caricando ...
La pagina sta caricando ...
La pagina sta caricando ...
La pagina sta caricando ...
La pagina sta caricando ...
La pagina sta caricando ...
La pagina sta caricando ...
La pagina sta caricando ...
La pagina sta caricando ...
La pagina sta caricando ...
La pagina sta caricando ...
La pagina sta caricando ...
La pagina sta caricando ...
La pagina sta caricando ...
La pagina sta caricando ...
La pagina sta caricando ...
La pagina sta caricando ...
La pagina sta caricando ...
La pagina sta caricando ...
La pagina sta caricando ...
La pagina sta caricando ...
La pagina sta caricando ...
La pagina sta caricando ...
La pagina sta caricando ...
La pagina sta caricando ...
La pagina sta caricando ...
La pagina sta caricando ...
La pagina sta caricando ...
La pagina sta caricando ...
La pagina sta caricando ...
La pagina sta caricando ...
La pagina sta caricando ...
La pagina sta caricando ...
La pagina sta caricando ...
La pagina sta caricando ...
La pagina sta caricando ...
La pagina sta caricando ...
La pagina sta caricando ...
La pagina sta caricando ...
La pagina sta caricando ...
La pagina sta caricando ...
La pagina sta caricando ...
La pagina sta caricando ...
La pagina sta caricando ...
La pagina sta caricando ...
La pagina sta caricando ...
La pagina sta caricando ...
La pagina sta caricando ...
La pagina sta caricando ...
La pagina sta caricando ...
La pagina sta caricando ...
La pagina sta caricando ...
La pagina sta caricando ...
La pagina sta caricando ...
La pagina sta caricando ...
La pagina sta caricando ...
La pagina sta caricando ...
La pagina sta caricando ...
La pagina sta caricando ...
La pagina sta caricando ...
La pagina sta caricando ...
La pagina sta caricando ...
La pagina sta caricando ...
La pagina sta caricando ...
La pagina sta caricando ...
La pagina sta caricando ...
La pagina sta caricando ...
La pagina sta caricando ...
La pagina sta caricando ...
La pagina sta caricando ...
La pagina sta caricando ...
La pagina sta caricando ...
La pagina sta caricando ...
La pagina sta caricando ...
La pagina sta caricando ...
La pagina sta caricando ...
La pagina sta caricando ...
La pagina sta caricando ...
La pagina sta caricando ...
La pagina sta caricando ...
La pagina sta caricando ...
La pagina sta caricando ...
La pagina sta caricando ...
La pagina sta caricando ...
La pagina sta caricando ...
La pagina sta caricando ...
La pagina sta caricando ...
La pagina sta caricando ...
La pagina sta caricando ...
La pagina sta caricando ...
La pagina sta caricando ...
La pagina sta caricando ...
La pagina sta caricando ...
La pagina sta caricando ...
La pagina sta caricando ...
La pagina sta caricando ...
La pagina sta caricando ...
La pagina sta caricando ...
La pagina sta caricando ...
La pagina sta caricando ...
La pagina sta caricando ...
La pagina sta caricando ...
La pagina sta caricando ...
La pagina sta caricando ...
La pagina sta caricando ...
La pagina sta caricando ...
La pagina sta caricando ...
La pagina sta caricando ...
La pagina sta caricando ...
La pagina sta caricando ...
La pagina sta caricando ...
La pagina sta caricando ...
La pagina sta caricando ...
La pagina sta caricando ...
La pagina sta caricando ...
La pagina sta caricando ...
La pagina sta caricando ...
La pagina sta caricando ...
La pagina sta caricando ...
La pagina sta caricando ...
La pagina sta caricando ...
La pagina sta caricando ...
La pagina sta caricando ...
La pagina sta caricando ...
La pagina sta caricando ...
La pagina sta caricando ...
La pagina sta caricando ...
La pagina sta caricando ...
La pagina sta caricando ...
La pagina sta caricando ...
La pagina sta caricando ...
La pagina sta caricando ...
La pagina sta caricando ...
La pagina sta caricando ...
La pagina sta caricando ...
La pagina sta caricando ...
La pagina sta caricando ...
La pagina sta caricando ...
La pagina sta caricando ...
La pagina sta caricando ...
La pagina sta caricando ...
La pagina sta caricando ...
La pagina sta caricando ...
La pagina sta caricando ...
La pagina sta caricando ...
La pagina sta caricando ...
La pagina sta caricando ...
La pagina sta caricando ...
La pagina sta caricando ...
La pagina sta caricando ...
La pagina sta caricando ...
La pagina sta caricando ...
La pagina sta caricando ...
La pagina sta caricando ...
La pagina sta caricando ...
La pagina sta caricando ...
La pagina sta caricando ...
La pagina sta caricando ...
La pagina sta caricando ...
La pagina sta caricando ...
La pagina sta caricando ...
La pagina sta caricando ...
La pagina sta caricando ...
La pagina sta caricando ...
La pagina sta caricando ...
La pagina sta caricando ...
La pagina sta caricando ...
La pagina sta caricando ...
La pagina sta caricando ...
La pagina sta caricando ...
La pagina sta caricando ...
La pagina sta caricando ...
La pagina sta caricando ...
La pagina sta caricando ...
La pagina sta caricando ...
La pagina sta caricando ...
La pagina sta caricando ...
La pagina sta caricando ...
La pagina sta caricando ...
La pagina sta caricando ...
La pagina sta caricando ...
La pagina sta caricando ...
La pagina sta caricando ...
La pagina sta caricando ...
La pagina sta caricando ...
La pagina sta caricando ...
La pagina sta caricando ...
La pagina sta caricando ...
La pagina sta caricando ...
La pagina sta caricando ...
La pagina sta caricando ...
La pagina sta caricando ...
La pagina sta caricando ...
La pagina sta caricando ...
La pagina sta caricando ...
La pagina sta caricando ...
La pagina sta caricando ...
La pagina sta caricando ...
La pagina sta caricando ...
La pagina sta caricando ...
La pagina sta caricando ...
La pagina sta caricando ...
La pagina sta caricando ...
La pagina sta caricando ...
La pagina sta caricando ...
La pagina sta caricando ...
La pagina sta caricando ...
La pagina sta caricando ...
La pagina sta caricando ...
La pagina sta caricando ...
La pagina sta caricando ...
La pagina sta caricando ...
La pagina sta caricando ...
La pagina sta caricando ...
La pagina sta caricando ...
La pagina sta caricando ...
La pagina sta caricando ...
La pagina sta caricando ...
La pagina sta caricando ...
La pagina sta caricando ...
La pagina sta caricando ...
La pagina sta caricando ...
La pagina sta caricando ...
-
 1
1
-
 2
2
-
 3
3
-
 4
4
-
 5
5
-
 6
6
-
 7
7
-
 8
8
-
 9
9
-
 10
10
-
 11
11
-
 12
12
-
 13
13
-
 14
14
-
 15
15
-
 16
16
-
 17
17
-
 18
18
-
 19
19
-
 20
20
-
 21
21
-
 22
22
-
 23
23
-
 24
24
-
 25
25
-
 26
26
-
 27
27
-
 28
28
-
 29
29
-
 30
30
-
 31
31
-
 32
32
-
 33
33
-
 34
34
-
 35
35
-
 36
36
-
 37
37
-
 38
38
-
 39
39
-
 40
40
-
 41
41
-
 42
42
-
 43
43
-
 44
44
-
 45
45
-
 46
46
-
 47
47
-
 48
48
-
 49
49
-
 50
50
-
 51
51
-
 52
52
-
 53
53
-
 54
54
-
 55
55
-
 56
56
-
 57
57
-
 58
58
-
 59
59
-
 60
60
-
 61
61
-
 62
62
-
 63
63
-
 64
64
-
 65
65
-
 66
66
-
 67
67
-
 68
68
-
 69
69
-
 70
70
-
 71
71
-
 72
72
-
 73
73
-
 74
74
-
 75
75
-
 76
76
-
 77
77
-
 78
78
-
 79
79
-
 80
80
-
 81
81
-
 82
82
-
 83
83
-
 84
84
-
 85
85
-
 86
86
-
 87
87
-
 88
88
-
 89
89
-
 90
90
-
 91
91
-
 92
92
-
 93
93
-
 94
94
-
 95
95
-
 96
96
-
 97
97
-
 98
98
-
 99
99
-
 100
100
-
 101
101
-
 102
102
-
 103
103
-
 104
104
-
 105
105
-
 106
106
-
 107
107
-
 108
108
-
 109
109
-
 110
110
-
 111
111
-
 112
112
-
 113
113
-
 114
114
-
 115
115
-
 116
116
-
 117
117
-
 118
118
-
 119
119
-
 120
120
-
 121
121
-
 122
122
-
 123
123
-
 124
124
-
 125
125
-
 126
126
-
 127
127
-
 128
128
-
 129
129
-
 130
130
-
 131
131
-
 132
132
-
 133
133
-
 134
134
-
 135
135
-
 136
136
-
 137
137
-
 138
138
-
 139
139
-
 140
140
-
 141
141
-
 142
142
-
 143
143
-
 144
144
-
 145
145
-
 146
146
-
 147
147
-
 148
148
-
 149
149
-
 150
150
-
 151
151
-
 152
152
-
 153
153
-
 154
154
-
 155
155
-
 156
156
-
 157
157
-
 158
158
-
 159
159
-
 160
160
-
 161
161
-
 162
162
-
 163
163
-
 164
164
-
 165
165
-
 166
166
-
 167
167
-
 168
168
-
 169
169
-
 170
170
-
 171
171
-
 172
172
-
 173
173
-
 174
174
-
 175
175
-
 176
176
-
 177
177
-
 178
178
-
 179
179
-
 180
180
-
 181
181
-
 182
182
-
 183
183
-
 184
184
-
 185
185
-
 186
186
-
 187
187
-
 188
188
-
 189
189
-
 190
190
-
 191
191
-
 192
192
-
 193
193
-
 194
194
-
 195
195
-
 196
196
-
 197
197
-
 198
198
-
 199
199
-
 200
200
-
 201
201
-
 202
202
-
 203
203
-
 204
204
-
 205
205
-
 206
206
-
 207
207
-
 208
208
-
 209
209
-
 210
210
-
 211
211
-
 212
212
-
 213
213
-
 214
214
-
 215
215
-
 216
216
-
 217
217
-
 218
218
-
 219
219
-
 220
220
-
 221
221
-
 222
222
-
 223
223
-
 224
224
-
 225
225
-
 226
226
-
 227
227
-
 228
228
-
 229
229
-
 230
230
-
 231
231
-
 232
232
-
 233
233
-
 234
234
-
 235
235
-
 236
236
-
 237
237
-
 238
238
-
 239
239
-
 240
240
-
 241
241
-
 242
242
-
 243
243
-
 244
244
-
 245
245
-
 246
246
-
 247
247
-
 248
248
-
 249
249
-
 250
250
-
 251
251
-
 252
252
-
 253
253
-
 254
254
-
 255
255
-
 256
256
-
 257
257
-
 258
258
-
 259
259
-
 260
260


in altre lingue
- English: Parrot Disco FPV User manual
- français: Parrot Disco FPV Manuel utilisateur
- español: Parrot Disco FPV Manual de usuario
- Deutsch: Parrot Disco FPV Benutzerhandbuch
- Nederlands: Parrot Disco FPV Handleiding
- português: Parrot Disco FPV Manual do usuário
Documenti correlati
-
 Mode Bebop 2 FPV Guida utente
-
Parrot Disco Pro AG Manuale utente
-
-
-
 Mode SWING + FLYPAD Manuale del proprietario
-
 Mode Mambo FPV Guida utente
-
-
-
Parrot ASTEROID Manuale del proprietario


Altri documenti
-
 Reely 2226747 Istruzioni per l'uso
-
 Vizu Drone X22 Manuale del proprietario
-
 QIMMIQ FREON Guida Rapida
-
Google LGD821.AHKGWH Manuale utente
-
 Seneo Seneo Wireless Charger Manuale utente
-
Align HEM00003 Manuale del proprietario
-
 beeloom 1300172 Mushloom 3D Wooden Puzzle Manuale utente
-
 tiko Class C Manuale utente
-
beeloom Parkloom Wooden Toy Garage Manuale utente
-
beeloom Veggie Table Manuale utente


