
3G to WiFi and
Ethernet Bridge


1
Overview
Overview
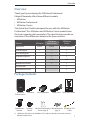
Thank you for purchasing the 3GStation Professional.
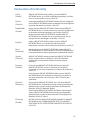
Ubiquiti Networks offers three different models:
• 3GStation
• 3GStation Professional
• 3GStation Carrier
This Quick Start Guide is designed for use with the 3GStation
Professional. The 3GStation and 3GStation Carrier models have
their own separate documentation. The chart below provides an
overview of the differences between the three versions:
Feature 3GStation
3GStation
Professional
3GStation
Carrier
Application Indoor Indoor Indoor/Outdoor
3G USB Support
PCI-E/SIM Support
3G Booster Support
3G Antenna 2dBi 5dBi
Wall-Mount Included
Hi-Power WiFi
2nd Ethernet PoE Out
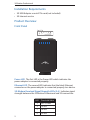
Package Contents
3G to WiFi and
Ethernet Bridge
3GStation
Professional (*)
Antennas 24V PoE Adapter Power Cord Quick Start Guide
Wall-Mount
Bracket
Desktop
Stand
M2.9x20 Self Tapping
Screws (Qty. 4)
M3x20 Anchors
(Qty. 4)
RPSMA to U.FL
Cable
(*) 1 RPSMA to TS9 cable and 1 RPSMA to U.FL Cable are already connected inside the
3GStation Professional.

2
3GStation Professional
Installation Requirements
• 3G USB Adapter or mini PCIe card (not included)
• 3G Internet service
Product Overview
Front Panel
Power LED The first LED is the Power LED which indicates the
power adapter is connected properly.
Ethernet LED The second LED indicates that the black Ethernet
connector on the power adapter is connected properly to a device.
3G Modem Received Signal Strength LEDs (3-6) Indicates signal
strength between the 3GStation Professional and 3G connection.
LED Threshold Value
3 min/-110 dBm
4 -95 dBm
5 -80 dBm
6 -65 dBm

3
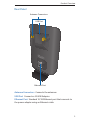
Product Overview
Rear Panel
Ethernet Port
USB Port
Antenna Connectors
Antenna Connectors Connects the antennas.
USB Port Connects a 3G USB Adapter.
Ethernet Port Standard 10/100 Ethernet port that connects to
the power adapter using an Ethernet cable.

4
3GStation Professional
Hardware Installation
The 3GStation Professional includes a desktop stand and a
wall-mount assembly. You can use either a 3G USB Adapter or a
miniPCIe card with the 3GStation Professional.
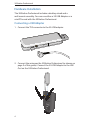
Connecting a USB Adapter
1. Connect the TS9 connector to the 3G USB adapter.
MICRO SD
2. Connect the antennas the 3GStation Professional (as shown on
page 9 of this guide). Connect the 3G USB Adapter to the USB
Port on the 3GStation Professional.

5
Hardware Installation
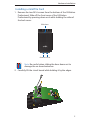
Installing a miniPCIe Card
1. Remove the two M1.6 screws from the bottom of the 3GStation
Professional. Slide off the front cover of the 3GStation
Professional by pressing down on it while holding the sides of
the back cover.
Slide down
Remove Screws
Note: Be careful when sliding the door down not to
damage the on-board antennas.
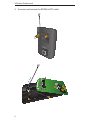
2. Carefully lift the circuit board while holding it by the edges.

6
3GStation Professional
3. Unscrew and remove the RPSMA toTS9 cable.

7
Hardware Installation
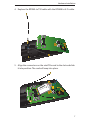
4. Replace the RPSMA to TS9 cable with the RPSMA to U.FL cable.
5. Align the connectors on the miniPCIe card to the slot and slide
it into position. The card will snap into place.
WIRELESS
MAIN
AUX

8
3GStation Professional
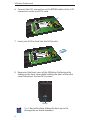
6. Connect the U.FL connectors on the RPSMA cables to the U.FL
connectors on the mini PCIe card.
WIRELESS
MAIN
AUX
7. Insert your 3G Sim Card into the 3G Sim slot.
WIRELESS
MAIN
AUX
3G
5637347834939523434
8. Reconnect the front cover of the 3GStation Professional by
sliding up the front cover while holding the sides of the back
cover. Reconnect the two M1.6 screws.
Slide up
Note: Be careful when sliding the door up not to
damage the on-board antennas.

9
Hardware Installation
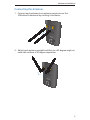
Connecting the Antennas
1. Connect each antenna to an antenna connector on the
3GStation Professional by rotating it clockwise.
2. Adjust each antenna upright and then to a 45 degree angle on
each side so there is 90 degree separation.

10
3GStation Professional
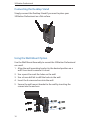
Connecting the Desktop Stand
Simply connect the Desktop Stand if you want to place your
3GStation Professional on a flat surface.
Using the Wall-Mount Option
Use the Wall-Mount Assembly to mount the 3GStation Professional
on a wall.
1. Align the wall-mounting bracket to the desired position on a
wall. Use a level to ensure it is level.
2. Use a pencil to mark the holes on the wall.
3. Use a 6 mm drill bit to drill the holes in the wall.
4. Insert the 4 screw anchors into the wall.
5. Secure the wall-mount bracket to the wall by inserting the
screws into the anchors.

11
Hardware Installation
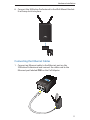
6. Connect the 3GStation Professional to the Wall-Mount Bracket.
It will snap lock into place.
Connecting the Ethernet Cables
1. Connect an Ethernet cable to the Ethernet port on the
3GStation Professional and connect the other end to the
Ethernet port labeled POE on the PoE Adapter.

12
3GStation Professional
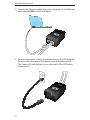
2. Connect an Ethernet cable from your computer to the Ethernet
port labeled LAN on the PoE Adapter.
3. Connect the power cord to the power port on the PoE Adapter.
Connect the other end of the power cord to a power outlet.
The Power LED should light up on the front of the 3GStation
Professional.

13
Accessing the AirOS Utility
Accessing the AirOS Utility
1. Launch your Web browser and type http://192.168.1.1 in the
address field and press enter (PC) or return (Mac).
Note: Your computer needs to be on the
192.168.1.x subnet. If you have DHCP enabled on
your Ethernet adapter, it should receive an address
automatically. If not, you will need to set a static IP
address in the 192.168.1.2 - 192.168.1.254 range.
2. The login screen will appear. Enter ubnt in the Username and
Password fields and click Login.

14
3GStation Professional
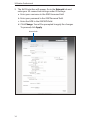
3. The AirOS interface will appear. Go to the Network tab and
enter your 3G connection settings under 3G Settings:
a. Enter your username in the GSM Username field.
b. Enter your password in the GSM Password field.
c. Enter the APN in the GSM APN field.
d. Click Change. You will be prompted to apply the changes.
To proceed, click Apply.
Network tab

15
General Warranty
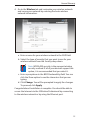
4. Go to the Wireless tab and customize your wireless network
and secure your network by entering the basic wireless
network information:
a. Enter a name for your wireless network in the SSID field.
b. Select the type of security that you want to use for your
wireless network from the Security drop-down.
Note: WPA2-AES security is the srongest wireless
security method. If all of your devices support this
option, it is recommended that you select it.
c. Enter a passphrase in the WPA Preshared Key field. You can
click the Show option to see the characters that you are
typing.
d. Click Change. You will be prompted to apply the changes.
To proceed, click Apply.
Congratulations! Installation is complete. You should be able to
access the Internet via the 3GStation Professional by connecting
to the wireless network or by using the Ethernet port.

16
3GStation Professional
General Warranty
UBIQUITI NETWORKS, Inc (“UBIQUITI NETWORKS”) represents and
warrants that the Products furnished hereunder shall be free from defects
in material and workmanship for a period of one (1) year from the date
of shipment by UBIQUITI NETWORKS under normal use and operation.
UBIQUITI NETWORKS sole and exclusive obligation under the foregoing
warranty shall be to repair or replace, at its option, any defective Product
that fails during the warranty period. The expense of removal and
reinstallation of any item is not included in this warranty.
The foregoing warranty is exclusive and in lieu of all other warranties,
express or implied, including the implied warranties of merchantability and
fitness for a particular purpose and any warranties arising from a course
of dealing, usage or trade practice with respect to the products. Repair or
replacement in the manner provided herein shall be the sole and exclusive
remedy of Buyer for breach of warranty and shall constitute fulfillment
of all liabilities of UBIQUITI NETWORKS with respect to the quality and
performance of the Products. UBIQUITI NETWORKS reserves the right
to inspect all defective Products (which must be returned by Buyer to
UBIQUITI NETWORKS factory freight prepaid).
No Products will be accepted for replacement or repair without obtaining
a Return Materials Authorization (RMA) number from UBIQUITI NETWORKS.
Products returned without an RMA number will not be processed and will
be returned to Buyer freight collect. UBIQUITI NETWORKS shall have no
obligation to make repairs or replacement necessitated by catastrophe,
fault, negligence, misuse, abuse, or accident by Buyer, Buyer’s customers or
any other parties. The warranty period of any repaired or replaced. Product
shall not extend beyond its original term.
Warranty Conditions
The foregoing warranty shall apply only if:
(V) The Product has not been subjected to misuse, neglect or unusual
physical, electrical or electromagnetic stress, or some other type of
accident.
(VI) No modification, alteration or addition has been made to the Product
by persons other than UBIQUITI NETWORKS or UBIQUITI NETWORK’S
authorized representatives or otherwise approved by UBIQUITI
NETWORKS.
(VII) The Product has been properly installed and used at all times in
accordance, and in all material respects, with the applicable Product
documentation.
(VIII) All Ethernet cabling runs use CAT5 (or above) shielded cabling.

17
Compliance
Disclaimer: UBIQUITI NETWORKS does not warrant that the operation of
the products is error-free or that operation will be uninterrupted. In no
event shall UBIQUITI NETWORKS be responsible for damages or claims
of any nature or description relating to system performance, including
coverage, buyer’s selection of products for buyer’s application and/or
failure of products to meet government or regulatory requirements.
Returns
In the unlikely event a defect occurs, please work through the dealer or
distributor from which this product was purchased.
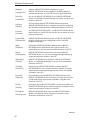
Compliance
FCC
This device complies with Part 15 of the FCC Rules. Operation is subject to
the following two conditions:
1. This device may not cause harmful interference, and
2. This device must accept any interference received, including
interference that may cause undesired operation.
Changes or modifications not expressly approved by the party responsible
for compliance could void the user’s authority to operate the equipment.
Note: This equipment has been tested and found to comply with the limits
for a Class B digital device, pursuant to part 15 of the FCC Rules.
These limits are designed to provide reasonable protection against
harmful interference in a residential installation. This equipment generates,
uses and can radiate radio frequency energy and, if not installed and used
in accordance with the instructions, may cause harmful interference to
radio communications. However, there is no guarantee that interference
will not occur in a particular installation. If this equipment does cause
harmful interference to radio or television reception, which can be
determined by turning the equipment off and on, the user is encouraged
to try to correct the interference by one or more of the following measures:
• Reorient or relocate the receiving antenna.
• Increase the separation between the equipment and receiver.
• Connect the equipment into an outlet on a circuit different from that to
which the receiver is connected.
• Consult the dealer or an experienced radio/TV technician for help.

18
3GStation Professional
Industry Canada
This Class B digital apparatus complies with Canadian ICES-003.
Operation is subject to the following two conditions: (1) this device may
not cause interference, and (2) this device must accept any interference,
including interference that may cause undesired operation of the device.
To reduce potential radio interference to other users, the antenna
type and its gain should be so chosen that the equivalent isotropically
radiated power (e.i.r.p.) is not more than that permitted for successful
communication.
The device has been designed to operate with the antennas listed below
and having a maximum gain of 5dBi*. Antennas not included in this list
or having a gain greater than 8dBi are strictly prohibited for use with this
device. The required antenna impedance is 50 ohms.
Model 3GStation Professional antenna gain is 2dBi.
Cet appareil numérique de la classe B est conforme à la norme NMB-003
du Canada.
Son fonctionnement est soumis aux deux conditions suivantes: (1) cet
appareil ne peut pas provoquer d'interférences et (2) cet appareil doit
accepter toute interférence, y compris les interférences susceptibles de
provoquer un fonctionnement du dispositif.
Pour réduire le risque d'interférence aux autres utilisateurs, l'antenne
type et son gain doivent être choisies de façon que l'équivalent puissance
isotrope rayonnée équivalente (pire) n'est pas plus que cela autorisé pour
une communication réussie.
Le dispositif a été conçu pour fonctionner avec les antennes énumérés
ci-dessous et ayant un gain maximal de 5dBi *. Antennes pas inclus dans
cette liste ou ayant un gain supérieur à 8dBi sont strictement interdite
pour une utilisation avec cet appareil. L'antenne doit impédance est de 50
ohms.
Modèle 3GStation gain d'antenne 2 dBi Professional est.
La pagina si sta caricando...
La pagina si sta caricando...
La pagina si sta caricando...
La pagina si sta caricando...
-
 1
1
-
 2
2
-
 3
3
-
 4
4
-
 5
5
-
 6
6
-
 7
7
-
 8
8
-
 9
9
-
 10
10
-
 11
11
-
 12
12
-
 13
13
-
 14
14
-
 15
15
-
 16
16
-
 17
17
-
 18
18
-
 19
19
-
 20
20
-
 21
21
-
 22
22
-
 23
23
-
 24
24


Ubiquiti 3GStation Carrier Guida Rapida
- Tipo
- Guida Rapida
- Questo manuale è adatto anche per
in altre lingue
Documenti correlati
-
Ubiquiti Power AP N 802.11n Guida Rapida
-
Ubiquiti Rocket M365 Guida Rapida
-
-
Ubiquiti airRouter HP Guida Rapida
-
-
Ubiquiti Networks AirRouterHP Guida Rapida
-
-
-
-