Rancilio Classe 8 S Manuale utente
- Categoria
- Accessori per la preparazione del caffè
- Tipo
- Manuale utente

Use and maintenance
espresso machine
classe 8
•
DE
•
S

2
Dear Customer,
First of all, thank you choosing RANCILIO.
We are confident that the product you have purchased will live up to all your expectations-just as all
our other products are designed to do. The product that you are about to use is the outcome of
painstaking research and tests. Rancilio’s product consistency assures that the equipment we have
supplied you with is the most functional, safe and satisfactory of its kind to be found on the market,
with regards to both its design and efficency. This booklet of instructions for its correct use and
maintenance will help you to get the best possible service out of your machine. We trust you will find
our explanations clear and understandable. We hope that we may continue to count you among our
esteemed customers well into the future.

3
Il presidente - The president
La presente dichiarazione perde la sua validità se la macchina viene modificata senza la nostra espressa autorizzazione.
La présente déclaration perd sa validité dès lors que la machine est modifiée sans notre expresse autorisation.
Die vorliegende Erklärung verliert ihre Gültigkeit, wenn die Maschine ohne unsere ausdrückliche Genehmigung verändert wird.
The present declaration will become invalid should the machine be modified without our specific authorization.
La presente declaración pierde su validez si la máquina es modificada sin nuestra expresa autorización.
A presente declaração perde a validade se a máquina é modificada sem a nossa expressa autorização.
Villastanza di Parabiago
Data: date: 10-10-2003
20010 Villastanza di Parabiago (MI)
Viale della Repubblica 40
DICHIARAZIONE DI CONFORMITA’ CE - DECLARATION DE CONFORMITE CE
EG-KONFORMITÄTSERKLÄRUNG - EC DECLARATION OF CONFORMITY
DECLARACIÓN DE CONFORMIDAD CE - DECLARAÇÃO DE CONFORMIDADE CE
Noi RANCILIO Macchine per caffè S.p.A.
Dichiariamo sotto la nostra responsabilità che il prodotto: Macchina per caffè per uso professionale
Déclarons, sous notre responsabilité, que le produit : Machine à café d’utilisation professionnel
Wir erklären auf unsere Verantwortung, daß das Produkt: Kaffeemaschine für Beruflichgebrauch
Declare under our responsibility that the product: Espresso coffee makers for commercial use
Declaramos bajo nuestra responsabilidad que el producto: Máquina para café de uso profesional
Declaramos sob a nossa responsabilidade que o produto: Máquina para café para uso profissional
al quale è riferita questa Dichiarazione, secondo quanto prescritto dalle direttive specifiche:
à laquelle se réfère cette déclaration, selon les prescriptions des directives spécifiques.
auf das sich diese Erklärung bezieht, Entsprechend der Vorschriften der spezifischen Richtlinien.
to which this declaration relates is, according to the provisions of the specific directives:
al cual se refiere esta Declaración, de acuerdo con lo prescrito por las específicas directivas:
ao qual se refere esta Declaração, segundo quanto prescrito pelas específicas diretrizes:
è conforme alle seguenti norme: - conforme aux normes suivantes :
In Übereinstimmung mit den folgenden Normen: - it complies with the following norms:
es conforme a las siguientes normas: - É conforme as seguintes normas:
EN 292-1, EN 292-2, EN 60335-1, EN 60335-2-15, EN 55014, EN 61000-3, EN 61000-4, ENV 50141, EN 55104
Norme EN armonizzate - Normes EN harmonisées - Harmonisierte EN-Norme - Harmonized EN norms - Normas EN armonizadas - Normes EN
Harmonia
VSR, S, M ed. ‘78 e ‘95
Norme applicate - Normes appliquées - Angewandte Vorschriften - Applied standards - Normas aplicadas - Normas aplicadas
Descrizione attrezzatura a pressione-Description de l’appareillage sous pression-Beschreibung der unter Druck stehenden Geräte-
Pressure device description-Descripción de los equipos de presión - Descrição dos equipamentos de pressão
Le macchine a leva non sono dotate di scambiatore- Les machines à levier ne sont pas équipées d’un échangeur-
Die mit einem Hebel versehenen Maschinen verfügen nicht über einen Austauscher.- The machines with lever are not fitted with exchanger- Las
máquinas de palanca no están dotadas de intercambiador - As máquinas com alavanca não possuem o intercambiador
98/37/CE
Direttiva macchina - Direttiva machine - Richtlinie Maschine - Makers directive - Directiva máquina - Diretriz da máquina:
73/23/CEE, 93/68/CEE
Direttiva Bassa Tensione - Direttiva Basse Tension - Niederspannungsrichtline - Low Voltage Directive - Directiva Baja Tensiòn - Diretriz Baixa Tensão:
89/336/CEE, 93/68/CEE, 92/31/CEE
Direttiva EMC - Direttiva EMC - Richtlinie EMC - EMC Directive - Directiva EMC - Diretriz EMC
97/23/CE
Direttiva attrezzatura a pressione (PED)-Directive sur les appareillages sous pression (PED)-Richtlinie für unter Druck stehende Geräte (PED) Pressure
device directive (PED) - Directiva equipos de presión (PED) - Diretriz aparelhagem de pressão (PED)
enoisserP
rab/apM.xaM
kcurD-noisserP
nóiserP-erusserP
oãsserP
°Cxam.pmeT
rutarepmeT-erutarépmeT
-erutarepmeT
arutarepmeT
meTp aruta
ediulF-odiulF
diulF-gissülF
odíulF-odiulF
tlàticapaC
-éticapaC
yticapaCtiekgihäF
aicnetoP-
tiaicnêtoP
ruegnahcé'ledorémuN-erotaibmacsoremuN
regnahexE-srehcsuatsuAsedremmuN
oremúN-rodaibmacretnioremúNrebmun
rodaibmacretnI
.rg1.rg2.rg3.rg4
ruegnahcE-erotaibmacS
regnahcxE-rehcsuatsuA
I-rodaibmacretn
rodaibmacretnI
21/2,1921
uaE-auqcA
retaW-ressaW
augÁ-augA
53,01234
enoisserP
rab/apM.xaM
kcurD-noisserP
nóiserP-erusserP
oãsserP
°Cxam.pmeT
-erutarépmeT
rutarepmeT-erutarepmeT
arutarepmeT
arutarepmeT
ediulF-odiulF
diulF-gissülF
odíulF-odiulF
-tltiekgihäF-tléticapaC-tlàticapaC
tiaicnêtoP-tlaicnetoP-tlyticapaC
.rg1.rg2.rg3.rg4
erèiduahC-aiadlaC
relioB-lesseK
ariedlaC-aredlaC
56,1/561,0921
ruepaV/uaE-eropaV/auqcA
maetS/retaW-fpmaD/ressaW
ropaV/augÁ-ropaV/augA
5116122

4

5
Fig. 1
Fig. 2
A

6
Fig. 3
1
1
2
2
6
6
2
1
45
5
8
8
9
9
10
11
16
12
12
13
15
15
10
11
16
MOD. DE
MOD. S
7
3
14

7
4
L
ovato
L
2 (3/8"G)
1
(Ø 30 mm)
Fig. 4
Fig. 6
Fig. 5
Fig. 7
H
D
C
B
A

8
Fig. 8
7
4B
9
1
2
3
10
MOD. DE
MOD. S
4B
A
B
C
D
E
9
10
4A
7
1
2
3
4A
5A
5B
6
8
6.1 6.2

9
Fig. 9
Fig. 13
Fig. 10
Fig. 11
Fig. 14
Fig. 12
SET OROLOGIO
SET DATA
SET ORA
FORMATO DATA
ORA
SET TIMER
ACCENSIONE
AUTOMATICA
DOMENICA
ON DUR
CLOCK
SET TIMER
SET DATE
CLOCK MODE
SET TIME
STAND BY TIMER
SUNDAY
ON - DUR.
CLEANING COFFEE?
press <ENTER>
INSERT THE BLIND
FILTERS, <ENTER>
CLEANING RUNNING
REMOVE THE
FILTERHOLDERS
RINSE RUNNING

10
Fig. 15
Fig. 17
Fig. 18
Fig. 16

11
Fig. 19
Fig. 20
Fig. 22
Fig. 24
Fig. 23
4
1
2
3
Fig. 21

12
CONTENTS
Machine identification data ............................ 49
1. General safety rules .................................... 49
2. Description ................................................... 50
2.1. Specifications and composition 50
2.2. Machine equipment................................. 50
2.3. Mechanical protective devices 51
2.4. Electric safety devices ............................ 51
2.5. Aerial noise ............................................. 51
2.6. Vibrations ................................................ 51
3. Technical data .............................................. 51
3.1. Dimensions and weights ......................... 51
4. Use ................................................................ 51
4.1. Precautionary measures ......................... 52
5. Transport ...................................................... 52
5.1. Packaging ............................................... 52
5.2. Inspection on receipt ............................... 52
6. Installation .................................................... 52
6.1.Connections to be made by the user ....... 53
6.1.1. Water and gas supply .......................... 53
6.1.2. Electric supply ...................................... 53
6.2. Preliminary operations ............................ 53
6.3 Antisuction valve installation .................... 53
6.4. Connections ............................................ 53
7. Operation ...................................................... 54
7.1. Controls .................................................. 54
7.2. Control instruments................................. 54
7.3. Starting up .............................................. 54
8. Use ................................................................ 55
8.1. Preparing coffee...................................... 55
8.2. Preparing cappuccino ............................. 55
8.3. Warming a beverage ............................... 55
8.4. Preparing tea, camomile, etc................ .. 55
8.5. Machines with TSC automatic system ......... 56
8.5.1. Heating Milk or a Drink (TSC) ............. 56
8.5.2. Preparing Frothed Milk (TSC) ............. 56
8.6 Programming functions ............................ 56
8.6.1. Programming panel (DE) ..................... 56
8.7. Programming (DE) .................................. 56
8.7.1. Barman programming .......................... 56
8.7.2. Clock .................................................... 56
8.7.3. Set timer .............................................. 56
8.7.4.Timer cut-out ........................................ 56
9. Adjustments and settings of the dose ....... 57
9.1.For models DE ......................................... 57
9.1.1. Adjusting the dose................................ 57
9.1.2. Adjusting the quantity of hot water ....... 57
9.2. Tray position adjustment ......................... 58
9.2.1.Tray case assembly .............................. 58
10. Maintenance ................................................. 58
10.1. Daily ...................................................... 58
10.2. Weekly .................................................. 58
10.2.1. Washing of the coffee groups ............. 58
10.2.2. TSC Washing (mod.DE)..................... 59
10.2.3.TSC quick washing ............................. 59
10.2.4. Cleaning TSC..................................... 59
10.3. Periodical .............................................. 59
10.3.1. Renewal of water ............................... 59
11. Stopping the machine ................................. 59
12. Troubleshooting ........................................... 59
The operations marked with this symbol are
to be undertaken exclusively by an
installation technician.
The operations marked with this symbol are
to be undertaken by the user.
WIRING DIAGRAMS 84-89
HYDRAULIC DIAGRAMS 90-92

13
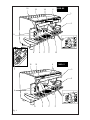
NAME: Coffee machine, CLASSE 8 series
MODEL: S - DE
VERSIONS: 1 - 2 - 3 - 4 GROUPS
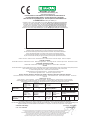
The label illustrated on the EC Declaration of Conformity of this instruction manual corresponds to the identification
label placed on the machine Fig. 2. (Pos. A).
Label identification (Fig.1):
1 Manufacturer
2 Model and version
3 Voltage
4 EC conformity mark (if required)
5 Serial number
6 Boiler data
7 Machine total absorption
8 Protection level
9 Motor power
10 Heating element power
11 Frequency
12 Conformity marks
13 Year of manufacture
Symbols
Warning signal. The instructions which refer to this signal must be followed with great care in order to
avoid accidents or damage to the machine.
This manual is an integral and essential part of the product and must be delivered to the user. The warnings
contained in it must be read carefully, as they supply important indications relating to the safety of installation,
use and maintenance. Keep this manual for future reference.
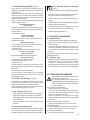
1. GENERAL SAFETY RULES
• Don’t leave the packing elements (plastic bags,
expanded polystyrene, nails, cardboard, etc.)
within the reach of children, as these elements are
potential sources or danger.
• Check that the data on the machine corresponds
to that of the electrical supply network, before
connecting the equipment.
• Adaptors, multiple sockets and /or extensions must
not be used.
• In doubt, request an accurate reading of the
electrical supply by qualified personnel. The electric
supply must be provided with the following safety
devices:
- efficient ground connection;
- section of conductors suitable for absorption
capacity
- efficient ground leakage protection circuit breaker.
• Install the machine on a water repellent surface
(laminate, steel, ceramic, etc.) away from heat
sources (oven, cooking stove, fireplace, etc.) and
in conditions in which the temperature may not go
below 5°C. KEEP WARM.
• Do not leave the machine exposed to atmospheric
agents or place them in damp rooms such as
bathrooms.
• Do not obstruct the suction or dispersion grills and
do not cover with cloths, etc.
• Keep the packed machine in a dry place, not
exposed to atmospheric agents and in conditions
in which the temperature does not go below 5°C.
Do not stack more than three items of the same
kind. Do not place heavy items on the packaging.
• In an emergency, such as the breaking out of a fire,
unusual noise, overheating, etc., take immediate
action, disconnecting the power and closing gas
and water taps.
• Only use original spare parts in order to avoid
compromising the safety and proper functioning of
the machine.
Erroneous installation can cause damage to
people, animals and things for which the
manufacturer cannot be considered
responsible

14
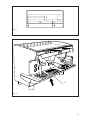
2.2. Machine equipment
Legend:
A Semiautomatic system; manual dispensing start
and stop.
B Automatic system; electronic control of coffee
and hot water doses dispensed.
C N. of coffee dispensing units.
D N. of steam spouts.
E N. of hot water spouts.
1 Steam tap
2 Steam spout
3 TSC button panel (Mod.DE)
4 TSC steam jet (Mod.DE)
5 Coffee dispensing unit
6 Coffee dispensing button panel (Mod.S - DE)
7 Manual water supply button
8 Level indicator
9 Gauge
10 Power on-off switch and led
11 Switch and boiler resistance engagement light.
12 Hot water key
13 Display (Mod.DE)
14 Programming panel (Mod.DE)
15 Hot water spout
16 Cup heating resistance switch
2. DESCRIPTION
The machines in the CLASSE 8 series have been
designed to prepare espresso and hot beverages.
A positive-displacement pump inside the machine
powers the heater in which the water is heated. By
pressing the appropriate buttons, water is supplied to
the spouts in the form of hot water or steam, according
to your need.
The hot water used to make drinks comes from the
boiler.
The machine is composed of a steel carrying structure
on which the mechanical and electrical components
are fitted. These are completely covered with panels
made of plastic and steel.
The beverages are dispensed at the front of the
machine, where all the buttons, control devices and
dispensers are to be found.
There is an optional cup-warming plate on the top of
the machine.
2.1. Specifications and composition (Fig.3)
1 GROUP 2 GROUP 3 GROUP 4 GROUP
1 dose filter holder
1111
2 dose filter holder
2234
Filters
3345
1 mt. supply pipe
1111
1,5 mt. supply pipe
1111
1,5 mt. drainage pipe 1111
Pipe connections
1111
Blind disks for cleaning
2234
Doser and presser
1111
Instruction manual
1111
Brush
1111
Tray side cases 1111
ABCDE
ED
-ko4-3-2-121
S
ko- 4-3-2-121

15
2.3. Mechanical protective devices
The machine is equipped with the following protective
devices:
• complete panelling protection of all the parts subject
to heat and of the steam and hot water supplier;
• cup-warmer plate supplied with a tray to collect spilt
liquids;
• work surface provided with grill and tray to collect
spilt liquids;
• expansion valve in the hydraulic system and valve
on the boiler to avoid overpressure;
• nonreturn valve on the hydraulic system to avoid
flowing back to the main supply.
2.4. Electric safety devices
The safety devices provided are:
• 12V low tension push buttons an the DE control
key panel;
• thermal protection on the pump motor;
• safe resistance thermal;
• Electronic safety devices.
2.5. Aerial noise
Noise level in the working place does not usually
exceed 70dB(A).
2.6. Vibrations
The machine is supplied with rubber vibration
damping feet. In normal working conditions, the
machine does not produce vibrations harmful to the
operator and the environment.
3. TECHNICAL DATA
3.1. Dimensions and weights (Fig.4)
You’ll find all the technical data for the electric
connection on the machine identification label
Fig. 1.
4. USE
The machine has been designed, manufactured and
protected to be used to make espresso and hot
beverages (tea, cappuccino, etc.). Any other use is
to be considered unsuitable and therefore dangerous.
The manufacturer cannot be held
responsible for any damage caused to
people or things due to unsuitable,
erroneous or irrational use of the
machine.
The operator must always follow the instructions
contained in this manual. In the case of a failure or if
the machine is not working properly, switch it off and
do not attempt any direct repair. Refer exclusively to
a service company.
PUORG1PUORG2PUORG3PUORG4
mmA 09605809010331
mm*1A 0750370790121
mmB 5055665095411
mmC 005005005005
mmD 003003003003
mmH 094094094094
.rtilniyticapacrelioB 5116122
gkthgiewenihcaM 356749211
telniretaW "8/3"8/3"8/3"8/3
eganiardmmØ 41414141
gnigakcaP
memuloV
3
72.044.055,076.0
mmHxPxLsnoisnemiD 006x076x066027x076x019027x076x0511027x076x0931
gkthgiewssorG 366709801
)ylbmessaesacedishtiwsnoisnemidllarevodecuder(1A*

16
6. INSTALLATION
The appliance is only to be installed in locations
where use and maintenance is restricted to trained
personnel.
The machines are fitted with height adjustable feet.
The support surface shall be levelled, dry, smooth,
steady and stable and at such a height that the cup-
warming surface is at over 150 cm from ground. Do
not use water jets or install where water jets are
used.
In order to guarantee normal operation, the machine
must be installed in areas that the environmental tem-
perature is between +5°C ÷ +32°C end humidity of
not over 70%.
It does not need to be anchored to the surface and it
does not require any technical operations to dampen
vibrations in order to operate properly.
It is recommended to leave the area around the
machine free to facilitate its use and the performan-
ce of any maintenance operations.
If the machine is wet or very damp, wait until it is
completely dry before installing or using it. It is always
necessary to request an accurate control to qualified
service people in order to find any possible damage
to the electric components.
Reserve an area near the machine for the installation
of the coffee grinding and dosage machine (see
relevant documentation).
The machine is usually equipped with a water
softener, type DP2 or DP4, which must be connected
by the user in compliance with the laws in force.
Should a different softener be installed, refer to the
documentation of the relevant product.
A dreg drawer should be fitted by the installer.
5. TRANSPORT
5.1. Packaging
The machine is delivered in a strong cardboard box
with internal protection.
The packaging bears symbols which must be
observed during handling and stocking of the item.
Always keep the package in a vertical position
during transport. Do not turn it over or lay it
on its side and avoid bumping and exposure
to atmospheric agents.
The user must not:
• touch the hot surfaces and dispensing areas;
• place liquids containers on the machine;
• put his hands under the spouts during use;
• transport the machine or carry out maintenance
operations when the plug is connected or when
the machine is hot;
• wash the machine with water or steam jet;
• dip completely or partially the machine in water;
• use the machine if the cable is damaged;
• touch the machine when his hands or feet are wet
or damp;
• use the machine when there are children in its
proximity;
• allow the machine to be used by children or unfit
people;
• obstruct the suction or dispersal grills with cloth or
any other thing;
• do not use the machine when wet or very damp.
4.1. Precautionary measures
This machine may only be used with foodstuffs. It
cannot be used for heating liquids or grinding any
other kind of product that could damage and pollute
it.
The manufacturer cannot be held responsible
for damage to people or things caused by
unsuitable, erroneous or irrational use.
5.2. Inspection on receipt
Check that the machine received corresponds to the
one indicated on the delivery note, including any
accessories.
Check that it has not been damaged during transport
and, if so, inform the forwarder and our customer
service office immediately.
The packing elements (plastic bags,
expanded polystyrene, nails, cardboard, etc.)
must not be left within reach of children as
they are potential sources of danger. Do not
dispose of the packing elements in the
environment; consign them to firms
authorized for their disposal.

17
6.1. Connections to be made by the
user
Hook-up must be carried out by qualified
personnel in full accordance with federal,
state and local regulations.
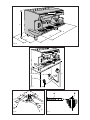
6.1.1. Water and gas supply (Fig.5)
Connections must be installed close to the machine.
• Water drainage pipe 1, having a minimum internal
diameter of 30 mm, equipped with a water-trap
accessible for inspection.
• Water supply pipe 2, with a 3/8"G cut-off tap.
Make sure that the maximum supply pressure
does not exceed 6.5 Mpa; otherwise, install
a pressure reducer.
6.1.2. Electric supply (Fig.5)
The machine is supplied ready for connection according
to the required electrical specifications.
Before connecting the machine ensure that the plate
details comply with those of the electric distribution
network.
The electrical connection cable must be directly con-
nected to the connection provided according to
current legislation. Ensure that the grounding system
is efficient and in compliance with current legal re-
quirements.
The grounding system and the lightning protection
system must be realized in accordance with the pro-
visions of current legislation.
For the supply network use a cable in compliance
with standards with protective conductor (grounding
wire).
For three-phase power use a cable with 3 conductors
( 3 phases + neutral + ground).
For single phase power supply use a cable with 3
conductors (phase + neutral + ground).
In both cases it is necessary to provide an automatic
differential switch (Fig. 5) at the start of the power
cable, complete with magnetic release elements in
accordance with the identification plate details (Fig.
1). The contacts must have an opening of equal or
over 3 mm and with dispersed current protection of
30 mA.
Remember that each machine must be fitted with its
own safety elements.
WARNING:
Should the power supply cable be damaged
it is to be replaced by the manufacturer or by
its technical assistance service or by person
with equivalent qualification, in order to
prevent any risks.
6.2. Preliminary operations (Fig.6)
POTENTIAL-EQUALIZING
CONNECTION
This connection, which is the one called for by several
norms, avoids electrical potential differences, building
up between any equipment that may be installed in
the same room. There is a terminal clip on the under
side of the base of the machine to which an external
potential-equalizing wire should be connected.
This connection is ABSOLUTELY NECESSARY and
must be made right after the machine is installed.
Use a wire whose cross-sectional area conforms to
the existing norms.
6.3 ANTISUCTION VALVE
INSTALLATION (Fig.7)
On the top of the boiler there is the antisuction valve.
When installing the machine make sure to remove
the plastic fork “A” and check that the pin ”B” is
not blocked.
This operation is very important for the correct
working of the machine.
• Place the machine on the horizontal surface
previously prepared.
Before connecting, thoroughly wash the mains water
pipes:
• Leave the water supply taps running at full pressure
for several minutes.
• Connect to the mains water supply.
• Connect the machine to the socket.
Thoroughly wash all the water pipes of the machine:
• Leave the water supply taps running at full pressure.
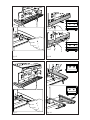
• Switch on main switch 1 (Fig.8): wait until the boiler
fills up to the level set.
• Switch on boiler resistance switch 2 (Fig.8) to begin
heating the water in the boiler.
• Operate each unit in order to allow the water to
escape for about one minute; repeat the operation
twice.
• Deliver steam from the steam jets for about one
minute.
• Deliver hot water for about one minute; repeat the
operation twice.
• Switch off switches 1 and 2.
• Empty the water from the boiler: see point 10.3.1.
IMPORTANT
Should the machine not deliver water for over
24 hours, wash the internal components be-
fore beginning work, repeating the operations
as described above.
6.4. Connections

18
7.3. Starting up
• Turn on the water supply tap 2 Fig.5.
• Turn the main switch 1; the pump is activated, filling
the boiler.
• When the water reaches the correct level, the pump
stops.
Turn the main switch 2 to begin heating the water
in the boiler then turn each one until water begins
to flow from them.
• Wait for the machine to reach its working pressure
and to reach the correct thermal balance.
7. OPERATION
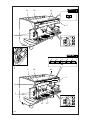
7.1. Controls (Fig.8)
1 Main switch
Two-position switch with led.
Turn on the switch (led on) the machine is turned
(apart from the boiler) and the pump is turned on
to fill the boiler;
2 Boiler resistance switch
Two-position switch with led.
On activating the switch (the led comes on) and
power is supplied to the resistance for the boiler
water.
3 Cup warmer switch
Two-phase switch with luminous led.
By turning on the switch (led on), the cup heating
resistance is power supplied.
4ACoffee dispensing switch (Mod.S)
Two-position switch:
With switch ON, coffee is dispensed;
With switch OFF, dispensing of coffee is
interrupted.
4B Coffee Dispensing Electronic Panel (Mod. DE)
This panel features 5 buttons for each dispenser
(max 4) and 5 LEDs consisting of the following:
4 (A-B-C-D) buttons for start/stop dispensing the
programmed coffee dose
1 (E) button for:
- Stop dispensing any dose
- Start in continuous mode
- Initialize dose programming for self-learning if
pressed for about 8 sec.(If the function is enabled)
Each time a coffee is dispensed, the LED of the rela-
tive button lights up.
During dose programming, the LED of the 5
th
button
flashes rapidly.
If the dose is supplied irregularly or the volumetric
counter is malfunctioning, the LED of the pressed
button flashes dispensing the dose on a time basis.
5A Hot water button (picking up directly from the
boiler) with two positions (Mod.S):
With switch ON, the LED flashes and hot water is
dispensed directly from the boiler.
With switch OFF, the LED switches off and
dispensing stops.
5B Hot water button (Mod.DE)
When the button is pressed, hot water is dispensed
directly from the boiler for the set time or until the
button is pressed again.
If you press the 2 buttons for 2 seconds,
dispensing is continuous and only stops when the
button is pressed again.
Dispensing is discontinued automatically after 30
and 60 seconds, respectively.
6 Steam TSC (Optional)
When the button is pressed, the steam dispensing
solenoid valve is powered until the set temperature
is reached or until the button is pressed again.
6.1 Emulsion steam TSC (Optional)
Press the button to power the steam and emulsion
delivery electromagnetic valves until the
programmed temperature and froth level are
reached or until the function is switched off.
Safety Devices
Dispensing cannot be carried out if the machine
has not reached the operating pressure or tempe-
rature at least once, and each time that the boiler
pressure drops too much.
7 Steam supply handwheel.
Tap: turn in an anticlockwise direction to open and
clockwise to close.
8 Supplementary manual water filling button
positioned under the discharge basin.
Press down to fill the boiler.
7.2. Control instruments (Fig.8)
9 Gauge with mobile needle on a fixed dial with a
double scale and colour indicator areas.
Visual control of the pump (manometer on the left-
hand side) and of the boiler pressure (manometer
on the right-hand side)
10 Minimum and maximum water level indicator .
Visual control of water level in boiler.

19
8. USE
The machine has a top shelf on which the cups are
kept and heated, ready for use.
This is very important to obtain good coffee as the
pre-warmed cup stops the coffee from growing cold
too quickly.
8.1. Preparing coffee
• Unclamp the filter-holder from the group and knock
any grounds out into the drawer especially provided
for this purpose, taking care not to damage the rim
of the filter.
• Use the filter for 1 or 2 coffees, according to need.
• Fill the filter with the measure of coffee, level it off
and press it down gently with the tamper.
• Remove any ground coffee that has stuck to the
rim of the filter while pressing.
If ground coffee is left on the rim of the filter,
a leaktight seal is not ensured, with
consequent leaking of water and coffee
grounds.
• Lock the filter-holder into the group firmly to obtain
a leaktight seal.
• Place the cups under the spouts and start
dispensing using control 3 - 4 or button panel 5
according to model (Fig.8).
• When the coffee has been dispensed, leave the
filter-holder attached to the dispensing unit until the
next coffee is required.
When dispensing, beware of the hot parts of
the machine, especially the group units, the
steam and hot water spouts. Do not put your
hands for any reason under the units and the
spouts when they are operating.
The grinding of the coffee beans is of fundamental
importance to the making of good coffee, and the
granular texture of the resulting grounds should be
such that it takes 25-30 seconds to produce the
beverage. If the coffee is ground too coarsely the
coffee will be pale in color and weak in flavor, with
only a very small amount of crema, and if the grounds
are too fine, the coffee will be dark with no crema.
Good coffee can only be made if the beans are freshly
and uniformly ground (only possible when the blades
of the coffee grinder are sharp) and are then measured
out into the correct quantities (roughly 6 grams per
measure).
The importance of freshly ground coffee beans is due
to the fact that once ground, they rapidly lose their
aromatic qualities, and fats present in the beans go
rancid.
8.4. Preparing tea, camomile, etc.
• Place the jug under the hot water spout and use
the delivery control according to the model (Fig.8).
When the desired quantity has been obtained, turn
off the switch.
• Add the beverage desired.
Models DE
For these models, hot water is dispensed in specific
measures (see paragraph 9, adjusting the dose of
hot water).
To dispense hot water in different quantities, proceed
as follows:
• Hold down the delivery control 5B for at least four
seconds then release the button; the machine
continuously delivers water.
• When the desired measure has been obtained, press
the button again to interrupt delivery.
8.3. Heating a beverage
• Immerse the steam spout into the liquid to be
heated.
• Gradually turn on the steam tap 7 Fig.8; the steam
that bursts in the liquid heats it to the desired tem-
perature.
• Turn off the steam tap when the desired temperatu-
re has been reached.
Immediately after carrying out this operation,
clean the spout with a sponge or clean cloth.
Be careful as the spout is hot and may burn
your hand.
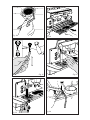
8.2. Preparing cappuccino (Fig.9)
• Make cup of cappuccino with espresso.
• Use a high and narrow jug, half-filled with milk.
• Place the jug under the spout so that the nozzle
touches the bottom.
• Turn on the steam tap and lower the jug so that the
nozzle is almost at the surface of the milk.
• Now, slowly raise and lower the vessel so that the
steam nozzle is immersed in and out of the milk to
create the froth.
• Turn off the steam tap and pour the milk into the
cup.
Immediately after carrying out this operation,
clean the spout with a sponge or a clean cloth
so that the milk does not dry on it. Be careful
as the spout is hot and may burn your hand.

20
8.5. Machines with TSC automatic system
(Fig.8) (only Mod. DE)
8.5.1 Heating Milk or a Drink (TSC)
• Immerse the wand in the drink
• Press button 6.2 on the keypad (Fig.8)
• The display will show the temperature of the drink
• Press button 6.2 again to stop heating at the desired
temperature.
• Wait for the machine to stop automatically at the
programmed temperature.
8.5.2. Preparing Frothed Milk (TSC)
• Immerse the wand in a container containing at least
250 cc of milk (the sensor must be at least 3 cm
below the water level).
To obtain best results, use refrigerated milk (≤ 5°C)
- (≤ 41°F)
• Press button 6.1 on the keypad (Fig.8)
• The display shows the temperature of the milk.
• Press button 6.1 again to stop the machine at the
desired temperature and emulsion level.
• Wait for the machine to stop automatically at the
set temperature and level of froth.
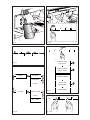
8.6 Programming functions
8.6.1 Programming Panel (Mod.DE)
Use the first coffee keyboard with keys having the
following functions (Fig.10):
1° Button Enter programming
Keeping pressed for 8 sec. you enter
programming, then you have:
(Fig.11)
1° Button “+” To move to a higher level in the
programming menus. Or to
increase the value
2°Button “-” To move to a lower level in the
programming menus. Or to
decrease the value
3° Button “enter” To enter the programming
menu. Or to confirm entries
4° Button “esc” To quit the menu
Or to quit programming mode.
5° Button Key off.
When the dose of hot water is being delivered
electronically, delivery can be interrupted by pressing
the button 5B.
When purified water is used, these beverages often
assume a darker color.
Should the user prefer a lighter colored drink, draw fresh
water from an ordinary tap and proceed with the heating
phase as described in point 8.3.
8.7 Programming (Mod.DE)
By keeping START/STOP key pressed and switching
the machine off and on again, you will enter
programming.
8.7.1 Barman programming (Fig.13)
By keeping key 1 of keyboard 1 pressed for 8
seconds you will enter programming.
By pressing “+” and “-” keys the following sub-menus
will be browsed:
Programming with the following sub-menus:
- Set clock
- Set date
- Set time
- Date/time format
- Set timer
- Automatic switching on
- Sunday
- On Dur.
8.7.2.Clock
Sub-menu to set date and time and mode (24 hours
or English 12 hours and date with dd/mm/yy or mm/
dd/yy)
8.7.3 Set timer
Menu to set automatic switching on/off of the machine
as follows:
- select automatic or manual switching on (to enable
function or not)
- set switching on time for every day of the week
- set working hours
To browse from one menu to another press “+” or “-”,
to enter a sub-menu or to confirm a variation press
“enter”, to exit press “esc”.
The value that can be modified with “+” or “-” keys is
flashing.
8.7.4 Timer-cut-out (Fig.14)
If the machine is turned off by the program, by
pressing key 4 of keyboard 1 at least for 3-4 seconds
it will turn on again and remain on until the following
programmed stop or by pressing the same key again.
If the machine is turned on by the program, by
pressing key 4 of keyboard 1 at least for 3-4 seconds
it will turn off again and remain off until the following
programmed stop or by pressing the same key again.
La pagina sta caricando ...
La pagina sta caricando ...
La pagina sta caricando ...
-
 1
1
-
 2
2
-
 3
3
-
 4
4
-
 5
5
-
 6
6
-
 7
7
-
 8
8
-
 9
9
-
 10
10
-
 11
11
-
 12
12
-
 13
13
-
 14
14
-
 15
15
-
 16
16
-
 17
17
-
 18
18
-
 19
19
-
 20
20
-
 21
21
-
 22
22
-
 23
23


Rancilio Classe 8 S Manuale utente
- Categoria
- Accessori per la preparazione del caffè
- Tipo
- Manuale utente
in altre lingue
- English: Rancilio Classe 8 S User manual
Documenti correlati
-
Rancilio Classe 8 S Manuale utente
-
-
-
-
-
-
-
Rancilio CLASSE 10 Use And Maintenance
-
-