Minolta Minoltafax 1300 Manuale utente
- Categoria
- Fax
- Tipo
- Manuale utente

The essentials of imaging
www.minoltaeuro
p
e.com
User Manual
Minoltafax 1300

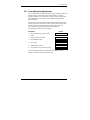
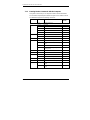
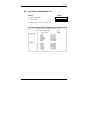
CONTENTS
Minoltafax 1300 I
CONTENTS
1 General Information 1
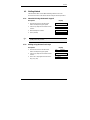
1.1 Introduction 1
1.2 How Does a Fax Machine Work? 2
1.3 Safety Precautions 3
1.4 User Instructions (For UK Users) 4
1.4.1 Mains Plug Wiring Instructions 6
1.5 Ozone Release Warning 7
1.6 Features 7
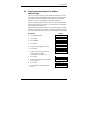
2 Installation 9
2.1 Unpacking 9
2.2 Location 10
2.3 Description of the Parts 12
2.4 The Ink Cartridge 15
2.4.1 Ink Footprint 16
2.4.2 Ink Save Mode 16
2.4.3 Opening the Transmission Unit 17
2.4.4 Installing the Ink Cartridge 17
2.5 Operation Panel, Displays and Keys 20
2.6 Connecting the Telephone Cable 22
2.7 Loading the Recording Paper 23
2.7.1 Adjusting the Paper Thickness 23
2.7.2 Filling the Paper Cassette 23
2.7.3 Using Single Sheet Feeder 25
2.7.4 Installing the Document Feeder 26
2.8 Turning the Machine On 26

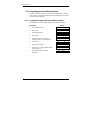
CONTENTS
II Minoltafax 1300
3 Entering Data 27
3.1 Typing Conventions in this Manual 27
3.2 General 27
3.3 Entering Letters 28
3.4 Entering Password, Name, Fax Number and Line Type 31
3.4.1 Positioning the Header 32
3.5 Entering Date and Time 33
3.6 Entering Telephone Numbers 34
3.6.1 One-Touch Dial 34
3.6.2 Speed Dial 35
3.6.3 Changing One-Touch Key Numbers or
Speed Dial Numbers 36
3.6.4 Deleting One-Touch Key Numbers or
Speed Dial Numbers 37
3.7 ECM Mode 38
3.7.1 Changing the ECM Mode setting for one Transmission 38
3.8 Fax Transfer 39
3.8.1 Automatic Fax Transfer 40
3.8.2 Manual Fax Transfer (Remote Controlled Polling) 40
3.9 Power Save Mode 42
3.10 Redial 42
3.11 Transmitting the Page Numbers 43
3.12 Programming User Software Switches 44
3.12.1 Changing the Setting of the User Software Switches 44
3.12.2 List of User Software Switches 45

CONTENTS
Minoltafax 1300 III
4 Sending 49
4.1 Transmission 49
4.1.1 Notes on Original Documents 49
4.1.2 Placing the Documents 51
4.1.3 Contrast / Resolution 52
4.2 Dialling Method 53
4.2.1 Manual Dial Using the Numeric Keypad 53
4.2.2 Dialling Using the One-Touch Keys 53
4.2.3 Dialling Using the Speed Dial 54
4.2.4 Manual Dialling Using the Line Monitor 54
4.3 Delay Transmission (Timer) 55
4.3.1 Deleting Delay Transmission 55
4.3.2 Changing Delay Transmission 56
4.4 Broadcast Transmission 57
4.4.1 Deleting Broadcast Transmission 58
4.5 Polling Transmission 58
4.5.1 Deleting Polling Transmissions 59
4.5.2 Changing Polling Transmission 60
4.6 Overseas Transmission 60

CONTENTS
IV Minoltafax 1300
5 Receiving 61
5.1 Manual Receiving 61
5.2 Automatic Receiving (AUTO) 62
5.3 Combination with an Answering Machine (ANSWER) 62
5.4 Polling Receiving 63
5.5 Timer Polling Receiving 64
5.5.1 Deleting Timer Polling Receiving 64
5.5.2 Changing Timer Polling Receiving 65
5.6 Memory Receiving 65
5.6.1 Memory Capacity 65
5.7 Reducing the Received Pages 66
5.7.1 Footprint for Split Pages 67
5.8 Selective Receiving 67
6 Copying 69
6.1 Single Copies 69
6.2 Multiple Copies 69
6.3 Reduction 70

CONTENTS
Minoltafax 1300 V
7 Connecting the Fax to the Computer 71
7.1 Installing the Printer Driver 72
7.1.1 Adjusting the Printer Driver 73
7.1.2 Switching between Fax and Printer Mode 74
7.1.3 The Operation Panel in Printer Mode 74
7.1.4 Fax Function in Printer Mode 75
7.2 Computer Fax Mode, Scanner Mode and Printer Mode 76
7.2.1 Pin Assignment for the RS-232C Cable 77
7.2.2 Modem Specifications 77
7.2.3 Entering Modem Commands with the Computer 78
7.2.4 Switching Computer Fax Mode, Scanner Mode
and Printer Mode on 80
7.2.5 Testing the Fax Software 81
7.2.6 Computer Fax Mode 82
7.2.7 Scanner Mode 84
7.2.8 Printer Mode 84
8 Reports 85
8.1 Activity Report 85
8.2 One-Touch and Speed Dial List 87
8.3 Broadcast List 88
8.3.1 Broadcast Report 88
8.4 Software Switch List 89
8.5 Transmission Report 90
8.6 Timer Transmission Report 90
8.7 Timer Polling Report 91

CONTENTS
VI Minoltafax 1300
9 Maintenance and Troubleshooting 93
9.1 Cleaning the Machine 93
9.1.1 Cleaning the Transport Rollers 1 and 2 93
9.2 Cleaning the Printer 95
9.3 Cleaning the Platen Roller 96
9.4 Removing a Paper Jam 96
9.5 Power Failure 98
9.6 Fax Error 98
9.6.1 General 98
9.6.2 Transmission 98
9.6.3 Receiving 99
9.6.4 Error LED 100
9.6.5 Connected Telephone 100
9.6.6 Problems with a connected Answering Machine 101
9.7 Printer Error 101
9.7.1 Paper Loading Problems 102
9.7.2 Print Quality Problems 103
9.7.3 Cleaning the Printer Head 104
9.8 Error Codes in Reports 104
10 Specifications 105

GENERAL
Minoltafax 1300 1
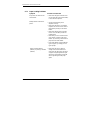
1 General Information
1.1 Introduction
Thank you for choosing this Minoltafax 1300 and showing confidence in
our product. This machine has a modern design and fulfils today’s
requirements of a fax machine. It combines advanced technology with a
harmonious design.
The machine is authorised for use in the public telephone network and is
compatible to other fax machines of the communication standard 3.
The Minoltafax 1300 was manufactured to the same high quality standards
as is common for all other precision instruments made by Minolta.
This manual will assist you in becoming familiar with the machine.
It contains all the necessary information for the start-up, its functions and
the replacement of the consumables.
Please, always keep this manual to hand when using the machine.

GENERAL
2 Minoltafax 1300
1.2 How Does a Fax Machine Work?
A fax machine can be connected to a normal telephone system without
taking any special precautions, just like a normal telephone set. The
function of a fax machine is quite similar to that of a telephone.
The way a fax machine works is simple: documents that are to be
transmitted are "read" by the take-up unit, the so called scanner. The
machine does not recognise the letters but reads the picture, dot by dot,
and marks each dot as black or white. That is why you can not only
transmit texts but also pictures and photos. The information is then
digitised and compressed so that the fax machine can send it quickly over
the telephone line to another fax machine which reverses the process,
reading and marking each dot as black or white on a sheet of paper.
When you are "called" by a fax machine, your telephone rings as normal.
Therefore you cannot know whether your are receiving a fax call or a
telephone call before picking up the receiver.
At the beginning of a fax transmission you will hear shrill sounds. Those
sounds are the so called "hand shaking" and function as an introduction
sequence before the actual transmission, just as interlocutors - often -
introduce themselves at the beginning of a telephone call. In the
introductory sequence the technical features of both machines are
matched to make sure the transmission and the reception are conducted
to a high standard.
With your Minoltafax 1300 you do not need to listen to the introductory
sequence. How to program the machine accordingly will be explained later
in this manual. Furthermore you will also find information about the
settings that come with the machine, that have to be made when installing,
or the settings that can be made at a later stage. Most of the features of
the fax machine work independently, so that you can program only the
settings you need for the moment and ignore all others.
By the way, the word "fax" is a combination of the Latin "facere" (to make)
and "simile" (similar) describing the process of making a copy which is
similar to the original. This artificial word "fax" has nowadays become
widely accepted in everyday language, replacing the older term facsimile.
Now, enjoy your new fax machine.

GENERAL
Minoltafax 1300 3
1.3 Safety Precautions
• Connect the machine only to a 200 - 240 V/ 50 Hz earthed power point
which complies with the VDE standards. Try to avoid the use of multiple
power points.
• Make sure the power is not turned off over night.
• Always pull at the plug, never at the wire, when you want disconnect the
machine from the power supply.
• To facilitate communication always keep the machine switched on and
program the correct user data.
• Do not unscrew any parts, if not specifically requested in this manual. If
there should be any problems, please inform your technical service.
• Never open the machine while it is transmitting or printing.
• Take care not to let humidity into the machine.
• Make sure no strange objects fall into the machine.
• If any problem occurs that can not be solved by the procedures
described in this manual make sure you contact the technical service.
• Follow the recommended maintenance procedures regularly.
• For the disposal of used ink cartridges check your local regulations.

GENERAL
4 Minoltafax 1300
1.4 User Instructions (For UK Users)
These facsimiles are approved for connection to the British Telecom public
switched telecommunication systems in accordance with the British
telecommunication Act of 1984. The usage should be subject to the
conditions set out in these instructions. Any other usage will INVALIDATE
this approval.
1 The approval of this facsimile for connection to the public switched
telephone network (PSTN) is invalidated if the facsimile is used with or
connected to:
(i) internal software that has not been formally accepted by BABT or
(ii) external control software or external control apparatus which
causes the operation of the facsimiles to contravene BABT
requirements.
2 This facsimile is approved for the use of the following facilities:
Tone Dialling (DTMF)
Automatic Clearing
Automatic answering (Facsimile with auto answer to ITU-T.30)
Last Number Redial
Automatic call initiation
Automatic dialling facilities
Automatic multiple repeat dial attempts
Series connection for "Off Hook" detection
Memory dialling
Any other usage will INVALIDATE the approval of the apparatus, if as
a result it then ceases to conform to the standard for which approval
was granted.
3 This facsimile is suitable for connection to exchange lines on PSTN
directly or via a compatible private branch exchange.
4 It cannot be guaranteed that the facsimile will operate under all
possible conditions of connection to compatible PBXs. Any cases of
difficulty should be referred in the first instance to the supplier of the
apparatus.
5 Connection to PSTN must not be hardwired.
The connection to PSTN must be disconnected before the mains plug
is removed.
6 The facsimile may be used on PSTN employing Loop disconnect of MF
signalling. However, please note as follows: Although the facsimile can
use either Loop disconnect or DTMF signalling, only the performance
of the DTMF signalling is subject to regulatory requirements for correct

GENERAL
Minoltafax 1300 5
operation. It is therefore strongly recommended that the facsimile is set
to use DTMF signalling for access to public or private emergency
services if it is used with a hand-set. DTMF signalling also provides
faster call set up.
7 Ringer Equivalent Number (REN) for the facsimile is 1.
The REN relates to the performance of the facsimile when used in
parallel with other items of terminal equipment. The REN is a customer
guide indicating approximately the maximum number of equipment that
should be connected in parallel simultaneously to the same line. To
determine the maximum number of items that can be connected
simultaneously to an exclusive line please add the REN values of each
item connected to the exclusive line. The sum should not exceed the
maximum REN value of 4. For the purposes of this calculation, the
REN of terminal equipment rented or brought from BT plc. should be
assumed to be a REN of 1.0 unless otherwise specified.
8 When other telephone apparatus is connected in parallel with the
facsimile, it must be set on Tone dialling (DTMF) mode only.
9 When connecting a telephone onto the same line or PBX extension as
this facsimile, the serial socket on the LJU unit (on the unit cord) must
be used.
10 Please be advised that should another telephone device be used
connected to the PSTN via the serial socket on the LJU unit, then
problems may be experienced in the following ways:
(i) Difficulty making calls.
(ii) Problems in telephone conversation sometimes experienced by
both parties. Should difficulties as described above be experienced,
then the supplier of the facsimile should be contacted for assistance
and the network operator.
11 The facsimile is not suitable as an extension to a pay phone or as a
1 + 1 carrier system.
12 On a private exchange (PABX) extension, insert a pause or pauses in
the autodial sequence to allow your PABX unit time to connect with the
public service telephone network (an outside line) before dialling
continues. For example, you may require a sequence of 9 "PAUSE"
0908 214315 to transmit a fax message to our Keynes Office. To insert
pause, press the "PAUSE" key. One key operation causes a pause of
4 seconds in the dialling sequence.

GENERAL
6 Minoltafax 1300
13 It may be necessary to insert a pause in the autodial sequence when
sending transmissions overseas in order that the international
exchanges have time to interconnect. For example, you may require a
sequence of 010 "PAUSE" 1555677899 to transmit a fax message to
your New York office. To insert a pause, press the "REDIAL/P" key.
One key operation causes a pause of 4 seconds in the dialling
sequence.
1.4.1 Mains Plug Wiring Instructions
This equipment is fitted with a moulded type mains plug incorporating a
detachable fuse cover, under no circumstances should the plug be used
without the fuse cover fitted. In the unlikely event of the socket outlet in
your home not being compatible with the plug supplied, cut off the mains
plug and fit an appropriate type observing the wiring code blow.
DANGER: The fuse from the cut-off plug should be removed and the plug
should be disposed of in a safe manner. Under no circumstances should
the cut-off plug be inserted into a socket outlet as a serious electric shock
may occur. If you are not sure how to do this, get help from a qualified
electrician.
IMPORTANT
The wires in this mains lead are coloured in accordance with
the following code:
GREEN-AND-YELLOW: Earth
BLUE: Neutral
BROWN: Live
As the colours of the wires in the mains lead of this apparatus may not
correspond with the coloured markings identifying the terminals in your
plug, proceed as follows. The wire which is coloured GREEN-AND-
YELLOW must be connected to the terminal in the plug which is marked
by the letter "E", or by the safety earth symbol ===, or coloured green or
green and yellow.
The wire which is coloured BLUE must be connected to the terminal which
is marked with the letter N or coloured black.
The wire which is coloured BROWN must be connected to the terminal
which is marked with the letter L or coloured red.
This appliance must be protected by a 13A fuse in the mains plug or
distribution board.
"WARNING: THIS EQUIPMENT MUST BE EARTHED."

GENERAL
Minoltafax 1300 7
1.5 Ozone Release Warning
During printer operation, a small quantity of ozone is released. This
amount is not large enough to harm anyone adversely. However, be sure
the room where the fax machine is being used has adequate ventilation,
especially if you are printing a high volume of material or if the fax machine
is being used continuously over a long period.
1.6 Features
Your new fax machine is a compact multi-functional device facilitating your
work and reducing your fax communication times. The features of the
Minoltafax 1300 include scanning of originals into the memory for delayed
transmission, allowing simultaneous reception of fax messages and vice
versa.
• Ink jet printing using plain paper with ink save mode option
• High resolution printing with 64-shade halftone control
• 20-page automatic document feed
• Memory / transmission reception (up to 34 pages)
• Broadcasting
• ECM (Error Correction Mode)
• Multiple copying (up to 99 copies)
• Automatic fax/phone and fax/answering machine switch over (answering
machine is not included)
• Voice response with auto reception mode
• 16-character LCD display
• 48-number automatic dialling memory
• Centronics parallel printer interface
• RS-232C interface compatible EIA-578 (Fax modem class 1)
• Power save mode to reduce power consumption

GENERAL
8 Minoltafax 1300

INSTALLATION
Minoltafax 1300 9
2 Installation
2.1 Unpacking
Please check whether the contents are complete.
1 Machine
2 Telephone cable (Great Britain and Germany only)
3 Document feeder
4 Printer Driver Disk
5 Manual (Great Britain and Germany only, separate for other countries)
6 Ink cartridge

INSTALLATION
10 Minoltafax 1300
2.2 Location
• Avoid direct exposure to sunlight and place the machine away from
heaters.
• Avoid humid or dusty locations.
• Place the machine on a flat, non-vibrating surface.
• Keep the machine away from magnetic fields (TV sets, radios).
• Avoid locations close to ventilation openings, air conditioners and
heaters.
• The machine should be easily accessible from all sides.
• Keep the paper exit area large, even and big enough for the sheets.
• Keep all covers closed when the machine is in standby. If any cover is
opened no transmission or reception is possible. If any cover is opened
during sending or receiving the procedure is interrupted.
• Avoid extreme fluctuations in temperature, which could lead the
humidity inside the machine to condense causing problems reading the
documents.
• Best use a completely separate power socket. Avoid kinks in the power
cable. Make sure the cable is not damaged by sharp edges.
• Make sure no liquids enter the machine.
• If liquid enters the machine, immediately unplug the power cable and
inform the technical service before you start the machine again.

INSTALLATION
Minoltafax 1300 11
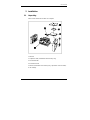
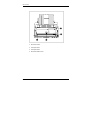
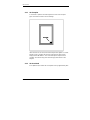
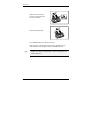
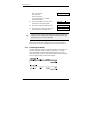
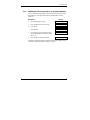
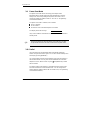
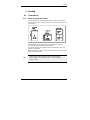
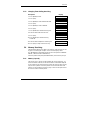
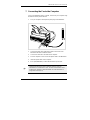
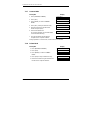
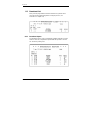
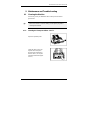
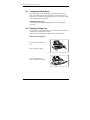
The pictures below show the space required for the replacement of the
consumables and the proper function of the machine.

INSTALLATION
12 Minoltafax 1300
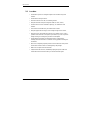
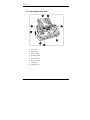
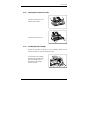
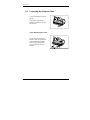
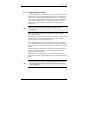
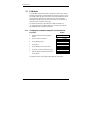
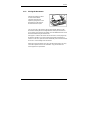
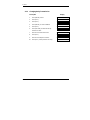
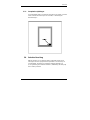
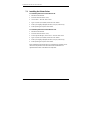
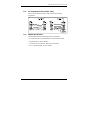
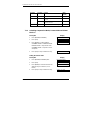
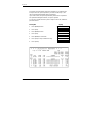
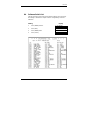
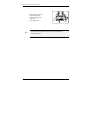
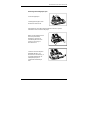
2.3 Description of the Parts
1 Cover latch
2 Paper guide
3 Paper cassette
4 Document feeder
5 Document guide
6 Document output
7 Paper output
8 Operation panel

INSTALLATION
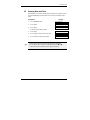
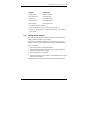
Minoltafax 1300 13
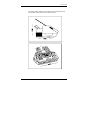
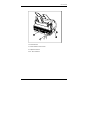
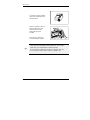
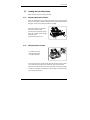
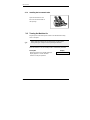
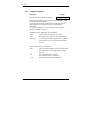
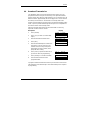
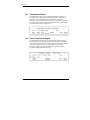
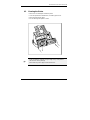
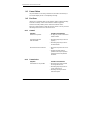
1 Printer interface
2 Volume switch for line monitor
3 Telephone terminal
4 RS- 232C interface
La pagina sta caricando ...
La pagina sta caricando ...
La pagina sta caricando ...
La pagina sta caricando ...
La pagina sta caricando ...
La pagina sta caricando ...
La pagina sta caricando ...
La pagina sta caricando ...
La pagina sta caricando ...
La pagina sta caricando ...
La pagina sta caricando ...
La pagina sta caricando ...
La pagina sta caricando ...
La pagina sta caricando ...
La pagina sta caricando ...
La pagina sta caricando ...
La pagina sta caricando ...
La pagina sta caricando ...
La pagina sta caricando ...
La pagina sta caricando ...
La pagina sta caricando ...
La pagina sta caricando ...
La pagina sta caricando ...
La pagina sta caricando ...
La pagina sta caricando ...
La pagina sta caricando ...
La pagina sta caricando ...
La pagina sta caricando ...
La pagina sta caricando ...
La pagina sta caricando ...
La pagina sta caricando ...
La pagina sta caricando ...
La pagina sta caricando ...
La pagina sta caricando ...
La pagina sta caricando ...
La pagina sta caricando ...
La pagina sta caricando ...
La pagina sta caricando ...
La pagina sta caricando ...
La pagina sta caricando ...
La pagina sta caricando ...
La pagina sta caricando ...
La pagina sta caricando ...
La pagina sta caricando ...
La pagina sta caricando ...
La pagina sta caricando ...
La pagina sta caricando ...
La pagina sta caricando ...
La pagina sta caricando ...
La pagina sta caricando ...
La pagina sta caricando ...
La pagina sta caricando ...
La pagina sta caricando ...
La pagina sta caricando ...
La pagina sta caricando ...
La pagina sta caricando ...
La pagina sta caricando ...
La pagina sta caricando ...
La pagina sta caricando ...
La pagina sta caricando ...
La pagina sta caricando ...
La pagina sta caricando ...
La pagina sta caricando ...
La pagina sta caricando ...
La pagina sta caricando ...
La pagina sta caricando ...
La pagina sta caricando ...
La pagina sta caricando ...
La pagina sta caricando ...
La pagina sta caricando ...
La pagina sta caricando ...
La pagina sta caricando ...
La pagina sta caricando ...
La pagina sta caricando ...
La pagina sta caricando ...
La pagina sta caricando ...
La pagina sta caricando ...
La pagina sta caricando ...
La pagina sta caricando ...
La pagina sta caricando ...
La pagina sta caricando ...
La pagina sta caricando ...
La pagina sta caricando ...
La pagina sta caricando ...
La pagina sta caricando ...
La pagina sta caricando ...
La pagina sta caricando ...
La pagina sta caricando ...
La pagina sta caricando ...
La pagina sta caricando ...
La pagina sta caricando ...
La pagina sta caricando ...
La pagina sta caricando ...
La pagina sta caricando ...
-
 1
1
-
 2
2
-
 3
3
-
 4
4
-
 5
5
-
 6
6
-
 7
7
-
 8
8
-
 9
9
-
 10
10
-
 11
11
-
 12
12
-
 13
13
-
 14
14
-
 15
15
-
 16
16
-
 17
17
-
 18
18
-
 19
19
-
 20
20
-
 21
21
-
 22
22
-
 23
23
-
 24
24
-
 25
25
-
 26
26
-
 27
27
-
 28
28
-
 29
29
-
 30
30
-
 31
31
-
 32
32
-
 33
33
-
 34
34
-
 35
35
-
 36
36
-
 37
37
-
 38
38
-
 39
39
-
 40
40
-
 41
41
-
 42
42
-
 43
43
-
 44
44
-
 45
45
-
 46
46
-
 47
47
-
 48
48
-
 49
49
-
 50
50
-
 51
51
-
 52
52
-
 53
53
-
 54
54
-
 55
55
-
 56
56
-
 57
57
-
 58
58
-
 59
59
-
 60
60
-
 61
61
-
 62
62
-
 63
63
-
 64
64
-
 65
65
-
 66
66
-
 67
67
-
 68
68
-
 69
69
-
 70
70
-
 71
71
-
 72
72
-
 73
73
-
 74
74
-
 75
75
-
 76
76
-
 77
77
-
 78
78
-
 79
79
-
 80
80
-
 81
81
-
 82
82
-
 83
83
-
 84
84
-
 85
85
-
 86
86
-
 87
87
-
 88
88
-
 89
89
-
 90
90
-
 91
91
-
 92
92
-
 93
93
-
 94
94
-
 95
95
-
 96
96
-
 97
97
-
 98
98
-
 99
99
-
 100
100
-
 101
101
-
 102
102
-
 103
103
-
 104
104
-
 105
105
-
 106
106
-
 107
107
-
 108
108
-
 109
109
-
 110
110
-
 111
111
-
 112
112
-
 113
113
-
 114
114


Minolta Minoltafax 1300 Manuale utente
- Categoria
- Fax
- Tipo
- Manuale utente
in altre lingue
- English: Minolta Minoltafax 1300 User manual
Altri documenti
-
Olivetti Fax-Lab 95 Manuale del proprietario
-
-
Panasonic UF4100 Istruzioni per l'uso
-
-
Panasonic UFE1 Istruzioni per l'uso
-
-
-
TSC CPX4 Series User's Setup Guide
-
Panasonic Panafax UF-490 Manuale utente
-
Lexmark X125 Manuale utente