
SNOW LOAD KIT
OWNER’S MANUAL
Keep this Identification Number in case you must contact our Customer Service Department.

2
Most injuries are caused by misuse and/or not following instructions. Use caution when using this product.
To ensure safety, do not attempt to assemble this product without following the instructions carefully. Check entire box and inside all
packing material for parts and/or additional instruction material. Before beginning assembly, read the instructions and identify parts
using the hardware identifi er and parts list in this document. Proper and complete assembly, use and supervision are essential to
reduce the risk of accident or injury.
FAILURE TO FOLLOW THESE WARNINGS MAY RESULT IN SERIOUS INJURY OR
PROPERTY DAMAGE AND WILL VOID WARRANTY.
s$ONOTUSEORSTOREHOTOBJECTSSUCHASGRILLSBLOWTORCHESWELDINGEQUIPMENTETCNEARTHEPRODUCT
s)FUSINGALADDERDURINGASSEMBLYUSEEXTREMECAUTION
s4WOCAPABLEADULTSAREREQUIREDFORASSEMBLY)TISALSORECOMMENDEDTHATATHIRDADULTFUNCTIONASANINSTRUCTIONREADER
SAFETY INSTRUCTIONS
REGISTER YOUR LIFETIME PRODUCT TODAY!
LIFETIME’S PROMISE TO YOU:
We invite you to read our privacy policy at www.lifetime.com
REGISTER today!
There are benefi ts to registering your Lifetime product. With our new online product registration form, it’s fast and easy! Register with us at www.lifetime.com
and enjoy these great benefi ts:
s2ECEIVEEXCLUSIVEMONEYSAVINGOFFERSFROM"UY,IFETIMECOMOURONLINESTOREASWELLAS.%7PRODUCTNOTIlCATIONSANDSPECIALCLOSEOUT
promotions!
s)NTHEUNLIKELYEVENTOFAPRODUCTRECALLORSAFETYMODIlCATIONWEWILLNOTIFYYOU
s2EGISTERINGYOURPRODUCTGUARANTEESYOUWARRANTYSERVICE)FYOUDONOTREGISTERYOURPRODUCTYOURWARRANTYRIGHTSWILLNOTBEDIMINISHED
But you will need to provide a sales receipt to verify your product purchase date before warranty service will be provided.
Maintaining your privacy is our long-standing policy at Lifetime. And you can rest assured that Lifetime will not sell or provide your
personal data to other third parties, or allow them to use your personal data for their own purposes.
**For customers outside the U.S. or Canada, please contact the store for assistance.**
**U.S. and Canada customers ONLY**
)&!33)34!.#%)3.%%$%$
DO NOT CONTACT THE STORE!
CALL OUR CUSTOMER SERVICE DEPARTMENT at 1 (800) 225-3865
(/523AMTOPM-ONDAYTHROUGH&RIDAY-OUNTAIN3TANDARD4IME
**Call, or visit our Web site for Saturday hours**
INSTRUCTION #1055821 B 12/31/2009

3
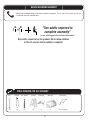
*Two adults required to
complete assembly*
(+ one adult suggested as an instruction reader)
Only adults should set up the product. Do not allow children
in the set-up area until assembly is complete.
BEFORE BEGINNING ASSEMBLY
+EEPTHEHARDWAREBAGSANDTHEIRCONTENTSSEPARATE)FANYPARTSAREMISSINGCALLOUR
#USTOMER3ERVICE$EPARTMENT
6’ Ladder
(2)
7/16"
(2) (1)
Power Drill* Work Light
Box Knife
(1)
(1)
5/16" Drill Bit
(1)
Safety Glasses
(1 for each person)
TOOLS REQUIRED FOR THIS ASSEMBLY

4
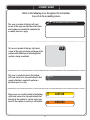
This area is located at the top, left-hand
corner of the page and indicates which tools
and hardware are needed to complete the
assembly steps on a page.
This area is located at the top, right-hand
corner of the page and shows an image of the
product with shaded parts indicating which
section is being assembled.
SEC
#
Note:
!
Refer to the following areas throughout the instructions
to assist in the assembly process:
This area is usually located in the bottom,
left-hand corner of a step and indicates that
special attention is needed to perform a
particular part of a step.
These areas are usually located in the bottom,
right-hand corner of a step and indicate that
damage to the product or serious injury may
occur if the caution or warning is not heeded.
WARNING
ASSEMBLY GUIDES
TOOLS AND HARDWARE REQUIRED FOR THIS PAGE
CAUTION

5
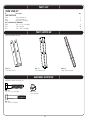
SNOW LOAD KIT
ID Description Qty
SHED PARTS BOX
"3+ 4RUSS"RACKET!
"3, 4RUSS"RACKET"
"3- ,ONG4RUSS3UPPORT
BSN SNOW LOAD KIT HARDWARE
!!+ vXv(EX"OLT
!$* v#AP.UT
"3* vv(EX"OLT
BSJX
vv(EX"OLT
Hardware shown at actual size
Parts not shown to scale
PARTS LIST
PARTS IDENTIFIER
HARDWARE IDENTIFIER
AAKX
vXv(EX"OLT
BSKX
4RUSS"RACKET!
BSLX
Truss Bracket B
BSMX
,ONG4RUSS3UPPORT
ADJX
v#AP.UT

TOOLS AND HARDWARE REQUIRED FOR THIS PAGE
6
SEC
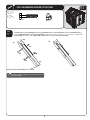
Angled end of Truss Bracket B (BSL) faces as shown.
AAK
AAK
ADJ
ADJ
BSL
BSK
Top
Top
Note: One kit contains enough parts to reinforce both sides of one
Shed Truss Assembly.
!
SEC
1.1
Slide Truss Bracket B (BSL) into Truss Bracket A (BSK)ANDALIGNTHEHOLESASSHOWN3ECUREWITHTWO1/4” x 1 1/2”
Hex Bolts (AAK)ANDTWO1/4” Cap Nuts (ADJ). Repeat Step 1.1 for each Truss Bracket Assembly.
1
7/16"X
AAKX
ADJX

TOOLS AND HARDWARE REQUIRED FOR THIS PAGE
7
SEC
AAK
ADJ
SEC
1.2
,OOSELYATTACHATruss Bracket AssemblyTOA'UTTER#HANNELUSINGONE1/4” x 1 1/2” Hex Bolt (AAK)ANDONE
1/4” Cap Nut (ADJ) through the hole at the position shown. Repeat this step for the other end of the Truss Brace and Gutter
Channel.
7/16"X
Gutter Channel
Truss Channel
Truss Channel
1
AAKX
ADJX

TOOLS AND HARDWARE REQUIRED FOR THIS PAGE
8
SEC
BSM
BSJ
ADJ
Gutter Channel
Gutter Channel
BSM
SEC
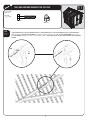
1.3
SEC
1.4
,OOSELYATTACHTHELong Truss Support (BSM)TOTHE'UTTER#HANNELUSINGONE1/4” x 1 3/4” Hex Bolt (BSJ) and one
1/4” Cap Nut (ADJ).
2OTATETHELong Truss Support (BSM)UPWARDUNTILITMEETSTHE4RUSS"RACKET!SSEMBLYAND4RUSS"RACE
Truss Brace
1
7/16"X
BSJX
ADJX

TOOLS AND HARDWARE REQUIRED FOR THIS PAGE
9
SEC
Mark the location of the hole on each side of the Truss Brace.
Truss Brace
BSJ
ADJ
SEC
1.5
SEC
1.6
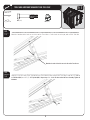
-ARKTHELOCATIONOFTHEHOLEONEACHSIDEOFTHE4RUSS"RACE$RILLAHOLEATEACHSPOTWITHAv$RILL"IT
,OOSELYSECURETHE,ONG4RUSS3UPPORTANDTHE4RUSS"RACKET!SSEMBLYTOTHE4RUSS"RACEWITHONE1/4” x 1
3/4” Hex Bolt (BSJ)ANDONE1/4” Cap Nut (ADJ). Repeat steps 1.3 - 1.6 for the other end of the Truss Assembly. Tighten all
Hardware.
1
Truss Brace
7/16"X
BSJX
ADJX
5/16"

TOOLS AND HARDWARE REQUIRED FOR THIS PAGE
10
SEC
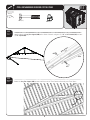
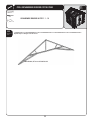
When finished, all Trusses will look like this.
SEC
1.7
Repeat Steps 1.3 through 1.6 for all Trusses.
USE HARDWARE REQUIRED IN STEPS 1.1 - 1.6
7/16"X
5/16"

11
ENHANCE YOUR LIFETIME
®
PURCHASE BY ADDING ACCESSORIES OR OTHER GREAT PRODUCTS
Or call: 1-800-424-3865
To purchase accessories or other Lifetime Products, visit us at:
www.lifetime.com
-
 1
1
-
 2
2
-
 3
3
-
 4
4
-
 5
5
-
 6
6
-
 7
7
-
 8
8
-
 9
9
-
 10
10
-
 11
11


in altre lingue
- English: Lifetime 1034594 Installation guide
Documenti correlati
-
Lifetime 60120 Manuale del proprietario
-
-
-
-
-
-
-
-