
SPORTELLI GASTROLINE
GASTROLINE DOORS
SCHEDA PER INSTALLATORE – INSTALLER’S GUIDE
Pag. 1 / 2 IL-MO-073 Rev. 0 08/2016
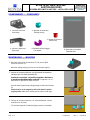
COMPONENTI - COMPONENTS
MONTAGGIO - MOUNTING
1. Montare la bussola di rotazione (2) sul perno della
cerniera inferiore (1).
Mount the rotating bushing (2) on the pivot of the lower hinge (1).
2. Inserire la cerniera inferiore con la bussola di rotazione
nell’apposito foro dello sportello (6).
Centrare lo sportello sul profilo magnetico del banco
in posizione perfettamente verticale e segnare con un
pennarello la posizione della cerniera.
Insert the lower hinge with the rotating bushing into the hole of the door
(6).
Center the door on the magnetic profile of the bench in perfect
upright position. Mark with a marking pen the position of the hinge.
3. Fissare la cerniera inferiore con viti autofilettanti a testa
svasata (non incluse).
Fix the lower hinge with countersunk tapping screws (not included).
3. Cerniera superiore
Upper hinge
1. Cerniera inferiore
Lower hinge
5. Tappo di chiusura
Closure Cap
2. Bussola di rotazione
Rotating bushing
6. Sportello reversibile
Reversible door
4. Rondella di bloccaggio
Lock washer

SPORTELLI GASTROLINE
GASTROLINE DOORS
SCHEDA PER INSTALLATORE – INSTALLER’S GUIDE
Pag. 2 / 2 IL-MO-073 Rev. 0 08/2016
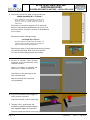
4. Calcolare la posizione della cerniera superiore :
altezza sportello (B) + 15,5 mm *
* Questi millimetri di aria tra sportello e cerniera sono
necessari perché lo sportello aprendosi di 90° si
innalza di circa 2-3 mm per effetto del sistema di
autochiusura.
Posizionare la cerniera superiore (3) a questa di-
stanza mantenendola perfettamente in linea con la
cerniera inferiore e fissarla con due viti autofilettanti
(non incluse).
Calculate the position of the upper hinge :
door height (B) + 15.5 mm *
* The space between the hinge bottom and the door are
necessary because the door opening of 90 ° increases by
approx 2-3 mm due to the self-closing system
Place the upper hinge (3) at this distance maintaining it perfectly
in line with the lower hinge. Better if you use a spirit level.
Fix it with countersunk tapping screws (not included).
5. Inserire lo sportello nella cerniera
superiore e successivamente nella
cerniera inferiore.
Aprire e chiudere lo sportello per
verificare il corretto inserimento.
Insert the door in the upper hinge (a) and
then in the lower hinge.
Open and close the door to check the
correct placement.
6. Inserire la rondella di bloccaggio(4)
nella cerniera superiore.
Insert the lock washer (4) in the upper hinge.
7 Tappare il foro, predisposto per
montare lo sportello nell’altro senso,
con l’apposito tappo di chiusura(5).
Close the opposite hole with the closure cap (5).
-
 1
1
-
 2
2


in altre lingue
- English: Ronda GL
Altri documenti
-
Whirlpool WTH4714 A+M Guida utente
-
LG GC-F399BTQA Manuale del proprietario
-
LG GR-F399BUQA Manuale utente
-
Samsung RL44PGPS Manuale utente
-
Electrolux SB225 Manuale utente
-
LG GR-B359PNQA Manuale utente
-
HOTPOINT/ARISTON NTMTZH 822 FT Guida utente
-
Maytag MLG23PD Manuale utente
-
Smeg FRP240SE1 Manuale utente