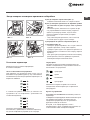
Indesit WITXL 1051 (EU) Guida utente
- Categoria
- Lavatrici
- Tipo
- Guida utente

1
GB
WASHING MACHINE
WITXL 1051
Instructions for use
Contents
Installation, 2-3
Unpacking and levelling
Electric and water connections
The first wash cycle
Technical details
Care and maintenance, 4
Cutting off the water or electricity supply
Cleaning your appliance
Caring for your appliance door and drum
Cleaning the pump
Checking the water inlet hose
Cleaning the detergent dispenser
Precautions and advice, 5
General safety
Disposal
Saving energy and respecting the environment
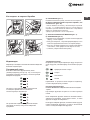
Washing machine description, 6-7
Control panel
How to open and shut the drum
Leds
Starting and Programmes, 8
Briefly: how to start a programme
Programme table
Personalisations, 9
Setting the temperature
Setting the spin cycle
Functions
Detergents and laundry, 10
Detergent dispenser
Bleach cycle
Preparing your laundry
Special items
Troubleshooting, 11
Service, 12
Before calling for Assistance
English, 1
GB
БЪЛГАРСКИ, 13
BG GR
ΕΛΛΗΝΙΚΑ, 25
FR UK
ES
Español, 37
Français, 49
Українська, 61
Русский,73
CIS

2
GB
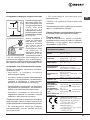
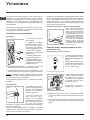
Installation
! Keep this instruction manual in a safe place for
future reference. Should the appliance be sold,
transferred or moved, make sure the instruction
manual accompanies the washing machine to
inform the new owner as to its operation and
features.
! Read these instructions carefully: they contain
vital information on installation, use and safety.
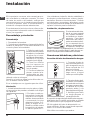
Unpacking and levelling
Unpacking
1. Unpack the washing machine.
2. Check whether the washing machine has been
damaged during transport. If this is the case, do
not install it and contact your retailer.
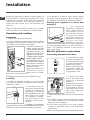
3. Remove the four pro-
tective screws and the
rubber washer with the
respective spacer, si-
tuated on the rear of the
appliance (see figure).
4. Seal the gaps using the
plastic plugs provided.
5. Keep all the parts: you
will need them again if
the washing machine
needs to be moved to
another location.
Warning: should the
screws be re-used,
make sure you fasten
the shorter ones at the top.
! Packaging materials are not children’s toys.
Levelling
1. Install the washing machine on a flat sturdy
floor, without resting it up against walls, furniture
cabinets or other.
2. If the floor is not per-
fectly level, compensate
for any unevenness by
tightening or loosening
the adjustable front feet
(see figure); the angle
of inclination, measu-
red according to the
worktop, must not ex-
ceed 2°.
Levelling your appliance
correctly will provide it with stability and avoid any
vibrations, noise and shifting during operation.
If it is placed on a fitted or loose carpet, adjust
the feet in such a way as to allow enough room
for ventilation beneath the washing machine.
Putting your appliance in place and
moving it.
I f y o u r w a s h i n g
machine is equipped
with a special set of
retractable wheels
you can easy move it.
To lower the wheels
and thus move the
appliance effortlessly,
just pull the lever,
situated on the left-
hand side beneath the base. Once the appliance
is in the required position, put the lever back in
place. The washing machine is now firmly in
place (see figure).
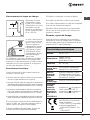
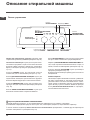
Electric and water connections
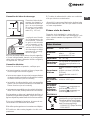
Connecting the water inlet hose
1. Connect the supply
pipe by screwing it to
a cold water tab using
a ¾ gas threaded con-
nection (see figure).
Before performing the
connection, allow the
water to run freely until
it is perfectly clear.
2. Connect the other
end of the water inlet
hose to the washing
machine,
screwing it onto the ap-
pliance’s cold water in-
let, situated on the top
right-hand side on the
rear of the appliance
(see figure).
3. Make sure there are no kinks or bends in the
hose.
! The water pressure at the tap must be within
the values indicated in the Technical details
table (on the next page).
! If the water inlet hose is not long enough,
contact a specialist store or an authorised
serviceman.
! Never use hoses that have already been used.

3
GB
Technical details
Model
WITXL 1051
Dimensions
40 cm wide
85 cm high
60 cm deep
Capacity
from 1 to 6 kg
Electric
connections
Please refer to the technical
data plate fixed to the ma-
chine.
Water
connections
maximum pressure 1 MPa
(10 bar) minimum pressure
0.05 MPa (0.5 bar) drum
capacity 42 litres
Spin speed
up to 1000 rpm
Test wash
cycles in
accordan-
ce with
directives
1061/2010
and
1015/2010.
Programme
: Cotton stan-
dard 60°C;
Programme : Cotton stan-
dard 40°C.
This appliance is compliant
with the following European
Community Directives:
- 2004/108/CE (Electroma-
gnetic Compatibility)
- 2006/95/CE (Low Voltage)
- 2002/96/CE
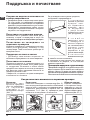
Connecting the drain hose
Connect the drain
hose, without bending
it, to a drainage duct
or a wall drain located
at a height between
65 and 100 cm from
the floor;
alternatively, rest it on
the side of a washba-
sin or bathtub, faste-
ning the duct sup-
plied to the tap (see
figure). The free end
of the hose should
not be underwater.
! We advise against the use of hose extensions;
if it is absolutely necessary, the extension must
have the same diameter as the original hose and
must not exceed 150 cm in length.
Electrical connections
Before plugging the appliance into the electricity
socket, make sure that:
• the socket is earthed and complies with all
applicable laws;
• the socket is able to withstand the maximum
power load of the appliance as indicated in the
Technical data table (see opposite);
• the power supply voltage falls within the va-
lues indicated in the Technical data table (see
opposite);
• the socket is compatible with the plug of the
washing machine. If this is not the case, repla-
ce the socket or the plug.
! The washing machine must not be installed
outdoors, even in covered areas. It is extremely
dangerous to leave the appliance exposed to
rain, storms and other weather conditions.
! When the washing machine has been installed,
the electricity socket must be within easy reach.
! Do not use extension cords or multiple sockets.
! The cable should not be bent or compressed.
! The power supply cable must only be replaced
by authorised technicians.
Warning! The company shall not be held respon-
sible in the event that these regulations are not
respected.
The first wash cycle
Once the appliance has been installed, and be-
fore you use it for the first time, run a wash cycle
with detergent and no laundry, setting the 90°C
programme without a pre-wash cycle.
65 - 100 cm

4
GB
To access the pre-chamber:
1. using a screwdriver,
remove the cover pa-
nel on the lower front
part of the washing
machine (see figure);
2. unscrew the lid by
rotating it anti-clockwi-
se (see figure): a little
water may trickle out.
This is perfectly nor-
mal;
3. clean the inside tho-
roughly;
4. screw the lid back
on;
5. reposition the panel,
making sure the hooks
are securely in place
before you push it onto
the appliance.
Checking the water inlet hose
Check the inlet hose at least once a year. If there
are any cracks, it should be replaced immedia-
tely: during the wash cycles, water pressure is
very strong and a cracked hose could easily
split open.
! Never use second-hand hoses.
Care and maintenance
Cutting off the water and electricity
supplies
• Turn off the water tap after every wash cycle.
This will limit wear on the hydraulic system in-
side the washing machine and help to prevent
leaks.
• Unplug the washing machine when cleaning it
and during all maintenance work.
Cleaning the washing machine
The outer parts and rubber components of the
appliance can be cleaned using a soft cloth
soaked in lukewarm soapy water. Do not use
solvents or abrasives.
Caring for the door and drum of
your appliance
• Always leave the porthole door ajar in order to
prevent unpleasant odours from forming.
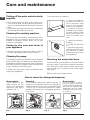
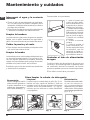
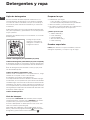
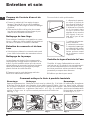
Cleaning the pump
The washing machine is fitted with a self-cleaning
pump which does not require any maintenance.
Sometimes, small items (such as coins or buttons)
may fall into the pre-chamber which protects the
pump, situated in its bottom part.
! Make sure the wash cycle has finished and
unplug the appliance.
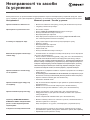
How to clean the detergent dispenser
Fig. 1 Fig. 2
Cleaning:
Then clean the dispenser under a tap (fig. 3)
using an old toothbrush and, once the pair of
siphons inserted in the top of compartments
1 and 2 (fig. 4) have been pulled out, check
whether the same are not clogged and then
rinse them.
Reassembly:
Do not forget to rein-
sert the pair of siphons
into the special housings
and then to replace the
dispenser into its seat,
clicking it into place (fig.
4, 2 and 1).
Disassembly:
Press lightly on the
large button on the
front of the detergent
dispenser and pull it
upwards (fig. 1).
Fig. 3
Fig. 4

5
GB
Precautions and advice
! The washing machine was designed and built in complian-
ce with the applicable international safety regulations. The
following information is provided for your safety and should
consequently be read carefully.
General safety
• This appliance has been designed for non-professional,
household use and its functions must not be changed.
• This appliance can be used by children aged
from 8 years and above and persons with re-
duced physical, sensory or mental capabilities
or lack of experience and knowledge if they
have been given supervision or instruction
concerning use of the appliance in a safe way
and understand the hazards involved. Children
shall not play with the appliance. Cleaning
and user maintenance shall not be made by
children without supervision.
• Never touch the washing machine when barefoot
or with wet or damp hands or feet.
• Do not pull on the power supply cable to unplug
the appliance from the electricity socket. Pull the
plug out yourself.
• Do not touch the drain water as it could reach
very high temperatures.
• Never force the washing machine door: this could
damage the safety lock mechanism designed to
prevent any accidental openings.
• In the event of a malfunction, do not under any
circumstances touch internal parts in order to
attempt repairs.
• Always keep children well away from the appliance
while in operation.
• Should it have to be moved, proceed with the help of two
or three people and handle it with the utmost care. Never
try to do this alone, because the appliance is very heavy.
• Before loading your laundry into the washing
machine, make sure the drum is empty.
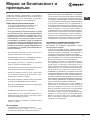
Disposal
The European Directive 2002/96/EC on Waste Electrical and
Electronic Equipment, requires that old household electrical
appliances must not be disposed of in the normal unsorted
municipal waste stream. Old appliances must be collected
separately in order to optimise the recovery and recycling of
the materials they contain and reduce the impact on human
health and the environment.
The crossed out “wheeled bin” symbol on the product re-
minds you of your obligation, that when you dispose of the
appliance it must be separately collected. Consumers may
take their old appliance to public waste collection areas,
other communal collection areas, or if national legislation
allows return it to a retailer when purchasing a similar new
product. All major household appliance manufacturers are
active in the creation of systems to manage the collection
and disposal of old appliances.
Saving energy and respecting the
environment
Environmentally-friendly technology
If you only see a little water through your appliance door,
this is because thanks to the latest technology, your
washing machine only needs less than half the amount
of water to get the best results: an objective reached to
respect the environment.
Saving on detergent, water, energy and time
• To avoid wasting resources, the washing machine
should be used with a full load. A full load instead
of two half loads allows you to save up to 50% on energy.
• The pre-wash cycle is only necessary on
extremely soiled garments. Avoiding it will save on
detergent, time, water and between 5 and 15% energy.
• Treating stains with a stain remover or leaving
them to soak before washing will cut down the
need to wash them at high temperatures. A
programme at 60°C instead of 90°C or one at
40°C instead of 60°C will save up to 50% on energy.
• Use the correct quantity of detergent depending on
the water hardness, how soiled the garments are and
the amount of laundry you have, to avoid wastage and
to protect the environment: despite being biodegra-
dable, detergents do contain ingredients that alter the
natural balance of the environment. In addition, avoid
using fabric softener as much as possible.
• If you use your washing machine from late in the
afternoon until the early hours of the morning, you
will help reduce the electricity board’s peak load.
The Delay Timer option helps to organise your wash
cycles accordingly.
• If your laundry has to be dried in a tumble dryer,
select a high spin speed. Having the least water
possible in your laundry will save you time and
energy in the drying process.

6
GB
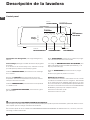
ON-OFF/LID LOCK led:
If this LED is on, the appliance Lid is locked to prevent it from being opened accidentally; to avoid any damages, you must
wait for the lamp to flash before you open the Lid.
.
! The rapid flashing of the ON-OFF/LID LOCK Led together with the flashing of at least one other LED indicates there is an
abnormality.
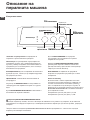
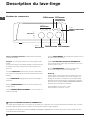
Control panel
Washing machine description
ON/OFF
button
SPIN
knob
TEMPERATURE
knob
START/RESET
button
FUNCTION
Buttons
PROGRAMME
knob
LEDs
LID LOCKED
LED
Detergent dispenser to add detergent and fabric sof-
tener.
LEDs to find out which wash cycle phase is under way.
If the Delay Timer function has been set, the time left until the
programme starts will be indicated.
FUNCTION keys to select the functions available.
The button corresponding to the function selected will
remain on.
SPIN SPEED knob to set the spin speed or exclude the
spin cycle completely.
TEMPERATURE knob to set the temperature or the cold
wash cycle.
ON/OFF key to turn the washing machine on and off.
START/RESET key to start the programmes or cancel
incorrect settings.
ON-OFF/LID LOCK led, to find out whether the wash-
ing machine is on (flashing) and if the lid may be opened.
PROGRAMME knob to set the programmes.
The knob stays still during the cycle.
Standby mode
This washing machine, in compliance with new energy sa-
ving regulations, is fitted with an automatic standby system
which is enabled after about 30 minutes if no activity is
detected. Press the ON/OFF button briefly and wait for the
machine to start up again.
Consumption in off-mode: 0,5 W
Consumption in Left-on: 0,5 W

7
GB
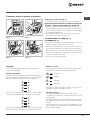
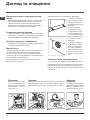
Fig. 1
Fig. 2
A) Opening (Fig. 1).
Lift the external lid and open it completely.
B) Then open the drum using both hands as
shown in Fig. 2:
- press the button indicated by the arrow in Fig. 2 lightly
downwards, with one hand firmly resting on the doors to
prevent them from suddenly opening and hurting your fingers;
- therefore follow the appliance doors along as these unhook
and open easily.
C) Loading the washing machine. (Fig. 3).
D) Shutting (Fig. 4).
- close the drum fully by first shutting the front door
followed by the rear one;
- then ensure the hooks on the front door are perfectly
housed within the seat of the rear door;
- after the hooks have clicked into position, press both
doors lightly downwards to make sure they do not
come loose;
- finally shut the external lid.
How to open and to close the drum
Fig. 3
Fig. 4
Cycle phase under way:
During the wash cycle, the LEDs gradually illuminate on
to indicate the cycle phase under way:
Prewash
Wash
Rinse
Spin cycle
Note: during draining, the LED corresponding to the Spin
cycle phase will be turned on.
Function buttons
The FUNCTION BUTTONS also act like LEDS.
When a function is selected, the corresponding button is
illuminated.
If the function selected is incompatible with the program-
me set, the button will flash and the function will not be
enabled.
If you set a function that is incompatible with another fun-
ction you selected previously, only the last one selected
will be enabled.
Leds
The LEDS provide important information.
This is what they can tell you:
Delay set:
If the Delay Timer function has been enabled (see page.
9), once you have started the programme, the LED corre-
sponding to the delay set will begin to flash:
As time passes, the remaining delay will be displayed,
and the corresponding LED will flash:
Once the set delay is complete, the flashing LED will turn
off and the programme set will start.

8
GB
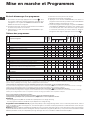
Starting and Programmes
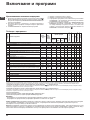
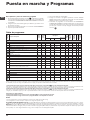
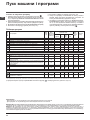
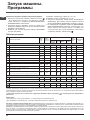
Programme table
Briefly: starting a programme
1. Switch the washing machine on by pressing button . All
the LEDS will light up for a few seconds and the ON-OFF/
DOOR LOCK Led will begin to flash.
2. Load your laundry into the washing machine, add the detergent
and any fabric softener and shut the appliance door.
3. Set the PROGRAMME knob to the programme required.
4. Set the wash temperature.
5. Set the spin speed.
6. Start he programme by pressing the START/RESET button.
To cancel it, keep the START/RESET button pressed for
at least 2 seconds.
7. When the programme is finished, the ON-OFF/DOOR
LOCK Led will flash to indicate that the appliance door
can be opened. Take out your laundry and leave the
appliance door ajar to allow the drum to dry thoroughly.
Turn the washing machine off by pressing button .
Notes
-For programmes 9 and 10, we advise against exceeding a wash load of 3.5 kg.
-For programme 14 we advise against exceeding a wash load of 3 kg.
Cotton Standard 20°C (wash cycle 8) ideal for heavily soiled cotton loads. The effective performance levels achieved at cold
temperatures, which are comparable to washing at 40°, are guaranteed by a mechanical action which operates at varying
speed, with repeated and frequent peaks.
Express (wash cycle 12) this wash cycle was designed to wash lightly soiled garments quickly: it lasts just 30 minutes and
therefore saves both energy and time. By selecting this wash cycle (12 at 30°C), it is possible to wash different fabrics toge-
ther (except for wool and silk items), with a maximum load of 3 kg.
Wash cycles
Description of the wash cycle
Max.
temp.
(°C)
Max.
speed
(rpm)
Detergents
Max. load (kg)
Residual
dampness %
Energy
consumption
kWh
Total water lt
Cycle
duration
Prewash
Wash
Fabric
softener
Bleach
Standard
1
Cotton with prewash: extremely soiled whites. 90° 1000
- 6 62 1,92 67 160’
2
Cotton: extremely soiled whites. 90° 1000 -
6 62 1,99 62 145’
3
Coloured Cottons: lightly soiled whites and delicate colours. 40° 1000 -
6 62 0,65 54 90’
4
Synthetics: heavily soiled resistant colours. 60° 800 -
3 44 0,85 39 110’
4
Synthetics (3): lightly soiled resistant colours. 40° 800 -
3 44 0,53 39 100’
Cotton Standard 60°C (1): heavily soiled whites and resistant colours. 60° 1000 -
6 62 1,02 50 185’
Cotton Standard 40°C (2): lightly soiled whites and delicate colours. 40° 1000 -
6 62 1,09 92 175’
7
Wool: for wool, cashmere, etc. 40° 800 -
- 1 - - - 65’
8 Cotton Standard 20°C
20° 1000 -
6 - - - 180’
Time 4 you
9
Cotton: Heavily soiled whites and fast colours 60° 1000 -
- 3,5 - - - 60’
10
Cotton: Lightly soiled whites and delicate colours (shirts, jumpers, etc.) 40° 1000 -
- 3,5 - - - 50’
11
Synthetics: Delicate colours (all types of slightly soiled garments) 40° 800 -
- 2,5 - - - 40’
12
Express: to refresh lightly soiled garments quickly (not suitable for wool, silk
and clothes which require washing by hand).
30° 800 -
- 3 71 0,25 33 30’
Sport
13 Special Shoes
30° 600 -
-
Max.
2 pairs
- - - 55’
14 Sport Intensive
30° 600 -
- 3 - - - 85’
Partial programmes
Rinse - 1000 - -
6 - - - 36’
Spin + Drain - 1000 - - - - 6 - - - 16’
1) Test wash cycle in compliance with directive 1061/2010: set wash cycle with a temperature of 60°C.
This cycle is designed for cotton loads with a normal soil level and is the most efficient in terms of both electricity and water consumption; it should be used for garments
which can be washed at 60°C. The actual washing temperature may differ from the indicated value.
2) Test wash cycle in compliance with directive 1061/2010: set wash cycle with a temperature of 40°C.
This cycle is designed for cotton loads with a normal soil level and is the most efficient in terms of both electricity and water consumption; it should be used for garments
which can be washed at 40°C. The actual washing temperature may differ from the indicated value.
For all Test Institutes:
2) Long wash cycle for cottons: set wash cycle with a temperature of 40°C.
3) Long wash cycle for synthetics: set wash cycle 4; with a temperature of 40°C.
The length of cycle shown on the display or in this booklet is an estimation only and is calculated assuming standard working conditions. The actual duration can vary accor-
ding to factors such as water temperature and pressure, the amount of detergent used, the amount and type of load inserted, load balancing and any wash options selected.

9
GB
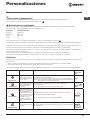
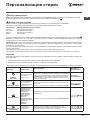
Personalisations
C
Setting the temperature
Turn the TEMPERATURE knob to set the wash temperature (see Programme table).
The temperature can be lowered, or even set to a cold wash ( ).
Setting the spin speed
Turn the SPIN SPEED knob to set the spin speed for the programme selected.
The maximum spin speeds for each programme are as follows:
Programmes Maximum spin speed
Cottone 1000 rpm
Synthetics 800 rpm
Wool 800 rpm
Silk no
The spin speed can be lowered, or the spin cycle can be excluded altogether by selecting symbol .
The washing machine will automatically prevent you from selecting a spin speed higher than the maximum speed for each
programme.
Note. To avoid excessive vibrations, before every spin cycle the machine distributes the load in a uniform manner by conti-
nuously rotating the drum at a speed which is slightly faster than the normal washing speed.
When, despite repeated attempts, the load is still not evenly distributed, the machine spins at a lower speed than the set
frequency.
If the load is excessively unbalanced, the machine attempts to distribute it instead of spinning.
The balancing attempts may extend the total duration of the cycle, up to a maximum of 10 minutes.
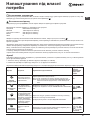
Functions
To enable a function:
1. press the button corresponding to the desired function, according to the table below;
2. the function is enabled when the corresponding button is illuminated.
Note: The rapid flashing of the button indicates that the corresponding function cannot be selected for the programme set.
Option Effect Comments Enabled with
programmes:
Delay Timer
Delays the start of the
wash by up to 9 hours.
Pess the button repeatedly until the LED corresponding to the
desired delay is turned on. The fifth time the button is pressed, the
function will be disabled.
N.B.: Once you have pressed the Start/Reset button, the delay
can only be decreased if you wish to modify it.
All
Bleaching
Bleaching cycle de-
signed to remove the
toughest stains.
Please remember to pour the bleach into extra compartment 4
(see page 10).
This option is incompatible with the EASY IRON option.
2, 3, 4,
, ,
8 and
Rinse cycle.
Easy iron
By selecting this
function, the wash
and spin cycles will be
modified in order to
reduce the formation of
creases.
At the end of the cycle
the washing machine
will perform slow
rotations of the drum.
To drain the water so that the laundry may be removed, press the
START/PAUSE button.
This option is incompatible with the BLEACHING option.
1, 2, 3, 4,
,
, 8, 9, 10, 11.
Extra Rinse
Increases the efficiency
of the rinse.
Recommended when the appliance has a full load or with large
quantities of detergent.
1, 2, 3, 4, ,
, 7, 8, 9, 10,
11, 13, 14, and
Rinse cycle.

10
GB
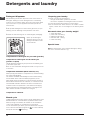
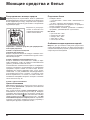
Detergent dispenser
Good washing results also depend on the correct dose of
detergent: adding too much detergent won’t necessarily
make for a more efficient wash, and may in fact cause build
up on the interior of your appliance and even pollute the
environment.
! Use powder detergent for white cotton garments, for pre-
washing, and for washing at temperatures over 60°C.
! Follow the instructions given on the detergent packaging.
Open up the detergent
dispenser and pour in the
detergent and fabric softe-
ner, as follows.
compartment 1: Detergent for pre-wash (powder)
compartment 2: Detergent for the wash cycle
(powder or liquid)
Liquid detergent should only be poured in immediately prior
to the wash cycle start.
! Do not use hand wash detergent because it may form too
much foam.
compartment 3: Additives (fabric softeners, etc.)
When pouring the softener in compartment 3, avoid exceeding
the “max” level indicated.
The softener is added automatically into the machine during
the last wash. At the end of the wash programme, some
water will be left in compartment 3. This is used for the inlet of
denser fabric softeners into the machine, i.e. to dilute the more
concentrated softeners. Should more than a normal amount
of water remain in compartment 3, this means the emptying
device is blocked. For cleaning instructions, see page 4. The
fabric softener should not overflow from the grid.
compartment 4: Bleach
Bleach cycle
Traditional bleach should be used on sturdy white fabrics, and
delicate bleach for coloured fabrics, synthetics and for wool.
When pouring in the bleach, be careful not to exceed the
“max” level indicated on compartment 4 (see figure).
To run the bleach cycle alone, pour the bleach into compart-
ment 4 and set the Rinse programme (for cotton fabrics)
and push the button Bleaching.
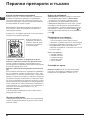
Preparing your laundry
• Divide your laundry according to:
- the type of fabric/the symbol on the label.
- the colours: separate coloured garments from whites.
• Empty all pockets and check for loose buttons.
• Do not exceed the values listed in the “Table of wash
cycles”, which refer to the weight of the laundry when
dry.
How much does your laundry weigh?
1 sheet 400-500 g
1 pillow case 150-200 g
1 tablecloth 400-500 g
1 bathrobe 900-1,200 g
1 towel 150-250 g
Special items
Wool: for best results, use a specific detergent, taking
care not to exceed a load of 1 kg.
Detergents and laundry

11
GB
Your washing machine could fail to work. Before calling for Assistance (see page 12), make sure the problem can’t easily
be solved by consulting the following list.
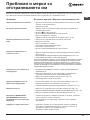
Troubleshooting
Problem
The washing machine won’t start.
The wash cycle won’t start.
The washing machine fails to load
water.
The washing machine continuou-
sly loads and unloads water.
The washing machine does not
drain or spin.
The washing machine vibrates too
much during the spin cycle.
The washing machine leaks.
The ON-OFF/DOOR LOCK Led
flashes rapidly at the same time
as at least one other LED.
There is too much foam.
Possible causes/Solution:
• The appliance is not plugged into the socket, or not enough to
make contact.
• There has been a power failure.
• The appliance door is not shut properly. The Lid locked Led flashes.
• The button has not been pressed.
• The START/RESET button has not been pressed.
• The water tap is not turned on.
• A delayed start has been set (using the Delay Timer, see page 9).
• The water inlet hose is not connected to the tap.
• The hose is bent.
• The water tap is not turned on.
• There is a water shortage.
• The water pressure is insufficient.
• The START/RESET button has not been pressed.
• The drain hose is not fitted between 65 and 100 cm from the floor
(see page 3).
• The free end of the hose is underwater (see page 3).
• The wall drainage system doesn’t have a breather pipe.
If the problem persists even after these checks, turn off the water tap, switch the
appliance off and call for Assistance. If the dwelling is on one of the upper floors of
a building, there may be drain trap problems causing the washing machine to load
and unload water continuously. In order to avoid such an inconvenience, special
anti-drain trap valves are available in shops.
• The programme does not foresee the draining: some programmes
require enabling the draining manually.
• The Easy iron option is enabled: to complete the programme, press
the START/RESET button.
• The drain hose is bent (see page 3).
• The drain duct is clogged.
• The drum was not unblocked correctly during installation (see page 2).
• The washing machine is not level (see page 2).
• The washing machine is closed in between furniture cabinets and
the wall (see page 2).
• The water inlet hose is not screwed on correctly (see page 2).
• The detergent dispenser is obstructed (to clean it, see page 4).
• The drain hose is not secured properly (see page 3).
• Switch off the machine and unplug the appliance; wait for
approximately 1 minute then switch it on again.
If the problem persists, contact Assistance.
• The detergent is not suitable for machine washing (it should bear
the definition “for washing machines” or “hand and machine wash”,or the like).
• You used too much detergent.

12
GB
Before calling for Assistance:
• Check whether you can solve the problem on your own (see page 11);
• Restart the programme to check whether the problem has been solved;
• If this is not the case, contact an authorised Technical Service Centre on the telephone number provided on the guarantee
certificate.
! Always request the assistance of authorised servicemen.
Notify the operator of:
• the type of problem;
• the appliance model (Mod.);
• the serial number (S/N).
This information can be found on the data plate situated on the rear of the washing machine.
Service

13
BG
БЪЛГАРСКИ
Съдържание
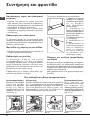
Монтиране, 14-15
Разопаковане и нивелиране
Хидравлични и електрически връзки
Първо пране
Технически данни
Поддръжка и почистване, 16
Спиране на водата и изключване на електрозахранването
Почистване на пералната машина
Почистване на касетата за перилните препарати
Поддръжка на люка и на казана
Почистване на помпата
Проверка на маркуча за студената вода
Как да почистите ваничката за перилния препарат
Мерки за безопасност и препоръки, 17
Общи предохранителни мерки
Претопяване
Спестяване и опазване на околната среда
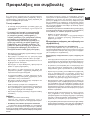
Описание на пералната машина, 18-19
Табло за управление
Светлинни индикатори
Как да отворите и затворите вратичките на барабана
Включване и програми, 20
Кратко описание: включване на програма
Таблица с програмите
Програмиране според потребностите, 21
Задаване на температурата
Задаване на öåíòðîôóãà
Функции
Перилни препарати и тъкани, 22
Касета за перилните препарати
Цикъл на избелване
Разпределяне на прането
Специфично пране
Проблеми и мерки за отстраняването им, 23
Сервизно обслужване, 24
Преди да се свържете с оторизирания сервиз
BG
ПЕРАЛНА МАШИНА
WITXL 1051
Инструкции за ползване

14
BG
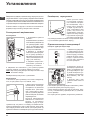
Когато настилката е мокет или килим,
регулирайте така крачетата, че под
пералната машина да остане достатъчно
място за вентилация.
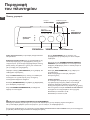
Разполагане, местене.
Ако вашата перална машина е снабдена
със специална количка с колелца, които се
прибират, тя може
да се мести лесно.
За да спуснете
количката, за да
можете да местите
пералната машина
б е з у с и л и е , е
н е о б х о д и м о
д а и з д ъ р п а т е
ч е р н и я л о с т,
разположен ниско вляво, под цокъла. След
преместването, върнете лоста в изходно
положение. На този етап пералната
машина е стабилно разположена. (Вж.
фигурата, само за съответните модели).
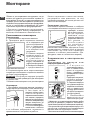
Хидравлични и електрически
връзки
С в ъ р з в а н е н а м а р к у ч а к ъ м
водопроводната мрежа
1 . Ñ â ú ð æ å ò å
çàõðàíâàùèÿ ìàðêó÷,
êàòî ãî çàâèåòå êúì
êðàíà çà ñòóäåíàòà
âîäà ñ íàêðàéíèê ñ
ãàçîâà ðåçáà 3/4 (âèæ
ôèãóðàòà).
Ïðåäè äà ãî ñâúðæåòå,
èçòî÷åòå âîäàòà,
äîêàòî ñå èçáèñòðè.
2. Свържете маркуча
за студената вода към
пералната машина,
като го завиете към
щуцера, разположен
на гърба, горе вдясно
(виж фигурата).
3 . В н и м а в а й т е
маркуча да не се
прегъва и пречупва.
! Налягането по водопроводната мрежа трябва
да бъде в границите, указани в таблицата с
техническите данни (виж следващата страница).
! Ако дължината на захранващия маркуч не е
достатъчна, се обърнете към специализиран
магазин или към оторизиран техник.
! Никога не използвайте вече използван маркуч.
! Важно е да съхранявате инструкциите, за да
можете да правите допълнителни справки по
всяко време. В случай, че пералната машина се
продаде, преотстъпи или премести трябва да се
погрижите инструкциите винаги да я придружават,
за да се предостави информация на новия
собственик за работата и предупрежденията.
! Прочетете внимателно инструкциите,
защото съдържат важна информация за
монтажа, използването и безопасността.
Разопаковане и нивелиране
Разопаковане
1. Разопаковайте пералната машина.
2. Проверете дали пералната машина
не е повредена при
транспортирането.
Ако е повредена,
не я свързвайте,
а се обърнете към
продавача.
3. Свалете четирите
защитни винта за
транспортирането
и г у м и ч к а т а с
д и с т а н ц и о н н а т а
втулка, поставени на
гърба (виж фигурата).
4. Затворете отворите
с предоставените
пластмасови капачки.
5. Съхранете всички части, за да се монтират
отново при необходимост пералната машина
да бъде транспортирана.
Внимание. В случай на повторна употреба
по-късите винтове трябва да бъдат монтирани
в горната част.
! Опаковъчният материал не е детска играчка
Нивелиране
1. Монтирайте пералната машина на равен и
твърд под без да я опирате в стени, мебели и др.
2. Ако подът не е
идеално хоризонтален,
к о м п е н с и р а й т е
неравностите като отвиете
или завиете предните
крачета (виж фигурата).
Наклонът, измерен върху
горната повърхност, не
трябва да надвишава 2°.
С точното нивелиране
машината е стабилна
и се избягват вибрациите, шумовете и
преместването й по време на работа.
Монтиране

15
BG
Свързване на маркуча за мръсната вода
Свържете маркуча за
мръсната вода, без
да го прегъвате, към
канализационната
т р ъ б а и л и к ъ м
т р ъ б а т а з а
отвеждане в стената,
разположени от пода
на височина между
65 и 100 см;
или го подпрете в
края на мивката
или ваната, като
вържете водача
з а к р а н а ( в и ж
ф и г у р а т а ) .
Свободният край
н а м а р к у ч а з а
мръсната вода не
трябва да бъде
потопен във водата.
! Не се препоръчва използването на
удължителни маркучи. Ако е необходимо,
удължителят трябва да има същия диаметър
като оригиналния и да не надвишава 150 см.
Свързване към електрическата мрежа
Преди да свържете щепсела в контакта,
проверете дали:
• к о н т а к т ъ т е з а з е м е н с ъ г л а с н о
действащата норма;
• контактът може да поеме максималната
мощност на натоварване на машината,
указана в таблицата с техническите
данни (виж следващата страница);
• захранващото напрежение е в границите
на указаното в таблицата с техническите
данни (виж следващата страница);
• контактът отговаря на щепсела на
пералната машина. В противен случай
заменете щепсела или контакта.
! Пералната машина не се монтира на открито,
дори под навес, защото е много опасно да се
остави на влиянието на атмосферните условия.
! За монтираната перална машина
електрическият контакт трябва да бъде
лесно достъпен.
! Не изпол звайте удълж ители или
разклонители.
! Кабелът не трябва да бъде огънат или
сплескан.
! Захранващият кабел трябва да се заменя
само от оторизирани техници.
Внимание! Фирмата отхвърля всякаква отговорност
в случаите, в които тези норми не се спазват.
Първо пране
След монтирането, преди употреба,
направете един цикъл на пране с перилен
препарат, но без дрехи, като зададете
програмата на 90°С без
65 - 100 cm
Òåõíè÷åñêè äàííè
Ìîäåë WITXL 1051
Ðàçìåðè
øèðèíà 40 ñì
âèñî÷èíà 85 ñì
äúëáî÷èíà 60 ñì
Âìåñòèìîñò îò 1 äî 6 êã.
Åëåêòðè÷åñêî
çàõðàíâàíå
Âèæ òàáåëêàòà ñ
õàðàêòåðèñòèêèòå,
ïîñòàâåíà íà ìàøèíàòà
Çàõðàíâàíå ñ
âîäà
ìàêñèìàëíî íàëÿãàíå 1
ÌÐà (10 bar)
ìèíèìàëíî íàëÿãàíå 0,05
ÌÐà (0,5 bar)
îáåì íà êàçàíà 42 ëèòðà
Ñêîðîñò íà
öåíòðîôóãàòà
äî 1000 îáîðîòà/ìèíóòà
Програми
за проверка
съгласно
Регламенти
№ 1061/2010
и №
1015/2010 на
Комисията
ïðîãðàìà
; стандартна
програма за памук при
60 °C
ïðîãðàìà ; стандартна
програма за памук при
40 °C.
Ïåðàëíàòà ìàøèíà
ñúîòâåòñòâà íà ñëåäíèòå
Åâðîïåéñêè äèðåêòèâè:
- 2004/108/CE (çà
åëåêòðîìàãíèòíà
ñúâìåñòèìîñò)
- 2006/95/ÑÅ (çà íèñêî
íàïðåæåíèå)
- 2002/96/CE

16
BG
Поддръжка и почистване
Спиране на водата и изключване на
електрозахранването
• Затваряйте крана за вода след всяко пране.
По този начин се ограничава износването
на хидравличната инсталация на пералната
машина и се ограничава опасността от течове.
• Изключвайте захранващия кабел, когато
почиствате пералната машина и по време
на работи по поддръжката.
Почистване на пералната машина
Външната част и гумените части могат да се
почистват с кърпа с хладка вода и сапун. Не
използвайте разтворители или абразивни препарати.
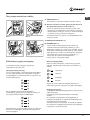
Почистване на чекмеджето за
перилните препарати
Извадете чекмеджето с повдигане и изтегляне
навън (виж фигурата). Измийте го под
течаща вода. Това почистване трябва да се
извършва често.
Поддръжка на люка и казана
• Оставяйте люка винаги открехнат за
избягване образуването на лоши миризми.
Почистване на помпата
Пералната машина е окомплектована със
самопочистваща се помпа, която няма нужда
от поддръжка. Възможно е обаче малки
предмети като монети и копчета да попаднат
във филтъра, който предпазва помпата и се
намира в долната й част.
! Уверете се, че цикълът на пране е завършил
и изключете от контакта.
За да извадите евентуални предмети,
попаднали в предкамерата:
1 . о т с т р а н е т е
цокъла в долната
п р е д н а ч а с т
н а п е р а л н а т а
м а ш и н а , к а т о
г о и з д ъ р п а т е
с р ъ ц е о т к ъ м
страничните части
(вж. фигурата);
2 . о т в и й т е
капачк ата, като
я з а въ р т и т е в
посока обратна
на часовниковата
с т р е л к а ( в и ж
ф и г у р а т а ) ;
нор м ално е да
изтече малко вода;
3 . п о ч и с т е т е
внимателно отвътре;
4. завийте отново капачката;
5. затворете отново панела, като преди да
го натиснете се уверете, че сте постави
правилно крачетата.
Проверка на маркуча за студената вода
Проверявайте маркуча за студената вода поне
веднъж годишно. Да се замени, ако е напукан и
нацепен, защото по време на пране голямото
налягане може да предизвика внезапно спукване.
! Никога не използвайте вече използван маркуч.
Почистване:
Почистете чекмеджето с течаща вода (Фиг. 3),
като за целта може да използвате и обикновена
четка за зъби, и след като сте извадили двете
сифончета, разположени в горната част на
отделения 1 и 2 (Фиг. 4), проверете дали
същите не са запушени и ги изчистете.
Обратен монтаж:
Върнете чекмеджето
в съответния отвор,
закачайки го, като не
забравяте да поставите
обратно на място двете
сифончета (Фиг. 4, 2, 1).
Демонтаж:
Н а т и с н е т е л е к о
бутона в предната
част на чекмеджето
з а п е р и л н и я
п р е п а р а т и г о
издърпайте нагоре
(Фиг. 1).
Фиг. 1
Фиг. 2
Фиг. 3
Фиг. 4
Как да почистите ваничката за перилния препарат

17
BG
Мерки за безопасност и
препоръки
! Пералната машина е проектирана и произведена в
съответствие с международните норми за безопасност.
Предупрежденията тук са продиктувани по причини за
безопасност и трябва да се четат внимателно.
Общи предохранителни мерки
• Този уред е предназначен за домашна, а не
за професионална употреба и неговите
функции не трябва да бъдат променяни.
• Този уред може да бъде използван от деца
над 8 години и лица с ограничени физически,
сетивни или умствени способности, или с
недостатъчен опит и познания, ако те са
наблюдавани или инструктирани относно
използването на уреда от лице, отговорно за
тяхната безопасност и разбират опасностите,
свързани с употребата на уреда. Децата не
трябва да си играят с уреда. Поддръжката и
почистването не трябва да се извършват от
деца без надзор.
• Не докосвайте машината, когато сте боси или с
мокри или влажни ръце или крака.
• Не изключвайте щепсела от захранващия контакт с
теглене на кабела, а като държите щепсела.
• Не отваряйте касетата с перилните препарати
докато, пералната машина работи.
• Не докосвайте маркуча за мръсната вода, защото
може да достигне високи температури.
• Никога не отваряйте люка със сила, защото може
да се повреди механизма за безопасност, който
предпазва от случайно отваряне.
• В случай на повреда по никакъв повод не достигайте
до вътрешните механизми в опити за ремонт.
• Винаги контролирайте децата да не се доближават
до работещата машина.
• По време на прането люкът се нагрява.
• Преместването да се извършва внимателно от
двама или трима души. Никога от сам човек, защото
пералната машина тежи много.
• Преди да заредите машината, проверете дали
казанът е празен.
Ïðåòîïÿâàíå
• Óíèùîæàâàíå íà îïàêîâú÷íèÿ ìàòåðèàë:
ñïàçâàéòå ìåñòíèòå íîðìè – ïî òîçè íà÷èí
îïàêîâú÷íèÿò ìàòåðèàë ìîæå äà ñå ðåöèêëèðà.
• Åâðîïåèñêàòà äèðåêòèâà 2002/96/CE çà îòïàäúöèòå
îò åëåêòðè÷åñêî è åëåêòðîííî îáîðóäâàíå ïðåäâèæäà
äîìàêèíñêèòå åëåêòðîóðåäè äà íå ñå èçõâúðëÿò çàåäíî
ñ îáè÷àéíèòå òâúðäè ãðàäñêè îòïàäúöè. Èçâàäåíèòå
îò óïîòðåáà óðåäè òðÿáâà äà áúäàò ñúáèðàíè îòäåëíî
ñ öåë äà áúäå óâåëè÷åí äåëúò íà ïîäëåæàùèòå íà
ïîâòîðíà óïîòðåáà è ðåöèêëèðàíå ìàòåðèàëè, îò êîèòî
ñà íàïðàâåíè, êàêòî è äà áúäàò èçáåãíàòè åâåíòóàëíè
âðåäè çà çäðàâåòî è îêîëíàòà ñðåäà. Ñèìâîëúò
“çà÷åðêíàòî êîø÷å” å ïîñòàâåí âúðõó âñè÷êè ïðîäóêòè,
çà äà íàïîìíÿ çà çàäúëæèòåëíîòî ðàçäåëíî ñúáèðàíå.
Çà äîïúëíèòåëíà èíôîðìàöèÿ îòíîñíî ïðàâèëíîòî
èçâàæäàíå îò óïîòðåáà íà äîìàêèíñêèòå åëåêòðîóðåäè,
èíòåðåñóâàùèòå ñå ìîãàò äà ñå îáúðíàò êúì ñëóæáàòà
çà ñúáèðàíå íà îòïàäúöè èëè êúì äèñòðèáóòîðèòå.
Спестяване и опазване на околната среда
Технология в служба на околната среда
п е с т я в а н е на п е р и л н и пр е п а р а т и , в о д а ,
електроенергия и време
• За да не се разхищават ресурси, пералната машина
трябва се използва максимално заредена. Максимално
заредена машина в сравнение с две заредени на
половината води до 50% енергийни спестявания.
• Предпрането е необходимо само за много замърсени
дрехи. С избягването му спестявате перилни препарати,
време, вода и между 5 и 15% електроенергия.
• Като обработите петната със специални препарати
за отстраняването им или ги оставите да се накиснат
преди прането намалявате необходимостта да
перете при висока температура. Ще спестите до 50%
електроенергия, като използвате програма на 60°C
вместо на 90°C или такава на 40°C вместо на 60°C.
• За избягване на разхищения и за опазване на околната
среда дозирайте добре перилния препарат в зависимост
от твърдостта на водата, от степента на замърсяване и от
количеството дрехи за пране. Въпреки, че са биологично
разграждащи се, перилните препарати съдържат елементи,
които променят равновесието в природата. Избягвайте
колкото е възможно употребата на омекотител.
• Прането късно вечер до рано сутрин спомага за
намаляване на консумацията на електроенергия.
Функцията за избор на това след колко часа да се
включи програмата помага много за организиране
на прането за спестяване на електроенергия.
• Ако прането трябва се изсуши в сушилна машина,
изберете по-голяма скорост за центрофугиране.
Малкото количество вода, която остава в прането
води до спестяване на време и електроенергия в
програмата за изсушаване.

18
BG
Регулатор на
ТЕМПЕРАТУРАТА
ПРОГРАМАТОР
Индикатори
ФУНКЦИОНАЛНИ
бутони
Бутон
ВКЛЮЧВАНЕ/
ИЗКЛЮЧВАНЕ
Бутон
СТАРТ/НУЛИРАНЕ
Индикатор за
БЛОКИРАН КАПАК
Индикатор ВКЛЮЧВАНЕ/БЛОКИРАНА ВРАТА:
Светещият индикатор показва, че люкът е блокиран за избягване на случайното му отваряне; за да избегнете
причиняването на повреди на пералнята, е необходимо да изчакате индикаторът да започне да мига, преди да я
отворите.
! Бързото мигане на индикатора ВКЛЮЧВАНЕ/БЛОКИРАНА ВРАТА едновременно с това на поне още един
индикатор сигнализира за аномалия.
Чекмедже за препаратите за зареждане на
перилните и допълнителните препарати.
Индикатори за проследяване текущата фаза на
програмата за пране. Àêî å èçáðàíà ôóíêöèÿòà De-
lay Timer (òàéìåð çà çàäàâàíå ÷àñà íà âêëþ÷âàíå íà
ïðîãðàìàòà) ùå ñå ïîêàæå âðåìåòî, êîåòî îñòàâà äî
âêëþ÷âàíåòî íà ïðîãðàìàòà.
ФУНКЦИОНАЛНИ бутони за задаване на възможните
функции. Бутонът, отнасящ се до избраната функция,
ще продължи да свети.
ÖÅÍÒÐÎÔÓÃÀ: çà âêëþ÷âàíå èëè èçêëþ÷âàíå íà
öåíòðîôóãàòà.
Регулатор на ТЕМПЕРАТУРАТА за настройване на
температурата или задаване на пране със студена
вода.
Бутон ВКЛЮЧВАНЕ/ИЗКЛЮЧВАНЕ за включване и
изключване на пералната машина.
Бутон СТАРТ/НУЛИРАНЕ за стартиране
на програмите или анулиране на погрешно
направените настройки.
Индикатор ВКЛЮЧВАНЕ/БЛОКИРАН КАПАК,
указващ дали пералната машина е включена
(мигаща светлина) и дали капакът може да бъде
отварян (постоянна светлина).
ПРОГРАМАТОР за задаване на програмите.
По време на програмата програматорът остава
неподвижен.
Ðåæèì íà stand by
 ñúîòâåòñòâèå ñ íîâèòå íîðìàòèâè çà ïåñòåíå
íà åíåðãèÿ òàçè ïåðàëíà ìàøèíà å ñíàáäåíà ñúñ
ñèñòåìà çà àâòîìàòè÷íî èçêëþ÷âàíå (stand by),
êîÿòî ñå çàäåéñòâà ñëåä 30 ìèíóòè â ñëó÷àé, ÷å
ìàøèíàòà íå ñå èçïîëçâà. Íàòèñíåòå çà êðàòêî áóòîí
ÂÊËÞ×ÂÀÍÅ/ÈÇÊËÞ×ÂÀÍÅ è èç÷àêàéòå ìàøèíàòà
äà ñå çàäåéñòâà îòíîâî.
Потребление в режим „Off“ (Изкл.): 0,5 W
Потребление в режим „On“ (Вкл.): 0,5 W
Описание на
пералната машина
Контролен панел
Регулатор на
ÖÅÍÒÐÎÔÓÃÀ

19
BG
Светлинни индикатори
Индикаторите носят важна информация.
Ето какво съобщават:
×àñúò çà âêëþ÷âàíå íà ïðîãðàìàòà:
Ïðè èçáèðàíå íà ôóíêöèÿòà Delay Timer (÷àñ çà
âêëþ÷âàíå íà ïðîãðàìàòà) (âèæ ñòð. 21) ñ âêëþ÷âàíåòî
íà ìàøèíàòà ùå çàïî÷íå äà ïðèìèãâà èíäèêàòîðúò çà
èçáðàíîòî çàáàâÿíå:
Ñ òå÷åíèå íà âðåìåòî îñòàòúêúò äî íà÷àëîòî íà
ïðîãðàìàòà ùå ñå èçîáðàçÿâà ñ ïðèìèãâàíå íà
ñúîòâåòíèÿ èíäèêàòîð:
Ñëåä êàòî èçòå÷å âðåìåòî çà îòëàãàíå íà
èçïúëíåíèåòî, ïðèìèãâàùèÿò ñâåòëèíåí èíäèêàòîð
ùå óãàñíå è èçáðàíàòà ïðîãðàìà ùå ñå ñòàðòèðà.
Текущи фази:
По време на цикъла на работа индикаторите ще
светват последователно, за да показват етапите от
изпълнението на програмата:
Предпране
Пране
Изплакване
Центрофуга
Забележка: по време на фазата на оттичане
на водата ще светне индикаторът за фазата на
центрофугата.
Бутони за управление
БУТОНИТЕ ЗА УПРАВЛЕНИЕ изпълняват ролята на
индикатори.
С избирането на една функция светва съответният бутон.
Ако избраната функция е несъвместима със
зададената програма бутонът ще примигва и
функцията няма да се включи.
В случай, че се зададе функция, която е
несъвместима с друга, предварително избрана, ще
остане активна само последната избрана.
Как да отворите и затворите вратичките на барабана
A) За да отворите горния капак (Фиг. 1):
повдигнете външния капак и го отворете изцяло.
B) За да отворите вратичките на барабана трябва
да използвате и двете си ръце, както е указано
(Фиг. 2):
- натиснете бутона, обозначен със стрелка на фиг.
2 и, упражнявайки лек натиск надолу, задръжте
едната си ръка върху капака, за да не може
рязкото отваряне на вратичките да нарани
пръстите ви;
- след това отворете вратичките, които лесно ще
се откачат една от друга и ще се отворят.
C) Зареждане на прането в пералнята (Фиг. 3).
Г) Затваряне (Фиг. 4):
- затворете добре барабана, като първо свалите
предната вратичка, а след това и задната;
- проверете дали куките на предната вратичка са
вкарани добре в съответното място върху задната
вратичка;
- като чуете куките да щракнат, натиснете леко надолу
двете вратички, които не трябва да се разкачат;
- най-накрая затворете външния капак.
Фиг. 1
Фиг. 2
Фиг. 3 Фиг. 4

20
BG
Кратко описание: включване на програма
1. Да се включи пералната машина с натискане на бутона .
Всички индикатори ще светнат за няколко секунди, след това
ще угаснат и индикаторът ВКЛЮЧВАНЕ/ЛЮК БЛОКИРАН ще
започне да примигва.
2. Поставете прането в пералнята, поставете перилния и
допълнителните препарати и накрая затворете вратичките
и капака.
3. С ПРОГРАМАТОРА се задава желаната програма.
4. Задава се температурата за пране.
5. Çàäàâà ñå ñêîðîñòòà íà öåíòðîôóãàòà.
6. Стартирайте програмата, като натиснете бутона СТАРТ/
АНУЛИРАНЕ. За анулиране натиснете бутона СТАРТ/
АНУЛИРАНЕ поне за 2 секунди.
7. В края на програмата индикаторът ВКЛЮЧВАНЕ/ЛЮК
БЛОКИРАН присветва, показвайки, че люкът може да
се отвори. Изважда се прането и люкът се оставя леко
отворен, за да изсъхне казана. Пералната машина се
ИЗКЛЮЧВА с натискане на бутона .
Включване и програми
Таблица с програмите
Бележка
- За програми 9 - 10 е препоръчително да не зареждате пералнята с повече от 3,5 кг. пране.
- За програма 14 е препоръчително да зареждате пералнята с не повече от 3 кг. пране.
Памук стандарт 20°C (програма 8) е идеална за замърсено пране от памучна тъкан. Добрите резултати включително при изпиране
със студена вода, в сравнение с тези след пране при 40°, са гарантирани от механичното действие с промяна на скоростта,
многократно и често достигащо до пикови стойности.
Express (програма 12 за синтетични тъкани), която е разработена за пране на леко замърсени дрехи: трае само 30 минути и по този
начин пести време и средства. С избирането на програмата (12 на 30°C) може да перете едновременно тъкани от различен вид (с
изключение на вълна и коприна) с максимално тегло до 3 кг. Препоръчва се използването на течен перилен препарат.
Ïðîãðàìè
Îïèñàíèå íà ïðîãðàìàòà
Ìàêñ.
òåìïåðàòóðà
(°C)
Ìàêñ.
ñêîðîñò
(îáîðîòè
â ìèíóòà)
Ïåðèëíè ïðåïàðàòè
Çàðåæäàíå ìaêñ. (êã)
Остатъчна влажност
%
Разход на енергия
kWh
Общ разход на вода lt
Ïðîäúëæèòåëíîñò íà
öèêúëà
Ïðåäïðàíå
Îñíîâíî
ïðàíå
Îìåêî-
òèòåë
Белина
Ñòàíäàðòíè
1
Ïàìók "ïðåäïðàíå": Áåëè, èçêëþ÷èòåëíî çàìúðñåíè.
90° 1000
- 6 62 1,92 67 160’
2
Ïàìók: Áåëè, èçêëþ÷èòåëíî çàìúðñåíè.
90° 1000 -
6 62 1,99 62 145’
3
Ïàìók–öâåòíè: Áåëè, ìàëêî çàìúðñåíè, è öâåòíè, íåóñòîé÷èâè.
40° 1000 -
6 62 0,65 54 90’
4
Ñèíòåòè×íè: Öâåòíè, óñòîé÷èâè, ìíîãî çàìúðñåíè.
60° 800 -
3 44 0,85 39 110’
4
Ñèíòåòè×íè (3): Öâåòíè, óñòîé÷èâè, ìíîãî çàìúðñåíè.
40° 800 -
3 44 0,53 39 100’
стандартна програма за памук при 60 °C (1): Áåëè è öâåòíè, óñòîé÷èâè,
ñèëíî çàìúðñåíè.
60° 1000 -
6 62 1,02 50 185’
стандартна програма за памук при 40 °C (2): Áåëè è öâåòíè, íåóñòîé÷èâè,
ñèëíî çàìúðñåíè.
40° 1000 -
6 62 1,09 92 175’
7
Âúëíåíè òúkàíè: Çà âúëíà, êàøìèð è ò.í.
40° 800 -
- 1 - - - 65’
8
Памук стандарт 20°C
20° 1000 -
6 - - - 180’
Çà ñâîáîäíîòî âðåìå
9
Áåëè è öâåòíè, óñòîé÷èâè, ñèëíî çàìúðñåíè
60° 1000 -
- 3,5 - - - 60’
10
Áåëè, ìàëêî çàìúðñåíè, è öâåòíè äåëèêàòíè (ðèçè, ôëàíåëè è ò.í.)
40° 1000 -
- 3,5 - - - 50’
11
Öâåòíè, äåëèêàòíè (âñÿêàêâî ñëàáî çàìúðñåíî ïðàíå)
40° 800 -
- 2,5 - - - 40’
12
EXPRESS: Çà áúðçî îñâåæàâàíå íà íå ìíîãî çàìúðñåíè äðåõè (íå ñå
ïðåïîðú÷âà çà âúëíà, êîïðèíà è äðåõè, êîèòî òðÿáâà äà ñå ïåðàò íà ðúêà).
30° 800 -
- 3 71 0,25 33 30’
Ñïîðò
13
Sport Shoes
30° 600 -
-
(ìaêñ.2
÷èôòà.)
- - - 55’
14
Sport Intensive
30° 600 -
- 3 - - - 85’
×Àñòè×íè ïðîãðàìè
ÈÇÏËÀKÂÀÍÅ
- 1000 - -
6 - - - 36’
ÖÅÍÒÐÎÔÓÃÀ + ÈÇÏÎMÏÂÀÍÅ
- 1000 - - - - 6 - - - 16’
Продължителността на цикъла, показана на дисплея или посочена в ръководството, е приблизително изчислена въз основа на стандартните
условия. Реалното времетраене може да варира в зависимост от множество фактори като температура и налягане на водата при пълнене,
температура на въздуха в помещението, количество перилен препарат, количество, вид и тегло на прането, допълнително избрани опции.
Ïðîãðàìà çà ïðîâåðêà ñúãëàñíî ñòàíàðò 200/06: çààòå ïðîãðàìà ñ òåìïåðàòðà 60
Този цикъл е подходящ за пране на памучни, нормално замърсени тъкани и е най-ефективен от гледна точка на комбиниран разход на енергия и вода,
подходящ е за дрехи, които могат да се перат на 60°C.
2 Ïðîãðàìà çà ïðîâåðêà ñúãëàñíî ñòàíàðò 200/06: çààòå ïðîãðàìà ñ òåìïåðàòðà 40
Този цикъл е подходящ за пране на памучни, нормално замърсени тъкани и е най-ефективен от гледна точка на комбиниран разход на енергия и вода,
подходящ е за дрехи, които могат да се перат на 40°C.
à âñè÷êè st nsttts:
2 úëãà ïðîãðàìà çà ïàìê çààòå ïðîãðàìà ñ òåìïåðàòðà 40
3 Синтетични програма по çààòå ïðîãðàìà 4 ñ òåìïåðàòðà 40
La pagina si sta caricando...
La pagina si sta caricando...
La pagina si sta caricando...
La pagina si sta caricando...
La pagina si sta caricando...
La pagina si sta caricando...
La pagina si sta caricando...
La pagina si sta caricando...
La pagina si sta caricando...
La pagina si sta caricando...
La pagina si sta caricando...
La pagina si sta caricando...
La pagina si sta caricando...
La pagina si sta caricando...
La pagina si sta caricando...
La pagina si sta caricando...
La pagina si sta caricando...
La pagina si sta caricando...
La pagina si sta caricando...
La pagina si sta caricando...
La pagina si sta caricando...
La pagina si sta caricando...
La pagina si sta caricando...
La pagina si sta caricando...
La pagina si sta caricando...
La pagina si sta caricando...
La pagina si sta caricando...
La pagina si sta caricando...
La pagina si sta caricando...
La pagina si sta caricando...
La pagina si sta caricando...
La pagina si sta caricando...
La pagina si sta caricando...
La pagina si sta caricando...
La pagina si sta caricando...
La pagina si sta caricando...
La pagina si sta caricando...
La pagina si sta caricando...
La pagina si sta caricando...
La pagina si sta caricando...
La pagina si sta caricando...
La pagina si sta caricando...
La pagina si sta caricando...
La pagina si sta caricando...
La pagina si sta caricando...
La pagina si sta caricando...
La pagina si sta caricando...
La pagina si sta caricando...
La pagina si sta caricando...
La pagina si sta caricando...
La pagina si sta caricando...
La pagina si sta caricando...
La pagina si sta caricando...
La pagina si sta caricando...
La pagina si sta caricando...
La pagina si sta caricando...
La pagina si sta caricando...
La pagina si sta caricando...
La pagina si sta caricando...
La pagina si sta caricando...
La pagina si sta caricando...
La pagina si sta caricando...
La pagina si sta caricando...
La pagina si sta caricando...
-
 1
1
-
 2
2
-
 3
3
-
 4
4
-
 5
5
-
 6
6
-
 7
7
-
 8
8
-
 9
9
-
 10
10
-
 11
11
-
 12
12
-
 13
13
-
 14
14
-
 15
15
-
 16
16
-
 17
17
-
 18
18
-
 19
19
-
 20
20
-
 21
21
-
 22
22
-
 23
23
-
 24
24
-
 25
25
-
 26
26
-
 27
27
-
 28
28
-
 29
29
-
 30
30
-
 31
31
-
 32
32
-
 33
33
-
 34
34
-
 35
35
-
 36
36
-
 37
37
-
 38
38
-
 39
39
-
 40
40
-
 41
41
-
 42
42
-
 43
43
-
 44
44
-
 45
45
-
 46
46
-
 47
47
-
 48
48
-
 49
49
-
 50
50
-
 51
51
-
 52
52
-
 53
53
-
 54
54
-
 55
55
-
 56
56
-
 57
57
-
 58
58
-
 59
59
-
 60
60
-
 61
61
-
 62
62
-
 63
63
-
 64
64
-
 65
65
-
 66
66
-
 67
67
-
 68
68
-
 69
69
-
 70
70
-
 71
71
-
 72
72
-
 73
73
-
 74
74
-
 75
75
-
 76
76
-
 77
77
-
 78
78
-
 79
79
-
 80
80
-
 81
81
-
 82
82
-
 83
83
-
 84
84


Indesit WITXL 1051 (EU) Guida utente
- Categoria
- Lavatrici
- Tipo
- Guida utente
in altre lingue
- français: Indesit WITXL 1051 (EU) Mode d'emploi