Metos D2 Manuale del proprietario
- Categoria
- Confezionatrici sottovuoto
- Tipo
- Manuale del proprietario

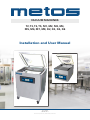
Installation and User Manual
10.2.2015
(9606 041)
VACUUM MACHINES
T2, T3, T4, T5, M1, M2, M3, M4,
M5, M6,
M7, M8, D2, D3, D4, D6
MG4221527, MG4221529, MG4221555, MG4291594

10.2.2015
METOS VACUUM MACHINES
2
|
1. TABLE OF CONTENTS ............................................................................................................................... 2
2. Safety Regulations and Warnings ............................................................................................................4
3. Welcome ....................................................................................................................................................5
3.1. Service from your Dealer ............................................................................................................................5
3.2. YouTube Henkovac Channel - Instruction and Service Videos .....................................................................5
4. Installation of Machine .............................................................................................................................5
4.1. Gas Connection for MAP Applications (Modified Atmospheric Packaging) .................................................6
4.2. Compressed Air Connection for Additional Sealing Pressure ......................................................................6
5. Overview of Main Machine Components................................................................................................7
6. Digital Control with LCD Display .............................................................................................................8
6.1. One-Program Control System .....................................................................................................................8
6.2. Operating the Machine with One-Program Control System ........................................................................9
6.3. Ten-Program Control System .....................................................................................................................10
6.3.1. Time-Based Operation (vacuum gauge: mbar) .......................................................................................... 10
6.3.2. Sensor-Based Operation (digital display: mbar) .........................................................................................10
6.4. Operating the Machine with Ten-Program Control System ....................................................................... 11
7. Programming the Machine .....................................................................................................................13
7.1. One-Program Control System ...................................................................................................................13
7.1.1. Programmable Functions ...........................................................................................................................13
7.1.2. Programming ............................................................................................................................................. 13
7.1.3. Reviewing Vacuum Time and Sealing Time ................................................................................................13
7.1.4. Adjusting Vacuum Time for P1 ............................................................................................................13
7.1.5. Adjusting Sealing Time for P1 ..............................................................................................................13
7.1.6. Turning Off Machine ..................................................................................................................................14
7.2. Ten-Program Control System .....................................................................................................................14
7.2.1. Programmable Functions ...........................................................................................................................14
7.2.2. Reviewing Function Values for P1-P9 .........................................................................................................14
7.2.3. Programming and Adjusting Values for P1-P9 ............................................................................................15
7.2.4. Turning Program Functions ON/OFF ..........................................................................................................15
7.2.5. Adjusting ON/OFF Function Values............................................................................................................15
7.2.6. Turning Off Machine ..................................................................................................................................15
8. Symbols in the Display ...........................................................................................................................16
9. Standard Vacuum Pump Settings: .........................................................................................................18
9.1. One-Program Control System ...................................................................................................................18
9.2. Ten-Program Control System .....................................................................................................................18
10. Further Explanation of Packaging Concepts ......................................................................................... 19
10.1. Sensor-Based Control ................................................................................................................................19
10.2. Time-Based Control ................................................................................................................................... 19
10.3. P H2O Program for Liquid Products .........................................................................................................19
10.4. Vacuum Plus (seconds)....................................................................................................................19
10.5. MAP Gassing (option) .......................................................................................................................19
1. TABLE OF CONTENTS

|
3
10.2.2015
METOS VACUUM MACHINES
10.6. Sealing ................................................................................................................................................20
10.7. Extra Sealing Pressure ..............................................................................................................................20
10.8. Soft-Air (option) ................................................................................................................................... 21
10.9. Multi-Cycle .........................................................................................................................................21
10.10. Cool-Down/Oil Dehumidification of the vacuum pump .............................................................................21
11. Maintenance ............................................................................................................................................22
11.1. General ......................................................................................................................................................22
11.2. Vacuum Pump ...........................................................................................................................................22
11.3. Adding and Changing the Pump Oil...........................................................................................................23
11.4. Seal Beams and Counter Beams ............................................................................................................... 24
11.4.1. Single-Seal Beam ......................................................................................................................................24
11.4.2. Aluminum/Stainless Steel Seal Beam .......................................................................................................25
11.4.3. Aluminum T-Shaped Seal Beam .................................................................................................................26
11.4.4. Applying Teflon Tape to Seal Beam ............................................................................................................26
11.5. Replacing Silicone Rubber Seal of Counter Beam .....................................................................................27
11.6. Rubber Seal of Vacuum Chamber Cover ...................................................................................................27
11.7. Struts, Dampers and Springs ....................................................................................................................27
11.8. Vacuum Hoses and Tubes ..........................................................................................................................27
12. Malfunctions and Notifications .............................................................................................................. 28
12.1. Service and Technical Support ...................................................................................................................28
12.2. YouTube Henkovac Channel - Instruction and Service Videos ...................................................................28
12.3. Trouble Shooting Check List ......................................................................................................................28
13. Recommended Spare Parts ....................................................................................................................29
14. Utilities .....................................................................................................................................................30
14.1. General Data .............................................................................................................................................30
15. Commonly-Used Symbols ...................................................................................................................... 30

10.2.2015
METOS VACUUM MACHINES
4
|
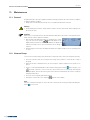
2. Safety Regulations and Warnings
General
The manufacturer of this equipment accepts no liability whatsoever for damage or injury caused by failing
to adhere to the directions and instructions in this manual, or through carelessness during the installa-
tion, use, maintenance and repair of the machine identified on the front of this document, or any of its
accompanying options or components.
The owner of the machine is fully responsible at all times for the adherence to the locally applicable
safety regulations and guidelines. Obey all safety instructions and guidelines as provided in this manual.
User Manual
• Every user of the machine should be familiar with the contents of this manual and follow its instruc-
tions carefully. Management must train the appropriate personnel on the basis of this manual and
make sure that all directions and indications are adhered to
• Never change the order of the actions to be taken
• Always keep the manual in the proximity of the machine
Pictograms and Instructions on the Machine
• The labels with pictograms, warnings and instructions that are attached to the machine are part of the
safety measures taken. These labels should not be damaged or removed and should remain present
and legible throughout the life of the machine
• Immediately replace or repair any labels that are damaged or have become illegible
Intended Use of the Machine 1
The machine is designed for vacuum packaging of food or other products for 8 hours a day, 5 days a
week. Any other or extended use is not in accordance with this purpose and the manufacturer accepts
no liability for any resulting damage or injury. Only use this machine while in perfect technical condition
in accordance with the above mentioned purpose.
Technical Specifications
The specifications outlined in this manual may not be altered.
Modifications
Modifications of the machine or its components is not permitted.
Safety Measures
The machine is equipped with the following standard safety devices:
• Short-circuit and overload safety
• Pump fan guards
All safety devices must be correctly installed and may only be removed to accommodate maintenance
and repair activities by trained and authorized service personnel. The machine may never be operated
while safety measures are incomplete, deactivated or absent. The safety devices may never be by-
passed.
1 The “use in accordance with purpose”, as established in EN 292-1, is the use for which the technical
product is suitable according to the statement by the manufacturer, including his directions in the sales
brochure. When in doubt, it is the use that manifests itself as the most common, based on the construc-
tion, model and function of the product. Use in accordance with the purpose also means adhering to the
instructions in the user manual.
©2014 HFE Vacuum Systems BV
All rights reserved.
No part of this document may be reproduced and/or published by means of print, photocopy, microfilm
or any other method without the prior written permission of the manufacturer. This also applies to the
accompanying illustrations and/or diagrams and schematics.

|
5
10.2.2015
METOS VACUUM MACHINES
3. Welcome
Thank you very much for your purchase of a Henkovac vacuum packaging machine. In order to guarantee
the reliability, longevity and robustness of your equipment, we only used materials of the highest
quality in the fabrication of your machine. During its design, it was our goal to make it easy to use and
simple to maintain.
Based on your purchase of this machine, we assume that you are familiar with the fundamentals of
vacuum packaging. For additional information and guidance about vacuum packaging applications, we
recommend that you contact your dealer.
3.1. Service from your Dealer
For technical support, please contact your dealer.
Please have the following information available:
• Machine type
• Serial number
You can locate the serial number on the front page of the original manual. In addition, you can find it on
the identification plate on the right-hand side or back-side of your machine.
3.2. YouTube Henkovac Channel - Instruction and Service Videos
Instructional videos are placed on YouTube for the operation and service of your machine. You may locate
these videos on the YouTube website under “Henkovac Channel”.
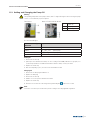
4. Installation of Machine
General
• Level the machine on a flat firm surface
• Position the machine in such a manner that the pump is unobstructed and properly ventilated
• Engage the locks on the wheels, if so equipped
• Check the oil level in the pump; add oil if necessary
- Never operate the machine when the oil level is low
Table-Top Model
Mobile and Double-
Chamber Models
Oil sight glass
Oil sight glass
Wheel locks
Electrical Connection 3-phase vacuum pump
If the machine is incorrectly hooked up to a three-phase electrical connection,
the pump will make excessive noise. If this happens, take the following steps:
• Turn the pump off immediately
• Switch the phase wires
• Make sure that the rotation direction of the pump matches the arrow on the
motor housing

10.2.2015
METOS VACUUM MACHINES
6
|
Turning on Machine
• If so equipped, like some mobile and double-chamber models, turn on the main
power switch on the back of the machine
• Push the on/off button on the control panel of the machine
4.1. Gas Connection for MAP Applications (Modified Atmospheric Packaging)
• Connect the gas supply line to the inlet on the back of the machine
• Maximum pressure: 1 bar
• Anchor the gas cylinders securely to prevent them from falling over
• Make sure that the work area is well-ventilated
• To assure that you use the appropriate gas for your application, consult
your dealer or gas supplier
• Assure a good connection and use high-quality materials
4.2. Compressed Air Connection for Additional Sealing Pressure
• Additional sealing pressure is usually recommended for MAP applications
only
• The M4-M8 and the D1-D6 models with the option Gas/MAP are standard
equipped with a compressed air inlet
• Extra sealing pressure is not necessary and not available for the Table-Top,
M1, M2, M3
• Consult your dealer for installation details
• Maximum pressure: 1 bar
• Assure a good connection and use high-quality materials

|
7
10.2.2015
METOS VACUUM MACHINES
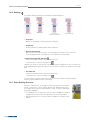
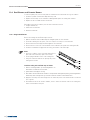
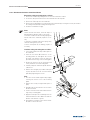
5. Overview of Main Machine Components
A
B
C
D
E
F
G
H
I
J K L
A
B
C
E
F
C
E
A
G
H
I
M
M
I
A Control panel
B Seal beam (located in the cover on the doublechamber machines)
C Counter beam
D MAP gassing pipes
E Fitting plates (optional)
F Exhaust (located in the cover on double-chamber and some mobile models)
G Cover lock (not for double-chamber machines)
H Silicone sealing gasket
I Identification plate
J Main switch
K MAP gas connection
L Compressed air connection (extra sealing pressure option)
M Wheel with lock
On the back side of the machine:
J Main switch
K MAP gas connection
L Compressed air connection

10.2.2015
METOS VACUUM MACHINES
8
|
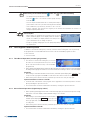
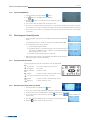
6. Digital Control with LCD Display
Some Henkovac vacuum machines have a control system with just one Program (P1). Other machines
have an optional expanded control system, which can accommodate up to 9 custom programs (P1-9).
6.1. One-Program Control System
Henkovac machines with the One-Program
control system can be programmed for the
following 2 functions:
1. Vacuum time (seconds)
2. Sealing time (seconds)
• The values for vacuum and sealing times are selected by the user and saved in program P1
• During operation, the LCD display will show symbols to indicate the active function and the progress
of the packing cycle
• The actual vacuum pressure is indicated by the analog vacuum gauge
Plug & Play
• When turning on the machine for the first time:
- running time of the vacuum pump is pre-set at 30-40 seconds and the sealing time at 2 seconds.
Vacuum is indicated on the analog vacuum gauge.
• When turning on the machine after that, program P1 will contain the most-recently used settings
• The vacuum and sealing times are easily adjusted to match the needs for the application

|
9
10.2.2015
METOS VACUUM MACHINES
Menu Button
- Confirms and saves the entered values for vacuum and sealing times
- Returns to the Home menu
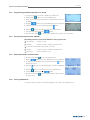
6.2. Operating the Machine with One-Program Control System
On: Turns the machine on
- The machine will start up in the most-recently used program
- The pump of a machine with a transparent cover will start when the cover is closed
Off: Turns the machine off
- When pressing the button once, the symbol will start blinking and the pump will stop after
about 4 seconds
- When pressing the button a second time, the pump will stop immediately
- Closing the cover will initiate the cool-down phase; the machine will complete a number of vacuum
cycles before turning off automatically
Stop-function
- Stops the machine at any point in the packing cycle and aerates the chamber
Reset-function
- While programming, resets the program value to its original setting
Press the menu button to return to the Home menu
Stops the current function and initiates the next step in the cycle
- By pressing the of the sealing button , the vacuum function stops and the program jumps to
the sealing function
- While packing sauce or soup, the package may be sealed as soon as product boiling is detected
Entering the desired vacuum time
- By pressing the + or – of the vacuum button , the vacuum time can be increased or decreased
The selected value is confirmed and saved by pressing the menu button
- Press the button to reset the original value
Entering the desired sealing time
- By pressing the + or – of the sealing button , the sealing time can be increased or decreased
The selected value is confirmed and saved by pushing the menu button
- Press the button to reset the original value
Packing of
sauce/soup

10.2.2015
METOS VACUUM MACHINES
10
|
Service Symbol
- After a number of operating hours or packing cycles, the service
symbol will briefly appear on the display when the machine is
turned on. In addition, the display indicates how many hours or
cycles remain before an oil change is required
When turning off the machine with the button, the symbol will start blinking
- The pump will stop after about 4 seconds
- Press the button a second time and the pump will stop
immediately
- Close the lid; the machine initiates the cool-down phase and per-
form a number of vacuum cycles before turning off automatically
- These additional cycles allow any moisture in the oil of the
pump to evaporate. This increases the longevity of the machine and minimizes the need for oil
changes and pump maintenance
- Except for regularly changing the oil in the pump (important!), the machine requires little other rou-
tine maintenance
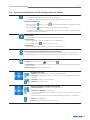
6.3. Ten-Program Control System
In addition to vacuum and sealing times, Henkovac machines with a Ten-Program control system may
be programmed for several additional functions. Each of the 9 customizable programs is either
1. time-controlled
2. sensor-controlled
6.3.1. Time-Based Operation (vacuum gauge: mbar)
• The values for vacuum and sealing time, as well as
the values for several optional functions, are selected
by the customer and saved in any of 9 customizable
programs P1-9
• When operating a packaging machine with a time-based program, the actual vacuum pressure is indicated by
the analog vacuum gauge. The number of seconds of vacuum time remaining is shown on the LCD display
Plug & Play
• When turning on a time-based machine for the first time, it will start up in the PA program
AUTOMATIC
. This
is a pre-set factory program with 30-40 seconds vacuum time and 2 seconds of sealing time
• When turning on the machine after that, it will start up in the most-recently used program
Optional installation of a Sensor or Soft-Air
• A machine with a time-based control program can be upgraded to sensor-based operation at a later
date by installing the optional sensor kit
• The Soft-Air feature can also be installed at a later date by ordering the optional soft-air kit
6.3.2. Sensor-Based Operation (digital display: mbar)
• When operating a packaging machine with a sensor-based program, the actual vacuum pressure is digi-
tally shown on the LCD display in mbar (standard setting) or in % vacuum
Plug & Play
• When turning on a sensor-based machine for the first time, it
will start up in the PA program
AUTOMATIC
. This is a pre-set
factory program with 5 mbar of vacuum and 2 seconds
of sealing time
• When turning on the machine after that, it will start up in the most-recently used program
Optional installation of Soft-Air
• The Soft-Air feature can also be installed at a later date by ordering the optional soft-air kit

|
11
10.2.2015
METOS VACUUM MACHINES
Review program values
1. Cycles through programs P1 to P9, as well as PA and P H2O
2. Displays the programmed value for each function; the function being reviewed will be
blinking
3. Displays the value for the next function
4. Returns to the Home menu
6.4. Operating the Machine with Ten-Program Control System
On: Turns the machine on
- The machine will start up in the most-recently used program
- The pump of a machine with a transparent cover will start when the cover is closed
Off: Turns the machine off
- When pressing the button once, the symbol will start blinking and the pump will stop after
about 4 seconds
- When pressing the button a second time, the pump will stop immediately
- Closing the cover will initiate the cool-down phase; the machine will complete a number of vacuum
cycles before turning off automatically
1. Stop-function
- Stops the machine at any point in the cycle and aerates the chamber
2. Reset-function
- While programming, resets the program value to its original setting
- Press the menu button to return to the Home menu
3. Back function
- While reviewing programmed values, returns to the previous selection
Stops the active function and initiates the next step in the cycle
- While the machine is running, exits the active function and jumps to the next step in the cycle
- While packing sauce or soup, the package may be sealed as soon as product boiling is detected
Packing of
sauce/soup
Menu Button
1. Toggles between Home menu and Settings menu
2. Save Function: During programming, confirms and saves the entered program values and returns to
the Home menu
3. Return Function: Returns to the Home menu
Adjust program values and turn functions ON/OFF
1. Forward or back; adjusted values are saved right away
2. Increases or decreases function values
3. Turns functions ON/OFF; specific functions, like soft-air, clean cut seal, etc., are turned
either on or off
4. If the function is turned on, the value may be adjusted by pressing the + and – buttons
5. Resets the original value
6. Saves changes and returns to the Home menu

10.2.2015
METOS VACUUM MACHINES
12
|
Multi-Functional button: Performs various functions, depending on the active menu
Home menu:
- No effect while in the PA program
- For programs P1-9, displays the entered values
Settings menu:
- For specific functions, like soft-air, clean cut seal etc., the button is used to turn the function
ON/OFF
Programs 1 through 9
- Each program may be customized by turning certain functions on or off and by adjusting the function
values
PA - Automatic
- Program with factory settings for vacuum and sealing functions, which is activated when turning on
the machine for the first time
P H2O – Program
- To be used when packing liquids or semi-liquids, like sauces and soups (see 10.3)
- Program jumps to the sealing function as soon as product boiling is detected; this prevents product
loss through spillage and evaporation.
P1 - P9
AUTOMATIC
PA
P H2O
When turning off the machine with the button, the symbol will start blinking on the LCD
display
- The pump will stop after about 4 seconds
- Press the button a second time and the pump will stop
immediately
- Close the lid; the machine initiates the cool-down phase and per-
form a number of vacuum cycles before turning off automatically
- These additional cycles allow any moisture in the oil of the pump to evaporate. This increases the
longevity of the machine and minimizes the need for oil changes and pump maintenance
Service Symbol
- After reaching a certain number of operating hours or packing
cycles, the service symbol will briefly appear on the display when
turning on the machine. In addition, the display indicates how
many hours or cycles remain before an oil change is required.
- Except for regularly changing the oil in the pump, the machine requires little other routine mainte-
nance
- After reaching the service limit, the display will indicate the negative number of exceeded operating
hours or cycles
- To reset the service interval counters after the oil change, press and hold the button for 5 seconds

|
13
10.2.2015
METOS VACUUM MACHINES
7. Programming the Machine
7. 1 . One-Program Control System
• The One-Program control system is standard on
the T2, T3, T4, T5, M1, M3 (with 21m3 pump)
- The One-Program control system is time-based
• The Ten-Program control system (time or sensor) is optional for these models, except for T2
The One-Program control system provides only one program (P1)
• There is no memory to store additional values
• The machine starts with the values that were most-recently used
• The pump starts upon closing of the cover and stops when it is reopened
7.1.1. Programmable Functions
The following function values may be customized for P1:
• Vacuum time: in seconds
• Sealing time: in seconds
7.1.2. Programming
1. Turn the machine on by pressing the on/off button
a. The factory setting for the vacuum time is 30-40 seconds
b. The factory settings for the seal time is 2 seconds
7.1.3. Reviewing Vacuum Time and Sealing Time
1. Press the button to display the programmed vacuum time the vacuum
time is pre-set at the factory
2. Press the button to display the programmed sealing time the sealing
time is pre-set at the factory at 2 seconds
7.1.4. Adjusting Vacuum Time for P1
1. Press twice on the + or - button
- After pressing once, the programmed value is displayed
- After pressing twice, the symbol will start blinking and the value
may be adjusted
2. Save the new value by pressing the menu button
3. To retain the original value, press the button
4. Exit the program by pressing the menu button
7.1.5. Adjusting Sealing Time for P1
1. Press twice on the plus or minus button
- After pressing once, the programmed value is displayed
- After pressing twice, the symbol will start blinking and the value
may be adjusted
2. Save the new value by pressing the menu button
3. To retain the original value, press the button
4. Exit the program by pressing the menu button

10.2.2015
METOS VACUUM MACHINES
14
|
7.1.6. Turning Off Machine
1. Turn the machine off by pressing the button
2. The symbol on the display will start blinking
3. Push the button a second time and the pump will stop im-
mediately
4. If no action is taken the pump turns off after 4 seconds
5. Close the cover and the machine will initiate the cool-down phase and perform a number of vacuum
cycles while the cover stays closed and the machine will turn off automatically after about 15 minutes
• These cycles are necessary to cool down the machine and to allow any moisture in the oil of the pump
to evaporate
7.2. Ten-Program Control System
• The Ten-Program control system is standard time-based on the M2, M4-M8,
D1-D6
- sensor-based operation is an option, which can be installed at a later date
• The Ten-Program control system provides:
1. 9 customizable programs (P1-P9)
2. Program PA; this is an - Automatic Program – Pre-set at the factory at a
vacuum time of 30-40 seconds (or 5 mbar for a sensor-based program)
and a sealing time of 2 seconds
3. Program P H2O for liquid products (see page 19)
• When turning on the machine, the pump will start. After about 15 minutes of
inactivity, the pump will stop automatically
7.2.1. Programmable Functions
The following functions may be customized for each program P1-P9:
Vacuum time: in seconds or mbar (only with sensor)
Sealing time: in seconds
Vacuum Plus: on/off, in seconds
Gassing: on/off, in seconds or mbar (only with sensor)
Clean Cut Controlled (CCC) Seal: on/off, in seconds
Soft-Air: on/off, in seconds or mbar (only with sensor)
Multi-cycle: on/off, in number of cycles
7.2.2. Reviewing Function Values for P1-P9
1. Turn the machine on by pushing the button
2. The most-recently used program will be indicated, for instance P3
3. All selected functions for this program are indicated at the bottom of the display
4. To review the values for these functions, push the button; use the button to display each
function value
5. The values cannot be changed; this can only be done in the Settings menu
6. Push the button to return to the Home menu

|
15
10.2.2015
METOS VACUUM MACHINES
7.2.3. Programming and Adjusting Values for P1-P9
1. Select the program to be set up or adjusted, for instance P2
2. Push the menu button to access the Settings menu
3. All functions for the selected program are indicated at the bottom of
the display
4. Push the button to select the blinking function to be adjusted
5. Adjust the value of the selected function with the button
6. Press the button to reset all functions to their original values
7. Select the next function with the button
8. Press the menu button to save the entered values and to return to the Home menu
7.2.4. Turning Program Functions ON/OFF
The following functions can be turned ON/OFF for each program P1-P9:
Vacuum Plus: on/off, in seconds
Gassing: on/off, in seconds or in mbar (only with sensor)
Clean Cut Controlled (CCC) Seal: on/off, in seconds
Soft-Air: on/off, in seconds or in mbar (only with sensor)
Multi-cycle: on/off, in number of cycles
7.2.5. Adjusting ON/OFF Function Values
1. Press the menu button to select the Settings menu
2. Use the button to select the blinking function to be adjusted
3. For instance, the gassing function is turned off. Press the button to
turn this function on
4. Press the button to select the desired value, for instance 180 mbar
5. Press the button to reset all functions to their original values
6. Select the next function with the button
7. Push the menu button to store all selected values and to return to
the Home menu
7.2.6. Turning Off Machine
• Follow the same procedure as for the One-Program control system, as explained in 7.1.6

10.2.2015
METOS VACUUM MACHINES
16
|
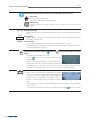
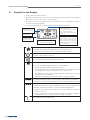
8. Symbols in the Display
• Not all symbols are visible at all times
• By default, the display will show the Home menu, indicating the program number (P1 through P9) and
digital readout for actual vacuum time or pressure (mbar)
• The symbols for all selected program functions will show at the bottom of the display. The symbol for
the active function will be blinking
• The remaining two symbols on the right-hand side will be visible when applicable
Indicator for actual vacuum pressure
or time, sealing time, etc.
In the presence of the service indica-
tor, the remaining production
hours or cycles will be briefly indicat-
ed at start up
This symbol will blink when turning
off the machine. When closing the
cover, the machine will perform a num-
ber of vacuum cycles before turning off
automatically. This allows any moisture
in the oil to evaporate
Symbols to show the active function
and the packing cycle progress
• Programs P1 thru P9
• PA Automatic (sensor)
• P H2O liquid (sensor)
Home Menu:
Default display
Settings Menu:
To adjust values for
program functions
Home Menu
• Standard default display, showing the progress of the packing cycle
• Programmed function values can be reviewed by pushing the button
Service Menu
• Factory settings; dealer access only
Settings Menu
• To enter and adjust the programmable function values
• P -Active-Program Display
• Up to 9 customizable programs may be entered and displayed
• The PA and P H2O programs are pre-set at the factory
- PA = Program Automatic: This Plug & Play program has factory settings for vacuum
and sealing functions. The pre set values are most commonly used
- P H2O program: This program is specially designed for liquid products to prevent
boiling and excessive evaporation
- P1-P9 can be individually programmed depending on the options available
• Standard Plug & Play program runs when turning on the machine for the first time
• Vacuum time or pressure, and sealing time are factory pre-set and cannot be changed
Display of the value of the active function
• Displays vacuum pressure in mbar (standard) or in % (for sensor-based applications)
• Displays remaining vacuum time in seconds (for time-based applications)
• sealing time, vacuum-plus time, soft-air time or pressure, MAP time or pressure,
multi- cycle count, etc.
• when oil change indicator is shorty shown at the start of the machine: displays re-
maining production hours or cycles before an oil change is required
• Programmable in the Settings menu

|
17
10.2.2015
METOS VACUUM MACHINES
SYMBOLS INDICATING PROGRESS OF THE PACKING CYCLE
Cycle Progress Indicator
• This symbol rotates during the packing cycle
Vacuum Process
• In the presence of a sensor, the vacuum measurement is digitally displayed.
• When operating a time-based program, the vacuum measurement is indicated by
the analog vacuum gauge
Vacuum Plus (10.4)
• With a sensor controlled machine, a number of seconds may be added to the vacu-
um process after the programmed pressure value has been reached
MAP Gassing (optional; for sensor-based operation only) (10.5)
• During the MAP (Modified Atmospheric Packaging) gassing process, the package is
vacuated down to a programmed value, for instance 600 mbar; the vacuum meas-
urement is shown in the display
• The gassing time count-down is displayed in seconds, or the increasing pressure is
displayed in mbar or %
Sealing (page 10.6)
• The package is heat-sealed for a programmable number of seconds (single-double-
clean cut)
Clean Cut Controlled Seal (optional) (10.6)
• Special sealing method, by which a second heating wire scores the package, making
it easy to remove the excess packaging material
• The additional wire is time-controlled independently; the scoring time is displayed
Soft-Air (optional) (10.8)
• The vacuum chamber is aerated more slowly. This allows the packaging material to
gradually conform to irregularly-shaped products and prevents sharp objects from
puncturing the bag
• The aeration time count-down is displayed in seconds, or the gradually increasing
pressure is displayed in mbar or %
Multi-Cycle (for MAP applications only) (10.9)
• After the package is vacuated down to the programmed value, it is gassed and revac-
uated a number of times. The objective of this procedure is to minimize the amount
of oxygen remaining in the package
• The number of cycles is counted down in the display
Cool-Down/Oil Dehumidification Phase (10.10)
• When turning off the machine with the button, the
symbol will start blinking in the LCD display and the pump
will stop after about 4 seconds
• Press the button a second time and the pump will stop immediately
• Close the lid and the machine will initiate the cool-down phase by performing a
number of vacuum cycles before turning off automatically
• These additional cycles allow any moisture in the oil of the pump to evaporate. This
increases the longevity of the machine and minimizes the need for oil changes and
maintenance

10.2.2015
METOS VACUUM MACHINES
18
|
Service Indicator: Oil Change
• After a number of operating hours or packing cycles, the
service symbol will briefly appear on the display when
turning on the machine. In addition, the display will
indicate how many hours or cycles remain before an oil change is required
• After reaching zero, the display will indicate the negative number of exceeded oper-
ating cycles or hours
• To reset the service interval counters after the oil change, press and hold the
button for 5 seconds
9. Standard Vacuum Pump Settings:
1. Pump stops after vacuum cycle
2. Pump runs continuously; stops after 15 minutes
• The pump of mobile packaging machines M1, M2 and M4, M5, M6, M7, M8, as well as the pump of
double-chamber units D1, D3, D4 and D6, runs continuously. After completion of a packing cycle, the
pump will stop after 15 minutes of inactivity.
• The pump of table units T2, T3, T4 and T5 starts when the cover is closed; the pump stops when the
cover is opened again.
• The 21m3 pump of the M3 continues to run, while the 40m3 pump stops between packing cycles
• These settings may be adjusted by the dealer in the Service menu
9.1. One-Program Control System
Stop the cycle and aerate:
• By pressing the button during the packing cycle, the active function is stopped, the chamber is
aerated and the cover opens. Subsequent functions in the cycle are cancelled
Stop the cycle and start sealing
• By pressing the of the sealing button , the vacuum function is interrupted and the program
jumps to the sealing function
9.2. Ten-Program Control System
Stop the cycle and aerate:
• By pressing the button during the packing cycle, the active function stops, the chamber is aerated,
and the cover opens. Subsequent functions in the cycle are cancelled
Stop the cycle and start sealing
• By pressing the button, the packing cycle is interrupted and the program jumps to the next func-
tion in the process

|
19
10.2.2015
METOS VACUUM MACHINES
10. Further Explanation of Packaging Concepts
10.1. Sensor-Based Control
The actual air pressure in the chamber is measured by a sensor. The result of this measurement is digi-
tally indicated on the LCD display.
Normal air pressure is about 1000 mbar. The vacuum pump of the machine reduces this to about 2-5
mbar. Depending on the program, the pressure by which certain functions need to take place can be
programmed. Examples are MAP gassing and Soft-Air.
The air pressure in time-controlled machines is indicated by the analog vacuum gauge.
10.2. Time-Based Control
• The standard control of a One-Program machine, as well as a Ten-Program machine, is time-based
• The Ten-Program time based machine can be converted into sensor-based operation by ordering the
optional sensor kit
A time-controlled machine is programmed with a time value in seconds, according to
which a desired vacuum is reached. The vacuum measurement is indicated by the analog
vacuum gauge. The reading of the analog vacuum gauge is less accurate than the digital
reading of a sensor-controlled machine.
• The Ten-Program machine can be retro-fitted with a sensor kit at a later date. The control system rec-
ognizes the sensor and will automatically switch over to sensor-based operation
• In case the sensor should fail, the machine will automatically switch over to time-based operation
10.3. P H2O Program for Liquid Products
• Only for Ten-Program machines with sensor-based control
• Specially designed for the packaging of cooled liquid products like sauces and soups at temperatures
< 150C (600F)
Under normal air pressure (1000 mbar), water boils at 100o C. At that point, water transfers rapidly from
a liquid phase to a gas phase. At lower air pressure, boiling starts at a lower temperature as well as rapid
evaporation. To avoid product loss through evaporation and spillage, the P H2O program detects the point
of boiling and initiatese sealing function in the cycle. Since air is replaced by water vapor at this point, the
oxygen content in the package will be very low.
10.4. Vacuum Plus (seconds)
• Only for Ten-Program machines with sensor-based control
• Can be turned on or off in the Settings menu
After reaching a programmed vacuum pressure, the sealing function may be delayed by adding a pro-
grammable number of seconds to the vacuum process. This enables any air to escape from porous
products.
10.5. MAP Gassing (option)
• Only for Ten-Program machines with sensor-based control
• Can be turned on or off in the Settings menu
After reaching a programmed vacuum pressure, the package is filled with an inert gas,
such as CO2, nitrogen, oxygen, or a mixture thereof. This feature is either time or pres-
sure-controlled.

10.2.2015
METOS VACUUM MACHINES
20
|
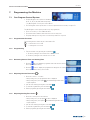
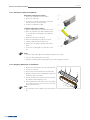
10.6. Sealing
The synthetic packaging material is melted shut by a heated sealing wire.
single seal
double seal
clean cut &
clean cut controlled
two-sided seal
• Single Seal
Only for T2. The package is sealed with a single sealing wire
• Double Seal
All other machines are equipped with a double sealing wire
• Clean Cut Seal (CC Seal)
One of the two heated wires is used to score the package. This makes it easy to remove the
excess packaging material. The package has one seal and a nicely trimmed edge.
• Clean Cut Controlled Seal (CCC Seal)
- Only for Ten-Program machines with sensor-based control
- Can be turned on or off in the Settings menu
Identical to the Clean Cut seal, with the only difference that the heating time for the scoring wire can
be programmed independently. This improves control over the scoring process. Typically used for shrink
bags.
• Two-Sided Seal
- Only for Ten-Program machines with sensor-based control
- Can be turned on or off in the Settings menu
The counter beam contains a sealing wire as well. Used for thick material or metallic packaging
materials, requiring additional heat to seal the bags.
10.7. Extra Sealing Pressure
During the sealing process, the package is held in place between the seal beam
and the counter beam. To assure a proper package seal, additional air pressure to
the sealing beam may be beneficial (maximum of 1 bar), for instance during MAP
gassing above 500 mbar.
• The M4-M8 and the D1-D6 models with the option Gas/MAP are standard
equipped with a compressed air inlet. Otherwise it can be easily retrofitted.
• Extra sealing pressure is not necessary and not available for the Table-Top, M1,
M2, M3
La pagina si sta caricando...
La pagina si sta caricando...
La pagina si sta caricando...
La pagina si sta caricando...
La pagina si sta caricando...
La pagina si sta caricando...
La pagina si sta caricando...
La pagina si sta caricando...
La pagina si sta caricando...
La pagina si sta caricando...
La pagina si sta caricando...
La pagina si sta caricando...
-
 1
1
-
 2
2
-
 3
3
-
 4
4
-
 5
5
-
 6
6
-
 7
7
-
 8
8
-
 9
9
-
 10
10
-
 11
11
-
 12
12
-
 13
13
-
 14
14
-
 15
15
-
 16
16
-
 17
17
-
 18
18
-
 19
19
-
 20
20
-
 21
21
-
 22
22
-
 23
23
-
 24
24
-
 25
25
-
 26
26
-
 27
27
-
 28
28
-
 29
29
-
 30
30
-
 31
31
-
 32
32


Metos D2 Manuale del proprietario
- Categoria
- Confezionatrici sottovuoto
- Tipo
- Manuale del proprietario
in altre lingue
- English: Metos D2 Owner's manual
