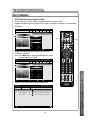
TEAC LES5572F3D Manuale utente
- Categoria
- TV LCD
- Tipo
- Manuale utente
Questo manuale è adatto anche per

LES4272F3D
LES5572F3D


The screen and cabinet get warm when the TV
is in use. This is not a malfunction.In case of
smoke, strange noise or strange smell from the
unit:
· Turn off the power switch immediately;
· Disconnect the power plug from the power
outlet;
· Contact your dealer or service centre. Never attempt to make repairs
yourself because this could be dangerous.
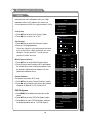
High Voltage
Do not open
Risk of electronic shock, do not open.
Do not attempt to service this product yourself
as opening or removing covers may expose
you to dangerous voltage or other hazards.
Refer all servicing to qualified service personnel.
CAUTION
Important Safety Instructions
Important Safety Instructions and Maintenance
Never push objects of any kind into the set
through the cabinet slots as they may touch
dangerous voltage points or short-circuit parts that
could result in a fire or electric shock. Never spill
liquid of any kind on the set. Use special caution
in households where children are present. The apparatus is not suitable for children
under 3-year to operate.
To reduce the risk of fire or electric shock, do not
expose this product to rain or moisture.
The apparatus shall not be exposed to dripping
or splashing and no objects filled with liquids,
such as vases, shall be placed on the apparatus.
1
If the following problems occur:
Turn off the TV set and unplug the AC power cord
immediately if any of the following problems occur.
Ask your dealer or service centre to have it checked
by qualified service personnel
When:
- AC power cord is damaged.
- Poor fitting of AC power outlet.
- TV set is damaged by being dropped, hit or having something thrown at it.
- Any liquid or solid object falls through openings in the cabinet.
Do not overload wall outlets, extension cords or
adaptors beyond their capacity, this can result in
fire or electrical shock.
Power-supply cords should be routed so that they
are not likely to be walked on or pinched by items
placed upon or against them, paying particular attention to cords at plug end, adaptors
and the point where they exit from the appliance. The mains plug is used as the
disconnect device. It shall remain readily accessible and should not be obstructed
during intended use. Make sure to plug the power cord in until it is firmly inserted.
When removing the power cord, make sure to hold the power plug when pulling the
plug from the outlet, do not pull the plug out by the wire. NEVER touch the plug or
power cord with wet hands. To disconnect the apparatus from the mains power, the
plug must be pulled out from the mains socket, therefore make sure the mains plug
is always easily accessible.
Safety Precautions
Introduction
General Description
External Connection
Basic operationMenu system
instruction
Digital Media Player
Troubleshooting
Picture defects and
the reason

Important Safety Instructions and Maintenance
Important Safety Instructions
When not in use
If you will not be using the TV set for several days, the
TV set should be disconnected from the AC mains for
environmental and safety reasons. As the TV set is not
disconnected from the AC power when the TV is turned
off at the standby switch, pull the plug from the AC power
outlet to disconnect the TV completely. However, some
TV sets may have features that require the TV set to be
left in standby to function correctly. In the case of lightning,
unplug the TV set from the outlet immediately. Never
touch the antenna wire during lightning.
An outside antenna system should not be located in
the vicinity of overhead power lines or other electric
light or power circuits, or where it can fall into such
power lines or circuits. When installing an outside
antenna system, extreme care should be taken to keep
from touching such power lines or circuits as contact
with them might be fatal.Ensuring the television is not
overhanging the edge of the supporting furniture.
Installation
The ventilation should not be impeded by covering the
ventilation opening with items, such as newspapers,
tablecloths, curtains, etc.
At least 10 cm space should be left around the
apparatus for sufficient ventilation.
The product should be situated away from heat
sources such as radiators, heat registers, stoves, or
other products (including amplifiers) that produce heat.
Place the apparatus in such a position that the screen
is not exposed to direct sunlight. It is best to have soft
indirect lighting while watching and avoid
and reflection from the screen as
these may cause eye fatigue.
Keep the TV set away from any equipment emitting
electromagnetic radiation.
completely
dark environments
Do not pull the plug out by the wire;
Never touch the plug with wet hands.
Excessive from earphones and headphones
can cause hearing loss.
volume
2
To avoid the fire, no naked flame source,
such as lighted candles, should be placed on the
apparatus.
Do not push or scratch the front filter, or place any objects on top of the TV set. The
image may be uneven or the screen may be damaged.
Safety Precautions
Introduction
General Description
External Connection
Basic operationMenu system
instruction
Digital Media Player
Troubleshooting
Picture defects and
the reason

Important Safety Instructions and Maintenance
Installation
Do not place this apparatus near water, for example,
near a bath tub, wash bowl, kitchen sink, or laundry
tub; in a wet basement; or a swimming pool; and
the like;
When the TV being moved in from cold place, it needs
some right time for dew inside unit evaporating fully
before turn on the unit;
Cleaning and handling the screen
surface and cabinet. Disconnect
the unit from the AC outlet before
cleaning. To remove dust, wipe
gently with a soft, lint free cloth. If
required use a slightly damp cloth.
Do not place the set on an unstable cart, stand, table
or shelf. The set may fall, causing serious personal
injury as well as damage to the product. Use only with
the cart, stand, tripod, bracket, or table specified by
the manufacturer, or sold with the apparatus. An
appliance and cart combination should be moved with
care. Quick stops, excessive force, and uneven
surfaces may cause the appliance and cart
combination to overturn.
To prevent injury, this apparatus must be securely
attached to the floor/wall in accordance with the
installation instructions.
3
Cleaning
Move
LED Screen
Although the LED screen is made with high precision technology and 99.99% or
more of the pixels are effective, black dots may appear or bright points of light (red,
blue or green) may appear constantly on the LED screen. This is a structural property
of the LED screen and is not a malfunction.
If the surface of the LED panel cracks, do not touch it until you have unplugged the
AC power cord. Otherwise electric shock may result.
Do not throw anything at the TV set. The LED panel may break from the impact and
cause serious injury.
Precautions When Displaying a Still Image
A still image may cause permanent damage to the TV screen.
Do not display still images and partially still images on the LED panel for more
than 2 hours as it can cause screen image retention. This image retention is
also known as "screen burn". To avoid such image retention, reduce the
degree of brightness and contrast of the screen when displaying a still image.
Watching the LED TV in 4:3 format for a long period of time may leave traces
of borders displayed on the left, right and centre of the screen caused by the
difference of light emission on the screen. Playing a DVD or a game console
may cause a similar effect to the screen. Damages caused by the above effect
are not covered by the Warranty.
Displaying still images from Video games and PC for longer than a certain
period of time may produce partial after-images. To prevent this effect, reduce
the 'brightness' and 'contrast' when displaying still images.
MAINS PLUG
Wipe the mains plug with
a dry cloth at regular
intervals. Moisture and
dust may lead to fire or
electrical shock.
Use care not to subject the TV's surfaces to detergent.
(A liquid inside the TV could lead to product failure, fire or
electrical shock.)
Use care not to subject surfaces to bug repellent, solvent,
thinner, or other volatile substances as this may deteriorate the
surface and finish of the cabinet.
solvent
thinner
Safety Precautions
Introduction
General Description
External Connection
Basic operationMenu system
instruction
Digital Media Player
Troubleshooting
Picture defects and
the reason

Table of Contents
Important Information
4
Accessories-----------------------------------------------------------------------------------------------5
Introduction-----------------------------------------------------------------------------------------------6
Features---------------------------------------------------------------------------------------------------------6
Specifications--------------------------------------------------------------------------------------------------7
Stand and wall-mounting instructions (optional)------------------------------------------------8
--------------------------------------------------------------------------------10
Overview of back panel------------------------------------------------------------------------------------10
Overview of front panel-------------------------------------------------------------------------------------11
Overview of remote control-------------------------------------------------------------------------------12
Installing Batteries in the Remote Control------------------------------------------------------------14
External Connection------------------------------------------------------------------------------14
Antenna connection----------------------------------------------------------------------------------------14
Connecting VCR -------------------------------------------------------------------------------------------15
Connecting a Camcorder---------------------------------------------------------------------------------16
Connecting a DVD Player/Set-Top Box via DVI ----------------------------------------------------17
Connecting DVD Player/Set-Top Box via HDMI ----------------------------------------------------18
Connecting Digital Audio System-----------------------------------------------------------------------19
Connecting PC ---------------------------------------------------------------------------------------------20
Supporting signals ---------------------------------------------------------------------------------------20
Basic operation---------------------------------------------------------------------------------------21
Turning the TV on and off---------------------------------------------------------------------------------21
The main interface------------------------------------------------------------------------------------------22
Applications of the TV--------------------------------------------------------------------------------------23
Menu system instruction-----------------------------------------------------------------------24
TV menu-------------------------------------------------------------------------------------------------------26
Sound----------------------------------------------------------------------------------------------------------26
Image-----------------------------------------------------------------------------------------------------------28
Program-------------------------------------------------------------------------------------------------------29
Input Source--------------------------------------------------------------------------------------------------31
3D---------------------------------------------------------------------------------------------------------------31
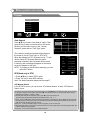
General Description
Function-------------------------------------------------------------------------------------------------------32
Time------------------------------------------------------------------------------------------------------------34
PVR-------------------------------------------------------------------------------------------------------------35
Digital Media Player --------------------------------------------------------------------------------------38
Troubleshooting -------------------------------------------------------------------------------------------42
Picture defects and the reason------------------------------------------------------------------------44
Keep small accessories out of reach of children so they are not mistakenly swallowed.
Introduction
General Description
External Connection
Basic operationMenu system
instruction
Digital Media Player
Troubleshooting
Picture defects and
the reason

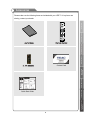
Please make sure the following items are included with your LED TV. If any items are
missing, contact your dealer.
Accessories
5
Introduction
General Description
External Connection
Basic operationMenu system
instruction
Digital Media Player
Troubleshooting
Picture defects and
the reason
Quick Start Guide
Contact Card

Features
Introduction
Input terminals used for external equipment connection
1 x CVBS output
1 x ANTENNA jack 4 x HDMI inputs
1 x computer PC-RGB input 4 x USB inputs including top mount
1 x COMPONENT input
1 x AV input 1 x SPDIF output
1 x Headphone output
l 42”/55” TFT display screen
l Zero X radiation complies to green environment protection requirement
l Connect to computer directly to realize TV/monitor combo.
l HDMI MHL 2.0
l Android4.2
l 1 x USB 3.0, 3 x USB 2.0(top usb for webcam mounting only)
l 16:9 wide screen
l Auto tuning and fine tuning
l 4 x HDMI inputs
l Component Compatible (480i; 480P; 576i; 576P; 720P; 1080i; 1080P)
l VGA input
l Programmable sleep timer
l Wide range voltage input
l No-signal automatic power off
LED
6
Introduction
General Description
External Connection
Basic operationMenu system
instruction
Digital Media Player
Troubleshooting
Picture defects and
the reason

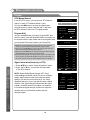
Note:
- Design and specifications are subject to change without notice.
- Weight and Dimension shown are approximate.
o
- It is suggested to watch 3D program under the operation temperature above 10 C to
obtain the best 3D effect.
Introduction
Specifications
7
Analog: Antenna:
46.25MHz-855.25MHz
Digital:5-12, 21-69
PAL / NTSC / SECAM
³5 X2W
90W
o o
0 C-40 C
<0.5W
~110-240V, 50/60Hz
75 ohms, unbalanced
42” Diagonal (max.)
Display size
LED panel resolution
Power supply
TV receive system
Frequency range
Video in
Antenna Input
Speaker output power
Power consumption
Standby consumption
Work Temperature
Model
Controller power
DC 3V
(Two AA size batteries)
1920X1080
958X52X566mm
16Kg
958X250X623mm
LES4272F3D
Digital: DVB-T
Analog: PAL: BG, I, DK,
SECAM: BG, D/K
14Kg
120W
55” Diagonal (max.)
LES5572F3D
20.5Kg
24kg
1240X55X726mm
1240X275X786mm
Introduction
General Description
External Connection
Basic operationMenu system
instruction
Digital Media Player
Troubleshooting
Picture defects and
the reason

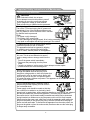
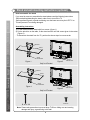
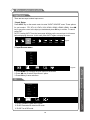
Stand and wall-mounting instructions (optional)
How to assemble the stand
-Before attaching/detaching the stand, make sure to turn off the TV.
-Before performing work, spread cushioning over the base area to lay the LED TV on.
This will prevent it from being damaged.
Assembling instruction:
1) Fix the bracket and the stand with four screws .(figure 1)
2) Put the television on the table, fix the stand and the unit with screws given in the carton.
(Figure 2)
- To disconnect the stand from the TV, perform the above steps in reverse order.
If you need to remove or assemble the stand please read the following instructions.
8
Figure 1
Figure 2
Screw
B-ST4*20x4
Screw
B-M4*10x4
Bracket
Stand
Figure 2
Screw
B-M4*10x5
Figure 1
Screw
B-ST4*20x4
Bracket
Stand
Only for 42”model
Only for 55”model
B- ST4*20
B-M4*10
Introduction
General Description
External Connection
Basic operationMenu system
instruction
Digital Media Player
Troubleshooting
Picture defects and
the reason
Note: Please take precautions to prevent large TVS from falling over and causing
damage and injury, eg anchoring to the wall.

99
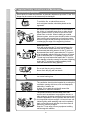
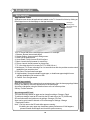
Stand and wall-mounting instructions (optional)
Only for 55” model
Only for 42” model
Mounting instruction:(Only for 42” model)
Your LED TV is able to wall mounting with the use of a wall mounting bracket(not supplied with LED
TV), and the mounting holes on the back of the unit. After detaching the stand:
1.Find the four mounting holes where you want to mount according to wall mounting bracket ③
and drill these four mounting holes on the wall.
2.Drive Nylon sleeves ② into the mounting holes on the wall tightly.
3.Fasten wall mounting bracket ③ on the Nylon sleeves with self-tapping screws ④;
4.Fasten screws ⑤ into the two screw holes on the rear cabinet;
5.Tighten bolt ⑦ on the bottom of the rear cabinet with screws ⑨,then put rubber gaskets ⑧ on
the bolt ⑦;
6.Left the TV and hang it on the wall.
400mm
400mm
①.Wall ②.Nylon sleeve (4 piece) ③.Wall mounting bracket(1 piece)
④.Self-tapping screw(4 piece) ⑤.Mounting Screw (2 piece) ⑥.Rear cabinet ⑦.Bolt
⑧.Rubber gaskets (2 piece) ⑨.Screw (2 piece)
(optional)
Your LED TV is able to accommodate wall mounting with the use of a wall mount bracket
(not supplied with LED TV, please contact your local hardware store) and the mounting
holes on the back of the unit. We recommend removing the TV stand prior to wall mounting
the TV. Please
Mounting instruction:(Only for 55” model)
1.After detaching the stand, fasten 4 mounting screws into the 4 screw holes on the rear cover, see the
figure below.
2.Fasten wall mounting bracket with screws on the wall.
3.Carefully check for the strength before releasing the LED TV.
Note:
1. Please ensure that the wall used for mounting can sustain the Tv’s weight.
2. Be careful not to scratch panel and TV cabinet when your fasten the screws on the TV.
Wall mounting instructions
see previous page for instructions on removing the stand.
Introduction
General Description
External Connection
Basic operationMenu system
instruction
Digital Media Player
Troubleshooting
Picture defects and
the reason

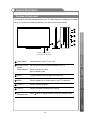
General Description
10
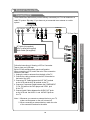
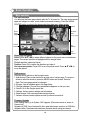
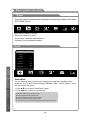
Overview of back panel
You can connect the TV with video devices such as DVD/VCD player, VCR and video camera
to enjoy the high quality picture.
SPDIF
Headphone
Microphone
Video output
SD card
(max 64GB)
USB 3
(USB 3.0)
USB 2
USB 1
USB 1
USB 2
USB 3
(USB 3.0)
SPDIF
Pr
Pb
Y/V
L
R
MIC
VIDEO
COMPONENT/AV IN
VGA AUDIO
ANT
HDMI4 HDMI3 HDMI2 HDMI1(MHL)
PC
Camcorder
DVD player
PC (HDMI-output)
Blu-ray disc player
DVD player
General Description
External Connection
Basic operationMenu system
instruction
Digital Media PlayerTroubleshooting
Picture defects and
the reason
Ethernet(LAN)

General Description
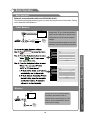
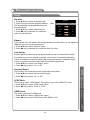
Overview of front panel
11
The buttons on the lower-left panel control your TV’s basic features, including the on-screen
menu. To use the more advanced features, you must use the remote control.
INPUT
MENU
PROG
VOL
1
2
3
4
5
VOLv/w
Press to increase or decrease the volume.
6
7
Press button to toggle between normal and standby mode.
Standby button
Remote Control
Sensor
Power Indicator Green: In power on mode.
Red: In standby mode.
Power Switch
Press this button to turn TV on or off.
Aim the remote control towards this spot on the TV.
INPUT
Toggles between all the available input sources.
MENU
Press to display an on-screen menu of your TV's features.
PROGr/s
Press to change programs.
General Description
External Connection
Basic operationMenu system
instruction
Digital Media Player
Troubleshooting
Picture defects and
the reason
Remote control sensor
(keep clear of obstacles)

12
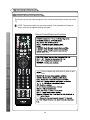
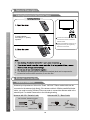
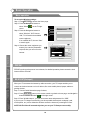
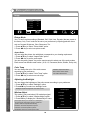
Overview of Remote Control
General Description
The remote control uses Infrared signals. Point it at the Infrared sensor at the front of the
TV.
NOTE: The remote control may not work correctly if it is operated out of range or
angle, of if there are objects blocking the signal.
Remote Control Buttons and Functions
General Description
External Connection
Basic operationMenu system
instruction
Digital Media Player
Troubleshooting
Picture defects and
the reason
Cycle through HDMI Modes 1-4.
Co to Home Page directly.
Press to display the OSD menu or return to last
level.

13
Overview of Remote Control
General Description
General Description
External Connection
Basic operationMenu system
instruction
Digital Media Player
Troubleshooting
Picture defects and
the reason
Remote Control Buttons and Functions
Fast Rewind/Fast Forward up to 32x.
OSC: Start/stop virtual mouse.
Virtual mouse (on screen pointer)
OSC:Press to turn on/off the pointer.
▲▼◀▶:Move the pointer on the screen.
OK:Click on the object that the pointer is pointing to.

Installing Batteries in the Remote Control
General Description
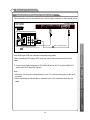
Antenna connection
Antenna input impedance of this unit is 75ohm. VHF/UHF 75ohm coaxial cable can be
connected to the antenna jack directly, if the antenna cable is 300ohm parallel flat feeder
cable, you need to use the 300ohm/75ohm converter to connect the antenna cable to the
antenna jack. For details Please refer to the following drawing.
Use a 75ohm - 300ohm converter
300ohm coaxial cable
Antenna feeder
ANT IN
75ohm coaxial cable
Antenna cable
Antennas with 300 W flat twins Leads
Antennas with 75 W Round Leads
External Connection
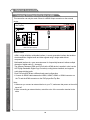
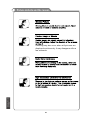
Installing BatteriesInstalling Batteries
Point the remote towards the remote
control sensor of the TV and use it
within 8 meters.
Put the used batteries into the recyc-
ling bin since they can negatively
affect the environment.
The batteries (battery pack or batteries installed) shall not be exposed to
excessive heat such as sunshine, fire or the like.
14
General Description
External Connection
Basic operationMenu system
instruction
Digital Media PlayerTroubleshooting
Picture defects and
the reason
2.Insert batteries
according to +/- polarity
symbols.

External Connection
15
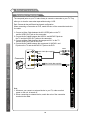
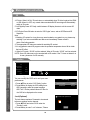
Connecting VCR
These instructions assume that you have already connected your TV to an antenna or a
cable TV system. Skip step 1 if you have not yet connected to an antenna or a cable
system.
VCR Rear Panel
Follow the instructions in Viewing a VCR or Camcorder
Tape to view your VCR tape.
Each VCR has a different back panel configuration.
When connecting a VCR, match the color of the connection
terminal to the cable.
1. Unplug the cable or antenna from the back of the TV.
2. Connect the cable or antenna to the ANT IN terminal on
the back of the VCR.
3. Connect an RF Cable between the ANT OUT terminal
on the VCR and the ANT IN terminal on the TV.
4.
jack
on the TV.
5. Connect Audio Cables between the AUDIO OUT jacks
on the VCR and the AUDIO L and AUDIO R jacks on
the TV.
Note: 1. Whenever you connect an external device to your TV,
make sure that power on the unit is turned off.
2. When connecting an external device, match the color
of the connection terminal to the cable.
Connect a Component Cable between the COMPONENT
[Y, Pb, Pr] jacks on the DVD player and YPbPr
TV Rear Panel
White
Red
Red
White
ANT
ANT OUT S-VIDEO
AUDIO OUT
Red
Blue
Green
VIDEO OUT
2
1
3
Audio Cable (Not supplied)
YPbPr cable( supplied) Not
RF Cable (Not supplied)
1 2
3
Green
Blue
Red
USB 1
USB 2
USB 3
(USB 3.0)
SPDIF
Pr
Pb
Y/V
L
R
MIC
VIDEO
COMPONENT/AV IN
VGA AUDIO
ANT
HDMI3 HDMI2 HDMI1(MHL)
External Connection
Basic operationMenu system
instruction
Digital Media Player
Troubleshooting
Picture defects and
the reason

External Connection
Connecting a Camcorder
16
The rear panel jacks on your TV make it easy to connect a camcorder to your TV. They
allow you to view the camcorder tapes without using a VCR.
Each Camcorder has a different back panel configuration.
When connecting a Camcorder or DVD, match the color of the connection terminal to
the cable.
1. Connect a Video Cable between the AV1 VIDEO jacks on the TV
and the VIDEO OUT jack on the camcorder.
2. Connect Audio Cables between the AUDIO L and AUDIO R jacks on
the TV and the AUDIO OUT jacks on the camcorder.
3. Connect a Video Cable between the component IN Y on the TV
and the VIDEO OUT jack on the DVD.
4. Connect Audio Cables between the component IN AUDIO L and
R jacks on the TV and the AUDIO OUT jack on the DVD.
Note:
1. Whenever you connect an external device to your TV, make sure that
power on the unit is turned off.
2. When connecting an external device, match the color of the connection
terminal to the cable.
Video Cable (Not supplied)
1
Audio Cable (Not supplied)
2
Camcorder
White
Y
l
e
low
Red
Red
White
USB 1
USB 2
USB 3
(USB 3.0)
SPDIF
Pr
Pb
Y/V
L
R
MIC
VIDEO
COMPONENT/AV IN
External Connection
Basic operationMenu system
instruction
Digital Media PlayerTroubleshooting
Picture defects and
the reason
La pagina si sta caricando...
La pagina si sta caricando...
La pagina si sta caricando...
La pagina si sta caricando...
La pagina si sta caricando...
La pagina si sta caricando...
La pagina si sta caricando...
La pagina si sta caricando...
La pagina si sta caricando...
La pagina si sta caricando...
La pagina si sta caricando...
La pagina si sta caricando...
La pagina si sta caricando...
La pagina si sta caricando...
La pagina si sta caricando...
La pagina si sta caricando...
La pagina si sta caricando...
La pagina si sta caricando...
La pagina si sta caricando...
La pagina si sta caricando...
La pagina si sta caricando...
La pagina si sta caricando...
La pagina si sta caricando...
La pagina si sta caricando...
La pagina si sta caricando...
La pagina si sta caricando...
La pagina si sta caricando...
La pagina si sta caricando...
La pagina si sta caricando...
-
 1
1
-
 2
2
-
 3
3
-
 4
4
-
 5
5
-
 6
6
-
 7
7
-
 8
8
-
 9
9
-
 10
10
-
 11
11
-
 12
12
-
 13
13
-
 14
14
-
 15
15
-
 16
16
-
 17
17
-
 18
18
-
 19
19
-
 20
20
-
 21
21
-
 22
22
-
 23
23
-
 24
24
-
 25
25
-
 26
26
-
 27
27
-
 28
28
-
 29
29
-
 30
30
-
 31
31
-
 32
32
-
 33
33
-
 34
34
-
 35
35
-
 36
36
-
 37
37
-
 38
38
-
 39
39
-
 40
40
-
 41
41
-
 42
42
-
 43
43
-
 44
44
-
 45
45
-
 46
46
-
 47
47
-
 48
48
-
 49
49


TEAC LES5572F3D Manuale utente
- Categoria
- TV LCD
- Tipo
- Manuale utente
- Questo manuale è adatto anche per
in altre lingue
- English: TEAC LES5572F3D User manual
Documenti correlati
Altri documenti
-
Philips 32PHT4002/40 Manuale utente
-
Haier LE32T3 Manuale utente
-
Hyundai E320D Manuale utente
-
Toshiba REGZA AV55 DIGITAL-Serie Manuale utente
-
Zenith H27E55DT Istruzioni per l'uso
-
-
Hitachi P42H01E Manuale utente
-
-
-
Hitachi P42A01 Manuale utente