
6PDUW9LGHR'RRUEHOO
%DWWHU\3OXV&KLPH.LW
,QVWUXFWLRQ0DQXDO
%#

Welcome to the Smart Home Family!
Thank you for choosing “Smart Video Doorbell (Battery Plus) & Chime Kit”. It is a smart video
doorbell and chime kit that provides a safe, easy and cost-effective solution to see and talk
to the person at your door remotely on a mobile device. Please take the time to unpack and
familiarize yourself with the included parts and this instruction manual to learn the easy steps
required to setup your “Smart Wi-Fi Doorbell”.
Disclaimer
This instruction manual has been reviewed thoroughly and has been designed to ensure that
your product setup will be quick and easy with our handy guide. All statements, technical
information and recommendations in this manual are believed to be reliable, but the
accuracy and completeness thereof are not guaranteed or warranted.
The specications and information regarding the products in this document are subject to
change without further notice.
Photocopy, copy, reproduction, translation to any language, modication, storage in a
retrieval system or retransmission, in any form or by any means, electronic, mechanical or
otherwise, is strictly prohibited without written permission.
In no event we are liable for any indirect, special, incidental or consequential damages,
including, without limitation, monetary loss or loss or damage to data arising out of the use
or inability to use this document, even if the product has been advised of the possibility of
such damages.

Contents
In the Box ....................................................................................................................................................... 1
Getting to Know Your Smart Video Doorbell ....................................................................................... 1
Getting to Know Your Wireless Chime ................................................................................................... 2
Getting Started ............................................................................................................................................. 2
Operating Requirement ........................................................................................................................ 2
Downloading the App ........................................................................................................................... 3
Adding Device .................................................................................................................................... 3~6
App Operation .............................................................................................................................................. 7
Main Page ................................................................................................................................................. 7
Doorbell Settings ..................................................................................................................................... 7
Chime Settings ......................................................................................................................................... 8
Add New Chime ....................................................................................................................................... 9
About Device .......................................................................................................................................... 10
Answering Your Door ............................................................................................................................... 11
History .......................................................................................................................................................... 12
Account Management ............................................................................................................................. 14
My shares .................................................................................................................................................... 15
Specification ................................................................................................................................................ 17

1
In the Box
In the Box
Smart Video Doorbell x 1 Bracket x 1
Double-Sided Tape x 1
Screw Kit x 1
Battery of Doorbell x 3
Wireless Chime x 1
Smar t Video Doorbell x 1 Bracket x 1
Double-Sided Tape x 1
Wireless Chime x 1 Battery of Doorbell x 3
Screw Kit x 1
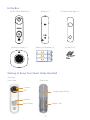
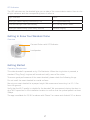
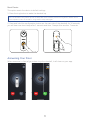
Getting to Know Your Smart Video Doorbell
Overview
Front View Rear View
Overview
Camera
MIC
Indicator
Ring Button
Battery Slot
Configuration Button
Camera
Conguration Button
Battery Slot
MIC
Indicator
Ring Button

2
LED Indicators
The LED indicators on the doorbell give you an idea of the current device status. Here is a list
of light indicators and the corresponding status it refers to.
Light indicator Status
Blue light ashes rapidly (once every 0.2s) Wi-Fi signal searching
Blue and red light ash alternatively Wi-Fi conguration mode
Blue light ashes slowly (once every second) Doorbell ringing
Getting to Know Your Wireless Chime
Overview
Power On
Wireless Chime
Connect Button with LED Indicator
Loudspeaker
Getting Started
Operating Requirement
This video doorbell is powered on by 3 AA batteries. When the ring button is pressed, a
standard “Ding Dong” ringtone will sound and notify users of the visitor.
To ensure good performance of the smart doorbell, please check the following things:
Do not install the smart doorbell on metal surfaces.
Mount your smart doorbell at a proper height. We recommend mounting it at 1.2~1.3m
from the ground.
Verify that the Wi-Fi quality is suitable for the doorbell. We recommend closing the door to
do a Wi-Fi speed test in the installation location to conrm that the upload speed is at least
2Mbps.
The app is available for iOS 8.0 or above with iPhone 5 or newer and Android 5.0 or above.

3
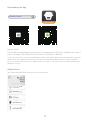
Downloading the App
Network Configuration
1. Download App from App Store or Google Play and register an account.
Available for iOS 8.0 or above with iPhone 5 or newer and Android 5.0 or above
Smart WiFi Doorbell
smanos home
Signing Up/In
If you have not registered an account with us, please press “Sign up” just below the “Sign in”
icon on the app. Then follow the instructions to create your account.
* If you do not receive an account verication code in your email inbox during the registration process,
please check your spam/junk folder to see if the notice has been blocked by your service provider.
Once you have an account with us, please select the “Sign in” icon and enter your email address and
password to log in.
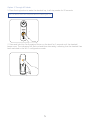
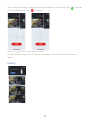
Adding Device
Tap "Smart Doorbell DB30" and start to set the device up.
3. Follow the instructions to connect the
device to your home WiFi network.
* 5GHz network is NOT supported! Please make sure
your phone connects to a 2.4GHz network before
configuration.
2. Press the ring button to wake the doorbell
up. It will stay awake for 20 seconds.
Note: The device enters into sleep state after the
indicator goes out.
Note:
The
device
enters
into
sleep
state
in
d
icator goes out
.

4
Putting the Doorbell into WiFi Conguration Mode
There are two options to add the device to your smart phone.
Option 1: Smart Cong
The faster and recommended way to get a device added. The device will be added to the
same network that your smart phone is currently connected to.
Please note: only 2.4 GHz network is supported.
1. Press the ring button to wake the doorbell up, it will stay awake for 20 seconds.
Note: The device enters into sleep state after the indicator goes out.
How to Reset the Doorbell?
1. Press the ring button to wake the doorbell up.
2. Press and hold the configuration button on the rear side of the doorbell for 10 seconds until 2 beeps are
heard.
2. Press the Conguration Button on the back for 3 times until two beeps are heard. Then
input the Wi-Fi password of the network your smart phone is currently connected to. The
doorbell will be ready to go after a minute or two.
How to Reset the Doorbell?
1. Press the ring button to wake the doorbell up.
2. Press and hold the configuration button on the rear side of the doorbell for 10 seconds until 2 beeps are
heard.

5
Option 2: Through AP Mode
1. Press the ring button to wake the doorbell up, it will stay awake for 20 seconds.
Note: The device enters into sleep state after the indicator goes out.
How to Reset the Doorbell?
1. Press the ring button to wake the doorbell up.
2. Press and hold the configuration button on the rear side of the doorbell for 10 seconds until 2 beeps are
heard.
2. Press and hold the Conguration Button on the back for 3 seconds until the doorbell
beeps once. The indicators will ash red and blue alternately, indicating that the doorbell has
been switched to the Wi-Fi conguration mode.
How to Reset the Doorbell?
1. Press the ring button to wake the doorbell up.
2. Press and hold the configuration button on the rear side of the doorbell for 10 seconds until 2 beeps are
heard.

6
3. Connecting the Doorbell to Your Smart Phone
NOTE: Android users may need to disable cellular (mobile) data before proceeding to this step. This setting is
normally found in your smart phone settings under Data Usage, or Mobile Networks.
If you're unable to nd the setting location, we suggest searching on Google with the following syntax: Disable (Phone
Model) cellular data.
Go to your smart phone Wi-Fi settings, and select “Smart Doorbell” to connect to the
doorbell. Your smart phone is now the control center of your doorbell.
4. Entering Wi-Fi Details for the Doorbell
Pick your home Wi-Fi network from the drop-down box listed on the app. Then enter the
Wi-Fi network password. The doorbell will connect to the selected Wi-Fi network. This
binding process should take about three minutes.

7
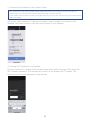
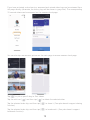
App Operation
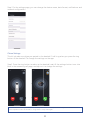
Main Page
Checking device status after setting up
If you have activated a cloud service,
answered and missed video clips can
be reviewed from the history directly
(otherwise, the video clips will be
shown in gray color). The correspond-
ing 15-second videos can be accessed
on the cloud recording page.
Yo u can activate the cloud plan from:
App Control Cloud Plan
Tap to share
the video clip
Navigation menu
Battery bar
History
Navigation menu
Battery bar
History
Tap to share
the video clip
Battery bar
Wake up the doorbell to check the real-
time battery status (when doorbell is in
dormant state, battery bar is not visible in
this interface)
Share
Click the selected video to load, after
loading, click the share icon in the upper
right corner to share the video clip.
History
View the visiting history if smanos cloud is
enabled
Doorbell Settings
Step 1: Press the ring button to wake the doorbell up. When the settings button turns blue in
the answering call page, tap on it to change the settings.
Note: The doorbell is only woken up from its sleep state when someone presses the ring button. If there are no
further operation within 20 seconds, it will go back to sleep state again.

8
Step 2: In the settings page, you can change the device name, date format, notications and
network conguration.
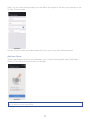
Chime Settings
This kit includes one chime pre-paired to the doorbell. It will ring when you press the ring
button of the doorbell. To change the settings on the app:
Step1. Press the ring button to wake up the doorbell, wait till the settings button turns into
blue in the answering call page, and tap on it to change the settings.
Note: The doorbell is only woken up from its sleep state when someone presses the ring button. If there are no
further operation within 20 seconds, it will go back to sleep state again.

9
Step 2. In the chime settings page, you can adjust the ringtone, volume, light settings or the
Do Not Disturb mode.
If you have activated a cloud service,
answered and missed video clips can
be reviewed from the history directly
(otherwise, the video clips will be
shown in gray color). The correspond-
ing 15-second videos can be accessed
on the cloud recording page.
Yo u can activate the cloud plan from:
App Control Cloud Plan
Tap to share
the video clip
Navigation menu
Battery bar
History
Do Not Disturb mode: all linked chimes will not ring during a user dened period.
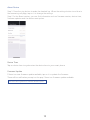
Add New Chime
To pair the wireless chime to your doorbell, go to [Chime Settings] and select [Add New
Chime]. Then follow the instructions on the app.
Note: You can press and hold the chime button for 5 seconds to disconnect the chime to the doorbell. The chime
light will ash twice when disconnected.

10
About Device
Step 1. Press the ring button to wake the doorbell up. When the settings button turns blue in
the answering call page, tap on it to change the settings.
Step 2. In the About section, you can nd information such as rmware version, device time,
rmware updates and the device reset option.
Device Time
Tap on device time to synchronize the device time to your smart phone.
Firmware Update
If there is a new rmware update available, tap on it to update the rmware.
There will be notication prompt on the app if there is a rmware update available.
Note: Press the ring button to wake the doorbell up rst.

11
Reset Device
This option resets the device to default settings.
1. Press the ring button to wake the doorbell up.
Note: The doorbell is only woken up from its sleep state when someone presses the ring button. If there are no
further operation within 20 seconds, it will go back to sleep state again.
2. Press and hold the conguration button on the rear side of the doorbell for 10 seconds,
you will hear one short beep after 3 seconds and then 2 beeps after another 7 seconds.
How to Reset the Doorbell?
1. Press the ring button to wake the doorbell up.
2. Press and hold the configuration button on the rear side of the doorbell for 10 seconds until 2 beeps are
heard.
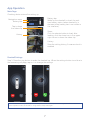
Answering Your Door
When someone in front of your door rings the doorbell, it will show on your app:

12
After loading successfully, it will show an image snapshot of the situation. Tap [ ] to speak
to the ringer directly or tap [
] to decline.
Hold the [ ] button to talk with your visitor.
You can also take screenshots during the conversation. It will be saved to your phone's
album.
History

13
If you have activated a cloud service, answered and missed video logs can be reviewed from
this page directly (otherwise, the history logs will be shown in gray color). The corresponding
15-second videos can be accessed on the smanos cloud page.
You can also tap user account picture on the main page to access smanos cloud page.
Tap[ ] to pick a specic day to lter videos.
Tap the edit icon [
] and then tap [ ] to delete the selected video.
Tap the selected video clip, and then tap [
] to share it. (Free plan doesn't support sharing
function).
Tap the selected video clip, and then tap [
] to bookmark it. (Free plan doesn't support
bookmark function).

14
Account Management
Editing Account
Tap user account picture on the main page to access account management.
Tap the picture to add or replace your prole image by taking a picture or choosing a picture
from your phone's album.
To change your account name, tap the [
] button to enter a new name.
A password change can also be done on this page.
Payment Method(For Android App Only)
You can access payment methods available for smanos cloud plans here.
My Orders
You can nd all the purchased or unprocessed smanos cloud orders in this section.
For iPhone users, you can nd the purchase record or edit your Subscription by tapping your
prole icon in the App Store app, then nd “Manage Subscriptions” on the same screen.
Delete Account
You can delete your account here. All your account information, shared settings, subscription
plans will be permanently removed.

15
My Shares
Sharing Device(s) with Family or Friends
In the “My Shares” page, tap the [+] button to share access to your device(s) with other
registered accounts.
Enter the email address and a nickname for the account you want to share with. Then select
the device(s) and access setting(s).
Access Setting
There are two types of granted access: administrator and user.
Admin (Full Access)
Admins (Full Access) will be able to do everything the owner can except for re-sharing the
device to others.
Important: For your safety, only grant admin access to the people you trust.
User (Read Only)
Users (Read Only) will only be able to edit the name of the device(s) and receive alerts. Re-
sharing the device(s) and changing the settings are not permitted.
(1) By Day of the Week
Select the day(s) and schedule you want the device(s) to be accessible to the account you
share with.

16
(2) By Date
The family and/or friend(s) you share with would have access to your device(s) during the
selected time period.
Stop Sharing
To remove access to the device you have shared, tap stop sharing. Then tap “√” on the top
right to save.

17
Specication
Doorbell
Model: DB-30
Power supply:
AA 1.5V Alkaline batteries x 3 pcs
Image sensor:
1/4-inch,1-megapixel CMOS sensor
Video quality: 1280x720
Field of view: 80 degrees
Night vision & motion detection: No
Wi-Fi: 802.11 b/g/n (2.4G)
Radio frequency: 868MHz or 915MHz
* Europe: 868MHz, Australia: 915MHz
Security: 128-bit AES with TLS/SSL
EIRP(dBm).Max: 15.18
ERP (dBm).Max: -11.49
Operation condition:
Temperature: -10°C to 50°C
Humidity:<90% RH (non-condensing)
Dimensions: 147 x 40 x 35 mm (L x W x H)
Wireless Chime
Model: WL-C100
Power supply: 110-240V AC
Radio frequency: 868MHz or 915MHz
* Europe: 868MHz, Australia: 915MHz
Operating condition:
Temperature: 0 °C to 50°C
Humidity:<80% RH (non-condensing)
Dimensions:
90 x 90 x 36 mm (no include the plug part)
La pagina sta caricando ...
La pagina sta caricando ...
La pagina sta caricando ...
La pagina sta caricando ...
-
 1
1
-
 2
2
-
 3
3
-
 4
4
-
 5
5
-
 6
6
-
 7
7
-
 8
8
-
 9
9
-
 10
10
-
 11
11
-
 12
12
-
 13
13
-
 14
14
-
 15
15
-
 16
16
-
 17
17
-
 18
18
-
 19
19
-
 20
20
-
 21
21
-
 22
22
-
 23
23
-
 24
24


in altre lingue
- English: Smanos DB-30 User manual
- français: Smanos DB-30 Manuel utilisateur
- Nederlands: Smanos DB-30 Handleiding
Documenti correlati
Altri documenti
-
Legrand NDBUS Guida d'installazione
-
Ubiquiti UniFi Protect UVC-G4-Doorbell Guida Rapida
-
Comelit Visto Technical Manual
-
Silvercrest 284941 Assembly, Operating And Safety Instructions
-
DEXAPLAN VT 623 - 9-10-2007 Manuale utente
-
-
Byron DIC-23312 Instructions Manual
-
Abus FUSG35010A Manuale utente
-
Schwaiger HSA600 532 Manuale utente
-
Xavax Feel Safe - 111982 Manuale del proprietario