
00186347
00176933
TS36E
Outdoor Sensor
Außensensor
Operating Instructions
Bedienungsanleitung
Mode d‘emploi
Instrucciones de uso
Руководство по эксплуатации
Istruzioni per l‘uso
RUS
GB
D
E
F
I
Alllistedbrands are trademarksofthe correspondingcompanies.
Errors andomissions excepted,and subjec ttotechnicalchanges.
Ourgeneral ter msofdeliveryand paymentare applied.
00186347_00176933/01.21
Hama GmbH &CoKG
86652 Monheim/Germany
Service &Support
www.hama.com
+49 9091 502-0
DG
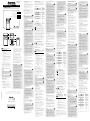
G Operating instruction
Controls and Displays
AMeasuring station
1. Display (on front side)
=Displays temperature, humidity and
current channel.
2.
LED indicator (on front side)
=Flashes when signals aretransmitted.
3. Wall mount
=For mounting the sensor on walls.
4. Set the transmission CHANNEL (1-3)
=Input channel for the weather station.
Set the channel beforeinserting the
batteries.
5. Battery compartment
=Unit requires 2pcs. UM-4 or “AAA”
1.5V batteries.
Thank you for choosing aHama product.
Take your time and read the following
instructions and information completely.
Please keep these instructions in asafe place
for futurereference. If you sell the device,
please pass these operating instructions on to
the new owner.
1. Explanation of Warning Symbols
and Notes
Warning
This symbol is used to indicate safety
instructions or to draw your attention to
specichazards and risks.
Note
This symbol is used to indicate additional
information or important notes.
2. Package Contents
• TS36E Outdoor Sensor
• These operating instructions
3. Safety Notes
• The product is intended for private, non-
commercial use only.
• Do not operate the product outside the
power limits given in the specications.
• Do not use the product in moist
environments and avoid splashes.
• Do not use the product in the immediate
vicinity of heaters or other heat sources or
in direct sunlight.
• Do not use the product in areas wherethe
use of electronic devices is not permitted.
• Do not put the product near interference
elds, metal frames, computers, TVs, etc.
Electronic devices and window frames
can negatively affect the product’s
functionality.
• Do not drop the product and do not
expose it to any major shocks.
• Do not open the device or continue to
operate it if it becomes damaged.
• Do not attempt to service or repair the
product yourself.Leave any and all service
work to qualied experts.
• Keep the packaging material out of
the reach of children due to the risk of
suffocation.
• Dispose of packaging material immediately
according to locally applicable regulations.
• Do not modify the product in any way.
Doing so voids the warranty.
Warning –Batteries
• When inserting batteries, note the
correct polarity (+ and -markings) and
insert the batteries accordingly.Failure
to do so could result in the batteries
leaking or exploding.
• Only use batteries (or rechargeable
batteries) that match the specied type.
• Beforeyou insert the batteries, clean the
battery contacts and the polar contacts.
• Do not allow children to change
batteries without supervision.
• Do not mix old and new batteries or
batteries of adifferent type or make.
• Remove the batteries from products
that arenot being used for an extended
period (unless these arebeing kept
ready for an emergency).
• Do not short-circuit batteries.
• Do not charge batteries.
• Do not throw batteries in a re.
• Keep batteries out of the reach of
children.
• Never open, damage or swallow
batteries or allow them to enter the
environment. They can contain toxic,
environmentally harmful heavy metals.
• Immediately remove and dispose of
dead batteries from the product.
• Avoid storing, charging or using the
device in extreme temperatures and
extremely low atmospheric pressure(for
example, at high altitudes).
4. Getting started
• Open the battery compartment (5) and
insert two AAA batteries observing the
correct polarity.
• Inside the battery compartment, you will
also nd the channel switch (4) that allows
you to switch between channels „CH1,
CH2 and CH3“.
• Move the channel switch to the desired
channel. The display (1) shows CH1,
CH2 or CH3.
Then close the battery compartment cover.
Replacing the batteries
• Open the battery compartment (5), remove
and properly dispose of the dead batteries
and insert two new AAA batteries with
the correct polarity.Then close the battery
compartment cover.
Note
Beforeuse, make surethat you insert the
batteries in the measuring station rst and
then in the base station.
5. Installation
Note –Installation
• We recommend initially placing the base
and measuring stations in the intended
locations without installing them and
making all the settings described in
6. Operation.
• Only install the stations once the
appropriate settings have been made
and astable wireless connection is
established.
Note
• The wireless transmission range
between the measuring and base
stations is up to 30 metres in open
spaces. Beforeinstallation, ensure
that wireless transmission will not be
disrupted by interference or obstacles
like buildings, trees, vehicles, high-
voltage lines, etc.
•
Befor
et
he
nal
installation,
ensur
et
hat
ther
ei
ss
u
cient
re
ception
between
the
intended installation locations.
• When installing the measuring station,
ensurethat it is protected from direct
sunlight and rain.
• The international standardheight for
measuring air temperatureis1.25 m
(4 ft) above ground.
Warning –Batteries
• Buy special or suitable installation
material from aspecialised dealer for
wall-mounting.
•
Ensur
et
hat
no
faulty
or
damaged
parts
ar
ei
nstalled.
• Never apply force during installation.
This could damage the product.
• Beforeinstallation, ensurethat the
chosen wall is suitable for the weight
to be installation, and make surethat
thereare no electrical wires, water,
gas or other lines in the wall at the
installation site.
• We recommend installing the measuring
station securely on an outdoor wall.
• Install an anchor,screw,nail, etc. in the
wall of your choice.
• Hang the measuring station using the
opening intended for this purpose (3).
6. Operation
6.1. Connection to the measuring station
• To connect the base station and the
measuring station, place the two devices as
close together as possible.
• After you insert the batteries, the base
station automatically searches for a
connection to the measuring station and
performs initial setup.
• If the device does not connect
automatically,the manual search program
on the base station must be started.
Note
• Initial setup takes approximately
3minutes.
• During the connection attempt, the
radio symbol and the LED indicator (2)
on the measuring station will ash.
• Do not press any buttons during
setup. Otherwise, values may not be
transmitted correctly and thereisarisk
of value errors and inaccuracies.
• The setup process is completed when
the indoor and outdoor measurement
data is displayed on the base station.
• The measured value is automatically
updated by the base device about every
30 seconds.
• If the temperatureisoutside of the
measuring range, LL.L (lower than
minimum temperature) or HH.H (higher
than maximum temperature) will appear
on the temperaturedisplay.
6.2. Selecting the channel/Other
measuring stations
Note
• Ensurethat the base station and
measuring station areset to the same
channel. Suitable base stations can be
found at www.hama.com
• The transmission channel on the
supplied measuring station can be
changed/set (CH1, CH2, CH3).
• The measuring station is suitable for
the following base stations: 136222,
136293, 136294, 186310, 186311,
186312
6.3. Low battery charge
Measuring station
If the batteries need to be replaced, the
symbol for low battery charge
will appear
next to the outdoor temperaturedisplay
on the base device. Replace the batteries
immediately.
Note –Replacing the batteries
• Note that the stations have to be
resynchronised each time after you
change the batteries in the measuring
or base station.
• To do this, remove the batteries from the
other station and then reinsert them, or
change them as required.
7. Care and Maintenance
•Only clean this product with aslightly
damp, lint-free cloth and do not use
aggressive cleaning agents.
•Make surethat water does not get into
the product.
8. Warranty Disclaimer
Hama GmbH &CoKGassumes no liability and
provides no warranty for damage resulting
from improper installation/mounting, improper
use of the product or from failuretoobserve
the operating instructions and/or safety notes.
9. Technical Data
Measuring
station
Power supply
3.0 V
2xAAA batteries
Measuring range
Thermometer
Hygrometer
-40°C –+60°C /
-40°F –140°F /
20% –95%
Measurement increments
Temperature
Humidity
0,1°C /0.2°F
1%
Measuring cycle
thermometer/hygrometer
CH1: 57 s
CH2: 67 s
CH3: 79 s
Hygrometer Yes
Thermometer Yes
Frequency 433 MHz
Radio-frequency
power transmitted
0,054 µW
Range
≤ 30 m
10.
Recycling Information
Note on environmental protection:
After the implementation of the
European Directive 2012/19/EU
and 2006/66/EU in the national
legal system, the following applies:
Electric and electronic devices as well as
batteries must not be disposed of with
household waste. Consumers areobliged by
law to return electrical and electronic devices
as well as batteries at the end of their service
lives to the public collecting points set up for
this purpose or point of sale. Details to this are
dened by the national law of the respective
country.This symbol on the product, the
instruction manual or the package indicates
that aproduct is subject to these regulations.
By recycling, reusing the materials or other
forms of utilising old devices/Batteries, you
aremaking an important contribution to
protecting our environment.
11. Declaration of Conformity
Hereby,Hama GmbH &CoKG
declares that the radio
equipment type [00186347,
00176933] is in compliance with Directive
2014/53/EU.The full text of the EU declaration
of conformity is available at the following
internet address:
www.hama.com-
>
00186347,
00176933-
>
Downloads.
Maximum radio-frequency
power transmitted
4,932 mW
D Bedienungsanleitung
Bedienungselemente und Anzeigen
AMessstation
1. Display (Vorderseite)
=Zeigt die Temperatur,Luftfeuchtigkeit
und den aktuellen Kanal an.
2. LED-Indikator (Vorderseite)
=Blinkt bei Signalübertragung.
3. Aussparung für Wandmontage
=Ermöglicht Wandmontage des Sensors.
4. Einstellung des KANALS (1-3) für die
Übertragung
=Eingangskanal für die Wetterstation.
Stellen Sie den gewünschten Kanal vor
dem Einsetzen der Batterien ein.
5. Batteriefach
=Eswerden 2Batterien des Typs AAA
(1.5 V) benötigt.
Vielen Dank, dass Sie sich für ein Hama
Produkt entschieden haben!
Nehmen Sie sich Zeit und lesen Sie die
folgenden Anweisungen und Hinweise
zunächst ganz durch. Bewahren Sie diese
Bedienungsanleitung anschließend an
einem sicheren Ort auf,umbei Bedarf
darin nachschlagen zu können. Sollten
Sie das Gerät veräußern, geben Sie diese
Bedienungsanleitung an den neuen
Eigentümer weiter.
1.
Erklärung von Warnsymbolen und
Hinweisen
Warnung
Wirdverwendet, um Sicherheitshinweise zu
kennzeichnen oder um Aufmerksamkeit auf
besondereGefahren und Risiken zu lenken.
Hinweis
Wirdverwendet, um zusätzlich
Informationen oder wichtige Hinweise zu
kennzeichnen.
2. Packungsinhalt
• Außensensor TS36E
• diese Bedienungsanleitung
3. Sicherheitshinweise
• Das Produkt ist für den privaten,
nicht-gewerblichen Haushaltsgebrauch
vorgesehen.
• Betreiben Sie das Produkt nicht außerhalb
seiner in den technischen Daten
angegebenen Leistungsgrenzen.
• Verwenden Sie das Produkt nicht in einer
feuchten Umgebung und vermeiden Sie
Spritzwasser.
• Betreiben Sie das Produkt nicht in
unmittelbarer Nähe der Heizung,
anderer Hitzequellen oder in direkter
Sonneneinstrahlung.
• Benutzen Sie das Produkt nicht in
Bereichen, in denen elektronische Produkte
nicht erlaubt sind.
• Positionieren Sie das Produkt nicht in der
Nähe von Störfeldern, Metallrahmen,
Computern und Fernsehern etc.
Elektronische Geräte sowie Fensterrahmen
beeinträchtigen die Funktion des Produktes
negativ.
• Lassen Sie das Produkt nicht fallen
und setzen Sie es keinen heftigen
Erschütterungen aus.
• Öffnen Sie das Produkt nicht und betreiben
Sie es bei Beschädigungen nicht weiter.
• Versuchen Sie nicht, das Produkt selbst zu
warten oder zu reparieren. Überlassen Sie
jegliche Wartungsarbeit dem zuständigen
Fachpersonal.
• Halten Sie Kinder unbedingt von dem
Verpackungsmaterial fern, es besteht
Erstickungsgefahr.
• Entsorgen Sie das Verpackungsmaterial
sofort gemäß den örtlich gültigen
Entsorgungsvorschriften.
• Nehmen Sie keine Veränderungen am
Produkt vor.Dadurch verlieren sie jegliche
Gewährleistungsansprüche.
Warnung –Batterien
• Beachten Sie unbedingt die korrekte
Polarität (Beschriftung +und -)
der Batterien und legen Sie diese
entsprechend ein. Bei Nichtbeachtung
besteht die Gefahr des Auslaufens oder
einer Explosion der Batterien.
• Verwenden Sie ausschließlich Akkus
(oder Batterien), die dem angegebenen
Typentsprechen.
• Reinigen Sie vor dem Einlegen der
Batterien die Batteriekontakte und die
Gegenkontakte.
• Gestatten Sie Kindern nicht ohne
Aufsicht das Wechseln von Batterien.
• Mischen Sie alte und neue Batterien
nicht, sowie Batterien unterschiedlichen
Typs oder Herstellers.
• Entfernen Sie Batterien aus Produkten,
die längereZeit nicht benutzt werden
(außer diese werden für einen Notfall
bereit gehalten).
•
Schließen
Sie
die
Batterien
nicht
kurz.
• Laden Sie Batterien nicht.
• Werfen Sie Batterien nicht ins Feuer.
• Bewahren Sie Batterien außerhalb der
Reichweite von Kindern auf.
• Batterien nie öffnen, beschädigen,
verschlucken oder in die Umwelt
gelangen lassen. Sie können giftige
und umweltschädliche Schwermetalle
enthalten.
• Entfernen und entsorgen Sie
verbrauchte Batterien unverzüglich aus
dem Produkt.
• Vermeiden Sie Lagerung, Laden und
Benutzung bei extremen Temperaturen
und extrem niedrigem Luftdruck (wie
z.B. in großen Höhen).
4.
Inbetriebnahme
• Öffnen Sie das Batteriefach (5) und legen
Sie zwei AAA Batterien polrichtig ein.
• Zusätzlich nden Sie im Batteriefach den
Kanalschalter (4) mit dem Sie zwischen den
Kanälen „CH1, CH2 und CH3“ wechseln
können. Schieben Sie den Kanalschalter
auf den gewünschten Channel. Auf dem
Display (1) wirdCH1, CH2 oder CH3
angezeigt.
• Schließen Sie die Batteriefachabdeckung
anschließend.
Batterien wechseln
• Öffnen Sie das Batteriefach (5), entnehmen
und entsorgen Sie die verbrauchten
Batterien und legen Sie zwei neue AAA
Batterien polrichtig ein. Schließen Sie die
Batteriefachabdeckung anschließend.
Hinweis
Beachten Sie, dass Sie bei der
Inbetriebnahme immer zuerst die Batterien
in die Messstation, und dann in die
Basisstation einlegen.
5. Montage
Hinweis –Montage
• Es wirdempfohlen, die Basis- und
Messstation zunächst an den
gewünschten Aufstellorten ohne
Montage zu platzieren und alle
Einstellungen -wie in 6. Betrieb
beschrieben –vorzunehmen.
• Montieren Sie erst nach korrekter
Einstellung und stabiler Funkverbindung
die Station/en.
Hinweis
• Die Reichweite der Funkübertragung
zwischen der Mess- und Basisstation
beträgt im freien Gelände bis zu 30m.
Achten Sie vor der Montage darauf,
dass die Funkübertragung nicht
durch Störsignale oder Hindernisse
wie Gebäude, Bäume, Fahrzeuge,
Hochspannungsleitungen, u.a.
beeinusst wird.
• Stellen Sie vor der endgültigen Montage
sicher,dass zwischen den gewünschten
Aufstellorten ausreichender Empfang
besteht.
• Achten Sie bei der Montage der
Messstation darauf,dass diese vor
direkter Sonne und Regen geschützt
positioniert ist.
• Die internationale Standardhöhe für die
Messung der Lufttemperatur beträgt
1,25 m(4ft) über Grund.
Warnung
• Besorgen Sie sich spezielles bzw.
geeignetes Montagematerial im
Fachhandel für die Montage an der
vorgesehenen Wand.
• Stellen Sie sicher,dass keine
fehlerhaften oder beschädigten Teile
montiert werden.
• Wenden Sie bei der Montage niemals
Gewalt oder hohe Kräfte an. Diese
können das Produkt beschädigen.
• Prüfen Sie vor Montage die Eignung
der vorgesehenen Wand für das
anzubringende Gewicht und
vergewissern Sie sich, dass sich an
der Montagestelle in der Wand keine
elektrischen Leitungen, Wasser-, Gas-
oder sonstige Leitungen benden.
• Es wirdempfohlen, die Messstation
sicher und fest an einer Außenwand zu
montieren.
• Befestigen Sie Dübel, Schraube, Nagel, etc.
in der dafür vorgesehenen Wand.
• Hängen Sie die Messstation mit der dafür
vorgesehenen Aussparung (3) daran ein.
6. Betrieb
6.1. Verbindung zur Messstation
• Um die Basisstation und die Messstation
miteinander zu verbinden stellen Sie beide
Geräte so nah wie möglich aneinander.
• Nach dem Einlegen der Batterien sucht
die Basisstation automatisch nach einer
Verbindung zur Messstation und führt die
Ersteinrichtung durch.
• Verbindet das Gerät nicht automatisch,
muss der manuelle Suchvorgang auf der
Basisstation gestartet werden.
Hinweis
• Die Ersteinrichtung dauert ca. 3
Minuten.
• Während dem Verbindungsversuch
blinkt das Funksymbol und die LED-
Anzeige (2) an der Messstation.
• Vermeiden Sie in dieser Zeit jegliche
Betätigung der Tasten! Andernfalls
können Fehler und Ungenauigkeiten
bei den Werten und deren Übertragung
entstehen.
• Der Vorgang ist beendet, sobald die
Messdaten für Innen- und Außenbereich
auf der Basisstation angezeigt werden.
• Der Messwert wirdvom Basisgerät
etwa alle 30 Sekunden automatisch
aktualisiert.
• Liegt der Temperaturwert
außerhalb des Messbereichs,
wirdinder Temperaturanzeige
LL.L (für Temperaturen unterhalb
des Messbereichs) bzw.HH.H
(für Temperaturen oberhalb des
Messbereichs) angezeigt.
6.2. Kanalauswahl/Weitere
Messstationen
Hinweis
• Achten Sie hierbei auf die identische
Kanaleinstellung an Basis- und
jeweiliger Messstation. Passende
Basisstationen nden Sie unter
www.hama.com
• Der Senderkanal der mitgelieferten
Messstation lässt sich verändern/
einstellen (CH1, CH2, CH3).
• Die Messstation ist für folgende
Basisstationen geeignet: 136222,
136293, 136294, 186310, 186311,
186312
6.3. Niedrige Batteriekapazität
Messstation
Wenn die Batterien ausgetauscht
werden müssen, erscheint neben der
Außentemperaturanzeige des Basisgeräts
das Symbol für niedrigen Batteriestand
.
Wechseln Sie die Batterien umgehend aus.
Hinweis –Batteriewechsel
• Beachten Sie, dass Sie nach jedem
Batteriewechsel an Mess- oder
Basisstation eine neue Synchronisation
der Stationen erfolgen muss.
• Nehmen Sie dazu die Batterien der
anderen Station heraus und setzen Sie
erneut ein oder wechseln Sie diese bei
Bedarf ebenfalls aus.
7. Wartung und Pflege
•Reinigen Sie dieses Produkt nur mit einem
fusselfreien, leicht feuchten Tuch und
verwenden Sie keine aggressiven Reiniger.
• Achten Sie darauf,dass kein Wasser in das
Produkt eindringt.
8. Haftungsausschluss
Die Hama GmbH &CoKG übernimmt
keinerlei Haftung oder Gewährleistung für
Schäden, die aus unsachgemäßer Installation,
Montage und unsachgemäßem Gebrauch
des Produktes oder einer Nichtbeachtung
der Bedienungsanleitung und/oder der
Sicherheitshinweise resultieren.
9. Technische Daten
Messstation
Stromversorgung
3,0 V
2xAAA Batterie
Messbereich
Thermometer
Hygrometer
-40°C –+60°C /
-40°F –140°F /
20% –95%
Messschritte
Temperatur
Luftfeuchtigkeit
0,1°C /0,2°F
1%
Messzyklus
Thermometer/
Hygrometer
CH1: 57 s
CH2: 67 s
CH3: 79 s
Hygrometer Ja
Thermometer Ja
Frequenz 433 MHz
Sendeleistung 0,054 µW
Reichweite ≤ 30 m
10.
Entsorgungshinweise
Hinweis zum Umweltschutz:
Ab dem Zeitpunkt der Umsetzung
der europäischen Richtlinien
2012/19/EU und 2006/66/EG in
nationales Recht gilt folgendes:
Elektrische und elektronische Geräte sowie
Batterien dürfen nicht mit dem Hausmüll
entsorgt werden. Der Verbraucher ist
gesetzlich verpichtet, elektrische und
elektronische Geräte sowie Batterien am
Ende ihrer Lebensdauer an den dafür
eingerichteten, öffentlichen Sammelstellen
oder an die Verkaufsstelle zurückzugeben.
Einzelheiten dazu regelt das jeweilige
Landesrecht. Das Symbol auf dem Produkt,
der Gebrauchsanleitung oder der Verpackung
weist auf diese Bestimmungen hin. Mit der
Wiederverwertung, der stoichen Verwertung
oder anderen Formen der Verwertung von
Altgeräten/Batterien leisten Sie einen
wichtigen Beitrag zum Schutz unserer Umwelt.
11. Konformitätserklärung
Hiermit erklärt die Hama GmbH
&CoKG,dass der
Funkanlagentyp [00186347,
00176933] der Richtlinie 2014/53/EU
entspricht. Der vollständige Text der
EU-Konformitätserklärung ist unter der
folgenden Internetadresse verfügbar:
www.hama.com-
>
00186347,
00176933-
>
Downloads.
Abgestrahlte maximal
Sendeleistung
4,932 mW
F Mode d‘emploi
Éléments de commande et d'affichage
A
Station de mesure
1. Écran (à l’avant)
=ache la température, l’humidité et le
canal en cours.
2. Indicateur LED (à l’avant)
=clignote pendant la transmission de
signaux.
3. Support mural
=Fente pour I´installation murale.
4. Réglage du CANAL de transmission (1-3)
=canal d’entrée de la station météo.
Réglez le canal avant d’insérer les piles.
5.
Compartiment des piles
=l’appareil requiert 2piles AAA de 1,5 V
Nous vous remercions d’avoir choisi un
produit Hama.
Veuillez prendreletemps de lirel‘ensemble
des remarques et consignes suivantes. Veuillez
conserver ce mode d‘emploi àportée de main
andepouvoir le consulter en cas de besoin.
Transmettez-le au nouveau propriétaireavec
l’appareil le cas échéant.
1. Explication des symboles
d‘avertissement et des remarques
Avertissement
Ce symbole est utilisé pour indiquer des
consignes de sécurité ou pour attirer
votreattention sur des dangers et risques
particuliers.
Remarque
Ce symbole est utilisé pour indiquer des
informations supplémentaires ou des
remarques importantes.
2. Contenu de l'emballage
• Capteur extérieur TS36E
• Mode d‘emploi
3. Consignes de sécurité
• Ce produit est destiné àune installation
domestique non commerciale.
• N‘utilisez pas le produit en dehors des
limites de puissance indiquées dans les
caractéristiques techniques.
• N‘utilisez pas le produit dans un
environnement humide et évitez toute
projection d‘eau.
• Évitez d’utiliser le produit àproximité
immédiate d‘un chauffage, d’autres
sources de chaleur ou exposé aux rayons
directs du soleil.
• N‘utilisez pas le produit dans les zones
dans lesquelles l‘utilisation d‘appareils
électroniques est interdite.
• Ne placez pas le produit àproximité de
champs parasites, de cadres métalliques,
d‘ordinateurs, de téléviseurs, etc. Les
appareils électroniques ainsi que les cadres
de fenêtreont une inuence négative sur le
fonctionnement du produit.
• Protégez le produit des secousses violentes
et évitez tout choc ou toute chute.
• Ne tentez pas d‘ouvrir le produit en cas de
détérioration et cessez de l’utiliser.
• Ne tentez pas de réparer l’appareil
vous-même ni d’effectuer des travaux
d’entretien. Déléguez tous travaux
d‘entretien àdes techniciens qualiés.
• Tenez les emballages d‘appareils hors de
portée des enfants, risque d‘étouffement.
• Recyclez les matériaux d’emballage
conformément aux prescriptions locales
en vigueur.
• N’apportez aucune modication à
l’appareil. Des modications vous feraient
perdrevos droits de garantie.
Avertissement –concernant
les piles
• Respectez impérativement la polarité
de la pile (marquage +et-)lors de
l‘insertion dans le boîtier ;risques
d‘écoulement et d‘explosion des piles si
tel n‘est pas le cas.
•
Utilisez
exclusivement
des
batteries
(ou
des piles) du type indiqué.
• Avant d‘insérer les piles, nettoyez-en
les contacts, ainsi que les contacts
d‘accouplement.
• N‘autorisez pas àdes enfants de
remplacer les piles d‘un appareil sans
surveillance.
• N’utilisez pas simultanément des piles
usagées et des piles neuves ou des piles
de différents types.
• Retirez les piles des produits que vous
ne comptez pas utiliser pendant un
certain temps (à l‘exception des produits
d‘alarme en veille).
• Ne court-circuitez pas les piles.
• Ne tentez pas de recharger les piles.
• Ne jetez pas de piles au feu.
• Conservez les piles hors de portée
des enfants.
• Ne tentez pas d‘ouvrir les piles, faites
attention ànepas les endommager,les
jeter dans l’environnement et àceque
des petits enfants ne les avalent pas.
Les piles sont susceptibles de contenir
des métaux lourds toxiques et nocifs
pour l‘environnement.
• Retirez les piles usagées immédiatement
du produit pour les recycler.
• Évitez de stocker,charger et utiliser le
produit àdes températures extrêmes
et àune pression atmosphérique
extrêmement basse (à haute altitude,
par exemple).
4. Mise en service
• Ouvrez le compartiment des piles (5) et
insérez deux piles AAA en respectant
la polarité.
• Utilisez ensuite le commutateur de canal
(4) avec lequel vous pouvez commuter
entreles canaux „CH1, CH2 et CH3“.
• Faites glisser le commutateur de canal sur
le canal de votrechoix. Sur l’écran (1),
CH1, CH2 ou CH3 est aché.
• Refermez le couvercle du compartiment
des piles.
Remplacement des piles
• Ouvrez le compartiment àpiles (5), retirez
et éliminez les piles déchargées, puis
insérez deux nouvelles piles LR6/AAA en
respectant les indications de polarité.
Refermez le couvercle du compartiment
àpiles.
Remarque
Lors de la premièremise en service,
veuillez premièrement insérer les piles
dans la station de mesure, puis dans la
station de base.
5. Installation
Remarque concernant
l'installation
• Nous vous recommandons de
positionner la station de base et la
station de mesuredans les endroits
envisagés sans effectuer le montage,
puis d'effectuer les réglages comme
décrit au chapitre 6. Fonctionnement.
• Procédez ensuite àl'installation de
la/des station(s) après avoir effectué
les réglages et reçu une connexion
radio stable.
Remarque
• La portée de la transmission radio
entrelastation de base et la station
de mesureest de 30 mdans un espace
dégagé. Veuillez contrôler,avant
l'installation, que la portée radio ne soit
pas altérée par des interférences ou des
obstacles tels que bâtiments, arbres,
véhicules, lignes haute tension, etc.
• Veuillez contrôler,avant l'installation
dénitive, la bonne qualité de la
transmission entreles deux stations.
• Veuillez également protéger les stations
de l'ensoleillement direct et de la pluie
lors de l'installation.
• La hauteur standardinternationale de
mesuredelatempératuredel'air est de
1,25 m(4ft) au-dessus du sol.
Avertissement
• En vue de l'installation, procurez-vous
le matériel d'installation adéquat pour
le mur concerné dans un commerce
spécialisé.
• Veuillez contrôler que l'emballage ne
contienne aucune pièce erronée ni
endommagée.
• N'appliquez en aucun cas une force
excessive lors de l'installation. Une force
excessive est susceptible d'endommager
le produit.
• Avant l'installation, vériez que le mur
prévu pour recevoir le produit dispose
d'une force portante susante et
qu'aucune conduite d'électricité, d'eau,
de gaz ni aucune autreconduite ne
passe dans cette partie de la cloison.
• Nous vous recommandons d‘installer
solidement la station de mesureàune
paroi extérieure.
• Fixez cheville, vis, clou, etc. dans la paroi
prévue pour recevoir l‘installation.
• Suspendez la station de base àl‘aide de la
fente (3) prévue àcet effet.
6. Fonctionnement
6.1. Connexion vers la station de mesure
• Pour connecter les stations de base et
de mesureentreelles, placez les deux
appareils aussi proches l’un de l’autre
que possible.
• La station de base recherche
automatiquement une connexion àla
station de mesureeteffectue la première
conguration après avoir inséré les piles.
• Lancez une recherche manuelle en cas
d’échec de la connexion automatique.
Remarque
• La premièreconguration dureenviron
3minutes.
•
Le
symbole
ra
dio
et
l’achage
LED
(2) de la station de mesureclignotent
pendant la tentative de connexion.
• N'appuyez sur aucune touche
pendant cette phase ;des erreurs ou
des inexactitudes de mesureoude
transmission pourraient en résulter.
• La conguration est terminée dès que
les valeurs mesurées pour la zone
intérieureetpour la zone extérieure
apparaissent àl'écran.
• La station de base met la valeur
mesurée àjour automatiquement,
toutes les 30 secondes environ.
• Une valeur de températurehors de la
plage de mesureest indiquée par LL.L
(pour une températureinférieureàla
plage de mesure) ou par HH.H (pour
une températuresupérieureàlaplage
de mesure).
6.2. Sélection du canal /autres
stations de mesure
Remarque
• Lors de l’installation de stations
supplémentaires, veuillez utiliser les
mêmes réglages de canal entrela
station de base et les stations de
mesuresupplémentaires. Vous trouverez
des stations de base adaptées sur
www.hama.com
• Impossible de modier /régler le canal
d’émission de la station de mesure
livrée (CH1, CH2, CH3).
• La station de mesureest compatible
avec les stations de base suivantes :
136222, 136293, 136294, 186310,
186311, 186312
6.3. Piles faibles
Station de mesure
Le symbole de faible niveau de charge
apparaît àcôté de l‘achage de température
extérieuredelastation de base lorsque les
piles doivent êtreremplacées. Veuillez dans ce
cas remplacer les piles au plus vite.
Remarque concernant le
remplacement des piles
• Veuillez noter qu'après chaque
remplacement de piles de la station
de base ou de la station de mesure,
vous devrez effectuer une nouvelle
synchronisation des stations.
• Lors de cette synchronisation, extrayez
également les piles de la station qui
continuait àfonctionner,puis réinsérez-les
ou remplacez ces dernières.
7. Soins et entretien
•Nettoyez la balance uniquement àl’aide
d’un chiffon non breux légèrement
humide ;évitez tout détergent agressif.
• Veillez àcequ’aucun liquide ne pénètre
dans le produit.
8. Exclusion de garantie
La société Hama GmbH &CoKG décline
toute responsabilité en cas de dommages
provoqués par une installation, un montage
ou une utilisation non conformes du produit
ou encoreprovoqués par un non respect
des consignes du mode d‘emploi et/ou des
consignes de sécurité.
9. Caractéristiques techniques
Station de
mesure
Alimentation en électricité
3,0 V
2piles AAA
Plage de mesure
Thermomètre
Hygromètre
-40°C –+60°C /
-40°F –140°F /
20% –95%
Incréments de mesure
Température
Humidité de l'air
0,1°C /0,2°F
1%
Cycle de mesuredu
thermomètre/hygromètre
CH1: 57 s
CH2: 67 s
CH3: 79 s
Hygromètre
oui
Thermomètre
oui
Fréquence 433 MHz
Radiofréquence maximale 0,054 µW
Portée
≤ 30 m
2
3
5
4
1

10.
Consignes de recyclage
Remarques concernant la protection de
l’environnement :
Conformément àladirective
européenne 2012/19/EU et
2006/66/CE, et and‘atteindreun
certain nombred‘objectifs en
matièredeprotection de l‘environnement, les
règles suivantes doivent êtreappliquées: Les
appareils électriques et électroniques ainsi que
les batteries ne doivent pas êtreéliminés avec
les déchets ménagers. Le pictogramme “picto”
présent sur le produit, son manuel d‘utilisation
ou son emballage indique que le produit est
soumis àcette réglementation. Le
consommateur doit retourner le produit/la
batterie usagé(e) aux points de collecte prévus
àcet effet. Il peut aussi les remettreàun
revendeur.Enpermettant le recyclage des
produits et des batteries, le consommateur
contribueraainsi àlaprotection de notre
environnement. C‘est un geste écologique.
11. Déclaration de conformité
Le soussigné, Hama GmbH &Co
KG,déclareque l‘équipement
radioélectrique du type
[00186347, 00176933] est conforme àla
directive 2014/53/UE. Le texte complet de la
déclaration UE de conformité est disponible à
l‘adresse internet suivante:
www.hama.com-
>
00186347,
00176933-
>
Downloads.
Puissance de
radiofréquence maximale
4,932 mW
E Instrucciones de uso
Elementos de manejo eindicadores
AEstación de medición
1. Pantalla (en la parte frontal)
=muestralatemperatura, humedad yel
canal actual.
2. Indicador LED (en la parte frontal)
=parpadea cuando se transmiten las
señales.
3. Soporte mural
=Aberturaparaelmontaje en pared
4. Ajuste el CANAL de transmisión (1-3)
=canal de entrada paralaestación
meteorológica. Ajuste el canal antes de
insertar las pilas.
5. Compartimiento de la batería
=launidad requiere2pilas AAA de 1,5 V
Le agradecemos que se haya decidido por un
producto de Hama.
Tómese tiempo yléase primerolas siguientes
instrucciones eindicaciones. Después, guarde
estas instrucciones de manejo en un lugar
seguroparapoder consultarlas cuando sea
necesario. Si vende el aparato, entregue estas
instrucciones de manejo al nuevo propietario.
1. Explicación de los símbolos de aviso y
de las indicaciones
Aviso
Se utiliza paracaracterizar las indicaciones
de seguridad oparallamar la atención
sobrepeligros yriesgos especiales.
Nota
Se utiliza paracaracterizar informaciones
adicionales oindicaciones importantes.
2. Contenido del paquete
• Sensor exterior TS36E
• Estas instrucciones de manejo
3. Instrucciones de seguridad
• El producto es paraeluso doméstico
privado, no comercial.
• No opereelproducto fueradelos límites
de potencia indicados en los datos
técnicos.
• No utilice el producto en entornos
húmedos yevite el contacto con las
salpicaduras de agua.
• No opereelproducto en las inmediaciones
de la calefacción, de otras fuentes de calor
obajo la radiación directa del sol.
• No utilice el producto en áreas donde no se
permitan aparatos electrónicos.
• No posicione el producto en las
proximidades de campos de interferencia,
marcos de metal, ordenadores, televisores,
etc. Losdispositivos electrónicos y
los marcos de las ventanas afectan
negativamente al funcionamiento del
producto.
• No deje caer el producto ni lo someta a
sacudidas fuertes.
• No abraelproducto ynolosiga operando
de presentar deterioros.
• No intente mantener orepararelaparato
por cuenta propia. Encomiende cualquier
trabajo de mantenimiento al personal
especializado competente.
• Mantenga el material de embalaje fuera
del alcance de los niños, existe peligro
de asxia.
• Deseche el material de embalaje en
conformidad con las disposiciones locales
sobreeldesecho vigentes.
• No realice cambios en el aparato. Esto
conllevaría la pérdida de todos los
derechos de la garantía.
Aviso –Pilas
• Observe siemprelacorrecta
polaridad (inscripciones +y-)de
las pilas ycoloque éstas de forma
correspondiente. La no observación de
lo anterior conlleva el riesgo de derrame
oexplosión de las pilas.
• Utilice exclusivamente pilas recargables
(o pilas) que sean del mismo tipo.
• Antes de colocar las pilas, limpie
los contactos ylos contra-contactos
de éstas.
• No permita alos niños cambiar las
pilas sin la supervisión de una persona
adulta.
• No mezcle pilas viejas ynuevas, ni
tampoco pilas de tipos ofabricantes
diferentes.
• Saque las pilas de los productos que no
se vayan autilizar durante un periodo
prolongado de tiempo. (A no ser de
que estén pensados parauncaso de
emergencia).
• No cortocircuite las pilas.
• No cargue las pilas.
• No arroje las pilas al fuego.
• Mantenga las pilas fueradel alcance
de los niños.
• Nunca abra, deterioreoingierapilas
opilas recargables ni las deseche en
el medioambiente. Pueden contener
metales pesados tóxicos ydañinos para
el medioambiente.
• Retireydeseche de inmediato las pilas
gastadas del producto.
• Evite almacenar,cargar yutilizar el
despertador atemperaturas extremas y
con presiones de aireexageradamente
bajas (p. ej. bajas temperaturas).
4. Puesta en funcionamiento
• Abraelcompartimento de las pilas (5) e
introduzca dos pilas AAA con la polaridad
correcta.
• Además, en el compartimento de las pilas
se encuentraelinterruptor de canal (4) con
el que se pueden intercambiar los canales
„CH1, CH2 yCH3“.
• Coloque el interruptor en el canal deseado.
La pantalla (1) muestraCH1, CH2 oCH3.
• Cierrelacubierta del compartimento
parapilas.
Cambio de las pilas
• Abraelcompartimento de pilas (5), retire
ydeseche las pilas gastadas ycoloque dos
pilas AAA nuevas atendiendo alacorrecta
polaridad de las mismas. Seguidamente,
cierrelacubierta del compartimento
parapilas.
Nota
En la puesta en funcionamiento, es
importante que coloque las pilas en la
estación de medición, en primer lugar,y,
seguidamente, en la estación base.
5. Montaje
Nota –Montaje
• Se recomienda colocar primero, sin
montar,laestación de base yla
estación de medición, en los lugares
de instalación deseados yllevar acabo
todos los ajustes tal ycomo se describe
en 6. Funcionamiento.
• Proceda amontar la(s) estación(es)
únicamente cuando haya podido
realizar correctamente los ajustes y
cuente con una conexión inalámbrica
estable.
Nota
• El alcance de la transmisión por radio
entrelaestación base ylaestación de
medición al airelibreesdehasta 30 m.
•
Antes
de
pr
oceder
al
montaje,
pr
este
atención
aq
ue
la
tr
ansmisión
por
ra
dio
no
se
vea
inuida,
entr
eo
tr
os,
por
interfer
encias
uo
bstáculos
tales
como
edicios, árboles, vehículos olíneas de
alta tensión.
• Antes de proceder al montaje denitivo,
asegúrese de que cuenta con recepción
suciente entrelos lugares de
instalación deseados.
• Al montar la estación de medición,
procuresituarla de maneraque quede
protegida de la radiación directa del sol
ydelalluvia.
• La alturaestándar internacional parala
medición de la temperaturadel airees
de 1,25 m(4pies) sobreelsuelo.
Aviso
• Adquieramaterial de montaje especial o
adecuado en un comercio especializado
paraelmontaje en la pared prevista.
•
Compruebe
que
no
haya
piezas
deterioradas odefectuosas.
• No ejerza nunca fuerza durante el
montaje. El producto podría verse
dañado.
• Antes de empezar con el montaje,
compruebe que la pared puede soportar
el peso que se va amontar yasegúrese
de que por el punto de montaje de la
pared no pasan cables eléctricos ni
tuberías de agua, gas odeotrotipo.
• Se recomienda jar la estación de medición
de forma segurayable auna pared
exterior.
• Fije el taco, el tornillo, el clavo, etc., en la
pared prevista.
• Cuelgue la estación de medición utilizando
la abertura(3) prevista paraello.
6. Funcionamiento
6.1. Conexión con la estación de
medición
• Para conectar entresílaestación de
medición yelsensor exterior,sitúe ambos
dispositivos lo más cerca posible el uno
del otro.
• Una vez colocadas las pilas, la estación
base busca automáticamente una conexión
con la estación de medición, realizando
entonces el ajuste inicial.
• Si el dispositivo no se conecta
automáticamente, es necesario iniciar
el proceso de búsqueda manual en la
estación base.
Nota
• El ajuste inicial duraaprox. 3minutos
• Durante el intento de conexión,
el símbolo de radiofrecuencia yel
indicador LED (2) de la estación de
medición parpadean.
• No pulse ninguna tecla mientras dure
el ajuste. De lo contrario, pueden
producirse fallos oimprecisiones en los
valores ysutransmisión.
• El proceso naliza en cuanto se
visualizan en la estación base los
valores de medición registrados para
interior yexterior.
• La unidad base actualiza el valor de
medición aproximadamente cada 30
segundos aproximadamente.
• Si el valor de la temperaturase
encuentrafueradel rango de medición,
en la visualización de la temperatura
se visualiza LL.L (en el caso de
temperaturas por debajo del rango
de medición) oHH.H (en el caso de
temperaturas por encima del rango
de medición).
6.2. Selección de canal/estaciones de
medición adicionales
Nota
• Al hacerlo, preste atención arealizar
ajustes de canal idénticos en la
estación base ylaestación de medición
correspondiente. Encontrará estaciones
de medición adecuadas en www.
hama.com
• Es posible modicar/ajustar el canal
de emisión de la estación de medición
suministrada (CH1, CH2, CH3).
• La estación de medición es apta para
las siguientes estaciones base: 136222,
136293, 136294, 186310, 186311,
186312
6.3. Capacidad de pilas baja
Estación de medición
Cuando es necesario cambiar las pilas,
junto al indicador de temperaturaexterior
de la unidad base se muestraelsímbolo de
nivel bajo de batería
.Cambie las pilas
inmediatamente.
Nota –Cambio de pilas
• Tenga en cuenta que es necesario
resincronizar las estaciones tras realizar
un cambio de pilas en la estación de
medición obase.
• Para ello, retirelas pilas de la otra
estación yvuelva acolocarlas o, de ser
necesario, proceda asustituirlas.
7. Mantenimiento ycuidado
•Limpie este producto sólo con un paño
ligeramente humedecido que no deje
pelusas ynoutilice detergentes agresivos.
•Asegúrese de que no entreagua en el
producto.
8. Exclusión de responsabilidad
Hama GmbH &CoKGnoseresponsabiliza ni
concede garantía por los daños que surjan por
una instalación, montaje omanejo incorrectos
del producto opor la no observación de
las instrucciones de manejo y/o de las
instrucciones de seguridad.
9. Datos técnicos
Estación de
medición
Alimentación de
corriente
3,0 V
2pilas AAA
Rango de medición
Termómetro
Higrómetro
-40°C –+60°C /
-40°F –140°F /
20% –95%
Intervalos de medición
Temperatura
Humedad
0,1°C /0,2°F
1%
Ciclo de medición
termómetro/
higrómetro
CH1: 57 s
CH2: 67 s
CH3: 79 s
Higrómetro
Sí
Termómetro
Sí
Frecuencia 433 MHz
Máxima de
radiofrecuencia
0,054 µW
Alcance
≤ 30 m
10.
Instrucciones para desecho y
reciclaje
Nota sobrelaprotección
medioambiental:
Después de la puesta en marcha de
la directiva Europea 2012/19/EU y
2006/66/EU en el sistema
legislativo nacional, se aplicaralo
siguiente:
Losaparatos eléctricos yelectrónicos, así
como las baterías, no se deben evacuar en la
basuradoméstica. El usuario está legalmente
obligado allevar los aparatos eléctricos y
electrónicos, así como pilas ypilas
recargables, al nal de su vida útil alos
puntos de recogida comunales oadevolverlos
al lugar donde los adquirió. Losdetalles
quedaran denidos por la ley de cada país. El
símbolo en el producto, en las instrucciones
de uso oenelembalaje hace referencia aello.
Gracias al reciclaje, al reciclaje del material o
aotras formas de reciclaje de aparatos/pilas
usados, contribuye Usted de forma importante
alaprotección de nuestromedio ambiente.
11. Declaración de conformidad
Porlapresente, Hama GmbH &
Co KG,declaraque el tipo de
equipo radioeléctrico [00186347,
00176933] es conforme con la Directiva
2014/53/UE. El texto completo de la
declaración UE de conformidad está
disponible en la dirección Internet siguiente:
www.hama.com-
>
00186347,
00176933-
>
Downloads.
Potencia máxima de
radiofrecuencia
4,932 mW
R Руководство по
эксплуатации
Органы управления ииндикации
А
Измерительная станция
1. Дисплей (спередней стороны)
= Показывает температуру, влажность
итекущий канал.
2. Светодиодный индикатор (спередней
стороны)
= Мигает во время передачи
сигналов.
3. Настенное крепление
=Oтвеpcтиe длянacтeннoгo мoнтaжa
4. Установите КАНАЛ передачи (1–3)
= Входной канал для метеостанции.
Установите канал, прежде чем
вставлять батарейки.
5. Отсекдля батареек
= Для устройства требуется 2
батарейки AAA 1,5 В.
Благодарим за покупку изделия фирмы
Hama.
внимательно ознакомьтесь снастоящей
инструкцией. Храните инструкцию в
надежном месте для справок вбудущем.
Вслучае передачи изделия другому лицу
приложите иэту инструкцию.
1. Предупредительные пиктограммы
иинструкции
Внимание
Данным значком отмечены
инструкции, несоблюдение которых
можетпривести копасной ситуации.
Примечание
Дополнительная или важная
информация.
2. Комплект поставки
• Блок наружногодатчика TS36E
• Настоящая инструкция
3. Техника безопасности
• Изделие предназначено толькодля
домашнегоприменения.
• Соблюдатьтехнические характеристики.
• Беречь от влаги ибрызг.
• Не эксплуатировать внепосредственной
близости снагревательными приборами
иберечь от прямых солнечных лучей.
• Не применять взапретных зонах.
• Не размещать рядом смагнитными
полями, металлическими рамками,
компьютерами, окнами ит.д.
Электронные приборы иоконные рамы
негативно сказываютсянаработе
изделия.
• Не ронять. Беречь от сильных ударов.
• Изделие не открывать. Запрещается
эксплуатировать неисправное изделие.
• Запрещается самостоятельно
ремонтировать устройство. Ремонт
разрешается производить только
квалифицированному персоналу.
• Упаковку не давать детям: опасность
асфиксии.
• Утилизировать упаковку всоответствии с
местными нормами.
• Запрещается вносить изменения
вконструкцию. Впротивном
случае гарантийные обязательства
аннулируются.
Внимание. Батареи
• Соблюдатьполярность батарей (+ и -).
Несоблюдение полярности можетстать
причиной взрыва батарей.
• Разрешается применять аккумуляторы
толькоуказанноготипа.
• Перед загрузкой батарей почистить
контакты.
• Запрещается детям заменять батареи
без присмотра взрослых.
• Не применять различные типы или
новые истарые батареи вместе.
• Вслучае большогоперерыв в
эксплуатации удалить батареи из
устройства (кроме случаев, когда
изделие применяется вкачестве
аварийного).
• Не закорачивать контакты батарей.
• Обычные батареи не заряжать.
• Батареи вогонь не бросать.
• Батареи хранить вбезопасном месте
инедавать детям.
• Не открывайте, не разбирайте, не
глотайте инеутилизируйте батареи
сбытовым мусором. Вбатареях
могут содержаться вредные тяжелые
металлы.
• Израсходованные батареи
немедленно удалять из прибора и
утилизировать.
• Избегайте хранения, зарядки и
использования при экстремальных
температурах иэкстремально низком
атмосферном давлении (например,
на большой высоте).
4.
Ввод вэксплуатацию
• Откройте отсекдля батареек (5) и
вставьте две батарейки ААА, соблюдая
правильность полюсов.
• Дополнительно вотсеке для батареек вы
найдете переключатель каналов (4), с
помощью которогоможно переключать
каналы CH1, CH2 и CH3.
• Сдвиньте переключатель каналов
на нужный канал. На дисплее (1)
высветится CH1, CH2 или CH3.
• После этого закройте крышку отсека
для батареек.
Замена батарей
• Откройте отсекбатарей (5), удалите и
утилизируйте старые батареи. Вставьте
две новые батареи АА, соблюдая
полярность. Закройте крышку отсека
батарей.
Примечание
При вводе вэксплуатацию всегда
сначала вставляйте батареи вблок
наружногодатчика, азатем восновной
блок.
5. Монтаж
Инструкция - Монтаж
• Перед тем как монтировать блоки,
рекомендуется сначала завершить
настройки вместах будущей
установки, как описано вглаве 6.
Работа.
• Монтаж следует производить после
того, как правильные настройки
обеспечатнадежную радиосвязь
между блоками.
Инструкция
• Максимально допустимое расстояние
между блоками составляет 30
метров.
• Монтируя блоки, следует учесть,
чторазличные препятствия
(стены, деревья, автомобили,
высоковольтные линии идр.) создают
помехи радиосвязи между блоками.
• Перед монтажом убедитесь, что
вместах расположения блоков
обеспечивается устойчивая
радиосвязь.
• Блок внешнегодатчика должен
размещаться вместе, защищенном
от воздействия прямых солнечных
лучей иосадков.
• Международный стандартвысоты
для измерения влажности воздуха
составляет 1,25 метра (4 фута) над
землей.
Внимание
• Подготовьте монтажный материал
(приобретается отдельно),
соответствующий свойствам стены.
• Перед началом эксплуатации
убедитесь вотсутствии дефектных
или поврежденных деталей.
• При монтаженеприменять
чрезмерных усилий. Впротивном
случае можно повредить устройство.
• Убедитесь, чтостена подходит для
монтажа. Встене на месте монтажа
не должно быть электрической
проводки, газопровода, водопровода
идругих трубопроводов.
• Однакорекомендуется монтировать
внешний блок на стене.
• Спомощью дюбеля закрепите шуруп
на стене.
• Подвесьте блок за соответствующий
паз (3).
6. Эксплуатация
6.1. Соединение сблоком внешнего
датчика
• Чтобы установить соединение между
основным ивнешним блоками,
расположите их как можно ближе
друг кдругу.
• После загрузки батарей основной
блок начинает автоматический
поиск сигнала внешнегодатчика и
выполняет операцию ввода устройства в
эксплуатацию.
• Если соединение автоматически не
установлено, необходимо выполнить
поиск внешнегодатчика вручную.
Инструкция
• Настройка при вводе вэксплуатацию
длится ок.3минут.
• Во время поиска радиосигнала
мигаютзначок радиосвязи и
светодиодный индикатор (2) на блоке
внешнегодатчика.
• Втечение этого времени не
нажимайте кнопки устройства! В
противном случае можетвозникнуть
сбой точной настройки значений и
передачи сигнала.
• Автоматическая настройка
завершена, когданадисплее начнут
отображаться данные измерения
внутри помещения ивне помещения.
• Данные на дисплее основного
блока обновляютсяавтоматически
приблизительно каждые 30 с.
• Если зафиксированная температура
находится нижедиапазона
измерения прибора, то на дисплее
отображается значок LL.L, аесли
выше диапазона измерения прибора
- значок HH.H.
6.2. Выбор канала / дополнительные
внешние датчики
Инструкция
• Чтобы установить соединение,
основной блок ивнешний датчик
должны работатьнаодном канале.
Совместимые основные блоки можно
найти на сайте www.hama.com.
•
Передающий
канал
внешнег
о
да
тчика
из
ко
мплект
ап
ост
авки
изменить невозможно (CH1, CH2,
CH3).
• Блок внешнегодатчика подходит
кследующим основным блокам:
136222, 136293, 136294, 186310,
186311, 186312
6.3. Низкий заряд батарей
Блок внешнего датчика
При возникновении необходимости в
замене батарей рядом со значением
наружной температуры начинает
отображаться значок низкогозаряда
батарей
. Вэтомслучае немедленно
замените батареи.
Инструкция - Замена батарей
• После замены батарей основного
блока иблокавнешнегодатчика
необходимо заново выполнить
синхронизацию блоков.
•
Для
это
го
необх
од
имо
удалить
батареи втом числе из другого
блока, азатем снова загрузить их в
отсекбатарей.
7. Уход итехническое обслуживание
• Чистку изделия производить только
безворсовой слегка влажной салфеткой.
Запрещается применять агрессивные
чистящие средства.
• Следите за тем, чтобы вустройство не
попала вода.
8. Отказ от гарантийных обязательств
Компания Hama GmbH &CoKGне несет
ответственность за ущерб, возникший
вследствие неправильногомонтажа,
подключения ииспользования изделия
не по назначению, атакже вследствие
несоблюдения инструкции по эксплуатации
итехники безопасности.
9. Технические характеристики
Блок внешнего
датчика
Питание
3,0 В
2 батареи АAА
Диапазон измерения
Термометр
Гигрометр
-40°C –+60°C /
-40°F –140°F /
20% –95%
Шаг шкалы
Температура
Влажность воздуха
0,1°C /0,2°F
1%
Цикл измерения
термометра / гигрометра
CH1: 57 s
CH2: 67 s
CH3: 79 s
Гигрометр
Да
Термометр
Да
Частота 433 MHz
излучаемая мощность 0,054 µW
Дальность действия
≤ 30 m
10.
Инструкции по утилизации
Охрана окружающей среды:
Смоментаперехода
национальногозаконодательства
на европейские нормативы
2012/19/EU и 2006/66/EU
действительно следующее:
Электрические иэлектронные приборы, а
такжебатареи запрещается утилизировать
собычным мусором. Потребитель,
согласно закону, обязан утилизировать
электрические иэлектронные приборы,
атакжебатареи иаккумуляторы
после их использования вспециально
предназначенных для этого пунктах сбора,
либо впунктах продажи. Детальная
регламентация этих требований
осуществляется соответствующим местным
законодательством. Необходимость
соблюдения данных предписаний
обозначается особым значком на
изделии, инструкции по эксплуатации или
упаковке. При переработке, повторном
использовании материалов или при
другой форме утилизации бывших в
употреблении приборов Вы помогаете
охране окружающей среды. Всоответствии
спредписаниями по обращению с
батареями, вГермании вышеназванные
нормативы действуютдля утилизации
батарей иаккумуляторов.
11. Декларация производителя
Настоящим компания Hama
GmbH &CoKG заявляет, что
радиооборудование типа
[00186347, 00176933] отвечает
требованиям директивы 2014/53/ЕС. С
полным текстом декларации осоответствии
требованиям ЕС можно ознакомиться
здесь:www.hama.com-
>
00186347,
00176933-
>
Downloads.
Максимальная
излучаемая мощность
4,932 mW
I Istruzioni per l‘uso
Elementi di comando eindicazioni
A
Stazione di misurazione
1. Display (lato anteriore)
=Visualizza la temperatura, l‘umiditàeil
canale al momento impostato
2. IndicatoreaLED (lato anteriore)
=Lampeggia durantelatrasmissionedei
segnali.
3. Foro per montaggio aparete
=Per il montaggio aparete del sensore.
4. Interruttoredel CANALE di trasmissione
(1-3)
=Canale di ingresso della stazione
meteorologica. Impostareilcanale prima
di inserire le batterie.
5. Vano batterie
=L‘apparecchio richiede 2batterie AAA
da 1.5V.
Grazie per avereacquistato un prodotto
Hama!
Prima della messa in esercizio, leggete
attentamente le seguenti istruzioni e
avvertenze, quindi conservatele in un luogo
sicuroper una eventuale consultazione. In
caso di cessione dell‘apparecchio, consegnate
anche le presenti istruzioni al nuovo
proprietario.
1. Spiegazione dei simboli di
avvertimento edelle indicazioni
Attenzione
Viene utilizzato per contrassegnare
le indicazioni di sicurezza oppureper
rivolgerel‘attenzione verso particolari
rischi epericoli.
Avvertenza
Viene utilizzato per contrassegnare
informazioni supplementari oindicazioni
importanti.
2. Contenuto della confezione
• Sensoreesterno TS36E
• Queste istruzioni per l’uso
3. Indicazioni di sicurezza
• Il prodotto èconcepito per l’uso domestico
privato, non commerciale.
• Non mettereinesercizio il prodotto al di
fuori dei suoi limiti di rendimento indicati
nei dati tecnici.
• Non usareilprodotto in ambienti umidi ed
evitareilcontatto con gli spruzzi.
• Evitaredimettereinesercizio il prodotto in
prossimità di riscaldamento, altrefonti di
caloreola luce diretta del sole.
• Non utilizzareilprodotto in zone in cui
non sono ammesse le apparecchiature
elettroniche.
• Non posizionareilprodotto nelle vicinanze
di campi di disturbo, telai metallici,
computer,televisori ecc. Gli apparecchi
elettronici egli inssi delle nestre
compromettono il funzionamento del
prodotto.
• Non farecadereilprodotto enon
sottoporlo aforti scossoni!
• Non aprireilprodotto enon utilizzarlo più
se danneggiato.
• Non tentarediaggiustareoriparare
l’apparecchio da soli. Fare eseguire
qualsiasi lavorodiriparazione al personale
specializzato competente.
• Tenerel’imballo fuori dalla portata dei
bambini, pericolo di soffocamento!
• Smaltireimmediatamente il materiale
d‘imballaggio attenendosi alle prescrizioni
locali vigenti.
• Non apportaremodiche all’apparecchio
per evitarediperdereidiritti di garanzia.
Attenzione –Batterie
• Attenersi semprealla corretta polarità
(scritte +e-)delle batterie einserirle di
conseguenza. La mancata osservanza
comporta la perdita di potenza oil
rischio di esplosione delle batterie.
• Utilizzareunicamente accumulatori (o
batterie) conformi al tipo indicato.
• Prima di inserirelebatterie, pulirei
contatti eicontrocontatti.
• Ibambini possono sostituirelebatterie
solo sotto la sorveglianza degli adulti.
• Non utilizzarebatterie di tipi o
costruttori diversi, né mischiarebatterie
vecchie enuove.
• Toglieresemprelebatterie dai prodotti
che non vengono utilizzati per un
lungo periodo (a meno che non
vengano tenuti aportata di mano per
un‘emergenza).
• Osservaresemprelacorretta polarità
(dicitura+e-) delle batterie einserirle
di conseguenza. La mancata osservanza
comporta la perdita di potenza oil
rischio di esplosione delle batterie.
• Non caricarelebatterie.
• Non gettarelebatterie nel fuoco.
• Conservarelebatterie al di fuori della
portata dei bambini.
• Non aprire, danneggiare, ingerireo
disperderemai nell’ambiente le batterie.
Possono conteneremetalli pesanti
dannosi etossici.
• Rimuovereesmaltireimmediatamente
le batterie scariche.
• Evitarediconservare, caricaree
utilizzarelabatteria atemperature
estreme. econ pressione atmosferica
molto bassa (come ad es. ad alta
quota).
4.
Messa in funzione
• Aprireilvano batterie (5) einseriredue
batterie AAA seguendo la polarità indicata.
• Il vano batterie ospita anche un interruttore
(4) che consente di impostareilcanale
„CH1, CH2 oCH3“.
• Impostarel‘interruttoresul canale
desiderato. Sul display (1) appareCH1,
CH2 oCH3.
• Chiudereilcoperchio del vano batterie.
Sostituzione delle batterie
• Aprireilvano batterie (5), rimuoveree
smaltirelebatterie usate einseriredue
batterie AA nuove con la polarità corretta.
Quindi chiudereilcoperchio del vano
batterie.
Avvertenza
Permettereinfunzione l'apparecchio,
inseriresempreprima le batterie nella
stazione di misura, quindi nella stazione
base.
5. Montaggio
Avvertenza –Installazione
• Si consiglia di collocarelastazione
base edimisuranel luogo di
montaggio desiderato senza montarla
edieffettuaretutte le impostazioni
come descritto al capitolo 6.
Funzionamento.
• Montarela/le stazioni solo dopo avere
effettuato l'impostazione corretta eun
collegamento radio stabile.
Avvertenza
• La portata della trasmissione radio
tralastazione base edimisurazione
all'aperto èdimax. 30m.
•
Prima
del
montaggio
pr
estar
e
attenzione
che
la
tr
asmissione
ra
dio
non
venga impedita da segnali di disturbo
oostacoli come edici, alberi, veicoli,
linee di alta tensione ecc.
• Prima del montaggio denitivo,
accertarsi che trailuoghi di montaggio
desiderati vi sia una ricezione
suciente.
• Durante il montaggio della stazione
di misurazione, accertarsi che il luogo
d'installazione sia protetto dalla luce
diretta del sole edalla pioggia.
• L'altezza standardinternazionale per la
misurazione della temperaturadell'aria
èpari a1,25 m(4ft) dal suolo.
Attenzione
• Procurarsi il materiale di installazione
idoneo per il montaggio alla parete
prevista presso irivenditori specializzati.
•
Ve
ricar
ec
he
non
vengano
montati
pezzi difettosi odanneggiati.
• Non usaretroppa forza, né violenza
durante il montaggio per evitaredi
danneggiareilprodotto.
• Prima di procederealmontaggio,
vericareche la parete sia idonea per
il peso da montareeaccertarsi che nel
punto della parete dove si desidera
appenderel’apparecchio non vi siano
cavi elettrici, né tubazioni di acqua,
gas oaltro.
• Si consiglia di montarelastazione di
misurazione in modo sicuroestabile su
una parete esterna.
• Fissaretasselli, viti, chiodi ecc. alla parete
prevista.
• Agganciarelastazione base/di misurazione
con il foroprevisto (3).
6. Funzionamento
6.1. Connessione alla stazione di
misurazione
• Perconnetteretra di lorolastazione di
misurazione eilsensoreesterno, metterei
due apparecchi il più vicino possibile.
• Dopo avereinserito le batterie, la
stazione base ricerca automaticamente
la connessione alla stazione di misurazione.
• Non effettuarelaconnessione automatica,
ma avviareilprocesso di ricerca manuale
sulla stazione base.
Avvertenza
• La prima congurazione duraca.
3minuti.
•
Dur
ante
il
tentativo
di
connessione,
il
simbolo
della
ra
dio
el
’indicator
e
LED della stazione di misurazione (2)
lampeggiano.
• Non premerealcun tasto in questo lasso
di tempo per evitareerrori eimprecisioni
dei valori edella lorotrasmissione!
• La proceduraèconclusa non appena
sulla stazione base vengono visualizzati
idati di misurazione per l'interno e
l'esterno.
• Ivalori misurati vengono aggiornati
automaticamente dall'apparecchio base
circa ogni 30 secondi.
• Se il valoreditemperaturasitrova
all‘esterno del campo di misurazione,
nell‘indicazione della temperaturaviene
visualizzato LL.L (per temperaturealdi
sotto del campo di misurazione) oppure
HH.H (per temperaturealdisopradel
campo di misurazione).
6.2. Scelta del canale /altre stazioni di
misurazione
Avvertenza
• Attenzione: ènecessario impostarelo
stesso canale per la stazione base ela
stazione di misurazione corrispondente.
Le stazioni di misurazione idonee sono
disponibili sul sito www.hama.com
• Il canale emittente della stazione di
misurazione in dotazione non può
esseremodicato/impostato (CH1,
CH2, CH3).
• La stazione di misurazione ècompatibile
con le seguenti stazioni di base:
136222, 136293, 136294, 186310,
186311, 186312
6.3. Capacità ridotta delle batterie
Stazione di misurazione
Quando ènecessario sostituirelebatterie, sul
display della temperaturainterna ed esterna
viene visualizzato il simbolo delle batterie
scariche
.Sostituireimmediatamente
le batterie.
Avvertenza –sostituzione delle
batterie
• Accertarsi che dopo ogni sostituzione
delle batterie sulla stazione di
misurazione osulla stazione base
avvenga una nuova sincronizzazione
delle stazioni.
•
Estrarreanche le batterie dall'altra
stazione einserirle nuovamente o, se
necessario, sostituirle.
7. Cura emanutenzione
• Pulireilprodotto unicamente con un panno
che non lascia pelucchi eappena inumidito
enon ricorrereadetergenti aggressivi.
•Fareattenzione anon farepenetrareacqua
nel prodotto.
8. Esclusione di garanzia
Hama GmbH &CoKGnon si assume alcuna
responsabilità per idanni derivati dal
montaggio ol‘utilizzo scorretto del prodotto,
nonché dalla mancata osservanza delle
istruzioni per l‘uso e/o delle indicazioni di
sicurezza.
9. Dati tecnici
Stazione di
misurazione
Alimentazione elettrica
3,0 V
2batterie AAA
Campo di misurazione
Termometro
Igrometro
-40°C –+60°C /
-40°F –140°F /
20% –95%
Passi di misurazione
Temperatura
Umidità dell’aria
0,1°C /0,2°F
1%
Ciclo di misurazione
termometro/igrometro
CH1: 57 s
CH2: 67 s
CH3: 79 s
Igrometro
Sì
Termometro
Sì
Frequenza 433 MHz
Adiofrequenza trasmessa 0,054 µW
Portata
≤ 30 m
10.
Indicazioni di smaltimento
Informazioni per protezione ambientale:
Dopo l’implementazione della
Direttiva Europea 2012/19/EU e
2006/66/EU nel sistema legale
nazionale, ci sono le seguenti
applicazioni:
Le apparecchiatureelettriche
ed elettroniche elebatterie non devono
esseresmaltite con iriuti domestici. I
consumatori sono obbligati dalla legge a
restituireIdispositivi elettrici ed elettronici e
le batterie alla ne della lorovita utile ai
punti di raccolta pubblici preposti per
questo scopo onei punti vendita. Dettagli di
quanto riportato sono deniti dalle leggi
nazionali di ogni stato. Questo simbolo sul
prodotto, sul manuale d’istruzioni o
sull’imballo indicano che questo prodotto è
soggetto aqueste regole. Riciclando,
ri-utilizzando imateriali outilizzando sotto
altraforma ivecchi prodotti/le batterie,
darete un importante contributo alla
protezione dell’ambiente.
11. Dichiarazione di conformità
Il fabbricante, Hama GmbH &Co
KG,dichiarache il tipo di
apparecchiaturaradio
[00186347, 00176933] èconforme alla
direttiva 2014/53/UE. Il testo completo della
dichiarazione di conformità UE èdisponibile al
seguente indirizzo Internet:
www.hama.com-
>
00186347,
00176933-
>
Downloads.
Massima potenza a
radiofrequenza trasmessa
4,932 mW
-
 1
1
-
 2
2


Hama 00186347 Manuale del proprietario
- Tipo
- Manuale del proprietario
- Questo manuale è adatto anche per
in altre lingue
- English: Hama 00186347 Owner's manual
- français: Hama 00186347 Le manuel du propriétaire
- español: Hama 00186347 El manual del propietario
- Deutsch: Hama 00186347 Bedienungsanleitung
- русский: Hama 00186347 Инструкция по применению
Documenti correlati
-
Hama 00185850 Manuale utente
-
Hama 00186300 Manuale del proprietario
-
Hama EWS-200 Manuale utente
-
-
-
Hama 186419 Outdoor Sensor TS38G Manuale del proprietario
-
-
Hama 00186345 Manuale del proprietario
-
Hama TS34A Manuale utente
-
Hama 00186351 Manuale del proprietario