
VE805R HDMI HDBaseT-Lite Receiver with Scaler Quick Start Guide VE805R Receptor HDMI HDBaseT-Lite con escalador Guía rápida
Récepteur HDBaseT-Lite HDMI avec convertisseur de format d’image VE805R - Guide de démarrage rapide Ricevitore HDMI HDBaseT-Lite con scaler VE805R - Guida rapida
VE805R HDMI-HDBaseT-Lite-Empfänger mit Skaliereinheit Kurzanleitung Краткое руководство пользователя приемника HDMI HDBaseT-Lite VE805R с преобразователем
www.aten.com www.aten.com
www.aten.com www.aten.com
www.aten.com www.aten.com
Package Contents
1 VE805R HDMI HDBaseT-Lite Receiver with Scaler
1 Power Adapter
1 IR Transmitter
1 IR Receiver
1 Terminal Block
1 User Instructions
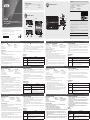
Hardware Review
A
Front View
1. IR Port
2. RS-232 Port
3. HDMI Output Port
4. F/W Upgrade Switch
Firmware Upgrades
The Firmware Upgrade switch is used to upgrade the VE805R from a computer connected via
the RS-232 port.
To upgrade the VE805R,
1. Download the fi rmware upgrade package from our website.
2. Connect a computer to the VE805R’s RS-232 port.
3. Power on the VE805R and turn the F/W Mode switch to ON
4. Reset the VE805R's power to enter fi rmware upgrade mode. The HDMI Out LED blinks
orange every second to indicate the device is in F/W upgrade mode.
5. At this point you can run the fi rmware upgrade package on the computer connected to the
VE805R.
6. After the fi rmware upgrade process is completed, switch the VE805R off, put the F/W Mode
to OFF and power the VE805R back on again.
Panoramica dell’hardware
A
Vista anteriore
1. Porta infrarossi
2. Porta RS-232
3. Porta d’uscita HDMI
4. Interruttore aggiornamento F/W
Aggiornamenti del fi rmware
L’interruttore per l’aggiornamento del fi rmware serve ad aggiornare il VE805R tramite un
computer collegato mediante la porta RS-232.
Per aggiornare il VE805R:
1. Scaricare il pacchetto di aggiornamento del fi rmware dal nostro sito web.
2. Collegare un computer alla porta RS-232 del VE805R.
3. Accendere il VE805R, quindi portare l’interruttore F/W Mode in posizione ON.
4. Riavviare l’alimentazione del VE805R per entrare in modalità di aggiornamento. Il LED
dell’uscita HDMI lampeggia in arancione ogni secondo, indicando che il dispositivo è in
modalità di aggiornamento del fi rmware.
5. Ora sarà possibile eseguire il pacchetto d’aggiornamento sul computer connesso al VE805R.
6. Completata la procedura di aggiornamento del fi rmware, spegnere il VE805R, portare
l’interruttore F/W Mode in posizione OFF e riaccendere il VE805R.
Обзор оборудования
A
Вид спереди
1. ИК-порт
2. Порт RS-232
3. Выход HDMI
4. Переключатель обновления прошивки
Обновление прошивки
Переключатель обновления прошивки используется для обновления VE805R через
компьютер, подключенный по порту RS-232.
Для обновления VE805R выполните следующие действия.
1. Загрузите пакет обновления прошивки с нашего веб-сайта.
2. Подключите компьютер к порту RS-232 устройства VE805R.
3. Включите VE805R и переведите переключатель обновления прошивки в положение «ВКЛ».
4. Перезагрузите VE805R для перехода в режим обновления прошивки. Индикатор
выхода HDMI мигает оранжевым каждую секунду, обозначая работу устройства в
режиме обновления прошивки.
5. Теперь можно запустить пакет обновления прошивки на компьютере, подключенном к
VE805R.
6. После завершения обновления прошивки выключите VE805R, переведите переключатель
обновления прошивки в положение «OFF» (ВЫКЛ), и снова включите VE805R.
Aspectos generales del hardware
A
Vista frontal
1. Puerto de infrarrojos
2. Puerto RS-232
3. Puerto de salida HDMI
4. Interruptor de actualización del fi rmware
Actualizaciones de fi rmware
El conmutador para actualizar el fi rmware sirve para actualizar el VE805R desde una
computadora y a través de una conexión RS-232.
Para actualizar el VE805R:
1. Descárguese el paquete de actualización del fi rmware de nuestro sitio web.
2. Conecte el VE805R al puerto RS-232 de una computadora.
3. Encienda el VE805R y coloque el conmutador para actualización del fi rmware en la posición ON.
4. Apague el VE805R, espere unos segundos y vuelva a encenderlo para activar el modo de
actualización del fi rmware. El indicador LED HDMI Out parpadea una vez por segundo de
color naranja para indicar que el dispositivo se encuentra en modo de actualización del
fi rmware.
5. Ejecute el paquete de actualización del fi rmware en la computadora que está conectada al
VE805R.
6. Cuando la actualización del fi rmware haya concluido, apague el VE805R, coloque el
conmutador para actualización del fi rmware en la posición OFF y vuelva a encender el
VE805R.
Hardware-Übersicht
A
Vorderseitige Ansicht
1. Infrarot-Port
2. RS-232-Port
3. HDMI-Ausgang
4. Schalter für Firmwareaktualisierung
Firmwareaktualisierung
Der Schalter zur Firmwareaktualisierung wird zur Aktualisierung des VE805R mit einem an den
RS-232-Anschluss angeschlossenen Computers benötigt.
So aktualisieren Sie den VE805R:
1. Laden Sie sich das Paket zur Firmwareaktualisierung von unserer Webseite herunter.
2. Verbinden Sie den VE805R über den RS-232-Anschluss mit einem Computer.
3. Schalten Sie den VE805R ein, und schalten Sie den Schalter zur Firmwareaktualisierung ein (ON).
4. Schalten Sie den VE805R aus und nach einigen Sekunden wieder ein, um die Betriebsart zur
Firmwareaktualisierung zu aktivieren. Während das Gerät zur Firmwareaktualisierung bereit
ist, blinkt die LED-Anzeige HDMI Out einmal pro Sekunde.
5. Führen Sie am Computer, der mit dem VE805R verbunden ist, das Paket zur
Firmwareaktualisierung aus.
6. Nachdem die Firmwareaktualisierung beendet ist, schalten Sie den VE805R aus, schieben den
Schalter zur Firmwareaktualisierung in die Positon OFF und schalten den VE805R wieder ein.
Description du matériel
A
Vue avant
1. Port infrarouge
2. Port RS-232
3. Port de sortie HDMI
4. Commutateur de mise à
niveau du microprogramme
Mises à niveau du microprogramme
Le commutateur de mise à niveau du microprogramme sert à mettre à niveau le récepteur
VE805R à partir d’un ordinateur connecté par le biais du port RS-232.
Pour mettre à niveau le récepteur VE805R, procédez comme suit :
1. Téléchargez le package de mise à niveau du microprogramme sur notre site Internet.
2. Connectez un ordinateur au port RS-232 du VE805R.
3. Allumez le VE805R et mettez le commutateur de mise à niveau du microprogramme dans la
position ON.
4. Redémarrez le VE805R pour passer en mode de mise à niveau du microprogramme. Le
voyant de sortie HDMI clignote en orange à intervalles d’une seconde afi n d’indiquer que
l’unité est en mode de mise à jour du microprogramme.
5. Vous pouvez alors exécuter le package de mise à niveau du microprogramme sur l’ordinateur
connecté au VE805R.
6. Une fois le processus de mise à niveau du microprogramme terminé, éteignez le récepteur
VE805R, désactivez le mode de mise à niveau du microprogramme (commutateur dans la
position OFF) et rallumez le VE805R.
Hardware Installation
B
1. Connect the HDMI Output Port on the VE805R to the HDMI Input port on your video display
using an HDMI cable.
2. Connect one end of a Cat 5e/6 cable to the HDBaseT Output port on the I/O board (VM8514).
Then connect the other end of the Cat 5e/6 cable to the HDBaseT Input port on the VE805R.
3. Plug the power adapter cable into the power jack on the VE805R.
4. (Optional) Connect your compter or controller system to the RS-232 terminal blocks on the
VE805R.
5. (Optional) Connect an IR Transmitter/Receiver cable to the IR port on the VE805R.
Operation
LED Display
LED Indication
Power (Green) Lights to indicate that the system is receiving power.
Link (Orange) Lights to indicate that the connection between the VE805R and output
board is established.
HDMI Out
(Orange)
• Lights to indicate that HDMI Output port signal is good.
• Blinks every second to indicate that the device is in F/W upgrade mode.
Installazione dell’hardware
B
1. Collegare la porta d’uscita HDMI del VE805R alla porta d’ingresso HDMI del dispositivo video
tramite un cavo HDMI.
2. Collegare un’estremità del cavo Cat 5e/6 alla porta di uscita HDBaseT della scheda I/O
(VM8514). Collegare quindi l’altra estremità del cavo Cat 5e/6 alla porta d’ingresso HDBaseT
del VE805R.
3. Inserire il cavo dell’alimentatore nella presa d’alimentazione del VE805R.
4. (Opzionale) Collegare il computer o il controller alla morsettiera RS-232 del VE805R.
5. (Opzionale) Collegare il cavo del trasmettitore/ricevitore a infrarossi alla porta infrarossi del
VE805R.
Funzionamento
Indicatore LED
LED Indicazione
Alimentazione
(verde) Si illumina a indicare che il sistema è alimentato.
Collegamento
(arancione)
Si illumina a indicare che il collegamento tra il VE805R e la scheda d’uscita è
attivo.
Uscita HDMI
(arancione)
• Si illumina a indicare che il segnale della porta d’uscita HDMI è buono.
• Lampeggia ogni secondo, indicando che il dispositivo è in modalità di
aggiornamento del fi rmware.
Установка оборудования
B
1. Подключите к выходу HDMI устройства VE805R и входу HDMI устройства
отображения кабель HDMI.
2. Подключите один конец кабеля Cat 5e/6 к выходу HDBaseT на плате ввода/вывода
(VM8514). Затем подключите другой конец кабеля Cat 5e/6 к входу HDBaseT
устройства VE805R.
3. Подключите кабель адаптера питания к гнезду питания устройства VE805R.
4. (Дополнительно) Подключите компьютер или систему управления к блокам выводов
RS-232 устройства VE805R.
5. (Дополнительно) Подключите кабель ИК-передатчика/приемника к ИК-порту
устройства VE805R.
Работа
Индикаторы
Индикатор Назначение
Питание (зеленый) Горит, если система получает питание.
Соединение
(оранжевый)
Горит, если установлено соединение между VE805R и платой
вывода.
Выход HDMI
(оранжевый)
• Горит, если сигнал на выходе HDMI хорошего качества.
• Мигает каждую секунду, если устройство находится в режиме
обновления прошивки.
Instalar el hardware
B
1. Conecte el puerto de salida HDMI del VE805R al puerto de entrada HDMI de su dispositivo de
visualización. Para ello, emplee un cable HDMI.
2. Conecte un extremo del cable de Cat. 5e/6 a la salida HDBaseT de la tarjeta E/S (VM8514).
Luego conecte el otro extremo del cable de Cat. 5e/6 al puerto de entrada HDBaseT del
VE805R.
3. Conecte el cable del adaptador de alimentación a la entrada de alimentación del VE805R.
4. (Opcional) Conecte su computadora o una controladora al bloque de terminales RS-232 del
VE805R.
5. (Opcional) Conecte el transmisor/receptor de infrarrojos al puerto para infrarrojos del VE805R.
Funcionamiento
Indicador LED
Indicador LED Indicación
Power (verde) Se enciende cuando el sistema está recibiendo corriente eléctrica.
Link (naranja) Se enciende para indicar que se ha establecido la conexión entre el VE805R y
la tarjeta de salida.
HDMI Out
(naranja)
• LSe enciende para indicar que la señal del puerto HDMI de salida es buena.
• Parpadea una vez por segundo para indicar que el dispositivo se encuentra
en el modo de actualización del fi rmware.
Hardware installieren
B
1. Verbinden Sie den HDMI-Ausgang am VE805R mit dem HDMI-Eingang Ihres Anzeigegerätes.
Verwenden Sie dazu ein passendes HDMI-Kabel.
2. Verbinden Sie ein Ende eines Kat. 5e/6-Kabels mit dem HDBaseT-Ausgang der E/A-Karte
(VM8514). Verbinden Sie anschließend das andere Ende des Kat. 5e/6-Kabels mit dem
HDBaseT-Eingang des VE805R.
3. Verbinden Sie das Kabel des Netzteils mit der Stromeingangsbuchse am VE805R.
4. (Optional) Verbinden Sie Ihren Computer oder eine Steuereinheit mit dem Anschlussblock des
VE805R.
5. (Optional) Schließen Sie das Kabel des Infrarot-Senders/-Empfängers an die Infrarotbuchse des
VE805R an.
Bedienung
LED-Anzeige
LED-Anzeigen Anzeige
Power (grün) Leuchtet, wenn das System mit Strom gespeist wird.
Link (orange) Leuchtet, wenn eine Verbindung zwischen dem VE805R und der Aus-
gangssteckkarte besteht.
HDMI Out
(orange)
• Leuchtet, wenn die Qualität des HDMI-Ausgangssignals gut ist.
• Blinkt einmal pro Sekunde, wenn sich das Gerät im Modus zur
Firmwareaktualisierung befi ndet.
Installation du matériel
B
1. Connectez le port de sortie HDMI du récepteur VE805R au port d’entrée HDMI de votre
périphérique vidéo à l’aide d’un câble HDMI.
2. Connectez une extrémité d’un câble de catégorie 5e/6 au port de sortie HDBaseT de la carte E/
S (VM8514). Ensuite, connectez l’autre extrémité du câble de catégorie 5e/6 au port d’entrée
HDBaseT du récepteur VE805R.
3. Branchez le câble de l’adaptateur secteur dans la prise d’alimentation du VE805R.
4. (Facultatif) Connectez votre ordinateur ou votre système de commande au bloc de connexion
du récepteur VE805R.
5. (Facultatif) Connectez le câble d’un émetteur/récepteur infrarouge au port infrarouge du
VE805R.
Fonctionnement
Affi chage des voyants
Voyant Indication
Voyant d’alimentation (vert) (Power) S'allume pour indiquer que le système est sous tension.
Voyant de liaison (orange) (Link) S’allume pour indiquer que la connexion entre le récepteur
VE805R et la carte de sortie est établie.
Voyant de sortie HDMI (Orange)
(HDMI Out)
• S’allume pour indiquer que le signal du port de sortie
HDMI est de bonne qualité.
• Clignote à intervalles d’une seconde afi n d’indiquer que
l’unité est en mode de mise à jour du microprogramme.
AHardware Review
BHardware Installation
© Copyright 2015 ATEN® International Co., Ltd.
ATEN and the ATEN logo are trademarks of ATEN International Co., Ltd. All rights reserved. All
other trademarks are the property of their respective owners.
This product is RoHS compliant.
Part No. PAPE-1223-D50G Printing Date: 03/2015
HDMI HDBaseT-Lite Receiver with Scaler
Quick Start Guide
VE805R
Rear View
1. HDBaseT Input Port
2. Power Jack
Vista posteriore
1. Porta d’ingresso HDBaseT
2. Presa d’alimentazione
Вид сзади
1. Вход HDBaseT
2. Гнездо питания
Vista posterior
1. Puerto de entrada HDBaseT
2. Entrada de alimentación
Rückseitige Ansicht
1. HDBaseT-Eingangsport
2. Stromeingangsbuchse
Top View
1. HDMI Out LED
2. Link LED
3. Power LED
Vista dall’alto
1. LED uscita HDMI
2. LED di collegamento
3. LED d’alimentazione
Вид сверху
1. Индикатор выхода HDMI
2. Индикатор соединения
3. Индикатор питания
Vista superior
1. Indicador LED de salida HDMI
2. Indicador de enlace (Link)
3. Indicador de alimentación
Draufsicht
1. LED-Anzeige des
HDMI-Ausgangs
2. Verbindungsanzeige
3. LED-Betriebsanzeige
Vue supérieure
1. Voyant de sortie HDMI
(HDMI Out)
2. Voyant de liaison (Link)
3. Voyant d’alimentation (Power)
Vue arrière
1. Port d’entrée HDBaseT
2. Prise d’alimentation
Important Notice
Considering environmental protection, ATEN does not provide a fully printed user manual for this product.
If the information contained in the Quick Start Guide is not enough for you to confi gure and operate your
product, please visit our website www.aten.com, and download the full user manual.
Online Registration
http://eservice.aten.com
Technical Phone Support
International:
886-2-86926959
All information, documentation, fi rmware, software utilities, and specifi cations contained in this package are
subject to change without prior notifi cation by the manufacturer. Please visit our website http://www.aten.
com/download/?cid=dds for the most up-to-date versions.
EMC Information
FEDERAL COMMUNICATIONS COMMISSION INTERFERENCE STATEMENT:
This equipment has been tested and found to comply with the limits for a Class A digital device, pursuant to Part 15 of the
FCC Rules. These limits are designed to provide reasonable protection against harmful interference when the equipment is
operated in a commercial environment. This equipment generates, uses, and can radiate radio frequency energy and, if not
installed and used in accordance with the instruction manual, may cause harmful interference to radio communications.
Operation of this equipment in a residential area is likely to cause harmful interference in which case the user will be
required to correct the interference at his own expense.
FCC Caution: Any changes or modifi cations not expressly approved by the party responsible for compliance could void the
user's authority to operate this equipment.
CE Warning: This is a class A product. In a domestic environment this product may cause radio interference in which case
the user may be required to take adequate measures.
Suggestion: Shielded twisted pair (STP) cables must be used with the unit to ensure compliance with FCC & CE standards.
This device complies with Part 15 of the FCC Rules. Operation is subject to the following two conditions:(1) this device mat
not cause harmful interference, and(2) this device must accept any interference received, including interference that may
cause undesired operation.
The following contains information that relates to China:
North America:
1-888-999-ATEN Ext: 4988
United Kingdom:
44-8-4481-58923
이 기기는 업무용(A급) 전자파 적합기기로서 판매자 또는 사용자는 이점을 주의하시기 바라며, 가정외
의 지역에서 사용하는 것을 목적으로합니다.
123
1 2
1 2
3 4
Front View
Rear View
Top View
3
4
5
2
1
(Front View)
(Rear View)
La pagina sta caricando ...
-
 1
1
-
 2
2


in altre lingue
- English: ATEN VE805R Quick start guide
- français: ATEN VE805R Guide de démarrage rapide
- español: ATEN VE805R Guía de inicio rápido
- Deutsch: ATEN VE805R Schnellstartanleitung
- русский: ATEN VE805R Инструкция по началу работы
- português: ATEN VE805R Guia rápido
- 日本語: ATEN VE805R クイックスタートガイド