
Switch DisplayPort / HDMI / VGA VE3912T con trasmettitore HDBaseT
www.aten.com
Conmutador DisplayPort / HDMI / VGA VE3912T con transmisor HDBaseT
www.aten.com
VE3912T DisplayPort / HDMI / VGA Switch mit HDBaseT Sender
www.aten.com
Commutateur DisplayPort / HDMI / VGA VE3912T avec émetteur HDBaseT
www.aten.com
© Copyright 2020 ATEN
®
International Co., Ltd.
ATEN and the ATEN logo are trademarks of ATEN International Co., Ltd. All rights reserved. All
other trademarks are the property of their respective owners.
Part No. PAPE-1223-T50G Printing Date: 01/2020
DisplayPort / HDMI / VGA Switch with
HDBaseT Transmitter
Quick Start Guide
VE3912T
VE3912T DisplayPort / HDMI / VGA Switch with HDBaseT Transmitter
www.aten.com
ATEN VanCryst
™
B
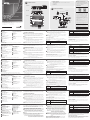
Package Contents
1 VE3912T DisplayPort / HDMI / VGA Switch with HDBaseT Transmitter
1 RS-232 Terminal Block
1 Power Adapter
4 Foot Pads
1 User Instructions
Hardware Installation
Front View
Rear View
Top View
A
Hardware Review
A
Hardware Review
Front View
1
DisplayPort Input Port
2
HDMI Input Port
3
VGA Input Port
4
Audio Input
5
Source Switch Pushbutton
Rear View
1
HDBaseT Output Port
2
HDBaseT Long Reach Mode Switch /
Firmware Upgrade Switch
3
RS-232 Serial Port
4
IR Port
5
HDMI Output Port
6
Power Jack
5
(Optional) To receive IR signals to remotely control a device (e.g. blu-
ray disc) connected to the video receiver, connect an IR emitter to the
VE3912T’s IR Port and an IR receiver to the VE2812R’s IR Port or vice versa.
Note: To purchase an IR emitter and an IR remote control, contact your
local sales representative for more information.
6
(Optional) Plug the power adapter cable into the Power Jack for additional
power supply.
Note: The VE3912T prioritizes the power supply from the power adapter
when the Power Adapter is plugged in.
Source Input Operation
Press the Source Switch Pushbutton on the VE3912T to switch between
different input sources – Auto, DisplayPort, HDMI, and VGA. Refer to the table
below for details.
Input Source Description
Auto (Default) The VE3912T automatically sets the latest source device
connected as priority and transmits the detected input to the
connected receiver.
DisplayPort The VE3912T only transmits the DisplayPort source to the
connected receiver.
HDMI The VE3912T only transmits the HDMI source to the
connected receiver.
VGA The VE3912T only transmits the VGA source and its audio
input to the connected receiver.
Working in Long Reach Mode
The VE3912T supports long reach mode. When this mode is applied, the
maximum range can be enhanced to 150 meters at resolutions up to 1080p.
Please refer to the user manual for details.
Compatible Receivers
The VE3912T is compatible with the following ATEN receivers: VE2812R ,
VE1812R, VE811R, VE812R, VE814AR, VE801R, VE802R, VE601R, VE901R,
VP1421, or future ATEN HDBaseT Receivers.
Troubleshooting
The Firmware Upgrade Switch is reserved for tech support. If you would like to
do a fi rmware upgrade yourself, please contact ATEN technical support.
B
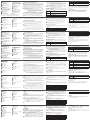
Hardware Installation
1
Connect the DisplayPort, HDMI, and/or VGA Input Port on the VE3912T
to the DisplayPort, HDMI, and/or VGA sources using the required cables
respectively. If VGA is connected, then you need to connect the VGA audio
jack to the Audio Input on the VE3912T to transmit sound.
2
Connect the HDMI Output Port on the VE3912T to an HDMI-enabled
display.
3
Connect the Ethernet cable to the HDBaseT Output Port on the transmitter,
and connect the other end to the HDBaseT input port on the receiver for
transmission and power supply.
Note: This HDBaseT output port is PoH PD ready, therefore you can
connect the PoH PSE ready device such as VP1421 or VE44PB for
power delivery, and no power adapter is required.
4
(Optional) Connect your computer or a control system to the terminal block
on the VE3912T. The RS-232 Serial Port supports Command Mode and
Bypass Mode, please refer to the user manual for details.
Source Input Indication LEDs:
6
Auto LED
7
DisplayPort LED
8
HDMI LED
9
VGA LED
Top View
1
HDMI / VGA / DisplayPort Input
Status LED
2
Link LED
3
Power LED
VE3912T - переключатель DisplayPort / HDMI / VGA с передатчиком HDBaseT
www.aten.com
이 기기는 업무용(A급) 전자파적합기기로서 판매자 또는 사용자는 이 점을
주의하시기 바라며, 가정외의 지역에서 사용하는 것을 목적으로 합니다.
EMC Information
FEDERAL COMMUNICATIONS COMMISSION INTERFERENCE
STATEMENT:
This equipment has been tested and found to comply with the limits
for a Class A digital device, pursuant to Part 15 of the FCC Rules.
These limits are designed to provide reasonable protection against
harmful interference when the equipment is operated in a commercial
environment. This equipment generates, uses, and can radiate radio
frequency energy and, if not installed and used in accordance with
the instruction manual, may cause harmful interference to radio
communications. Operation of this equipment in a residential area
is likely to cause harmful interference in which case the user will be
required to correct the interference at his own expense.
FCC Caution: Any changes or modifi cations not expressly approved by
the party responsible for compliance could void the user's authority to
operate this equipment.
Warning: Operation of this equipment in a residential environment
could cause radio interference.
Suggestion: Shielded twisted pair (STP) cables must be used with the
unit to ensure compliance with FCC & CE standards.
This device complies with Part 15 of the FCC Rules. Operation is subject
to the following two conditions:(1) this device mat not cause harmful
interference, and(2) this device must accept any interference received,
including interference that may cause undesired operation.
Important. Before proceeding, download the Installation and
Operation Manual by visiting the website, www.aten.com and
navigating to the product page. The manual includes important
warnings, loading specifi cations and grounding instructions.
Achtung: Der Gebrauch dieses Geräts in Wohnumgebung kann
Funkstörungen verursachen.
S
upport and Documentation Notice
All information, documentation, fi rmware, software utilities,
and specifi cations contained in this package are subject to
change without prior notifi cation by the manufacturer.
To reduce the environmental impact of our products, ATEN
documentation and software can be found online at
http://www.aten.com/download/
Technical Support
www.aten.com/support
1 2 3
1 2 3 4 5
6 7 8 9
1 2 3 4 5 6
1
1
2
3
4
5
6
Example: VE2812R
Power Adapter
HDMI, DisplayPort, or VGA Source
HMI Display
ATEN Control Box
PC
Control Pad
oror
Scan for more information
ATEN Website User Manual
A
Description de l’appareil
Vue de devant
1
Port d’entrée DisplayPort
2
Port d'entrée HDMI
3
Port d’entrée VGA
4
Entrée audio
5
Bouton-poussoir de commutation de source
Vue de derrière
1
Port de sortie HDBaseT
2
Commutateur de mode longue portée
HDBaseT / Commutateur de mise à
niveau du microprogramme
3
Port série RS-232
4
Port IR
5
Ports de sortie HDMI
6
Prise d’alimentation
commande et le Mode de contournement, veuillez consulter le manuel de
l’utilisateur pour plus de détails.
5
(Optionnel) Afi n de recevoir les signaux IR pour contrôler un appareil à
distance (par ex. un disque bluray) connecté au récepteur vidéo, connectez
un émetteur IR au port IR du VE3912T et un récepteur IR au port IR du
VE2812R ou vice versa.
Remarque : Pour acheter un émetteur IR et une télécommande IR, contactez
votre représentant local des ventes pour plus d’informations.
6
(Optionnel) Branchez le câble de l’adaptateur secteur dans la prise
d’alimentation pour une alimentation supplémentaire.
Remarque : Le VE3912T donne la priorité à l’alimentation provenant de
l’adaptateur secteur si ce dernier est branché.
Fonctionnement de l’entrée source
Appuyez sur le bouton poussoir du commutateur de source du VE3912T afi n
de basculer entre les différentes sources d’entrée – Automatique, DisplayPort,
HDMI et VGA. Consultez le tableau ci-dessous pour des détails.
Source
d’entrée
Description
Automatique
(par défaut)
Le VE3912T défi nit automatiquement le dernier appareil
source connecté comme prioritaire et transmet l’entrée
détectée au récepteur connecté.
DisplayPort Le VE3912T transmet uniquement la source DisplayPort au
récepteur connecté.
HDMI Le VE3912T transmet uniquement la source HDMI au
récepteur connecté.
VGA Le VE3912T transmet uniquement la source VGA et son
entrée audio au récepteur connecté.
Fonctionnement en mode longue portée
Le VE3912T prend en charge le mode longue portée. Lorsque ce mode est appliqué,
la portée maximum peut être prolongée jusqu’à 150 mètres, à des résolutions jusque
1080p. Veuillez consulter le manuel de l'utilisateur pour plus de détails.
Récepteurs compatibles
Le VE3912T est compatible avec les récepteurs ATEN suivants : VE2812R,
VE1812R, VE811R, VE812R, VE814AR, VE801R, VE802R, VE601R, VE901R,
VP1421 ou futurs récepteurs ATEN HDBaseT.
Dépannage
Le port de mise à niveau du microprogramme est réservé au support
technique. Si vous voulez faire une mise à niveau du fi rmware vousmême,
veuillez contacter l’assistance technique ATEN.
B
Installation matérielle
1
Connectez le port d’entrée DisplayPort, HDMI et/ou VGA sur le VE3912T
aux sources DisplayPort, HDMI et/ou VGA en utilisant respectivement les
câbles requis. Si le VGA est connecté, alors vous devez connecter la prise
audio VGA à l’entrée audio du VE3912T afi n de transmettre le son.
2
Connectez le port de sortie HDMI sur le VE3912T à un écran compatible
HDMI.
3
Connectez le câble Ethernet au port de sortie HDBaseT de l’émetteur, puis
connectez l’autre extrémité au Port d’entrée HDBaseT du récepteur pour la
transmission et l’alimentation.
Remarque : Ce port de sortie HDBaseT est compatible PoH PD, donc, vous
pouvez connecter un appareil compatible PoH PSE tel que
le VP1421 ou le VE44PB pour le transfert d’alimentation et
aucun adaptateur secteur n’est requis.
4
(Optionnel) Connectez votre ordinateur ou un système de contrôle au
bornier du VE3912T. Le port série RS-232 prend en charge le Mode de
Diodes d’indication de
l’entrée source :
6
LED automatique
7
Diodes DisplayPort
8
LED HDMI
9
LED VGA
Vue de dessus
1
LED d'état de l'entrée HDMI /
VGA / DisplayPort
2
Diode de lien
3
Voyant d’alimentation
A
Hardwareübersicht
Ansicht von vorne
1
DisplayPort Eingangsanschluss
2
HDMI Eingangsanschluss
3
VGA Eingangsanschluss
4
Audioeingang
5
Quellenschalter Drucktaste
Ansicht von hinten
1
HDBaseT Ausgangsanschluss
2
HDBaseT Lange Reichweite Modus
Schalter / Schalter für Firmware-
Aktualisierung
3
RS-232 serieller Anschluss
4
IR Anschluss
5
HDMI Ausgangsanschluss
6
Netzadapterbuchse
5
(Optional) Um IR-Signale zur Fernsteuerung eines an den Videoempfänger
angeschlossenen Geräts (z.B. Bluray Disc) zu empfangen, schließen Sie
einen IR-Sender an den IR-Anschluss des VE3912T und einen IR-Empfänger
an den IR-Anschluss des VE2812R an oder umgekehrt.
Hinweis: Wenden Sie sich für weitere Informationen an Ihren örtlichen
Vertriebsmitarbeiter, um einen IR-Sender und eine
IR-Fernbedienung zu erwerben.
6
(Optional) Stecken Sie das Netzteilkabel in die Netzbuchse für eine
zusätzliche Stromversorgung.
Hinweis: Der VE3912T bevorzugt die Stromversorgung über das Netzteil,
wenn das Netzteil eingesteckt ist.
Quelleneingang bedienen
Drücken Sie die Taste für den Quellenwechsel am VE3912T, um zwischen den
verschiedenen Eingangsquellen – Auto, DisplayPort, HDMI und VGA zu
wechseln. Einzelheiten entnehmen Sie bitte der folgenden Tabelle.
Eingangsquelle
Beschreibung
Auto
(Standard)
Der VE3912T stellt automatisch das zuletzt angeschlossene
Quellgerät als Priorität ein und überträgt den erkannten
Eingang an den angeschlossenen Empfänger.
DisplayPort Der VE3912T sendet nur die DisplayPort-Quelle an den
angeschlossenen Empfänger.
HDMI Der VE3912T sendet nur die HDMI-Quelle an den
angeschlossenen Empfänger.
VGA Der VE3912T sendet nur die VGA-Quelle und ihren
Audioeingang an den angeschlossenen Empfänger.
Im Lange Reichweite Modus arbeiten
Der VE3912T unterstützt den Reichweite Modus. Wenn dieser Modus
angewandt wird, kann die maximale Reichweite auf 150 Meter erweitert
werden, bei Aufl ösungen bis 1080p. Einzelheiten entnehmen Sie bitte dem
Benutzerhandbuch.
Kompatible Empfänger
Der VE3912T ist mit den folgenden ATEN Empfängern kompatibel: VE2812R,
VE1812R, VE811R, VE812R, VE814AR, VE801R, VE802R, VE601R, VE901R,
VP1421 oder zukünftigen ATEN HDBaseT Empfängern.
Fehlerbehebung
Der Port für die Firmware-Aktualisierung ist für den technischen Support
reserviert. Wenn Sie die Firmware selbst aktualisieren möchten, wenden Sie
sich bitte an den technischen Support von ATEN.
B
Installation der Hardware
1
Verbinden Sie den DisplayPort, HDMI und/oder VGA Eingangsanschluss des
VE3912T mit den jeweils erforderlichen Kabeln mit den DisplayPort, HDMI
und/oder VGA Quellen. Wenn VGA angeschlossen ist, müssen Sie die VGA
Audiobuchse mit dem Audioeingang des VE3912T verbinden, um den Ton
zu übertragen.
2
Verbinden Sie den HDMI Ausgangsanschluss des VE3912T mit einem
HDMI-fähigen Bildschirm.
3
Schließen Sie das Ethernet-Kabel an den HDBaseT Ausgangsanschluss des
Senders an und verbinden Sie das andere Ende mit dem HDBaseT
Eingangsanschluss des Empfängers zur Übertragung und Stromversorgung.
Hinweis: Dieser HDBaseT Ausgangsanschluss ist PoH PD fähig. Sie können
ein PoH PSE fähiges Gerät wie das VP1421 oder VE44PB zur
Stromversorgung anschließen ohne ein Netzteil zu benötigen.
4
(Optional) Schließen Sie Ihren Computer oder ein Steuersystem an den
Anschlussblock des VE3912T an. Der serielle RS-232 Anschluss unterstützt
den Befehlsmodus und den Bypass-Modus. Einzelheiten entnehmen Sie
bitte dem Benutzerhandbuch.
Quelleingang Anzeige LEDs:
6
Auto-LED
7
DisplayPort-LED
8
HDMI-LED
9
VGA-LED
Ansicht von oben
1
HDMI / VGA / DisplayPort
Eingang Status-LED
2
Link-LED
3
Betriebszustands-LED
A
Panoramica hardware
Vista anteriore
1
Porta ingresso DisplayPort
2
Porta ingresso HDMI
3
Porta ingresso VGA
4
Ingresso audio
5
Pulsante push scambio sorgente
Vista posteriore
1
Porta uscita HDBaseT
2
Interruttore modalità lunga distanza
HDBaseT / Interruttore aggiornamento
fi rmware
3
Porta seriale RS-232
4
Porta IR
5
Porta uscita HDMI
6
Presa di alimentazione
5
(Opzionale) Per ricevere i segnali IR per il controllo remoto di un dispositivo (ad
esempio un disco blu-ray) collegato al ricevitore video, collegare un emettitore IR
alla porta IR del VE3912T e un ricevitore IR alla porta IR del VE2812R o viceversa.
Nota: Per acquistare un emettitore IR e un telecomando IR, contattare il
rappresentante vendite locale per ulteriori informazioni.
6
(Opzionale) Collegare il cavo dell'adattatore di alimentazione al jack di
alimentazione per ulteriore alimentazione.
Nota: il VE3912T da priorità all'alimentazione dall'alimentatore quando è
collegato l'Adattatore.
Uso dell'ingresso sorgente
Premere il pulsante push Scambio sorgente sul VE3912T per passare alle
diverse sorgenti di ingresso: Auto, DisplayPort, HDMI e VGA. Consultare la
tabella di seguito per i dettagli.
Sorgente
ingresso
Descrizione
Auto
(Predefi nito)
Il VE3912T imposta automaticamente l'ultimo dispositivo sor-
gente collegato come priorità e trasmette l'ingresso rilevato al
ricevitore collegato.
DisplayPort Il VE3912T trasmette al ricevitore collegato solo la sorgente
DisplayPort.
HDMI Il VE3912T trasmette al ricevitore collegato solo la sorgente
HDMI.
VGA Il VE3912T trasmette al ricevitore collegato solo la sorgente
VGA e il relativo ingresso audio.
Funzionamento in Modalità lunga distanza
VE3912T supporta la Modalità lungo distanza. Quando si applica questa
modalità, il raggio massimo può essere ampliato a 150 metri, con risoluzioni
fi no a 1080p. Consultare il manuale utente per ulteriori informazioni.
Ricevitori compatibili
Il VE3912T è compatibile con i seguenti ricevitori ATEN: VE2812R, VE1812R,
VE811R, VE812R, VE814AR, VE801R, VE802R, VE601R, VE901R, VP1421 o i
futuri ricevitori HDBaseT di ATEN.
Risoluzione dei problemi
La porta aggiornamento fi rmware è riservata al supporto tecnico. Per effettua-
re un aggiornamento fi rmware da soli, contattare il supporto tecnico ATEN.
B
Installazione hardware
1
Collegare la porta ingresso DisplayPort, HDMI, e/o VGA sul VE3912T alle
sorgenti DisplayPort, HDMI, e/o VGA utilizzando i rispettivi cavi. Se è colle-
gato il VGA, è necessario collegare il jack audio VGA all'ingresso audio sul
VE3912T per trasmettere l'audio.
2
Collegare la porta uscita HDMI sul VE3912T a un display dotato di HDMI.
3
Collegare il cavo Ethernet alla porta uscita HDBaseT sul trasmettitore, quin-
di collegare l'altra estremità alla porta ingresso HDBaseT sul ricevitore per la
trasmissione e l'alimentazione.
Nota: Questa porta uscita HDBaseT è pronta per PoH PD, pertanto è possibile
collegare un dispositivo dotato di PoH PSE come VP1421 o VE44PB per
l'alimentazione, non è pertanto necessario alcun alimentatore.
4
(Opzionale) Collegar il computer o il sistema di controllo al blocco terminale
sul VE3912T. La porta seriale RS-232 supporta la Modalità comando e la
Modalità bypass, consultare il manuale per ulteriori informazioni.
LED indicazione ingresso sorgente:
6
LED auto
7
LED DisplayPort
8
LED HDMI
9
LED VGA
Vista lato superiore
1
LED stato ingresso HDMI / VGA /
DisplayPort
2
LED collegamento
3
LED di accensione
A
Presentación del hardware
Vista frontal
1
Puerto de entrada DisplayPort
2
Puerto de entrada HDMI
3
Puerto de entrada VGA
4
Entrada de audio
5
Pulsador de cambio de fuente
Vista posterior
1
Puerto de salida HDBaseT
2
Interruptor de modo de largo alcance
HDBaseT / Interruptor de actualización
de fi rmware
3
Puerto serie RS-232
4
Puerto de infrarrojos
5
Puerto de salida HDMI
6
Entrada de alimentación
5
(Opcional) Para recibir señales de infrarrojos para controlar de forma remota
un dispositivo (p. ej., un disco Bluray) conectado al receptor de vídeo,
conecte un emisor de infrarrojos al puerto de infrarrojos del VE3912T y un
receptor de infrarrojos al puerto de infrarrojos del VE2812R, o viceversa.
Nota: Para adquirir un emisor de infrarrojos y un mando a distancia por
infrarrojos, póngase en contacto con el representante de ventas local
para obtener más información.
6
(Opcional) Conecte el cable del adaptador de alimentación a la toma de
alimentación para un suministro de alimentación adicional.
Nota: El VE3912T da prioridad al suministro de alimentación del adaptador
de alimentación cuando el adaptador de alimentación esté conectado.
Operación de entrada de fuente
Presione el pulsador de cambio de fuente del VE3912T para cambiar entre las
distintas fuentes de entrada: Automático, DisplayPort, HDMI y VGA. Consulte
la siguiente tabla para más información.
Fuente de
entrada
Descripción
Automático
(predeterminado)
El VE3912T establece automáticamente como prioridad el
último dispositivo fuente conectado y transmite la entrada
detectada al receptor conectado.
DisplayPort El VE3912T solo transmite la fuente DisplayPort al receptor
conectado.
HDMI El VE3912T solo transmite la fuente HDMI al receptor
conectado.
VGA El VE3912T solo transmite la fuente VGA y su entrada de
audio al receptor conectado.
Trabajar en modo de largo alcance
El VE3912T admite el modo de largo alcance. Cuando se aplica este modo,
el alcance máximo se puede extender hasta 150 metros, con resoluciones de
hasta 1080p. Consulte el manual de usuario para obtener más información.
Receptores compatibles
El VE3912T es compatible con los siguientes receptores ATEN: VE2812R,
VE1812R, VE811R, VE812R, VE814AR, VE801R, VE802R, VE601R, VE901R,
VP1421 o los futuros receptores HDBaseT de ATEN.
Solución de problemas
El puerto de actualización de fi rmware se reserva para el soporte técnico. Si
desea realizar una actualización de fi rmware, póngase en contacto con el
soporte técnico de ATEN.
B
Instalación del hardware
1
Conecte el puerto de entrada DisplayPort, HDMI y/o VGA del VE3912T a las
fuentes DisplayPort, HDMI y/o VGA utilizando los cables correspondientes.
Si se conecta una fuente VGA, tendrá que conectar el conector de audio
VGA a la entrada de audio del VE3912T para transmitir sonido.
2
Conecte el puerto de salida HDMI del VE3912T a una pantalla compatible
con HDMI.
3
Conecte el cable Ethernet al puerto de salida HDBaseT del transmisor y, a
continuación, conecte el otro extremo al puerto de entrada HDBaseT del
receptor para la transmisión y el suministro de alimentación.
Nota: Este puerto de salida HDBaseT es compatible con PoH PD, por lo que
puede conectar un dispositivo compatible PoH PSE como el VP1421
o el VE44PB para el suministro de alimentación y no será necesario
ningún adaptador de alimentación.
4
(Opcional) Conecte su ordenador o sistema de control al bloque de
terminales del VE3912T. El puerto serie RS-232 admite el Modo de comando
y el Modo bypass. Para más información, consulte el manual de usuario.
Indicadores LED de entrada
de fuente:
6
LED automático
7
Indicador LED de DisplayPort
8
LED HDMI
9
LED VGA
Vista superior
1
LED de estado de entrada
HDMI / VGA / DisplayPort
2
LED de enlace
3
LED de alimentación
A
Обзор аппаратного обеспечения
Вид спереди
1
Входной разъем DisplayPort
2
Входной разъем HDMI
3
Входной разъем VGA
4
Звуковой вход
5
Кнопка переключения источника
Вид сзади
1
Выходной порт HDBaseT
2
Переключатель режима Long
Reach HDBaseT / Переключатель
обновления прошивки
3
Последовательный порт RS-232
4
ИК-порт
5
Выходной разъем HDMI
6
Разъем питания
4
(Необязательно) Подключите компьютер или систему управления к
разъему на VE3912T. Последовательный порт RS-232 поддерживает
командный режим и режим обхода; подробности см. в руководстве
пользователя.
5
(Необязательно) Чтобы принимать ИК-сигналы для дистанционно-
го управления устройством (например, плеером дисков Blu-ray),
подключенным к приемнику видео, подключите ИК-передатчик к ИК-
порту VE3912T, а ИК-приемник - к ИК-порту VE2812R, или наоборот.
Примечание: Чтобы купить ИК-передатчик и ИК-пульт ДУ,
обратитесь за дополнительной информацией к
нашему местному торговому представителю.
6
(Необязательно) Для использования дополнительного источника
питания вставьте штекер кабеля адаптера питания в гнездо питания.
Примечание: когда подсоединен адаптер питания, VE3912T в качестве
приоритетного источника питания использует адаптер
питания.
Работа с источниками входного сигнала
Для переключения между разными источниками входного сигнала (Авто,
DisplayPort, HDMI и VGA) нажимайте кнопку переключения источника на
VE3912T. Подробности см. в следующей таблице.
Источник
входного
сигнала
Описание
Авто (по умол-
чанию)
VE3912T автоматически устанавливает последнее подключен-
ное устройство-источник в качестве приоритетного и передает
обнаруженный входной сигнал на подключенный приемник.
DisplayPort VE3912T передает на подключенный приемник только сигнал с
DisplayPort-источника.
HDMI VE3912T передает на подключенный приемник только сигнал с
источника сигнала HDMI.
VGA VE3912T передает на подключенный приемник только сигнал с
источника сигнала VGA и своего звукового входа.
Работа в режиме Long Reach
VE3912T поддерживает режим Long Reach. При работе в этом режиме макси-
мальный диапазон можно увеличить до 150 метров, а разрешение до 1080p.
Дополнительные сведения см. в руководстве пользователя.
Совместимые приемники
VE3912T совместим со следующими приемниками ATEN: VE2812R, VE1812R,
VE811R, VE812R, VE814AR, VE801R, VE802R, VE601R, VE901R, VP1421 или
будущими моделями приемников HDBaseT компании ATEN.
Поиск и устранение неисправностей
Разъем обновления встроенного ПО зарезервирован для технической под-
держки. Чтобы самостоятельно выполнить обновление встро
енного ПО,
обратитесь в службу технической поддержки ATEN.
B
Установка аппаратного обеспечения
1
Подключите входные разъемы DisplayPort, HDMI и/или VGA на VE3912T
к источникам DisplayPort, HDMI и/или VGA с помощью соответствующих
кабелей. Если подключаете VGA, то подключите звуковой разъем
VGA-источника к звуковому входу на VE3912T для передачи звука.
2
Подключите выходной разъем HDMI на VE3912T к разъему HDMI на
дисплее.
3
Подключите кабель Ethernet к выходному порту HDBaseT на
передатчике, а другой конец подключите к входному порту HDBaseT
на приемнике для передачи сигнала и подачи питания.
Примечание: Этот выходной порт HDBaseT поддерживает технологию
PoH PD, поэтому для подачи питания вы можете подклю-
чить устройство с поддержкой PoH PSE, такое как VP1421
или VE44PB, чтобы не использовать адаптер питания.
Индикаторы источника
входного сигнала:
6
Индикатор AUTO
7
Индикатор DisplayPort
8
Индикатор HDMI
9
Индикатор VGA
Вид сверху
1
Индикатор состояния входа
HDMI / VGA / DisplayPort
2
Индикатор канала
3
Индикатор питания
La pagina sta caricando ...
-
 1
1
-
 2
2


in altre lingue
- English: ATEN VE3912T Quick start guide
- français: ATEN VE3912T Guide de démarrage rapide
- español: ATEN VE3912T Guía de inicio rápido
- Deutsch: ATEN VE3912T Schnellstartanleitung
- русский: ATEN VE3912T Инструкция по началу работы
- português: ATEN VE3912T Guia rápido
- polski: ATEN VE3912T Skrócona instrukcja obsługi
- 日本語: ATEN VE3912T クイックスタートガイド
- Türkçe: ATEN VE3912T Hızlı başlangıç Kılavuzu