Jungborn Three 52 Manuale utente
- Categoria
- Supporti per altoparlanti
- Tipo
- Manuale utente

1
EN
FR
IT
NL
SE
CZ
SK
RO
Montageanleitung Wand-WC
Assembly Instructions Wall-Mounted Toilet
Notice de montage WC suspendu
Istruzioni di montaggio WC a parete
Montagehandleiding hangtoilet
Monteringsinstruktion för väggmonterad WC-stol
Návod k montáži nástěnného WC
Montážny návod nástenného WC
DE
PL
Instrucţiuni de montaj pentru WC suspendat
Instrukcja montażu muszli klozetowej wiszącej
THREE 52
Art.10520522
Version: 06/23

2
1
2
3
4
5
6
8
7
I
I
1A ×1
6A ×1
7A ×2

DE
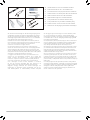
Lesen Sie die Anweisungen vor der Benutzung sorgfältig durch
und bewahren Sie diese zum späteren Nachschlagen auf! Verwen
den Sie für die tägliche Reinigung nur handelsübliche Badreiniger.
Kalkablagerungen und Seifenreste lassen sich z. B. mit handelsüb
lichen Kalkentferner oder Essigreinigern entfernen.
EN Read the instructions carefully before use and keep them for
future reference! For daily cleaning use only commercial bath clea
ners. Lime scale and soap residue can be removed with
commercial lime remover or vinegar cleaners.
FR Lisez attentivement ces instructions et conservezles pour
pouvoir les consulter ultérieurement ! Pour le nettoyage quotidien,
utilisez uniquement des produits nettoyants courants pour salle
de bain. Les dépôts de calcaire et les résidus de savon peuvent par
exemple être éliminés avec des produits détartrants ou des produits
nettoyants au vinaigre vendus dans le commerce.
IT Leggere con attenzione le istruzioni prima dell’utilizzo e con
servarle per una consultazione successiva. Per la pulizia quo
tidiana, utilizzare solo detergenti per il bagno disponibili in
commercio. I depositi di calcare e i residui di sapone possono es
sere rimossi, ad esempio, con prodotti per la rimozione del cal
care o detergenti a base di aceto disponibili in commercio.
NL
Lees de instructies zorgvuldig door vóór gebruik en be
waar ze, zodat u later nog iets kunt naslaan! Gebruik voor de
dagelijkse reiniging uitsluitend een normale badreiniger. Kal
kafzettingen en zeepresten kunnen bijvoorbeeld met een nor
male kalkverwijderaar of schoonmaakazijn worden verwijderd.
SE Läs noggrant igenom anvisningarna, innan du använder produk
ten, och förvara dem för framtida bruk. Använd endast gängse
toalettrengöringsmedel för den dagliga rengöringen. Kalkavlagringar
och tvålrester kan t ex tas bort med gängse kalkborttagningsmedel
eller vinägerrengöringsmedel.
CZ Před použitím si pozorně přečtěte pokyny a návod si dobře uscho
vejte pro pozdější použití! Pro každodenní čištění používejte běžné
čističe koupelen. Usazeniny vápníku a zbytky mýdla lze odstranit
např. běžnými odstraňovači vápníku nebo octovými čističi.
SK Prečítajte si pred použitím pozorne pokyny a uschovajte si návod
pre neskoršie možné nahliadnutie! Používajte na denné čistenie iba
bežný obchodný čistič do kúpeľní. Usadeniny vodného kameňa a
zvyšky mydla sa dajú odstrániť bežným obchodným odstraňovačom
vodného kameňa alebo octovými čističmi.
RO Citiţi cu atenţie şi în întregime instrucţiunile înainte de utilizarea
produsului şi păstraţile pentru a putea f consultate ulterior! Pentru
curăţarea zilnică folosiţi numai produse uzuale pentru curăţarea băii.
Depunerile de calcar şi resturile de săpun se pot îndepărta de ex. cu
produse uzuale pt. îndepărtarea calcarului sau produse de curăţare pe
bază de oţet.
PL Przed przystąpieniem do użytkowania produktu należy uważnie
przeczytać niniejsze zalecenia i przechować je na później! Do ciągłego
utrzymywania produktu w czystości używać tylko zwykłych środków
dostępnych w handlu. Osady wapniowe i resztki mydła można
usuwać przy pomocy odkamieniaczy dostępnych powszechnie w
handlu i roztworu octu do czyszczenia.
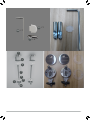
3
DE Dieses
Zubehör
ist
nicht
im
Einbausatz
enthalten.
EN These
accessories
are
not
in
the
installation
kit.
FR Ces
accessoires
ne
font
pas
partie
du
kit
d'installation.
IT Questi
accessori
non
fanno
parte
del
kit
di
installazione.
NL Deze
accessoires
zitten
niet
in
de
installatiekit.
SV Dessa
tillbehör
ingår
inte
i
installationssatsen.
CZ Toto
příslušenství
není
součástí
instalační
sady.
SK Toto
príslušenstvo
nie
je
súčasťou
inštalačnej
sady.
RO Aceste
accesorii
nu
sunt
incluse
în
kitul
de
instalare.
PL Akcesoria
te
nie
znajdują
się
w
zestawie
montażowym.
PH
2×100
PH
2×100
PH
2×250
PH
2×
S L4×100

2
4
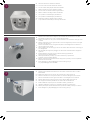
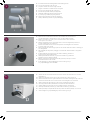
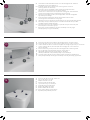
DE Messen Sie den Abstand des Ansaugrohrs an der Wand und markieren Sie ihn mit dem
Buchstaben A (Einlaufrohr ist nicht im Lieferumfang enthalten)
EN Measure the distance of inlet pipe on the wall and mark it with the letter A (inlet pipe is not
included)
FR Mesurez la distance entre le tuyau d'arrivée et le mur et désignez-la par la lettre A (le tuyau
d'arrivée n'est pas fourni)
IT Misurare la distanza del tubo di ingresso sulla parete e contrassegnarla con la lettera A (il
tubo di ingresso non è incluso)
NL Meet de afstand van de invoerpijp op de muur en markeer deze met de letter A (invoerpijp is
niet meegeleverd)
SV Mät avståndet på inloppsröret på väggen och markera det med bokstaven A (inloppsröret
ingår inte)
CZ Změřte vzdálenost vstupního potrubí na stěně a označte jej písmenem A
(Vstupní potrubí není součástí balení)
SK Odmerajte vzdialenosť prívodnej rúry na stene a označte si ju písmenom A
(prívodná rúra nie je súčasťou balenia)
RO Măsurați distanța de la țeava de alimentare de pe perete și marcați-o cu litera A (țeava de
alimentare nu este inclusă)
PL Zmierz odległość rury doprowadzającej w ścianie i oznacz ją literą A
(rury doprowadzającej brak w zestawie)
DE Dies ist die Toilette mit installiertem Zubehör.
EN This is the toilet with some accessories installed.
FR Voici les toilettes avec quelques accessoires installés.
IT Questa è la toilette con alcuni accessori installati.
NL Dit is het toilet met enkele accessoires geïnstalleerd.
SV Detta är toaletten med några tillbehör installerade.
CZ Toto je toaleta s nainstalovaným příslušenstvím.
SK Toto je toaleta s nainštalovaným príslušenstvom.
RO Aceasta este toaleta cu câteva accesorii instalate.
PL To jest toaleta z zainstalowanymi niektórymi akcesoriami.
DE Messen Sie den Abstand des Zulaufrohrs an der Toilette und markieren Sie ihn mit dem
Buchstaben B
EN Measure the distance of inlet pipe on the toilet and mark it with the letter B
FR Mesurez la distance entre le tuyau d'arrivée et les toilettes et désignez-la par la lettre B
IT Misurare la distanza del tubo di ingresso sul water e contrassegnarla con la lettera B
NL Meet de afstand van de invoerpijp op het toilet en markeer deze met de letter B
SV Mät inloppsrörets avstånd på toaletten och markera det med bokstaven B
CZ Změřte vzdálenost vstupního potrubí na toaletě a označte ji písmenem B
SK Odmerajte vzdialenosť prívodnej rúry na záchode a označte si ju písmenom B
RO Măsurați distanța de la țeava de alimentare de pe vasul de toaletă și marcați-o cu litera B
PL Zmierz odległość rury doprowadzającej w muszli i oznacz ją literą B
3
1

5
4
5
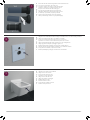
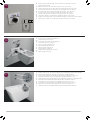
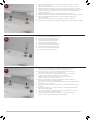
DE Schneiden Sie das überschüssige Material des Ansaugrohrs ab
EN Cut the extra material of the inlet pipe
FR Coupez le matériau en excès du tuyau d'arrivée
IT Tagliare il materiale in eccesso del tubo di ingresso
NL Snij het extra materiaal van de invoerpijp af
SV Skär av överskjutande material på inloppsröret
CZ Odřízněte nadbytečný materiál vstupního potrubí
SK Z prívodnej rúry odrežte prebytočný materiál
RO Tăiați surplusul de material al țevii de alimentare
PL Odetnij nadmiarowy materiał rury doprowadzającej
DE Messen Sie den Abstand des Abflussrohrs an der Wand und markieren Sie ihn
mit dem Buchstaben C (Abflussrohrs ist nicht im Lieferumfang enthalten)
EN Measure the distance of outlet pipe on the wall and mark it with the letter C
(outlet pipe is not included)
FR Mesurez la distance entre le tuyau d’évacuation et le mur et désignez-la par la lettre C
(le tuyau d'évacuation n'est pas fourni)
IT Misurare la distanza del tubo di uscita sulla parete e contrassegnarla con la lettera C
(il tubo di uscita non è incluso)
NL Meet de afstand van de afvoerpijp op de muur en markeer deze met de letter C (afvoerpijp is
niet meegeleverd)
SV Mät avståndet på utloppsröret på väggen och markera det med bokstaven C (inloppsröret
ingår inte)
CZ Změřte vzdálenost výstupního potrubí na stěně a označte jej písmenem C
(výstupní potrubí není součástí balení)
SK Odmerajte vzdialenosť odtokovej rúry na stene a označte si ju písmenom C
(odtoková rúra nie je súčasťou balenia)
RO Măsurați distanța de la țeava de evacuare de pe perete și marcați-o cu litera C
(țeava de evacuare nu este inclusă)
PL Zmierz odległość rury odprowadzającej w ścianie i oznacz ją literą C
(rury odprowadzającej brak w zestawie)
DE Messen Sie den Abstand des Abflussrohrs an der Toilette und markieren Sie ihn mit dem
Buchstaben D
EN Measure the distance of outlet pipe on the toilet and mark it with the letter D
FR Mesurez la distance entre le tuyau d'évacuation et les toilettes et désignez-la par la lettre D
IT Misurare la distanza del tubo di uscita sul water e contrassegnarla con la lettera D
NL Meet de afstand van de afvoerpijp op het toilet en markeer deze met de D
SV Mät utloppsrörets avstånd på toaletten och markera det med bokstaven D
CZ Změřte vzdálenost výstupního potrubí na toaletě a označte ji písmenem D
SK Odmerajte vzdialenosť prívodnej rúry na záchode a označte si ju písmenom D
RO Măsurați distanța de la țeava de evacuare de pe vasul de toaletă și marcați-o cu litera D
PL Zmierz odległość rury odprowadzającej w muszli i oznacz ją literą D
6

12
8
6
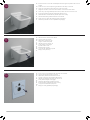
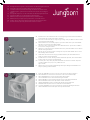
DE Hängen Sie die schalldämpfende Unterlage an die Wand (nicht im Lieferumfang enthalten)
EN Hang the soundproofing pad on the wall(not included)
FR Accrochez le panneau d'insonorisation au mur (non fourni)
IT Appendere il cuscinetto insonorizzante alla parete (non incluso)
NL Hang het geluiddempende kussen aan de muur (niet meegeleverd)
SV Häng upp ljudkontrolldynan på väggen (ingår inte)
CZ Zavěste odhlučňovací podložku na stěnu (není součástí balení)
SK Na stenu zaveste zvukovoizolačnú podložku (nie je súčasťou balenia)
RO Fixați placa fonoizolantă pe perete (neinclusă)
PL Zawieś podkładkę wyciszającą na ścianie (brak w zestawie)
7DE Schneiden Sie das überschüssige Material des Auslassrohrs ab
EN Cut the extra material of the outlet pipe
FR Coupez le matériau en excès du tuyau d'évacuation
IT Tagliare il materiale in eccesso del tubo di uscita
NL Snij het extra materiaal van de afvoerpijp af
SV Skär av överskjutande material på utloppsröret
CZ Odřízněte nadbytečný materiál výstupního potrubí
SK Z odtokovej rúry odrežte prebytočný materiál
RO Tăiați surplusul de material al țevii de evacuare
PL Odetnij nadmiarowy materiał rury odprowadzającej
DE Hängen Sie die Toilette an die Wand
EN Hang the toilet on the wall
FR Accrochez les toilettes au mur
IT Appendere il water alla parete
NL Hang het toilet aan de muur
SV Häng upp toaletten på väggen
CZ Zavěste toaletu na zeď
SK Záchod zaveste na stenu
RO Fixați vasul de toaletă pe perete
PL Powieś muszlę na ścianie
13
9

7
DE Zeichnen Sie die Linie auf der schalldämpfenden Unterlage entsprechend der Form der
Toilette.
EN Draw the line on the soundproofing pad based on the shape of the toilet
FR Tracez sur le panneau d'insonorisation la forme des toilettes
IT Disegnare la linea sul cuscinetto insonorizzante in base alla forma del water
NL Teken de lijn op het geluiddempende kussen op basis van de vorm van het toilet
SV Rita linjen på ljudkontrolldynan baserad på toalettens form
CZ Nakreslete čáru na odhlučňovací podložku podle tvaru toalety
SK Na zvukovoizolačnej podložke obkreslite tvar záchodu
RO Trasați conturul vasului de toaletă pe placa fonoizolantă
PL Nanieś obrys kształtu muszli na podkładce wyciszającej
DE Nehmen Sie die Toilette von der Wand
EN Take the toilet off the wall
FR Détachez les toilettes du mur
IT Togliere il water dalla parete
NL Haal het toilet van de muur af
SV Ta av toaletten från väggen
CZ Sejměte toaletu se zdi
SK Záchod zveste zo steny
RO Luați vasul de toaletă de pe perete
PL Zdejmij muszlę ze ściany
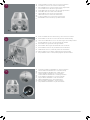
12 DE Entfernen Sie die schalldämpfende Unterlage von der Wand
EN Take the soundproofing pad off the wall
FR Détachez le panneau d'insonorisation du mur
IT Togliere il cuscinetto insonorizzante dalla parete
NL Haal het geluiddempende kussen van de muur af
SV Ta av ljudkontrolldynan från väggen
CZ Odstraňte odhlučňovací podložku ze stěny
SK Zvukovoizolačnú podložku dajte dolu zo steny
RO Luați placa fonoizolantă de pe perete
PL Zdejmij ze ściany podkładkę wyciszającą
10
11

14
13
8
DE Schneiden Sie die Schalldämmunterlage entlang der Linie zu
EN Cut the soundproofing pad along the line
FR Découpez le panneau d'insonorisation en suivant le tracé
IT Tagliare il cuscinetto insonorizzante lungo la linea
NL Knip het geluiddempende kussen langs de lijn door
SV Skär ljudkontrolldynan utmed linjen
CZ Odřízněte odhlučňovací podložku podél linie
SK Zvukovoizolačnú podložku odrežte podľa obkreslenej čiary
RO Decupați placa fonoizolantă de-a lungul conturului trasat
PL Przetnij podkładkę wyciszającą wzdłuż linii obrysu
DE Hängen Sie die Schallschutzmatte an die Wand
EN Hang the soundproofing pad on the wall
FR Accrochez le panneau d'insonorisation au mur
IT Appendere il cuscinetto insonorizzante alla parete
NL Hang het geluiddempende kussen aan de muur
SV Häng upp ljudkontrolldynan på väggen
CZ Zavěste odhlučňovací podložku na stěnu
SK Zvukovoizolačnú podložku zaveste na stenu
RO Fixați placa fonoizolantă pe perete
PL Zawieś podkładkę wyciszającą na ścianie
15 DE Tragen Sie das Schmieröl auf die Dichtungsringe in der Wand auf, um den Einbau zu erleichtern
EN Apply the lubricating oil to the seal rings inside the wall for easier installation
FR Appliquez de l'huile lubrifiante sur les joints d'étanchéité à l'intérieur du mur pour faciliter
l'installation
IT Applicare l’olio lubrificante agli anelli di tenuta all’interno della parete per facilitare l’installazione
NL Breng de smeerolie aan op de dichtingsringen in de muur voor een gemakkelijke installatie
SV Applicera smörjolja på förseglingsringarna inne i väggen för en enklare installation
CZ Pro snazší montáž naneste mazací olej na těsnicí kroužky uvnitř stěny
SK Pre jednoduchšiu inštaláciu naneste na tesniace krúžky v stene mazací olej
RO Lubrifiați garniturile inelare de etanșare din interiorul peretelui pentru a ușura instalarea
PL Nałóż olej smarowy na pierścienie uszczelniające w ścianie, aby ułatwić montaż

16
17
9
DE Stecken Sie die Rohre in die Löcher an der Wand
EN Put the pipes into the holes on the wall
FR Introduisez les tuyaux dans les trous du mur
IT Inserire i tubi nei fori della parete
NL Plaats de pijpen in de gaten in de muur
SV Sätt rören i hålen på väggen
CZ Vložte trubky do otvorů na stěně
SK Rúry vložte do otvorov v stene
RO Introduceți țevile în orificiile din perete
PL Włóż rury do otworów w ścianie
DE Tragen Sie Schmieröl auf die Außenseite des Dichtungsrings am Einlassrohr und auf die
Innenseite des Dichtungsrings am Auslassrohr auf, um den Einbau zu erleichtern
EN Apply the lubricating oil to the outside of the seal ring on the inlet pipe and the inside of the
seal ring on the outlet pipe for easier installation
FR Appliquez de l'huile lubrifiante sur l'extérieur du joint d'étanchéité du tuyau d'arrivée et sur
l'intérieur du joint d'étanchéité du tuyau d'évacuation pour faciliter l'installation
IT Applicare l’olio lubrificante all’esterno dell’anello di tenuta sul tubo di ingresso e all’interno
dell'anello di tenuta sul tubo di uscita per facilitare l’installazione
NL Breng smeerolie aan op de buitenkant van de afdichtingsring op de invoerpijp en de
binnenkant van de afdichtingsring op de afvoerpijp voor een gemakkelijke installatie
SV Applicera smörjoljan på utsidan av förseglingsringen på inloppsröret och på insidan av
förseglingsringen på utloppsröret för att förenkla installationen
CZ Pro snadnější montáž naneste mazací olej na vnější stranu těsnicího kroužku na vstupním
potrubí a vnitřní stranu těsnicího kroužku na výstupním potrubí
SK Pre jednoduchšiu inštaláciu naneste mazací olej na vonkajšiu stranu tesniaceho krúžku na
prívodnej rúre aj na vnútornú stranu tesniaceho krúžku na odtokovej rúre
RO Lubrifiați exteriorul garniturii de etanșare de pe țeava de alimentare și interiorul garniturii de
etanșare de pe țeava de evacuare pentru a ușura instalarea
PL Nałóż olej smarowy na zewnątrz pierścienia uszczelniającego rury doprowadzającej i
wewnątrz pierścienia uszczelniającego rury odprowadzającej, aby ułatwić montaż
18
/
7A
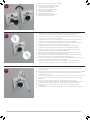
DE Setzen Sie 7A in die Schraube an der Wand ein und drehen Sie sie, bis die Kerbe der Bolzen
7A nach oben zeigt.
EN Put 7A into the screw on the wall and rotate it until the notch of the bolts 7A is pointing upwards.
FR Engagez 7A dans la vis du mur et faites tourner jusqu'à ce que l'encoche des boulons 7A
soit orientée vers le haut.
IT Inserire 7A nella vite sulla parete e ruotarlo finché la tacca dei bulloni 7A non è rivolta verso l’alto.
NL Steek 7A in de schroef op de muur en draai deze totdat de inkeping van de bouten 7A naar
boven wijst.
SV Sätt 7A i skruven på väggen och rotera den tills bultarnas 7A hack pekar uppåt.
CZ Vložte 7A do šroubu na stěně a otáčejte jím, dokud zářez šroubů 7A nebude směřovat nahoru.
SK 7A vložte do skrutky v stene a otáčajte, kým nebude zárez čapov 7A smerovať nahor.
RO Așezați 7A pe șurubul de pe perete și răsuciți-l până când fanta de pe șuruburile 7A este
orientată în sus.
PL Załóż 7A na śrubę w ścianie i obracaj, aż wcięcie na śrubach 7A będzie skierowane do góry.

/
10
DE Schieben Sie die Toilette auf die Bolzen 7A.
EN Slide the toilet on the bolts 7A.
FR Faites glisser les toilettes sur les boulons 7A.
IT Far scorrere il water sui bulloni 7A.
NL Schuif het toilet op de bouten 7A.
SV Sätt på toaletten på bultarna 7A.
CZ Nasuňte toaletu na šrouby 7A.
SK Záchod nasuňte na čapy 7A.
RO Glisați vasul de toaletă pe șuruburile 7A.
PL Nasuń muszlę na śruby 7A.
DE Drehen Sie 5A mit der L-förmigen Schraube 6A durch das Befestigungsloch des Sitzbezugs.
EN Rotate the 5A through the seat cover fitting hole with L-shaped screw 6A.
FR Faites pivoter 5A dans le trou de fixation du couvercle du siège avec la vis en L 6A.
IT Ruotare 5A attraverso il foro di montaggio del coprisedile con la vite a L 6A.
NL Draai de 5A door het bevestigingsgat van de zittingafdekking met de L-vormigeschroef 6A.
SV Rotera 5A genom sätesövertäckningens hål med den L-formade skruven 6A.
CZ Otočte 5A otvorem pro upevnění krytu sedadla pomocí šroubu tvaru L 6A.
SK 5A otáčajte cez upevňovací otvor krytu sedadla pomocou skrutky v tvare L 6A.
RO Rotiți 5A prin orificiul de prindere al capacului cu șurubul în formă de L 6A.
PL Obracaj 5A przez otwór montażowy deski za pomocą wkrętaka 6A w kształcie L.
DE Stellen Sie sicher, dass die Größe "a" auf der Toilette mit der Größe "a" auf der
Schraube übereinstimmt.
EN Make sure size "a" on the toilet is the same as size "a" on the screw
FR Assurez-vous que la taille "a" de la toilette est la même que la taille "a" de la vis.
IT Assicurarsi che la misura "a" della toilette corrisponda alla misura "a" della vite.
NL Zorg ervoor dat maat "a" op het toilet dezelfde is als maat "a" op de schroef.
SV Se till att storlek "a" på toaletten är samma som storlek "a" på skruven.
CZ Ujistěte se, že velikost "a" na toaletě je stejná jako velikost "a" na šroubu.
SK Uistite sa, že veľkosť "a" na záchode je rovnaká ako veľkosť "a" na skrutke
RO Asigurați-vă că dimensiunea "a" de pe toaletă este aceeași cu dimensiunea "a" de pe șurub.
PL Upewnij się, że rozmiar "a" na toalecie jest taki sam jak rozmiar "a" na śrubie
19
a
7A
/
20
6A
/
5A
/
21

11
DE Fügen Sie Klebstoff in den Spalt zwischen der Toilette und der Wand ein
EN Add sealant to the gap between the toilet and the wall
FR Appliquez mastic dans l'espace entre les toilettes et le mur
IT Aggiungere della sigillante allo spazio tra il water e la parete
NL Breng afdichtmiddel aan in de opening tussen het toilet en de muur
SV Applicera tätningsmedel i mellanrummet mellan toaletten och väggen
CZ Přidejte tmel do mezery mezi toaletou a stěnou
SK Do medzery medzi záchodom a stenou pridajte tmel
RO Adăugați etanșant în spațiul dintre vasul de toaletă și perete
PL Wprowadź szpachlówka w szczelinę między toaletą a ścianą
22

1
2
3
4
5
6
8
7
I
I
×2
12
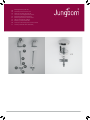
DE Montageanleitung
WC-Sitz
EN Assembly
instructions
WC
seat
FR Notice
de
montage
siège
de
WC
IT Istruzioni
di
montaggio
sedile
per
WC
NL Montagehandleiding
toiletzitting
SV Monteringsinstruktion
för
WC-sitsen
CZ Návod
k
montáži
WC
sedátka
SK Montážny
návod
sedadla
WC
RO Instrucţiuni
de
montaj
pentru
scaunul
de
WC
PL Instrukcje
montażu
deski
sedesowej

13
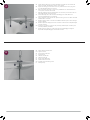
DE Stellen Sie den Klappstift (7) und die Schraube (4) parallel ein und stecken Sie
diese in die dafür vorgesehenen Löcher in der Toilette .
EN Adjust the folding pin (7) and bolt (4) to the parallel direction, then plug them
into the designated holes on the toilet.
FR Mettez la broche à anneau (7) et la vis (4) parallèlement et insérez-la dans les
trous prévus à cet effet dans le WC.
IT Mettere parallele la spina di ribaltamento (7) e la vite (4), quindi inserirle nei fori
della tazza del WC previsti allo scopo.
NL Stel de kantelpen (7) en de schroef (4) evenwijdig in en steek deze in de
hiervoor bedoelde gaten in de toiletpot.
SV Ställ in vikstiftet (7) och skruven (4) i parallell riktning, och stick in dem i de därför
avsedda hålen i toaletten.
CZ Nastavte sklopný kolík (7) a šroub (4) souběžně a zastrčte je do k tomu určených
otvorů v toaletě.
SK Nastavte paralelne sklopný kolík (7) a skrutku (4) a zastrčte ich do naplánovaných
otvorov v toalete.
RO Ajustaţi ştiftul pliabil (7) şi şurubul (4) pe direcţie paralelă, apoi introduceţi-le în
orificiile prevăzute pe toaletă.
PL Ustaw ruchomy trzpień (7) i śrubę (4) do kierunku równoległego, następnie
wprowadź do odpowiadających im otworów w muszli.
DE Ziehen Sie die Schraube fest.
EN Tighten the bolt.
FR Serrez la vis fermement.
IT Serrare la vite.
NL Draai de schroef vast.
SV Dra åt skruven på.
CZ Šroub pevně dotáhněte.
SK Riadne utiahnite skrutku.
RO Strângeţi corespunzător şurubul.
PL Zaciśnij śrubę.
A
7
4
/
/
B

14
DE Verschrauben Sie die Edelstahlschrauben (4) mit der Montageplatte (2), sodass die
Montageplatte noch leicht beweglich ist.
EN Screw the stainless steel screws (4) to the mounting plate (2) so that the
mounting platecan still move easily.
FR Vissez les vis en acier inoxydable (4) avec la plaque de montage (2) de sorte
que la plaque de montage puisse encore bouger aisément.
IT Avvitare le viti in acciaio inox (4) con la piastrina di montaggio(2), inmanierataleche
la piastrinadi montaggio stessa si possa ancora muove con facilità.
NL Schroef de rvs-schroeven (4) vast op de montageplaat(2), zodat de montageplaat
nog makkelijk kan bewegen.
SV Skruva fast monteringsplattan (2) med de rostfria stålskruvarna (4), så att
monteringsplattan fortfarande kan röra sig något.
CZ Nerezovými šrouby (4) přišroubujte montážní desku (2) tak, aby byla ještě lehcepohyblivá.
SK Zoskrutkujte skrutky z ušľachtilej ocele (4) s montážnou doskou (2) tak, aby sa dala
montážna doska ešte zľahka pohybovať.
RO Înşurubaţi şuruburile din oţel inoxidabil (4) cu placa de montaj (2), astfel încât placa
de montaj să fie încă mobilă cu uşurinţă.
PL Wkręć śruby ze stali nierdzewnej (4) do płytki montażowej (2), tak aby ciągle
możliwy był łatwy ruch płytki montażowej
DE Stecken Sie den WC-Sitz auf die Zapfen der Montageplatte (2), bis dieser einrastet.
EN Push the WC seat onto the pins of the mounting plate (2) until it snaps into position.
FR Insérez l’abattant de WC sur les tenons de la plaque de montage (2) jusqu'à ce qu’il s’enclenche.
IT Inserire il sedile per WC sui perni della piastrina di montaggio (2), finché il sedile non
scatta in posizione.
NL Steek de toiletzitting over de pennen van de montageplaat (2) tot deze vergrendelt .
SV Sätt upp WC-sitsen på nylonplattans (2) tappar, tills den rastar in.
CZ Nasuňte WC sedátko na kolíky montážní desky (2), až zaskočí.
SK Nasúvajte sedadlo WC na čap montážnej dosky (2), kým nezaklapne.
RO Introduceţi scaunul de WC pe cepurile plăcii de montaj (2),până ce se fixează scaunul.
PL Wciśnij deskę sedesową na kołki płytki montażowej (2), tak aby zatrzasnąć ją w położeniu.
DE Richten Sie den WC-Sitz auf der Toilette aus.
EN Align the WC seat on the toilet.
FR Adaptez l’abattant sur le WC.
IT Allineare il sedile per WC alla tazza.
NL Lijn de toiletzitting uit op de toiletpot.
SV Justera WC-sitsen på toalettstolen.
CZ Nastavte WC sedátko na toaletě.
SK Nastavte sedadlo WC na toalete.
RO Aliniaţi scaunul de WC pe vasul toaletei.
PL Wyrównaj deskę sedesową na muszli.
C
4
2
4
2
2
D
E

15
DE Richten Sie den WC-Sitz senkrecht nach oben aus.Ziehen Sie diesen dann nach oben
weg, um ihn zu entfernen.
EN Align the WC vertically towards the top. Next, pull the seat up vertically to remove it.
FR Adaptez l’abattant verticalement vers le haut.Tirez-le ensuite vers lehaut pour l’enlever.
IT Allineare il sedile per WC verticalmente, verso l’alto. Quindi tirarlo verso l’alto per rimuoverlo.
NL Lijn de toiletzitting verticaal naar boven uit.Trek deze vervolgens naar boven toe weg
om deze te verwijderen.
SV Justera WC-sitsen vertikalt uppåt. Dra den sedan uppåt, och ta bort den.
CZ Nastavte WC sedátko svisle nahoru. Potom jej vytáhněte směrem nahoru,abyste jej sundali.
SK Nasmerujte sedadlo WC zvisle smerom hore. Potom ho vytiahnite smerom hore,
aby ste ho odstránili.
RO Aliniaţi scaunul de WC vertical în sus. Apoi trageţi-l în sus spre a îl îndepărta.
PL Wyrównaj toaletę pionowo do góry. Następnie pociągnij deskę pionowo w górę,aby ją zdjąć.
DE Schrauben Sie nun die Montageplatten (2) fest.
EN Now, screw the mounting plates (2) tight.
FR Vissez ensuite les plaques de montage (2).
IT Serrare ora le piastrine di montaggio (2).
NL Schroef nu de montageplaten (2) vast.
SV Skruva därefter fast monteringsplattorna (2).
CZ Nyní pevně přišroubujte montážní desky (2).
SK Potom riadne utiahnite montážne dosky (2).
RO Acum înşurubaţi strâns plăcile de montaj (2).
PL Dokręć do końca płytki montażowe (2).
DE Stecken Sie nun die Abdeckkappe (1) auf die Montageplatte (2) und setzen
Sie anschließend den Sitz wieder auf die Zapfen, bis dieser einrastet.
EN Now, slide the cover cap (1) onto the mounting plate (2) before pushing the
toilet seat back onto the pins so that it snaps into place.
FR Insérez ensuite le capuchon (1) sur la plaque de montage (2), puis poussez de
nouveau l’abattant de WC sur les tenons pour qu’il s’enclenche.
IT Applicare il cappuccio (1) sulla piastrina di montaggio (2), poi reinserire il
sedile sui perni finché non scatta in posizione.
NL Plaats nu het afdekkapje (1) op de montageplaat (2) en plaats vervolgens de
zitting weer over de pennen tot deze vergrendelt .
SV Sätt nu på locket (1) på monteringsplattan (2), och skjut därefter upp toalettsitsenpå
tapparna igen, så att den rastar in.
CZ Nyní nasaďte krytku (1) na montážní desku (2) a opět nasaďte WC sedátko na kolíky,
až zaskočí.
SK Potom musíte nasunúť kryt (1) na nylonovú dosku (2) a následne nasunúť sedadlo
opäť na čap tak, aby zaklaplo.
RO Acum introduceţi capacul (1) pe placa de montaj (2) și apoi aşezaţi scaunul de WC
înapoi pe cepuri, până când acesta se fixează.
PL Teraz nasuń nasadkę (1) na płytkę montażową (2) i wciśnij deskę sedesową z
powrotem na kołki, tak aby zatrzasnęła się w swoim miejscu.
F
G
2
1
H

16
1
1
5A
4A
3A
DE Stecken Sie 5A in 4A und drehen Sie 5A, bis sie fest genug sind, dann stecken Sie 4A&5A in
3A und drehen Sie sie halb herum (bereits installiert)
EN Put 5A into 4A and rotate 5A until they are tight enough, then put 4A&5A into 3A and rotate
them half way(Installed already)
FR Mettez 5A dans 4A et tournez 5A jusqu'à ce qu'ils soient assez serrés, puis mettez 4A&5A
dans 3A et tournez-les à moitié (déjà installés)
IT Inserire 5A in 4A e ruotare 5A finché non sono abbastanza stretti, quindi inserire 4A&5A in
3A e ruotarli a metà (già installati)
NL Plaats 5A in 4A en draai 5A tot ze voldoende vast zitten, plaats dan 4A&5A in 3A en draai ze
halfvast (reeds geïnstalleerd)
SV Sätt 5A i 4A och rotera 5A tills de är tillräckligt tätt ihop. Sätt sedan 4A&5A i 3A och rotera
dem halvvägs (redan installerad)
CZ Vložte 5A do 4A a otočte 5A tak, aby byly dostatečně těsné, pak vložte 4A&5A do 3A a
otočte je o polovinu (Již nainstalované)
SK 5A vložte do 4A, a 5A točte, až dokým nebudú dostatočne upevnené, potom vložte 4A&5A
do 3A a otočte ich o polovicu (už nainštalované)
RO Introduceți 5A în 4A și răsuciți 5A până când ambele sunt suficient de strânse, după care
introduceți 4A&5A în 3A și rotiți-te cu jumătate de tură
(gata montate)
PL Włóż 5A do 4A i obracaj 5A do odpowiedniego zaciśnięcia. Następnie włóż 4A&5A do 3A,
wkręć do połowy (już zamontowane)
DE Setzen Sie 3A&4A&5A von unten in das Loch in der Toilette ein (bereits installiert)
EN Place 3A&4A&5A into the hole from the bottom of the toilet (Installed already)
FR Placez 3A&4A&5A dans le trou du bas des toilettes (déjà installé)
IT Inserire 3A&4A&5A nel foro dal fondo del water (già installato)
NL Plaats 3A&4A&5A in het gat aan de onderkant van het toilet
(reeds geïnstalleerd)
SV Placera 3A&4A&5A i hålet i botten på toaletten (redan installerad)
CZ Umístěte 3A&4A&5A do otvoru ze spodní části záchodu (Již nainstalované)
SK 3A&4A&5A vložte zospodu do otvoru na záchode (už nainštalované)
RO Introduceți 3A&4A&5A în orificiul din partea de jos a vasului de toaletă (gata montate)
PL Umieść 3A&4A&5A w otworze od spodu muszli (już zamontowane)
DE Die folgenden Schritte gelten für den Austausch von Wandmontagekomponenten
EN The following steps are for changing wall mounting components
FR Les étapes suivantes permettent de changer les éléments de fixation murale
IT I passaggi seguenti riguardano la sostituzione dei componenti del montaggio a
parete
NL De volgende stappen zijn voor het verwisselen van wandmontagecomponenten
SV Följande steg gäller för byte av väggmonteringskomponenter
CZ Následující kroky se týkají výměny komponentů pro montáž na stěnu
SK Nasledujúce kroky sa týkajú výmeny komponentov pre montáž na stenu
RO Următorii pași se referă la schimbarea componentelor de montare pe perete
PL Poniższe kroki dotyczą zmiany elementów do montażu na ścianie
2

17
DE Drehen Sie 2A&8A etwa eine halbe Drehung in das Loch (bereits installiert)
EN Rotate 2A&8A into the hole for around a half distance (Installed already)
FR Faites tourner 2A&8A dans le trou sur une demi-longueur environ (déjà installés)
IT Ruotare 2A&8A nel foro per circa metà distanza (già installato)
NL Draai 2A&8A in het gat halfvast (reeds geïnstalleerd)
SV Rotera 2A&8A i hålet ungefär halva avståndet (redan installerad)
CZ Otočte 2A&8A do otvoru asi na půl vzdálenosti (Již nainstalované)
SK 2A&8A zatočte do otvoru približne do polovice (už nainštalované)
RO Răsuciți 2A&8A în orificiu până la jumătatea distanței (gata montate)
PL Wkręć 2A&8A do otworu na około połowę odległości (już zamontowane)
DE Verbinden Sie 2A&8A und 3A&4A&5A mit 1A (bereits installiert)
EN Connect 2A&8A and 3A&4A&5A with 1A (Installed already)
FR Raccordez 2A&8A et 3A&4A&5A avec 1A (déjà installé)
IT Collegare 2A&8A e 3A&4A&5A con 1A (già installato)
NL Verbind 2A&8A en 3A&4A&5A met 1A (reeds geïnstalleerd)
SV Anslut 2A&8A och 3A&4A&5A till 1A (redan installerad)
CZ Připojte 2A&8A a 3A&4A&5A s 1A (Již nainstalované)
SK 2A&8A a 3A&4A&5A spojte s 1A (už nainštalované)
RO Racordați 2A&8A și 3A&4A&5A cu 1A (gata montate)
PL Połącz 2A&8A oraz 3A&4A&5A z 1A (już zamontowane)
HORNBACH Baumarkt AG, Hornbachstrasse 11, D76879 Bornheim, www.hornbach.com
DE Setzen Sie 2A&8A von außen in das Loch ein (bereits installiert)
EN Put 2A&8A into the hole from outside (Installed already)
FR Mettez 2A&8A dans le trou depuis le côté extérieur (déjà installé)
IT Inserire 2A&8A nel foro dall’esterno (già installato)
NL Steek 2A&8A vanaf de buitenkant in het gat (reeds geïnstalleerd)
SV Sätt 2A&8A i hålet från utsidan (redan installerad)
CZ Vložte 2A&8A do otvoru zvenku (Již nainstalované)
SK 2A&8A vložte do otvoru zvonka (už nainštalované)
RO Introduceți 2A&8A în orificiu din exterior (gata montate)
PL Włóż 2A&8A do otworu od zewnątrz (już zamontowane)
3
2A
/
/
8A
/
2A
/
8A
4
/
1A
5
-
 1
1
-
 2
2
-
 3
3
-
 4
4
-
 5
5
-
 6
6
-
 7
7
-
 8
8
-
 9
9
-
 10
10
-
 11
11
-
 12
12
-
 13
13
-
 14
14
-
 15
15
-
 16
16
-
 17
17


Jungborn Three 52 Manuale utente
- Categoria
- Supporti per altoparlanti
- Tipo
- Manuale utente
in altre lingue
- français: Jungborn Three 52 Manuel utilisateur
- Deutsch: Jungborn Three 52 Benutzerhandbuch
- Nederlands: Jungborn Three 52 Handleiding
- slovenčina: Jungborn Three 52 Používateľská príručka
- polski: Jungborn Three 52 Instrukcja obsługi
- română: Jungborn Three 52 Manual de utilizare
Documenti correlati


Altri documenti
-
Wellis Plastic Flexible Drain S Pipe for Toilet Manuale utente
-
Dometic CT4050/4110, CTLP4050/4110, CTS4050/4110, CTW4050/4110 Istruzioni per l'uso
-
-
-
Dometic Masterflush MF 7100, MF 7200 Manuale del proprietario
-
-
-