
Quick Reference Guide – Guida Rapida – Guide de Référence Rapide
Schnellstart-Anleitung – Guía de Referencia Rápida
ONLY 1 ADMINISTRATOR – 1 SOLO AMMINISTRATORE – 1 ADMINISTRATEUR SEULEMENT – 1 NUR ADMINISTRATOR - 1 ADMINISTRADOR SOLAMENTE
STEP 1 Open the weBBoat® 4G Lite upper radome
using a screwdriver (not supplied).
STEP 2 Pull out the SIM card tray by pushing the button (fig.1) with
a SIM card needle (not supplied) or a pen tip. Place the SIM card
into the SIM card tray and slide the SIM card tray back into the slot.
IMPORTANT: Insert the SIM card when weBBoat® 4G Lite is off. We
recommend to remove the SIM PIN code before inserting the SIM card
into the weBBoat® SIM slot. Also, the SIM PIN code can be inserted
from the App (STEP 8). NOTE: Please note that US carriers do not use
PIN codes.
STEP 3 Connect the weBBoat® 4G Lite to a 12 or 24 Vdc source.
IMPORTANT: This unit is not protected against excessive current or
short circuit. It is recommended to use a 1 amp fuse for protection
purposes during installation.
STEP 4 Download and install the weBBoat Lite APP on your device
from the APP store (for iOS devices) or from Goggle Play (for Android
devices). Scan the QR code below (Fig. 2). NOTE: This Quick Reference
Guide refers to the iOS version. The screens for the Android will differ
slightly.
STEP 5 Connect your mobile device (e.g. smartphone) to the weBBoat®
4G Lite WiFi network (Fig. 3). The default WiFi network name (SSID)
is weBBoat_XXXX (where XXXX is a unique string for each weBBoat®
4G Lite) and it’s not password protected. NOTE: It is advised after
initial setup to create a password (minimum 8 characters) to secure
the weBBoat 4G Lite network. (see STEP 12).
STEP 6 Open the weBBoat® 4G Lite App. Tap the “+” button in the
top right corner (Fig. 4). Tap the QR Code button. Scan the QR Code
on the router and press “Save” (Fig. 5). After scanning the QR code,
you can rename the device if desired. Alternatively, you can connect
the weBBoat® 4G Lite by tapping the “+” button on the top (Fig. 4)
and insert manually the Serial Number located below the QR Code on
the label (Fig. 5). NOTE: The QR code and the Serial Number can be
found on the bottom-right of page 2 of this quick reference guide.
STEP 7 Select the weBBoat® 4G Lite from the list (Fig. 6). Type the
administrator password: admin (Fig. 7). Then, tap Login button. NOTE
FOR IOS USERS: for quick access, tap the star icon to select weBBoat
device in the list.
STEP 8 In the “Setup Wizard”, select the language (English, Italian,
French, Spanish and German). English language is set by default
(Fig. 8). To unlock the SIM card, enter the PIN code (if needed). Choose
the country corresponding to the SIM card’s provider and the related
APN from the drop-down list (Fig. 9). To insert an APN manually,
tap “Custom APN” button. NOTE: Check the proper APN with the
Internet Service Provider (ISP) of your SIM card. If the APN you need is
not in the default list, please contact us at [email protected].
STEP 9 In “Setup Wizard”, the Autoswitch option is disabled by
default. Enable “Autoswitch” function to switch automatically from
PASO 1
Abra la cúpula superior del weBBoat® 4G Lite con un
destornillador (no suministrado).
PASO 2
Empuje el soporte de la SIM en el lado frontal del enrutador con
una aguja SIM (no incluida) o una punta de bolígrafo (Fig.1). Extraiga el
soporte de la SIM. Inserte la tarjeta SIM en el soporte de la SIM y deslice el
soporte nuevamente dentro de la ranura. IMPORTANTE:
Inserte la tarjeta
SIM cuando el weBBoat
®
4G Lite esté apagado. Recomendamos eliminar
el código PIN de la SIM antes de insertar la tarjeta SIM en la ranura de la
SIM weBBoat
®
. Además, el código PIN de la SIM se puede insertar desde la
aplicación (
PASO 8
).
PASO 3
Conecte el weBBoat® 4G Lite a una fuente Vcc 12 o 24.
IMPORTANTE: no está protegido contra la sobrecorriente ni el cortocircuito.
Se recomienda usar un fusible de 1A durante la instalación.
PASO 4 Descargue e instale la aplicación weBBoat® 4G Lite en su
dispositivo desde la App Store (para dispositivos iOS) y desde Google Play
(para dispositivos Android). Vea el código QR a continuación (Fig. 2). NOTA:
Esta guía de referencia rápida se refiere a la versión de iOS. Las pantallas
para la versión de Android pueden diferir ligeramente.
PASO 5 Conecte su dispositivo móvil (por ejemplo, un teléfono inteligente)
a la red WiFi de weBBoat® 4G Lite (Fig. 3). El nombre de la red Wi-Fi (SSID)
predeterminado es weBBoat_XXXX (donde XXXX es una cadena única
para cada weBBoat® 4G Lite) y no está protegida por contraseña. NOTA:
Glomex le aconseja, después de la primera configuración, que agregue una
contraseña (de al menos 8 caracteres) a la red WiFi de weBBoat® 4G Lite
(consulte el PASO 12).
PASO 6 Abra la aplicación weBBoat® 4G Lite. Toque el botón “+” en la
esquina superior derecha (Fig. 4). Toque el botón con el código QR. Escanee
el código QR en el enrutador y presione “Guardar” (Fig. 5). Después
de escanear el código QR, puede cambiar el nombre del dispositivo.
Alternativamente, puede conectar el weBBoat® 4G Lite tocando el botón
“+” en la parte superior (Fig. 4) e inserte manualmente el número de serie
ubicado debajo de la etiqueta del Código QR del enrutador (Fig. 5). NOTA:
El código QR y el número de serie se pueden encontrar en la parte inferior
derecha de la página 2 de esta guía de referencia rápida.
PASO 7 Seleccione el weBBoat® 4G Lite en la lista (Fig. 6). Inserte la
contraseña de administrador: admin (Fig. 7). Luego, toque el botón Iniciar
sesión. NOTA PARA USUARIO DE IOS: para un acceso rápido, toque el
ícono de estrella para seleccionar los dispositivos weBBoat en la lista.
PASO 8 En el “Asistente de configuración”, seleccione el idioma (inglés,
italiano, francés, español y alemán). El idioma inglés está configurado por
defecto (Fig. 8). Para desbloquear la tarjeta SIM, ingrese el código PIN (si
es necesario). Elija el país correspondiente al proveedor de la tarjeta SIM
y el APN relacionado de la lista desplegable (Fig. 9). Para insertar un APN
manualmente, toque el botón “APN personalizado”. NOTA: Verifique el
APN adecuado con el proveedor de servicios de Internet (ISP) de su tarjeta
SIM. Si el APN que necesita no está en la lista predeterminada, contáctenos
PASO 9 En el “Asistente de configuración”, la opción Autoswitch está
deshabilitada de manera predeterminada. Habilite la función “Autoswitch”
para cambiar automáticamente de WiFi a 4G/3G si se pierde la señal de
PASSAGGIO 1 Aprire il radome superiore del weBBoat® 4G Lite
con un cacciavite (non in dotazione).
PASSAGGIO 2 Estrarre l’alloggiamento della scheda SIM premendo il
bottone (Fig.1) con un ago per SIM (non in dotazione) o con la punta
di una penna. Inserire la scheda SIM nell’alloggiamento e riposizionare
l’alloggiamento nello slot. IMPORTANTE: Inserire la scheda SIM quando
il weBBoat® 4G Lite è spento. Si consiglia di rimuovere il codice PIN della
SIM prima di inserire la scheda SIM nello slot SIM del weBBoat®. Il codice
PIN della SIM può anche essere inserito tramite App (PASSAGGIO 8).
PASSAGGIO 3 Collegare il weBBoat® 4G Lite ad una fonte di
alimentazione 12 o 24 Vdc. IMPORTANTE: il weBBoat 4G Lite non è
protetto da sovracorrente e cortocircuito. Si consiglia di utilizzare un
fusibile da 1A durante l’installazione.
PASSAGGIO 4 Scaricare ed installare l’App weBBoat® 4G Lite sul proprio
dispositivo dall’App Store (per dispositivi iOS) e da Google Play (per
dispositivi Android). Scansionare il codice QR qui sotto (Fig. 2). NOTA:
Questa guida rapida fa riferimento alla versione iOS. Le schermate per la
versione Android potrebbero differire leggermente.
PASSAGGIO 5 Connettere il proprio dispositivo mobile (per esempio
smartphone) alla rete Wi-Fi del weBBoat® 4G Lite (Fig. 3). Il nome
predefinito della rete WiFi (SSID) è weBBoat_XXXX (dove XXXX è una
stringa univoca per ogni weBBoat® 4G Lite) e non è protetto da password.
NOTA: Glomex consiglia di aggiungere, dopo la prima installazione, una
password (almeno 8 caratteri) alla rete WiFi weBBoat® 4G Lite (si veda
PASSAGGIO 12).
PASSAGGIO 6 Aprire l’App weBBoat® 4G Lite. Premere il pulsante “+”
in alto a destra (Fig. 4). Premere il pulsante Codice QR. Scannerizzare il
codice QR sul router e premere “Salva” (Fig. 5). Dopo aver scannerizzato
il codice QR, è possibile rinominare il dispositivo. In alternativa, è
possibile collegare manualmente il weBBoat® 4G Lite facendo clic sul
pulsante “+” in alto (Fig. 4) e inserire manualmente il numero di serie
situato nell’etichetta del codice QR del router (Fig. 5). NOTA: Il codice QR
e il numero di serie si possono trovare a pagina 2 in basso a destra di
questa guida rapida.
PASSAGGIO 7 Selezionare il weBBoat® 4G Lite nell’elenco (fig. 6).
Inserire la password amministratore: admin (Fig. 7). Quindi, premere il
pulsante Login. NOTA PER L’UTENTE IOS: per l’accesso rapido, toccare
l’icona a stella per selezionare i dispositivi weBBoat nell’elenco.
PASSAGGIO 8 In “Configurazione guidata”, selezionare la lingua
(inglese, italiano, francese, spagnolo e tedesco). La lingua inglese è
l’impostazione predefinita (Fig. 8). Per sbloccare la scheda SIM, inserire il
codice PIN (se necessario). Scegliere il Paese corrispondente all’operatore
telefonico della carta SIM e l’APN correlato dal menu a tendina (Fig.
9). Per inserire un APN manualmente, premere il pulsante “APN
personalizzato”. Nota: Verificare l’APN corretto con il Provider di servizi
Internet (ISP) della scheda SIM. Se l’APN di cui si ha bisogno non è incluso
nell’elenco di default, siete pregati di contattarci a [email protected].
PASSAGGIO 9 In “Configurazione guidata”, l’opzione di Autoswitch
è disattivata come impostazione predefinita. Abilitare la funzione
“Autoswitch” per passare automaticamente da WiFi a 4G / 3G se si
ÉTAPE 1 Ouvrez le radôme supérieur weBBoat® 4G Lite à l’aide
d’un tournevis (non fourni).
ÉTAPE 2
Ouvrir le lecteur de carte SIM situé sur la face latérale du routeur
à l’aide d’une aiguille SIM ou de la pointe d’un stylo (Fig.1). Insérez la carte
SIM et refermez le lecteur de carte SIM.
IMPORTANT : insérez la carte SIM
lorsque le weBBoat
®
4G Lite est éteint. Nous recommandons d’enlever le
code PIN de la SIM avant de l’inserer dans le lecteur. Néanmoins, le code PIN
peut etre inséré depuis l’appli (
ÉTAPE 8
).
ÉTAPE 3 Connectez le weBBoat® 4G Lite à une source de 12 ou de 24 Vcc.
IMPORTANT : il n’est pas protégé contre les surintensités et les courts-circuits.
Il est recommandé d’utiliser un fusible de 1A lors de l’installation.
ÉTAPE 4
Téléchargez et installez l’appli weBBoat® 4G Lite dans votre
appareil depuis l’App Store (pour les appareils iOS) et depuis Google Play
(pour les appareils Android) (voir Fig.2). REMARQUE: Ce guide de référence
rapide fait référence à la version iOS. Les écrans pour la version Android
peuvent différer légèrement.
ÉTAPE 5 Connectez votre appareil mobile (par exemple, un smartphone) au
réseau Wi-Fi weBBoat® 4G Lite. Le nom du réseau Wi-Fi par défaut (SSID) est
weBBoat_XXXX (où XXXX est une chaîne unique pour chaque weBBoat® 4G
Lite) et il n’est pas protégé par un mot de passe. REMARQUE : Glomex vous
conseille, après la première installation, d’ajouter un mot de passe (au moins
8 caractères) au réseau Wi-Fi weBBoat® 4G Lite (voir l’ÉTAPE 12).
ÉTAPE 6 Ouvrez l’appli weBBoat® 4G Lite. Appuyez sur le bouton « + » dans
le coin droit supérieur (Fig. 4). Appuyez sur le bouton Code QR. Scannez le
Code QR sur le routeur et appuyez sur « Save » (Enregistrer) (Fig. 5). Après
avoir scanné le code QR, vous pouvez renommer l’appareil. Autrement, vous
pouvez connecter le weBBoat® 4G Lite en appuyant sur le bouton « + » en
haut (Fig. 4) et insérer manuellement le Numéro de série situé en-dessous
de l’étiquette Code QR du routeur (Fig. 5). REMARQUE : le code QR et le
Numéro de série se trouvent en bas à droite de la page 2 de ce guide de
référence rapide.
ÉTAPE 7 Sélectionnez le weBBoat® 4G Lite sur la liste (Fig. 6). Insérez le mot
de passe administrateur : admin (Fig. 7). Puis enfoncez le bouton « Login »
(Connexion). REMARQUE POUR LES DISPOSITIFS IOS: pour un accès rapide,
appuyez sur l’icône étoile pour sélectionner les périphériques weBBoat dans
la liste.
ÉTAPE 8
Sur « Setup Wizard » (configuration), sélectionnez la langue,
(anglais, italien, français, espagnol et allemand). La langue anglaise est
définie par défaut (Fig. 8). Pour déverrouiller la carte SIM, saisissez le code PIN
(si besoin). Choisissez le pays correspondant au fournisseur de la carte SIM
et l’APN en question du menu déroulant (Fig. 9). Pour insérer manuellement
un APN, appuyez sur le bouton « Custom APN » (Personnaliser APN).
REMARQUE :
vérifiez le bon APN avec le Fournisseur de service Internet (FSI)
de votre carte SIM. Si l’APN dont vous avez besoin n’est pas dans la liste par
défaut, veuillez nous contacter à
ÉTAPE 9 Sur « Setup Wizard » (configuration) l’option Autoswitch est
désactivée par défaut. Activez la fonction « Autoswitch » pour passer
automatiquement du Wi-Fi au 4G/3G si le signal de la borne Wi-Fi externe
(c’est-à-dire marina Wi-Fi) est perdu. Lorsque vous utilisez la connexion
4G/3G, si la même borne Wi-Fi externe (c’est-à-dire marina Wi-Fi) est
détectée à nouveau, le weBBoat® 4G Lite rétablira la connexion du 4G/3G
au Wi-Fi automatiquement. Pour activer cette option, appuyez sur le bouton
SCHRITT 1 Öffnen Sie die weBBoat® 4G Lite obere Radarkuppel
mit einem Schraubenzieher (nicht mitgeliefert).
SCHRITT 2
Verschieben Sie mit einer SIM-Nadel (nicht im Lieferumfang
enthalten) oder eine Bleistiftspitze (Abb. 1) die SIM-Kartenhalterung auf
der Router-Stirnseite. SIM-Kartenhalterung abnehmen. Die SIM-Karte in
die SIM-Kartenhalterung einsetzen und sie wieder in den Schlitz schieben.
WICHTIG: SIM-Karte einlegen, wenn weBBoat 4G Lite ausgeschaltet ist.
Wir empfehlen, den SIM-PIN-Code vor dem Einsetzen der SIM-Karte in den
WeBBoat
®
SIM-Slot zu entfernen. Der SIM-Pincode kann auch über die App
(SCHRITT 8) eingesetzt werden.
SCHRITT 3
WeBBoat® 4G Lite an eine 12 oder 24 Vdc-Stromquelle
anschließen. WICHTIG: Ist nicht gegen Überstrom und Kurzschluss gesichert.
Wir empfehlen, während der Installation eine 1A-Sicherung zu verwenden.
SCHRITT 4 Laden Sie vom App-Store (für IOS-Geräte) und von Google Play
(Android Geräte) die weBBoat® Lite App auf Ihr Gerät. Sie nachstehenden
QR-Code (Abb. 2) HINWEIS: Diese Kurzanleitung bezieht sich auf die
iOS-Version. Die Bildschirme für die Android-Version können geringfügig
abweichen.
SCHRITT 5 Verbinden Sie Ihr Mobilgerät (z.B. Smartphone) mit dem
weBBoat® 4G Lite WiFi-Netzwerk (Abb. 3) Der Standard WiFi-Netzwerkname
(SSID) ist WeBBoat_XXXX (XXXX bezeichnet eine eindeutige Zeichenfolge
für jedes WeBBoat® 4G Lite) und es ist nicht kennwortgeschützt. HINWEIS:
Glomex empfiehlt Ihnen nach der Ersteinrichtung das weBBoat® 4G Lite
WiFi -Netzwerk (siehe SCHRITT 12) mit einem Passwort (mindestens 8
Zeichen) zu ergänzen.
SCHRITT 6 Öffnen Sie die weBBoat® 4G Lite App. Tippen Sie auf die Taste
“+” in der rechten oberen Ecke (Abb. 4). Tippen Sie auf die Schaltfläche
“QR Code”. Scannen Sie am Router den QR Code und bestätigen mit
„Speichern“(Abb. 5). Nach dem Scannen des QR-Codes können Sie das
Gerät umbenennen. Alternativ können Sie weBBoat® 4G Lite durch einen
Klick auf die Taste „+“ ganz oben (Abb.4) und geben manuell die unter der
QR Codeetikettierung des Routers befindliche Seriennummer ein. HINWEIS:
Den QR-Code und die Seriennummer finden Sie unten rechts auf der Seite 2
dieser Kurzanleitung.
SCHRITT 7
Wählen Sie in der Liste weBBoat® 4G Lite (Abb. 6) aus.
Administrator-Passwort eingeben: admin (Abb. 7). Danach die
Anmeldeschaltflächen anklicken. HINWEIS FÜR IOS-BENUTZER: Tippen Sie
für den Schnellzugriff auf das Sternsymbol, um weBBoat-Geräte in der Liste
auszuwählen.
SCHRITT 8
Wählen Sie am “Einrichtungsassistenten” die Sprache aus
(Englisch, Italienisch, Französisch, Spanisch und Deutsch). Englisch ist
vorgegeben (Abb. 8). Um die SIM-Karte zu entsperren, geben Sie den
PIN-Code (falls erforderlich) ein. Wählen Sie aus der Drop-Down-Liste
das dem SIM-Kartenanbieter entsprechende Land und die dazugehörige
APN aus (Fig.9). Um einen APN manuell einzugeben, tippen Sie auf
“Benutzerdefinierte APN”. HINWEIS: Überprüfen Sie die richtige APN
mit Internet Service Provider (ISP) Ihrer SIM-Karte. Wenn die von Ihnen
benötigte APN nicht in der Vorgabeliste ist, wenden Sie sich unter
[email protected] an uns.
SCHRITT 9 Standardmäßig ist im “Einrichtungsassistenten”, die
automatische Umschaltfunktion deaktiviert. Aktivieren Sie die “Automatische
Umschaltfunktion”, um automatisch von WiFi zu 4G/3G umzuschalten,
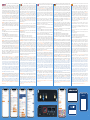
(Fig. 9)(Fig. 8)(Fig. 7)(Fig. 6)(Fig. 5)(Fig. 4)(Fig. 3)
(Fig. 2)
(Fig. 10)
DOWNLOAD THE APP
(Fig. 1)
1
Code: IT1104
Rev. 1.1 issued June 2019 - Specifications may change without notice

WiFi to 4G/3G if the external WiFi Hotspot signal
(i.e. marina WiFi) is lost. While using the 4G/3G
connection, if the same external WiFi Hotspot (i.e. marina WiFi)
is detected again, weBBoat® 4G Lite will switch the connection
back from 4G/3G to WiFi automatically. To enable this option, tap
“Enable” button (Fig. 8). Tap WiFi Scan button (Fig. 10), select one
of the available external WiFi networks. Tap OK button to join the
network and then enter the password (if required). Tap “Save” button
to proceed (Fig.11). WARNING: During the Autoswitch configuration,
the connection between the mobile device and weBBoat® 4G Lite
will be lost. Please check the connection between the devices and if
needed reconnect before proceeding. To skip the Setup Wizard, tap
“Skip” button (not recommended).IMPORTANT: Tap “Save” button in
“Setup Wizard” to save all configuration settings (Fig. 10).
STEP 10 After tapping “Save” button, the Control Panel will be
shown automatically. This section includes all information related to
the signal, the SIM card and the APN in use (Fig. 12). If the Autoswitch
function is not enabled, enable it by tapping “Autoswitch” button
(Fig. 12).
STEP 11 In the “Control Panel”, choose one of the following Mobile
modes (Fig. 12)
Auto: weBBoat® 4G Lite is connected to the network that provides the
best Internet connection
4G only: weBBoat® 4G Lite is connected to the 4G network only
3G only: weBBoat® 4G Lite is connected to the 3G network only
NOTE: Please note that other WiFi networks nearby could affect the
speed performance of the weBBoat® 4G Lite.
STEP 12 To customize the name of the Wi-Fi network generated by
weBBoat® 4G Lite (SSID) and its password, tap the Menu button (Fig.
13) and select “Advanced settings”. Go to “WiFi Configuration”
section. Change the SSID in the related field and select the encryption
type. Type the password and tap Save button (Fig. 14). SUGGESTION:
Choose WPA2- PSK encryption for better security. NOTE: Do not
use spaces or special characters in the name of the Wi-Fi network
(SSID) and password. After changing the name of the Wi-Fi network
(SSID) and the password, the weBBoat® 4G Lite will be rebooted
automatically. Close the weBBoat® 4G Lite App, reconnect your
mobile device (e.g. smartphone) to the new Wi-Fi network of the
weBBoat® 4G Lite and then reopen the App.
STEP 13 To change the Administrator password, tap the Menu
button (Fig. 13) and tap “Advanced settings”. In the “Administrator
Password” section enter the new administrator password in both
fields and tap Save button. IMPORTANT: Keep the new password in
a safe place and do not forget it. If the administrator password is
lost, you must restore the device to the default factory settings using
the Reset button placed in the back of the router (Fig 15). To restore
the device, push and hold the Reset button for at least 5 seconds.
The Reset button can be released when all 5 signal strength LEDs
(Fig. 16) are ON. When the weBBoat® 4G Lite reboots, it will reset all
custom changes to factory defaults. Close the weBBoat® 4G Lite App,
reconnect your mobile device (e.g. smartphone) to the Wi-Fi network
of the weBBoat® 4G Lite and then reopen the App.
STEP 14 When firmware and APN list updates are available, they will
appear as an Upgrade Button in the “System Updates” menu (Fig.
17). Tap “Upgrade” button to perform the upgrade and wait for a
few minutes. IMPORTANT: When the Firmware upgrade is completed,
weBBoat® 4G Lite will reboot automatically. Close the weBBoat® 4G
Lite App, reconnect your mobile device (e.g. smartphone) to the
Wi-Fi network of the weBBoat® 4G Lite and then reopen the App.
PLEASE DO NOT POWER OFF THE WEBBOAT 4G LITE DURING THE
INSTALLATION.
Hotspot WiFi externo (es decir, marina WiFi). Cuando se utiliza
la conexión 4G/3G, si el mismo Hotspot WiFi externo (es decir
marina WiFi) se detecta de nuevo, weBBoat® 4G Lite cambiará la conexión
de vuelta de 4G/3G a WiFi automáticamente. Para habilitar esta opción,
toque el botón “Habilitar” (Fig. 8). Toque el botón Escanear WiFi (Fig.
10), seleccione una de las redes WiFi externas disponibles. Toque el
botón Aceptar para unirse a la red y luego ingrese la contraseña (si es
necesario). Toque el botón “Guardar” para continuar (Fig.11). ATENCIÓN:
Durante la configuración del Autoswitch, la conexión entre el dispositivo
móvil y el weBBoat® 4G Lite podría perderse. Verifique la conexión entre
los dispositivos y, si es necesario, reconéctelos de forma inalámbrica entre
sí antes de continuar. Para omitir el Asistente de configuración, toque
el botón “Omitir” (no recomendado). IMPORTANTE: Toque el botón
“Guardar” en el “Asistente de configuración” para guardar todos los
ajustes de configuración (Fig. 10).
PASO 10 Después de tocar el botón “Guardar”, el Panel de control se
mostrará automáticamente. Esta sección incluye toda la información
relacionada con la señal, la tarjeta SIM y el APN en uso (Fig. 12). Si la
función de Autoswitch no está habilitada, actívela tocando el botón
“Autoswitch” (Fig. 12).
PASO 11 En el “Panel de control”, elija uno de los siguientes modos
móviles (Fig. 12)
Automático: weBBoat® 4G Lite está conectado a la red que proporciona la
mejor conexión a Internet
Solo 4G: weBBoat® 4G Lite está conectado solo a la red 4G
Solo 3G: weBBoat® 4G Lite está conectado solo a la red 3G
NOTA: Tenga en cuenta que otras redes WiFi cercanas podrían afectar el
rendimiento de velocidad del weBBoat® 4G Lite.
PASO 12 Para personalizar el nombre de la red Wi-Fi generada por
weBBoat® 4G Lite (SSID) y su contraseña, pulse el botón de menú (Fig. 13)
y seleccione “Configuración avanzada”. Vaya a la sección “Configuración
de WiFi”. Cambie el SSID en el campo relacionado y seleccione el tipo
de cifrado. Escriba la contraseña y toque el botón Guardar (Fig. 14).
SUGERENCIA: Elija el cifrado WPA2-PSK para una mayor seguridad. NOTA:
No use espacios o caracteres especiales en el nombre de la red Wi-Fi (SSID)
ni la contraseña. Después de cambiar el nombre de la red Wi-Fi (SSID) y la
contraseña, el weBBoat® 4G Lite se reiniciará automáticamente. Cierre la
aplicación weBBoat® 4G Lite, vuelva a conectar el dispositivo móvil (por
ejemplo, teléfonos inteligentes) a la nueva red Wi-Fi del weBBoat® 4G Lite
y vuelva a abrir la aplicación.
PASO 13 Para cambiar la contraseña de administrador, toque el botón
de menú (Fig. 13) y toque “Configuración avanzada”. En la sección
“Contraseña de administrador”, inserte la nueva contraseña de
administrador en ambos campos y toque el botón Guardar. IMPORTANTE:
Guarde la nueva contraseña en un lugar seguro y no la olvide. Si se pierde
la contraseña de administrador, Glomex le sugiere restaurar el dispositivo a
la configuración predeterminada de fábrica utilizando el botón Restablecer
ubicado en la parte posterior del enrutador (Fig. 15). Para restaurar el
dispositivo, mantenga presionado el botón Restablecer durante al menos
5 segundos. El botón de reinicio se puede liberar cuando los 5 LED de
intensidad de señal (Fig. 16) están encendidos. Cuando el weBBoat® 4G
Lite se reinicie, restablecerá todos los cambios del cliente a los valores
predeterminados de fábrica. Cierre la aplicación weBBoat® 4G Lite, vuelva
a conectar su dispositivo móvil (por ejemplo, un teléfono inteligente) a la
red Wi-Fi del weBBoat® 4G Lite y luego vuelva a abrir la aplicación.
PASO 14 Cuando el firmware y las actualizaciones de la lista APN estén
disponibles, aparecerá un botón Actualizar en el menú “Actualizaciones
del sistema” (Fig. 17). Toque el botón “Actualizar” para realizar la
actualización y espere unos minutos. IMPORTANTE: Cuando se haya
completado la actualización del firmware, weBBoat® 4G Lite se reiniciará
automáticamente. Cierre la aplicación weBBoat® 4G Lite, vuelva a conectar
su dispositivo móvil (por ejemplo, un teléfono inteligente) a la red Wi-Fi
del weBBoat® 4G Lite y luego vuelva a abrir la aplicación.POR FAVOR NO
APAGUE EL WEBBOAT 4G LITE DURANTE LA INSTALACIÓN
perde il segnale dell’hotspot WiFi esterno (es. WiFi della
marina). Quando si utilizza la connessione 4G/3G, se viene
rilevato nuovamente lo stesso hotspot WiFi esterno (ad es. WiFi della
marina), weBBoat® 4G Lite passerà automaticamente da 4G/3G a WiFi.
Per abilitare questa opzione, premere il pulsante “Abilita” (Fig. 8).
Premere il pulsante WiFi Scan (Fig. 10), selezionare una delle reti WiFi
esterne disponibili. Premere il pulsante OK per connettersi alla rete,
quindi inserire la password (se necessario). Premere il tasto “Salva”
per continuare (Fig. 11). AVVERTENZA: Durante la configurazione
Autoswitch, la connessione tra il dispositivo mobile e weBBoat® 4G
Lite potrebbe andare persa. Si prega di verificare la connessione tra i
dispositivi e, se necessario, riconnetterli in modalità wireless prima di
procedere. Per ignorare la Configurazione guidata, premere il pulsante
“Ignora” (non consigliato). IMPORTANTE: Premere il tasto “Salva”
nella “Configurazione guidata” per salvare tutte le impostazioni di
configurazione (Fig. 10).
PASSAGGIO 10 Dopo aver premuto il tasto “Salva”, il Pannello di
Controllo verrà mostrato automaticamente. Questa sezione include tutte
le informazioni relative al segnale, la scheda SIM e l’APN in uso (Fig. 12).
Se la funzione Autoswitch non è stata abilitata, abilitarla premendo il
tasto “Autoswitch” (Fig. 12).
PASSAGGIO 11 Nel “Pannello di controllo”, scegliere una delle seguenti
modalità Mobile (Fig. 12)
Auto: weBBoat® 4G Lite è collegato alla rete che fornisce la migliore
connessione Internet
Solo 4G: weBBoat® 4G Lite è collegato solo alla rete 4G
Solo 3G: weBBoat® 4G Lite è collegato solo alla rete 3G
NOTA: Si prega di tenere presente che altre reti WiFi nelle vicinanze
potrebbero influire sulle prestazioni di velocità del weBBoat® 4G Lite.
PASSAGGIO 12
Per personalizzare il nome della rete Wi-Fi generata
da weBBoat
®
4G Lite (SSID) e la relativa password, premere il pulsante
Menu (Fig. 13) e selezionare “Impostazioni avanzate”. Entrare nella
sezione “Configurazione WiFi”. Cambiare il SSID nel campo correlato
e selezionare il tipo di crittografia. Digitare la password e premere
il pulsante Salva (Fig. 14). SUGGERIMENTO: Scegliere la crittografia
WPA2 - PSK per una maggiore sicurezza. NOTA: Non utilizzare spazi o
caratteri speciali nel nome della rete Wi-Fi (SSID) e nella password. Dopo
avere cambiato il nome della rete Wi-Fi (SSID) e la password, il weBBoat
®
4G Lite si riavvierà automaticamente. Chiudere l’app weBBoat
®
4G Lite,
ricollegare il dispositivo mobile (ad es. Smartphone) alla nuova rete Wi-Fi
del weBBoat
®
4G Lite e poi riaprire l’app.
PASSAGGIO 13 Per modificare la password amministratore, premere
il tasto Menu (Fig. 13) e “Impostazioni avanzate”. Nella sezione
“Password amministratore” inserire la nuova password amministratore
in entrambi i campi e premere il tasto “Salva”. IMPORTANTE: Conservare
la nuova password in un posto sicuro e non dimenticarla. Se si dimentica
la password amministratore, Glomex consiglia di ripristinare il dispositivo
alle impostazioni predefinite di fabbrica utilizzando il pulsante Reset
posto sul retro del router (Fig. 15). Per ripristinare il dispositivo, tenere
premuto il pulsante Reset per almeno 5 secondi. Il pulsante Reset
può essere rilasciato quando tutti e 5 i LED di potenza del segnale
(Fig. 16) sono accesi. Quando weBBoat® 4G Lite si riavvia, ripristinerà
tutte le modifiche del cliente alle impostazioni di fabbrica. Chiudere l’app
weBBoat® 4G Lite, ricollegare il dispositivo mobile (ad es. Smartphone)
alla nuova rete Wi-Fi del weBBoat® 4G Lite e poi riaprire l’app.
PASSAGGIO 14 Quando sono disponibili aggiornamenti per il Firmware
e la lista APN, apparirà un pulsante “Aggiornamento” nel menu
“Aggiornamenti di sistema” (Fig. 17). Premere il tasto “Aggiornamento”
per eseguire l’aggiornamento e attendere pochi minuti. IMPORTANTE:
Al termine dell’aggiornamento firmware, weBBoat® 4G Lite si riavvia in
automatico. Chiudere l’app weBBoat® 4G Lite, ricollegare il dispositivo
mobile (ad es. Smartphone) alla rete Wi-Fi del weBBoat® 4G Lite e
poi riaprire l’app. NON SPEGNERE IL WEBBOAT 4G LITE DURANTE
L’INSTALLAZIONE.
« Activer » (Fig. 8). Appuyez sur le bouton Wi-Fi Scan (Fig. 10),
sélectionnez l’un des réseaux Wi-Fi externes disponibles. Appuyez
sur le bouton OK pour rejoindre le réseau puis saisissez le mot de passe
(si cela est requis). Appuyez sur le bouton « Save » (Enregistrer) pour
continuer (Fig.11). AVERTISSEMENT : lors de la configuration Autoswitch, la
connection wi-fi entre l’appareil mobile et le weBBoat® 4G Lite pourrait être
perdue. Veuillez vérifier la connexion entre les appareils et, au besoin, les
reconnecter avant de continuer. Pour ignorer l’Assistant de configuration,
appuyez sur le bouton « Skip » (Ignorer) (non recommandé). IMPORTANT
: appuyez sur le bouton « Save » (Enregistrer) dans « Setup Wizard »
(configuration) pour enregistrer tous les paramètres de configuration
(Fig. 10).
ÉTAPE 10 Après avoir appuyé sur le bouton « Save » (Enregistrer), le
Panneau de commande s’affichera automatiquement. Cette section
comprend toutes les informations relatives au signal, à la carte SIM et à
l’APN utilisés (Fig. 12). Si la fonction Autoswitch n’est pas activée, activez-la
en appuyant sur le bouton « Autoswitch » (Fig. 12).
ÉTAPE 11 Dans le « Control Panel » (Panneau de commande), choisissez
l’un des modes Mobile suivants (Fig. 13)
Auto : weBBoat® 4G Lite est connecté au réseau qui fournit la meilleure
connexion Internet
4G seulement : weBBoat® 4G Lite est connecté au réseau 4G seulement
3G seulement : weBBoat® 4G Lite est connecté au réseau 3G seulement
REMARQUE : Sachez que d’autres réseaux Wi-Fi à proximité pourraient
affecter la performance de la vitesse du weBBoat® 4G Lite.
ÉTAPE 12 Pour personnaliser le nom du réseau Wi-Fi généré par weBBoat®
4G Lite (SSID) et son mot de passe, appuyez sur le bouton Menu (Fig. 13)
et sélectionnez « Advanced settings » (Paramètres avancés). Dirigez-vous
vers la section « WiFi Configuration » (Configuration Wi-Fi). Changez le
SSID dans le champ correspondant et sélectionnez le type de chiffrement.
Tapez le mot de passe et appuyez sur le bouton « Save » (Enregistrer)
(Fig. 14). SUGGESTION : choisissez le chiffrement WPA2- PSK pour une
meilleure sécurité. REMARQUE : N’utilisez pas d’espaces ou de caractères
spéciaux dans le nom du réseau Wi-Fi (SSID) et le mot de passe. Après avoir
modifié le nom du réseau Wi-Fi (SSID) et le mot de passe, le weBBoat® 4G
Lite sera redémarré automatiquement. Fermez l’appli weBBoat® 4G Lite,
reconnectez votre appareil mobile (ex., un smartphone) au nouveau réseau
Wi-Fi du weBBoat® 4G Lite, puis rouvrez l’appli.
ÉTAPE 13 Pour modifier le Mot de passe administrateur, appuyez sur le
bouton menu (Fig. 13), puis sur « Advanced settings » (Paramètres avancés).
Dans la section « Administrator Password » (Mot de passe administrateur),
insérez le nouveau mot de passe administrateur dans les deux champs et
appuyez sur le bouton « Save » (Enregistrer). IMPORTANT : conservez le
nouveau mot de passe dans un lieu sûr et ne l’oubliez pas. Si le mot de passe
administrateur est perdu, Glomex vous suggère de restaurer l’appareil aux
paramètres d’usine par défaut en utilisant le bouton « Reset » (Réinitialiser)
placé à l’arrière du routeur (Fig. 15). Pour restaurer l’appareil, appuyez et
maintenez enfoncé le bouton « Reset » (Réinitialiser) pendant au moins 5
secondes. Le bouton « Reset » (Réinitialiser) peut être relâché lorsque les
5 LED de force du signal (Fig. 16) sont allumées. Lorsque le weBBoat® 4G
Lite redémarre, il réinitialisera toutes les modifications du client aux défauts
d’usine. Fermez l’appli weBBoat® 4G Lite, reconnectez votre appareil mobile
(ex., un smartphone) au réseau Wi-Fi du weBBoat® 4G Lite, puis rouvrez
l’appli.
ÉTAPE 14 Lorsque des mises à jour de la liste des microprogrammes et
des APN sont disponibles, un bouton Mettre à jour apparaîtra dans le
menu « System Updates » (Mises à jour du système) (Fig. 17). Appuyez
sur le bouton « Upgrade » (Mettre à jour) pour effectuer la mise à jour
et attendez quelques minutes. IMPORTANT : à la fin de la mise à niveau
du microprogramme, le weBBoat® 4G Lite redémarrera automatiquement.
Fermez l’appli weBBoat® 4G Lite, reconnectez votre appareil mobile (ex.,
un smartphone) au réseau Wi-Fi du weBBoat® 4G Lite, puis rouvrez l’appli.
VEUILLEZ NE PAS METTRE LE WEBBOAT 4G LITE SOUS TENSION AVANT
L’INSTALLATION.
wenn das externe WiFi Hotspot-Signal (d.h. Marina WiFi) verloren
geht. Wenn Sie 4G/3G verwenden und wieder derselbe externe
WiFi Hotspot (d.h. Marina WiFi) erkannt wird, schaltet weBBoat® 4G Lite
automatisch von 4G/3G zu WiFi. Um diese Option zu aktivieren, tippen
Sie auf “Aktivieren” (Abb. 8). Tippen Sie auf die WiFi Scan-Taste (Abb. 10)
und wählen eines der verfügbaren externen WiFi-Netzwerke aus. Tippen
Sie auf OK, um das Netzwerk zu nutzen, und geben dann das Kennwort
ein (falls erforderlich). Tippen Sie auf “Speichern”, um fortzufahren (Abb.
11). WARNUNG: Während der Auto-Switch-Konfiguration, könnte die
Verbindung zwischen dem Mobilgerät und weBBoat® 4G Lite verloren gehen.
Prüfen Sie bitte die Verbindung zwischen den Geräten und verbinden sich
bei Bedarf über Funk, ehe Sie fortsetzen. Um den Einrichtungsassistenten zu
überspringen, tippen Sie auf “Überspringen” (nicht empfohlen). WICHTIG:
Um alle Konfigurationseinstellungen (Abb. 10) zu speichern, tippen Sie im
„Einrichtungsassistenten“ auf „Speichern“.
SCHRITT 10 Nach Antippen von „Speichern“ wird automatisch die
Systemsteuerung angezeigt. Dieser Abschnitt enthält alle signalrelevanten
Informationen und die verwendete SIM-Karte und APN (Abb. 12). Ist die
Auto-Switch-Funktion nicht aktiviert, aktivieren Sie sie durch Antippen der
Schaltfläche „Autoswitch“ (Abb. 12).
SCHRITT 11 In der „Systemsteuerung“ können Sie einige der folgenden
Mobilbetriebsarten (Abb.12) auswählen.
Auto:
weBBoat® 4G Lite ist mit dem Netzwerk verbunden, das zu einer
besseren Internetanbindung führt.
Nur 4G:
weBBoat® 4G Lite ist nur mit dem 4G-Netzwerk verbunden
Nur 3G:
weBBoat® 4G Lite ist nur mit dem 3G-Netzwerk verbunden
HINWEIS: Bitte beachten Sie, dass andere in der Nähe befindliche
WiFi-Netzwerke die Geschwindigkeit von weBBoat® 4G Lite beeinträchtigen
können.
SCHRITT 12 Um den Namen des von weBBoat® 4G Lite (SSID) erzeugten
WiFi-Netzwerks und das Passwort zu individualisieren, klicken Sie bitte auf die
Menütaste und danach auf „Erweiterte Einstellungen“ (Abb.13) und wählen
„Erweiterte Einstellungen“ aus. Gehen Sie auf „WiFi-Konfiguration“. Ändern
Sie im entsprechenden Feld die SSID und wählen den Verschlüsselungstyp
aus. Geben Sie das Kennwort und tippen Sie auf Speichern (Abb. 14).
EMPFEHLUNG: Wählen Sie WPA2 - PSK Verschlüsselung für mehr Sicherheit.
HINWEIS: Verwenden Sie im Namen des WiFi-Netzwerks (SSID) und beim
Passwort keine Leerzeichen oder Sonderzeichen. Nachdem der Name des
WiFi-Netzwerks (SSID) und Passworts geändert wurde, wird weBBoat 4G
Lite automatisch neu gestartet. Schließen Sie die die weBBoat® 4G Lite
App, verbinden wieder Ihr Mobilgerät (zB Smartphone) mit dem neuen
Wi-Fi-Netzwerk von weBBoat® 4G Lite und öffnen danach wieder die App.
SCHRITT 13 Zum Ändern des Administrator-Passworts, klicken Sie auf die
Menütaste (Abb. 13) und danach auf “Erweiterte Einstellungen”. Geben Sie
im Abschnitt „Administrator-Passwort“ das neue Administrator-Passwort in
beiden Feldern ein und bestätigen mit „Speichern“. WICHTIG: Bewahren
Sie das neue Passwort sicher auf und vergessen es nicht. Wird das
Administrator Passwort verloren, empfiehlt Glomex, das Gerät mit der auf
der Router-Rückseite befindlichen Reset-Taste wieder herzustellen (Abb. 15).
Um das Gerät wiederherzustellen, halten Sie die Reset-Taste mindestens 5
Sekunden gedrückt. Die Reset-Taste kann losgelassen werden, wenn alle
5 Signalstärken-LEDs (Abb. 16) LEUCHTEN. Wenn weBBoat® 4G Lite neu
startet, werden alle kundenseitigen Änderungen auf Werkseinstellungen
zurückgesetzt. Schließen Sie die die weBBoat® 4G Lite App, verbinden wieder
Ihr Mobilgerät (zB Smartphone) mit dem Wi-Fi-Netzwerk von weBBoat® 4G
Lite und öffnen danach wieder die App.
SCHRITT 14 Sind Aktualisierungen der Firmware und der APN-Liste verfügbar,
wird im Menü „Systemaktualisierungen“ die Schaltfläche Aktualisieren
angezeigt (Abb. 17). Tippen Sie auf „Aktualisieren“, um die Aktualisierung
durchzuführen, und warten ein paar Minuten. WICHTIG: Nach Abschluss
des Firmware-Updates, startet weBBoat® 4G Lite automatisch neu. Schließen
Sie die die weBBoat® 4G Lite App, verbinden wieder Ihr Mobilgerät (zB
Smartphone) mit dem Wi-Fi-Netzwerk von weBBoat® 4G Lite und öffnen
danach wieder die App. SCHALTEN SIE WÄHREND DER INSTALLATION
WEBBOAT 4G LITE NICHT AUS.
(Fig. 11) (Fig. 12) (Fig. 13) (Fig. 14) (Fig. 17)
2
(Fig. 15)(Fig. 16)
weBBoat 4G Lite
QRcode
-
 1
1
-
 2
2


in altre lingue
- français: Glomex WeBBoat Mode d'emploi
- español: Glomex WeBBoat Guía del usuario
- Deutsch: Glomex WeBBoat Benutzerhandbuch
Documenti correlati
Altri documenti
-
ZyXEL NBG4115 Manuale del proprietario
-
TP-LINK tp-link M7350 Mobile Controlled Wireless Network Equipment Guida d'installazione
-
TP-LINK Routeur Mobile 4G+ LTE Manuale utente
-
TP-LINK M7200 4G LTE Mobile WiFi Guida d'installazione
-
Archos Xenon Series User 101 Xenon Manuale utente
-
Digicom Travel Router 150 3G Manuale utente
-
Wiko Rainbow Lite 4G Manuale del proprietario