HOTPOINT/ARISTON 7OF 937 C.1 IX RU/HA Guida utente
- Categoria
- Microonde
- Tipo
- Guida utente
Questo manuale è adatto anche per

GB
Operating Instructions
Contents
Installation, 2-3
Positioning
Electrical connections
Description of the appliance, 4
Overall view
Control panel
Start-up and use, 5
Starting the oven
Using the cooking timer
Data plate
The electronic cooking programmer, 6
Analogue Programmer, 7
Cooking modes, 8-10
Cooking modes
Practical cooking advice
Cooking advice table
Precautions and tips, 11
General safety
Disposal
Respecting and conserving the environment
Assistance
Maintenance and care, 12
Switching the appliance off
Cleaning the appliance
Cleaning the oven door
Replacing the light bulb
Sliding Rack Kit assembly
OVEN
English,1
GB
7OFH 837 C RU /HA
7OFTR 850 RU /HA
7OFH 937 C.1 RU/HA
7OFH 937 C.1 IX RU/HA
7OFH 837 C IX RU/HA
7OFQ 837 C.1 /HA
Ðóññêèé, 13
RS

2
GB
595 mm.
595 mm.
24 mm.
545 mm.
5 mm.
567 mm.
23 mm.
593 mm.
45 mm.
558 mm.
5
4
7
m
m
. m
in
.
Installation
560 m
m
.
45 mm.
Before placing your new appliance into operation
please read these operating instructions carefully.
They contain important information for safe use, for
installation and for care of the appliance.
Please keep these operating instructions for future
reference. Pass them on to possible new owners of
the appliance.
Positioning
Keep packaging material out of the reach of
children.It can become a choking or suffocation
hazard. see Precautions and tips).
! The appliance must be installed by a qualified
person in compliance with the instructions provided.
Incorrect installation may cause harm to persons,
animals or may damage property.
Fitting the appliance
Use the appropriate cabinet to ensure that the
appliance functions properly.
The panels adjacent to the oven must be made of
heat-resistant material.
Cabinets with a veneer exterior must be assembled
with glues which can withstand temperatures of up
to 100°C.
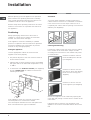
To install the oven under the counter (see diagram)
and in a kitchen unit, the cabinet must have the
following dimensions:
! The appliance must not come into contact with
electrical parts once it has been installed.
The consumption indications on the data plate have
been calculated for this type of installation.
Ventilation
To ensure good ventilation, the back panel of the
cabinet must be removed. It is advisable to install the
oven so that it rests on two strips of wood, or on a
completely flat surface with an opening of at least 45 x
560 mm (see diagrams).
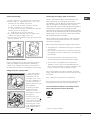
Centring and fastening
Position the 4 tabs on the side of the oven according
to the 4 holes of the outer frame. Adjust the tabs
according to the thickness of the cabinet side panel,
as shown below:
thickness of 20 mm: take off
the removable part of the tab
(see diagram)
thickness of 18 mm: use the
first groove, which has already
been set in the factory (see
diagram)
thickness of 16 mm: use the
second groove (see diagram)
Secure the appliance to the cabinet by opening the
oven door and putting 4 screws into the 4 holes of the
outer frame.
! All parts which ensure the safe operation of the
appliance must not be removable without the aid of a
tool.

3
GB
Centring and fixing*
1. Position brackets A against oven support B.
2. Position tabs C against brackets A. If the
thickness of the cabinet side panel:
is 16 mm thick: place the tab so that the
number 16 written on it is facing you;
is 18 mm thick: place the tab so that the part
without any text is facing you;
is 20 mm thick: do not fit the tab.
3. Fix the brackets and tabs onto the edge of the
cabinet side panel using screws D.
4. Fix the oven to the cabinet using the screws and
plastic washers E.
Electrical connections
! Ovens equipped with a three-pole power supply
cable are designed to operate with alternating
current at the voltage and frequency indicated on
the data plate located on the appliance (see below).
Fitting the power supply cable
1. Open the terminal
board by inserting a
screwdriver into the
side tabs of the cover.
Use the screwdriver as
a lever by pushing it
down to open the cover
(see diagram).
2. Loosen the cable
clamp screw and
remove it, using a
screwdriver as a lever
(see figure).
3. Remove the wire
contact screws L-N-
, then fasten the wires
under the screw heads,
respecting the colour
code: Blue (N), Brown
(L) and Yellow-Green
Verde (
).
Connecting the supply cable to the mains
Install a standardised plug corresponding to the
load indicated on the data plate (see side).
The appliance must be directly connected to the mains
using an omnipolar circuit-breaker with a minimum
contact opening of 3 mm installed between the appliance
and the mains, suitable for the load indicated and
complying with current electrical regulations (the earthing
wire must not be interrupted by the circuit-breaker). The
supply cable must not come into contact with surfaces
with temperatures higher than 50°C.
! The installer must ensure that the correct electrical
connection has been made and that it is compliant
with safety regulations.
Before connecting to the power supply, make sure that:
The appliance is earthed and the plug is compliant
with the law.
The socket can withstand the maximum power of
the appliance, which is indicated on the data plate
(see below).
The voltage must be in the range between the
values indicated on the data plate (see below).
The socket is compatible with the plug of the
appliance. If the socket is incompatible with the
plug, ask an authorised technician to replace it. Do
not use extension cords or multiple sockets.
! Once the appliance has been installed, the power
supply cable and the electrical socket must be easily
accessible.
! The cable must not be bent or compressed.
! The cable must be checked regularly and replaced
by authorised technicians only (see Assistance).
! The manufacturer declines any liability should
these safety measures not be observed.
* Only on certain models.
E
E
D
A
B
D
D
1
6
1
6
1
6
1
6
C
C
C

4
GB
Description of the appliance
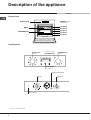
Overall view
Control panel
Control panel
GRILL
DRIPPING PAN
GUIDES for the
sliding racks
position 5
position 4
position 3
position 2
position 1
•• ••
SELECTOR
Knob
THERMOSTAT
Knob
Indicator light
THERMOSTAT
ELECTRONIC
Pro
g
rammer*
* Only on certain models.
OVEN INDICATOR *
SELECTOR
knob
THERMOSTAT
knob
ANALOGUE PROGRAMMER *
knob

5
GB
Start-up and use
! The first time you use your appliance, heat the
empty oven with its door closed at its maximum
temperature for at least half an hour. Ensure that the
room is well ventilated before switching the oven off
and opening the oven door. The appliance may
produce a slightly unpleasant odour caused by the
burning away of protective substances used during
the manufacturing process.
Starting the oven
1. Select the desired cooking mode by turning the
SELECTOR knob.
2. Select the desired temperature with the
THERMOSTAT knob. See the Cooking advice table for
cooking modes and the suggested cooking
temperatures (see Cooking Modes).
3. When lit, the THERMOSTAT indicator light indicates
that the oven is heating up to the temperature set.
4. You may do the following during cooking:
- change the cooking mode by turning the SELECTOR
knob.
- change the temperature by turning the
THERMOSTAT knob.
- stop cooking by turning the SELECTOR knob to the
0 position.
! Never put objects directly on the oven bottom to
avoid damaging the enamel coating.
! Always place cookware on the rack(s) provided.
Cooling ventilation
In order to cool down the external temperature of the
oven, some models are fitted with a cooling fan that
blows out air between the control panel and the oven
door.
! Once the cooking has been completed, the cooling
fan remains on until the oven has cooled down
sufficiently.
Oven light
It goes on when selecting
/ with the
SELECTOR knob. It stays on when a cooking mode
is selected.
Using the cooking timer*
1. To set the buzzer, turn the COOKING TIMER knob
clockwise almost one complete revolution.
2. Turn the knob anticlockwise to set the desired
time: align the minutes shown on the COOKING
TIMER knob with the indicator on the control panel.
3. When the selected time has elapsed, a buzzer
sounds and the oven turns off.
4. When the oven is off the cooking timer can be
used as a normal timer.
To use the oven manually, in other words when you
do not wish to use the end of cooking timer, turn the
COOKING TIMER knob until it reaches the '
symbol.
DATA PLATE
Dimensions
width 43.5 cm
height 32 cm
depth 41,5 cm
Volume
lt. 58
Electrical
connections
voltage: 220-240V ~ 50Hz
maximum power absorbed
2800W
ENERGY LABEL
Directive 2002/40/EC on the label
of electric ovens.
Standard EN 50304
Energy consumption for Natural
convection – heating mode: /
Convection mode.
Declared energy consumption for
Forced convection Class – heating
mode: / Baking.
This appliance conforms to the
following European Economic
Community directives:
- 2006/95/EEC of 12/12/06 (Low
Voltage) and subsequent
amendments;
- 2004/108/EEC of 15/12/04
(Electromagnetic Compatibility) and
subsequent amendments;
- 93/68/EEC of 22/07/93 and
subsequent amendments.
- 2002/96/EC and subsequent
amendments.
* Only on certain models.

6
GB
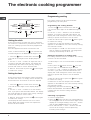
The electronic cooking programmer
DISPLAY
SET TIME
button
END OF
COOKING icon
CLOCK icon
DURATION
icon
TIMER icon
DECREASE TIME
button
INCREASE TIME
button
•• ••
Setting the clock
The clock may be set when the oven is switched
off or when it is switched on, provided that a the end
time of a cooking cycle has not been programmed
previously.
After the appliance has been connected to the
mains, or after a blackout, the
icon and the four
numerical digits on the DISPLAY will begin to flash.
1. Press the
button several times until the
icon and the four digits on the display begin to
flash.
2. Use the + and - buttons to adjust the time; if
you press and hold either button, the display will
scroll through the values more quickly, making it
quicker and easier to set the desired value.
3. Wait for 10 seconds or press the
button again
to finalise the setting.
Setting the timer
This function does not interrupt cooking and does
not affect the oven; it is simply used to activate the
buzzer when the set amount of time has elapsed.
1. Press the
button several times until the
icon and the three digits on the display begin to
flash.
2. Use the + and - buttons to set the desired
time; if you press and hold either button, the display
will scroll through the values more quickly, making it
quicker and easier to set the value.
3. Wait for 10 seconds or press the
button again
to finalise the setting.
The display will then show the time as it counts
down. When this period of time has elapsed the
buzzer will be activated.
Programming cooking
A cooking mode must be selected before
programming can take place.
Programming the cooking duration
1. Press the
button several times until the
icon and the three digits on the DISPLAY begin to
flash.
2. Use the + and - buttons to set the desired
duration; if you press and hold either button, the
display will scroll through the values more quickly,
making it quicker and easier to set the value.
3. Wait for 10 seconds or press the
button again
to finalise the setting.
4. When the set time has elapsed, the text END
appears on the DISPLAY, the oven will stop cooking
and a buzzer sounds.
For example: it is 9:00 a.m. and a time of 1 hour
and 15 minutes is programmed. The programme
will stop automatically at 10:15 a.m.
Setting the end time for a cooking mode
A cooking duration must be set before the cooking
end time can be scheduled.
1. Follow steps 1 to 3 to set the duration as detailed
above.
2. Next, press the
button until the icon and
the four digits on the DISPLAY begin to flash.
3. use the + and - buttons to adjust the cooking
end time; if you press and hold either button, the
display will scroll through the values more quickly,
making it quicker and easier to set the desired
value.
4. Wait for 10 seconds or press the
button again
to finalise the setting.
5. When the set time has elapsed, the text END
appears on the DISPLAY, the oven will stop cooking
and a buzzer sounds.
Programming has been set when the
and
buttons are illuminated. The DISPLAY shows the
cooking end time and the cooking duration
alternately.
Cancelling a programme
To cancel a programme:
press the
button until the icon corresponding to
the setting you wish to cancel and the digits on the
display are no longer flashing. Press the - button
until the digits 00:00 appear on the display.
Press and hold the + and - buttons; this will
cancel all the settings selected previously,
including timer settings.

7
GB
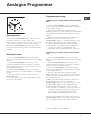
Setting the time*
1. Press the PROGRAMMER knob and turn it in a
clockwise direction to set the correct time.
The clock can only be set if the oven is connected
to the electricity mains. In the event of a power
failure, the PROGRAMMER will stop: the correct
time will need to be reset once the power has been
restored.
Starting the oven*
1. Turn the PROGRAMMER knob in a clockwise
direction until the symbol appears in the display
window.
2. Pull the PROGRAMMER knob and turn it in a
clockwise direction until the red pointer is aligned
with the current time. A click will indicate the end of
the programming phase.
3. Turn the PROGRAMMER knob in a clockwise
direction until the ' symbol appears in the display
window.
4. Select the desired cooking mode using the
SELECTOR knob.
5. To switch the oven off, turn the SELECTOR knob
back to the "0" position.
Analogue Programmer
*
Only available in certain models.
Programming cooking*
Programming a cooking duration with immediate
start
1. Turn the PROGRAMMER knob in a clockwise
direction until the desired cooking duration appears
in the display window.
2. Select the desired cooking mode using the
SELECTOR knob. The oven switches on immediately
and remains in operation for the entire set cooking
duration.
3. When the selected time period has elapsed, a
buzzer will sound. To silence it, turn the
PROGRAMMER knob in a clockwise direction until
the symbol appears in the display window.
4. Turn the SELECTOR knob to the "0" position.
For example: it is 9:00 a.m. and a duration of 1
hour and 15 minutes is programmed. The
programme will stop automatically at 10:15 a.m.
Programming a cooking duration with delayed
start
1. Turn the PROGRAMMER knob in a clockwise
direction until the symbol appears in the display
window.
2. Pull the PROGRAMMER knob and turn it in a
clockwise direction until the red pointer is aligned
with the desired cooking start time.
3. Turn the PROGRAMMER knob in a clockwise
direction until the desired cooking duration appears
in the display window.
4. Select the desired cooking mode using the
SELECTOR knob. The oven will switch on at the set
cooking start time and will remain on for the entire
set cooking duration.
5. When the selected time period has elapsed, a
buzzer will sound. To silence it, turn the
PROGRAMMER knob in a clockwise direction until
the
symbol appears in the display window.
6. Turn the SELECTOR knob to the "0" position.
For example: it is 9:00 a.m., a time of 1 hour and
15 minutes is programmed and the start time is
set to 11:00 a.m. The programme will start
automatically at 11:00 and will end at 12:15.
To cancel a programmed cooking cycle, turn the
PROGRAMMER knob in a clockwise direction until
the ' symbol appears in the display window.

8
GB
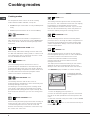
Cooking modes
Cooking modes
! A temperature value can be set for all cooking
modes between 60°C and Max, except for
BARBECUE (recommended: set only to MAX power
level);
GRATIN (recommended: do not exceed 200°C).
/ LEAVENING mode
The oven reaches and maintains a temperature of
40°C irrespective of the position of the THERMOSTAT
knob. This mode is ideal for leavening dough made
with yeast.
/ TRADITIONAL OVEN mode
Both the top and bottom heating elements will come
on. With this traditional cooking mode, it is best to use
one cooking rack only: if more than one rack is used,
the heat distribution will be uneven.
/ BAKING mode
The rear heating element and the fan come on,
guaranteeing the distribution of heat delicately and
uniformly throughout the oven. This mode is ideal for
baking and cooking temperature sensitive foods such
as cakes that need to rise and to prepare certain
tartlets on 3 shelves simultaneously.
/ FAST COOKING mode
The heating elements and the fan come on,
guaranteeing the distribution of heat consistently and
uniformly throughout the oven.
Pre-heating is not necessary for this cooking mode.
This mode is especially recommended for cooking
pre-packed food quickly (frozen or pre-cooked). The
best results are obtained if you use one cooking rack
only.
/ MULTI-COOKING mode
All the heating elements (top, bottom and circular), as
well as the fan, will come on. Since the heat remains
constant throughout the oven, the air cooks and
browns food uniformly. A maximum of two racks may
be used at the same time.
/ PIZZA mode
The heating elements (bottom and circular) and the
fan come on. This combination heats the oven rapidly
by producing a considerable amount of heat,
particularly from the bottom element. If you use more
than one rack simultaneously, switch the position of
the dishes halfway through the cooking process.
/ BARBECUE mode
The top heating element and the rotisserie (where
present) come on. The high and direct temperature of
the grill is recommended for food that requires high
surface temperature. Always cook in this mode with
the oven door closed.
/ GRATIN mode
The top heating element as well as the fan and the
rotisserie (where present) come on. This combination
of features increases the effectiveness of the
unidirectional thermal radiation of the heating
elements through forced circulation of the air
throughout the oven.
This helps prevent food from burning on the surface,
allowing the heat to penetrate right into the food.
Always cook in this mode with the oven door closed.
The Rotisserie (only available on certain models)
To operate the rotisserie
(see diagram) proceed as
follows:
1. Place the dripping pan in position 1.
2. Place the rotisserie support in position 3 and insert
the spit in the hole provided on the back panel of the
oven.
3. Start the rotisserie using the knob to select MODE
/ or / .
When
/ mode is on, the rotisserie will stop if
the door is opened.

9
GB
Practical cooking advice
! Do not place racks in position 1 and 5 during fan-
assisted cooking. Excessive direct heat can burn
temperature sensitive foods.
! In the BARBECUE and GRATIN cooking modes,
particularly when using the rotisserie, place the
dripping pan in position 1 to collect cooking residues
(fat and/or grease).
MULTI-COOKING
Use position 2 and 4, placing the food that requires
more heat on 2.
Place the dripping pan on the bottom and the rack
on top.
BARBECUE
Insert the rack in position 3 or 4. Place the food in
the centre of the rack.
We recommend that you set the maximum power
level. The top heating element is regulated by a
thermostat and may not always be on.
PIZZA MODE
Use a light aluminium pizza pan. Place it on the
rack provided.
For a crispy crust, do not use the dripping pan
(prevents crust from forming by extending cooking
time).
If the pizza has a lot of toppings, we recommend
adding the mozzarella cheese on top of the pizza
halfway through the cooking process.

10
GB
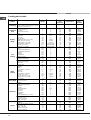
Cooking advice table
Cooking
modes
Foods Weight
(in kg)
Rack Position Pre-heating
time
(minutes)
Recommended
temperature
Cooking
time
(minutes)
Leavening
Leavening process of dough made with
yeast or baking powder (brioches, bread,
sugar pie, croissants, etc.)
Traditional
Oven
Duck
Roast veal or beef
Pork roast
Biscuits (short pastry)
Tarts
1
1
1
-
1
3
3
3
3
3
15
15
15
15
15
200
200
200
180
180
65-75
70-75
70-80
15-20
30-35
Baking
Mode
Tarts
Fruit cakes
Plum cake
Sponge cake
Stuffed pancakes (on 2 racks)
Small cakes (on 2 racks)
Cheese puffs (on 2 racks)
Cream puffs (on 3 racks)
Biscuits (on 3 racks)
Meringues (on 3 racks)
0.5
1
0.7
0.5
1.2
0.6
0.4
0.7
0.7
0.5
3
2 or 3
3
3
2 and 4
2 and 4
2 and 4
1 and 3 and 5
1 and 3 and 5
1 and 3 and 5
15
15
15
15
15
15
15
15
15
15
180
180
180
160
200
190
210
180
180
90
20-30
40-45
40-50
25-30
30-35
20-25
15-20
20-25
20-25
180
Frozen food
Pizza
Courgette and prawn pie
Country style spinach pie
Turnovers
Lasagne
Golden Rolls
Chicken morsels
0.3
0.4
0.5
0.3
0.5
0.4
0.4
2
2
2
2
2
2
2
-
-
-
-
-
-
-
250
200
220
200
200
180
220
12
20
30-35
25
35
25-30
15-20
Pre-cooked food
Golden chicken wings
0.4
2
-
200
20-25
Fast
cooking
Fresh Food
Biscuits (short pastry)
Plum cake
Cheese puffs
0.3
0.6
0.2
2
2
2
-
-
-
200
180
210
15-18
45
10-12
Multi-
cooking
Pizza (on 2 racks)
Lasagne
Lamb
Roast chicken + potatoes
Mackerel
Plum cake
Cream puffs (on 2 racks)
Biscuits (on 2 racks)
Sponge cake (on 1 rack)
Sponge cake (on 2 racks)
Savoury pies
1
1
1
1+1
1
1
0.5
0.5
0.5
1
1.5
2 and 4
3
2
2 and 4
2
2
2 and 4
2 and 4
2
2 and 4
3
15
10
10
15
10
10
10
10
10
10
15
230
180
180
200
180
170
190
180
170
170
200
15-20
30-35
40-45
60-70
30-35
40-50
20-25
10-15
15-20
20-25
25-30
Pizza Mode
Pizza
Roast veal or beef
Chicken
0.5
1
1
3
2
2 or 3
15
10
10
220
220
180
15-20
25-30
60-70
Soles and cuttlefish
Squid and prawn kebabs
Cuttlefish
Cod filet
Grilled vegetables
Veal steak
Sausages
Hamburgers
Mackerels
Toasted sandwiches (or toast)
0.7
0.6
0.6
0.8
0.4
0.8
0.6
0.6
1
4 and 6
4
4
4
4
3 or 4
4
4
4
4
4
-
-
-
-
-
-
-
-
-
-
Max
Max
Max
Max
Max
Max
Max
Max
Max
Max
10-12
8-10
10-15
10-15
15-20
15-20
15-20
10-12
15-20
3-5
Barbecue
With rotisserie (where present)
Veal on the spit
Chicken on the spit
Lamb on the spit
1.0
1.5
1.0
-
-
-
-
-
-
Max
Max
Max
80-90
70-80
70-80
Grilled chicken
Cuttlefish
1.5
1.5
2
2
10
10
200
200
55-60
30-35
Gratin
With rotisserie (where present)
Veal on the spit
Lamb on the spit
Chicken on the spit +
potatoes (roasted)
1.5
1.5
1.5
-
-
-
-
2
10
10
10
10
200
200
200
200
70-80
70-80
70-75
70-75

11
GB
Precautions and tips
! The appliance was designed and manufactured in
compliance with international safety standards. The
following warnings are provided for safety reasons
and must be read carefully.
General safety
The appliance was designed for domestic use
inside the home and is not intended for
commercial or industrial use.
The appliance must not be installed outdoors,
even in covered areas. It is extremely dangerous
to leave the appliance exposed to rain and
storms.
When handling the appliance, always use the
handles provided on the sides of the oven.
Do not touch the appliance with bare feet or with
wet or moist hands and feet.
The appliance must be used by adults only for
the preparation of food, in accordance with the
instructions outlined in this booklet. Any other
use of
the appliance (e.g. for heating the room)
constitutes improper use and is dangerous.
The manufacturer may not be held liable for
any damage resulting from i mprop
er, incorrect
and unreasonable use of the appliance.
When the appliance is in use, the heating
elements and some parts of the oven door
become extremely hot.
Make sure you don't
touch them and keep children well away.
Ensure that the power supply cable of other
electrical appliances does not come into contact
with the hot parts of the oven.
The openings used for ventilation and dispersion
of heat must never be covered.
Always grip the oven door handle in the centre:
the ends may be hot.
Always use oven gloves to place cookware in the
oven or when removing it.
Do not use aluminium foil to line the bottom of the
oven.
Do not place flammable materials in the oven: if
the appliance is switched on by mistake, it could
catch fire.
Always make sure the knobs are in the l/
¡
position when the appliance is not in use.
When unplugging the appliance always pull the
plug from the mains socket, do not pull on the
cable.
Never carry out any cleaning or maintenance work
without having unplugged the plug from the
mains.
In the case of a malfunction, under no
circumstances should you attempt to repair the
appliance yourself. Repairs carried out by
inexperienced persons may cause injury or further
malfunctioning of the appliance. Contact a Service
Centre (see Assistance).
Do not rest heavy objects on the open oven door.
Do not let children play with the appliance.
The appliance should not be operated by people
(including children) with reduced physical,
sensory or mental capacities, by inexperienced
individuals or by anyone who is not familiar with
the product. These individuals should, at the very
least, be supervised by someone who assumes
responsibility for their safety or receive
preliminary instructions relating to the operation of
the appliance.
Disposal
Observe local environmental standards when
disposing packaging material for recycling
purposes. Observe existing legislation when
disposing of the old appliance.
The European Directive 2002/96/EC on Waste
Electrical and Electronic Equipment (WEEE),
requires that old household electrical appliances
must not be disposed of in the normal unsorted
municipal waste stream. Old appliances must be
collected separately in order to optimise the
recovery and recycling of the materials they
contain and reduce the impact on human health
and the environment. The crossed out wheeled
bin symbol on the product reminds you of your
obligation, that when you dispose of the
appliance it must be separately collected.
Consumers should contact their local authority or
retailer for information concerning the correct
disposal of their old appliance.
Respecting and conserving the
environment
By using the appliance in the hours between late
afternoon and early morning, you can help reduce
the work load placed on electrical companies.
Always keep the oven door closed when using the
BARBECUE and GRATIN modes: to attain best
results and to save energy (approximately 10%).
Regularly check the door seals and wipe clean to
ensure they are free of debris so that they stick
properly to the door and do not allow heat to
disperse.
Assistance
Communicating:
appliance model (Mod.)
serial number (S/N)
This information is found on the data plate located
on the appliance and/or on the packaging.

12
GB
Maintenance and care
Switching the appliance off
Disconnect your appliance from the electricity supply
before carrying out any work on it.
Cleaning the appliance
The stainless-steel or enamel-coated external parts as
well as the rubber seals may be cleaned using a
sponge that has been soaked in lukewarm water and
neutral soap. If these stains are difficult to remove,
use only specialised products. After cleaning, rinse
and dry thoroughly. Do not use abrasive powders or
corrosive substances.
Ideally, the inside of the oven should be cleaned after
each use, when it is still lukewarm. Use hot water and
detergent, rinse and dry with a soft cloth. Do not use
abrasive products.
All accessories - with the exception of the sliding
racks - can be washed like everyday crockery, and
are even dishwasher safe.
Never use steam cleaners or pressure cleaners on
the appliance.
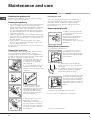
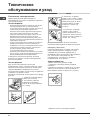
Cleaning the oven door
Clean the glass part of the oven door using a sponge
and a non-abrasive cleaning product, then dry
thoroughly with a soft cloth. Do not use rough abrasive
material or sharp metal scrapers as these could scratch
the surface and cause the glass to crack.
To clean more thoroughly, you
can remove the oven door.
1. Open the oven door fully
(see diagram).
2. Use a screwdriver to lift up
and turn the small levers .
located on the two hinges (see
diagram).
3. Grip the door on the two
external sides and close it
approximately half way. Unlock
the door by pressing on the
clamps ., then pull the door
towards you lifting it out of its
seat (see diagram).*
3. Grip the door on the two
outer sides and close it
approximately half way. Pull
the door towards you lifting it
out of its seat (see diagram).*
To replace the door, reverse
this sequence.
Inspecting the seals
Check the door seals around the oven periodically. If
the seals are damaged, please contact your nearest
After-sales Service Centre (see Assistance). We
recommend not using the oven until the seals have
been replaced.
Replacing the light bulb
To replace the oven light bulb:
1. Remove the glass cover of
the lamp-holder.
2. Remove the light bulb and
replace it with a similar one:
Wattage 25 W, cap E 14.
3. Replace the glass cover (see
diagram).
Sliding Rack Kit assembly
To assemble the sliding racks:
1. Loosen the two screws A
(see diagram). If the oven is
fitted with self-cleaning panels,
these will have to be temporarily
disassembled.
2. Replace the screws A with the
screws and spacers (B + C) supplied
with the kit.
3. Tighten the new screws B and the
corresponding spacers C, fitting the
self-cleaning panels on again.
4. Secure the two joints D of the
guide rail in the holes provided
on the oven walls (see diagram).
The holes for the left guide rail
are situated at the top, while the
holes for the right one are at the
bottom.
5. Finally, fit the guide rail on the spacer C.
Do not place the sliding racks in position 5.
F
F
F
B
C
D
A
A
*
Only on certain models

7OFH 837 C RU /HA
7OFTR 850 RU /HA
7OFH 937 C.1 RU/HA
7OFH 937 C.1 IX RU/HA
7OFH 837 C IX RU/HA
7OFQ 837 C.1 /HA
Ñîäåðæàíèå
Ìîíòàæ, 14-15
Ðàñïîëîæåíèå
Ýëåêòðè÷åñêîå ïîäêëþ÷åíèå
Îïèñàíèå èçäåëèÿ, 16
Îáùèé âèä
Êîíñîëü óïðàâëåíèÿ
Âêëþ÷åíèå è ýêñïëóàòàöèÿ, 17
Âêëþ÷åíèå äóõîâîãî øêàôà
Ïðîãðàììèðîâàíèå îêîí÷àíèÿ ïðèãîòîâëåíèÿ ïðè
ïîìîùè òàéìåðà
Ïàñïîðòíàÿ òàáëè÷êà
Ýëåêòðîííûé òàéìåð
ïðîãðàììèðîâàíèÿ ïðèãîòîâëåíèÿ, 18
Àíàëîãîâûé ïðîãðàììåð, 19
Ïðîãðàììû, 20- 22
Ïðîãðàììû ïðèãîòîâëåíèÿ
Ïðàêòè÷åñêèå ñîâåòû ïî ïðèãîòîâëåíèþ
Òàáëèöà ïðèãîòîâëåíèÿ
Ïðåäîñòîðîæíîñòè è ðåêîìåíäàöèè, 23
Îáùèå òðåáîâàíèÿ ïî áåçîïàñíîñòè
Ïåðåðàáîòêà
Ýêîíîìèÿ ýëåêòðîýíåðãèè è îõðàíà îêðóæàþùåé
ñðåäû
Òåõíè÷åñêîå îáñëóæèâàíèå è óõîä, 24-
25
Îáåñòî÷èâàíèå èçäåëèÿ
×èñòêà èçäåëèÿ
×èñòêà äâåðöû
Çàìåíà ëàìïî÷êè
Êðåïëåíèå êîìïëåêòà âûäâèæíûõ íàïðàâëÿþùèõ
Ñåðâèñíîå îáñëóæèâàíèå
RS
Èíñòðóêöèè ïî
ýêñïëóàòàöèè
Ðóññêèé, 13
ÄÓÕÎÂÎÉ ØÊÀÔ
English,1
GB
RS

14
RS
Âàæíî ñîõðàíèòü äàííîå ðóêîâîäñòâî äëÿ åãî
ïîñëåäóþùèõ êîíñóëüòàöèé.  ñëó÷àå ïðîäàæè,
ïåðåäà÷è èçäåëèÿ èëè ïðè ïåðååçäå íà íîâîå
ìåñòî æèòåëüñòâà íåîáõîäèìî ïðîâåðèòü, ÷òîáû
ðóêîâîäñòâî îñòàâàëîñü âìåñòå ñ èçäåëèåì, äëÿ
òîãî ÷òîáû åãî íîâûé âëàäåëåö ìîã îçíàêîìèòüñÿ
ñ ïðàâèëàìè ýêñïëóàòàöèè è ñ ñîîòâåòñòâóþùèìè
ïðåäóïðåæäåíèÿìè.
Âíèìàòåëüíî ïðî÷èòàéòå èíñòðóêöèè: â íèõ
ñîäåðæàòñÿ âàæíûå ñâåäåíèÿ îá óñòàíîâêå,
ýêñïëóàòàöèè è áåçîïàñíîñòè èçäåëèÿ.
Ðàñïîëîæåíèå
Íå ðàçðåøàéòå äåòÿì èãðàòü ñ óïàêîâî÷íûìè
ìàòåðèàëàìè. Óïàêîâêà äîëæíà áûòü óíè÷òîæåíà â
ñîîòâåòñòâèè ñ ïðàâèëàìè ñáîðà ìóñîðà (ñì.
Ïðåäîñòîðîæíîñòè è ðåêîìåíäàöèè).
Ìîíòàæ èçäåëèÿ ïðîèçâîäèòñÿ â ñîîòâåòñòâèè ñ
äàííûìè èíñòðóêöèÿìè êâàëèôèöèðîâàííûìè
ñïåöèàëèñòàìè. Íåïðàâèëüíûé ìîíòàæ èçäåëèÿ
ìîæåò ñòàòü ïðè÷èíîé ïîâðåæäåíèÿ èìóùåñòâà è
ïðè÷èíèòü óùåðá ëþäÿì è äîìàøíèì æèâîòíûì.
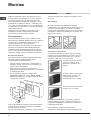
Âñòðîåííûé ìîíòàæ
Äëÿ îáåñïå÷åíèÿ èñïðàâíîãî ôóíêöèîíèðîâàíèÿ
èçäåëèÿ êóõîííûé ýëåìåíò äîëæåí èìåòü
ñîîòâåòñòâóþùèå õàðàêòåðèñòèêè:
ïàíåëè êóõîííûõ ýëåìåíòîâ, ïðèëåãàþùèõ ê
äóõîâîìó øêàôó, äîëæíû áûòü âûïîëíåíû èç
òåðìîñòîéêîãî ìàòåðèàëà;
êëåé êóõîííûõ ýëåìåíòîâ ýëåìåíòîâ èç
ôàíåðîâàííîãî äåðåâà äîëæåí áûòü óñòîé÷èâûì
ê òåìïåðàòóðå 100°C.
äëÿ âñòðàèâàíèÿ äóõîâîãî øêàôà ïîä
êóõîííûì òîïîì (ñì. ñõåìó) èëè â øêàô-
ïåíàë íèøà êóõîííîãî ýëåìåíòà äîëæíà èìåòü
ñëåäóþùèå ðàçìåðû:
Ïîñëå âñòðàèâàíèÿ èçäåëèÿ â êóõîííûé ýëåìåíò
äîëæíà áûòü èñêëþ÷åíà âîçìîæíîñòü êàñàíèÿ ê
ýëåêòðè÷åñêèìè ÷àñòÿìè.
Ðàñõîä ýëåêòðîýíåðãèè, óêàçàííûé íà ïàñïîðòíîé
òàáëè÷êå èçäåëèÿ, áûë çàìåðåí äëÿ äàííîãî òèïà
ìîíòàæà.
Âåíòèëÿöèÿ
Äëÿ îáåñïå÷åíèÿ íàäëåæàùåé âåíòèëÿöèè
íåîáõîäèìî ñíÿòü çàäíþþ ïàíåëü íèøè êóõîííîãî
ýëåìåíòà. Ðåêîìåíäóåòñÿ óñòàíîâèòü äóõîâîé
øêàô íà äâà äåðåâÿííûõ áðóñêà èëè íà ñïëîøíîå
îñíîâàíèå ñ îòâåðñòèåì äèàìåòðîì íå ìåíåå 45 õ
560 ìì (ñì ñõåìû).
Öåíòðîâêà è êðåïëåíèå
4 êðåïåæíûõ ýëåìåíòà ñ áîêîâ äóõîâîãî øêàôà
äîëæíû áûòü îòðåãóëèðîâàíû â ñîîòâåòñòâèè ñ 4
îòâåðñòèÿìè â ðàìå â çàâèñèìîñòè îò òîëùèíû
áîêîâîé ïàíåëè êóõîííîãî ýëåìåíòà:
òîëùèíà 20 ìì: ïîëíîñòüþ
óäàëèòå ñúåìíóþ ÷àñòü
êðåïåæíîãî ýëåìåíòà (ñì.
ñõåìó);
òîëùèíà 18 ìì: èñïîëüçóéòå
ïåðâûé ïàç, ñîãëàñíî óæå
ãîòîâîé êîíôèãóðàöèè
ïðîèçâîäèòåëÿ (ñì. ñõåìó);
òîëùèíà 16 ìì: èñïîëüçóéòå
âòîðîé ïàç (ñì. ñõåìó).
Äëÿ êðåïëåíèÿ èçäåëèÿ ê êóõîííîìó ýëåìåíòó:
îòêðîéòå äâåðöó äóõîâîãî øêàôà è çàâèíòèòå 4
øóðóïà äëÿ äåðåâÿííûõ ïàíåëåé â 4 îòâåðñòèÿ â
ïåðèìåòðàëüíîé ðàìå.
Âñå çàùèòíûå ýëåìåíòû äîëæíû áûòü
çàêðåïëåíû òàêèì îáðàçîì, ÷òîáû èõ ìîæíî áûëî
595 mm.
595 mm.
24 mm.
545 mm.
5 mm.
567 mm.
23 mm.
593 mm.
45 m
m
.
558 mm.
5
4
7
m
m
. m
in
.
560 m
m
.
45 mm.
Ìîíòàæ

15
RS
ñíÿòü òîëüêî ïðè ïîìîùè ñïåöèàëüíîãî
èíñòðóìåíòà.
Öåíòðîâêà è êðåïëåíèå*
1. Óñòàíîâèòü ñêîáû A â êðàé ê äóõîâîìó øêàôó
B.
2. Óñòàíîâèòü óãîëêè C â êðàé ê ñêîáàì A. Â
÷àñòíîñòè, åñëè òîëùèíà áîêîâîé ïàíåëè
ìåáåëüíîãî ýëåìåíòà:
16 ìì: ïðèêðåïèòü óãîëîê òàêèì îáðàçîì,
÷òîáû ïðîñòàâëåííûé íà íåé íîìåð 16 áûë
îáðàùåí ê âàì;
18 ìì: ïðèêðåïèòü óãîëîê òàêèì îáðàçîì,
÷òîáû ñòîðîíà áåç íàäïèñåé áûëà îáðàùåíà ê
âàì;
20 ìì: íå óñòàíàâëèâàòü óãîëîê.
3. Ïðèêðåïèòü ñêîáû è óãîëêè ê êðàþ áîêîâîé
ïàíåëè ìåáåëüíîãî ýëåìåíòà ïðè ïîìîùè
øóðóïîâ D.
4. Ïðèêðåïèòü äóõîâîé øêàô ê ìåáåëüíîìó
ýëåìåíòó ïðè ïîìîùè øóðóïîâ è
ïëàñòìàññîâûõ øàéá E.
Ýëåêòðè÷åñêîå ïîäêëþ÷åíèå
Äóõîâûå øêàôû, óêîìïëåêòîâàííûå
òðåõïîëþñíûì êàáåëåì ýëåêòðîïèòàíèÿ,
ðàñ÷èòàíû íà ôóíêöèîíèðîâàíèå ñ ïåðåìåííûì
òîêîì ñ íàïðÿæåíèåì è ÷àñòîòîé ýëåêòðîïèòàíèÿ,
óêàçàííûìè íà ïàñïîðòíîé òàáëè÷êå ñ äàííûìè
(ñì. íèæå).
Ïîäñîåäèíåíèå ñåòåâîãî êàáåëÿ
1. Îòêðîéòå çàæèìíóþ
êîðîáêó, íàæàâ ïðè
ïîìîùè îòâåðòêè íà
âûñòóïû ñ áîêîâ
êðûøêè: ïîòÿíèòå è
îòêðîéòå êðûøêó (ñì.
ñõåìó).
2. Îòâèíòèòå âèíò
êàáåëüíîãî ñàëüíèêà è
âûíüòå åãî, ïîääåâ
îòâåðòêîé (ñì. ñõåìó).
3. Îòâèíòèòå âèíòû
êîíòàêòîâ L-N-
è
çàòåì ïðèêðåïèòå
ïðîâîäà ïîä
ãîëîâêàìè âèíòîâ,
ñîáëþäàÿ öâåòîâóþ
ìàðêèðîâêó Ñèíèé (N)
Êîðè÷íåâûé (L) Æåëòî-
çåëåíûé (
).
Ïîäñîåäèíåíèå ñåòåâîãî êàáåëÿ èçäåëèÿ ê
ñåòè ýëåêòðîïèòàíèÿ
Óñòàíîâèòå íà ñåòåâîé êàáåëü íîðìàëèçîâàííóþ
øòåïñåëüíóþ âèëêó, ðàñ÷èòàííóþ íà íàãðóçêó,
óêàçàííóþ íà ïàñïîðòíîé òàáëè÷êå (ñì. ñáîêó).
 ñëó÷àå ïðÿìîãî ïîäêëþ÷åíèÿ ê ñåòè
ýëåêòðîïèòàíèÿ ìåæäó èçäåëèåì è ñåòüþ
íåîáõîäèìî óñòàíîâèòü ìíîãîïîëþñíûé
âûêëþ÷àòåëü ñ ìèíèìàëüíûì ðàññòîÿíèåì ìåæäó
êîíòàêòàìè 3 ìì, ðàñ÷èòàííûé íà äàííóþ íàãðóçêó
è ñîîòâåòñòâóþùèé äåéñòâóþùèì íîðìàòèâàì
(âûêëþ÷àòåëü íå äîëæåí ðàçìûêàòü ïðîâîä
çàçåìëåíèÿ). Ñåòåâîé êàáåëü äîëæåí áûòü
ðàñïîëîæåí òàêèì îáðàçîì, ÷òîáû íè â îäíîé
òî÷êå åãî òåìïåðàòóðà íå ïðåâûøàëà òåìïåðàòóðó
ïîìåùåíèÿ áîëåå ÷åì íà 50°C.
Ýëåêòðîìîíòåð íåñåò îòâåòñòâåííîñòü çà
ïðàâèëüíîå ïîäêëþ÷åíèå èçäåëèÿ ê ýëåêòðè÷åñêîé
ñåòè è çà ñîáëþäåíèå ïðàâèë áåçîïàñíîñòè.
Ïåðåä ïîäêëþ÷åíèåì èçäåëèÿ ê ñåòè
ýëåêòðîïèòàíèÿ ïðîâåðüòå ñëåäóþùåå:
ñåòåâàÿ ðîçåòêà äîëæíà áûòü ñîåäèíåíà ñ
çàçåìëåíèåì è ñîîòâåòñòâîâàòü íîðìàòèâàì;
ñåòåâàÿ ðîçåòêà äîëæíà áûòü ðàññ÷èòàíà íà
ìàêñèìàëüíóþ ïîòðåáëÿåìóþ ìîùíîñòü èçäåëèÿ,
óêàçàííóþ íà ïàñïîðòíîé òàáëè÷êå (ñì. íèæå);
íàïðÿæåíèå ñåòè ýëåêòðîïèòàíèÿ äîëæíî
íàõîäèòüñÿ â ïðåäåëàõ çíà÷åíèé, óêàçàííûõ íà
ïàñïîðòíîé òàáëè÷êå (ñì. íèæå);
ñåòåâàÿ ðîçåòêà äîëæíà áûòü ñîâìåñòèìà ñî
øòåïñåëüíîé âèëêîé èçäåëèÿ. Â ïðîòèâíîì
ñëó÷àå çàìåíèòå ðîçåòêó èëè âèëêó; íå
èñïîëüçóéòå óäëèíèòåëè èëè òðîéíèêè.
Èçäåëèå äîëæíî áûòü óñòàíîâëåíî òàêèì
îáðàçîì, ÷òîáû ñåòåâîé êàáåëü è ñåòåâàÿ ðîçåòêà
áûëè ëåãêî äîñòóïíû.
Ñåòåâîé êàáåëü èçäåëèÿ íå äîëæåí áûòü ñîãíóò
èëè ñæàò.
Ðåãóëÿðíî ïðîâåðÿéòå ñîñòîÿíèå ñåòåâîãî êàáåëÿ
è â ñëó÷àå íåîáõîäèìîñòè ïîðó÷èòå åãî çàìåíó
òîëüêî óïîëíîìî÷åííûì òåõíèêàì (ñì.
Òåõíè÷åñêîå îáñëóæèâàíèå).
Ïðîèçâîäèòåëü íå íåñåò îòâåòñòâåííîñòè çà
ïîñëåäñòâèÿ íåñîáëþäåíèÿ ïåðå÷èñëåííûõ
âûøå òðåáîâàíèé.
E
E
D
A
B
D
D
1
6
1
6
1
6
1
6
C
C
C
*
Èìååòñÿ òîëüêî â íåêîòîðûõ ìîäåëÿõ.

16
RS
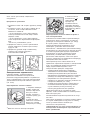
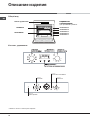
Панель управления
РЕШЕТКА
ПРОТИВЕНЬ
ВЫДВИЖНЫЕ
НАПРАВЛЯЮЩИЕ
для противеней и решето
к
положение 5
положение 4
положение 3
положение 2
положение 1
Îïèñàíèå èçäåëèÿ
Îáùèé âèä
Êîíñîëü óïðàâëåíèÿ
•• ••
*
* Èìååòñÿ òîëüêî â íåêîòîðûõ ìîäåëÿõ.
Рукоятка
ПРОГРАММ
Рукоятка
ТЕРМОСТАТА
Рукоятка
АНАЛОГОВОГО ПРОГРАММЕРА*
Индикатор
РАБОТЫ ДУХОВКИ*

17
RS
Ïðè ïåðâîì âêëþ÷åíèè äóõîâîãî øêàôà
ðåêîìåíäóåì ïðîêàëèòü åãî ïðèìåðíî â òå÷åíèå
÷àñà ïðè ìàêñèìàëüíîé òåìïåðàòóðå ñ çàêðûòîé
äâåðöåé. Çàòåì âûêëþ÷èòå äóõîâîé øêàô,
îòêðîéòå äâåðöó è ïðîâåòðèòå ïîìåùåíèå. Çàïàõ,
êîòîðûé âû ìîæåòå ïî÷óâñòâîâàòü, âûçâàí
èñïàðåíèåì âåùåñòâ, èñïîëüçîâàííûõ äëÿ
ïðåäîõðàíåíèÿ äóõîâîãî øêàôà.
Âêëþ÷åíèå äóõîâîãî øêàôà
1. Âûáåðèòå íóæíóþ ïðîãðàììó ïðèãîòîâëåíèÿ ïðè
ïîìîùè ðóêîÿòêè ÏÐÎÃÐÀÌÌÛ.
2. Âûáåðèòå òåìïåðàòóðó ïðè ïîìîùè ðåãóëÿòîðà
ÒÅÐÌÎÑÒÀÒ. Â ñïåöèàëüíîé òàáëèöå ïðèâîäèòñÿ
ïåðå÷åíü òèïîâ ïðèãîòîâëåíèÿ ñ
ñîîòâåòñòâóþùèìè ðåêîìåíäóåìûìè
òåìïåðàòóðàìè (ñì. Ïðîãðàììû).
3. Âêëþ÷åííûé èíäèêàòîð ÒÅÐÌÎÑÒÀÒÀ îçíà÷àåò
òåêóùóþ ôàçó íàãðåâà äóõîâêè äî çàäàííîé
òåìïåðàòóðû.
4. Â ïðîöåññå ïðèãîòîâëåíèÿ â ëþáîé ìîìåíò
ìîæíî:
- èçìåíèòü ïðîãðàììó ïðèãîòîâëåíèÿ ïðè ïîìîùè
ðóêîÿòêè ÏÐÎÃÐÀÌÌÛ;
- èçìåíèòü òåìïåðàòóðó ïðè ïîìîùè ðåãóëÿòîðà
ÒÅÐÌÎÑÒÀÒ;
- ïðåðâàòü ïðèãîòîâëåíèå, ïîâåðíóâ ðóêîÿòêó
ÏÐÎÃÐÀÌÌÛ â ïîëîæåíèå «0».
Íèêîãäà íå ñòàâüòå íèêàêèõ ïðåäìåòîâ íà äíî
äóõîâîãî øêàôà, òàê êàê îíè ìîãóò ïîâðåäèòü
ýìàëèðîâàííîå ïîêðûòèå.
Âñåãäà ñòàâüòå ïîñóäó íà ïðèëàãàþùóþñÿ
ðåøåòêó.
Îõëàäèòåëüíàÿ âåíòèëÿöèÿ
Äëÿ ïîíèæåíèÿ òåìïåðàòóðû âîêðóã ðàáîòàþùåãî
äóõîâîãî øêàôà íåêîòîðûå ìîäåëè îñíàùàþòñÿ
îõëàäèòåëüíûì âåíòèëÿòîðîì. Ýòîò âåíòèëÿòîð
íàïðàâëÿåò ñòðóþ âîçäóõà ìåæäó ïàíåëüþ
óïðàâëåíèÿ è äâåðöåé äóõîâîãî øêàôà.
Ïî çàâåðøåíèè ïðèãîòîâëåíèÿ âåíòèëÿòîð
ïðîäîëæàåò ðàáîòàòü âïëîòü äî íàäëåæàùåãî
îõëàæäåíèÿ äóõîâêè.
Îñâåùåíèå äóõîâîãî øêàôà
Çàãîðàåòñÿ ïðè âûáîðå
/ ïðè ïîìîùè
ðóêîÿòêè ÏÐÎÃÐÀÌÌÛ. Îñòàåòñÿ âêëþ÷åííîé ïðè
âûáîðå ïðîãðàììû ïðèãîòîâëåíèÿ.
Ïðîãðàììèðîâàíèå îêîí÷àíèÿ
ïðèãîòîâëåíèÿ ïðè ïîìîùè òàéìåðà*
1. Ïðåæäå âñåãî íåîáõîäèìî çàâåñòè òàéìåð,
ïîâåðíóâ ðóêîÿòêó ÒÀÉÌÅÐ ÎÊÎÍ×ÀÍÈß
ÏÐÈÃÎÒÎÂËÅÍÈß ïî ÷àñîâîé ñòðåëêå ïî÷òè íà
îäèí ïîëíûé îáîðîò.
2. Ïîâîðà÷èâàÿ ðóêîÿòêó îáðàòíî, ïðîòèâ ÷àñîâîé
ñòðåëêè, çàäàåòñÿ íóæíîå âðåìÿ ìèíóòû íà
ðóêîÿòêå ÒÀÉÌÅÐÀ ÎÊÎÍ×ÀÍÈß
ÏÐÈÃÎÒÎÂËÅÍÈß äîëæíû ñîâïàñòü ñ îòìåòêàìè
íà ïàíåëè óïðàâëåíèÿ.
3. Ïî èñòå÷åíèè çàäàííîãî âðåìåíè ðàçäàåòñÿ
çâóêîâîé ñèãíàë è äóõîâîé øêàô âûêëþ÷àåòñÿ.
4. Êîãäà äóõîâîé øêàô âûêëþ÷åí, òàéìåð
ïðîãðàììèðîâàíèÿ îêîí÷àíèÿ ïðèãîòîâëåíèÿ
ìîæåò áûòü èñïîëüçîâàí â êà÷åñòâå îáû÷íîãî
òàéìåðà.
äëÿ èñïîëüçîâàíèÿ äóõîâîãî øêàôà â ðó÷íîì
ðåæèìå, ò.å. èñêëþ÷èâ óñòðîéñòâî
ïðîãðàììèðîâàíèÿ îêîí÷àíèÿ ïðèãîòîâëåíèÿ,
íåîáõîäèìî, ÷òîáû ôèêñèðîâàííàÿ îòìåòêà íà
ïåðåäíåé ïàíåëè äóõîâêè ñîâïàëà ñ ñèìâîëîì '.
Âêëþ÷åíèå è
ýêñïëóàòàöèÿ
ÏÀÑÏÎÐÒÍÀß ÒÀÁËÈ×ÊÀ
Ãàáàðèòíûå
ðàçìåðû
øèðèíà 43,5 ñì.
âûñîòà 32 ñì.
ãëóáèíà 41,5 ñì.
Îáúåì
ë 58
Ýëåêòðè÷åñêîå
ïîäêëþ÷åíèå
íàïðÿæåíèå 220-240 Â ~ 50 Ãö
ìàêñ. ïîãëîùàåìàÿ ìîùíîñòü
2800 Âò
ÌÀÐÊÈÐÎÂÊÀ
ÏÎÒÐÅÁËÅÍÈß
ÝËÅÊÒÐÎÝÍÅÐÃÈÈ
Äèðåêòèâà 2002/40/ÑÅ îá
ýòèêåòêàõ ýëåêòðè÷åñêèõ
äóõîâûõ øêàôîâ.
Íîðìàòèâ EN 50304
Ðàñõîä ýëåêòðîýíåðãèè
Íàòóðàëüíàÿ êîíâåêöèÿ –
ôóíêöèÿ íàãðåâàíèÿ: /
Òðàäèöèîíàëüíàÿ:
Çàÿâëåíèå î ðàñõîäå
ýëåêòðîýíåðãèè êëàññà
ïðèíóäèòåëüíîé êîíâåêöèè -
ôóíêöèÿ íàãðåâàíèÿ: /
Êîíäèòåðñêàÿ âûïå÷êà.
Äàííîå èçäåëèå ñîîòâåòñòâóåò
ñëåäóþùèì Äèðåêòèâàì
Åâðîïåéñêîãî Ñîîáùåñòâà:
2006/95/CEE îò 12.12.06 (Íèçêîå
íàïðÿæåíèå) ñ ïîñëåäóþùèìè
èçìåíåíèÿìè – 2004/108/ÑÅÅ îò
15/12/04 (Ýëåêòðîìàãíèòíàÿ
ñîâìåñòèìîñòü) ñ
ïîñëåäóþùèìè èçìåíåíèÿìè –
93/68/ÑÅÅ îò 22/07/93 ñ
ïîñëåäóþùèìè èçìåíåíèÿìè.
2002/96/CE ñ ïîñëåäóþùèìè
* Èìååòñÿ òîëüêî â íåêîòîðûõ ìîäåëÿõ.

18
RS
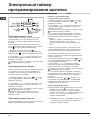
Ýëåêòðîííûé òàéìåð
ïðîãðàììèðîâàíèÿ âûïå÷êè
•• ••
Ïðîãðàììèðîâàíèå ÷àñîâ
×àñû ìîæíî íàñòðîèòü êàê ïðè âûêëþ÷åííîì
äóõîâîì øêàôó, òàê è ïðè âêëþ÷åííîì, ïðè
óñëîâèè ÷òî íå áûëî çàäàíî âðåìÿ îêîí÷àíèÿ
âûïå÷êè.
Ïîñëå ïîäêëþ÷åíèÿ ê ýëåêòðè÷åñêîé ñåòè èëè
ïîñëå îòêëþ÷åíèÿ ýëåêòðîýíåðãèè, íà÷íåò ìèãàòü
èêîíà
è ÷åòûðå öèôðû íà ÄÈÑÏËÅÅ.
1. Íàæìèòå íåñêîëüêî ðàç êíîïêó
è
óäåðæèâàéòå äî òåõ ïîð, ïîêà íà ÄÈÑÏËÅÅ íå
çàìèãàåò èêîíà
è ÷åòûðå öèôðîâûõ çíà÷åíèÿ;
2. ïðè ïîìîùè + è - ðåãóëèðóåòñÿ âðåìÿ; ïðè
èõ óäåðæèâàíèè öèôðû ìåíÿþòñÿ áûñòðåå, ÷òî
îáëåã÷àåò óñòàíîâêó.
3. ïîäîæäèòå 10 ñåê. èëè íàæìèòå ñíîâà íà êíîïêó
äëÿ ôèêñèðîâàíèÿ óñòàíîâêè.
Ïðîãðàììèðîâàíèå òàéìåðà
Äàííàÿ ôóíêöèÿ íå ïðåðûâàåò ïðîöåññà âûïå÷êè
è íå çàâèñèò îò ðàáîòû äóõîâîãî øêàôà. Îíà
ïîçâîëÿåò òîëüêî âêëþ÷èòü çâóêîâîé ñèãíàë ïî
èñòå÷åíèè çàäàííîãî âðåìåíè.
1. Íàæìèòå íåñêîëüêî ðàç êíîïêó
äî òåõ ïîð,
ïîêà íà ÄÈÑÏËÅÅ íå çàìèãàåò ñèìâîë
è òðè
öèôðîâûå çíà÷åíèÿ;
2. ïðè ïîìîùè + è - ðåãóëèðóåòñÿ âðåìÿ; ïðè
èõ óäåðæèâàíèè öèôðû ìåíÿþòñÿ áûñòðåå, ÷òî
îáëåã÷àåò óñòàíîâêó.
3. ïîäîæäèòå 10 ñåê. èëè íàæìèòå ñíîâà íà êíîïêó
äëÿ ôèêñèðîâàíèÿ óñòàíîâêè.
Íà äèñïëåå áóäåò ïîêàçàí îáðàòíûé îòñ÷åò
âðåìåíè, ïî çàâåðøåíèè êîòîðîãî âêëþ÷èòñÿ
çâóêîâîé ñèãíàë.
Ïðîãðàììèðîâàíèå âûïå÷êè
Çàïðîãðàììèðîâàòü ãîòîâêó ìîæíî òîëüêî ïîñëå
âûáîðà ñîîòâåòñòâóþùåé ïðîãðàììû.
Ïîðÿäîê ïðîãðàììèðîâàíèÿ
ïðîäîëæèòåëüíîñòè âûïå÷êè
1. Íàæìèòå íåñêîëüêî ðàç êíîïêó
äî òåõ ïîð,
ïîêà íà ÄÈÑÏËÅÅ íå çàìèãàåò ñèìâîë
è òðè
öèôðîâûå çíà÷åíèÿ;
2. ïðè ïîìîùè + è - ðåãóëèðóåòñÿ âðåìÿ; ïðè
èõ óäåðæèâàíèè öèôðû ìåíÿþòñÿ áûñòðåå, ÷òî
îáëåã÷àåò óñòàíîâêó.
3. ïîäîæäèòå 10 ñåê. èëè íàæìèòå ñíîâà íà êíîïêó
äëÿ ôèêñèðîâàíèÿ óñòàíîâêè.
4. ïî èñòå÷åíèè çàäàííîãî âðåìåíè íà äèñïëåå
ïîêàçûâàåòñÿ íàäïèñü END (ÊÎÍÅÖ), è äóõîâîé
øêàô çàâåðøàåò ïðèãîòîâëåíèå ñî çâóêîâûì
ñèãíàëîì.
Ïðèìåð: â 9.00 âû ïðîãðàììèðóåòå âûïå÷êó, íà
êîòîðóþ ïîòðåáóåòñÿ 1 ÷àñ 15 ìèíóò.
Ïðèãîòîâëåíèå àâòîìàòè÷åñêè çàâåðøèòñÿ â
10:15.
Ïîðÿäîê ïðîãðàììèðîâàíèÿ îêîí÷àíèÿ âûïå÷êè
Çàïðîãðàììèðîâàòü îêîí÷àíèå âûïå÷êè ìîæíî
òîëüêî ïîñëå íàñòðîéêè åå ïðîäîëæèòåëüíîñòè.
1. Âûïîëíèòå îïåðàöèè ñ ïóíêòà 1 ïî ïóíêò 3, â
êîòîðûõ îïèñûâàåòñÿ ïîðÿäîê ïðîãðàììèðîâàíèÿ
ïðîäîëæèòåëüíîñòè;
2. çàòåì íàæìèòå íåñêîëüêî ðàç êíîïêó
äî òåõ
ïîð, ïîêà íà ÄÈÑÏËÅÅ íå çàìèãàåò ñèìâîë
è
÷åòûðå öèôðîâûõ çíà÷åíèÿ;
3. ïðè ïîìîùè + è - ðåãóëèðóåòñÿ âðåìÿ
îêîí÷àíèÿ ãîòîâêè; ïðè èõ óäåðæèâàíèè öèôðû
ìåíÿþòñÿ áûñòðåå, ÷òî îáëåã÷àåò óñòàíîâêó.
4. ïîäîæäèòå 10 ñåê. èëè íàæìèòå ñíîâà íà êíîïêó
äëÿ ôèêñèðîâàíèÿ óñòàíîâêè.
5. ïî èñòå÷åíèè çàäàííîãî âðåìåíè íà äèñïëåå
ïîêàçûâàåòñÿ íàäïèñü END (ÊÎÍÅÖ), è äóõîâîé
øêàô çàâåðøàåò ïðèãîòîâëåíèå ñî çâóêîâûì
ñèãíàëîì.
Âêëþ÷åííûå ñèìâîëû
è óêàçûâàþò, ÷òî
ïðîèçâåäåíî ïðîãðàììèðîâàíèå. Íà ÄÈÑÏËÅÅ
ïîïåðåìåííî ïîêàçûâàåòñÿ âðåìÿ îêîí÷àíèÿ è
ïðîäîëæèòåëüíîñòü âûïå÷êè.
Îòìåíà ïðîãðàììèðîâàíèÿ
Ïîðÿäîê îòìåíû çàïðîãðàììèðîâàííîãî çíà÷åíèÿ:
íàæèìàòü íà êíîïêó
äî òåõ ïîð, ïîêà íà
äèñïëåå íå íà÷íåò ìèãàòü ñèìâîë óñòàíîâêè,
êîòîðûé íóæíî îòìåíèòü, è öèôðû. Íàæèìàòü íà
êíîïêó - äî òåõ ïîð, ïîêà íà äèñïëåå íå
ïîÿâÿòñÿ öèôðû 00:00.
îäíîâðåìåííî íàæàòü è óäåðæèâàòü êíîïêè + è
-; òàêèì îáðàçîì îòìåíÿþòñÿ âñå çàäàííûå
óñòàíîâêè, âêëþ÷àÿ òàéìåð.

19
RS
Àíàëîãîâûé ïðîãðàììåð
Ïðîãðàììèðîâàíèå ïðèãîòîâëåíèÿ*
Ïðîãðàììèðîâàíèå ïðîäîëæèòåëüíîñòè
ïðèãîòîâëåíèÿ ñ ìãíîâåííûì íà÷àëîì
1. Ïîâåðíèòå ðóêîÿòêó ÏÐÎÃÐÀÌÌÅÐÀ ïî ÷àñîâîé
ñòðåëêå âïëîòü äî ïîÿâëåíèÿ â îêîøêå òðåáóåìîé
ïðîäîëæèòåëüíîñòè ïðèãîòîâëåíèÿ.
2. Âûáåðèòå íóæíóþ ïðîãðàììó ïðèãîòîâëåíèÿ ïðè
ïîìîùè ðóêîÿòêè ÏÐÎÃÐÀÌÌÛ. Äóõîâîé øêàô
âêëþ÷àåòñÿ íåçàìåäëèòåëüíî è ðàáîòàåò íà
ïðîòÿæåíèè âñåãî çàäàííîãî âðåìåíè
ïðèãîòîâëåíèÿ.
3. Ïî èñòå÷åíèè çàäàííîãî âðåìåíè ðàçäàåòñÿ
çâóêîâîé ñèãíàë. Ïîâåðíèòå ðóêîÿòêó
ÏÐÎÃÐÀÌÌÅÐÀ ïî ÷àñîâîé ñòðåëêå âïëîòü äî
ïîÿâëåíèÿ â îêîøêå ñèìâîëà .
4.Ïîâåðíèòå ðóêîÿòêó ÏÐÎÃÐÀÌÌÛ â ïîëîæåíèå
0.
Ïðèìåð: â 9:00 âû çàäàåòå ïðèãîòîâëåíèå, íà
êîòîðîå ïîòðåáóåòñÿ 1 ÷àñ 15 ìèíóò.
Ïðèãîòîâëåíèå àâòîìàòè÷åñêè çàâåðøèòñÿ â
10:15.
Ïðîãðàììèðîâàíèå ïðîäîëæèòåëüíîñòè
ïðèãîòîâëåíèÿ ñ îòëîæåííûì íà÷àëîì
1. Ïîâåðíèòå ðóêîÿòêó ÏÐÎÃÐÀÌÌÅÐÀ ïî ÷àñîâîé
ñòðåëêå âïëîòü äî ïîÿâëåíèÿ â îêîøêå ñèìâîëà .
2. Ïîòÿíèòå çà ðóêîÿòêó ÏÐÎÃÐÀÌÌÅÐÀ è
ïîâåðíèòå åå ïî ÷àñîâîé ñòðåëêå âïëîòü äî
óñòàíîâêè êðàñíîé ñòðåëêè íàïðîòèâ íóæíîãî
âðåìåíè íà÷àëà ïðèãîòîâëåíèÿ.
3. Ïîâåðíèòå ðóêîÿòêó ÏÐÎÃÐÀÌÌÅÐÀ ïî ÷àñîâîé
ñòðåëêå âïëîòü äî ïîÿâëåíèÿ â îêîøêå òðåáóåìîé
ïðîäîëæèòåëüíîñòè ïðèãîòîâëåíèÿ.
4. Âûáåðèòå íóæíóþ ïðîãðàììó ïðèãîòîâëåíèÿ ïðè
ïîìîùè ðóêîÿòêè ÏÐÎÃÐÀÌÌÛ. Äóõîâîé øêàô
âêëþ÷àåòñÿ â ìîìåíò, çàäàííûé â êà÷åñòâå íà÷àëà
ïðèãîòîâëåíèÿ, è áóäåò ðàáîòàòü íà ïðîòÿæåíèè
âñåãî çàäàííîãî âðåìåíè ïðèãîòîâëåíèÿ.
5. Ïî èñòå÷åíèè çàäàííîãî âðåìåíè ðàçäàåòñÿ
çâóêîâîé ñèãíàë. Ïîâåðíèòå ðóêîÿòêó
ÏÐÎÃÐÀÌÌÅÐÀ ïî ÷àñîâîé ñòðåëêå âïëîòü äî
ïîÿâëåíèÿ â îêîøêå ñèìâîëà .
6. Ïîâåðíèòå ðóêîÿòêó ÏÐÎÃÐÀÌÌÛ â ïîëîæåíèå
0.
Ïðèìåð: â 9.00 âû ïðîãðàììèðóåòå
ïðèãîòîâëåíèå, íà êîòîðîå ïîòðåáóåòñÿ 1 ÷àñ 15
ìèíóò, è çàäàåòå âðåìÿ íà÷àëà ïðèãîòîâëåíèÿ â
11:00. Ïðîãðàììà àâòîìàòè÷åñêè íà÷èíàåòñÿ â
11:00 è çàâåðøàåòñÿ â 12:15.
Äëÿ îòìåíû ïðîãðàììèðîâàíèÿ ïîâåðíèòå
ðóêîÿòêó ÏÐÎÃÐÀÌÌÅÐÀ ïî ÷àñîâîé ñòðåëêå
âïëîòü äî ïîÿâëåíèÿ â îêîøêå ñèìâîëà '.
*
Èìååòñÿ òîëüêî â íåêîòîðûõ ìîäåëÿõ.
Íàñòðîéêà ÷àñîâ*
1. Íàæìèòå ðóêîÿòêó ÏÐÎÃÐÀÌÌÅÐÀ è ïîâåðíèòå
åå ïî ÷àñîâîé ñòðåëêå âïëîòü äî óñòàíîâêè
çíà÷åíèÿ òåêóùåãî âðåìåíè.
Íàñòðîéêà ÷àñîâ âîçìîæíà, òîëüêî åñëè äóõîâîé
øêàô ïîäêëþ÷åí ê ñåòè ýëåêòðîïèòàíèÿ.  ñëó÷àå
îòêëþ÷åíèÿ ýëåêòðîïèòàíèÿ ÏÐÎÃÐÀÌÌÅÐ
îñòàíàâëèâàåòñÿ: ïðè âêëþ÷åíèè ýëåêòðîïèòàíèÿ
íåîáõîäèìî âíîâü âûñòàâèòü âðåìÿ.
Âêëþ÷åíèå äóõîâîãî øêàôà*
1. Ïîâåðíèòå ðóêîÿòêó ÏÐÎÃÐÀÌÌÅÐÀ ïî ÷àñîâîé
ñòðåëêå âïëîòü äî ïîÿâëåíèÿ â îêîøêå ñèìâîëà
.
2. Ïîòÿíèòå çà ðóêîÿòêó ÏÐÎÃÐÀÌÌÅÐÀ è
ïîâåðíèòå åå ïî ÷àñîâîé ñòðåëêå âïëîòü äî
óñòàíîâêè êðàñíîé ñòðåëêè íàïðîòèâ òåêóùåãî
âðåìåíè. Ïî çàâåðøåíèè îïåðàöèè âû óñëûøèòå
ùåë÷îê.
3. Ïîâåðíèòå ðóêîÿòêó ÏÐÎÃÐÀÌÌÅÐÀ ïî ÷àñîâîé
ñòðåëêå âïëîòü äî ïîÿâëåíèÿ â îêîøêå ñèìâîëà
'.
4. Âûáåðèòå íóæíóþ ïðîãðàììó ïðèãîòîâëåíèÿ ïðè
ïîìîùè ðóêîÿòêè ÏÐÎÃÐÀÌÌÛ.
5. Äëÿ âûêëþ÷åíèÿ äóõîâîãî øêàôà ïîâåðíèòå
ðóêîÿòêó ÏÐÎÃÐÀÌÌÛ â ïîëîæåíèå «0».

20
RS
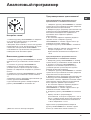
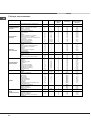
Ïðîãðàììû ïðèãîòîâëåíèÿ
Äëÿ âñåõ ïðîãðàìì ìîæíî çàäàòü òåìïåðàòóðó îò
60°C äî ÌÀÊÑ êðîìå:
ÃÐÈËÜ (ðåêîìåíäóåòñÿ óñòàíàâëèâàòü òîëüêî
ÌÀÊÑ. òåìïåðàòóðó);
ÇÀÏÅÊÀÍÊÀ (ðåêîìåíäóåòñÿ íå ïðåâûøàòü
òåìïåðàòóðó 200°C).
/ Ïðîãðàììà ÐÀÑÑÒÎÉÊÀ
Äóõîâêà íàãðåâàåòñÿ è ïîääåðæèâàåò òåìïåðàòóðó
40°C, íåçàâèñèìî îò ïîëîæåíèÿ ðåãóëÿòîðà
ÒÅÐÌÎÑÒÀÒ. Äàííàÿ ïðîãðàììà èäåàëüíî
ïîäõîäèò äëÿ ðàññòîéêè äðîææåâîãî òåñòà.
/ Ïðîãðàììà ÒÐÀÄÈÖÈÎÍÀËÜÍÀß
ÄÓÕÎÂÊÀ
Âêëþ÷àþòñÿ äâà íàãðåâàòåëüíûõ ýëåìåíòà:
íèæíèé è âåðõíèé. Â ðåæèìå òðàäèöèîíàëüíîãî
ïðèãîòîâëåíèÿ ðåêîìåíäóåòñÿ èñïîëüçîâàòü
òîëüêî îäèí óðîâåíü: ïðè èñïîëüçîâàíèè
íåñêîëüêèõ óðîâíåé ðàñïðåäåëåíèå òåìïåðàòóðû
áóäåò íåîïòèìàëüíûì.
/ Ïðîãðàììà ÊÎÍÄÈÒÅÐÑÊÀß
ÂÛÏÅ×ÊÀ
Âêëþ÷àåòñÿ çàäíèé íàãðåâàòåëüíûé ýëåìåíò è
âåíòèëÿòîð, îáåñïå÷èâàÿ óìåðåííûé è
îäíîðîäíûé æàð âíóòðè äóõîâêè. Äàííàÿ ôóíêöèÿ
ðåêîìåíäóåòñÿ äëÿ ïðèãîòîâëåíèÿ äåëèêàòíûõ
áëþä (íàïðèìåð, êîíäèòåðñêèõ èçäåëèé,
òðåáóþùèõ ïîäúåìà òåñòà) è ìåëêîé âûïå÷êè
îäíîâðåìåííî íà òðåõ óðîâíÿõ.
/ Ïðîãðàììà FAST COOKING (Áûñòðîå
ïðèãîòîâëåíèå
Âêëþ÷àþòñÿ íàãðåâàòåëüíûå ýëåìåíòû è
âåíòèëÿòîð, îáåñïå÷èâàÿ ïîñòîÿííûé è
îäíîðîäíûé æàð.
Ïðîãðàììà íå íóæäàåòñÿ â ïðåäâàðèòåëüíîì
íàãðåâå äóõîâêè. Äàííàÿ ïðîãðàììà â
îñîáåííîñòè ðåêîìåíäóåòñÿ äëÿ áûñòðîãî
ïðèãîòîâëåíèÿ ïîëóôàáðèêàòîâ (ìîðîæåíûõ èëè
ãîòîâûõ áëþä). Îïòèìàëüíûå ðåçóëüòàòû
ïîëó÷àþòñÿ ïðè èñïîëüçîâàíèè òîëüêî îäíîãî
óðîâíÿ.
/ Ïðîãðàììà ÎÄÍÎÂÐÅÌÅÍÍÎÅ
ÏÐÈÃÎÒÎÂËÅÍÈÅ
Âêëþ÷àþòñÿ âñå íàãðåâàòåëüíûå ýëåìåíòû
(âåðõíèé, íèæíèé è êðóãëûé) è âåíòèëÿòîð. Òàê êàê
æàð ÿâëÿåòñÿ ïîñòîÿííûì âî âñåì äóõîâîì
øêàôó, âîçäóõ îáåñïå÷èâàåò îäíîðîäíîå
ïðèãîòîâëåíèå è ïîäðóìÿíèâàíèå ïðîäóêòà.
Ìîæíî îäíîâðåìåííî èñïîëüçîâàòü íå áîëåå äâóõ
óðîâíåé â äóõîâêå.
/ Ïðîãðàììà ÏÈÖÖÀ
Âêëþ÷àþòñÿ íèæíèé è êðóãëûé íàãðåâàòåëüíûå
ýëåìåíòû è âåíòèëÿòîð. Òàêîå ñî÷åòàíèå ïîçâîëÿåò
áûñòðî ðàçîãðåòü äóõîâêó ñ áîëåå ñèëüíûì
âûäåëåíèåì æàðà ñíèçó. Åñëè èñïîëüçóþòñÿ
íåñêîëüêî óðîâíåé îäíîâðåìåííî, íåîáõîäèìî
ìåíÿòü ìåñòàìè áëþäà â ñåðåäèíå èõ
ïðèãîòîâëåíèÿ.
/ Ïðîãðàììà ÃÐÈËÜ
Âêëþ÷àåòñÿ âåðõíèé íàãðåâàòåëüíûé ýëåìåíò è
âåðòåë (åñëè îí èìååòñÿ). Âûñîêàÿ òåìïåðàòóðà è
æàð ïðÿìîãî äåéñòâèÿ ãðèëÿ ðåêîìåíäóåòñÿ äëÿ
ïðèãîòîâëåíèÿ ïðîäóêòîâ, íóæäàþùèõñÿ â
âûñîêîé ïîâåðõíîñòíîé òåìïåðàòóðå. Ãîòîâüòå
áëþäà ñ çàêðûòîé äâåðöåé äóõîâîãî øêàôà.
/ Ïðîãðàììà ÇÀÏÅÊÀÍÊÀ
Âêëþ÷àåòñÿ âåðõíèé íàãðåâàòåëüíûé ýëåìåíò,
âåðòåë è âåíòèëÿòîð (åñëè îí èìååòñÿ). Ñî÷åòàåò
îäíîíàïðàâëåííîå âûäåëåíèå æàðà ñ
ïðèíóäèòåëüíîé öèðêóëÿöèåé âîçäóõà âíóòðè
äóõîâîãî øêàôà.
Ýòî ïðåïÿòñòâóåò îáãîðàíèþ ïîâåðõíîñòè
ïðîäóêòîâ, ïîâûøàÿ ïðîíèêàþùóþ ñïîñîáíîñòü
æàðà. Ãîòîâüòå áëþäà ñ çàêðûòîé äâåðöåé
äóõîâîãî øêàôà.
Âåðòåë (èìååòñÿ òîëüêî â íåêîòîðûõ ìîäåëÿõ)
Äëÿ âêëþ÷åíèÿ
âåðòåëà (ñì. ñõåìó)
âûïîëíèòå ñëåäóþùèå
îïåðàöèè:
1. óñòàíîâèòå
ïðîòèâåíü íà 1-ûé
óðîâåíü;
2. óñòàíîâèòå
äåðæàòåëü âåðòåëà íà
3-ûé óðîâåíü è
âñòàâüòå âåðòåë â
ñïåöèàëüíîå îòâåðñòèå â çàäíåé ñòåíêå
äóõîâîãî øêàôà;
3. âêëþ÷èòå âåðòåë ïðè ïîìîùè ðóêîÿòêè
ÏÐÎÃÐÀÌÌÛ
/ èëè / ;
Ïîñëå íà÷àëà âûïîëíåíèÿ ïðîãðàììû
/
ïðè îòêðûâàíèè äâåðöû äóõîâêè âåðòåë
îñòàíàâëèâàåòñÿ.
Ïðîãðàììû
La pagina si sta caricando...
La pagina si sta caricando...
La pagina si sta caricando...
La pagina si sta caricando...
La pagina si sta caricando...
La pagina si sta caricando...
La pagina si sta caricando...
La pagina si sta caricando...
-
 1
1
-
 2
2
-
 3
3
-
 4
4
-
 5
5
-
 6
6
-
 7
7
-
 8
8
-
 9
9
-
 10
10
-
 11
11
-
 12
12
-
 13
13
-
 14
14
-
 15
15
-
 16
16
-
 17
17
-
 18
18
-
 19
19
-
 20
20
-
 21
21
-
 22
22
-
 23
23
-
 24
24
-
 25
25
-
 26
26
-
 27
27
-
 28
28


HOTPOINT/ARISTON 7OF 937 C.1 IX RU/HA Guida utente
- Categoria
- Microonde
- Tipo
- Guida utente
- Questo manuale è adatto anche per