Panasonic CSE10HD3EA Istruzioni per l'uso
- Categoria
- Condizionatori d'aria a sistema split
- Tipo
- Istruzioni per l'uso
Questo manuale è adatto anche per

2
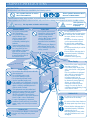
SAFETY PRECAUTIONS SAFETY PRECAUTIONS
Air
Air
outlet
outlet
Air inlet
Air inlet
Air inlet
Air inlet
DEFINITION
The instructions to be followed are classifi ed by the following symbols:
This symbol denotes an action
that is PROHIBITED.
These symbols denote actions
that are COMPULSORY.
To prevent personal injury, injury to others, or property damage, please observe the following.
Incorrect operation due to failure to follow instructions may cause harm or damage, the seriousness of which is classifi ed as below:
Warning
This sign warns of death or serious injury.
Caution
This sign warns of
injury or damage
to property.
Power Supply
• Do not share the same power outlet with
other equipment.
• Do not modify power cords.
• Do not use extension cords.
• Do not operate with wet hands.
• Use the specifi ed supply cord.
• If the supply cord is damaged, it must be
replaced by the manufacturer, its service
agent or similarly qualifi ed persons in
order to avoid a hazard.
• This equipment must be earthed and
strongly recommended to be installed
with Earth Leakage Circuit Breaker
(ELCB) or Residual Current Device
(RCD). Otherwise, it may cause electrical
shock or fi re in case of malfunction.
• In case of emergency or abnormal
conditions (burnt smell, etc), turn off the
power supply, and consult your nearest
dealer.
Indoor Unit
• Do not install, remove and
reinstall the unit by yourself;
improper installation will
cause leakage, electric
shock or fi re. Please consult
an authorized dealer or
specialist for the installation
work.
• Do not insert your fi ngers or
other objects into the unit.
• Do not attempt to repair the
unit by yourself.
Indoor Unit
• Do not install the unit in a
potentially explosive atmosphere.
• Do not wash the unit with water,
benzene, thinner or scouring
powder.
• Do not use for other purposes
such as preservation of food.
• Do not use any combustible
equipment in front of the airfl ow
outlet.
• Do not expose directly to cold air
for a long period.
• Ensure that the drainage pipe is
connected properly. Otherwise,
leakage may occur.
• Aerate the room regularly.
Remote Control
• Do not use rechargeable
(Ni-Cd) batteries.
• Do not allow infants and
small children to play
with the remote control
to prevent them from
accidentally swallowing the
batteries.
• Remove the batteries if the
unit is not going to be used
for a long period of time.
• New batteries of the same
type must be inserted
following the polarity stated
to prevent malfunction of
the remote control.
Power Supply
• Switch off the power supply before
cleaning or servicing.
• Turn off the power supply if the
unit is not used for a long period
of time.
• This air conditioner is equipped
with a built-in surge protective
device. However, in order
to further protect your air
conditioner from being damaged
by abnormally strong lightning
activity, you may want to
disconnect it from the power
supply. Do not touch the air
conditioner during lightning, it may
cause electric shock.
Outdoor Unit
• Do not sit or step on the unit, you
may fall down accidentally.
• Do not touch the sharp aluminum
fi n, sharp parts may cause injury.
• Ensure that the drainage pipe is
connected properly. Otherwise,
leakage may occur.
• After long periods of use, make
sure the installation rack is not
damaged.
Outdoor Unit
• Do not insert your fi ngers or other objects
into the unit, sharp parts may cause
injury.


7
ENGLISH
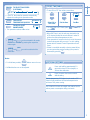
TO SET THE TIMER
TO SET THE TIMER
• To turn ON or OFF the unit at a preset time.
ON
1
OFF
2
TIMER
SET
Select ON or
OFF timer.
Set the time. Confi rm.
• To cancel ON or OFF timer, press
ON
or
OFF
then
press
CANCEL
.
• When ON Timer is set, the unit may start earlier (up
to 35 minutes) before the actual set time in order to
achieve the desired temperature on time.
• Timer operation is based on the clock set in the remote
control and repeats daily once set. For clock setting,
please refer to Remote Control Preparation at back
cover.
• If timer is cancelled manually or due to power failure,
you can restore the previous setting (once power is
resumed) by pressing
SET
.
OPTIONAL SETTINGS
OPTIONAL SETTINGS
CLOCK
Press and hold for approximately 10
seconds to show 12-hour (am/pm) or
24-hour time indication.
RESET
Press to restore the remote control’s
default setting.
Set the temperature 1°C higher in cool mode or 2°C
lower in heat mode than the desired temperature to
achieve a 10% power saving.
Use curtains to screen off sunlight and outdoor heat to
reduce power consumption during cool mode.
• and
QUIET
can be activated in all modes
and can be cancelled by pressing the respective
button again.
•
and
QUIET
can not be selected at the
same time.
TO SELECT FAN SPEED
(5 OPTIONS)
• For AUTO, the indoor fan speed is automatically
adjusted according to the operation mode.
TO ACHIEVE
TEMPERATURE QUICKLY
POWERFUL
QUIET
TO ENJOY QUIET
ENVIRONMENT
QUIET
• This operation reduces airfl ow noise.
Notes:
• For Hide-Away models,
AIR SWING
AUTO
MANUAL
buttons are not in use.
• Airfl ow direction can not be adjusted.

15
FRANÇAIS
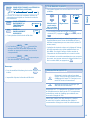
RÉGLAGES FACULTATIFS
RÉGLAGES FACULTATIFS
CLOCK
Maintenez la touche enfoncée pendant
environ 10 secondes pour passer du mode
d’affi chage de l’heure 12 h (am/pm) ou au
mode 24 heures et inversement.
RESET
Appuyez pour revenir aux réglages par
défaut de la télécommande.
Augmentez de 1°C la température souhaitée en mode
de refroidissement ou diminuez de 2°C la température
souhaitée en mode de chauffage pour atteindre une
économie d’énergie de 10%.
Utilisez des rideaux pour faire barrage à la lumière
du soleil et à la chaleur extérieure pour réduire la
consommation d’énergie en mode de refroidissement.
POUR RÉGLER L’HEURE
POUR RÉGLER L’HEURE
• Pour mettre l’appareil sous ou hors tension à une heure
prédéfi nie.
ON
1
OFF
2
TIMER
SET
Sélectionnez le
mode marche
(ON) ou arrêt de
la minuterie (OFF).
Réglez l’heure. Confi rmez.
• Pour annuler le mode marche (ON) ou arrêt de la
minuterie (OFF), appuyez sur
ON
ou sur
OFF
, puis sur
CANCEL
.
• Lorsque le mode minuterie est activé, il se peut que
l’appareil démarre avant l’heure réelle défi nie de façon à
atteindre la température que vous avez choisie (environ 35
minutes avant).
• L’opération de minuterie se base sur le réglage de l’horloge
de la télécommande et se répète quotidiennement une
fois défi nie. Pour régler l’horloge, veuillez consulter la
Préparation de la télécommande sur le couvercle arrière.
• Si la minuterie est annulée manuellement ou par une panne
de courant, vous pouvez restaurer le réglage antérieur (une
fois le courant rétabli) en appuyant sur
SET
.
• Les fonctions et
QUIET
peuvent être
activées dans tous les modes et peuvent être
annulées en appuyant à nouveau sur la touche
correspondante.
• Les fonctions
et
QUIET
ne peuvent pas
être sélectionnées en même temps.
POUR SÉLECTIONNER LA VITESSE DU
VENTILATEUR (5 OPTIONS)
• Pour AUTO, la vitesse du ventilateur intérieur est
automatiquement ajustée en fonction du mode de
fonctionnement.
POUR ATTEINDRE
RAPIDEMENT LA
TEMPÉRATURE
SOUHAITÉE
POWERFUL
QUIET
POUR UN
ENVIRONNEMENT
SILENCIEUX
QUIET
• Cette opération réduit le bruit du fl ux d’air.
Remarque:
• Pour les modèles Hide-Away, les touches
AIR SWING
AUTO
MANUAL
sont
inutiles.
• Impossible d’ajuster la direction du fl ux d’air.


La pagina si sta caricando...
La pagina si sta caricando...
La pagina si sta caricando...
La pagina si sta caricando...


La pagina si sta caricando...
La pagina si sta caricando...
La pagina si sta caricando...
La pagina si sta caricando...
La pagina si sta caricando...


-
 1
1
-
 2
2
-
 3
3
-
 4
4
-
 5
5
-
 6
6
-
 7
7
-
 8
8
-
 9
9
-
 10
10
-
 11
11
-
 12
12
-
 13
13
-
 14
14
-
 15
15
-
 16
16
-
 17
17
-
 18
18
-
 19
19
-
 20
20
-
 21
21
-
 22
22
-
 23
23


Panasonic CSE10HD3EA Istruzioni per l'uso
- Categoria
- Condizionatori d'aria a sistema split
- Tipo
- Istruzioni per l'uso
- Questo manuale è adatto anche per
in altre lingue
- English: Panasonic CSE10HD3EA Operating instructions
- français: Panasonic CSE10HD3EA Mode d'emploi
- español: Panasonic CSE10HD3EA Instrucciones de operación
- Deutsch: Panasonic CSE10HD3EA Bedienungsanleitung
- Nederlands: Panasonic CSE10HD3EA Handleiding
- português: Panasonic CSE10HD3EA Instruções de operação
Documenti correlati
-
Panasonic CUE10HBEA Istruzioni per l'uso
-
Panasonic CSMRE5SKE Manuale del proprietario
-
Panasonic CUE24LKE Istruzioni per l'uso
-
-
Panasonic CUE9LKE Manuale del proprietario
-
-
-
-
Panasonic CU-E10HBEA Manuale del proprietario
-