
DC-Kit2
DC Extension Kit
Installation and Operating Manual. . . . . . . . 8
DC-Erweiterungskit
Montage- und Bedienungsanleitung . . . . .25
Kit d'extension CC
Instructions de montage
et de service . . . . . . . . . . . . . . . . . . . . . . . . .43
Set de ampliación para CC
Instrucciones de montaje y de uso . . . . . . . 61
Kit de expansão DC
Instruções de montagem e manual de
instruções . . . . . . . . . . . . . . . . . . . . . . . . . . .79
Kit di ampliamento per CC
Istruzioni di montaggio e d’uso . . . . . . . . .96
DC-uitbreidingskit
Montagehandleiding en
gebruiksaanwijzing . . . . . . . . . . . . . . . . . . 114
DC-udvidelsessæt
Monterings- og betjeningsvejledning . . .130
DC-utbyggnadssats
Monterings- och bruksanvisning . . . . . . . 147
DC-utvidelsessett
Monterings- og bruksanvisning. . . . . . . . 164
DC-laajennussetti
Asennus- ja käyttöohje . . . . . . . . . . . . . . . 180
Комплект расширения для
постоянного тока
Инструкция по монтажу и эксплуатации 196
Zestaw uzupełniający DC
Instrukcja montażu i obsługi. . . . . . . . . . . 214
Rozširujúca súprava DC
Návod na montáž a uvedenie
do prevádzky. . . . . . . . . . . . . . . . . . . . . . . 232
Rozšiřující sada DC
Návod k montáži a obsluze . . . . . . . . . . . 249
Egyenáramú bővítőkészlet
Szerelési és használati útmutató . . . . . . . 266
EN
DE
FR
ES
PT
IT
NL
DA
SV
NO
FI
RU
PL
SK
CS
HU
AIR CONDITIONERS
ACCESSORIES
DC-Kit2--IO-16s.book Seite 1 Dienstag, 21. März 2017 2:15 14

DC-Kit2--IO-16s.book Seite 2 Dienstag, 21. März 2017 2:15 14

DC-Kit2
3
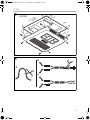
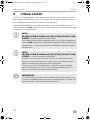
CA2500
1
A
B
C
2
DC-Kit2--IO-16s.book Seite 3 Dienstag, 21. März 2017 2:15 14

DC-Kit2
4
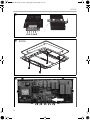
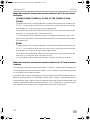
I5I2I1 I4I3
3
B2200
4
5
DC-Kit2--IO-16s.book Seite 4 Dienstag, 21. März 2017 2:15 14

DC-Kit2
5
FreshJet
6
7
DC-Kit2--IO-16s.book Seite 5 Dienstag, 21. März 2017 2:15 14

DC-Kit2
6
FreshLight
A
B
C
8
DC-Kit2--IO-16s.book Seite 6 Dienstag, 21. März 2017 2:15 14

DC-Kit2
7
9
DC-Kit2--IO-16s.book Seite 7 Dienstag, 21. März 2017 2:15 14

EN
DC-Kit2
8
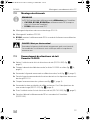
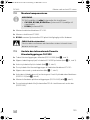
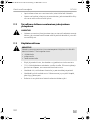
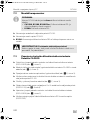
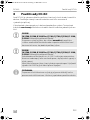
Please read this instruction manual carefully before installation and first
use, and store it in a safe place. If you pass on the product to another
person, hand over this instruction manual along with it.
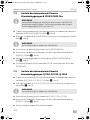
Contents
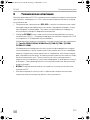
1 Explanation of symbols. . . . . . . . . . . . . . . . . . . . . . . . . . . . . . . . . . . . . . . . . . .9
2 General safety instructions . . . . . . . . . . . . . . . . . . . . . . . . . . . . . . . . . . . . . . . .9
3 Scope of delivery . . . . . . . . . . . . . . . . . . . . . . . . . . . . . . . . . . . . . . . . . . . . . . 11
4 Target group for this manual. . . . . . . . . . . . . . . . . . . . . . . . . . . . . . . . . . . . . . 11
5 Intended use . . . . . . . . . . . . . . . . . . . . . . . . . . . . . . . . . . . . . . . . . . . . . . . . . .12
6 Technical description . . . . . . . . . . . . . . . . . . . . . . . . . . . . . . . . . . . . . . . . . . .13
7 Installing and connecting the DC kit . . . . . . . . . . . . . . . . . . . . . . . . . . . . . . .14
8 Using the DC kit . . . . . . . . . . . . . . . . . . . . . . . . . . . . . . . . . . . . . . . . . . . . . . 20
9 Maintaining and cleaning the DC kit . . . . . . . . . . . . . . . . . . . . . . . . . . . . . . 23
10 Rectifying faults . . . . . . . . . . . . . . . . . . . . . . . . . . . . . . . . . . . . . . . . . . . . . . . 24
11 Warranty . . . . . . . . . . . . . . . . . . . . . . . . . . . . . . . . . . . . . . . . . . . . . . . . . . . . 24
12 Disposal . . . . . . . . . . . . . . . . . . . . . . . . . . . . . . . . . . . . . . . . . . . . . . . . . . . . . 24
13 Technical data . . . . . . . . . . . . . . . . . . . . . . . . . . . . . . . . . . . . . . . . . . . . . . . . 24
DC-Kit2--IO-16s.book Seite 8 Dienstag, 21. März 2017 2:15 14

EN
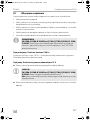
DC-Kit2 Explanation of symbols
9
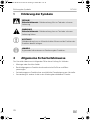
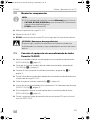
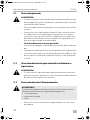
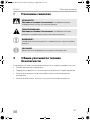
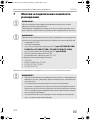
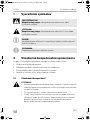
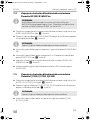
1 Explanation of symbols
D
!
A
I
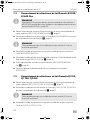
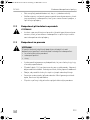
2 General safety instructions
The manufacturer accepts no liability for damage in the following cases:
• Faulty assembly or connection
• Damage to the product resulting from mechanical influences and excess voltage
• Alterations to the product without express permission from the manufacturer
• Use for purposes other than those described in the operating manual
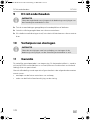
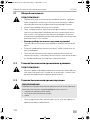
2.1 General safety
!
WARNING!
• Observe the safety instructions in the installation and operating
manual for the components supplied and your Dometic roof air
conditioner.
• Use the device only as intended.
• People whose physical sensory or mental capacities prevent them
from using this device safely should not operate it without the super-
vision of a responsible adult.
• Electrical devices are not toys!
Always keep and use the device out of the reach of children.
DANGER!
Safety instruction: Failure to observe this instruction will cause fatal or
serious injury.
WARNING!
Safety instruction: Failure to observe this instruction can cause fatal or
serious injury.
NOTICE!
Failure to observe this instruction can cause material damage and impair
the function of the product.
NOTE
Supplementary information for operating the product.
DC-Kit2--IO-16s.book Seite 9 Dienstag, 21. März 2017 2:15 14

EN
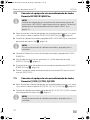
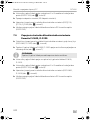
General safety instructions DC-Kit2
10
• Children must be supervised to ensure that they do not play with the
device.
• Maintenance and repair work may only be carried out by qualified
personnel who are familiar with the risks involved and the relevant
regulations.
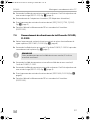
2.2 Safety when installing and repairing
!
WARNING!
• Installing and repairing the device may only be performed by qualified
personnel who are familiar with the risks as well as the guidelines and
safety precautions to be applied.
2.3 Safe operation
!
• Only operate the system if you are certain that all the housings and
cables are not damaged.
• The 12 V connection cables are designed for high levels of current. Do
not make any changes to the cable. If necessary, get a specialist to do
this for you.
• Make sure the air inlets and outlets of the device are not covered.
• Ensure good ventilation. The inverter produces dissipated heat which
has to be diverted.
• Always disconnect the power supply when working on the device.
WARNING!
Note the following basic safety information when using electrical
devices to protect against:
• Electric shock
• Fire hazards
• Injury
DC-Kit2--IO-16s.book Seite 10 Dienstag, 21. März 2017 2:15 14

EN
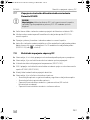
DC-Kit2 Scope of delivery
11
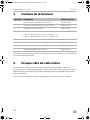
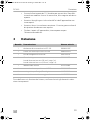
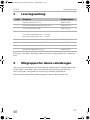
3Scope of delivery
Before starting the system, check that all the parts belonging to the scope of delivery
are present.
4 Target group for this manual
The installation information in this manual is only intended for qualified personnel at
workshops, who are familiar with the guidelines and safety precautions to be applied
during the installation of vehicle accessory parts.
All other chapters are intended for the users.
Quantity Description Ref. number
1 Charging current distributor ECL-102 9600000547
1 Inverter with priority circuit PP2002 9600000024
1 Universal connection cable 4441300124
1 Connection cable
Black supply line (25 mm², 1 m long)
Red supply line (25 mm², 1 m long)
9102700006
1 Inverter adapter 9103530084
1 Remote control for inverter MCR9 9600000091
1 Sensing Cable for FreshJet/FreshLight 4441300221
1 Installation and operating manual 4445101953
DC-Kit2--IO-16s.book Seite 11 Dienstag, 21. März 2017 2:15 14

EN
Intended use DC-Kit2
12
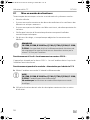
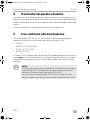
5 Intended use
The DC-Kit2 extension kit (ref. no. 9100300001) is suitable for equipping the
following Dometic roof air conditioners for 12 Vg driving:
• CA2500
• B1600, B2200, B1600 Plus
• FJ1100, FJ1700, FJ2200
• FL1600, FL2200
The PP2002 inverter is only designed for the cooling device in the roof air condi-
tioner not for the heating mode, as the heating elements take more power than the
inverter is able to generate in continuous operation.
I
NOTE
The functions described in this manual for the B2200 Dometic roof air
conditioner apply to roof air conditioners with a serial number higher
than 802200001.
For B2200 Dometic roof air conditioners with a lower serial number, the
information for the B1600 Dometic roof air conditioner applies.
DC-Kit2--IO-16s.book Seite 12 Dienstag, 21. März 2017 2:15 14

EN
DC-Kit2 Technical description
13
6 Technical description
The DC-Kit2 extension kit enables Dometic roof air conditioners to be used in
vehicles with 12 Vg. The extension kit consists of the following components:
• The ECL-102 charging current distributor with low voltage protection regulates
the power distribution between the starter battery, supply battery and light-
machine. This prevents the battery and the electronics in the vehicle from over-
loading.
• The PP2002 inverter supplies the roof air conditioner with the required input
voltage of 230 Vw. The inverter generates the 230 V input voltage from the 12 V
on-board electricity supply in the vehicle.
Remote control RC1 can switch the inverter on and off (applies to CA2500/
B2200/B1600 Plus, FJ1100/FJ1700/ FJ2200/FL1600/FL2200).
The integrated priority circuit can be used for distributing the voltage in the
vehicle with two available power sources. If a mains voltage and voltage created
by the inverter (vehicle battery) are both connected to the device, the use of the
mains voltage has priority. If the only voltage available is that generated by the
inverter, the power supply from the battery is used. This ensures that the limited
power of the battery is not used unnecessarily.
• B1600: The RC2 remote control can switch the inverter on and off.
• The inverter adapter ensures that the condenser fan for the roof air conditioner
can control the speed.
DC-Kit2--IO-16s.book Seite 13 Dienstag, 21. März 2017 2:15 14

EN
Installing and connecting the DC kit DC-Kit2
14
7 Installing and connecting the DC kit
A
A
Note the following safety instructions during installation:
A
NOTICE!
The DC kit may only be installed by a qualified workshop.
The following information is intended for specialists who are familiar with
the guidelines and safety precautions to be applied.
NOTICE!
Observe the information in the installation and operating manuals when
installing the components supplied
• PP2002 inverter
• Inverter adapter
• RC1 remote control (for CA2500/B2200/B1600 Plus/FJ1100/
FJ1700/ FJ2200/FL1600/FL2200)
• RC2 remote control (for B1600)
• MCR9 remote control
• ECL-102 charging current distributor
and for your Dometic roof air conditioner
• CA2500
• B1600, B1600 Plus, B2200
• FJ1100, FJ1700, FJ2200
• FL1600, FL2200
NOTICE!
• Note the location of wiring harnesses, wiring and other components
within the installation area.
• Install the DC kit using the following instructions. Improper
installation of the DC kit can put the safety of the user at risk and lead
to irreparable damage to the DC kit or other devices.
• Disconnect all power supply lines to the individual components and
the roof air conditioner.
DC-Kit2--IO-16s.book Seite 14 Dienstag, 21. März 2017 2:15 14

EN
DC-Kit2 Installing and connecting the DC kit
15
Observe the following safety instructions for the electrical connections:
A
Observe the following instructions when selecting the location for installing the
components:
• Make sure the cables are of the correct length.
• Choose a well-ventilated installation location near the supply battery.
7.1 Preparing the installation
➤ Disconnect the following voltage supplies in the vehicle:
– Positive battery terminal
– External voltage supply
NOTICE! Risk of short circuit!
• First, disconnect the 230 V external power supply to the caravan.
• Disconnect the earth connection to the supply battery.
• Disconnect the connection to the starter battery.
• If you have to feed cables through metal walls or other walls with
sharp edges, use ducts or tubes to prevent damage.
• Do not lay cables which are loose or bent next to electrically
conductive material (metal).
• Fasten the cables securely.
• Ensure the 12 V cables are especially well-protected.
• Check whether you need to fit any additional fuses.
• Do not pull on the cables.
• Do not lay the 230 V mains cable and the 12/24 V DC cable in the
same duct.
• Lay the cables so that they cannot be tripped over or damaged.
DC-Kit2--IO-16s.book Seite 15 Dienstag, 21. März 2017 2:15 14

EN
Installing and connecting the DC kit DC-Kit2
16
7.2 Installing components
I
➤ Install the ECL-102 charging current distributor.
➤ Install the PP2002 inverter.
➤ B1600: Fit remote control RC2 in an easily accessible location in the vehicle.
D
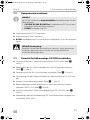
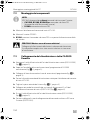
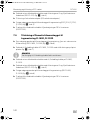
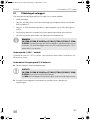
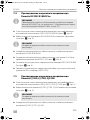
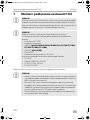
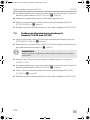
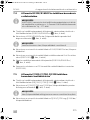
7.3 Connecting the CA2500 Dometic roof air conditioner
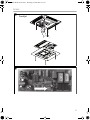
➤ Remove the air outlet of the roof air conditioner ( CA2500) (fig. 1, page 3).
➤ Cut the cable loop of the CA2500 on/off cable through the middle (fig. 2 A,
page 3).
➤ Connect the control cable to the on/off cable (fig. 2 B, page 3).
➤ Lay the control cable of the roof air conditioner to the ECL-102 charging current
distributor.
➤ Cut off round system plug (fig. 2 C, page 3).
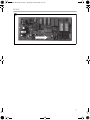
➤ Connect both ends of the cable with connections I2 and I3 of the charging
current distributor ( ECL-102) (fig. 3 1 and 2, page 4).
➤ Attach the air outlet of the roof air conditioner ( CA2500) (fig. 1, page 3).
➤ Run the connection cable of remote control RC1 to the inverter and connect
( PP2002).
NOTE
DC Kit 2 contains two different remote controls for the inverter:
• CA2500, B2200, B1600 Plus: remote control RC1 (is included in
the scope of supply of the inverter)
• B1600: remote control RC2
DANGER! Electrocution
Only connect the battery once you have the completed all the
installation work and you are certain it has been done properly.
DC-Kit2--IO-16s.book Seite 16 Dienstag, 21. März 2017 2:15 14

EN
DC-Kit2 Installing and connecting the DC kit
17
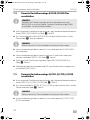
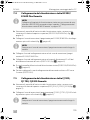
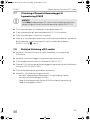
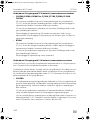
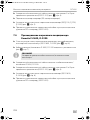
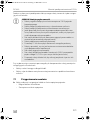
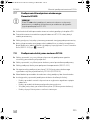
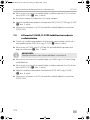
7.4 Connecting the B2200/B1600 Plus Dometic roof air
conditioner
I
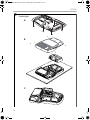
➤ Remove the outlet panel of the roof air conditioner, if necessary also remove the
upper cover ( B2200/B1600 Plus) (fig. 4, page 4).
➤ Join on/off cable for B2200/B1600 Plus to the plug connector on the circuit
board (fig. 5, page 4).
I
➤ Join the universal connection cable to the on/off cable of the B2200/B1600
Plus.
➤ Connect the universal connection cable with connections I2 and I5 of the
charging current distributor ( ECL-102) (fig. 3 1 and 3, page 4).
➤ Attach the outlet panel of the roof air conditioner ( B2200/B1600 Plus)
(fig. 4, page 4).
➤ Run the connection cable of remote control RC1 to the inverter and connect
( PP2002).
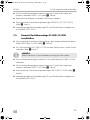
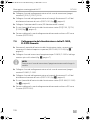
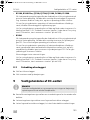
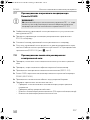
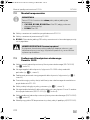
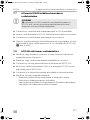
7.5 Connecting the FJ1100, FJ1700, FJ2200, Dometic roof
air conditioner
➤ Remove the outlet panel of the roof air conditioner, if necessary also remove the
upper cover (FJ1100, FJ1700, FJ2200) (fig. 6, page 5).
➤ Join on/off cable for FJ1100, FJ1700, FJ2200 to the plug connector on the circuit
board (fig. 7, page 5).
I
➤ Join the universal connection cable to the on/off cable of the FJ1100, FJ1700,
FJ2200.
NOTE
Connect roof air conditioners with a serial number lower than
802200001 in the way described in chapter “Connecting the B1600
Dometic roof air conditioner” on page 19.
NOTE
Guide the on/off cable carefully past the fan.
NOTE
Guide the on/off cable carefully past the fan.
DC-Kit2--IO-16s.book Seite 17 Dienstag, 21. März 2017 2:15 14

EN
Installing and connecting the DC kit DC-Kit2
18
➤ Connect the universal connection cable with connections I2 and I5 of the
charging current distributor ( ECL-102) (fig. 3 1 and 3, page 4).
➤ Connecting the inverter adapter ( inverter adapter).
➤ Attach the outlet panel of the roof air conditioner (FJ1100, FJ1700, FJ2200)
(fig. 6, page 5).
➤ Run the connection cable of remote control RC1 to the inverter and connect
( PP2002).
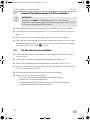
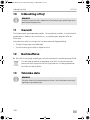
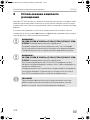
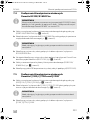
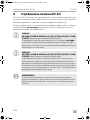
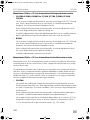
7.6 Connecting the FL1600, FL2200 Dometic roof air
conditioner
➤ Remove the outlet panel of the roof air conditioner, if necessary also remove the
upper cover (FL1600, FL2200) (fig. 8, page 6).
➤ Join on/off cable for FL1600, FL2200 to the plug connector on the circuit board
(fig. 9, page 7).
I
➤ Join the universal connection cable to the on/off cable of the FL1600, FL2200.
➤ Connect the universal connection cable with connections I2 and I5 of the
charging current distributor ( ECL-102) (fig. 3 1 and 3, fig. 4 ).
➤ Attach the outlet panel of the roof air conditioner (FL1600, FL2200) (fig. 8,
page 6).
➤ Run the connection cable of remote control RC1 to the inverter and connect
( PP2002).
NOTE
Guide the on/off cable carefully past the fan.
DC-Kit2--IO-16s.book Seite 18 Dienstag, 21. März 2017 2:15 14

EN
DC-Kit2 Installing and connecting the DC kit
19
7.7 Connecting the B1600 Dometic roof air conditioner
A
➤ Connect the open cable ends of the control cable to remote control RC2.
➤ Run the control cable on the ECL-102 charging current distributor to the inverter.
➤ Connect the system plug of the control cable to the inverter.
➤ Cut a wire of the control cable at charging current distributor height and join both
ends of the wire with connections I2 and I3 on the charging current distributor
( ECL-102) (fig. 3 1, page 4).
7.8 Connecting the DC kit to the power supply
➤ Check that all the connections have been made in accordance with the
instructions.
➤ Check that the roof air conditioner is closed properly.
➤ Connect the electrical connections of the components ( ECL-102).
➤ Connect the 230 V connection on the roof air conditioner to the socket on the
PP2002 inverter ( PP2002).
➤ Connect the positive battery cables to the batteries.
➤ Check the following are working properly:
– Check the on and off values for the charging voltage regulator
– Check the priority circuit
– Switch on the air conditioning in driving mode ( air conditioning)
– Switch on the air conditioning on mains operation
NOTICE!
Do not connect remote control RC1 because inverter shutdown due to
a low voltage signal from the ECL-102 will no longer function properly.
DC-Kit2--IO-16s.book Seite 19 Dienstag, 21. März 2017 2:15 14

EN
Using the DC kit DC-Kit2
20
8 Using the DC kit
The DC-Kit2 consists of several components, each with its own installation and
operating manual. Use the installation and operating manuals for the components
and make sure you are familiar with the individual devices.
This chapter contains information on operating the overall system. This operating
manual does not replace any information contained in the installation and operating
instructions for the components.
A
A
I
NOTICE!
CA2500, B2200, B1600 Plus, FJ1100, FJ1700, FJ2200, FL1600,
FL2200: the inverter may be damaged.
Ensure that these models are not used in the automatic air conditioning
mode or heating modes for driving. The inverter is not designed for gen-
erating this amount of power.
NOTICE!
CA2500, B2200, B1600 Plus, FJ1100, FJ1700, FJ2200, FL1600,
FL2200: the inverter may be damaged.
If you are operating the system on the 230 V mains and the automatic air
conditioner or the heating is on, make sure that the inverter is switched
off and stays switched off.
The inverter is not designed for the amount of power an active heating
system requires. If the 230 V mains power fails, the inverter would then
take over supplying the power.
NOTE
The operating noises made by the roof air conditioner are slightly louder
during mobile air conditioning than during stationary air conditioning.
The noises are caused by using the inverter.
DC-Kit2--IO-16s.book Seite 20 Dienstag, 21. März 2017 2:15 14
La pagina sta caricando ...
La pagina sta caricando ...
La pagina sta caricando ...
La pagina sta caricando ...
La pagina sta caricando ...
La pagina sta caricando ...
La pagina sta caricando ...
La pagina sta caricando ...
La pagina sta caricando ...
La pagina sta caricando ...
La pagina sta caricando ...
La pagina sta caricando ...
La pagina sta caricando ...
La pagina sta caricando ...
La pagina sta caricando ...
La pagina sta caricando ...
La pagina sta caricando ...
La pagina sta caricando ...
La pagina sta caricando ...
La pagina sta caricando ...
La pagina sta caricando ...
La pagina sta caricando ...
La pagina sta caricando ...
La pagina sta caricando ...
La pagina sta caricando ...
La pagina sta caricando ...
La pagina sta caricando ...
La pagina sta caricando ...
La pagina sta caricando ...
La pagina sta caricando ...
La pagina sta caricando ...
La pagina sta caricando ...
La pagina sta caricando ...
La pagina sta caricando ...
La pagina sta caricando ...
La pagina sta caricando ...
La pagina sta caricando ...
La pagina sta caricando ...
La pagina sta caricando ...
La pagina sta caricando ...
La pagina sta caricando ...
La pagina sta caricando ...
La pagina sta caricando ...
La pagina sta caricando ...
La pagina sta caricando ...
La pagina sta caricando ...
La pagina sta caricando ...
La pagina sta caricando ...
La pagina sta caricando ...
La pagina sta caricando ...
La pagina sta caricando ...
La pagina sta caricando ...
La pagina sta caricando ...
La pagina sta caricando ...
La pagina sta caricando ...
La pagina sta caricando ...
La pagina sta caricando ...
La pagina sta caricando ...
La pagina sta caricando ...
La pagina sta caricando ...
La pagina sta caricando ...
La pagina sta caricando ...
La pagina sta caricando ...
La pagina sta caricando ...
La pagina sta caricando ...
La pagina sta caricando ...
La pagina sta caricando ...
La pagina sta caricando ...
La pagina sta caricando ...
La pagina sta caricando ...
La pagina sta caricando ...
La pagina sta caricando ...
La pagina sta caricando ...
La pagina sta caricando ...
La pagina sta caricando ...
La pagina sta caricando ...
La pagina sta caricando ...
La pagina sta caricando ...
La pagina sta caricando ...
La pagina sta caricando ...
La pagina sta caricando ...
La pagina sta caricando ...
La pagina sta caricando ...
La pagina sta caricando ...
La pagina sta caricando ...
La pagina sta caricando ...
La pagina sta caricando ...
La pagina sta caricando ...
La pagina sta caricando ...
La pagina sta caricando ...
La pagina sta caricando ...
La pagina sta caricando ...
La pagina sta caricando ...
La pagina sta caricando ...
La pagina sta caricando ...
La pagina sta caricando ...
La pagina sta caricando ...
La pagina sta caricando ...
La pagina sta caricando ...
La pagina sta caricando ...
La pagina sta caricando ...
La pagina sta caricando ...
La pagina sta caricando ...
La pagina sta caricando ...
La pagina sta caricando ...
La pagina sta caricando ...
La pagina sta caricando ...
La pagina sta caricando ...
La pagina sta caricando ...
La pagina sta caricando ...
La pagina sta caricando ...
La pagina sta caricando ...
La pagina sta caricando ...
La pagina sta caricando ...
La pagina sta caricando ...
La pagina sta caricando ...
La pagina sta caricando ...
La pagina sta caricando ...
La pagina sta caricando ...
La pagina sta caricando ...
La pagina sta caricando ...
La pagina sta caricando ...
La pagina sta caricando ...
La pagina sta caricando ...
La pagina sta caricando ...
La pagina sta caricando ...
La pagina sta caricando ...
La pagina sta caricando ...
La pagina sta caricando ...
La pagina sta caricando ...
La pagina sta caricando ...
La pagina sta caricando ...
La pagina sta caricando ...
La pagina sta caricando ...
La pagina sta caricando ...
La pagina sta caricando ...
La pagina sta caricando ...
La pagina sta caricando ...
La pagina sta caricando ...
La pagina sta caricando ...
La pagina sta caricando ...
La pagina sta caricando ...
La pagina sta caricando ...
La pagina sta caricando ...
La pagina sta caricando ...
La pagina sta caricando ...
La pagina sta caricando ...
La pagina sta caricando ...
La pagina sta caricando ...
La pagina sta caricando ...
La pagina sta caricando ...
La pagina sta caricando ...
La pagina sta caricando ...
La pagina sta caricando ...
La pagina sta caricando ...
La pagina sta caricando ...
La pagina sta caricando ...
La pagina sta caricando ...
La pagina sta caricando ...
La pagina sta caricando ...
La pagina sta caricando ...
La pagina sta caricando ...
La pagina sta caricando ...
La pagina sta caricando ...
La pagina sta caricando ...
La pagina sta caricando ...
La pagina sta caricando ...
La pagina sta caricando ...
La pagina sta caricando ...
La pagina sta caricando ...
La pagina sta caricando ...
La pagina sta caricando ...
La pagina sta caricando ...
La pagina sta caricando ...
La pagina sta caricando ...
La pagina sta caricando ...
La pagina sta caricando ...
La pagina sta caricando ...
La pagina sta caricando ...
La pagina sta caricando ...
La pagina sta caricando ...
La pagina sta caricando ...
La pagina sta caricando ...
La pagina sta caricando ...
La pagina sta caricando ...
La pagina sta caricando ...
La pagina sta caricando ...
La pagina sta caricando ...
La pagina sta caricando ...
La pagina sta caricando ...
La pagina sta caricando ...
La pagina sta caricando ...
La pagina sta caricando ...
La pagina sta caricando ...
La pagina sta caricando ...
La pagina sta caricando ...
La pagina sta caricando ...
La pagina sta caricando ...
La pagina sta caricando ...
La pagina sta caricando ...
La pagina sta caricando ...
La pagina sta caricando ...
La pagina sta caricando ...
La pagina sta caricando ...
La pagina sta caricando ...
La pagina sta caricando ...
La pagina sta caricando ...
La pagina sta caricando ...
La pagina sta caricando ...
La pagina sta caricando ...
La pagina sta caricando ...
La pagina sta caricando ...
La pagina sta caricando ...
La pagina sta caricando ...
La pagina sta caricando ...
La pagina sta caricando ...
La pagina sta caricando ...
La pagina sta caricando ...
La pagina sta caricando ...
La pagina sta caricando ...
La pagina sta caricando ...
La pagina sta caricando ...
La pagina sta caricando ...
La pagina sta caricando ...
La pagina sta caricando ...
La pagina sta caricando ...
La pagina sta caricando ...
La pagina sta caricando ...
La pagina sta caricando ...
La pagina sta caricando ...
La pagina sta caricando ...
La pagina sta caricando ...
La pagina sta caricando ...
La pagina sta caricando ...
La pagina sta caricando ...
La pagina sta caricando ...
La pagina sta caricando ...
La pagina sta caricando ...
La pagina sta caricando ...
La pagina sta caricando ...
La pagina sta caricando ...
La pagina sta caricando ...
La pagina sta caricando ...
La pagina sta caricando ...
La pagina sta caricando ...
La pagina sta caricando ...
La pagina sta caricando ...
La pagina sta caricando ...
La pagina sta caricando ...
La pagina sta caricando ...
La pagina sta caricando ...
La pagina sta caricando ...
La pagina sta caricando ...
La pagina sta caricando ...
La pagina sta caricando ...
La pagina sta caricando ...
La pagina sta caricando ...
La pagina sta caricando ...
La pagina sta caricando ...
La pagina sta caricando ...
La pagina sta caricando ...
La pagina sta caricando ...
La pagina sta caricando ...
La pagina sta caricando ...
-
 1
1
-
 2
2
-
 3
3
-
 4
4
-
 5
5
-
 6
6
-
 7
7
-
 8
8
-
 9
9
-
 10
10
-
 11
11
-
 12
12
-
 13
13
-
 14
14
-
 15
15
-
 16
16
-
 17
17
-
 18
18
-
 19
19
-
 20
20
-
 21
21
-
 22
22
-
 23
23
-
 24
24
-
 25
25
-
 26
26
-
 27
27
-
 28
28
-
 29
29
-
 30
30
-
 31
31
-
 32
32
-
 33
33
-
 34
34
-
 35
35
-
 36
36
-
 37
37
-
 38
38
-
 39
39
-
 40
40
-
 41
41
-
 42
42
-
 43
43
-
 44
44
-
 45
45
-
 46
46
-
 47
47
-
 48
48
-
 49
49
-
 50
50
-
 51
51
-
 52
52
-
 53
53
-
 54
54
-
 55
55
-
 56
56
-
 57
57
-
 58
58
-
 59
59
-
 60
60
-
 61
61
-
 62
62
-
 63
63
-
 64
64
-
 65
65
-
 66
66
-
 67
67
-
 68
68
-
 69
69
-
 70
70
-
 71
71
-
 72
72
-
 73
73
-
 74
74
-
 75
75
-
 76
76
-
 77
77
-
 78
78
-
 79
79
-
 80
80
-
 81
81
-
 82
82
-
 83
83
-
 84
84
-
 85
85
-
 86
86
-
 87
87
-
 88
88
-
 89
89
-
 90
90
-
 91
91
-
 92
92
-
 93
93
-
 94
94
-
 95
95
-
 96
96
-
 97
97
-
 98
98
-
 99
99
-
 100
100
-
 101
101
-
 102
102
-
 103
103
-
 104
104
-
 105
105
-
 106
106
-
 107
107
-
 108
108
-
 109
109
-
 110
110
-
 111
111
-
 112
112
-
 113
113
-
 114
114
-
 115
115
-
 116
116
-
 117
117
-
 118
118
-
 119
119
-
 120
120
-
 121
121
-
 122
122
-
 123
123
-
 124
124
-
 125
125
-
 126
126
-
 127
127
-
 128
128
-
 129
129
-
 130
130
-
 131
131
-
 132
132
-
 133
133
-
 134
134
-
 135
135
-
 136
136
-
 137
137
-
 138
138
-
 139
139
-
 140
140
-
 141
141
-
 142
142
-
 143
143
-
 144
144
-
 145
145
-
 146
146
-
 147
147
-
 148
148
-
 149
149
-
 150
150
-
 151
151
-
 152
152
-
 153
153
-
 154
154
-
 155
155
-
 156
156
-
 157
157
-
 158
158
-
 159
159
-
 160
160
-
 161
161
-
 162
162
-
 163
163
-
 164
164
-
 165
165
-
 166
166
-
 167
167
-
 168
168
-
 169
169
-
 170
170
-
 171
171
-
 172
172
-
 173
173
-
 174
174
-
 175
175
-
 176
176
-
 177
177
-
 178
178
-
 179
179
-
 180
180
-
 181
181
-
 182
182
-
 183
183
-
 184
184
-
 185
185
-
 186
186
-
 187
187
-
 188
188
-
 189
189
-
 190
190
-
 191
191
-
 192
192
-
 193
193
-
 194
194
-
 195
195
-
 196
196
-
 197
197
-
 198
198
-
 199
199
-
 200
200
-
 201
201
-
 202
202
-
 203
203
-
 204
204
-
 205
205
-
 206
206
-
 207
207
-
 208
208
-
 209
209
-
 210
210
-
 211
211
-
 212
212
-
 213
213
-
 214
214
-
 215
215
-
 216
216
-
 217
217
-
 218
218
-
 219
219
-
 220
220
-
 221
221
-
 222
222
-
 223
223
-
 224
224
-
 225
225
-
 226
226
-
 227
227
-
 228
228
-
 229
229
-
 230
230
-
 231
231
-
 232
232
-
 233
233
-
 234
234
-
 235
235
-
 236
236
-
 237
237
-
 238
238
-
 239
239
-
 240
240
-
 241
241
-
 242
242
-
 243
243
-
 244
244
-
 245
245
-
 246
246
-
 247
247
-
 248
248
-
 249
249
-
 250
250
-
 251
251
-
 252
252
-
 253
253
-
 254
254
-
 255
255
-
 256
256
-
 257
257
-
 258
258
-
 259
259
-
 260
260
-
 261
261
-
 262
262
-
 263
263
-
 264
264
-
 265
265
-
 266
266
-
 267
267
-
 268
268
-
 269
269
-
 270
270
-
 271
271
-
 272
272
-
 273
273
-
 274
274
-
 275
275
-
 276
276
-
 277
277
-
 278
278
-
 279
279
-
 280
280
-
 281
281
-
 282
282
-
 283
283
-
 284
284


in altre lingue
- español: Dometic DC-Kit2 Instrucciones de operación
- português: Dometic DC-Kit2 Instruções de operação
- slovenčina: Dometic DC-Kit2 Návod na používanie
- dansk: Dometic DC-Kit2 Betjeningsvejledning
- svenska: Dometic DC-Kit2 Bruksanvisningar
Documenti correlati
-
Dometic FL1600, FL2200 (Freshlight) Guida d'installazione
-
-
-
-
-
-
-
-
-