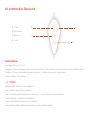
Onvis K1 Kameleon LED Lightstrip Manuale utente
- Tipo
- Manuale utente

Kameleon LED Lightstrip K1
User Manual
V3.0

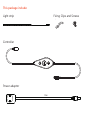
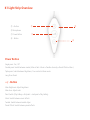
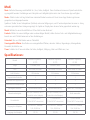
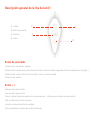
This package include:
Light strip
Controller
Power adaptor
1.5m
Fixing Clips and Screws

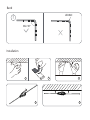
LED&IC
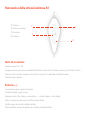
Min 90°
!
123
4 5
Bend
Installation

QUICK START GUIDE
1. Power up the K1 light strip with the enclosed power adaptor. Long press the power button for 10 seconds, K1 light strip
blinks rainbow twice after reset.
2. Make sure your iOS device (iOS 14.1 or later) to a 2.4GHz Wi-Fi network. Shutdown 5GHz Wi-Fi network when necessary.
3. Download and launch the free Onvis Home app from the App Store. Check and update firmware with Onvis Home. The
iOS Home App can be used to setup and control.
4. Tap “+” on the top right corner and scan the HomeKit QR code to setup the device.
Note: When QR code scanning is NOT applicable, select the target device(last 6 digits matching the MAC address), and
manually input the SETUP code printed on the cover page.
If the app prompts “Couldn’t add Onvis-XXXXXX”, please reset and re-add the device. Please keep the QR code for future
use.
The use of a HomeKit-enable accessory needs the follow permissions:
a. Settings>iCloud>iCloud Drive>Turn On
b. Settings>iCloud>Keychain>Turn On
c. Settings>Privacy>HomeKit>Onvis Home>Turn On
5. Assign the device to a room, name it and use this name to control with Siri. This light strip can be integrated into your
HomeKit scenes and automations.
6. Mount the light strip on a clearn dry surface. Do NOT twist at the ICs or LED beads.
7. Activate/Deactivate units in product setting page on Onvis Home app.
8. For troubleshooting visit http://www.onvistech.com/page-1717.html
Controlling this HomeKit-enabled accessory automatically and away from home requires a HomePod, HomePod mini,
or Apple TV set up as a home hub. It is recommended that you update to the latest software and operating system.
You may find the instruction for HomeKit hub setting here: http://www.onvistech.com/page-1718.html
HomeKit Hub Setting
Restore Factory Settings
Press and hold the power button for about 10 seconds. After the light strip blinks full rainbow twice, the device will be
restored to factory settings.
EN

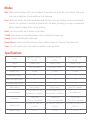
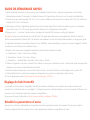
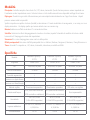
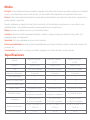
+ Button
Microphone
Power Button
- Button
K1 Light Strip Overview
Main-Brightness: Adjust brightness
Main-Hue: Adjust color
Paint: Switch (Play Gallery→ first paint…→last paint→Play Gallery)
Music: Switch between music effects
Twinkle: Switch between twinkle styles
Preset Effects: Switch between preset effects
+ / - Button
Single press: On / Off
Double press: Switch between modes (Main→PaintMusic→Twinkle→Security→Preset Effects→Main…)
Triple press: Switch between Brightness / Hue control in Main mode
Long Press: Reset
Power Button

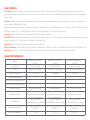
Specifications:
Model
Kameleon Lightstrip
K1-2TS
Kameleon Lightstrip
K1-5TS
Kameleon Lightstrip
K1-5BS
Length 2 meters /6.6ft 5 meters /16.4ft 5 meters /16.4ft
LED 5050 RGB, 60pcs 5050 RGB, 150pcs 5050 RGB, 150pcs
Lighting Units 20 units 50 units 50 units
Segmented Control √ √ √
Works with Apple Home √ √ √
Works with Alexa/Google × × ×
Sealed Method Epoxy coating Epoxy coating Bare LED, unsealed
Water Resistance
IP65 (light strip only, NOT
the controller or adaptor)
IP65 (light strip only, NOT
the controller or adaptor)
Non-waterproof
Connectivity
2.4GHz WiFi
(5GHz NOT supported)
2.4GHz WiFi
(5GHz NOT supported)
2.4GHz WiFi
(5GHz NOT supported)
Adaptor Input
110~240V AC, Max 1.2A,
50/60 Hz
110~240V AC, Max 1.2A,
50/60 Hz
110~240V AC, Max 1.2A,
50/60 Hz
Adaptor Output 12V 1A 12V 2A 12V 2A
Modes
Main: Simple control including On/Off, colour, brightness. These features can be set with voice assistance. Settings like
color cycle are brightness cycle are available in Onvis Home app.
Paint: Palette: Each lighting unit can be painted individually with Onvis Home app. Paintings can be saved and played.
Spectrum: Set a spectrum of color(hue) or saturation and K1 will display accordingly, in an array or a symmetrical
display. A spectrum display can be saved as a painting.
Music: Select a music effect and K1 will light up at the beats.
Twinkle: Select random or routine blinking style, set color and brightness change range.
Security: Blue and Red flashing like a police light.
Preset Effects: A series of preset effect including: Meteor, Rainbow, Fairground, Romance, Cherry Blossom etc.
Timer: Turn on K1 and set on/off, color, brightness, saturation, modes and effects.

SCHNELLSTARTANLEITUNG
Werkseinstellungen wiederherstellen
Halten Sie den Netzschalter etwa 10 Sekunden lang gedrückt. Nachdem der Lichtstreifen zweimal mit vollem Regenbogen
blinkt, wird das Gerät auf die Werkseinstellungen zurückgesetzt.
1. Schalten Sie den K1-Lichtstreifen mit dem beiliegenden Netzteil ein. Drücken Sie den Netzschalter 10 Sekunden lang. Der
K1-Lichtstreifen blinkt nach dem Zurücksetzen zweimal im Regenbogen.
2. Stellen Sie sicher, dass Ihr iOS-Gerät (iOS 14.1 oder höher) mit einem 2,4-GHz-WLAN-Netzwerk verbunden ist. Fahren Sie
das 5-GHz-WLAN-Netzwerk bei Bedarf herunter.
3. Laden Sie die kostenlose Onvis Home-App aus dem App Store herunter und starten Sie sie. Überprüfen und aktualisieren
Sie die Firmware mit Onvis Home. Die iOS Home App kann zum Einrichten und Steuern verwendet werden.
4. Tippen Sie oben rechts auf „+“ und scannen Sie den HomeKit-QR-Code, um das Gerät einzurichten.
Hinweis: Wenn das Scannen von QR-Codes NICHT möglich ist, wählen Sie das Zielgerät aus (die letzten 6 Ziffern stimmen
mit der MAC-Adresse überein) und geben Sie den auf dem Deckblatt aufgedruckten SETUP-Code manuell ein.
Wenn die App die Meldung "Onvis-XXXXXX konnte nicht hinzugefügt werden" anfordert, setzen Sie das Gerät zurück und
fügen Sie es erneut hinzu. Bitte bewahren Sie den QR-Code für die zukünftige Verwendung auf.
Für die Verwendung eines HomeKit-fähigen Zubehörs sind die folgenden Berechtigungen erforderlich:
a. Einstellungen> iCloud> iCloud-Laufwerk> Einschalten
b. Einstellungen> iCloud> Schlüsselbund> Einschalten
c. Einstellungen> Datenschutz> HomeKit> Onvis Home> Einschalten
5. Weisen Sie das Gerät einem Raum zu, benennen Sie es und verwenden Sie diesen Namen, um mit Siri zu steuern. Dieser
Lichtstreifen kann in Ihre HomeKit-Szenen und -Automationen integriert werden.
6. Montieren Sie den Lichtstreifen auf einer trockenen Oberfläche. Verdrehen Sie NICHT die ICs oder LED-Perlen.
7. Einheiten auf der Produkteinstellungsseite der Onvis Home App aktivieren/deaktivieren.
8. Informationen zur Fehlerbehebung finden Sie unter http://www.onvistech.com/page-1717.html
DE
Um dieses HomeKit-fähige Zubehör automatisch und von unterwegs aus zu steuern, ist ein HomePod, HomePod mini
oder Apple TV erforderlich, der als Home-Hub eingerichtet ist. Es wird empfohlen, dass Sie auf die neueste Software und
das neueste Betriebssystem aktualisieren. Die Anleitung dazu finden Sie hier:http://www.onvistech.com/page-1718.html
HomeKit-Hub-Einstellung

Netzschalter
Einmaliges Drücken: Ein / Aus
Doppeltes Drücken: Umschalten zwischen den Modi (Main→Paint→Music→Twinkle→Security→Preset→Effekte→Main…)
Dreifaches Drücken: Umschalten zwischen Helligkeits- / Farbtonsteuerung im Hauptmodus
Langes Drücken: Zurücksetzen
+ Taste
Netzschalter
Mikrofon
- Taste
K1 Lichtstreifen Übersicht
+ / - Taste
Main-Helligkeit: Passen Sie die Helligkeit an
Main-Farbton: Passen Sie die Farbe an
Malen: Wechseln (Galerie abspielen → erste Farbe… → letzte Farbe → Galerie abspielen)
Musik: Wechseln Sie zwischen Musikeffekten
Funkeln: Wechseln Sie zwischen den Funkelstilen
Voreingestellte Effekte: Wechseln Sie zwischen voreingestellten Effekten

Spezifikationen:
Modi
Main: Einfache Steuerung einschließlich Ein / Aus, Farbe, Helligkeit. Diese Funktionen können mit Sprachunterstützu-
ng eingestellt werden. Einstellungen wie Farbzyklus und Helligkeitszyklus sind in der Onvis Home-App verfügbar.
Malen: Palette: Jedes Licht ing Einheit kann individuell lackiert werden mit Onvis Home-App. Malen Ings können
gespeichert und abgespielt werden.
Spektrum: Stellen Sie ein Farbspektrum (Farbton) oder eine Sättigung ein, und K1 wird entsprechend in einem n- Array
oder einer symmetrischen Anzeige angezeigt. Ein Spektrum Display kann als eine Farbe gespeichert werden ing .
Musik: Wählen Sie einen Musikeffekt und K1 leuchtet bei den Beats auf.
Funkeln: Wählen Sie einen zufälligen oder routinemäßigen Blinkstil, stellen Sie den Farb- und Helligkeitsänderungs-
bereich ein und K1 blinkt basierend auf den Einstellungen .
Sicherheit: Blau und Rot blinken wie ein Polizeilicht
Voreingestellte Effekte: Eine Reihe von voreingestellten Effekten, darunter: Meteor, Regenbogen, Messegelände,
Romantik, Kirschblüte usw.
Timer: Schalten Sie K1 ein und stellen Sie Farbe, Helligkeit, Sättigung, Modi und Effekte ein / aus.
Modell
Kameleon Lightstrip
K1-2TS
Kameleon Lightstrip
K1-5TS
Kameleon Lightstrip
K1-5BS
Länge 2 meters /6.6ft 5 meters /16.4ft 5 meters /16.4ft
LED 5050 RGB, 60 Stück 5050 RGB, 150 Stück 5050 RGB, 150 Stück
Licht Einheiten 20 Einheiten 50 Einheiten 50 Einheiten
Segmentierte Kontrolle √√√
Funktioniert mit Apple Home √√√
Funktioniert mit Alexa/Google × × ×
Versiegelte Methode Epoxid-Beschichtung Epoxid-Beschichtung Nackte LED, unversiegelt
Wasserbeständigkeit
IP65 (nur Lichtleiste, NICHT
Controller oder Adapter)
IP65 (nur Lichtleiste, NICHT
Controller oder Adapter) Nicht wasserfest
Konnektivität
2,4 GHz WLAN
(5 GHz NICHT unterstützt)
2,4 GHz WLAN
(5 GHz NICHT unterstützt)
2,4 GHz WLAN
(5 GHz NICHT unterstützt)
Eingang des Adapters
110~240V AC, maximal
1,2A, 50/60 Hz
110~240V AC, maximal
1,2A, 50/60 Hz
110~240V AC, maximal
1,2A, 50/60 Hz
Ausgang des Adapters 12V 1A 12V 2A 12V 2A

GUIDE DE DÉMARRAGE RAPIDE
FR
1. Mettez la bande lumineuse K1 sous tension avec l'adaptateur secteur fourni . Appuyez longuement sur le bouton
d'alimentation pendant 10 secondes. La bande lumineuse K1 clignote deux fois en arc-en-ciel après la réinitialisation .
2. Assurez-vous que votre appareil iOS ( iOS 14 .1 ou version ultérieure) est connecté à un réseau Wi-Fi 2,4 GHz. Arrêtez le
réseau Wi-Fi 5 GHz si nécessaire.
3. Téléchargez et lancez l'application gratuite Onvis Home depuis l'App Store. Vérifiez et mettez à jour le micrologiciel
avec Onvis Home. T il iOS Accueil App peut être utilisé pour la configuration et lecontrôle .
4. Appuyez sur « + » en haut à droite corne r et analyser le HomeKit QR code pour configurer l'appareil.
Remarque: lorsque la numérisation de code QR n'est PAS applicable, sélectionnez le périphérique cible (les 6 derniers
chiffres correspondant à l'adresse MAC) et saisissez manuellement le code de configuration imprimé sur la page de garde.
Si l'application demande «Impossible d'ajouter Onvis-XXXXXX», veuillez réinitialiser et ajouter à nouveau l'appareil. Veuillez
conserver le code QR pour une utilisation future.
L'utilisation d'un accessoire compatible HomeKit nécessite les autorisations suivantes:
a. Paramètres> iCloud> iCloud Drive> Activer
b. Paramètres> iCloud> Porte-clés> Activer
c. Paramètres> Confidentialité> HomeKit> Onvis Home> Activer
5. Attribuez l'appareil à une pièce, nommez-le et utilisez ce nom pour contrôler avec Siri. Cette bande lumineuse peut être
intégrée à vos scènes et automatisations HomeKit.
6. Montez la bande lumineuse sur une surface claire et sèche . Ne tordez PAS les circuits intégrés ou les perles LED.
7. Activez/désactivez les unités dans la page de configuration du produit sur l'application Onvis Home.
8. Pour le dépannage, visitez http://www.onvistech.com/page-1717.html
Le contrôle de cet accessoire compatible HomeKit de manière automatique et en dehors de la maison nécessite un
HomePod, un HomePod mini ou une Apple TV configurée comme un hub domestique. Il est recommandé d'effectuer une
mise à jour vers les derniers logiciels et systèmes d'exploitation.
Vous pouvez trouver l'instruction ici: http://www.onvistech.com/page-1718.html
Réglage du hub HomeKit
Rétablir les paramètres d'usine
Appuyez sur le bouton d'alimentation et maintenez-le enfoncé pendant environ 10 secondes. Une fois que la bande
lumineuse clignote deux fois en plein arc-en-ciel, l'appareil sera restauré aux paramètres d'usine.

Bouton marche
Appui unique: marche / arrêt
Double pression: basculer entre les modes (Main→Paint→Music→Twinkle→Security→Preset Effects→Main…)
Appuyez trois fois: basculez entre le contrôle de la luminosité et de la teinte en mode principal
Appui long: réinitialiser
Bouton + / -
Principal-Luminosité: régler la luminosité
Principal-Teinte: Ajuster la couleur
Peinture: Switch (Play Gallery→first paint… →last paint→Play Gallery)
Musique: basculer entre les effets musicaux
Scintillement: basculer entre les styles de scintillement
Effets prédéfinis: basculer entre les effets prédéfinis
+ Bouton
Bouton marche
Microphone
- Bouton
Présentation de la bande lumineuse K1

Caractéristiques:
Les modes
Principale: Contrôle simple, y compris marche/arrêt, couleur, luminosité. Ces fonctionnalités peuvent être définies avec
l'assistance vocale. Des paramètres tels que le cycle de couleur et le cycle de luminosité sont disponibles dans l'application
Onvis Home.
PeinturePalette: chaque unité d'éclairage peut être peinte individuellement avec l'application Onvis Home. Les peintures
peuvent être enregistrées et lues.
Spectre: définissez un spectre de couleur (teinte) ou de saturation et K1 s'affichera en conséquence , dans un tableau n ou un
affichage symétrique . Un affichage du spectre peut être enregistré en tant que peinture ing .
MusiqueSélectionnez un effet de musique et K1 s'allumera au rythme.
Scintillement: Sélectionnez un style de clignotement aléatoire ou de routine, définissez la plage de changement de couleur
et de luminosité, et K1 clignotera en fonction des paramètres .
Sécurité: Bleu et rouge clignotant comme un feu de police.
Effets prédéfinis: UUne série d'effets prédéfinis comprenant: Meteor, Rainbow, Fairground, Romance, Cherry Blossom, etc.
Minuteur: Allumez K1 et activez / désactivez la couleur, la luminosité, la saturation, les modes et les effets.
Modèle
Kameleon Lightstrip
K1-2TS
Kameleon Lightstrip
K1-5TS
Kameleon Lightstrip
K1-5BS
Longueur 2 mètres / 6.6ft 5 mètres /16.4ft 5 mètres /16.4ft
LED 5050 RVB, 60 pièces 5050 RVB, 150 pièces 5050 RVB, 150 pièces
Unités d'éclairage 20 unités 50 unités 50 unités
Contrôle segmenté √√√
Fonctionne avec Apple Home √√√
Fonctionne avec Alexa/Google × × ×
Méthode scellée Revêtement époxy Revêtement époxy LED nue, non scellée
Résistance à l'eau
IP65 (bande lumineuse
uniquement, PAS le contrô
leur ou l'adaptateur)
IP65 (bande lumineuse
uniquement, PAS le contrô
leur ou l'adaptateur)
Non résistant à l'eau
Connectivité
Wi-Fi 2,4 GHz
(5 GHz NON pris en charge)
Wi-Fi 2,4 GHz
(5 GHz NON pris en charge)
Wi-Fi 2,4 GHz
(5 GHz NON pris en charge)
Adaptateur d'entrée
110 ~ 240 V CA, max 1,2 A,
50/60 Hz
110 ~ 240 V CA, max 1,2 A,
50/60 Hz
110 ~ 240 V CA, max 1,2 A,
50/60 Hz
Sortie de l'adaptateur 12V 1A 12V 2A 12V 2A

GUIDA RAPIDO
IT
Impostazione dell'hub HomeKit
Per controllare questo accessorio abilitato a HomeKit in modo automatico e lontano da casa è necessario un HomePod,
un HomePod mini o una Apple TV impostata come hub domestico. Si consiglia di aggiornare il software e il sistema
operativo più recenti. È possibile trovare le istruzioni qui: http://www.onvistech.com/page-1718.html
Ripristinare le impostazioni predefinite
Tieni premuto il pulsante di accensione per circa 10 secondi. Dopo che la striscia luminosa lampeggia due volte in pieno
arcobaleno, il dispositivo verrà ripristinato alle impostazioni di fabbrica.
1. Accendi la striscia luminosa K1 con l'alimentatore in dotazione . Premere a lungo il potere tasto per 10 secondi. La striscia
uminosa K1 lampeggia due volte con l'arcobaleno dopo il ripristino .
2. Assicurati che il tuo dispositivo iOS ( iOS 14 .1 o successivo) sia connesso a una rete Wi-Fi a 2,4 GHz. Spegni la rete Wi-Fi
a 5GHz quando necessario.
3. Scarica e avvia l'app gratuita Onvis Home dall'App Store. Controlla e aggiorna il firmware con Onvis Home. T egli iOS
casa App può essere utilizzato per l'installazione e il controllo .
4. Toccare “+” in alto a destra corne r e la scansione del codice QR HomeKit per configurare il dispositivo.
Nota: quando la scansione del codice QR NON è applicabile, selezionare il dispositivo di destinazione (le ultime 6 cifre che
corrispondono all'indirizzo MAC) e inserire manualmente il codice SETUP stampato sulla copertina.
Se l'app richiede "Impossibile aggiungere Onvis-XXXXXX", reimposta e aggiungi di nuovo il dispositivo. Si prega di conservare
il codice QR per un utilizzo futuro.
L'utilizzo di un accessorio abilitato a HomeKit richiede le seguenti autorizzazioni:
a. Impostazioni> iCloud> iCloud Drive> Attiva
b. Impostazioni> iCloud> Portachiavi> Attiva
c. Impostazioni> Privacy> HomeKit> Onvis Home> Attiva
5. Assegna il dispositivo a una stanza, assegnagli un nome e usa questo nome per controllare con Siri. Questa striscia
luminosa può essere integrata nelle scene e nelle automazioni di HomeKit.
6. Montare la striscia luminosa su una superficie chiara e asciutta . NON attorcigliare i circuiti integrati o le perline LED.
7. Attiva/disattiva le unità nella pagina delle impostazioni del prodotto sull'app Onvis Home.
8. Per la risoluzione dei problemi, visitare http://www.onvistech.com/page-1717.html

Tasto di accensione
Pressione singola: On / Off
Doppia pressione: passa da una modalità all'altra (Main→Paint→Music→Twinkle→Security→Preset Effects→Main ...)
Pressione tripla: consente di passare dal controllo Luminosità / Tonalità alla modalità Principale.
Pressione lunga: ripristino
Pulsante + / -
Luminosità principale: regola la luminosità
Tonalità principale: regola il colore
Dipingere: Switch (Play Gallery → prima pittura ... → ultima Disegno → Play Gallery)
Musica: consente di passare da un effetto musicale all'altro
Scintillio: passa da uno stile scintillante all'altro
Effetti predefiniti: consente di passare da un effetto predefinito all'altro
Pulsante +
Tasto di accensione
Microfono
Pulsante -
Panoramica della striscia luminosa K1

Specifiche
Modalità
Principale: Controllo semplice che include On / Off, colore, luminosità. Queste funzioni possono essere impostate con
l'assistenza vocale. Impostazioni come il ciclo del colore e il ciclo della luminosità sono disponibili nell'app Onvis Home.
Dipingere: Tavolozza: ogni unità di illuminazione può essere dipinta individualmente con l'app Onvis Home. I dipinti
possono essere salvati e riprodotti.
Spettro: imposta uno spettro di colore (tonalità) o saturazione e K1 verrà visualizzato di conseguenza , in un array n o in un
display simmetrico . Un display spettro può essere salvato come una vernice ing .
Musica:Seleziona un effetto musicale e K1 si accenderà al ritmo.
Scintillio: Seleziona lo stile di lampeggiamento casuale o di routine, imposta l'intervallo di modifica del colore e della
luminosità e K1 lampeggerà in base alle impostazioni .
Sicurezza: Blu e rosso lampeggiano come una luce della polizia.
Effetti preimpostati: Una serie di effetti preimpostati tra cui: Meteor, Rainbow, Fairground, Romance, Cherry Blossom ecc.
Timer: Accendi K1 e imposta on / off, colore, luminosità, saturazione, modalità ed effetti.
Modello
Kameleon Lightstrip
K1-2TS
Kameleon Lightstrip
K1-5TS
Kameleon Lightstrip
K1-5BS
Lunghezza 2 metri /6.6ft 5 metri /16.4ft 5 metri /16.4ft
LED 5050 RGB, 60 pezzi 5050 RGB, 150 pezzi 5050 RGB, 150 pezzi
Unità di illuminazione 20 unità 50 unità 50 unità
Controllo segmentato √ √ √
Funziona con Apple Home √ √ √
Funziona con Alexa/Google × × ×
Metodo sigillato Rivestimento epossidico Rivestimento epossidico LED nudo, non sigillato
Resistenza all'acqua
IP65 (solo striscia luminosa,
NON controller o adattatore)
IP65 (solo striscia luminosa,
NON controller o adattatore) Non impermeabile
Connettività
Wi-Fi a 2,4 GHz
(5 GHz NON supportato)
Wi-Fi a 2,4 GHz
(5 GHz NON supportato)
Wi-Fi a 2,4 GHz
(5 GHz NON supportato)
Ingresso adattatore
110~240 V CA, massimo 1,2
A, 50/60 Hz
110~240 V CA, massimo 1,2
A, 50/60 Hz
110~240 V CA, massimo 1,2
A, 50/60 Hz
Uscita adattatore 12V 1A 12V 2A 12V 2A

GUÍA DE INICIO RÁPIDO
ES
Para controlar este accesorio habilitado para HomeKit de forma automática y fuera de casa se necesita un HomePod, un
HomePod mini o un Apple TV configurado como hub doméstico. Se recomienda actualizar a la última versión del
software y del sistema operativo. Usted puede encontrar la instrucción aquí: http://www.onvistech.com/page-1718.html
Configuración del hub de HomeKit
Restaurar la configuración de fábrica
Mantenga presionado el botón de encendido durante unos 10 segundos. Después de que la tira de luz parpadee con un
arcoíris completo dos veces, el dispositivo se restaurará a la configuración de fábrica.
1. Encienda la tira de luz K1 con el adaptador de corriente incluido. Mantenga presionado el botón de encendido durante
10 segundos. La tira de luz K1 parpadea como un arco iris dos veces después de reiniciar.
2. Asegúrese de que su dispositivo iOS (iOS 14.1 o posterior) esté conectado a una red Wi-Fi de 2.4GHz. Apague la red
Wi-Fi de 5GHz cuando sea necesario.
3. Descargue e inicie la aplicación gratuita Onvis Home desde la App Store. Verifique y actualice el firmware con Onvis
Home. La aplicación iOS Home se puede utilizar para configurar y controlar.
4. Toque "+" en la esquina superior derecha y escanee el código QR de HomeKit para configurar el dispositivo.
Nota: Cuando el escaneo de códigos QR NO sea aplicable, seleccione el dispositivo de destino (los últimos 6 dígitos que
coincidan con la dirección MAC) e ingrese manualmente el código de CONFIGURACIÓN impreso en la portada.
Si la aplicación muestra "No se pudo agregar Onvis-XXXXXX", restablezca y vuelva a agregar el dispositivo. Conserve el
código QR para utilizarlo en el futuro.
El uso de un accesorio habilitado para HomeKit necesita los siguientes permisos:
a. Configuración> iCloud> iCloud Drive> Activar
b. Configuración> iCloud> Llavero> Activar
c. Configuración> Privacidad> HomeKit> Onvis Home> Activar
5. Asigne el dispositivo a una habitación, asígnele un nombre y use este nombre para controlarlo con Siri. Esta tira de luz
se puede integrar en sus escenas y automatizaciones de HomeKit.
6. Monte la tira de luz sobre una superficie limpia y seca. NO retuerza los circuitos integrados ni las cuentas LED.
7. Activar/Desactivar unidades en la página de configuración del producto en la aplicación Onvis Home.
8. Para solucionar problemas, visitehttp://www.onvistech.com/page-1717.html

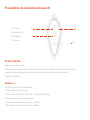
Descripción general de la tira de luz K1
+ Botón
Botón de encendido
Micrófono
- Botón
Botón de encendido
Pulsación única: encendido / apagado
Pulsación doble: cambiar entre modos (Principal→Pintura→Música→Twinkle→Seguridad→Efectos preestablecidos→Principal...)
Pulsación triple: cambia entre el control de brillo / tono en el modo principal.
Pulsación larga: reiniciar
Botón + / -
Brillo principal: ajustar el brillo
Tono principal: ajustar el color
Pintura: Cambiar (Galería de reproducción→primera pintura… →última pintura→Galería de reproducción)
Música: cambia entre efectos musicales
Centelleo: cambia entre estilos de centelleo
Efectos predefinidos: cambia entre efectos predefinidos

Especificaciones:
Modos
PrincipalControl simple que incluye encendido / apagado, color, brillo. Estas funciones se pueden configurar con asistencia
de voz. Las configuraciones como el ciclo de color y el ciclo de brillo están disponibles en la aplicación Onvis Home.
Pintura: Paleta: cada unidad de iluminación se puede pintar individualmente con la aplicación Onvis Home. Las pinturas se
pueden guardar y reproducir.
Espectro: establezca un espectro de color (tono) o saturación y K1 se mostrará en consecuencia , en una matriz n o una
pantalla simétrica . Una pantalla de espectro se puede guardar como una pintura ing .
Música: Seleccione un efecto de música y K1 se iluminará al ritmo.
Centelleo: Seleccione el estilo de parpadeo aleatorio o rutinario, configure el rango de cambio de color y brillo, y K1
parpadeará según la configuración .
Seguridad: Azul y rojo parpadeando como una luz de policía.
Efectos preestablecidos:Una serie de efectos preestablecidos que incluyen: meteorito, arcoíris, recinto ferial, romance, flor
de cerezo, etc.
Temporizador: Encienda K1 y configure encendido / apagado, color, brillo, saturación, modos y efectos.
Modelo
Kameleon Lightstrip
K1-2TS
Kameleon Lightstrip
K1-5TS
Kameleon Lightstrip
K1-5BS
Longitud 2 metros /6.6ft 5 metros /16.4ft 5 metros /16.4ft
LED 5050 RGB, 60 piezas 5050 RGB, 150 piezas 5050 RGB, 150 piezas
Unidades de iluminación 20 unidades 50 unidades 50 unidades
Control segmentado √ √ √
Funciona con Apple Home √ √ √
Funciona con Alexa/Google × × ×
Método Sellado Recubrimiento epoxi Recubrimiento epoxi LED desnudo, sin sellar
Resistencia al agua
IP65 (solo tira de luz, NO el
controlador o adaptador)
IP65 (solo tira de luz, NO el
controlador o adaptador)
No resistente al agua
Conectividad
Wi-Fi de 2,4 GHz
(5 GHz NO compatible)
Wi-Fi de 2,4 GHz
(5 GHz NO compatible)
Wi-Fi de 2,4 GHz
(5 GHz NO compatible)
Entrada del adaptador
110~240 V CA, máx. 1,2 A,
50/60 Hz
110~240 V CA, máx. 1,2 A,
50/60 Hz
110~240 V CA, máx. 1,2 A,
50/60 Hz
Salida del adaptador 12V 1A 12V 2A 12V 2A

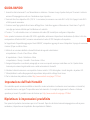
Warnings
• Indoor use only. Keep controller away from water.
• If the light strip is too long, please try deactivating some units. If cutting is necessary, please deactivate the target units
and check the effects first, then power off and cut the light strip.
• DO NOT use outside the electrical ratings. Use the original power supply in package.
• Do NOT disassemble the light strip from the controller.
• Do NOT over bend the light strip; Do not twist on an IC or LED bead
• Do NOT turn on the light strip for over 5 minutes when it is tightly rolled, to avoid over heating.
• Do NOT mount the controller on a greasy, or uneven surface.
General Instructions
This product contains inside small parts that might cause choking to children. Keep the product away from children under
three years old. If the product comes in a plastic bag package, dispose of this bag correctly, and take actions to prevent
children from playing with it as it poses risk of suffocation to children. This product may become warm with normal use.
Please make sure the product is adequately ventilated and securely positioned, and do not place it near other sources of
heat (e.g. direct sunlight, radiators, or similar). Unless otherwise stated, this product is for indoor use only, and must be
maintained out of damp\humid conditions and other weather-related influences such as rain, snow and mist.
This product is not designed for use in any kind of machine, medical equipment or industrial applications. The product
contains no user-serviceable or exchangeable parts. Do not attempt to repair the product. Do not dismantle the device
nor the AC adapter as this may result in electrocution or other dangers that may cause injury. If the device plastic case,
AC adapter, pins or terminals are damaged, stop using and dispose of this product properly. Contact for our
after-saleservice if your product malfunctions or is damaged.
Legal
• Use of the Works with Apple badge means that an accessory has been designed to work specifically with the technology
identified in the badge and has been certified by the developer to meet Apple performance standards. Apple is not
responsible for the operation of this device or its compliance with safety and regulatory standards.

FCC compliance statement
This device complies with part 15 of the FCC Rules. Operation is subject to the following two conditions:
(1) This device may not cause harmful interference.
(2) This device must accept any interference received, including interference that may cause undesired operation.
This equipment has been tested and found to comply with the limits for a Class B digital device, pursuant to Part 15 of
the FCC Rules. These limits are designed to provide reasonable protection against harmful interference in a residential
installation.
This equipment generates uses and can radiate radio frequency energy and, if not installed and used in accordance with
the instructions, may cause harmful interference to radio communications.
However, there is no guarantee that interference will not occur in a particular installation. If this equipment does cause
harmful interference to radio or television reception, which can be determined by turning the equipment off and on, the
user is encouraged to try to correct the interference by one or more of the following measures:
(1) Reorient or relocate the receiving antenna.
(2) Increase the separation between the equipment and receiver.
(3) Connect the equipment into an outlet on a circuit different from that to which thereceiver is connected.
(4) Consult the dealer or an experienced radio/TV technician for help.
Any Changes or modifications not expressly approved by the party responsible for compliance could void the user's
authority to operate the equipment.
The antenna(s) used for this transmitter must be installed to provide a separation distance of at least 20 cm from all
persons and must not be co-located or operating in conjunction with any other antenna or transmitter.
• Apple, Apple Home, Apple Watch, HomeKit, HomePod, HomePod mini, iPad, iPad Air, iPhone, and tvOS are trademarks
of Apple Inc., registered in the U.S. and other countries and regions. The trademark “iPhone” is used with a license from
Aiphone K.K.
La pagina sta caricando ...
La pagina sta caricando ...
-
 1
1
-
 2
2
-
 3
3
-
 4
4
-
 5
5
-
 6
6
-
 7
7
-
 8
8
-
 9
9
-
 10
10
-
 11
11
-
 12
12
-
 13
13
-
 14
14
-
 15
15
-
 16
16
-
 17
17
-
 18
18
-
 19
19
-
 20
20
-
 21
21
-
 22
22