Onvis CT3 Smart Contact Sensor Manuale utente
- Tipo
- Manuale utente

Smart Contact Sensor CT3
User Manual

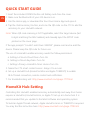
QUICK START GUIDE
1. Insert the included CR2450 button cell battery and close the cover.
2. Make sure the Bluetooth of your iOS device is on.
3. Use the Home app, or download the free Onvis Home App and open it.
4. Tap the ‘Add accessory’ button, and scan the QR code on the CT3 to add the
accessory to your HomeKit network.
Note: When QR code scanning is NOT applicable, select the target device (last
6 digits matching the MAC address), and manually input the SETUP code
printed on the cover page.
If the app prompts “Couldn’t add Onvis-XXXXXX”, please reset and re-add the
device. Please keep the QR code for future use.
The use of a HomeKit-enable accessory needs the follow permissions:
a. Settings>iCloud>iCloud Drive>Turn On
b. Settings>iCloud>Keychain>Turn On
c. Settings>Privacy>HomeKit>Onvis Home>Turn On
5. Name the CT3 smart contact sensor. Assign it to a room.
6. Set up a HomeKit hub (HomePod Mini and Apple TV4K2021) to enable
BLE+Thread connection, remote control and notification.
7. For troubleshooting visit: http://www.onvistech.com/page-1717.html
HomeKit Hub Setting
EN
Controlling this HomeKit-enabled accessory automatically and away from home
requires a HomePod, HomePod mini, or Apple TV set up as a home hub. It is
recommended that you update to the latest software and operating system.
To build an Apple Thread network, Apple HomePod mini or TV4K2021 is required.
You may find the instruction here: http://www.onvistech.com/page-1718.html

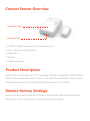
Contact Sensor Overview
•
THREAD: Stable connection and instant response
• Door / Window contact sensor
• Notification
• Records
• Flexible deploying
Restore Factory Settings
Insert a pin and press the button for about 10 seconds. After the LED indicator
blinks green 3 times, the device is restored to factory settings.
Product Description
Onvis Smart Contact Sensor CT3 is an Apple HomeKit compatible Thread+BLE5.0
button battery powered contact sensor. It monitors the open/close status of your
door/window, sends you notifications and shows the on/off records.
Indicator Light
Reset Button

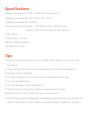
Specifications
Wireless connection: Thread + Bluetooth Low Energy 5.0
Operating temperature: 14~113(-10~45)
Operating humidity: 5%~95% RH
Dimensions(L×W×H)Sensor--1.18*1.81*0.59 inch (30*46*15mm)
Magnet--0.47*1.02*0.41 inch (12*26*10.5mm)
Color: White
Usage: Indoor use only
Battery: CR2450 650mAh
Standby time: 1 year
Tips
1. Align the magnet and sensor at the contact marks. Make sure the gap is less
than 20mm.
2. Clean and dry the target surface before putting CT3 and the magnet on.
3. Keep the setup code label.
4. To replace battery, pry CT3 open with a metal at the button side.
5. Do not clean with liquid.
6. Do not attempt to repair the product.
7. Keep the product away from children under the age of three.
8. Keep the Onvis CT3 in clean, dry, indoor environment.
9. Be sure the product is adequately ventilated, is positioned securely, and do not
place it near other sources of heat (e.g. direct sunlight, radiators, or similar).

FAQ
1. Why did I fail to set up my Onvis Smart Contact Sensor CT3 to Onvis Home app?
(1) Make sure Bluetooth is enabled in your iOS device.
(2) Make sure your CT3 is within connecting range of your iOS device.
(3) Before set up, reset the device by long pressing the button for about 10 seconds
until green LED blinks 3 times.
(4) Scan the setup code on the device, instruction manual or inner packaging.
(5) If the app prompts ”couldn’t add the device” after scanning the setup code:
a. remove this CT3 that was added before and close the app;
b. restore the accessory to factory settings;
c. add the accessory again;
d. update the device firmware to the latest version.
2. No Response
(1)Please check the battery level. Make sure the battery level is higher than 5%.
(2) If CT3 is under BLE5.0 connection, the range is limited to BLE range only. So
if BLE connection is poor, please consider setting up a Thread network for CT3.
(3) If the connection of CT3 and the Thread network is too weak, try putting a
Thread router to improve the Thread connection.
3. Firmware Update
(1) A red dot on the CT3 icon in the Onvis Home app means a newer firmware is
available.
(2) Tap the CT3 icon to enter main page, and then tap the upper right to enter details.
(3)Follow the app prompting to complete firmware update. Do not quit the app
during firmware update. Wait about 20 seconds for CT3 to reboot and reconnect.

SCHNELLSTARTANLEITUNG
1. Legen Sie die mitgelieferte 1 Knopfzelle CR2450 ein und schließen Sie die Abdeckung.
2. Vergewissern Sie sich, dass die Bluetooth-Funktion Ihres iOS-Geräts eingeschaltet ist.
3. Verwenden Sie die Home App, oder laden Sie die kostenlose Onvis Home App herunter
und öffnen Sie sie.
4. Tippen Sie auf die Schaltfläche "Zubehör hinzufügen", und scannen Sie den QR-Code auf
dem CT3, um das Zubehör zu Ihrem HomeKit-Netzwerk hinzuzufügen.
Hinweis: Wenn das Scannen des QR-Codes NICHT anwendbar ist, wählen Sie das Zielgerät
aus (die letzten 6 Ziffern stimmen mit der MAC-Adresse überein), und geben Sie
den auf dem Deckblatt aufgedruckten SETUP-Code manuell ein.
Wenn die App die Meldung "Onvis-XXXXXX konnte nicht hinzugefügt werden" anzeigt,
setzen Sie das Gerät bitte zurück und fügen es erneut hinzu. Bitte bewahren Sie den
QR-Code zur späteren Verwendung auf.
Die Verwendung eines HomeKit-fähigen Zubehörs erfordert die folgenden Berechtigungen:
a. Einstellungen>iCloud>iCloud Drive>Einschalten
b. Einstellungen>iCloud>Schlüsselbund>Einschalten
c. Einstellungen>Datenschutz>HomeKit>Onvis Home>Einschalten
5. Benennen Sie den intelligenten Kontaktsensor CT3. Weisen Sie ihn einem Raum zu.
6. Richten Sie einen HomeKit-Hub ein (HomePod Mini und Apple TV4K2021), um BLE +
Thread-Verbindung, Fernsteuerung und Benachrichtigung zu aktivieren.
7. Informationen zur Fehlerbehebung finden Sie unter:
http://www.onvistech.com/page-1717.html
Um dieses HomeKit-fähige Zubehör automatisch und von unterwegs aus zu steuern, ist ein
HomePod, HomePod mini oder Apple TV erforderlich, der als Home-Hub eingerichtet ist.
Es wird empfohlen, dass Sie auf die neueste Software und das neueste Betriebssystem
aktualisieren.
Für den Aufbau eines Apple-Thread-Netzwerks ist ein Apple HomePod mini oder
TV4K2021 erforderlich.
Die Anleitung dazu finden Sie hier:http://www.onvistech.com/page-1718.html
HomeKit-Hub-Einstellung
DE

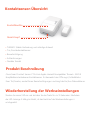
Kontaktsensor-Übersicht
• THREAD: Stabile Verbindung und sofortige Antwort
• Tür-/Fensterkontaktsensor
• Benachrichtigung
• Aufzeichnungen
• Flexibler Einsatz
Wiederherstellung der Werkseinstellungen
Stecken Sie einen Stift ein und drücken Sie die Taste für ca. 10 Sekunden. Nachdem
die LED-Anzeige 3 Mal grün blinkt, ist das Gerät auf die Werkseinstellungen z
urückgesetzt.
Produkt Beschreibung
Onvis Smart Contact Sensor CT3 ist ein Apple HomeKit kompatibler Thread + BLE5.0
Knopfbatterie betriebener Kontaktsensor. Er überwacht den Öffnungs-/Schließstatus
Ihrer Tür/Fenster, sendet Ihnen Benachrichtigungen und zeigt die Ein/Aus-Datensätze an.
Kontrollleuchte
Reset-Knopf

Spezifikationen
Drahtlose Verbindung: Thread + Bluetooth Low Energy 5.0
Betriebstemperatur: 14~113(-10~45)
Luftfeuchtigkeit bei Betrieb: 5%~95% RH
Abmessungen (L×B×H): Sensor--1.18*1.81*0.59 Zoll (30*46*15mm)
Magnet--0.47*1.02*0.41 Zoll (12*26*10.5mm)
Farbe: Weiß
Verwendung: Nur für den Innenbereich
Batterie: CR2450 650mAh
Standby-Zeit: 1 Jahr
Tipps
1. Richten Sie den Magneten und den Sensor an den Kontaktmarkierungen aus. Stellen
Sie sicher, dass der Abstand weniger als 20 mm beträgt.
2. Reinigen und trocknen Sie die Oberfläche des Messobjekts, bevor Sie CT3 und den
Magneten anbringen.
3. Bewahren Sie das Etikett mit dem Einrichtungscode auf.
4. Zum Auswechseln der Batterie CT3 mit einem Metallstück an der Knopfseite aufhebeln.
5. Nicht mit Flüssigkeit reinigen.
6. Versuchen Sie nicht, das Produkt zu reparieren.
7. Halten Sie das Produkt von Kindern unter drei Jahren fern.
8. Bewahren Sie den Onvis CT3 in sauberen, trockenen Räumen auf.
9. Achten Sie darauf, dass das Gerät ausreichend belüftet und sicher aufgestellt ist, und
stellen Sie es nicht in der Nähe anderer Wärmequellen auf (z. B. direktes Sonnenlicht,
Heizkörper o. Ä.).

FAQ
1. Warum konnte ich meinen Onvis Smart Contact Sensor CT3 nicht mit der Onvis Home
App einrichten?
(1) Stellen Sie sicher, dass Bluetooth auf Ihrem iOS-Gerät aktiviert ist.
(2) Vergewissern Sie sich, dass sich Ihr CT3 innerhalb des Verbindungsbereichs Ihres iOS-
Geräts befindet.
(3) Setzen Sie das Gerät vor der Einrichtung zurück, indem Sie die Taste etwa 10 Sekunden
lang drücken, bis die grüne LED dreimal blinkt.
(4) Scannen Sie den Einrichtungscode auf dem Gerät, der Bedienungsanleitung oder der
inneren Verpackung.
(5) Wenn die App nach dem Scannen des Einrichtungscodes die Meldung "Das Gerät konnte
nicht hinzugefügt werden" ausgibt:
a. Entfernen Sie das zuvor hinzugefügte CT3 und schließen Sie die App;
b. Setzen Sie das Zubehör auf die Werkseinstellungen zurück;
c. Fügen Sie das Zubehör erneut hinzu;
d. Aktualisieren Sie die Gerätefirmware auf die neueste Version.
2. Keine Antwort.
(1) Bitte prüfen Sie den Batteriestand. Stellen Sie sicher, dass der Batteriestand höher als 5% ist.
(2) Wenn CT3 mit BLE5.0 verbunden ist, ist die Reichweite nur auf den BLE-Bereich beschränkt.
Wenn die BLE-Verbindung schlecht ist, sollten Sie ein Thread-Netzwerk für CT3 einrichten.
(3) Wenn die Verbindung zwischen CT3 und dem Thread-Netzwerk zu schwach ist, versuchen
Sie einen Thread-Router einzusetzen, um die Thread-Verbindung zu verbessern.
3. Firmware-Update.
(1) Ein roter Punkt auf dem CT3-Symbol in der Onvis Home App bedeutet, dass eine neuere
Firmware verfügbar ist.
(2) Tippen Sie auf das CT3-Symbol, um die Hauptseite aufzurufen, und tippen Sie dann auf die
obere rechte Seite, um Details einzugeben.
(3) Folgen Sie den Aufforderungen der App, um das Firmware-Update abzuschließen.
Beenden Sie die App nicht während des Firmware-Updates. Warten Sie etwa 20 Sekunden,
bis das CT3 neu gestartet und wieder verbunden ist.

GUIDE DE DÉMARRAGE RAPIDE
1. Insérez la pile bouton CR2450 fournie et fermez le couvercle.
2. Assurez-vous que le Bluetooth de votre appareil iOS est activé.
3. Utilisez l'application Home, ou téléchargez l'application gratuite Onvis Home App et
ouvrez-la.
4. Appuyez sur le bouton " Ajouter un accessoire ", et scannez le code QR sur le CT3 pour
ajouter l'accessoire à votre réseau HomeKit.
Remarque: lorsque le scan du code QR n'est PAS applicable, sélectionnez l'appareil cible
(les 6 derniers chiffres correspondant à l'adresse MAC), et saisissez manuellement le code
SETUP imprimé sur la page de couverture.
Si l'application affiche le message "Couldn't add Onvis-XXXXXX", réinitialisez et ajoutez à
nouveau l'appareil. Veuillez conserver le code QR pour une utilisation ultérieure.
L'utilisation d'un accessoire compatible HomeKit nécessite les autorisations suivantes :
a. Paramètres>iCloud>iCloud Drive>Mettre en marche
b. Paramètres>iCloud>Keychain>Activer
c. Paramètres>Privacy>HomeKit>Onvis Home>Activer
5.Nommez le capteur de contact intelligent CT3. Attribuez-le à une pièce.
6. Configurez un hub HomeKit (HomePod Mini et Apple TV4K2021) pour activer la
connexion BLE + fil, la télécommande et la notification.
7. Pour le dépannage, visitez: http://www.onvis
tech.com/page-1717.html
Le contrôle de cet accessoire compatible HomeKit de manière automatique et en
dehors de la maison nécessite un HomePod, un HomePod mini ou une Apple TV
configurée comme un hub domestique. Il est recommandé d'effectuer une mise à jour
vers les derniers logiciels et systèmes d'exploitation.
Pour construire un réseau Apple Thread, Apple HomePod mini ou TV4K2021 est
nécessaire.
Vous pouvez trouver l'instruction ici: http://www.onvistech.com/page-1718.html
Réglage du hub HomeKit
FR

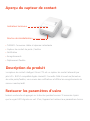
Aperçu du capteur de contact
• THREAD: Connexion stable et réponse instantanée
• Capteur de contact de porte / fenêtre
• Notification
• Enregistrements
• Déploiement flexible
Restaurer les paramètres d'usine
I
nsérez une broche et appuyez sur le bouton pendant environ 10 secondes. Après
que le voyant LED clignote en vert 3 fois, l'appareil est restauré aux paramètres d'usine.
Description du produit
Le capteur de contact intelligent Onvis CT3 est un capteur de contact alimenté par
pile à fil + BLE5.0 compatible Apple HomeKit. Il surveille l'état d'ouverture/fermeture
de votre porte/fenêtre, vous envoie des notifications et affiche les enregistrements de
mise en marche/arrêt.
Indicateur lumineux
Bouton de réinitialisation

Spécifications
Connexion sans fil : Thread + Bluetooth Low Energy 5.0
Température de fonctionnement : 14~113(-10~45)
Humidité de fonctionnement : 5%~95% RH
Dimensions (L×W×H) : Capteur--1,18*1,81*0,59 pouce (30*46*15mm)
Aimant--0,47*1,02*0,41 pouce (12*26*10,5mm)
Couleur : Blanc
Utilisation : Utilisation en intérieur uniquement
Pile : Pile bouton CR2450, 650mAh
Autonomie en veille : 1 an
Conseils
1. Alignez l'aimant et le capteur au niveau des marques de contact. Assurez-vous que
l'écart est inférieur à 20mm.
2. Nettoyez et séchez la surface de la cible avant de mettre le CT3 et l'aimant.
3. Conserver l'étiquette du code de configuration.
4. Pour remplacer la pile, ouvrez le CT3 en faisant levier avec un métal du côté du bouton.
5. Ne pas nettoyer avec un liquide.
6. Ne pas essayer de réparer le produit.
7. Gardez le produit hors de portée des enfants de moins de trois ans.
8. Conservez l'Onvis CT3 dans un environnement intérieur propre et sec.
9. Assurez-vous que le produit est correctement ventilé, qu'il est positionné de manière
sûre et ne le placez pas à proximité d'autres sources de chaleur (par exemple, lumière
directe du soleil, radiateurs ou autres).

FAQ
1. Pourquoi n'ai-je pas réussi à configurer mon détecteur de contact intelligent Onvis
CT3 avec l'application Onvis Home ?
(1) Assurez-vous que la fonction Bluetooth est activée sur votre appareil iOS.
(2) Assurez-vous que votre CT3 est à portée de connexion de votre appareil iOS.
(3) Avant la configuration, réinitialisez l'appareil en appuyant longuement sur le bouton
pendant environ 10 secondes jusqu'à ce que la LED verte clignote 3 fois.
(4) Scannez le code de configuration sur l'appareil, le manuel d'instructions ou l'emballage
intérieur.
(5) Si l'application demande "impossible d'ajouter l'appareil" après avoir scanné le code de
configuration :
a. supprimez ce CT3 qui a été ajouté auparavant et fermez l'appli ;
b. rétablissez les paramètres d'usine de l'accessoire ;
c. ajoutez à nouveau l'accessoire ;
d. mettez à jour le micrologiciel de l'appareil avec la dernière version.
2. Pas de réponse.
(1) Veuillez vérifier le niveau de la batterie. Assurez-vous que le niveau de la batterie est
supérieur à 5%.
(2) Si CT3 est sous connexion BLE5.0, la portée est limitée à la portée BLE uniquement.
Donc, si la connexion BLE est faible, veuillez envisager de mettre en place un réseau
Thread pour le CT3.
(3) Si la connexion du CT3 et du réseau Thread est trop faible, essayez de mettre un routeur
Thread pour améliorer la connexion Thread.
3. Mise à jour du firmware.
(1) Un point rouge sur l'icône du CT3 dans l'appli Onvis Home signifie qu'un firmware plus
récent est disponible.
(2) Appuyez sur l'icône CT3 pour accéder à la page principale, puis appuyez en haut à
droite pour entrer les détails.
(3) Suivez les instructions de l'application pour terminer la mise à jour du micrologiciel.
Ne quittez pas l'application pendant la mise à jour du firmware. Attendez environ 20
secondes pour que le CT3 redémarre et se reconnecte.

GUIDA RAPIDA
1. Inserire la batteria a bottone CR2450 in dotazione e chiudere il coperchio.
2. Assicurarsi che il Bluetooth del dispositivo iOS sia attivo.
3. Utilizzare l'app Home o scaricare l'app gratuita Onvis Home e aprirla.
4. Toccare il pulsante "Aggiungi accessorio" e scansionare il codice QR sul CT3 per
aggiungere l'accessorio alla rete HomeKit.
Nota: se la scansione del codice QR NON è applicabile, selezionare il dispositivo di
destinazione (le ultime 6 cifre corrispondono all'indirizzo MAC) e inserire manualmente
il codice SETUP stampato sulla copertina.
Se l'app visualizza il messaggio "Impossibile aggiungere Onvis-XXXXXX", ripristinare e
aggiungere nuovamente il dispositivo. Conservare il codice QR per usi futuri.
L'uso di un accessorio compatibile con HomeKit richiede le seguenti autorizzazioni:
a. Impostazioni>iCloud>iCloud Drive>Accendi
b. Impostazioni>iCloud>Portachiavi>Accendi
c. Impostazioni>Privacy>HomeKit>Onvis Home>Attiva
5. Assegnare un nome al sensore di contatto intelligente CT3. Assegnarlo a una stanza.
6. Impostare un hub HomeKit (HomePod Mini e Apple TV4K2021) per abilitare la
connessione BLE + Thread, il controllo remoto e la notifica.
7. Per la risoluzione dei problemi, visitare: http://www.onvistech.com/page-1717.html
Per controllare questo accessorio abilitato a HomeKit in modo automatico e lontano da
casa è necessario un HomePod, un HomePod mini o una Apple TV impostata come
hub domestico. Si consiglia di aggiornare il software e il sistema operativo più recenti.
Per creare una rete Apple Thread, è necessario Apple HomePod mini o TV4K2021.
È possibile trovare le istruzioni qui: http://www.onvistech.com/page-1718.html
Impostazione dell'hub HomeKit
IT

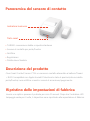
Panoramica del sensore di contatto
•
THREAD: connessione stabile e risposta istantanea
•
Sensore di contatto per porte/finestre
•
Notifiche
•
Registrazioni
•
Distribuzione flessibile
Ripristino delle impostazioni di fabbrica
Inserire uno spillo e premere il pulsante per circa 10 secondi. Dopo che l'indicatore LED
lampeggia verde per 3 volte, il dispositivo viene ripristinato alle impostazioni di fabbrica.
Descrizione del prodotto
Onvis Smart Contact Sensor CT3 è un sensore a contatto alimentato a batteria Thread
+ BLE5.0 compatibile con Apple HomeKit. Monitora lo stato di apertura/chiusura della
porta/finestra, invia notifiche e mostra i record di accensione/spegnimento.
Indicatore luminoso
Tasto reset

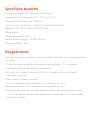
Specifiche tecniche
Connessione wireless: Filo + Bluetooth Low Energy 5.0
Temperatura di funzionamento: 14~113(-10~45)
Umidità di funzionamento: 5%~95% RH
Dimensioni (L×L×H): Sensore--1,18*1,81*0,59 pollici (30*46*15mm)
Magnete--0,47*1,02*0,41 pollici (12*26*10,5 mm)
Colore: Bianco
Utilizzo: Solo per uso interno
Batteria: Batteria a bottone CR2450, 650mAh
Tempo di standby: 1 anno
Suggerimenti:
1Allineare il magnete e il sensore ai segni di contatto. Assicurarsi che lo spazio sia inferiore
a 20 mm.
2. Pulire e asciugare la superficie del target prima di applicare il CT3 e il magnete.
3. Conservare l'etichetta del codice di impostazione.
4. Per sostituire la batteria, fare leva sul CT3 con un metallo sul lato del pulsante.
5. Non pulire con liquidi.
6. Non tentare di riparare il prodotto.
7. Tenere il prodotto lontano dai bambini di età inferiore ai tre anni.
8. Conservare l'Onvis CT3 in un ambiente interno pulito e asciutto.
9. Assicurarsi che il prodotto sia adeguatamente ventilato, che sia posizionato in modo
sicuro e che non sia collocato vicino ad altre fonti di calore (ad es. luce solare diretta,
termosifoni o simili).

FAQ
1. Perché non sono riuscito a configurare il mio Onvis Smart Contact Sensor CT3 sull'app
Onvis Home?
(1) Assicurarsi che il Bluetooth sia abilitato nel dispositivo iOS.
(2) Assicurarsi che il CT3 si trovi nel raggio di connessione del dispositivo iOS.
(3) Prima della configurazione, resettare il dispositivo premendo a lungo il pulsante per circa
10 secondi finché il LED verde non lampeggia 3 volte.
(4) Eseguire la scansione del codice di configurazione sul dispositivo, sul manuale di istruzioni
o sulla confezione interna.
(5) Se dopo la scansione del codice di configurazione l'applicazione richiede "Impossibile
aggiungere il dispositivo":
a. rimuovere il CT3 aggiunto in precedenza e chiudere l'app;
b. ripristinare le impostazioni di fabbrica dell'accessorio;
c. aggiungere nuovamente l'accessorio;
d. aggiornare il firmware del dispositivo alla versione più recente.
2. Nessuna risposta.
(1) Controllare il livello della batteria. Assicurarsi che il livello della batteria sia superiore al 5%.
(2) Se il CT3 è collegato a BLE5.0, la portata è limitata alla sola gamma BLE. Pertanto, se la
connessione BLE è scarsa, si consiglia di impostare una rete Thread per il CT3.
(3) Se la connessione del CT3 e della rete Thread è troppo debole, provare a inserire un
router Thread per migliorare la connessione Thread.
3. Aggiornamento del firmware.
(1) Un punto rosso sull'icona del CT3 nell'app Onvis Home significa che è disponibile un
firmware più recente.
(2) Toccare l'icona CT3 per accedere alla pagina principale, quindi toccare la parte superiore
destra per inserire i dettagli.
(3) Seguire le indicazioni dell'app per completare l'aggiornamento del firmware. Non
abbandonare l'app durante l'aggiornamento del firmware. Attendere circa 20 secondi
affinché il CT3 si riavvii e si ricolleghi.

GUÍA DE INICIO RÁPIDO
1. Introduzca la pila de botón CR2450 incluida y cierre la tapa.
2. Asegúrate de que el Bluetooth de tu dispositivo iOS está activado.
3. Utiliza la aplicación Home, o descarga la aplicación gratuita Onvis Home y ábrela.
4. Toca el botón 'Añadir accesorio', y escanea el código QR del CT3 para añadir el
accesorio a tu red HomeKit.
Nota: Cuando el escaneo del código QR NO es aplicable, seleccione el dispositivo de
destino (los últimos 6 dígitos coinciden con la dirección MAC), e introduzca
manualmente el código de SETUP impreso en la carátula.
Si la aplicación indica "No se ha podido añadir Onvis-XXXXXX", reinicie y vuelva a
añadir el dispositivo. Conserve el código QR para utilizarlo en el futuro.
El uso de un accesorio habilitado para HomeKit necesita los siguientes permisos:
a. Ajustes>iCloud>iCloud Drive>Activar
b. Ajustes>iCloud>Keychain>Activar
c. Ajustes>Privacidad>HomeKit>Onvis Home>Activar
5. Asigne un nombre al sensor de contacto inteligente CT3. Asígnelo a una habitación.
6. Configura un hub HomeKit (HomePod Mini y Apple TV4K2021) para habilitar la
conexión BLE + Thread, el control remoto y las notificaciones.
7. Para la solución de problemas, visite: http://www.onvistech.com/page-1717.html
Para controlar este accesorio habilitado para HomeKit de forma automática y fuera de
casa se necesita un HomePod, un HomePod mini o un Apple TV configurado como
hub doméstico. Se recomienda actualizar a la última versión del software y del sistema
operativo.
Para construir una red de Apple Thread, se requiere Apple HomePod mini o TV4K2021.
Usted puede encontrar la instrucción aquí: http://www.onvistech.com/page-1718.html
Configuración del hub de HomeKit
ES

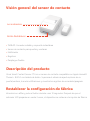
Visión general del sensor de contacto
•
THREAD: Conexión estable y respuesta instantánea
•
Sensor de contacto para puertas y ventanas
•
Notificación
•
Registros
•
Despliegue flexible
Restablecer la configuración de fábrica
Introduzca un alfiler y pulse el botón durante unos 10 segundos. Después de que el
indicador LED parpadee en verde 3 veces, el dispositivo se restaura a los ajustes de fábrica.
Descripción del producto
Onvis Smart Contact Sensor CT3 es un sensor de contacto compatible con Apple HomeKit
Thread + BLE5.0 con batería de botón. Supervisa el estado de apertura/cierre de su
puerta/ventana, le envía notificaciones y muestra los registros de encendido/apagado.
Luz indicadora
Botón Restablecer

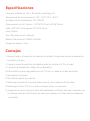
Especificaciones
Conexión inalámbrica: Hilo + Bluetooth Low Energy 5.0
Temperatura de funcionamiento: 14~113(-10~45)
Humedad de funcionamiento: 5%~95% RH
Dimensiones(L×A×H): Sensor--1.18*1.81*0.59 inch (30*46*15mm)
Imán: 0,47*1,02*0,41 pulgadas (12*26*10,5mm)
Color: Blanco
Uso: Sólo para uso en interiores
Batería: Pila de botón CR2450, 650mAh
Tiempo de espera: 1 año
Consejos
1. Alinee el imán y el sensor en las marcas de contacto. Asegúrese de que la separación
es inferior a 20 mm.
2. Limpie y seque la superficie del objetivo antes de colocar el CT3 y el imán.
3. Conserve la etiqueta del código de configuración.
4. Para sustituir la pila, haga palanca en el CT3 con un metal en el lado del botón.
5. No limpiar con líquido.
6. No intente reparar el producto.
7. Mantenga el producto fuera del alcance de los niños menores de tres años.
8. Mantenga el Onvis CT3 en un entorno limpio, seco y en interiores.
9. Asegúrese de que el producto esté adecuadamente ventilado, esté bien colocado y no
lo coloque cerca de otras fuentes de calor (por ejemplo, luz solar directa, radiadores
o similares).
La pagina si sta caricando...
La pagina si sta caricando...
La pagina si sta caricando...
La pagina si sta caricando...
-
 1
1
-
 2
2
-
 3
3
-
 4
4
-
 5
5
-
 6
6
-
 7
7
-
 8
8
-
 9
9
-
 10
10
-
 11
11
-
 12
12
-
 13
13
-
 14
14
-
 15
15
-
 16
16
-
 17
17
-
 18
18
-
 19
19
-
 20
20
-
 21
21
-
 22
22
-
 23
23
-
 24
24


Onvis CT3 Smart Contact Sensor Manuale utente
- Tipo
- Manuale utente
in altre lingue
Documenti correlati


Altri documenti
-
Aqara CHC01 Manuale utente
-
Aqara CH-H01 Manuale utente
-
Aqara G2H Manuale utente
-
Bticino XM8002 Istruzioni per l'uso
-
-
-
Aqara Hub M2 Guida utente
-
TMby Aqara Guida utente
-
 Aqara HM1S-G01 для умного дома M1S Manuale utente
-
Aqara Hub Guida utente
