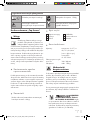
LIVARNO 385276 Manuale del proprietario
- Categoria
- Supporti per altoparlanti
- Tipo
- Manuale del proprietario

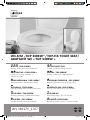
WC-SITZ „TOP SCREW“ / TOP-FIX TOILET SEAT /
ABATTANT WC « TOP SCREW »
IAN 385276_2107
WC-SITZ „TOP SCREW“
Montage-, Bedienungs- und Sicherheitshinweise
ASIENTO DE WC «TOP SCREW»
Instrucciones de montaje, de uso y de seguridad
TOILETSÆDE “TOP SCREW″
Monterings-, betjenings- og sikkerhedshenvisninger
DESKA SEDESOWA „TOP SCREW“
Wskazówki montażu, obsługi i bezpieczeństwa
ABATTANT WC « TOP SCREW »
Instructions de montage, d‘utilisation et
consignes de sécurité
WC-BRIL “TOP SCREW”
Montage-, bedienings- en veiligheidsinstructies
ZÁCHODOVÉ SEDÁTKO „TOP SCREW“
Pokyny k montáži, obsluze a bezpečnostní pokyny
WC DOSKA „TOP SCREW“
Pokyny pre montáž, obsluhu a bezpečnostné pokyny
TOP-FIX TOILET SEAT
Assembly, operating and safety instructions
ASSE PER WC
Istruzioni di montaggio, d’uso e di sicurezza
WC-SEDEŽ »TOP SCREW«
Navodila za montažo, uporabo in varnostna navodila
WC-ÜLŐKE „TOP SCREW“
Szerelési, használati és biztonsági tudnivalók
385276_2107_V1.0_liv_WC_Sitz_cover_OS.indd 2385276_2107_V1.0_liv_WC_Sitz_cover_OS.indd 2 15.12.21 18:1715.12.21 18:17

DE / AT / CH Montage-, Bedienungs- und Sicherheitshinweise Seite 5
GB / IE Assembly, operating and safety instructions Page 9
FR / BE Instructions de montage, d‘utilisation et consignes de sécurité Page 13
NL / BE Montage-, bedienings- en veiligheidsinstructies Pagina 17
PL Wskazówki montażu, obsługi i bezpieczeństwa Strona 21
CZ Pokyny k montáži, obsluze a bezpečnostní pokyny Strana 25
SK Pokyny pre montáž, obsluhu a bezpečnostné pokyny Strana 29
ES Instrucciones de montaje, de uso y de seguridad Página 33
DK Monterings-, betjenings- og sikkerhedshenvisninger Side 37
IT Istruzioni di montaggio, d’uso e di sicurezza Pagina 41
HU Szerelési, használati és biztonsági tudnivalók Oldal 45
SI Navodila za montažo, uporabo in varnostna navodila Stran 49
Klappen Sie vor dem Lesen die Seite mit den Abbildungen aus und machen Sie sich anschließend mit allen Funktionen
des Gerätes vertraut.
Before reading, unfold the page containing the illustrations and familiarise yourself with all functions of the device.
Avant de lire le mode d‘emploi, ouvrez la page contenant les illustrations et familiarisez-vous ensuite avec toutes
les fonctions de l‘appareil.
Vouw vóór het lezen de pagina met de afbeeldingen open en maak u vertrouwd met alle functies van het apparaat.
Przed przeczytaniem proszę rozłożyć stronę z ilustracjami, a następnie proszę zapoznać się z wszystkimi funkcjami
urządzenia.
Před čtením si otevřete stranu s obrázky a potom se seznamte se všemi funkcemi přístroje.
Pred čítaním si odklopte stranu s obrázkami a potom sa oboznámte so všetkými funkciami prístroja.
Antes de empezar a leer abra la página que contiene las imágenes y, en seguida, familiarícese con todas las
funciones del dispositivo.
Før du læser, vend siden med billeder frem og bliv bekendt med alle apparatets funktioner.
Prima di leggere aprire la pagina con le immagini e prendere confidenza con le diverse funzioni dell’apparecchio.
Olvasás előtt kattintson az ábrát tartalmazó oldalra és végezetül ismerje meg a készülék mindegyik funkcióját.
Pred branjem odprite stran s slikami in se nato seznanite z vsemi funkcijami naprave.
385276_2107_V1.0_liv_WC_Sitz_cover_OS.indd 3385276_2107_V1.0_liv_WC_Sitz_cover_OS.indd 3 15.12.21 18:1715.12.21 18:17

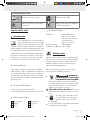
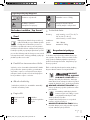
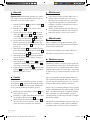
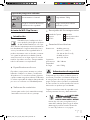
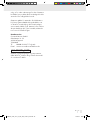
1
Sie benötigen · You need · Il vous faut
U hebt nodig · Wymagane · Potřebujete
Potrebujete · Necesita · Du skal bruge
Ecco cosa serve · Szükséges szerszámok
Potrebujete:
A B
1 2
3
4
5
C D
13
E F G
6
385276_2107_V1.0_liv_WC_Sitz_cover_OS.indd 4385276_2107_V1.0_liv_WC_Sitz_cover_OS.indd 4 15.12.21 18:1715.12.21 18:17

5 DE/AT/CH
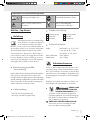
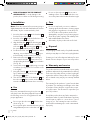
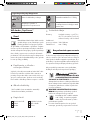
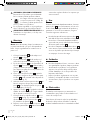
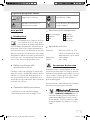
Legende der verwendeten Piktogramme
Anleitung voll ständig lesen! Max.
150
kg
Maximale Belastbarkeit 150 kg
Warn- und Sicherheitshinweise
beachten! Lebens- und Unfallgefahr
für Kleinkinder und Kinder!
WC-Sitz „Top Screw“
Einleitung
Wir beglückwünschen Sie zum Kauf Ihres
neuen Produkts. Sie haben sich damit für
ein hochwertiges Produkt entschieden.
Machen Sie sich vor der ersten Inbetriebnahme mit
dem Produkt vertraut. Lesen Sie hierzu aufmerksam
die nachfolgende Bedienungsanleitung und die
Sicherheitshinweise. Benutzen Sie das Produkt nur
wie beschrieben und für die angegebenen Einsatz-
bereiche. Bewahren Sie diese Anleitung an einem
sicheren Ort auf. Händigen Sie alle Unterlagen bei
Weitergabe des Produktes an Dritte mit aus.
Bestimmungsgemäße
Verwendung
Das Produkt ist für die Montage auf handelsüblichen
WCs geeignet. Jede andere Verwendung oder
Veränderung des Produktes gilt als nicht bestimmungs-
gemäß und birgt Unfallgefahren. Der Hersteller haftet
nicht für Schäden, die durch nicht bestimmungsge-
mäßen Gebrauch verursacht werden.
Lieferumfang
1 WC-Sitz (inkl. Montagematerial)
1 Montage- und Bedienungsanleitung
Teilebeschreibung
1 Befestigungsstift
2 Halterung
3 Schraube
4 Unterlegscheibe
5 WC-Sitz
6 Sichtblende
Technische Daten
Maße: Außenmaße: ca. 37,3 x 42,7
x 2,8–4,4 cm (B x T x H),
Innenmaße: ca. 22–28 cm
Bohrlochabstand: 108–180 mm
Belastbarkeit: max. 150 kg
Sicherheitshinweise
Prüfen Sie das Produkt nach Lieferung und vor der
ersten Benutzung, um den Zustand und die Funktion
aller Teile festzustellen. Verwenden Sie das Produkt
keinesfalls wenn es beschädigt ist. Andernfalls droht
Verletzungsgefahr. Verwenden Sie kein beschädigtes
Produkt.
Beachten Sie folgende Sicherheitsvorschriften, um
Verletzungen und Sachschäden zu vermeiden:
LEBENS- UND
UNFALLGEFAHR FÜR KLEIN-
KINDER UND KINDER! Lassen
Sie Kinder niemals unbeaufsichtigt mit dem
Verpackungsmaterial. Es besteht Erstickungsge-
fahr. Halten Sie das Produkt von Kindern fern.
Das Produkt ist kein Spielzeug.
VORSICHT! VERLETZUNGSGEFAHR!
Verwenden Sie kein beschädigtes Produkt.
Ansonsten droht Verletzungsgefahr.
V1.0
385276_2107_V1.0_liv_WC_Sitz_content_OS.indd 5385276_2107_V1.0_liv_WC_Sitz_content_OS.indd 5 15.12.21 18:2215.12.21 18:22

6 DE/AT/CH
Max.
150
kg
Belasten Sie den WC-Sitz nicht über
150 kg. Andernfalls kann es zu Ver-
letzungen und / oder Beschädigungen
des Produkts kommen.
Stellen Sie sich zu Ihrer eigenen Sicherheit nicht
auf das Produkt, da es dadurch auseinander-
brechen könnte.
GEFAHR DER SACHBESCHÄDIGUNG!
Lassen Sie das Produkt während der Montage
nicht fallen, um Beschädigungen am Produkt
zu vermeiden.
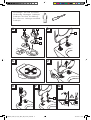
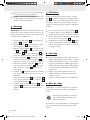
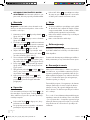
Montage
Hinweis: Reinigen Sie die Keramik vor der Montage
mit einem angefeuchteten Tuch und etwas Badreiniger.
Trocknen Sie die Keramik anschließend mit einem
trockenen Tuch ab.
1. Setzen Sie die Unterlegscheibe 4 von unten
in die Halterung 2 ein (siehe Abb. A).
2. Stecken Sie die Schraube 3 von oben in die
Bohrlöcher der Keramik ein (siehe Abb. A).
3. Richten Sie die beiden Halterungen 2 mit den
Befestigungsstiften 1 und den Schrauben 3
auf beiden Seiten aus und setzen Sie den WC-
Sitz 5 mit den dafür vorgesehenen Öffnungen
auf die Befestigungsstifte 2 (siehe Abb. B).
4. Schließen Sie den WC-Sitz 5 und richten Sie
ihn aus. Achten Sie beim Ausrichten darauf, dass
der WC-Sitz 5 mittig auf der Keramik sitzt
(siehe Abb. C).
5.
Entfernen Sie den WC-Sitz
5
wieder. Achten Sie
darauf, dass dabei die Position der Halterung
2
nicht verrutscht, indem Sie die Halterung 2
mit dem Daumen fixieren (siehe Abb. D).
6. Schrauben Sie die Schrauben 3 mithilfe eines
Kreuzschlitzschraubendrehers fest (siehe Abb. E).
Achten Sie darauf, die Schrauben nicht zu fest
anzuziehen.
7.
Setzen Sie nun die Sichtblenden
6
auf die
Halterungen
2
(siehe Abb. F)
und setzen Sie
anschließend den WC-Sitz 5 wieder auf die
Befestigungs stifte 1.
8. Prüfen Sie anschließend den Sitz der Halterungen
2 und des WC-Sitzes 5. Führen Sie diese
Kontrolle in regelmäßigen Abständen durch.
Nehmen Sie ggf. Nachjustierungen vor.
Anwendung
Durch die Absenkautomatik wird der WC-Sitz 5
nach Antippen automatisch langsam abgesenkt.
Bitte beachten Sie für eine lange Lebensdauer des
Produktes und einwandfreie Anwendung folgende
Hinweise:
Klappen Sie den Deckel des WC-Sitzes 5
nicht weiter als in Abb. G gezeigt auf.
Beschleunigen Sie die Absenkautomatik nicht
durch zusätzliche Druckausübung auf den
Deckel des WC-Sitzes 5.
Verwenden Sie den Deckel des WC-Sitzes 5
nicht als Sitz- oder Trittfläche. Durch Spannungen
im Kunststoff kann der Deckel bei Belastung
brechen.
Pflege
Verwenden Sie zur Reinigung des Produkts keine
scharfen, ätzenden oder scheuernden Reinigungs-
mittel, Desinfektionsmittel oder Reinigungsmittel
mit aggressiven Zusätzen. Die Oberfläche des
Produkts kann durch Einsatz von falschen Reini-
gungsmitteln beschädigt werden.
Reinigen Sie das Produkt regelmäßig mit einem
feuchten Tuch und handelsüblichen Badreiniger.
Trocknen Sie anschließend das Produkt mit einem
weichen Tuch.
Entsorgung
Die Verpackung besteht aus umweltfreundlichen
Materialien. Entsorgen Sie diese in den örtlichen
Recyclingbehältern.
Möglichkeiten zur Entsorgung des ausgedienten
Produkts erfahren Sie bei Ihrer Gemeinde- oder
Stadtverwaltung.
385276_2107_V1.0_liv_WC_Sitz_content_OS.indd 6385276_2107_V1.0_liv_WC_Sitz_content_OS.indd 6 15.12.21 18:2215.12.21 18:22

7 DE/AT/CH
Garantie und Service
Das Produkt wurde nach strengen Qualitätsrichtlinien
sorgfältig produziert und vor Anlieferung gewissen-
haft geprüft. Im Falle von Mängeln dieses Produkts
stehen Ihnen gegen den Verkäufer des Produkts
gesetzliche Rechte zu. Diese gesetzlichen Rechte
werden durch unsere im Folgenden dargestellte
Garantie nicht eingeschränkt.
Sie erhalten auf dieses Produkt 3 Jahre Garantie
ab Kaufdatum. Die Garantiefrist beginnt mit dem
Kaufdatum. Bitte bewahren Sie den Original-Kassenbon
gut auf. Diese Unterlage wird als Nachweis für den
Kauf benötigt.
Tritt innerhalb von 3 Jahren ab dem Kaufdatum dieses
Produkts ein Material- oder Fabrikationsfehler auf,
wird das Produkt von uns – nach unserer Wahl – für
Sie kostenlos repariert oder ersetzt. Diese Garantie
verfällt, wenn das Produkt beschädigt, nicht sach-
gemäß benutzt oder gewartet wurde.
Die Garantieleistung gilt für Material- oder Fabrika-
tionsfehler. Diese Garantie erstreckt sich nicht auf
Produktteile, die normaler Abnutzung ausgesetzt
sind (z. B. Batterien) und daher als Verschleißteile
angesehen werden können oder Beschädigungen
an zerbrechlichen Teilen, z. B. Schalter, Akkus oder
die aus Glas gefertigt sind.
Kundenservice
Conmetall Meister GmbH
Oberkamper Str. 39
42349 Wuppertal
DEUTSCHLAND
Tel.: 0202 24750 430 / 431 / 432
(Gesprächskosten entsprechend dem
Festnetztarif Ihres Telefonanbieters)
Tel.: +800 34 99 67 53 (aus dem Ausland)
E-Mail: meister-service@conmetallmeister.de
IAN 385276_2107
Bitte halten Sie für alle Anfragen den Kassenbon
und die Artikelnummer (IAN 385276_2107) als
Nachweis für den Kauf bereit.
385276_2107_V1.0_liv_WC_Sitz_content_OS.indd 7385276_2107_V1.0_liv_WC_Sitz_content_OS.indd 7 15.12.21 18:2215.12.21 18:22

9 GB/IE
List of pictograms used
Read the instructions in full! Max.
150
kg
Maximum load 150 kg
Observe the warnings and safety
information! Danger to life and risk of accidents
for infants and children!
Top-Fix toilet seat
Introduction
We congratulate you on the purchase of
your new product. You have chosen a high
quality product. Familiarise yourself with
the product before using it for the first time. In addition,
please carefully refer to the operating instructions and
the safety advice below. Only use the product as in-
structed and only for the indicated field of application.
Keep these instructions in a safe place. If you pass
the product on to anyone else, please ensure that
you also pass on all the documentation with it.
Intended use
The product is suitable for mounting on standard
toilets. All other usages or modifications of the product
are regarded as being contrary to the operating in-
structions and carry with them a real risk of accidents.
The manufacturer is not liable for damage caused
by improper use.
Scope of delivery
1 toilet seat (incl. mounting material)
1 set of assembly instructions and instructions for use
Parts description
1 Mounting pin
2 Bracket
3 Screw
4 Plain washer
5 Toilet seat
6 Lid
Technical data
Dimensions: outside dimensions:
approx. 37.3 x 42.7 x
2.8‒4.4 cm (w x h x d),
inside dimensions:
approx. 22–28 cm
Drill hole spacing: 108‒180 mm
Load-bearing capacity: max. 150 kg
Safety notes
Check the product after it has been delivered and
before first use to ascertain the condition and func-
tionality of all parts. Never use the product if it is
damaged. Otherwise, there is the risk of injury.
Never use a damaged product.
Observe the following safety notes in order to
avoid injuries and damage to property:
DANGER TO
LIFE AND RISK OF ACCIDENTS
FOR INFANTS AND CHILDREN!
Never leave children unsupervised with the
packaging material. There is a danger of suffo-
cation. Keep this product out of the reach of
children. This product is not a toy.
CAUTION! RISK OF INJURY! Never use a
damaged product. Otherwise there is a risk of
injury.
Max.
150
kg
The load on the toilet seat must not
exceed 150 kg. The product may
otherwise cause injuries and / or
be damaged.
For your own safety, do not stand on the product
as this may cause it to break.
385276_2107_V1.0_liv_WC_Sitz_content_OS.indd 9385276_2107_V1.0_liv_WC_Sitz_content_OS.indd 9 15.12.21 18:2215.12.21 18:22

10 GB/IE
RISK OF DAMAGE TO THE PRODUCT
OR PROPERTY! To avoid damage to the
product, do not allow it to fall during mounting.
Installation
Note: Clean the ceramic before mounting using a
slightly dampened cloth and a little bathroom cleaner.
Afterwards, dry the ceramic with a dry cloth.
1. Insert the plain washer 4 into the bracket 2
from below (see fig. A).
2. Insert the screw 3 into the drilled holes in the
ceramic from above (see fig. A).
3. Align both brackets 2 with the mounting pins 1
and the screws 3 on both sides and place the
toilet seat 5 on the mounting pins 2 using
the openings provided (see fig. B).
4. Put down the toilet seat 5 and adjust it. When
adjusting, ensure that the toilet seat 5 is posi-
tioned centrally on the ceramic (see fig. C).
5. Remove the toilet seat 5 again. In doing so,
ensure that the bracket 2 position does not
slip by holding the bracket 2 with your thumbs
(see fig. D).
6. Screw in the screws 3 in tightly using a cross-tip
screwdriver (see fig. E). Do not screw the screws
in too tightly.
7. Now place the lid 6 on the brackets 2 (see
fig. F) and then place the toilet seat 5 on the
mounting pin 1 again.
8. Then check the position of the brackets 2 and
the toilet seat 5. Carry out this check at regular
intervals. Make readjustments where necessary.
Use
Due to the automated lowering, the toilet seat 5
will slowly lower after being tapped. Please read
the following notices for a long product life and
proper application:
Do not open the toilet seat 5 lid further than
shown in fig. G.
Do not speed up the automated lowering by ex-
erting additional pressure on the toilet seat
5
lid.
Do not use the toilet seat 5 lid as a seat or
standing surface. The lid can break due to ten-
sion to the plastic when burdened with a weight.
Care
Do not use any harsh, corrosive or abrasive
cleaning agents, disinfectants or cleaning agents
with aggressive ingredients to clean the prod-
uct. The surface of the product can become
damaged by using the wrong cleaning agents.
Clean the product regularly with a damp cloth
and standard bathroom cleaner.
Afterwards, dry the product with a soft cloth.
Disposal
The packaging is made entirely of recyclable materials,
which you may dispose of at local recycling facilities.
Contact your local refuse disposal authority for more
details of how to dispose of your worn-out product.
Warranty and service
The product has been manufactured to strict quality
guidelines and meticulously examined before delivery.
In the event of product defects you have legal rights
against the retailer of this product. Your legal rights
are not limited in any way by our warranty detailed
below.
The warranty for this product is 3 years from the d
ate
of purchase. The warranty period begins on the date
of purchase. Please keep the original sales receipt
in a safe location. This document is required as your
proof of purchase.
Should this product show any fault in materials or
manufacture within 3 years from the date of purchase,
we will repair or replace it – at our choice – free of
charge to you. This warranty becomes void if the
product has been damaged, or used or maintained
improperly.
385276_2107_V1.0_liv_WC_Sitz_content_OS.indd 10385276_2107_V1.0_liv_WC_Sitz_content_OS.indd 10 15.12.21 18:2215.12.21 18:22

11 GB/IE
The warranty applies to defects in material or manu-
facture. This warranty does not cover product parts
subject to normal wear, thus possibly considered con-
sumables (e.g. batteries) or for damage to fragile parts,
e.g. switches, rechargeable batteries or glass parts.
Customer service
Conmetall Meister GmbH
Oberkamper Straße 39
42349 Wuppertal
GERMANY
Tel.: 00800 34 99 67 53 (toll-free)
Email: [email protected]
IAN 385276_2107
Please have your receipt and the item number
(IAN 385276_2107) ready as your proof of
purchase when enquiring about your product.
385276_2107_V1.0_liv_WC_Sitz_content_OS.indd 11385276_2107_V1.0_liv_WC_Sitz_content_OS.indd 11 15.12.21 18:2215.12.21 18:22

13 FR/BE
Légende des pictogrammes utilisés
Lisez entièrement les instructions ! Max.
150
kg
Charge maximale supportée 150 kg
Respectez les avertissements et
les consignes de sécurité! Danger de mort et d'accident pour
les enfants en bas âge et les enfants!
Abattat WC « Top Screw »
Introduction
Nous vous félicitons pour l‘achat de votre
nouveau produit. Vous avez opté pour un
produit de grande qualité. Avant la première
mise en service, vous devez vous familiariser avec
toutes les fonctions du produit. Veuillez lire attentive-
ment le mode d’emploi ci-dessous et les consignes de
sécurité. N’utilisez le produit que pour l’usage décrit
et les domaines d’application cités. Conserver ces
instructions dans un lieu sûr. Si vous donnez le pro-
duit à des tiers, remettez-leur également la totalité
des documents.
Utilisation conforme
Le produit est adapté à un montage sur des WC
courants. Toute autre utilisation ou modification du
produit est considérée comme non conforme et com-
porte des risques d‘accident. Le fabricant n’endosse
aucune responsabilité en cas de dommages causés
par une manipulation non conforme.
Contenu de la livraison
1 siège WC (avec matériel de montage)
1 notice de montage et d‘utilisation
Descriptif des éléments
1 Tige de fixation
2 Support
3 Vis
4 Rondelle
5 Siège WC
6 Cache
Caractéristiques techniques
Dimensions : Dimensions extérieures :
env. 37,3 x 42,7 x 2,8–
4,4 cm (B x T x H),
dimensions intérieures :
env. 22–28 cm
Distance des trous
de perçage : 108–180 mm
Charge: max. 150 kg
Consignes de sécurité
Après livraison et avant la première utilisation du
produit, vérifiez le produit afin de constater l‘état
et le fonctionnement de toutes les pièces. N‘utilisez
jamais le produit s‘il est endommagé. Autrement, il
existe un risque de blessures. N‘utilisez pas de pro-
duit défectueux.
Veuillez respecter les remarques de sécurité suivantes
afin d‘éviter toute blessure et dommage matériel:
DAN-
GER DE MORT ET RISQUE
D‘AC-
CIDENT POUR LES ENFANTS
EN BAS ÂGE ET LES ENFANTS! Ne laissez
jamais les enfants manipuler sans surveillance
les matériaux d‘emballage. Risque d‘asphyxie.
Gardez le produit hors de portée des enfants.
Le produit n’est pas un jouet.
ATTENTION! RISQUE DE BLESSURES!
N‘utilisez pas de produit défectueux. Dans le
cas contraire, il existe un risque de blessure.
Max.
150
kg
Ne pas soumettre le siège WC à une
charge supérieure à 150 kg. Dans le
cas contraire, vous risqueriez de
vous blesser et / ou d’endommager le produit.
385276_2107_V1.0_liv_WC_Sitz_content_OS.indd 13385276_2107_V1.0_liv_WC_Sitz_content_OS.indd 13 15.12.21 18:2215.12.21 18:22

14 FR/BE
Pour votre sécurité, ne vous placez pas debout
sur le produit, car il pourrait se briser.
RISQUE DE DÉGÂTS MATÉRIELS ! Ne lais-
sez pas tomber le produit pendant le montage
afin d‘éviter de l‘endommager.
Montage
Remarque : Nettoyez la céramique avant le mon-
tage au moyen d‘un chiffon humide et d‘un peu de
produit nettoyant pour sanitaires. Essuyer ensuite la
céramique avec un chiffon sec.
1. Placez la rondelle plate 4 par le bas dans le
support 2 (v. Fig. A).
2. Introduisez la vis 3 par le haut dans les trous
de perçage de la céramique (v. Fig. A).
3.
Alignez les deux supports
2
sur les tiges de fixa-
tion 1 et les vis 3 sur les deux côtés et placez
le siège WC 5 sur les tiges de fixation 2 au
moyen des deux ouvertures prévues (v. Fig. B).
4. Fermez le siège WC 5 et alignez-le. Lors de
l‘alignement, veillez à ce que le siège WC
5
soit
bien placé au centre sur le céramique (v. Fig. C).
5. Retirez de nouveau le siège WC 5. Veillez à
ce que la position du support 2 ne glisse pas.
Pour ceci, fixez le support 2 avec le pouce
(voir Fig. D).
6.
Vissez les vis
3
à l’aide d’un tournevis cruciforme
(voir Fig. E). Veillez à ne pas serrer les vis trop
fermement.
7.
Placez à présent les caches
6
sur les supports
2
(
voir Fig. F) et replacez ensuite le siège WC 5
sur les tiges de fixation 1.
8. Vérifiez ensuite l‘assise des supports 2 et du
siège WC 5. Effectuez ce contrôle à intervalles
réguliers. Effectuez des réajustements le cas
échéant.
Utilisation
Grâce au système de fermeture ralentie, le siège
WC 5 se rabaisse lentement et automatiquement
dès que vous le touchez. Afin de garantir la durée
de vie du produit ainsi qu‘une utilisation sans en-
combres, veuillez prendre en compte les indications
suivantes:
N‘ouvrez pas le couvercle du siège WC 5 à
un angle supérieur à celui indiqué sur la Fig. G.
Ne tentez pas d‘accélérer le système de fermeture
ralentie en exerçant une pression supplémentaire
sur le couvercle du siège WC 5.
N‘utilisez pas le couvercle du siège WC
5
comme
siège ou marchepied. Les pressions sur le plas-
tique peuvent rompre le couvercle en raison de
la charge exercée.
Entretien
Pour le nettoyage du produit, n‘utilisez pas de
produit de nettoyage acide, caustique ou déca-
pant, de désinfectant ou encore un produit de
nettoyage contenant des additifs agressifs. La
surface du produit risque d‘être endommagée
en cas d‘utilisation de produits de nettoyage
inappropriés.
Nettoyez le produit régulièrement avec un
chiffon humide et un produit nettoyant pour
sanitaires courant.
Pour finir, séchez le produit avec un chiffon doux.
Mise au rebut
L’emballage se compose de matières recyclables
pouvant être mises au rebut dans les déchetteries
locales.
Le produit est recyclable, soumis à la
responsabilité élargie du fabricant et
collecté séparément.
Votre mairie ou votre municipalité vous renseigneront
sur les possibilités de mise au rebut des produits
usagés.
385276_2107_V1.0_liv_WC_Sitz_content_OS.indd 14385276_2107_V1.0_liv_WC_Sitz_content_OS.indd 14 15.12.21 18:2215.12.21 18:22

15 FR/BE
Garantie et service après-vente
Article L217-16 du Code de la
consommation
Lorsque l‘acheteur demande au vendeur, pendant
le cours de la garantie commerciale qui lui a été
consentie lors de l‘acquisition ou de la réparation
d‘un bien meuble, une remise en état couverte par
la garantie, toute période d‘immobilisation d‘au
moins sept jours vient s‘ajouter à la durée de la
garantie qui restait à courir. Cette période court à
compter de la demande d‘intervention de l‘ache-
teur ou de la mise à disposition pour réparation du
bien en cause, si cette mise à disposition est posté-
rieure à la demande d‘intervention.
Indépendamment de la garantie commerciale sous-
crite, le vendeur reste tenu des défauts de conformité
du bien et des vices rédhibitoires dans les conditions
prévues aux articles L217-4 à L217-13 du Code
de la consommation et aux articles 1641 à 1648
et 2232 du Code Civil.
Article L217-4 du Code de la
consommation
Le vendeur livre un bien conforme au contrat et ré-
pond des défauts de conformité existant lors de la
délivrance.
Il répond également des défauts de conformité ré-
sultant de l‘emballage, des instructions de montage
ou de l‘installation lorsque celle-ci a été mise à sa
charge par le contrat ou a été réalisée sous sa res-
ponsabilité.
Article L217-5 du Code de la
consommation
Le bien est conforme au contrat :
1° S´il est propre à l‘usage habituellement at-
tendu d‘un bien semblable et, le cas échéant :
- s‘il correspond à la description donnée par le
vendeur et posséder les qualités que celui-ci a
présentées à l‘acheteur sous forme d‘échantil-
lon ou de modèle ;
- s‘il présente les qualités qu‘un acheteur peut
légitimement attendre eu égard aux déclara-
tions publiques faites par le vendeur, par le
producteur ou par son représentant, notam-
ment dans la publicité ou l‘étiquetage ;
2° Ou s‘il présente les caractéristiques définies
d‘un commun accord par les parties ou être
propre à tout usage spécial recherché par
l‘acheteur, porté à la connaissance du vendeur
et que ce dernier a accepté.
Article L217-12 du Code de la
consommation
L‘action résultant du défaut de conformité se pres-
crit par deux ans à compter de la délivrance du
bien.
Article 1641 du Code civil
Le vendeur est tenu de la garantie à raison des
défauts cachés de la chose vendue qui la rendent
impropre à l‘usage auquel on la destine, ou qui di-
minuent tellement cet usage que l‘acheteur ne l‘au-
rait pas acquise, ou n‘en aurait donné qu‘un moindre
prix, s‘il les avait connus.
Article 1648 1er alinéa du Code civil
L‘action résultant des vices rédhibitoires doit être in-
tentée par l‘acquéreur dans un délai de deux ans
à compter de la découverte du vice.
Les pièces détachées indispensables à l’utilisation
du produit sont disponibles pendant la durée de la
garantie du produit.
Le produit a été fabriqué selon des critères de qua-
lité stricts et contrôlé consciencieusement avant sa
livraison. En cas de défaillance, vous êtes en droit
de retourner ce produit au vendeur. La présente ga-
rantie ne constitue pas une restriction de vos droits
légaux.
Ce produit bénéficie d‘une garantie de 3 ans à
compter de sa date d’achat. La durée de garantie
débute à la date d’achat. Veuillez conserver le
ticket de caisse original. Il fera office de preuve
d’achat.
Si un problème matériel ou de fabrication devait
survenir dans 3 ans suivant la date d‘achat de ce
produit, nous assurons à notre discrétion la
385276_2107_V1.0_liv_WC_Sitz_content_OS.indd 15385276_2107_V1.0_liv_WC_Sitz_content_OS.indd 15 15.12.21 18:2215.12.21 18:22

16 FR/BE
réparation ou le remplacement du produit sans
frais supplémentaires. La garantie prend fin si le
produit est endommagé suite à une utilisation inap-
propriée ou à un entretien défaillant.
La garantie couvre les vices matériels et de fabrica-
tion. Cette garantie ne s’étend ni aux pièces du
produit soumises à une usure normale (p. ex. des
piles) et qui, par conséquent, peuvent être considé-
rées comme des pièces d’usure, ni aux dommages
sur des composants fragiles, comme des interrup-
teurs, des batteries ou des éléments fabriqués en
verre.
Service client
Conmetall Meister GmbH
Oberkamper Str. 39
42349 Wuppertal
ALLEMAGNE
Tél.: 00800 34 99 67 53 (gratuites)
E-mail: [email protected]
IAN 385276_2107
Pour toute demande, veuillez conserver le ticket de
caisse et le numéro d‘article (IAN 385276_2107)
comme preuve d‘achat.
385276_2107_V1.0_liv_WC_Sitz_content_OS.indd 16385276_2107_V1.0_liv_WC_Sitz_content_OS.indd 16 15.12.21 18:2215.12.21 18:22

17 NL/BE
Legenda van de gebruikte pictogrammen
Lees de handleiding volledig door! Max.
150
kg
Maximale belastbaarheid 150 kg
Neem de waarschuwingen en
veiligheidsinstructies in acht! Levensgevaar en kans op ongevallen
voor kleuters en kinderen!
Wc-bril “Top Screw”
Inleiding
Hartelijk gefeliciteerd met de aankoop van
uw nieuwe product. U hebt voor een hoog-
waardig product gekozen. Maak u voor
de eerste ingebruikname vertrouwd met het product.
Lees hiervoor aandachtig de volgende gebruiksaan-
wijzing en de veiligheidsvoorschriften. Gebruik het
product alleen zoals beschreven en voor de aange-
geven toepassingsgebieden. Bewaar deze gebruiks-
aanwijzing op een veilige plek. Geef, wanneer u het
product doorgeeft aan derden, ook alle documen-
ten mee.
Correct en doelmatig gebruik
Het product is geschikt voor montage op normale
standaard toiletten. Elk ander gebruik of een veran-
dering aan het product geldt als niet-correct en ver-
hoogt de kans op ongelukken. De fabrikant is niet
aansprakelijk voor schade die ontstaat door
niet-correct gebruik.
Omvang van de levering
1 wc-bril (incl. montagemateriaal)
1 montagehandleiding en gebruiksaanwijzing
Beschrijving van de onderdelen
1 Bevestigingsstift
2 Houder
3 Schroef
4 Tussenring
5 WC-bril
6 Kapje
Technische gegevens
Afmetingen: buitenmaten: ca. 37,3 x 42,7
x 2,8–4,4 cm (b x d x h), bin-
nenmaten: ca. 22–28 cm
Boorgat-afstand: 108–180 mm
Belastbaarheid: max. 150 kg
Veiligheidsinstructies
Controleer het product na de levering en voor de eerste
ingebruikname om de toestand en de werking van
alle onderdelen vast te stellen. Gebruik het product
in geen geval als het beschadigd is. Anders is er kans
op verwondingen. Gebruik geen beschadigd product.
Neem de volgende veiligheidsvoorschriften in acht
om letsel en materiële schade te vermijden:
LE-
VENSGEVAAR EN KANS OP
ONGEVALLEN VOOR KLEUTERS
EN KINDEREN! Laat kinderen nooit zonder
toezicht bij het verpakkingsmateriaal. Er bestaat
verstikkingsgevaar. Houd het product uit de buurt
van kinderen. Het product is geen speelgoed.
PAS OP! LETSELGEVAAR! Gebruik geen
beschadigd product. Anders is er kans op ver-
wondingen.
Max.
150
kg
Belast de wc-bril niet met meer dan
150 kg. Anders kan dit tot verwon-
dingen en / of beschadigingen aan
het product leiden.
Ga voor uw eigen veiligheid niet op het product
staan omdat het daardoor kan breken en uit
elkaar kan vallen.
385276_2107_V1.0_liv_WC_Sitz_content_OS.indd 17385276_2107_V1.0_liv_WC_Sitz_content_OS.indd 17 15.12.21 18:2215.12.21 18:22

18 NL/BE
KANS OP MATERIËLE SCHADE! Laat het
product tijdens de montage niet vallen om be-
schadigingen aan het product te vermijden.
Montage
Opmerking: reinig het keramiek voor de montage
met een vochtig gemaakte
doek en een beetje bad-
kamerreiniger. Droog het keramiek vervolgens met
een droge doek af.
1. Plaats de tussenring 4 van onderaf in de houder
2 (zie afb. A).
2. Steek de schroef 3 van bovenaf in de boor-
gaten van de wc-pot (zie afb. A).
3. Stel de beide houders 2 met de bevestigings-
stiften 1 en de schroeven 3
aan beide zijden
af en plaats de wc-bril
5
met de daarvoor be-
stemde
openingen op de bevestigingsstiften 2
(zie afb. B).
4. Sluit de wc-bril 5 en stel hem af. Let er bij het
afstellen op dat de wc-bril 5 in het midden op
de wc-pot ligt (zie afb. C).
5. Verwijder de wc-bril 5 weer. Zorg ervoor dat
daarbij de positie van de houder 2 niet ver-
andert door de houder 2 met de duim vast
te houden (zie afb. D).
6.
Draai de schroeven
3
met behulp van een kruis-
kopschroevendraaier vast (zie afb. E). Denk eraan
dat u de schroeven niet te vast aandraait.
7. Zet vervolgens de kapjes 6 op de houders 2
(zie afb. F) en plaats daarna de wc-bril 5
weer op de bevestigingsstiften 1.
8. Controleer vervolgens of de houders 2 en de
wc-bril 5 goed vastzitten. Voer deze controle
regelmatig uit. Stel indien nodig het geheel bij.
Gebruik
Door het soft-close systeem gaat de wc-bril 5 na
het aanraken automatisch langzaam omlaag. Neem
voor een lange levensduur van het product en een
optimale werking de volgende instructies in acht:
Klap het deksel van de wc-bril
5
niet verder
open dan op afb. G getoond.
Versnel de soft-close functie niet door extra druk
op het deksel van de wc-bril 5 uit te oefenen.
Gebruik het deksel van de wc-bril 5 niet als
zitje of als opstapje. Door spanningen in het
kunststof kan het deksel breken bij belasting.
Onderhoud
Gebruik voor het schoonmaken van het product
geen scherpe, etsende of schurende reinigings-
middelen, desinfecterende middelen of reini-
gingsmiddelen met agressieve bestanddelen.
Het oppervlak van het product kan door het
gebruik van verkeerde schoonmaakmiddelen
beschadigd raken.
Reinig het product regelmatig met een vochtige
doek en normale badkamerreiniger.
Maak daarna het product droog met een
zachte doek.
Afvoer
De verpakking bestaat uit milieuvriendelijke grond-
stoffen die u via de plaatselijke recyclingcontainers
kunt afvoeren.
Informatie over de mogelijkheden om het uitgediende
product na gebruik te verwijderen, verstrekt uw
gemeentelijke overheid.
Garantie en service
Het product wordt volgens strenge kwaliteitsrichtlijnen
zorgvuldig geproduceerd en voor levering grondig
getest. In geval van schade aan het product kunt u
rechtmatig beroep doen op de verkoper van het
product. Deze wettelijke rechten worden door onze
hierna vermelde garantie niet beperkt.
Op dit product verlenen wij 3 jaar garantie vanaf
aankoopdatum. De garantieperiode start op de dag
van aankoop. Bewaar de originele kassabon alstublieft.
Dit document is nodig als bewijs voor aankoop.
385276_2107_V1.0_liv_WC_Sitz_content_OS.indd 18385276_2107_V1.0_liv_WC_Sitz_content_OS.indd 18 15.12.21 18:2215.12.21 18:22

19 NL/BE
Wanneer binnen 3 jaar na de aankoopdatum van
dit product een materiaal- of productiefout optreedt,
dan wordt het product door ons – naar onze keuze –
gratis voor u gerepareerd of vervangen. Deze ga-
rantie komt te vervallen als het product beschadigd
wordt, niet correct gebruikt of onderhouden wordt.
De garantie geldt voor materiaal- en productiefouten.
Deze garantie is niet van toepassing op producton-
derdelen, die onderhevig zijn aan normale slijtage
en hierdoor als aan slijtage onderhevige onderdelen
gelden (bijv. batterijen) of voor beschadigingen aan
breekbare onderdelen, zoals bijv. schakelaars, accu’s
of dergelijke onderdelen, die gemaakt zijn van glas.
Klantenservice
Conmetall Meister GmbH
Oberkamper Str. 39
42349 Wuppertal
DUITSLAND
Tel.: 00800 34 99 67 53 (kosteloos)
E-mail: meister-service@conmetallmeister.de
IAN 385276_2107
Houd bij alle vragen alstublieft de kassabon en het
artikelnummer (IAN 385276_2107) als bewijs
van aankoop bij de hand.
385276_2107_V1.0_liv_WC_Sitz_content_OS.indd 19385276_2107_V1.0_liv_WC_Sitz_content_OS.indd 19 15.12.21 18:2215.12.21 18:22

21 PL
Legenda zastosowanych piktogramów
Dokładnie przeczytać instrukcję! Max.
150
kg
Maksymalne obciążenie: 150 kg
Przestrzegać wskazówek
ostrzegawczych i bezpieczeństwa! Niebezpieczeństwo utraty życia i
wypadku dla dzieci!
Deska sedesowa „Top Screw“
Wstęp
Gratulujemy Państwu zakupu nowego
produktu. Zdecydowali się Państwo na
zakup produktu najwyższej jakości. Przed
uruchomieniem urządzenia po raz pierwszy zapo-
znaj się z nim. W tym celu przeczytaj uważnie po-
niższą instrukcję obsługi oraz wskazówki dotyczące
bezpieczeństwa. Produkt należy użytkować w spo-
sób tu opisany i zgodnie z określonym zakresem
zastosowania. Należy przechowywać tę instrukcję
w bezpiecznym miejscu. Przekazując produkt innej
osobie, należy również przekazać wszystkie doku-
menty.
Zastosowanie zgodne
z przeznaczeniem
Produkt przeznaczony jest do montażu do standar-
dowych toalet. Jakiekolwiek inne użycie lub zmiany
urządzenia uważane są za niezgodne z przezna-
czeniem i kryją w sobie niebezpieczeństwo wypadku.
Producent nie odpowiada za szkody powstałe w
wyniku zastosowania w sposób niezgodny z prze-
znaczeniem.
Zawartość
1 deska sedesowa (z materiałem montażowym)
1 instrukcja montażu i obsługi
Opis części
1 Trzpień mocujący
2 Uchwyt
3 Śruba
4 Podkładka
5 Deska sedesowa
6 Osłonka
Dane techniczne
Wymiary: zewnętrzne: ok. 37,3 x
42,7 x 2,8–4,4 cm
(szer. x głęb. x wys.),
wewnętrzne:
ok. 22–28 cm
Odstęp wywierconych
otworów: 108–180 mm
Obciążenie: maks. 150 kg
Wskazówki
bezpieczeństwa
Po dostawie i przed pierwszym użyciem sprawdzić
produkt, aby stwierdzić, jaki jest stan i działanie
wszystkich części. W żadnym razie nie używać
produktu, jeżeli jest uszkodzony. W innym razie
grozi to niebezpieczeństwem odniesienia obrażeń.
Nie należy używać uszkodzonego produktu.
Proszę przestrzegać następujących przepisów bez-
pieczeństwa, aby uniknąć obrażeń i uszkodzenia
mienia:
NIEBEZPIE-
CZEŃSTWO UTRATY ŻYCIA I
WYPADKU DLA DZIECI! Nigdy
nie pozostawiać dzieci bez nadzoru z materia-
łem opakowania. Istnieje niebezpieczeństwo
uduszenia. Produkt należy trzymać poza zasię-
giem dzieci. Produkt nie jest zabawką.
385276_2107_V1.0_liv_WC_Sitz_content_OS.indd 21385276_2107_V1.0_liv_WC_Sitz_content_OS.indd 21 15.12.21 18:2215.12.21 18:22

22 PL
OSTROŻNIE! NIEBEZPIECZEŃSTWO
OBRAŻEŃ CIAŁA! Nie należy używać
uszkodzonego produktu. W przeciwnym wy-
padku występuje niebezpieczeństwo odniesienia
obrażeń.
Max.
150
kg
Nie należy obciążać deski sedesowej
ponad 150 kg. W innym przypadku
może spowodować to urazy i / lub
uszkodzenie produktu.
Dla własnego bezpieczeństwa nie stawać na
produkcie, ponieważ mogłoby to spowodować
jego rozbicie.
NIEBEZPIECZEŃSTWO POWSTANIA SZ-
KÓD MATERIALNYCH! Nie należy upuścić
produktu podczas montażu, aby uniknąć jego
uszkodzenia.
Montaż
Wskazówka: przed montażem należy oczyścić
ceramikę zwilżoną ściereczką
i środkiem do czysz-
czenia łazienki. Następnie wysuszyć ceramikę suchą
ściereczką.
1. Podkładkę 4 włożyć od dołu w uchwyt 2
(patrz rys. A).
2. Śrubę 3 włożyć od góry w otwory ceramiki
(patrz rys. A).
3. Ustawić oba uchwyty 2 w jednej linii z trzpie-
niami mocującymi 1 i śrubami 3 po obu
stronach i umieścić deskę sedesową 5 w
otworach przewidzianych na trzpienie mocujące
2 (patrz rys. B).
4. Zamknąć deskę sedesowa 5 i wyrównać ją.
Podczas wyrównania uważać na to, aby deska
sedesowa 5 znajdowała się po środku na
ceramice (patrz rys. C).
5. Zdjąć deskę sedesową 5. Uważać przy tym,
aby pozycja uchwytu 2 nie przesunęła się,
w tym celu przytrzymać uchwyt 2 kciukiem
(patrz rys. D).
6. Przykręcić śruby 3 przy pomocy śrubokrętu
krzyżakowego (patrz rys. E). Należy uważać,
aby śrub nie wkręcić za mocno.
7. Teraz umieść osłonki 6 na uchwytach 2
(patrz rys. F), a następnie umieścić deskę
sedesową 5 z powrotem na trzpieniach
mocujących 1.
8. Następnie sprawdzić osadzenie uchwytów 2
i deski sedesowej 5. Sprawdzać to w regular-
nych odstępach. Ewentualnie wyregulować je.
Zastosowanie
Dzięki automatyce opuszczania deska sedesowa 5
automatycznie i powoli opuszcza się po jej dotknięciu.
W celu zapewnienia długiej żywotności produktu
i właściwego stosowania należy przestrzegać po-
niższych wskazówek:
Nie rozkładać pokrywy deski sedesowej 5
dalej niż pokazano to na rysunku. G.
Nie należy przyspieszać automatycznego
opuszczania poprzez wywieranie dodatkowego
nacisku na pokrywę deski sedesowej 5.
Nie należy używać pokrywy deski sedesowej 5
jako siedziska lub drabinki. Naprężenie w two-
rzywie sztucznym może spowodować pęknięcie
pokrywy pod obciążeniem.
Konserwacja
Do czyszczenia produktu nie należy używać
żadnych ostrych, żrących lub ściernych środków
czyszczących, środków dezynfekcyjnych lub
środków czyszczących z agresywnymi dodatkami.
Powierzchnia produktu może zostać uszkodzona
przez zastosowanie niewłaściwych środków
czyszczących.
Produkt należy regularnie czyścić wilgotną
szmatką i standardowym środkiem do czysz-
czenia łazienki.
Następnie osuszyć produkt miękką ściereczką.
385276_2107_V1.0_liv_WC_Sitz_content_OS.indd 22385276_2107_V1.0_liv_WC_Sitz_content_OS.indd 22 15.12.21 18:2215.12.21 18:22

23 PL
Utylizacja
Opakowanie wykonane jest z materiałów przyja-
znych dla środowiska, które można przekazać do
utylizacji w lokalnym punkcie przetwarzania surow-
ców wtórnych.
Informacji na temat możliwości utylizacji wyeksplo-
atowanego produktu udziela urząd gminy lub miasta.
Gwarancja i serwis
Produkt wyprodukowano według wysokich standar-
dów jakości i poddano skrupulatnej kontroli przed
wysyłką. W przypadku wad produktu nabywcy
przysługują ustawowe prawa. Gwarancja nie
ogranicza ustawowych praw nabywcy produktu.
Produkt objęte jest 3 gwarancją, licząc od daty
zakupu. Gwarancja wygasa w razie zawinionego
przez użytkownika uszkodzenia produktu, niewłaści-
wego
użycia lub konserwacji.
W przypadku wystąpienia w ciągu 3 lat od daty
zakupu wad materiałowych lub fabrycznych, doko-
nujemy – według własnej oceny – bezpłatnej na-
prawy lub wymiany produktu.
Świadczenie gwarancyjne obejmuje wady materia-
łowe i fabryczne. Gwarancja nie obejmuje części
produktu ulegających normalnemu zużyciu, uzna-
wanych za części zużywalne (np. baterie) oraz
uszkodzeń części łamliwych, np. przełączników,
akumulatorów lub wykonanych ze szkła.
Zgodnie z Kodeksem Cywilnym art. 581 §1 wraz
z wymianą urządzenia lub ważnej części czas
gwarancji rozpoczyna się na nowo.
Obsługa klienta
Conmetall Meister GmbH
Oberkamper Str. 39
42349 Wuppertal
NIEMCY
Tel.: 00800 34 99 67 53 (bezpłatny)
E-mail: [email protected]
IAN 385276_2107
Przed skontaktowaniem się z działem serwisowym
należy przygotować jako dowód zakupu paragon
i numer artykułu (IAN 385276_2107).
385276_2107_V1.0_liv_WC_Sitz_content_OS.indd 23385276_2107_V1.0_liv_WC_Sitz_content_OS.indd 23 15.12.21 18:2215.12.21 18:22

25 CZ
Legenda použitých piktogramů
Přečtěte si celý návod! Max.
150
kg
Maximální nosnost 150 kg
Dodržujte výstražné
a bezpečnostní pokyny! Nebezpečí ohrožení života
a nehody malých i velkých dětí!
Záchodové sedátko „Top Screw“
Úvod
Blahopřejeme Vám ke koupi nového vý-
robku. Rozhodli jste se pro kvalitní výrobek.
Před prvním uvedením do provozu se
seznamte s výrobkem. K tomu si pozorně přečtěte
následující návod k obsluze a bezpečnostní pokyny.
Používejte výrobek jen popsaným způsobem a pouze
pro uvedené oblasti použití. Uschovejte si tento návod
na bezpečném místě. Všechny podklady vydejte při
předání výrobku i třetí osobě.
Použití ke stanovenému účelu
Výrobek je určen kmontáži na běžná WC. Každé
jiné použití nebo úprava výrobku je považována
za použití vrozporu surčeným účelem a skrývá
nebezpečí úrazu. Výrobce neručí za škody způso-
bené použitím vrozporu surčením.
Obsah dodávky
1záchodové prkénko (vč. montážního materiálu)
1 návod kmontáži a použití
Popis dílů
1 Upevňovací kolík
2 Držák
3 Šroub
4 Podložka
5 Záchodové prkénko
6 Krytka
Technická data
Rozměry: vnější rozměry: cca 37,3 x 42,7 x
2,8–4,4 cm (Š x H x V),
vnitřní rozměry: cca 22–28 cm
Vzdálenost
otvorů: 108–180 mm
Zatížení: maximálně 150 kg
Bezpečnostní pokyny
Po dodávce a před prvním použitím zkontrolujte
stav výrobku a správnou funkci všech dílů. Poško-
zený výrobek v žádném případě nepoužívejte.
Jinak hrozí nebezpečí zranění. Nepoužívejte po-
škozený výrobek.
Řiďte se následujícími bezpečnostními předpisy,
abyste zabránili zranění a věcným škodám:
NEBEZPEČÍ
OHROŽENÍ ŽIVOTA A NEHODY
PRO MALÉ I VELKÉ DĚTÍ! Nene-
chávejte děti nikdy bez dohledu sobalovým
materiálem. Hrozí nebezpečí udušení. Výrobek
nepatří do dětských rukou. Výrobek není hračka.
OPATRNĚ! NEBEZPEČÍ ZRANĚNÍ! Nepo-
užívejte poškozený výrobek. Jinak hrozí nebez-
pečí zranění.
Max.
150
kg
Nezatěžujte záchodové prkénko
hmotností vyšší než 150 kg. Vopač-
ném případě může dojít kúrazu
anebo poškození výrobku.
Vzájmu vlastní bezpečnosti se na výrobek
nestavte, mohl by prasknout.
NEBEZPEČÍ HMOTNÝCH ŠKOD! Během
montáže dávejte pozor, aby výrobek nespad-
nul, tím zabráníte jeho poškození.
385276_2107_V1.0_liv_WC_Sitz_content_OS.indd 25385276_2107_V1.0_liv_WC_Sitz_content_OS.indd 25 15.12.21 18:2215.12.21 18:22
La pagina si sta caricando...
La pagina si sta caricando...
La pagina si sta caricando...
La pagina si sta caricando...
La pagina si sta caricando...
La pagina si sta caricando...
La pagina si sta caricando...
La pagina si sta caricando...
La pagina si sta caricando...
La pagina si sta caricando...
La pagina si sta caricando...
La pagina si sta caricando...
La pagina si sta caricando...
La pagina si sta caricando...
La pagina si sta caricando...
La pagina si sta caricando...
La pagina si sta caricando...
La pagina si sta caricando...
La pagina si sta caricando...
La pagina si sta caricando...
La pagina si sta caricando...
La pagina si sta caricando...
-
 1
1
-
 2
2
-
 3
3
-
 4
4
-
 5
5
-
 6
6
-
 7
7
-
 8
8
-
 9
9
-
 10
10
-
 11
11
-
 12
12
-
 13
13
-
 14
14
-
 15
15
-
 16
16
-
 17
17
-
 18
18
-
 19
19
-
 20
20
-
 21
21
-
 22
22
-
 23
23
-
 24
24
-
 25
25
-
 26
26
-
 27
27
-
 28
28
-
 29
29
-
 30
30
-
 31
31
-
 32
32
-
 33
33
-
 34
34
-
 35
35
-
 36
36
-
 37
37
-
 38
38
-
 39
39
-
 40
40
-
 41
41
-
 42
42


LIVARNO 385276 Manuale del proprietario
- Categoria
- Supporti per altoparlanti
- Tipo
- Manuale del proprietario
in altre lingue
- français: LIVARNO 385276 Le manuel du propriétaire
- Deutsch: LIVARNO 385276 Bedienungsanleitung
- Nederlands: LIVARNO 385276 de handleiding
- slovenčina: LIVARNO 385276 Návod na obsluhu
- dansk: LIVARNO 385276 Brugervejledning
- polski: LIVARNO 385276 Instrukcja obsługi
Documenti correlati
-
LIVARNO 425948 Manuale del proprietario
-
-
-
-
-
-
-
-
-