
ALIMENTATION ALIMENTAÇÃO
STROMVERSORGUNG
POWER SUPPLY
TURNING UNIT ON/OFF
ÉCOUTE DE LA RADIO
AUDIÇÃO DO RÁDIO
RADIO HÖREN
LISTENING TO THE RADIO
MISE EN MARCHE ET ARRET DE L’APPAREIL
LIGANDO/DESLIGANDO O APARELHO
EINSCHALTEN/ AUSSCHALTEN DES GERÄTS
ÉCOUTE DES DISQUES
REPRODUÇÃO DE UM DISCO
CD’S ABSPIELEN
DISC PLAYBACK
LECTURE USB
REPRODUÇÃO DE USB
USB PLAYBACK
CONNEXION D'UNE SOURCE AUXILIAIRE
UTILIZAÇÃO DA ENTRADA AUXILIAR
CONNECTING AUXILIARY SOURCE
MAINTENANCE
MANUTENÇÃO
MAINTENANCE
FICHE TECHNIQUE
ESPECIFICAÇÕES
TECHNICAL SPECIFICATIONS
INSTRUCTIONS IMPORTANTES SUR LA SECURITE
IMPORTANT SAFETY INSTRUCTION
INSTRUÇÕES DE SEGURANÇA IMPORTANTES
ATTENTION: Pour réduire le risque de choc électrique, ne pas
ouvrir l'appareil, il n'y a aucune partie à l'intérieur destinée à
l'utilisateur. Conez toutes les réparations à un personnel qualié.
CAUTION: To reduce the risk of electric shock, do not open the
device, there is no party inside for the user. Refer all servicing to
qualied personnel.
ATENÇÃO: Para reduzir o risco de choque eléctrico, não
desmonte o aparelho. O aparelho não contém qualquer peça
passível de ser reparada pelo utilizador. Cone todas as
operações de manutenção a um técnico qualicado.
AVERTISSEMENT: POUR PRÉVENIR TOUT RISQUE D’INCENDIE OU DE CHOC
ÉLECTRIQUE, N’EXPOSEZ PAS CET APPAREIL À LA PLUIE OU À L’HUMIDITÉ.
ATTENTION: Radiations laser invisibles lorsque les dispositifs de sécurité sont ouverts
ou défectueux.
Ce lecteur de disque compact est classié comme un produit laser de CATEGORIE 1,
la marque PRODUIT LASER DE CATEGORIE 1 est située sur le cabinet en dessous
de l'appareil.
WARNING: TO PREVENT FIRE OR SHOCK HAZARD, DO NOT EXPOSE THIS
APPLIANCE TO RAIN OR MOISTURE.
CAUTION: Invisible laser radiation when open and interlocks defeated. Avoid exposure
to beam.
This compact disc player is classied as a CLASS 1 LASER product. The CLASS 1
LASER PRODUCT marking is located on the bottom cabinet.
ADVERTÊNCIA: PARA PREVENIR O RISCO DE INCÊNDIO OU DE CHOQUE
ELÉCTRICO, NÃO EXPONHA ESTE APARELHO A CHUVA OU HUMIDADE.
ATENÇÃO: São emitidas radiações invisíveis quando os dispositivos de segurança são
abertos ou defeituosos.
Esse reprodutor de discos compactos é classicado como um produto de LASER DE
CLASSE 1. O indicador de PRODUTOS DE LASER DE CLASSE 1 pode ser encontrado
na parte inferior do invólucro do aparelho.
L'éclair avec le symbole de la èche dans le triangle est un signe d'alerte
avertissant l'utilisateur de "tension dangereuse" à l'intérieur de l'unité.
The lightning with the arrow symbol in the triangle is a warning sign alerting the
user to "dangerous voltage" inside the unit.
O símbolo do relâmpago com uma seta e situado no interior de um triângulo
destina-se a alertar o utilizador para a presença de uma “tensão perigosa” no
aparelho.
Le point d'exclamation dans le triangle est un signe d'alerte avertissant l'utilisateur
d'instructions importantes accompagnant le produit.
The exclamation point in the triangle is a warning sign alerting the user of
important instructions accompanying the product.
O ponto de exclamação no interior de um triângulo destina-se a alertar o utilizador
para a presença de instruções importantes no manual que acompanha o aparelho.
La marque d'avertissement est située en dessous de l'appareil.
The caution mark is located on bottom of the device.
O indicador de cuidado poderá ser encontrado na parte inferior do aparelho.
Si à l'avenir, vous deviez vous débarrasser de ce produit, sachez que les
produits électriques usagés ne doivent pas être jetés avec les ordures
ménagères. Des installations destinées au recyclage existent. Vériez
auprès de votre municipalité ou demandez à votre revendeur des conseils.
(Directive Déchets d'Equipements Electriques et Electroniques)
If in the future, you need to get rid of this product, please note that Waste
electrical products should not be disposed of with household waste.
Recycling facilities exist. Check with your municipality or ask your dealer for
advice. (Directive for Waste Electrical and Electronic Equipment)
Caso pretenda descartar-se deste aparelho, proceda à sua reciclagem num
centro de recolha para electrodomésticos. Procure obter informações sobre
o centro de reciclagem mais próximo. Informe-se junto das autoridades
locais ou do seu revendedor local para a obtenção de pormenores adicionais
(Directiva sobre os Resíduos dos Equipamentos Eléctricos e Electrónicos).
Nos emballages peuvent faire l’objet d’une consigne de tri, pour en savoir
plus: www.quefairedemesdechets.fr
IMPORTANT
- Utilisez cet appareil sous un climat tempéré.
- La plaque signalétique se trouve à l’arrière de cet appareil.
- Veiller à avoir une distance minimale de 5 cm autour de l'appareil pour une aération
sufsante et que la ventilation ne soit pas gênée en recouvrant les orices d'aération de
l'appareil avec des objets tels que journaux, nappes, rideaux…..
- Ne placez pas de sources de ammes nues, telles que des bougies allumées sur
l'appareil.
- Ne pas exposer l'appareil à des gouttes d'eau ou éclaboussures.
- Ne placez pas d'objets remplis de liquides, tels que verre, vase ou objets similaires
sur l'appareil.
- Ne pas jeter les piles dans le feu! Respectez l'environnement lors de la disposition des
piles usagées.
- Les piles ne doivent pas être exposées à une chaleur excessive comme le soleil, le feu
ou autre source de chaleur similaire.
- La che du cordon d'alimentation est utilisée comme dispositif de débranchement et
doit rester facilement accessible. Pour être totalement déconnecté, cette che doit être
débranchée du réseau complètement. La prise de courant ne doit pas être obstruée et
doit être facilement accessible lors de son utilisation .
- Sous l'inuence du phénomène transitoire rapide et / ou phénomène électrostatique
électrique, le produit pourrait présenter des dysfonctionnements et l'utilisateur devra
faire une réinitialisation de l'appareil.
- Avant de jeter des piles, consultez votre revendeur car celui-ci peut les reprendre pour
les recycler.
IMPORTANT
- The use of apparatus in moderate climates.
- The Marking plate is located at the back of the device.
- Make sure to have a minimum distance of 5 cm around the unit for sufcient ventilation.
- Ensure that the ventilation openings is not covered with items such as newspapers,
tablecloths, curtains, etc.
- Do not place naked ame sources, such as lighted candles on the apparatus.
- Do not expose this appliance to dripping or splashing water.
- Do not place objects lled with liquids, such as glass, vase on the device.
- Do not throw batteries into re! Respect the environment when disposing of used
batteries.
- Batteries should not be exposed to excessive heat such as sunshine, re or other
similar heat source.
- The power plug is used as a disconnect device and must be easily accessible. To
be completely disconnected from the power, the plug of the appliance should be
disconnected completely. The socket must not be obstructed and should be easily
accessible during intended use.
- Under the inuence of fast transient and / or electrostatic electric phenomenon, the
product may malfunction and the user must perform a power reset of the device
- Before throwing any batteries away, consult your distributor who may be able to take
them back for specic recycling.
ATENÇÃO
- Utilize este aparelho num clima temperado.
- A placa de características situa-se na parte de trás deste aparelho.
- Certique-se de que respeita uma distância mínima de 5 cm à volta do aparelho de
modo a permitir uma ventilação suciente.
- Certique-se de que garante uma ventilação correcta do aparelho e que não tapa os
orifícios de ventilação com objectos como jornais, toalhas, cortinas, etc.
- Não coloque qualquer fonte de calor, como uma vela acesa, sobre ou na proximidade
do aparelho.
- Não exponha o aparelho a salpicos ou a humidade.
- Não coloque objectos que contenham líquido, como uma jarra, sobre ou na proximidade
do aparelho.
- Não deite as pilhas no fogo! Certique-se de que respeita o ambiente quando eliminar
pilhas gastas.
- Não exponha as pilhas a calor excessivo, como raios do sol, fogo ou outras fontes de
calor semelhantes.
- A cha de alimentação de rede permite desligar o aparelho e deve car facilmente
acessível. Para cortar a alimentação do aparelho, desligue de vez a cha de
alimentação de rede da tomada de rede. A cha de alimentação de rede não pode
estar tapada e deve ser facilmente acessível durante a utilização.
- Sob o efeito de fenómenos electrostáticos e/ou eléctricos transitórios, o produto
pode apresentar anomalias e pode acabar por ser necessário proceder-se a uma
reinicialização.
- Antes de eliminar as pilhas, consulte o seu distribuidor que poderá estar em condições
de as aceitar de volta para ns de reciclagem especíca.
Cet appareil fonctionne sur courant alternatif 230V AC 50 Hz ou avec 6 piles 1,5V de
type R14/ UM-2/ «C » (non fournies).
Alimentation secteur
Branchez le cordon d'alimentation détachable (inclus) à la prise secteur se trouvant à
l'arrière de l'appareil. Branchez le cordon d'alimentation sur une prise secteur murale.
FONCTIONNEMENT CC
Installez les piles dans leur compartiment .Utilisez uniquement la taille et le type de piles
spéciées. Respectez la polarité indiquée dans le compartiment. Une mauvaise Polarité
peut causer des dommages à l'appareil. Ne pas essayer de recharger les piles, elles
peuvent prendre feu ou exploser. Les piles doivent être remplacées lorsque: le volume
sonore diminue ou le son est déformé. An d'éviter tout risque de fuites des piles, retirez-
les si l'appareil n'est pas utilisé pendant une période prolongée.
ATTENTION: Risque d’explosion si les piles ne sont pas insérées correctement. Utilisez
uniquement des piles identiques ou de type équivalent.
Attention:
- Le cordon d'alimentation doit être débranché à la fois de l'appareil et de la prise secteur
pour que l'appareil fonctionne sur piles.
- Lorsque l’appareil est connecté au secteur, la source d'alimentation bascule
automatiquement en alimentation secteur.
- Dans un soucis d'économie d'énergie, lorsque la lecture est terminée ou arrêtez, l'unité
s'éteindra automatiquement après 10 minutes. Pour rénitialiser l'unité, positionnez
l'interrupteur de fonction sur la position OFF. Attendez quelques secondes et
positionnez sur ON de nouveau.
Este aparelho trabalha com AC 230V 50Hz ou 6 pilhas x 1,5V de tamanho R14/ UM-2/
“C” (não incluídas)
Funcionamento AC
Ligue o cabo AC (incluído) na tomada AC nas costas da unidade, ligue o cabo de
alimentação numa tomada AC padrão adequada.
Funcionamento DC
Instale as baterias em seu compartimento. Utilize apenas pilhas que respeitam as
recomendações do fabricante. Certique-se de que respeita a polaridade aquando
da colocação de pilhas (ver compartimento). A inobservância da polaridade pode
danicar o aparelho. Não tente recarregar pilhas não recarregáveis. Podem sofrer
um sobreaquecimento e explodir. As pilhas devem ser substituídas quando: O volume
diminuir, ou o som car distorcido durante o funcionamento. De forma a evitar fugas,
retire as pilhas se não usar o dispositivo durante um longo período.
ATENÇÃO: Riscos de explosão se as pilhas não forem inseridas correctamente. Utilize
apenas pilhas idênticas ou de tipo equivalente.
Nota:
- O cabo CA deve ser desligado tanto da tomada como do transformador para a unidade
poder funcionar com as baterias.
- Quando o cabo AC estiver ligado da unidade principal à tomada da parede, a
alimentação muda automaticamente para AC.
- No interesse de economizar energia, quando a reprodução chegar ao nal ou não
haja nenhuma reprodução, o aparelho se desligará automaticamente em 10 minutos.
Para reiniciar o aparelho, coloque o seletor de função na posição OFF (DESLIGADO).
Aguarde por alguns segundos e então LIGUE o aparelho novamente.
Dieses Gerät wird mit AC 230V 50Hz oder 6 x 1.5V Batterien der Größe R14/ UM-2/
„C“ (nicht mitgeliefert) betrieben.
AC-Betrieb
Verbinden Sie das abnehmbare AC-Kabel (mitgeliefert) mit der AC-Buchse hinten an der
Einheit. Stecken Sie das AC-Netzkabel in eine günstig liegende normale AC-Steckdose.
Gleichstrombetrieb
Legen Sie die Batterien in das Batteriefach ein. Verwenden Sie nur Batterien, die den
Vorgaben des Herstellers entsprechen. Bitte beachten Sie die Polarität beim Einlegen
der Batterien (siehe Batteriefach). Die Nicht-Beachtung der Polarität kann das Gerät
beschädigen. Nicht-wiederauadbare Batterien sind für eine erneute Auadung
ungeeignet. Sie könnten überhitzen und explodieren.
Batterien müssen ersetzt werden, wenn: Die Lautstärke nachlässt oder der Klang
während des Betriebs unklar wird. Um Auslaufen zu vermeiden, entfernen Sie die
Batterien, wenn die Einheit über eine längere Zeit nicht gebraucht werden soll.
ACHTUNG: Wenn die Batterien nicht richtig eingelegt sind, besteht Explosionsgefahr.
Verwenden Sie nur gleiche oder gleichwertige Batterietypen.
Vorsicht!
- Damit die Einheit mit Batterien betrieben werden kann, muss zuerst das AC-Kabel
sowohl aus der Buchse der Einheit als auch aus der Steckdose gezogen werden.
- Wenn das AC-Kabel der Haupteinheit mit der Steckdose verbunden ist, schaltet die
Stromquelle automatisch auf AC.
- Um Strom zu sparen, schaltet sich das Gerät automatisch nach 10 Minuten aus,
nachdem die Wiedergabe gestoppt wird. Um das Gerät danach wieder einzuschalten,
stellen Sie den Funktionsschalter auf die Position OFF (Aus). Warten Sie einige
Sekunden und schalten Sie dann das Gerät wieder EIN.
This set operates on AC 230V 50Hz or 6 x 1.5V R14/ UM-2/ “C” size batteries (not
provided).
AC OPERATION
Connect the detachable AC cord (included) to the AC socket on the rear of the unit. Insert
the AC power cord into a convenient standard AC wall outlet.
DC OPERATION
Install the batteries in their compartment. Use only the size and type of batteries specied.
Respect the polarity indicated in the compartment. Improper polarity can cause damage
to the device. Do not attempt to recharge the batteries, they can catch re or explode.
The batteries need to be replaced when: The volume decreases, or sound is distorted
during operation. In order to avoid leakage, remove the batteries when unit will not be
used for a long period of time.
CAUTION: Danger of explosion if batteries are incorrectly replaced. Replace only with
the same or equivalent type.
Note:
- The AC cord must be unplugged from both the socket on the unit and the power outlet
for the unit to run on the batteries.
- When the set is connected to the mains, the power source automatically switches to AC.
- In a concern of saving energy, when playback has reached to the end or not playing,
the unit will automatically turn off after 10 minutes. To reset the unit, slide the Function
switch to OFF position. Wait a few seconds and then turn ON the unit again.
1. Slide the Function switch to CD/USB/AUX or RADIO position to turn on the unit. The
ON indicator will light up.
2. Slide the Function switch to OFF position to turn off the unit. The ON indicator will
turn off.
1. Positionnez l'interrupteur de fonction sur la position RADIO. L'indicateur ON s'allumera.
Il n'y a aucune indication qui s’afche sur l'écran LCD en mode radio.
2. Utilisez le sélecteur de bande FM/MW pour sélectionner la bande de fréquences.
3. Utilisez ensuite le bouton de tuning pour atteindre la sta tion de votre choix.
4. Réglez le niveau sonore.
Pour améliorer la réception radio:
FM: déployez l’antenne FM
MW: pivotez l'appareil horizontalement pour une réception optimale.
1. Coloque o Seletor de Funções na posição RADIO. O indicador LIGADO se acenderá.
Não há indicação no visor no visor LCD em modo rádio.
2. Utilize o comutador FM/MW para escolher a banda pretendida.
3. Utilize, de seguida, o botão TUNING para regular a frequência pretendida.
4. Regule o nível sonoro com a ajuda do botão rotativo VOLUME.
Para melhorar a qualidade de recepção rádio:
FM: Estique a antena .
MW: Rode o aparelho horizontalmente para uma melhor recepção.
1. Schieben Sie den Funktionsschalter in die RADIO-Position. Die Ein -Anzeige leuchtet
daraufhin auf. Im Radiomodus erscheint keine Anzeige im LCD.
2. Verwenden Sie den MW/UKW-Schalter, um den gewünschten Frequenzbereich
auszuwählen.
3. Drehen Sie anschließend am Tuning-Knopf, um die gewünschte Frequenz einzustellen.
4. Stellen Sie die Lautstärke mit Hilfe des Drehrädchens Lautstärke ein.
Zur Verbesserung der Radioempfangsleistung:
UKW: Ziehen Sie den UKW-Antennendraht vollständig aus.
MW: Zur Erreichung eines optimalen Empfangs drehen Sie die Einheit horizontal.
1. Slide the Function switch to RADIO position. The ON indicator will light up. There is no
indication on LCD display in radio mode.
2. Slide the Band switch to select between FM and MW band.
3. Use the TUNING control to tune to your desired radio station.
4. Adjust the volume level.
To enhance radio reception ability:
FM: Extend the telescopic antenna.
MW: Rotate the unit horizontally for optimum reception.
1. Positionnez l'interrupteur de fonction sur la position CD/USB/AUX ou RADIO pour
allumer l'unité. l'indicateur ON s'allumera.
2. Positionnez l'interrupteur de fonction sur la position OFF pour éteindre l'unité.
l'indicateur ON s'éteindra.
1. Coloque o Seletor de Funções na posição CD/USB/AUX ou RADIO para ligar o
aparelho. O indicador LIGADO se acenderá.
2. Coloque o Seletor de Funções na posição OFF para desligar o aparelho. O indicador
LIGADO se apagará.
1. Schieben Sie den Funktionsschalter in die CD/USB/AUX- oder RADIO-Position, um
das Gerät einzuschalten. Die Ein -Anzeige leuchtet daraufhin auf.
2. Schieben Sie den Funktionsschalter in die OFF-Position, um das Gerät auszuschalten.
Die EIN -Anzeige geht aus.
1. Positionnez l'interrupteur de fonction sur la position CD/USB/AUX. L'indicateur ON
s'allumera. Si l'appareil est en mode USB (L icône « USB » est afchée), appuyez sur la
touche CD / USB pour basculer en mode CD. L'icône « CD » sera afché.
2. Ouvrez le clapet du CD. Insérez un CD avec l'étiquette orientée vers le haut et fermez le
clapet du CD. après quelques secondes, le nombre total de piste apparaitra sur l'écran.
La lecture démarre automatiquement.
Remarque: Si le disque inséré est un disque MP3, seule l'icône « MP3 » sera afché
pendant la lecture.
LECTURE/PAUSE
Pour interrompre la lecture temporairement, appuyez sur la touche . L'indicateur
clignotera.
Pour reprendre la lecture, appuyez sur cette touche de nouveau.
ARRÊT
Si vous appuyez sur la touche pendant la lecture, le disque cessera d'être lu. (Le nombre
total de pistes s'afchera sur l'écran).
SAUT ET RECHERCHE
Vous pouvez toujours sauter une piste en avant ou en arrière pour atteindre le numéro
de piste de votre choix en appuyant sur les touches SAUT ( / ). Lorsque vous jouez
un CD audio, tnez la touche saut appuyée. Vous pouvez faire une recherche rapide
dans le CD dans la direction avant ou arrière. La lecture normale reprendra lorsque vous
relâcherez la touche.
Répétition de la lecture
Appuyez sur la touche REP. pour sélectionner un mode de répétition.
- Répétition de la piste, « » clignote à l’écran
- Répétition du répertoire, l'écran afche « FOLDER » (MP3 seulement)
- Répétition du disque, « » s’arrête de clignoter et reste allumé
Pour désactiver la répétition, appuyez de manière répétée sur la touche REP. jusqu'à ce
que l'indicateur du mode répétition disparaisse.
PROGRAMME
1. Lorsque la lecture est à l’arrêt, appuyez sur la touche PROG. L’icône « P » clignote et
l’indicateur « P01 » s’afche à l’écran.
2. Sélectionnez le chier de votre choix à l’aide des touches / . Appuyez sur la touche
PROG. pour conrmer.
3. Répétez les étapes ci-dessus pour programmer jusqu'à 20 pistes pour les CD et 99
pistes pour les MP3.
4. Appuyez sur la touche pour commencer la lecture programmée. L’icône « P » s’arrête
de clignoter et reste allumée pendant la lecture du programme.
5. Pour annuler la lecture programmée, appuyez deux fois sur la touche . L'indicateur de
programmation « P » s'éteindra.
SELECTIONNEZ UN DOSSIER (MP3 UNIQUEMENT)
Appuyez sur la touche FOLD.UP pour sélectionner le dossier suivant sur le disque en
cours d’utilisation (ou l’USB).
Si vous rencontrez un problème de lecture CD, l'une des deux solutions peut s'avérer utile:
1. Éteignez l'unité. Déconnectez le cordon d'alimentation CA de la prise CA et reconnectez-
le de nouveau.
2. Nettoyez votre disque CD.
1. Coloque o Seletor de Funções na posição CD/USB/AUX. O indicador LIGADO se
acenderá. Se a unidade estiver em modo USB (é exibido o ícone “USB”), prima o
botão CD/USB para mudar para o modo CD. É exibido o ícone “CD”.
2. Abra o compartimento do CD. Insira um CD com a etiqueta voltada para cima e feche
o compartimento do CD. Depois de alguns segundos, o número total de faixas será
exibido na tela. A reprodução começará imediatamente.
Nota: Se o disco inserido for um disco MP3, será exibido apenas o ícone “ MP3” durante
a reprodução.
REPRODUZIR/PAUSAR
Para interromper temporariamente, pressione o botão . O indicador piscará.
Para restaurar a reprodução, pressione esse botão novamente.
PARAR
Caso o botão for pressionado durante uma reprodução, a reprodução do disco irá
parar. (o número total de faixas será exibido na tela).
PULAR E BUSCAR
Você sempre poderá avançar ou voltar para o número da faixa desejado ao pressionar os
botões PULAR ( / ). Quando estiver reproduzindo qualquer CD de áudio, mantenha
o botão PULAR pressionado. Uma busca em alta velocidade para frente ou para trás
será realizada no CD. A reprodução normal será restaurada quando você soltar o botão.
REPETIR
Pressione mais de uma vez o botão REP. para selecionar o modo de repetição.
- Repetir 1, “ “ pisca no visor
- Repetir pasta: “ FOLDER ” é exibido na tela. (Apenas para MP3)
- Repetir todas: “ “ para de piscar e permanece LIGADO
Para cancelar a reprodução com repetição, prima o botão REP. várias vezes até que o
indicador desapareça.
PROGRAMAR
1. Quando a reprodução estiver parada, prima o botão PROG.. O ícone “ P ” pisca e
aparece “ P01 ” no visor.
2. Seleccione o cheiro pretendido com a ajuda dos botões / . Prima o botão
PROG. para conrmar.
3. Repita os passos acima para programar até 20 faixas de CDs e 99 faixas de MP3.
4. Prima o botão para iniciar a reprodução programada. O ícone “ P ” deixa de piscar
e permanece LIGADO durante a reprodução do programa.
5. Para cancelar a reprodução programada, pressione o botão duas vezes. O ícone
“ P ” desaparecerá.
SELECIONE UMA PASTA (APENAS MP3)
Pressione o botão FOLD. UP para selecionar a pasta seguinte do disco atual (ou USB).
Caso você encontre problemas quando for tocar um CD, uma das seguintes soluções
poderá ajudá-lo:
1. Desligue o aparelho. Retire o o da tomada e conecte-o de volta.
2. Limpe o seu CD.
1. Schieben Sie den Funktionsschalter in die CD/USB/AUX-Position. Die Ein -Anzeige
leuchtet daraufhin auf. Drücken Sie während des USB-Modus („USB“-Icon wird
angezeigt) die Taste CD/USB, um in den CD-Modus umzuschalten. Das „CD“-Icon
erscheint.
2. Öffnen Sie das CD-Ladefach. Legen Sie eine CD mit der beschrifteten Seite nach oben
in das Ladefach und schließen Sie es. Nach ein paar Sekunden wird die Gesamtzahl
der Titel in der Anzeige angezeigt. Die Wiedergabe startet automatisch.
1. Slide the function switch to CD/USB/ AUX position. The ON indicator will light up. If the
unit is in USB mode (“USB” icon is displayed), press CD/ USB button to switch to CD
mode. The “CD” icon is displayed.
2. Open the CD door. Insert a CD with label facing up and close the CD door. After a few
seconds, the total number of tracks will show on display. Playback starts automatically.
Note: If the disc inserted is a MP3 disc, only the “ MP3” icon will be displayed during
playback.
PLAY/PAUSE
To temporarily stop playing, press button. The icon will ash.
To resume play, press this button again.
STOP
If the button is pressed in the course of playing, the disc will cease to play. (Total
number of tracks will show on display).
SKIP AND SEARCH
You can always skip forward or backward to your desired track number by pressing the
SKIP( / ) buttons. When playing any audio CD, press and hold the SKIP button.
The CD will search at high speed in the forward or backward direction. Normal play will
continue when you release the button.
REPEAT
Press the REP. button repeatedly to select a play mode:
- Repeat One: “ “ blinks on display
- Repeat folder: “ FOLDER “ is displayed (MP3 only)
- Repeat All: “ “ stops blinking and remains ON
- To cancel repeat playback, press REP. button repeatedly until repeat indicator disappears.
PROGRAM
1. In stop mode, press PROG. button. “ P ” icon blinks and “ P01” shows on display.
2. Press / to select a desired track and press PROG. button to conform.
3. Repeat above steps to program up to 20 tracks for CD and 99 tracks for MP3.
4. Press button to start program playback. “ P ” icon stops blinking and remains ON
during program playback.
5. To cancel program playback, press button twice. “ P ” icon will disappear.
SELECT A FOLDER (MP3 ONLY)
Press FOLD.UP button to select the next folder of your current disc ( or USB).
If you encounter CD playback problem, either of the following ways may help:
1. Turn off the unit. Disconnect the AC power cord from AC outlet and reconnect it again.
2. Clean your CD disc.
1. Positionnez l'interrupteur de fonction sur la position CD/USB/AUX. L'indicateur ON
s'allumera. Si l’appareil est en mode CD (l’icône « CD » est afché, appuyez sur la
touche CD/USB pour basculer vers le mode USB. L’icône « USB » sera afchée.
2. Connectez le périphérique USB au port USB de l’appareil. La lecture démarre
automatiquement. Après quelques secondes, le nombre total de dossiers et de chiers
apparaitra sur l’écran. La lecture démarre automatiquement.
Remarques:
- N’insérez rien d’autre qu’un périphérique USB dans le port prévu à cet effet. Vous
risqueriez d’abîmer l’appareil.
- Le port USB ne doit pas être directement connecté à un ordinateur: cela pourrait
endommager l’appareil.
- Il existe sur le marché de nombreux modèles de clefs USB et de lecteurs MP3. Nous
ne pouvons garantir une compatibilité avec tous les formats. Merci d’utiliser un autre
périphérique USB si le vôtre ne fonctionne pas.
- Le nombre total de chiers MP3 sur le disque ne doit pas dépasser 999.
- Le disque ne peut contenir plus de 99 dossiers.
1. Coloque o Seletor de Funções na posição CD/USB/AUX. O indicador LIGADO se
acenderá. Se a unidade estiver em modo CD (é exibido o ícone “CD”), prima o botão
CD/USB para mudar para o modo USB. É exibido o ícone “USB”.
2. Ligue o periférico USB à porta USB do aparelho. Depois de alguns segundos, o
número total de diretórios e faixas serão exibidos no ecrã. A reprodução começará
imediatamente.
Observação:
- Não insira mais nada a não ser um periférico USB na porta prevista para este efeito.
Corre o risco de danicar o aparelho.
- A porta USB não deve ser directamente ligada a um computador: tal pode danicar o
aparelho.
- Existem no mercado inúmeros modelos de chaves USB e de leitores de MP3. Não
podemos garantir uma compatibilidade com todos os formatos. Utilize um outro
periférico USB se o seu não funcionar.
- O número total de arquivos MP3 no disco não poderá ser maior que 999.
- O disco não pode conter mais de 99 directórios.
1. Slide the function switch to CD/USB/AUX position. The ON indicator will light up. If the
unit is in CD mode (“CD” icon is displayed), press CD/USB button to switch to USB
mode. “USB” icon is displayed.
2. Connect an USB device to the USB port on unit. After a few seconds, the total number
of folder and track will appear on display. Playback starts automatically.
Notes:
- Do not put anything other than a USB device to the port of this unit. Other objects may
damage the USB mechanism.
- The USB socket must not be connected to the computer directly, for that may damage
the unit.
- There are many USB devices in the market. We cannot guarantee to support all different
models. Please try another USB device if your device is not supported.
- The total number of MP3 les on the disc should not exceed 999.
- The disc may not contain more than 99 directories.
1. Positionnez l'interrupteur de fonction sur la position CD/USB/AUX. Connectez votre
source auxiliaire (par exemple lecteur MP3) sur la prise AUX IN sur le coté droit de
l’unité (câble non inclus). L'unité passera automatiquement en mode AUX. « AUX»
apparaît a l’écran.
2. Commencez la lecture de votre source auxiliaire.
3. Réglez le volume au niveau souhaité.
4. Pour arrêter la lecture, débranchez votre source auxiliaire de la prise AUX IN.
1. Coloque o Seletor de Função na posição CD/USB/AUX. Conecte a origem auxiliar (por
exemplo um tocador mp3) ao conector AUX IN no lado direito do aparelho (o não
acompanha). O aparelho mudará para o modo AUX automaticamente. “ AUX ” aparece
no ecrã.
2. Arranque a reprodução na sua fonte auxiliar.
3. Ajuste o volume sonoro para o nível pretendido.
4. Para parar a reprodução, desligue a fonte áudio externa com ligação à tomada AUX IN.
1. Slide the Function switch to CD/USB/AUX position. Connect your auxiliary source
(e.g. mp3 player) to the AUX IN jack on the unit (cable not included). The unit will
switch to AUX mode automatically. “AUX” appears on display.
2. Start playback from your auxiliary source.
3. Adjust the volume to desired level.
4. To stop playback, disconnect your auxiliary source from the AUX IN jack.
Nettoyage
ATTENTION: Déconnectez cet appareil de toute source d’alimentation avant de le
nettoyer.
- Utilisez un chiffon doux, propre et sec. Dépoussiérez régulièrement les orices de
ventilation à l'arrière ou sur les côtés de l'appareil.
- L'utilisation de solvants ou de produits abrasifs ou à base d'alcool peut endommager
l'appareil.
- Si un objet ou un liquide entre dans l'appareil, débranchez immédiatement ce dernier et
faites-le contrôler par un ingénieur agréé.
Remarques sur les disques
* N’utilisez pas de disques de forme irrégulière (exemple : en forme de cœur, octogonaux).
L’appareil pourrait présenter des dysfonctionnements.
* Ne placez pas plusieurs disques dans le compartiment.
* N’essayez pas d’ouvrir le compartiment du disque pendant la lecture.
* Ne touchez pas la lentille. Vous pourriez provoquer un dysfonctionnement.
* Si le disque est rayé, sale ou maculé de traces de doigts, l’appareil peut ne pas
fonctionner. Avant la lecture, essuyez le disque avec un chiffon. Procédez du
centre vers l’extérieur. Ne rangez pas les disques dans des endroits présentant des
températures élevées ou une humidité importante. Ils pourraient se déformer. Après la
lecture, replacez vos disques dans leur boîtier.
Remarque importante
Retirez le disque du compartiment si l’appareil doit être transporté.
Limpeza
ATENÇÃO: Desligue este aparelho de qualquer fonte de alimentação antes de
proceder à sua limpeza.
• Utilize um pano macio, limpo e seco. Limpe regularmente os orifícios de ventilação na
parte de trás ou nos lados do aparelho para eliminar as partículas de pó.
• A utilização de solventes ou de produtos abrasivos ou à base de álcool pode danicar
o aparelho.
• Se um objecto ou líquido entrar no aparelho, desligue-o de imediato e solicite a sua
inspecção por um técnico autorizado.
Observações relativas aos discos
* Não utilize discos de forma irregular (exemplo: em forma de coração, octogonais). O
aparelho pode car avariado.
* Não coloque mais do que um disco no compartimento.
* Não tente abrir o compartimento do disco durante a reprodução.
* Não toque na lente dado que pode causar uma avaria no aparelho.
* Se o disco estiver riscado, sujo ou marcado com dedadas, o aparelho pode não
funcionar. Antes da reprodução, limpe o disco com um pano. Proceda do centro para
fora. Não arrume os discos em locais com temperaturas altas ou uma humidade
signicativa. Podem car deformados. Após a reprodução, volte a colocar os discos
nas respectivas caixas.
Observação importante
• Retire o disco do compartimento se o aparelho tiver de ser transportado.
Cleaning
WARNING: Disconnect the unit from the mains supply before cleaning.
- Use a soft, dry, clean cloth. Regularly dust the vents at the back or sides.
- Using solvents, abrasive or alcohol-based products risks damaging the appliance.
- If an object or liquid enters inside the appliance, unplug it immediately and have it
checked by an authorized engineer.
Notes on disc
* Do not use irregular shape CDs (example: heart-shaped, octagonal ones). It may result
in malfunctions.
* Do not place more than one disc in the disc compartment.
* Do not try to open the disc compartment during playing.
* Do not touch the lens. Doing so may cause malfunction.
* If there is a scratch, dirt or ngerprints on the disc, it may cause tracking error. Before
playing, clean the disc with a cleaning cloth. Wipe the disc from the center out. Don't
store discs in places with high temperatures or high humidity, they can become warped.
After playing, store the disc in its case.
Important Note
• Before transporting the unit, remove the disc from the disc compartment.
Alimentation:
Secteur: 230V 50Hz, consommation: 14W
Courant continu: 6x1.5V, type R14/ UM-2/”C” (non fournies)
Remarque: les caractéristiques et les spécications sont sujettes à modication sans
préavis.
Alimentação:
AC 230V 50Hz, consumo 14W
6x1,5V, bateria do modelo R14/ UM- 2/”C” (não inclusa)
Nota: O desenho e as especicações estão sujeitas a mudanças sem aviso prévio.
POWER SUPPLY:
AC 230V 50Hz, 14W consumption
DC 9V 6x1.5V, battery type R14/UM-2/ “C” size (not provided)
Note: Design and specication are subject to change without notice.
Knoll Elektrogroßhandel GmbH & Co. KG
Ritter-von-Eitzenberger-Straße 9, 95448 Bayreuth, Germany
EMPLACEMENT ET DESCRIPTION DES COMMANDES DESCRIÇÃO DO APARELHO
BESCHREIBUNG DES GERÄTES
LOCATION AND DESCRIPTION OF CONTROLS
RADIO PORTABLE LECTEUR CD/ MP3 AVEC USB TOCADOR DE RÁDIO E CD/MP3 PORTÁTIL COM USB
TRAGBARER RADIO-CD/MP3-PLAYER MIT USB
PORTABLE RADIO CD/ MP3 PLAYER
FR PT
DE
GB
1. LCD display
2. Power ON indicator
3. Speakers
4. PLAY/ PAUSE button
5. STOP button
6. SKIP button
7. SKIP button
8. CD/ USB button: To switch between
CD and USB mode.
9. FOLDER UP button (FOLD. UP) (for
mp3 only)
10. PROGRAM button (PROG.)
11. REPEAT button (REP.)
1. Afchage LCD
2. Indicateur ON
3. Haut-parleurs
4. Touche (lecture / pause)
5. Touche (Arrêt)
6. Touche (saut)
7. Touche (saut)
8. Touche CD / USB : Pour basculer
entre le mode CD et le mode USB.
9. Touche FOLD. UP (DOSSIER
SUIVANT) (uniquement pour mp3)
10. Touche PROG. (programmation)
11. Touche REP. (répétition)
12. Compartiment disque
1. Tela
2. Indicador LIGADO (ON)
3. Altifalantes
4. Botão (Leitura/Pausa)
5. Botão (Parar)
6. Botão
7. Botão
8. Botão CD/USB: Para trocar entre o
modo CD e USB.
9. Botão PASTA ACIMA (FOLD. UP)
(apenas para mp3)
10. Botão PROG. (programação)
11. Botão REP. (Repetição)
12. Compartimento para disco
1. LCD Anzeige
2. Betriebsanzeige (ON)
3. Lautsprecher
4. Taste ( Wiedergabe und Pause)
5. Taste
6. Taste
7. Taste
8. Taste CD/USB: Zwischen CD- und
USB-Modus umschalten.
9. Taste FOLD. UP (ORDNER
AUFWÄRTS) (nur für MP3)
10. Taste PROG. (Programmierung)
11. Taste REP. (Wiederholung)
12. CD compartment
13. Carrying handle
14. FM telescopic antenna
15. AUX IN jack
16. Function selector ( CD/USB/AUX,
RADIO, Unit ON/OFF)
17. Volume control
18. TUNING knob with dial scale
19. Dial pointer
20. Band selector (FM/MW)
21. USB port
22. Battery compartment
23. AC socket ( AC IN)
13. Poignée de transport
14. Antenne télescopique FM
15. Entrée auxiliaire (AUX IN)
16. Sélecteur de fonction ( CD/USB/AUX,
RADIO, Unité M/A)
17. Bouton de VOLUME
18. Molette TUNING (syntonisation) avec
cadran de fréquence
19. Aiguille
20. Sélecteur de bande (FM/MW)
21. Port USB
22. Compartiment à piles
23. Prise secteur ( AC IN)
13. Pega
14. Antena telescópica FM
15. Tomada de entrada Aux (AUX IN)
16. Seletor de funções (CD/USB/AUX,
RÁDIO, LIGAR/DESLIGAR aparelho)
17. Botão rotativo VOLUME
18. SINTONIZADOR com marcações
(TUNING)
19. Ponteiro de frequência
20. Seleccionador de bandas (FM/MW)
21. Porta USB
22. Compartimento para pilha
23. Tomada AC ( AC IN)
12. Disk-Fach
13. Tragegriff
14. FM-Teleskopantenne
15. AUX-Eingang (AUX IN)
16. Funktionsauswahl (CD/USB/AUX,
RADIO, EIN/AUS)
17. Lautstärkeregulierung
18. Frequenzauswahl mit Frequenzskala
19. Skalenzeiger
20. Frequenzbandwähler (FM/MW)
21. USB-Port
22. Batterie-Fach
23. AC-Buchse ( AC IN)
Lire attentivement les instructions avant de faire
fonctionner l’appareil.
Read the instructions carefully before operating the
unit.
Leia este manual com atenção antes de qualquer
utilização.
Bitte lesen sie dieses handbuch vor dem gebrauch des
gerätes sorgfältig durch.
Antes de utilizar este aparato, lea atentamente las
siguientes instrucciones.
Leggere attentamente questo manuale prima di
utilizzare l’apparecchio.
Lees deze handleiding aandachtig voor u het toestel
gebruikt.
FR
GB
PT
DE
ES
IT
NL
FR Manuel de l’utilisateur
GB User Manual
PT Manual do Utilizador
Benutzerhandbuch
DE
ES Manual de instrucciones
Manuale di istruzioni
IT
NL Handleiding M-23 KDB / M-23 KDG
Knoll Elektrogroßhandel GmbH & Co. KG
Ritter-von-Eitzenberger-Straße 9, 95448 Bayreuth, Germany
Knoll Elektrogroßhandel GmbH & Co. KG
Ritter-von-Eitzenberger-Straße 9, 95448 Bayreuth, Germany

Hinweis: Falls eine MP3-Disc eingelegt wurde, erscheint während der Wiedergabe nur
das „MP3“-Icon.
WIEDERGABE / PAUSE
Um die Wiedergabe vorübergehend zu unterbrechen, betätigen Sie die Taste . Die
Anzeige fängt an zu blinken.
Zum Fortfahren der Wiedergabe betätigen Sie diese Taste bitte erneut.
STOPP
Wenn die Taste während der Wiedergabe betätigt wird, wird die Wiedergabe der Disc
gestoppt. (Gesamtzahl der Titel wird in der Anzeige angezeigt.)
TITEL ÜBERSPRINGEN / SCHNELLSUCHLAUF
Sie können jederzeit zu der gewünschten Titelnummer springen, indem Sie die
Auswahltasten ( / ) benutzen. Während der CD-Wiedergabe, halten Sie die SKIP-
Taste gedrückt. Das Gerät durchsucht die CD dann mit hoher Geschwindigkeit vor bzw.
zurück. Die normale Wiedergabe wird fortgesetzt, wenn Sie die Taste loslassen.
WIEDERHOLUNG
Betätigen Sie die REP.-Taste mehrfach, um einen Wiederholungsmodus zu wählen:
- Einzelwiederholung: „ “ blinkt im Display
- Verzeichnis wiederholen: Anzeige zeigt " FOLDER ". (Nur MP3)
- Alles wiederholen: „ “ hört auf zu blinken und LEUCHTET stetig
Wenn Sie die Wiederholung wieder abschalten möchten, betätigen Sie einfach die REP.-
Taste solange, bis die Wiederholungsanzeige verschwindet.
PROGRAMMWIEDERGABE
1. Wenn die Wiedergabe angehalten ist, drücken Sie auf die Taste PROG.. Das Icon „ P “
blinkt und „ P01 “ erscheint in der Anzeige.
2. Wählen Sie die gewünschte Datei mit Hilfe der Tasten / . Drücken Sie zur
Bestätigung die Taste PROG..
3. Wiederholen Sie die obigen Schritte zur Programmierung von bis zu 20 Titel für Audio-
CDs und 99 Titel für MP3-Discs.
4. Drücken Sie auf die Taste , um die programmierte Wiedergabe zu beginnen.
Das Icon „ P “ hört auf zu blinken und LEUCHTET während der programmierten
Wiedergabe stetig.
5. Um die Programmwiedergabe abzubrechen, betätigen Sie die Taste zweimal. Das
Icon „ P “ verschwindet aus der Anzeige.
ORDNER AUSWÄHLEN (NUR FÜR MP3)
Drücken Sie die Taste FOLD.UP, um den nächsten Ordner auf der aktuellen Disc (oder
dem USB-Gerät) auszuwählen.
Falls CD-Wiedergabeprobleme auftreten, versuchen Sie sie auf eine der folgenden
Weisen zu beheben:
1. Schalten Sie das Gerät aus, trennen Sie es von der Stromversorgung ab und schließen
Sie es erneut an.
2. Reinigen Sie Ihre Compact-Disc.
USB-WIEDERGABE
REPRODUCCIÓN DE UN DISPOSITIVO USB
RIPRODUZIONE DI UNA PERIFERICA USB
WEERGAVE VAN EEN USB-APPARAAT
ANSCHLUSS EINER ZUSATZQUELLE
CONEXIÓN DE UN DISPOSITIVO EXTERNO
COLLEGAMENTO SORGENTE AUSILIARIA
GEBRUIK VAN DE HULPINGANG
WARTUNG
MANTENIMIENTO
MANUTENZIONE
ONDERHOUD
1. Schieben Sie den Funktionsschalter in die CD/USB/AUX-Position. Die Ein -Anzeige
leuchtet daraufhin auf. Drücken Sie während des CD-Modus („CD“-Icon wird
angezeigt) die Taste CD/USB, um in den USB-Modus umzuschalten. Das „USB“-Icon
erscheint.
2. Schließen Sie den USB-Stick an den USB-Port des Geräts an. Nach ein paar
Sekunden wird die Gesamtzahl der Verzeichnisse und Titel in der Anzeige angezeigt.
Die Wiedergabe startet automatisch.
Anmerkungen:
- Stecken Sie nur ein USB-Gerät in den dazu vorgesehenen USB-Port. Sie könnten das
Gerät ansonsten beschädigen.
- Der USB-Port darf nicht direkt an einen PC angeschlossen werden: Dadurch könnte
das Gerät beschädigt werden.
- Auf dem Markt sind zahlreiche USB-Sticks und MP3-Player erhältlich. Die Kompatibilität
mit allen Formaten kann daher nicht gewährleistet werden. Benutzen Sie bitte einen
anderen USB-Stick, falls der Ihre nicht funktionieren sollte.
- Auf der Disc dürfen höchstens 999 MP3-Dateien gespeichert sein.
- Die Disc darf insgesamt nicht mehr als 99 Verzeichnisse enthalten.
1. Deslice el interruptor de función hasta la posición CD/USB/AUX. El indicador de
Encendido se iluminará. Si la unidad está en modo CD (el icono "CD" se muestra)
presione el botón CD/USB para cambiar a modo USB. Ahora se mostrará el icono
"USB".
2. Introduzca un dispositivo USB en el puerto USB del aparato. Pasados unos segundos,
el número total de carpetas y pistas aparecerá en el display. La reproducción iniciará
automáticamente.
Notas:
- Introduzca sólo dispositivos USB en el puerto USB. En caso contrario, podría dañar
el aparato.
- No conecte el puerto USB directamente a un ordenador: podría dañar el aparato.
- En el mercado pueden encontrarse numerosos modelos de dispositivos USB y de
reproductores MP3. No podemos garantizarle que este aparato sea compatible con
todos los formatos. En caso de que su dispositivo USB no funcione, utilice otro.
- El número total de archivos MP3 del disco no deberá ser superior a 999.
- El disco no puede contener más de 99 carpetas.
1. Scorrete l'interruttore di funzione in posizione CD/USB/AUX. La spia di accensione si
illumina. Se l'unità è in modalità CD (l'icona “CD” è visualizzata sul display), premere
il tasto CD/USB per passare alla modalità USB. L'icona “USB” viene visualizzata sul
display.
2. Collegate la periferica USB alla porta USB dell’apparecchio. Dopo pochi secondi,
il numero totale di cartella e traccia apparirà sul display. La riproduzione si attiverà
automaticamente.
Nota bene:
- Inserite esclusivamente periferiche USB nello slot corrispondente. Inserire altri oggetti
rischia di danneggiare l’apparecchio.
- La porta USB non deve essere direttamente collegata ad un PC, in quanto ciò potrebbe
danneggiare l’apparecchio.
- Sul mercato esistono numerosi modelli di periferiche USB e di lettori MP3. Non è
possibile garantire la compatibilità con tutti i formati. Qualora un modello di periferica
USB non sia compatibile, provate con un’altro.
- Il numero totale di le MP3 non può superare le 999 unità.
- Il numero totale di cartelle non può superare le 99 unità.
1. Schuif de functieschakelaar naar de stand CD/USB/AUX. De AAN -indicator licht op.
Druk, als het apparaat in de CD-modus staat (het pictogram “CD” wordt getoond),
op CD/USB om naar de USB-modus te schakelen. Het pictogram “USB” wordt nu
getoond.
2. Sluit de USB-randapparatuur aan op de USB-poort van het toestel. Na een paar
seconden zullen het totaal aantal mappen en het totaal aantal tracks op het display
verschijnen. Het afspelen start automatisch.
Opmerkingen:
- Steek niets anders dan USB-randapparatuur in de hiertoe voorziene poort. U riskeert
het toestel te beschadigen.
- De USB-poort mag niet rechtstreeks aangesloten worden op een computer: dit kan het
toestel beschadigen.
- Er bestaan verschillende USB-sleutels en MP3-spelers op de markt. Wij kunnen niet
garanderen dat het toestel compatibel is met alle formaten. Gebruik daarom een andere
USB-drager indien uw USB-drager niet werkt.
- Het totaal aantal MP3-bestanden op de disc mag niet hoger zijn dan 999.
- De schijf mag niet meer dan 99 mappen bevatten.
1. Schieben Sie den Funktionsschalter in die CD/USB/AUX-Position. Schließen Sie ein
externes Gerät (z.B. MP3-Spieler) an die AUX IN Buchse rechts am Gerät an (Kabel
nicht mitgeliefert). Das Gerät schaltet dann automatisch in den AUX-Modus. Die Anzeige
„AUX“ wird auf dem Display eingeblendet.
2. Beginnen Sie mit dem Playback Ihrer Zusatzquelle.
3. Stellen Sie die Lautstärke auf den gewünschten Pegel ein.
4. Um das Playback zu beenden, nehmen Sie Ihre Zusatzquelle aus der AUX IN Buchse
heraus.
1. Deslice el interruptor de función hasta la posición CD/USB/AUX. Conecte su fuente
auxiliar (por ejemplo, un reproductor de MP3) a la toma AUX IN de la parte derecha
de la unidad (cable no incluido). El aparato pasará al modo auxiliar automáticamente.
«AUX» aparecerán en la pantalla
2. Empiece el playback desde la fuente AUX IN.
3. Ajuste el volumen hasta el nivel deseado.
4. Para parar el playback, desconecte la fuente AUX-IN de la entrada AUX- IN.
1. Scorrete l'interrutore di funzione in posizione CD/USB/AUX. Collegate la sorgente
ausiliaria (es.lettore MP3) alla presa AUX IN posta sul retro dell’apparecchio (cavo non
incluso).L'unità entra in automatico in modalità AUX. “AUX” compare sullo schermo.
2. Avviate la riproduzione dalla sorgente ausiliaria.
3. Regolate il volume al livello desiderato.
4. Per arrestare la riproduzione scollegate la sorgente ausiliaria dalla presa AUX IN.
1. Schuif de functieschakelaar naar de stand CD/USB/AUX. Sluit uw hulpbron (bv. mp3-
speler) aan op de AUX IN-aansluiting aan de rechterkant van het apparaat (kabel
niet meegeleverd). Het apparaat schakelt automatisch naar de AUX-modus. « AUX »
verschijnt op het scherm
2. Start het afspelen van uw hulpbron.
3. Stel het geluidsvolume in op het gewenste niveau.
4. Om het afspelen te stoppen, trekt u de externe audiobron uit de AUX IN aansluiting.
Reinigung
ACHTUNG: Entfernen Sie alle Geräte von den vorhandenen Stromquellen, bevor
Sie das Gerät reinigen.
• Verwenden Sie ein weiches, trockenes und sauberes Tuch. Entfernen Sie regelmäßig
den Staub von den Lüftungsöffnungen hinten und an den Seiten.
• Die Verwendung von Lösungsmitteln, scharfen Reinigungsmitteln oder alkoholhaltigen
Reinigungsmitteln kann das Gerät beschädigen.
• Wenn ein Gegenstand oder eine Flüssigkeit in das Gerät gelangt, ziehen Sie sofort
den Netzstecker und lassen Sie das Gerät von einem zugelassenen Fachmann prüfen.
HINWEISE ZU DEN DISKS
* Verwenden Sie keine CDs mit speziellen Formen (achteckige, herzförmige CDs...), die
Störungen des Gerätes hervorrufen könnten.
* Legen Sie nicht mehr als eine Disk in das CD-Fach ein.
* Versuchen Sie nicht, das CD-Fach während der Wiedergabe zu öffnen.
* Berühren Sie nicht die Linse, denn dadurch könnten Störungen des Gerätes
hervorgerufen werden.
* Eine CD, die Kratzer, Staub oder Fingerspuren aufweist, kann Störungen verursachen.
Nach dem Abspielen, reinigen Sie die CD mit einem Tuch. Reinigen Sie die CD immer
von innen nach außen. Räumen Sie CDs nicht an zu heißen oder nassen Stellen auf,
damit sie nicht verformt werden. Räumen Sie Ihre CDs nach dem Abspielen in der
zugehörigen Hülle auf.
Wichtiger Hinweis
• Vor dem Transport des Geräts die eventuell vorhandene Disc herausnehmen.
Limpieza
ATENCIÓN: Desconecte este aparato de toda fuente de alimentación antes de
limpiarlo.
- Utilice un paño suave, limpio y seco. Limpie regularmente los oricios de ventilación de
la parte trasera del aparato y de los laterales.
- El uso de disolventes o productos abrasivos o a base de alcohol puede dañar el
aparato.
- Si un objeto o un líquido penetra en el aparato, desenchúfelo inmediatamente y
póngase en contacto con personal técnico cualicado.
Notas relativas a los discos
* No utilice discos con formas especiales (octogonales, en forma de corazón, etc.), ya
que podrían ocasionar un fallo en el funcionamiento del aparato.
* No introduzca más de un disco en el compartimento.
* No intente abrir el compartimento del disco durante la reproducción.
* No toque la lente del reproductor; si lo hace, podría producirse un fallo en el
funcionamiento del aparato.
* Un disco cuya supercie esté rayada, contenga polvo o huellas puede ocasionar fallos
en el funcionamiento del aparato. Antes de comenzar la reproducción, limpie el disco
con un paño limpio. Para ello, frótelo desde el centro hacia los bordes. No guarde los
discos en lugares con temperaturas elevadas o una humedad considerable; podrían
deformarse. Una vez que haya escuchado el disco, guárdelo en su estuche.
Nota importante
• Retire el disco del compartimento cuando transporte el aparato.
Pulizia
ATTENZIONE: Scollegare l’apparecchio dalla fonte di alimentazione prima di
pulirlo.
- Servitevi di un panno morbido e asciutto. Spolverate regolarmente le aperture di
ventilazione poste sul retro o ai lati dell’apparecchio.
- Il ricorso a solventi oppure a prodotti abrasivi o a base d’alcool rischia di danneggiare
l’apparecchio.
- Se un oggetto o un liquido entra nell’apparecchio, scollegate immediatamente
l’apparecchio dalla corrente e afdatelo ad un tecnico autorizzato.
Osservazioni sui dischi
* Non utilizzate dischi di forma irregolare (ad esempio ottagonali o a forma di cuore).
L’apparecchio potrebbe non funzionare correttamente.
* Non inserite più di un disco nello scomparto.
* Non cercate di aprire il compartimento CD mentre la riproduzione è in corso.
* Non toccate la lente per non provocare un malfunzionamento.
* Se il disco è rigato, sporco o presenta impronte digitali, è possibile che l'apparecchio
non funzioni. Prima della riproduzione, pulite il disco con un panno. Pulite delicatamente
dal centro verso l'esterno. Non riponete i dischi in luoghi soggetti a temperature elevate
o a forte umidità. Potrebbero deformarsi. Terminato l’ascolto, riponete il disco nella sua
custodia.
Nota importante
• Estraete il disco dal compartimento se l’apparecchio deve essere trasportato.
OPGEPAST: Koppel het toestel los van elke voedingsbron vooraleer het schoon
te maken.
- Gebruik een propere, zachte, droge doek. Stof de verluchtingsopeningen aan de
achterzijde of zijkanten van het toestel regelmatig af.
- Het gebruik van solventen of bijtende middelen op basis van alcohol kan het toestel
beschadigen.
- Als een object of een vloeistof in het toestel loopt, koppel het dan meteen los en laat het
nakijken door een gekwaliceerd technieker.
Opmerkingen ivm disks
* Gebruik geen disks met een speciale vorm (achthoek, hartvorm, enz.) die het toestel
slecht zou doen werken.
* Plaats maar 1 disk in het compartiment.
* Open het compartiment niet tijdens de weergave.
* Raak de lens niet aan om disfunctie van het toestel te vermijden.
* Een disk met krassen, stof of vingerafdrukken kan slecht werken. Gebruik een zachte,
droge doek om de disk schoon te maken, vooraleer de disk weer te geven. Doe dit
van het midden uit naar de zijkanten toe. Plaats de disks nooit bloot aan vochtigheid
of extreme temperaturen om ze niet te vervormen. Plaats uw disks na de weergave
opnieuw in hun doosjes.
Belangrijke opmerking
• Haal de disk uit het compartiment als het toestel vervoerd moet worden.
TECHNISCHE EIGENSCHAFTEN
FICHA TÉCNICA
SPECIFICHE
TECHNISCHE KENMERKEN
IMPORTANT SAFETY INSTRUCTION
IMPORTANTES INSTRUCCIONES DE SEGURIDAD
ISTRUZIONI DI SICUREZZA IMPORTANTI
BELANGRIJKE VEILIGHEIDSINSTRUCTIES
ACHTUNG: Um Elektroschockgefahr zu vermeiden, dürfen Sie
dieses Gerät nicht demontieren. Das Gerät enthält keine Teile,
die der Benutzer selbst reparieren kann. Vertrauen Sie die
Instandhaltung des Geräts einem Fachmann an.
ATENCIÓN: Para reducir el riesgo de descarga eléctrica, no
desmonte el aparato. En el interior de este aparato no existe
ninguna pieza que pueda ser reparada por el usuario. Para
cualquier operación de mantenimiento y reparación, póngase en
contacto con personal técnico cualicado.
ATTENZIONE: Per ridurre il rischio di scossa elettrica, non
smontate l’apparecchio. Questo apparecchio non contiene
pezzi riparabili dall’utente. Per ogni riparazione rivolgetevi
esclusivamente a tecnici qualicati.
OPGEPAST: Om het risico op elektrische schokken te vermijden,
mag u het toestel niet demonteren. Het toestel bevat geen enkel
onderdeel dat door de gebruiker zelf kan gerepareerd worden.
Contacteer altijd een gekwaliceerde technieker indien een
reparatie nodig is.
WARNUNG: UM BRAND- UND ELEKTROSCHOCKGEFAHR VORZUBEUGEN,
DÜRFEN SIE DIESES GERÄT WEDER REGEN NOCH FEUCHTIGKEIT AUSSETZEN.
ACHTUNG: Beim Umgehen der Sicherheitsvorrichtungen oder wenn diese defekt sind,
kann aus dem Gerät unsichtbare Laserstrahlung austreten.
Dieser CD-Player wurde als Klasse I Laserprodukt eingestuft. Der Hinweis KLASSE 1
LASER PRODUKT bendet sich auf der Unterseite des Gehäuses.
ADVERTENCIA: PARA PREVENIR EL RIESGO DE INCENDIO O DE DESCARGA
ELÉCTRICA, NO EXPONGA ESTE APARATO A LA LLUVIA O A LA HUMEDAD.
ATENCIÓN: Radiación láser invisible en caso de apertura o fallo de los cierres de
seguridad.
Este reproductor de discos compactos ha sido clasicado como producto LÁSER DE
CLASE 1. La marca de PRODUCTO LÁSER DE CLASE 1 se encuentra en la parte
inferior del exterior del dispositivo.
AVVERTENZA: PER EVITARE IL RISCHIO DI INCENDIO O SCOSSA ELETTRICA,
NON ESPONETE L’APPARECCHIO ALLA PIOGGIA O ALL’UMIDITÀ.
ATTENZIONE: Emissione di radiazioni laser invisibili quando i dispositivi di sicurezza
sono aperti o difettosi.
Questo lettore CD è un prodotto a laser di classe 1. Il simbolo indicante PRODOTTO A
LASER DI CLASSE 1 è posto sul fomdo del compartimento disco.
WAARSCHUWING Stel het toestel niet bloot aan vocht of regen om het risico op
brand of elektrische schokken te vermijden.
OPGEPAST: ONZICHTBARE LASERSTRALEN WANNEER HET VEILIGHEIDSME-
CHANISME OPEN OF STUK IS. Deze cd-speler is geclassiceerd als een KLASSE
1 LASERPRODUCT. De KLASSE 1 LASERPRODUCT-markering bevindt zich op de
onderkant van de behuizing.
Das in einem Pfeil endende Blitzsymbol innerhalb eines Dreiecks weist den
Benutzer auf die Gegenwart einer „gefährlichen Spannung“ im Gerät hin.
El símbolo del rayo con una echa dentro de un triángulo equilátero advierte al
usuario de la presencia de voltaje peligroso en el interior del aparato.
Il simbolo del fulmine con una freccia all’estremità all’interno di un triangolo
equilatero avverte l’utente della presenza di una “tensione pericolosa”
nell’apparecchio.
Het symbool van een zwarte driehoek met daarin een witte bliksemschicht
eindigend in een driehoek, waarschuwt de gebruiker dat er een gevaarlijke
spanning aanwezig is in het toestel.
Das Ausrufezeichen im Inneren eines Dreiecks weist den Benutzer auf wichtige
Anweisungen hin, die sich in dem das Gerät begleitenden Handbuch benden.
El signo de exclamación dentro de un triángulo equilátero advierte al usuario de
la presencia de importantes instrucciones de funcionamiento y mantenimiento en
el manual que acompaña al producto.
Il punto esclamativo inscritto nel triangolo equilatero indica all'utente che nel
manuale di istruzioni si trovano importanti avvertenze per l'uso e la manutenzione
dell'apparecchio.
Het bovenstaande symbool (zwarte driehoek met daarin een wit uitroepingsteken)
waarschuwt de gebruiker dat er belangrijke gebruiksaanwijzingen in verband met
het gebruik en het onderhoud ter beschikking zijn in de bijgeleverde handleiding.
Das Warnsymbol bendet sich auf der Unterseite des Geräts.
El símbolo de precaución se encuentra en la parte inferior del dispositivo.
ll simbolo è posto sul fondo dell'unità.
De waarschuwingsmarkering bevindt zich op de onderkant van het apparaat.
Wenn Sie dieses Gerät entsorgen möchten, denken Sie daran, es bei einer
Sammelstelle für elektrische Haushaltsgeräte zu entsorgen. Erkundigen
Sie sich nach Ihrer nächstgelegenen Wertstoffsammelstelle. Für detaillierte
Informationen wenden Sie sich an die örtlichen Behörden oder an Ihren
Händler. (Richtlinie über elektrische und elektronische Abfallgeräte).
Si desea deshacerse de este aparato, recuerde que ha de depositarlo en
un lugar destinado al reciclado de electrodomésticos. Infórmese acerca del
centro de reciclaje más cercano. Consulte a las autoridades locales o a su
proveedor para obtener más información al respecto. (Directiva de Residuos
de Aparatos Eléctricos y Electrónicos)
Se in futuro volete sbarazzarvi di questo apparecchio, ricordate che le
apparecchiature elettroniche non devono essere gettate insieme ai riuti
domestici. Informatevi per sapere dove si trova il centro di riciclaggio più
vicino. Per ulteriori dettagli, rivolgetevi alle autorità locali o al vostro rivenditore.
(Direttiva sui riuti delle apparecchiature elettriche ed elettroniche).
Indien u dit toestel in de toekomst wilt weggooien, denk er dan aan om het
te recycleren via een inzamelpunt voor elektrische huishoudapparaten.
Informeer naar het dichtstbijzijnde recyclagecentrum. Voor meer informatie
wendt u zich tot de lokale overheden of uw verdeler (richtlijn met betrekking
tot Afval afkomstig van elektrische en elektronische apparaten).
ACHTUNG
- Verwenden Sie dieses Gerät in klimatisch gemäßigter Umgebung.
- Das Typenschild bendet sich auf der Rückseite des Geräts.
- Achten Sie auf einen Mindestabstand von 5 cm zu Ihrem Gerät, um eine ausreichende
Belüftung zu gewährleisten.
- Stellen Sie eine ausreichende Belüftung des Geräts sicher und behindern Sie die
Belüftungsöffnungen nicht mit Gegenständen wie z. B. Zeitungen, Tischdecken,
Vorhängen, usw.
- Stellen Sie keine Wärmequelle wie eine angezündete Kerze auf oder in der Nähe des
Geräts ab.
- Setzen Sie das Gerät niemals Wasserspritzern oder Feuchtigkeit aus.
- Stellen Sie kein mit Wasser gefülltes Gefäß, wie z. B. Vasen, in der Nähe des Geräts ab.
- Werfen Sie Batterien nicht ins Feuer! Entsorgen Sie leere Batterien umweltgerecht.
- Batterien dürfen keiner übermäßigen Hitze ausgesetzt werden (wie zum Beispiel praller
Sonne, Feuer oder anderen ähnlichen Hitzequellen).
- Mit dem Netzstecker kann das Gerät vom Netz getrennt werden, er muss daher leicht
zugänglich sein. Um das Gerät vollständig vom Netz zu trennen, trennen Sie den
Netzstecker komplett von der Netzsteckdose. Der Netzstecker darf nicht behindert
werden und muss während der Verwendung leicht zugänglich sein.
- Unter der Einwirkung von elektrostatischen und/oder elektrischen Phänomen kann das
Produkt Fehlfunktionen aufweisen. Ein Zurücksetzen auf die Werkseinstellungen kann
sich als notwendig erweisen.
ATENCIÓN
- Utilice este aparato en lugares con climas templados.
- La placa de datos técnicos está situada en la parte posterior del dispositivo.
- Deje libre alrededor del aparato una distancia mínima de 5 cm para garantizar una
correcta ventilación del mismo.
- Para asegurar una ventilación correcta del aparato, no cubra los oricios de ventilación
con objetos tales como periódicos, manteles, cortinas, etc.
- No coloque ninguna fuente de calor, como por ejemplo una vela encendida, sobre el
aparato o cerca de él.
- No exponga el aparato a salpicaduras o a la humedad.
- No coloque objetos que contengan líquido, como un jarrón, encima del aparato.
- No tire las pilas al fuego. Respete el medio ambiente cuando se deshaga de las pilas
usadas.
- No exponga las pilas a temperaturas demasiado altas, como las producidas por la
exposición directa a los rayos del sol, al fuego o a otras fuentes de calor.
- El acceso al enchufe ha de permanecer despejado. Para cortar por completo la
alimentación del aparato, desenchúfelo de la toma de corriente. Se ha de poder
acceder fácilmente al enchufe durante el uso del aparato; procure que el acceso al
mismo esté despejado.
- Como resultado de fenómenos electroestáticos y/o eléctricos transitorios, pueden
producirse fallos en el funcionamiento del producto. En estos casos, el usuario deberá
reiniciar el aparato desenchufándolo y volviéndolo a enchufar.
- Antes de tirar las pilas, consulte a su proveedor: puede entregárselas para reciclarlas.
ATTENZIONE
- Utilizzate l’apparecchio in ambienti temperati.
- La targhetta segnaletica si trova nella parte posteriore dell'apparecchio.
- Lasciate uno spazio minimo di 5 cm intorno all’apparecchio per permettere una
ventilazione sufciente.
- Garantite sempre una ventilazione corretta dell’apparecchio e non coprite le aperture di
ventilazione con oggetti come giornali, tovaglie, tende, ecc.
- Non collocate nessuna fonte di calore, come una candela accesa, sopra o nei pressi
dell’apparecchio.
- Non esponete l’apparecchio all'acqua o all’umidità.
- Non collocate nessun recipiente contenente liquidi, come ad esempio un vaso, nelle
vicinanze dell’apparecchio.
- Non gettate le pile nel fuoco! Abbiate cura di rispettare l’ambiente quando gettate le pile.
- Non esponete le pile ad un calore eccessivo, come raggi solari, fuoco o fonti di calore
analoghe.
- La presa di alimentazione permette di scollegare l’apparecchio dalla corrente elettrica
e deve quindi restare facilmente accessibile. Per interrompere completamente
l’alimentazione dell’apparecchio, scollegate la spina di alimentazione dalla presa di
corrente. La presa di alimentazione deve restare facilmente accessibile durante l’uso,
accertatevi che l’accesso alla presa sia libero.
- Per effetto di fenomeni transitori elettrostatici e/o elettrici, è possibile che il prodotto non
funzioni correttamente. In tal caso è opportuno reinizializzarel’apparecchio.
- Prima di gettare le pile, rivolgetevi al vostro rivenditore, qualora provveda al riciclaggio
delle pile usate.
OPGELET
- Gebruik dit toestel bij een gematigd klimaat.
- Het kenmerkenplaatje bevindt zich aan de achterkant van het toestel.
- Zorg voor een afstand van minimum 5 cm rondom uw toestel voor voldoende ventilatie.
- Zorg voor een juiste ventilatie van het toestel en bedek de ventilatie-openingen niet met
voorwerpen zoals dagbladen, tafellakens, gordijnen, enz.
- Plaats geen warmtebron, zoals een brandende kaars, op of in de buurt van het toestel.
- Stel het toestel niet bloot aan waterspatten of vochtigheid.
- Plaats geen voorwerpen met vloeistof, zoals een vaas, op of in de buurt van het toestel.
- Gooi de batterijen niet in het vuur. Respecteer het milieu als u gebruikte batterijen
wegwerpt.
- Stel de batterijen niet bloot aan overdreven hitte zoals zonnestralen, vuur of gelijkaardige
warmtebronnen.
- Met de netspanningsstekker kan het toestel uitgetrokken worden, deze moet
dus gemakkelijk toegankelijk blijven. Om de voeding van het toestel volledig te
onderbreken dient u de voedingsstekker helemaal uit het stopcontact te trekken. De
netspanningsstekker mag niet verhinderd worden en moet gemakkelijk toegankelijk zijn
tijdens gebruik.
- Onder invloed van tijdelijke elektrostatische en/of elektrische verschijnselen kan het
product storingen ondervinden en kan een heropstart nodig blijken.
- Voor u batterijen wegwerpt, raadpleegt u eerst uw verdeler die wellicht batterijen
terugneemt voor specieke recyclage.
- Aufgebrauchte Batterien bitte nicht wegwerfen, sondern fragen Sie bei Ihrem Händler
nach ob dieser möglicherweise Batterien zum speziellen Wiederverwerten (Recycling)
entgegen nimmt und sammelt.
Netzstromversorgung:
AC 230V 50Hz, Stromverbrauch 14W
DC: 6 Batterien Typ R14/UM-2/ “C” (nicht im Lieferumfang enthalten)
Bemerkung: Gestaltung und Ausführung bleiben Änderungen vorbehalten.
Alimentación:
AC 230V 50Hz, consumo 14W
DC 6x1,5V pilas R14/ UM-2/del tipo ”C” (no incluidas)
Nota: Los diseños y especicaciones están sujetos a cambio sin previo aviso.
Alimentatore:
CA 230V 50 Hz,potenza assorbita 14W
DC 9V, 4x1.5V batteria tipo R14/UM-2/”C” (non forniti).
Nota: Il modello e le caratteristiche tecniche possono subire variazioni senza preavviso.
Netstroom:
AC 230V 50Hz, Verbruik 14W
DC: 6x1.5V, batterijtype R14/ UM-2/”C” (niet meegeleverd)
Opmerking: Ontwerp en specicaties zijn onderhevig aan verandering zonder
kennisgeving.
FUENTE DE ALIMENTACIÓN
ALIMENTAZIONE
STROOMTOEVOER
FUNCIONAMIENTO DE LA RADIO
ASCOLTO DELLA RADIO
NAAR DE RADIO LUISTEREN
ENCENDIDO/APAGADO DE LA UNIDAD
ATTIVARE E DISATTIVARE L’APPARECCHIO
HET APPARAAT IN-/UITSCHAKELEN
REPRODUCCIÓN DE DISCOS
RIPRODUZIONE DI UN DISCO
WEERGAVE VAN DISKS
Este aparato funciona con CA 230V 50Hz o pilas 6 X 1.5V tipo R14/ UM-2/ tamaño
"C" (no incluidas).
Funcionamiento CA (corriente alterna)
Conecte el cable de CA (incluido) a la entrada CA de detrás del aparato. Conecte el cable
CA a la toma de corriente de la pared.
Funcionamiento DC
Introduzca la pila en el compartimento de la pila. Utilice únicamente pilas que cumplan
las recomendaciones del fabricante. Respete la polaridad al colocar las pilas (véase
el interior del compartimento de las pilas). Si no lo hace, podría estropear el aparato.
No intente recargar las pilas no recargables. Podrían sobrecalentarse y explotar.
Las baterías se tienen que sustituir cuando: el volumen disminuye, o el sonido está
distorsionado durante el funcionamiento. Con el n de evitar cualquier tipo de derrame
de líquido, extraiga las baterías cuando no vaya a utilizar el aparato durante un largo
periodo de tiempo.
ATENCIÓN: Riesgo de explosión si las pilas no se introducen correctamente. Cambie las
pilas únicamente por otras del mismo tipo o uno equivalente.
¡Precaución!
- Para que el dispositivo funcione con baterías, el cable CA debe estar desenchufado
tanto del enchufe del dispositivo como de la toma de corriente.
- Cuando el aparato está conectado a la red eléctrica, la fuente de alimentación cambia
automáticamente a CA.
- Con el objetivo de ahorrar energía, cuando la reproducción haya alcanzado el nal
o no se esté reproduciendo, la unidad se apagará automáticamente transcurridos 10
minutos. Para resetear la unidad, deslice el interruptor de Función hasta la posición
OFF. Espere unos segundos y luego encienda de nuevo la unidad.
Questo apparecchio è alimentato da un alimentatore CA 230V 50Hz o 6 batterie X
1.5V R14/ UM-2/ ”C” (non forniti).
Alimentazione con CA
Collegare il cavetto del CA (fornito) alla presa CA sulla parte posteriore dell’apparecchio.
Inserire il cavetto di alimentazione CA in una presa da parete CA standard.
Alimentazione con CC
Inserire le batterie nel relativo vano.Utilizzate soltanto pile che corrispondono alle
indicazioni del fabbricante. Rispettate la polarità durante l’inserimento delle pile (vedi
illustrazione nel comparto). Non rispettare la polarità può arrecare danni all’apparecchio.
Non cercate di ricaricare pile non ricaricabili. Potrebbero surriscaldarsi ed esplodere. Le
batterie devono essere sostituite quando: il volume diminuisce, o il suono risulta distorto
durante l’uso. Per evitare perdite di acido, rimuovere le batterie se l’unita non viene
utilizzata per un periodo prolungato.
ATTENZIONE: Rischio di esplosione se le pile non sono inserite correttamente. Utilizzate
solamente pile identiche o equivalenti.
Nota:
- Il cavo di alimentazione deve essere staccato sia dalla presa dell'apparecchio, che dalla
presa di corrente, per far operare l'apparecchio con batterie.
- Quando l’apparecchio è collegato con la presa da parete mediante il cavetto CA,
l’alimentazione passa automaticamente a CA.
- Per risparmiare energia, al termine della riproduzione o quando accesa ma non in
uso, l'unità si spegne in automatico dopo 10 minuti. Per resettare l'unità, scorrere
l'interruttore di funzione in posizione OFF. Attendere alcuni secondi, quindi riaccendere
l'unità.
Dit apparaat werkt op AC 230V 50Hz of 6 x 1.5V R14/ UM-2/ “C“-batterijen (niet
meegeleverd).
AC
Sluit het afneembare AC-snoer (inbegrepen) aan op de AC-aansluiting aan de achterkant
van het apparaat. Steek het AC-snoer in een standaard AC-stopcontact.
Gebruik van de batterijen
Installeer de batterijen in hun compartiment. Gebruik uitsluitend batterijen die voldoen
aan de aanbevelingen van de fabrikant. Respecteer de polariteit wanneer u batterijen
plaatst (zie compartiment). Anders kan het toestel beschadigd raken. Zorg ervoor dat
u geen niet-oplaadbare batterijen oplaadt. Ze zouden kunnen verhitten en ontploffen.
Vervang de batterijen wanneer het volume vermindert of het geluid vervormt tijdens het
gebruik. Om lekken te vermijden dienen de batterijen verwijderd te worden wanneer het
apparaat voor langere tijd niet wordt gebruikt.
OPGELET: Ontplofngsgevaar als de batterijen niet juist geplaatst zijn. Gebruik enkel
identieke of gelijkwaardige batterijen.
Let op!
- Om het apparaat op batterijen te laten werken moet het AC-snoer afgekoppeld zijn van
zowel de aansluiting op het apparaat als van het stopcontact.
- Wanneer het AC-snoer aangesloten is op het apparaat en op het stopcontact, wijzigt de
stroombron automatisch naar AC.
- Als het afspelen is beëindigd en het apparaat niet wordt gebruikt, dan zal het na 10
minuten automatisch uitschakelen om energie te besparen. Schuif de functieschakelaar
naar de stand OFF(UIT) om het apparaat te resetten. Wacht een paar seconden en zet
het apparaat daarna weer AAN.
1. Deslice el interruptor de función hasta la posición RADIO. El indicador de Encendido
se iluminará. En modo radio, no hay ninguna indicación en la pantalla LCD.
2. Utilice el selector de banda (FM/MW) para seleccionar la banda.
3. Utilice el mando TUNING para sintonizar la emisora de radio que desee.
4. Regule el nivel del volumen.
Para mejorar la capacidad de recepción de la radio:
FM: Alargar la antena
MW: Girar el aparato horizontalmente para una recepción óptima.
1. Scorrete l'interruttore di funzione in posizione RADIO. La spia di accensione si
illumina. In modalità radio, sul display LCD non compare nessuna icona.
2. Utilizzare il selettore FM/MW per selezionare la banda desiderata.
3. Servitevi quindi della manopola TUNING per impostare la frequenza desiderata.
4. Regolate il volume con la manopola volume.
Per migliorare la ricezione:
FM: Estendere l’antenna.
MW: Ruotare l’apparecchio orizzontalmente per ottenere la ricezione migliore.
1. Schuif de functieschakelaar naar de stand RADIO. De AAN -indicator licht op. Er wordt
in de radiomodus geen indicator op het LCD-display getoond.
2. Kies de MW of FM-band met behulp van de schakelaar FM/MW.
3. Gebruik de TUNING-knop om de radio op de gewenste frequentie af te stemmen.
4. Regel het volume met behulp van de VOLUME-knop.
Om de ontvangst van de radio te optimaliseren:
FM: Strek de FM-draadantenne volledig uit.
MW: Draai het apparaat in horizontale richting.
1. Deslice el interruptor de función hasta la posición CD/USB/AUX o RADIO para
encender la unidad. El indicador de Encendido se iluminará.
2. Deslice el interruptor de función hasta la posición OFF para apagar la unidad. El
indicador de Encendido se apagará.
1. Per accendere l'unità, scorrere l'interruttore di funzione in posizione CD/USB/AUX o
RADIO. La spia di accensione si illumina.
2. Per spegnere l'unità, scorrere l'interruttore di funzione in posizione OFF. La spia di
accensione si spegne.
1. Schuif de functieschakelaar naar de stand CD/USB/AUX of RADIO om het apparaat
in te schakelen. De AAN -indicator licht op.
2. Schuif de functieschakelaar naar de stand OFF om het apparaat uit te schakelen. De
AAN -indicator is nu niet langer opgelicht.
1. Deslice el interruptor de función hasta la posición CD/USB/AUX. El indicador de
Encendido se iluminará. Si la unidad está en modo USB (el icono “USB” se muestra),
presione el botón CD/USB para cambiar a modo CD. Ahora se mostrará el icono "CD".
2. Abra la tapa de alojamiento del CD. Introduzca un CD con la cara impresa mirando
hacia arriba y cierre la tapa. Pasados unos segundos, el número total de pistas se
mostrará en el display. La reproducción se iniciará automáticamente.
Nota: Si el disco introducido es un disco MP3, durante la reproducción solo se mostrará
el icono "MP3".
REPRODUCCIÓN/PAUSA
Para detener la reproducción temporalmente, pulse el botón El indicador
parpadeará.
Para reanudar la reproducción, pulse de nuevo este botón.
DETENCIÓN
Si se pulsa el botón durante la reproducción, el disco dejará de reproducir. (El número
total de pistas se mostrará en el display).
SALTO Y BÚSQUEDA
Podrá saltar hacia delante o hacia atrás hasta el número de pista que desee pulsando los
botones de SALTO ( / ). Cuando reproduzca un CD de audio, mantenga pulsado el
botón de SALTO ( / ). El CD buscará a alta velocidad hacia delante o hacia atrás.
La reproducción normal se reanudará cuando deje de pulsar el botón.
REPETICIÓN
Pulse el botón REP. repetidamente para seleccionar un modo de reproducción.
- Repetir 1, “ “ parpadeará en pantalla
- Repetir carpeta, la pantalla muestra “ FOLDER” (Sólo MP3)
- Repetir todo, “ “ dejará de parpadear y se mantendrá encendido
Para cancelar la reproducción repetida, pulse el botón REP. diversas veces, hasta que el
indicador de repetición desaparezca.
PROGRAMACIÓN
1. En modo de parada, pulse el botón PROG. El icono " P ” parpadeará y “ P01 ” se
mostrará en pantalla.
2. Utilice los botones / para seleccionar el archivo que desee. Pulse el botón
PROG. para conrmar.
3. Repita los pasos descritos arriba para programar hasta 20 pistas para un CD y 99
pistas para MP3.
4. Pulse el botón para iniciar la reproducción programada. El icono " P ” dejará de
parpadear y se mantendrá encendido durante la reproducción programada.
5. Para cancelar la reproducción programada, pulse el botón dos veces. El icono " P ”
desaparecerá.
SELECCIONAR UN CARPETA (SOLO MP3)
Presione el botón FOLD.UP para seleccionar la siguiente carpeta en el disco actual (o
en el USB).
Si tuviera problemas con la reproducción del CD, cualquiera de los siguientes
procedimientos podría ayudarle:
1. Apague la unidad. Desconecte el cable de alimentación de la toma de corriente y
después vuelva a conectarlo.
2. Limpie el CD.
1. Scorrete l'interruttore di funzione in posizione CD/USB/AUX. La spia di accensione
si illumina. Se l'unità è in modalità USB (l'icona “USB” è visualizzata sul display),
premere il tasto CD/USB per passare alla modalità CD. Sul display viene visualizzata
l'icona “CD”.
2. Sollevate lo sportello del compartimento disco. Inserite un CD con il lato stampato
rivolto verso l'alto. Richiudete lo sportello. Dopo alcuni secondi sul display viene
visualizzato il numero totale delle tracce. La riproduzione si attiverà automaticamente.
Nota: se il CD inserito è un disco MP3, durante la riproduzione viene visualizzata solo
l'icona “MP3”.
RIPRODUZIONE/SOSPENSIONE
Per sospendere temporaneamente la riproduzione, premete il tasto . L'indicatore
si illumina.
Per riprendere la riproduzione, premete di nuovo il tasto .
ARRESTO
Premendo il tasto durante la riproduzione, la riproduzione viene arrestata (sul display
viene visualizzato il numero totale delle tracce).
AVANZAMENTO, RIAVVOLGIMENTO E RICERCA
L'unità consente di avanzare a una traccia successiva o tornare a una precedente in
qualsiasi momento utilizzando i tasti / . Durante la riproduzione di un CD, tenete
premuto uno dei due tasti. L'unità avvia il riavvolgimento o l'avanzamento rapido delle
tracce del CD. Per arrestare il riavvolgimento o l'avanzamento rilasciate il tasto.
RIPETIZIONE
Premere più volte il tasto REP. per selezionare una modalità di ripetizione:
- Ripeti 1: l'icona “ “ lampeggia sul display
- Ripeti cartella: la dicitura “ FOLDER“ è visualizzata sul display (solo MP3)
- Ripeti tutto: l'icona “ “ smette di lampeggiare e rimane ssa
Per cancellare la ripetizione del playback, premete il tasto REP. ripetutamente no a
quando l’indicatore ripeti scompare.
RIPRODUZIONE PROGRAMMATA
1. Quando la riproduzione è in modalità di arresto, premete il tasto PROG. L'icona “ P ”
lampeggia e la dicitura “ P01 ” compare sul display.
2. Selezionate il le che desiderate ascoltare con i tasti e . Premete il tasto PROG.
per confermare.
3. Ripetere i passaggi sopra illustrati per programmare no a 20 tracce per CD e 99 per
MP3.
4. Premete il tasto per avviare la riproduzione programmata. L'icona “ P ” smette di
lampeggiare e rimane ssa durante la riproduzione.
5. Per annullare la funzione premete due volte il tasto . L'icona “ P ” scompare dal
display.
SELEZIONE DI UNA CARTELLA (SOLO MP3)
Premete il tasto FOLD.UP per selezionare la cartella successiva contenuta nel CD ( o
nel dispositivo USB).
In caso di problemi con la riproduzione di CD audio cercare di risolvere il problema come
suggerito di seguito:
1. Spegnere l'unità. Scollegare la presa di alimentazione CA e ricollegare.
2. Pulire il CD.
EEN MAP SELECTEREN (ALLEEN MP3)
Druk op FOLD.UP om de volgende map op de huidige disc (of USB-apparaat) te
selecteren.
Als u problemen tegenkomt bij het afspelen van CD's, kunt u dit op de volgende manieren
verhelpen:
1. Schakel het apparaat uit. Trek de stekker uit het stopcontact en steek hem daarna
weer in het stopcontact.
2. Maak de CD schoon.
1. Schuif de functieschakelaar naar de stand CD/USB/AUX. De AAN -indicator licht op.
Druk, als het apparaat in de USB-modus staat (het pictogram “USB” wordt getoond),
op CD/USB om naar de CD-modus te schakelen. Het pictogram “CD” wordt nu
getoond.
2. Open de CD-deur. Plaats een CD met het label omhoog gericht en sluit de CD-deur.
Na een paar seconden zal het totaal aantal tracks op het display worden getoond. Het
afspelen start automatisch.
Opmerking: als de geplaatste disc een MP3-CD is, zal alleen het pictogram “ MP3”
worden getoond tijdens het afspelen.
AFSPELEN/PAUZEREN
Druk om het afspelen tijdelijk te stoppen op . De indicator knippert.
Druk om het afspelen te hervatten nogmaals op de knop.
STOPPEN
Als er tijdens het afspelen op wordt gedrukt, dan stopt het afspelen van de disc. (Het
totaal aantal tracks wordt getoond op het display).
OVERSLAAN EN VOORUIT-/TERUGSPOELEN
U kunt altijd naar het volgende of vorige nummer gaan door op OVERSLAAN ( / )
te drukken. Houd tijdens het afspelen van een audio-CD de OVERSLAAN-knoppen
ingedrukt om vooruit of achteruit te spoelen. Het normale afspelen wordt hervat wanneer
u de knop loslaat.
HERHALEN
Druk herhaaldelijk op REP. om een afspeelmodus te selecteren:
- Herhaal 1: “ “ knippert op het display
- Herhaal map: display toont “ FOLDER ”. (Alleen MP3)
- Herhaal alle: “ “ stopt met knipperen en blijft opgelicht
Druk om het herhalen te annuleren herhaaldelijk op REP. tot de herhaalindicator
verdwijnt.
PROGRAMMA AFSPELEN
1. Druk als het afspelen gestopt is op de PROG. toets. Het pictogram “ P ” en de tekst
“ P01 ” verschijnen op het display.
2. Selecteer het bestand dat u wilt afspelen via de / toetsen. Druk op de PROG.
toets om te bevestigen.
3. Herhaal de bovenstaande stappen om tot 20 tracks voor CD’s en 99 tracks voor MP3’s
te programmeren.
4. Druk op de toets om het geprogrammeerd afspelen te starten. Het pictogram “ P ”
stopt met knipperen en blijft opgelicht tijdens het afspelen van het programma.
5. Druk om het afspelen van het programma te annuleren twee keer op de toets . Het
pictogram “ P ” wordt niet langer op het display getoond.
UBICACIÓN Y DESCRIPCIÓN DE LOS CONTROLES
DESCRIZIONE DEL PRODOTTO
BESCHRIJVING VAN HET TOESTEL
REPRODUCTOR DE CD/MP3 PORTÁTIL CON RADIO CON USB
RADIO PORTATILE CON LETTORE CD/ MP3 CON USB
DRAAGBARE RADIO-CD/ MP3-SPELER MET USB
ES
IT
NL
1. Display LCD
2. Indicador de Encendido (ON)
3. Altavoces
4. Botón (Reproducción/Pausa)
5. Botón (Parada)
6. Botón
7. Botón
8. Botón CD/USB: Para cambiar entre
modo CD y USB.
9. Botón FOLD.UP (CARPETA
SUPERIOR) (solo para mp3)
10. Botón PROG. (programada)
11. Botón REP. (Repetir)
1. Display LCD
2. Spia di accensione (ON)
3. Altoparlanti
4. Tasto (riproduzione/pausa)
5. Tasto (stop )
6. Tasto (salto)
7. Tasto (salto)
8. Tasto CD/USB: consente di
passare dalla modalità CD alla
modalità USB e viceversa
9. Tasto FOLD.UP (cartella
successiva) (solo per MP3)
10. Tasto PROG. (programmazione)
11. Tasto REP. (ripeti)
1. LCD-display
2. AAN –indicator
3. Luidsprekers
4. Toets (spelen / pauze)
5. Toets ( stop)
6. Toets (doorspoelen)
7. Toets (doorspoelen)
8. Toets CD/USB: Schakelen tussen
CD- en USB-modus.
9. Toets FOLD.UP (map omhoog,
alleen voor mp3)
10. Toets PROG. ( programmering )
11. Toets REP. (herhaling)
12. Compartimento del disco
13. Asa de transporte
14. Antena telescópica FM
15. Entrada auxiliar (AUX IN)
16. Selector de función ( CD/USB/AUX,
RADIO, Unidad Encendida/Apagada)
17. Botón giratorio VOLUME (volumen)
18. Control TUNING con escala dial
19. Puntero de dial
20. Selector de Banda (FM/MW)
21. Puerto USB
22. Compartimento para la pila
23. Entrada CA ( AC IN)
12. Compartimento disco
13. Maniglia
14. Antenna telescopica FM
15. Ingresso ausiliario (AUX IN)
16. Interruttore di funzione ( CD/USB/AUX,
RADIO, unità ON/OFF)
17. Manopola VOLUME
18. Manopola di SINTONIZZAZIONE
(TUNING) con scala graduata
19. Lancetta
20. Selettore Band (FM/MW)
21. Porta USB
22. Vano batterie
23. Presa AC ( AC IN)
12. Diskcompartiment
13. Draagbeugel
14. Telescopische FM-antenne
15. Aux in-stekkerbus
16. Functieschakelaar ( CD/USB/AUX,
RADIO, Apparaat AAN/UIT)
17. VOLUME-draaiknop
18. Afstemknop met afstemschaal
19. Schaalwijzer
20. Golfbereikschakelaar (FM/MW)
21. USB-poort
22. Batterijcompartiment
23. AC-aansluiting ( AC IN)
M-23KDB/IB/V0-to Germany
Knoll Elektrogroßhandel GmbH & Co. KG
Ritter-von-Eitzenberger-Straße 9, 95448 Bayreuth, Germany
Knoll Elektrogroßhandel GmbH & Co. KG
Ritter-von-Eitzenberger-Straße 9, 95448 Bayreuth, Germany
Knoll Elektrogroßhandel GmbH & Co. KG
Ritter-von-Eitzenberger-Straße 9, 95448 Bayreuth, Germany
Knoll Elektrogroßhandel GmbH & Co. KG
Ritter-von-Eitzenberger-Straße 9, 95448 Bayreuth, Germany
-
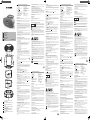 1
1
-
 2
2


in altre lingue
- français: Muse M-23 KDB Manuel utilisateur
- español: Muse M-23 KDB Manual de usuario
- Deutsch: Muse M-23 KDB Benutzerhandbuch
- Nederlands: Muse M-23 KDB Handleiding
- português: Muse M-23 KDB Manual do usuário
Documenti correlati
-
Muse MD-205 NY Manuale utente
-
Muse MD-203 KB Manuale utente
-
Muse M-182 RDC Manuale del proprietario
-
-
-
-
-
Muse M-695 DBT Manuale utente
-
-