Toro Flex-Force Power System 60V MAX 55cm Recycler Lawn Mower Manuale utente
- Categoria
- Tosa erba
- Tipo
- Manuale utente

FormNo.3436-161RevA
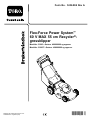
Flex-ForcePowerSystem™60VMAX55cmRecycler®LawnMower
21863and21863T
Flex-ForcePowerSystem™60VMAX55cmRecycler®Rasenmäher
21863and21863T
CortacéspedRecycler®60VMAXde55cmconFlex-ForcePower
System™
21863and21863T
TondeuseRecycler®60VMAX55cmavecFlexForcePower
System™
21863and21863T
TosaerbaRecycler®da55cmFlex-ForcePowerSystem™60VMAX
21863and21863T
Flex-ForcePowerSystem™60VMAX55cmRecycler®gazonmaaier
21863and21863T
Flex-ForcePowerSystem™60VMAX55cmRecycler®-
gressklipper
21863and21863T
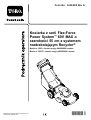
KosiarkazseriiFlex-ForcePowerSystem™60VMAXoszerokości
55cmzsystememrozdrabniającymRecycler®
21863and21863T
Flex-ForcePowerSystem™60VMAX55cmRecycler®gräsklippare
21863and21863T
www.T oro.com.
*3436-161*A


FormNo.3432-878RevA
Flex-ForcePowerSystem
™
60V
MAX55cmRecycler
®
Lawn
Mower
ModelNo.21863—SerialNo.400000000andUp
ModelNo.21863T—SerialNo.400000000andUp
Registeratwww.Toro.com.
OriginalInstructions(EN)
*3432-878*A

Forassistance,pleasesee
www.Toro.com/support
forinstructionalvideos
orcontact1-888-384-9939
beforereturningthis
product.
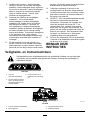
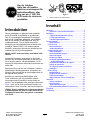
Introduction
Thisrotary-blade,walk-behindlawnmowerisintended
tobeusedbyresidentialhomeowners.Itisdesigned
primarilyforcuttinggrassonwell-maintainedlawns
onresidentialproperties.Itisnotdesignedforcutting
brushorforagriculturaluses.Itisdesignedprimarily
touselithium-ionbatterypackModel81860(provided
withModel21863).Usingtheseproductsforpurposes
otherthantheirintendedusecouldprovedangerous
toyouandbystanders.
Model21863Tdoesnotincludeabatteryora
charger.
Readthisinformationcarefullytolearnhowtooperate
andmaintainyourproductproperlyandtoavoid
injuryandproductdamage.Youareresponsiblefor
operatingtheproductproperlyandsafely.
Visitwww.T oro.comformoreinformation,including
safetytips,trainingmaterials,accessoryinformation,
helpndingadealer,ortoregisteryourproduct.
Wheneveryouneedservice,genuineT oroparts,or
additionalinformation,contactanAuthorizedService
DealerorT oroCustomerServiceandhavethemodel
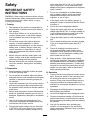
andserialnumbersofyourproductready.Figure1
identiesthelocationofthemodelandserialnumbers
ontheproduct.Writethenumbersinthespace
provided.
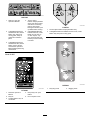
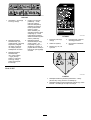
Important:Withyourmobiledevice,youcan
scantheQRcodeontheserialnumberdecal(if
equipped)toaccesswarranty,parts,andother
productinformation.
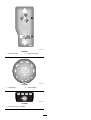
g275230
Figure1
1.Modelandserialnumberlocation
Contents
Safety.......................................................................3
SafetyandInstructionalDecals..........................5
Setup........................................................................8
1MountingtheBatteryCharger
(Optional)........................................................8
2UnfoldingtheHandle.......................................9
3AssemblingtheGrassBag...............................9
ProductOverview....................................................11
Specications...................................................11
BeforeOperation.................................................12
InstallingtheBatteryPack................................12
AdjustingtheCuttingHeight.............................13
DuringOperation.................................................13
StartingtheMachine.........................................13
UsingtheSelf-PropelDrive...............................14
RecyclingtheClippings....................................14
BaggingtheClippings.......................................14
OperatingtheBag-on-DemandLever...............15
Side-DischargingtheClippings.........................15
ShuttingOfftheMachine..................................16
RemovingtheBatteryPackfromthe
Machine........................................................16
OperatingTips.................................................16
AfterOperation....................................................17
ChargingtheBatteryPack................................17
CleaningundertheMachine.............................18
FoldingtheHandle...........................................18
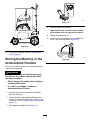
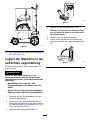
StoringtheMachineintheVertical-Stow
Position.........................................................19
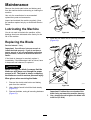
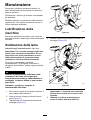
Maintenance...........................................................20
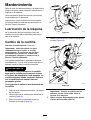
LubricatingtheMachine....................................20
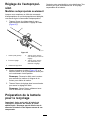
ReplacingtheBlade..........................................20
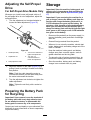
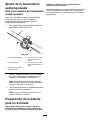
AdjustingtheSelf-PropelDrive.........................21
PreparingtheBatteryPackfor
Recycling......................................................21
Storage...................................................................21
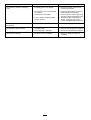
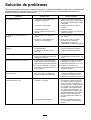
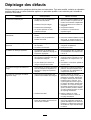
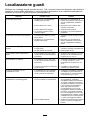
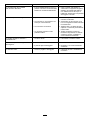
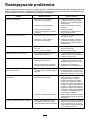
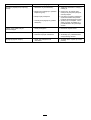
Troubleshooting......................................................22
©2019—TheToro®Company
8111LyndaleAvenueSouth
Bloomington,MN55420
2
Contactusatwww.Toro.com.
PrintedinChina
AllRightsReserved

Safety
IMPORTANTSAFETY
INSTRUCTIONS
WARNING—Whenusinganelectricmachine,always
readandfollowbasicsafetywarningsandinstructions
toreducetheriskofre,electricshock,orinjury,
includingthefollowing:
I.Training
1.Theoperatorofthemachineisresponsiblefor
anyaccidentsorhazardsoccurringtoothersor
theirproperty.
2.Donotallowchildrentouseorplaywiththe
machine,batterypack,orthebatterycharger;
localregulationsmayrestricttheageofthe
operator.
3.Donotallowpeoplewithreducedphysical,
sensory,ormentalcapabilitiesorwithout
experienceandknowledgetousethemachine,
batterypack,orbatterychargerunlessthey
receiveinstructionorsupervisiononusingit
safelyandunderstandthehazardsinvolved
whileusingit.
4.Beforeusingthemachine,batterypack,and
batterycharger,readalltheinstructionsand
cautionarymarkingsontheseproducts.
5.Becomefamiliarwiththecontrolsandproper
useofthemachine,batterypack,andbattery
charger.
II.Preparation
1.Keepbystanders,especiallychildrenandpets,
outoftheoperatingarea.
2.Donotoperatethemachinewithoutallguards
andsafetydevices,suchasdeectorsandgrass
catchers,inplaceandfunctioningproperlyon
themachine.
3.Inspecttheareawhereyouwillusethemachine
andremoveallobjectsthatcouldinterferewith
theoperationofthemachineorthatthemachine
couldthrow.
4.Beforeusingthemachine,ensurethattheblade,
bladebolt,andbladeassemblyarenotwornor
damaged.Replaceanydamagedorunreadable
labels.
5.UseonlythebatterypackspeciedbyT oro.
Usingotheraccessoriesandattachmentsmay
increasetheriskofinjuryandre.
6.Pluggingthebatterychargerintoanoutletthat
isnot100to240Vcancauseareorelectric
shock.Donotplugthebatterychargerintoan
outletotherthan100to240V.Foradifferent
styleofconnection,useanattachmentplug
adapterofthepropercongurationforthepower
outletifneeded.
7.Donotuseadamagedormodiedbattery
packorbatterycharger,whichmayexhibit
unpredictablebehaviorthatresultsinre,
explosion,orriskofinjury.
8.Ifthesupplycordtothebatterychargeris
damaged,contactanAuthorizedServiceDealer
toreplaceit.
9.Donotusenon-rechargeablebatteries.
10.Chargethebatterypackwithonlythebattery
chargerspeciedbyT oro.Achargersuitablefor
1typeofbatterypackmaycreateariskofre
whenusedwithanotherbatterypack.
11.Chargethebatterypackinawell-ventilatedarea
only.
12.Donotexposeabatterypackorbatterycharger
toreortotemperatureshigherthan68°C
(154°F).
13.Followallcharginginstructionsanddo
notchargethebatterypackoutsideofthe
temperaturerangespeciedintheinstructions.
Otherwise,youmaydamagethebatterypack
andincreasetheriskofre.
14.Dressproperly—Wearappropriateclothing,
includingeyeprotection;longpants;substantial,
slip-resistantfootwear(notbarefootorwearing
sandals);andhearingprotection.Tiebacklong
hairanddonotwearloosejewelrythatcanget
caughtinmovingparts.Wearadustmaskin
dustyoperatingconditions.
III.Operation
1.Contactwiththemovingbladewillcauseserious
injury.Keepyourhandsorfeetnearawayfrom
thecuttingareaandallmovingpartsofthe
machine.Keepclearofanydischargeopening.
2.Usingthismachineforpurposesotheranits
intendedusecouldprovedangeroustoyouand
bystanders.
3.Disengagetheself-propeldrive(ifequipped)
beforestartingthemachine.
4.Donottilttheappliancewhenstartingthemotor.
5.Preventunintentionalstarting—Ensurethatthe
electric-startbuttonisremovedfromtheignition
beforeconnectingthebatterypackandhandling
themachine.
6.Useyourfullattentionwhileoperatingthe
machine.Donotengageinanyactivitythat
causesdistractions;otherwise,injuryorproperty
damagemayoccur.
3

7.Stopthemachine,removetheelectric-start
button,removethebatterypackfromthe
machine,andwaitforallmovementtostop
beforeadjusting,servicing,cleaning,orstoring
themachine.
8.Removethebatterypackandelectric-start
buttonfromthemachinewheneveryouleaveit
unattendedorbeforechangingaccessories.
9.Donotforcethemachine—Allowthemachineto
dothejobbetterandsaferattherateforwhichit
wasdesigned.
10.Stayalert—Watchwhatyouaredoinganduse
commonsensewhenoperatingthemachine.
Donotusethemachinewhileill,tired,orunder
theinuenceofalcoholordrugs.
11.Operatethemachineonlyingoodvisibilityand
appropriateweatherconditions.Donotoperate
themachinewhenthereistheriskoflightning.
12.Useextremecautionwhenreversingorpulling
themachinetowardyou.
13.Keepproperfootingandbalanceatalltimes,
especiallyonslopes.Mowacrosstheface
ofslopes,neverupanddown.Useextreme
cautionwhenchangingdirectionsonslopes.Do
notmowexceedinglysteepslopes.Walk,never
runwiththemachine.
14.Donotdirectthedischargematerialtoward
anyone.Avoiddischargingmaterialagainsta
wallorobstruction;materialmayricochettoward
you.Stoptheblade(s)whencrossinggravel
surfaces.
15.Watchforholes,ruts,bumps,rocks,orother
hiddenobjects.Uneventerraincouldcauseyou
toloseyourbalanceorfooting.
16.Wetgrassorleavescancauseseriousinjuryif
youslipandcontacttheblade.Avoidmowingin
wetconditionsorwhenitisraining.
17.Ifthemachinestrikesanobjectorstartsto
vibrate,immediatelyshutoffthemachine,
removetheelectric-startbutton,removethe
batterypack,andwaitforallmovementtostop
beforeexaminingthemachinefordamage.
Makeallnecessaryrepairsbeforeresuming
operation.
18.Stopthemachineandremovetheelectric-start
buttonbeforeloadingthemachineforhauling.
19.Underabusiveconditions,thebatterypackmay
ejectliquid;avoidcontact.Ifyouaccidently
comeintocontactwiththeliquid,ushwith
water.Iftheliquidcontactsyoureyes,seek
medicalhelp.Liquidejectedfromthebattery
packmaycauseirritationorburns.
IV.MaintenanceandStorage
1.Stopthemachine,removetheelectric-start
button,removethebatterypackfromthe
machine,andwaitforallmovementtostop
beforeadjusting,servicing,cleaning,orstoring
themachine.
2.Donotattempttorepairthemachineexceptas
indicatedintheinstructions.HaveanAuthorized
ServiceDealerperformserviceonthemachine
usingidenticalreplacementparts.
3.Wearglovesandeyeprotectionwhenservicing
themachine.
4.Sharpenadullbladeonbothsidestomaintain
balance.Cleanthebladeandensurethatitis
balanced.
5.Replacethebladeifitisbent,worn,orcracked.
Anunbalancedbladecausesvibration,which
coulddamagethemotororcausepersonal
injury.
6.Whenservicingtheblade,beawarethatthe
bladecanstillmoveeventhoughthepower
sourceisoff.
7.Checkthegrasscollectionbagfrequentlyfor
deteriorationorwear,andreplaceawornbag
withaToro[replacement]bag.
8.Forbestperformance,useonlygenuineT oro
replacementpartsandaccessories.Other
replacementpartsandaccessoriescouldbe
dangerous,andsuchusecouldvoidtheproduct
warranty.
9.Maintainthemachine—Keepcuttingedges
sharpandcleanforthebestandsafest
performance.Keephandlesdry,clean,andfree
fromoilandgrease.Keepguardsinplaceandin
workingorder.Keepbladessharp.Useidentical
replacementbladesonly.
10.Checkthemachinefordamagedparts—Ifthere
aredamagedguardsorotherparts,determine
whetherthemachinewilloperateproperly.
Checkformisalignedandbindingmovingparts,
brokenparts,mounting,andanyothercondition
thatmayaffectitsoperation.Unlessindicated
intheinstructions,haveanAuthorizedService
Dealerrepairorreplaceadamagedguardor
part.
11.Whenthebatterypackisnotinuse,keepit
awayfrommetalobjectssuchaspaperclips,
coins,keys,nails,andscrewsthatcanmakea
connectionfrom1terminaltoanother.Shorting
thebatteryterminalsmaycauseburnsorare.
12.Checkthebladeandmotormountingbolts
frequentlyfortightness.
13.Whenyouarenotusingthemachine,storeit
indoorsinadry,secureplaceoutofthereach
ofchildren.
4

14.CAUTION—Amistreatedbatterypackmay
presentariskofreorchemicalburn.Donot
disassemblethebatterypack.Donotheatthe
batterypackabove68°C(154°F)orincinerate
it.ReplacethebatterypackwithagenuineT oro
batterypackonly;usinganothertypeofbattery
packmaycauseareorexplosion.Keep
batterypacksoutofthereachofchildrenand
intheoriginalpackaginguntilyouarereadyto
usethem.
15.Donotdisposeofthebatteryinare.The
cellmayexplode.Checkwithlocalcodesfor
possiblespecialdisposalinstructions.
SAVETHESE
INSTRUCTIONS
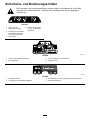
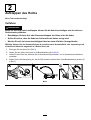
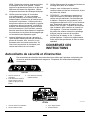
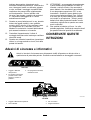
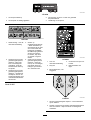
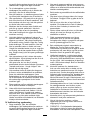
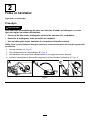
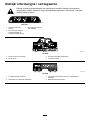
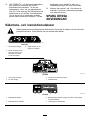
SafetyandInstructionalDecals
Safetydecalsandinstructionsareeasilyvisibletotheoperatorandarelocatednearanyarea
ofpotentialdanger.Replaceanydecalthatisdamagedormissing.
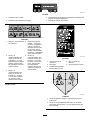
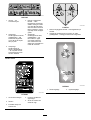
decal140-1324
140-1324
1.ReadtheOperator’s
Manual.
3.Toshutoffthemachine,
releasethebar.
2.Tostartthemachine,
squeezethebartothe
handleandpressthe
button.
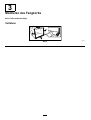
decal137-9495
137-9495
1.ReadtheOperator’sManual.
3.Forindooruse.
2.Donotdiscard.4.Doubleinsulated
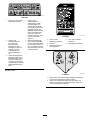
decal137-9496
137-9496
1.Thebatterypackischarging.3.Thebatterypackisoverorundertheappropriatetemperature
range.
2.Thebatterypackisfullycharged.4.Batterypackchargingfault
5

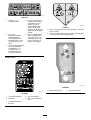
decal140-1328
140-1328
1.Warning—readthe
Operator’sManual.
4.Thrownobject
hazard—keepbystanders
away;shutofftheengine
andwaitforallmoving
partstostopbefore
leavingthemachine;pick
updebrisbeforemowing.
2.Cutting/dismemberment
hazardofthehand,mower
blade—stayawayfrom
movingparts;keepall
guardsandshieldsin
place.
5.Cutting/dismemberment
hazardofthefoot,mower
blade—donotmowup
ordownslopes;only
mowacrossslopes;look
behindyouwhenmowing
inreverse.
3.Cutting/dismemberment
hazardofthehand,mower
blade—removethekey
andreadtheOperator’s
Manualbeforeperforming
maintenance.
Model81860
decal137-9489
137-9489
1.ReadtheOperator’s
Manual.
4.Keepawayfromopen
ames.
2.Recycle5.Donotexposetorain.
3.Containslithiumions;do
notdiscard.
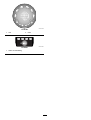
decal112-8760
112-8760
1.Thrownobjecthazard—keepbystandersaway.
2.Cutting/dismembermenthazardofhandorfoot,mower
blade—stayawayfrommovingparts.
decal125-5026
125-5026
1.Recyclingmode2.Baggingmode
6

decal137-9196
137-9196
1.Lock2.Unlock
decal137-9461
137-9461
1.Batterychargestatus
7

Setup
Note:Thebatterypackisnotfullychargedwhenit
ispurchased.Beforeusingthemachinefortherst
time,refertoChargingtheBatteryPack(page17).
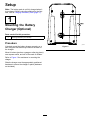
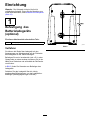
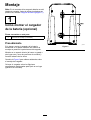
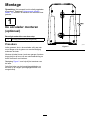
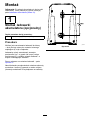
1
MountingtheBattery
Charger(Optional)
Partsneededforthisprocedure:
2
Mountinghardware(notincluded)
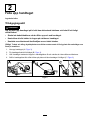
Procedure
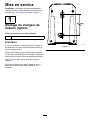
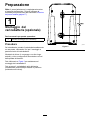
Ifdesired,mountthebatterychargersecurelyona
wallusingthewall-mountkeyholesonthebackof
thecharger.
Mountitindoors(suchasagarageorotherdryplace),
nearapoweroutlet,andoutofthereachofchildren.
RefertoFigure2forassistanceinmountingthe
charger.
Slidethechargerovertheappropriatelypositioned
hardwaretosecurethechargerinplace(hardware
notincluded).
g247359
Figure2
8

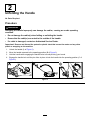
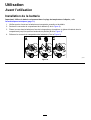
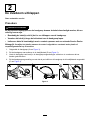
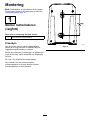
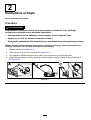
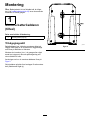
2
UnfoldingtheHandle
NoPartsRequired
Procedure
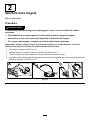
WARNING
Unfoldingthehandleimproperlycandamagethecables,causinganunsafeoperating
condition.
•Donotdamagethecable(s)whenfoldingorunfoldingthehandle.
•Ensurethatthecable(s)areroutedtotheoutsideofthehandle.
•Ifacableisdamaged,contactanAuthorizedServiceDealer.
Important:Removeanddiscardtheprotectiveplasticsheetthatcoversthemotorandanyother
plasticorwrappingonthemachine.
1.Unlockthehandle(AofFigure3).
2.Movethehandlerearwardtotheoperatingposition(BofFigure3).
3.Holdthehandlewhileengagingthehandlelockstoavoidpinchingyourhands.
4.Engagethehandlelockuntilthepinclicksinplacetolockthehandleintotheoperatingposition(Cof
Figure3).
g251609
Figure3
9

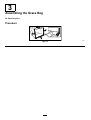
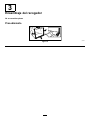
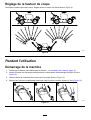
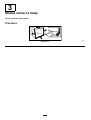
3
AssemblingtheGrassBag
NoPartsRequired
Procedure
g230447
Figure4
10

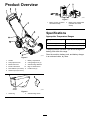
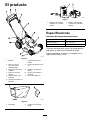
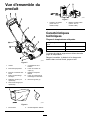
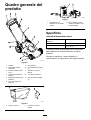
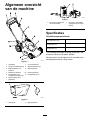
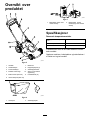
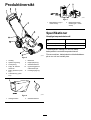
ProductOverview
g297638
Figure5
1.Handle7.Batterycompartment
2.Self-propeldrivebar8.Cutting-heightlever(4)
3.Blade-controlbar
9.Side-dischargedeector
4.Electric-startbutton10.Bag-on-demandlever
5.Reardeector(notshown)11.Handleknob(2)
6.Washoutport(notshown)
g036586
Figure6
1.Grassbag2.Side-dischargechute
g292995
Figure7
1.Batterycharger(included
withModel21863)
2.Batterypackmodel81860
(includedwithModel
21863)
Specications
AppropriateTemperatureRanges
Charge/storethebatterypack
at
5°C(41°F)to40°C(104°F)*
Usethebatterypackat
-30°C(-22°F)to49°C(120°F)*
Usethemachineat
0°C(32°F)to49°C(120°F)*
*Chargingtimewillincreaseifyoudonotchargethe
batterypackwithinthisrange.
Storethemachine,batterypack,andbatterycharger
inanenclosedclean,dryarea.
11

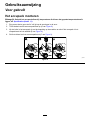
Operation
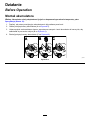
BeforeOperation
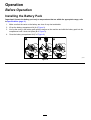
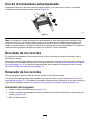
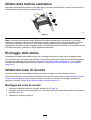
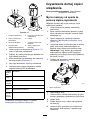
InstallingtheBatteryPack
Important:Operatethebatterypackonlyintemperaturesthatarewithintheappropriaterange;refer
toSpecications(page11).
1.Makesurethattheventsonthebatteryareclearofanydustanddebris.
2.Liftupthebattery-compartmentlid(AofFigure8).
3.Lineupthecavityinthebatterypackwiththetongueonthemachineandslidethebatterypackintothe
compartmentuntilitlocksintoplace(BofFigure8).
4.Closethebattery-compartmentlid(CofFigure8).
g251221
Figure8
12

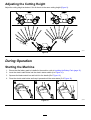
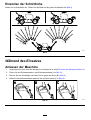
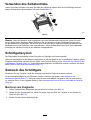
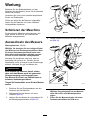
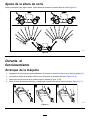
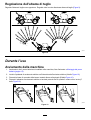
AdjustingtheCuttingHeight
Adjustthecuttingheightasdesired.Setallwheelstothesamecuttingheight(Figure9).
g254131
Figure9
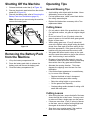
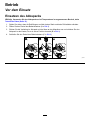
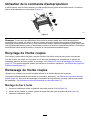
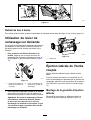
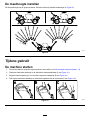
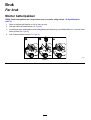
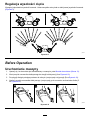
DuringOperation
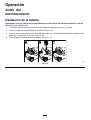
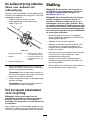
StartingtheMachine
1.Ensurethatthebatterypackisinstalledinthemachine;refertoInstallingtheBatteryPack(page12).
2.Inserttheelectric-startbuttonintotheelectricstarterswitch(AofFigure10).
3.Squeezetheblade-controlbarandholdittothehandle(BofFigure10).
4.Presstheelectric-startbuttonandkeepitpresseduntilthemotorstarts(CofFigure10).
g293036
Figure10
13

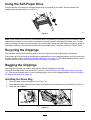
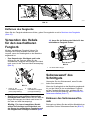
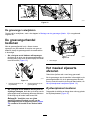
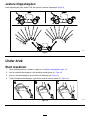
UsingtheSelf-PropelDrive
Simplywalkwithyourhandsontheupperhandleandyourelbowsatyoursides,andthemachinewill
automaticallykeeppacewithyou(Figure11).
g233423
Figure11
Note:Ifthemachinedoesnotfreelyrollbackwardafterself-propelling,stopwalking,holdyourhandsinplace,
andallowthemachinetorollacoupleofcentimeters(inches)forwardtodisengagethewheeldrive.Youcan
alsotryreachingjustundertheupperhandletothemetalhandleandpushingthemachineforwardacoupleof
centimeters(inches).Ifthemachinestilldoesnotrollbackwardeasily,contactanAuthorizedServiceDealer.
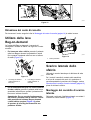
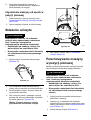
RecyclingtheClippings
Yourmachinecomesfromthefactoryreadytorecyclethegrassandleafclippingsbackintothelawn.
Ifthegrassbagisonthemachineandthebag-on-demandleverisinthebaggingposition,movethelevertothe
recyclingposition;refertoOperatingtheBag-on-DemandLever(page15).Iftheside-dischargechuteisonthe
machine,removeit;refertoRemovingtheSide-DischargeChute(page15).
BaggingtheClippings
Usethegrassbagwhenyouwanttocollectgrassandleafclippingsfromthelawn.
Iftheside-dischargechuteisonthemachine,removeit;refertoRemovingtheSide-DischargeChute(page
15).Ifthebag-on-demandleverisintherecyclingposition,moveittothebaggingposition;refertoOperating
theBag-on-DemandLever(page15).
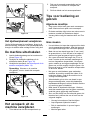
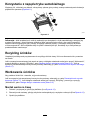
InstallingtheGrassBag
1.Raiseandholdupthereardeector(AofFigure12).
2.Installthegrassbag,ensuringthatthepinsonthebagrestinthenotchesonthehandle(BofFigure12).
3.Lowerthereardeector.
g233434
Figure12
14

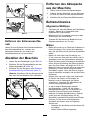
RemovingtheGrassBag
Toremovethebag,reversethestepsinInstallingtheGrassBag(page14).
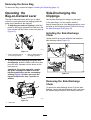
Operatingthe
Bag-on-DemandLever
Thebag-on-demandfeatureallowsyoutoeither
collectorrecyclegrassandleafclippingswhilethe
grassbagisattachedtothemachine.
•Tobagthegrassandleafclippings,pressthe
buttononthebag-on-demandleverandmovethe
leverforwarduntilthebuttonontheleverpopsup
(Figure13).
g251583
Figure13
1.Bag-on-demandlever(in
therecyclingposition)
2.Bag-on-demandlever(in
thebaggingposition)
•Torecycleorside-dischargethegrassand
leafclippings,pressthebuttonontheleverand
movetheleverrearwarduntilthebuttononthe
leverpopsup.
Important:Forproperoperation,remove
anygrassclippingsanddebrisfromthe
bag-on-demanddoorandthesurrounding
opening(Figure14)beforeyoumovethe
bag-on-demandleverfrom1positionto
another.
g251584
Figure14
1.Cleanhere
Side-Dischargingthe
Clippings
Usethesidedischargeforcuttingverytallgrass.
Ifthegrassbagisonthemachineandthe
bag-on-demandleverisintheBaggingposition,move
thelevertotheRecyclingposition;refertoRemoving
theSide-DischargeChute(page15).
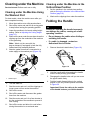
InstallingtheSide-Discharge
Chute
Unlatchandliftupthesidedeectorandinstallthe
side-dischargechute(Figure15).
g235646
Figure15
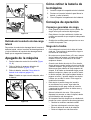
RemovingtheSide-Discharge
Chute
Toremovetheside-dischargechute,liftuptheside
deector,removetheside-dischargechute,andlower
theside-dischargedeectoruntilitlatchessecurely.
15

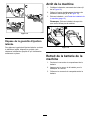
ShuttingOfftheMachine
1.Releasetheblade-controlbar(AofFigure16).
2.Removetheelectric-startbuttonfromtheelectric
starter(BofFigure16).
3.Removethebatterypack;refertoRemovingthe
BatteryPackfromtheMachine(page16).
Note:Wheneveryouarenotusingthemachine,
removethebatterypack.
g251435
Figure16
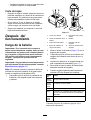
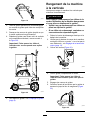
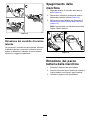
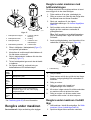
RemovingtheBatteryPack
fromtheMachine
1.Liftupthebattery-compartmentlid.
2.Pressthebattery-packlatchtoreleasethe
batterypackandremovethebatterypack.
3.Closethebattery-compartmentlid.
OperatingTips
GeneralMowingTips
•Avoidstrikingsolidobjectswiththeblade.Never
deliberatelymowoveranyobject.
•Forbestperformance,installanewbladebefore
thecuttingseasonbegins.
•ReplacethebladewhennecessarywithaT oro
replacementblade.
CuttingGrass
•Cutonlyaboutathirdofthegrassbladeatatime.
Forimprovedruntime,cutgrassatahigherheight
ofcut.
•Donotcutbelow51mm(2inches)unlessthe
grassissparseoritislatefallwhengrassgrowth
beginstoslowdown.
•Whencuttinggrassover15cm(6inches)tall,
mowatthehighestcuttingheightsettingandwalk
slower;thenmowagainatalowersettingforthe
bestlawnappearance.Ifthegrassistoolong,the
machinemayplugandcausethemotortostall.
•Wetgrassandleavestendtoclumpontheyard
andcancausethemachinetoplugorthemotorto
stall.Avoidmowinginwetconditions.
•Beawareofapotentialrehazardinverydry
conditions,followalllocalrewarnings,andkeep
themachinefreeofdrygrassandleafdebris.
•Alternatethemowingdirection.Thishelps
dispersetheclippingsoverthelawnforeven
fertilization.
•Ifthenishedlawnappearanceisunsatisfactory,
try1ormoreofthefollowing:
–Replacethebladeorhaveitsharpened.
–Walkataslowerpacewhilemowing.
–Raisethecuttingheightonyourmachine.
–Cutthegrassmorefrequently.
–Overlapcuttingswathsinsteadofcuttingafull
swathwitheachpass.
CuttingLeaves
•Aftercuttingthelawn,ensurethathalfofthelawn
showsthroughthecutleafcover.Youmayneed
tomakemorethanasinglepassovertheleaves.
•Iftherearemorethan13cm(5inches)ofleaves
onthelawn,mowatahighercuttingheightand
thenagainatthedesiredcuttingheight.
•Slowdownyourmowingspeedifthemachine
doesnotcuttheleavesnelyenough.
16

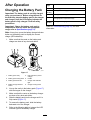
AfterOperation
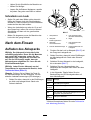
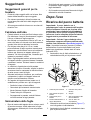
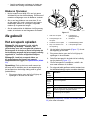
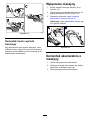
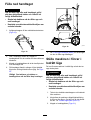
ChargingtheBatteryPack
Important:Thebatterypackisnotfullycharged
whenyoupurchaseit.Beforeusingthetoolfor
thersttime,placethebatterypackinthecharger
andchargeituntiltheLEDdisplayindicatesthe
batterypackisfullycharged.Readallsafety
precautions.
Important:Chargethebatterypackonlyin
temperaturesthatarewithintheappropriate
range;refertoSpecications(page11).
Note:Atanytime,pressthebattery-charge-indicator
buttononthebatterypacktodisplaythecurrent
charge(LEDindicators).
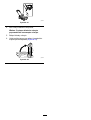
1.Makesurethattheventsonthebatteryand
chargerareclearofanydustanddebris.
g290533
Figure17
1.Batterypackcavity
5.LEDindicators(current
charge)
2.Batterypackventingareas6.Handle
3.Batterypackterminals
7.ChargerLEDindicator
light
4.Battery-charge-indicator
button
8.Chargerventingareas
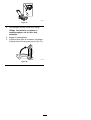
2.Lineupthecavityinthebatterypack(Figure17)
withthetongueonthecharger.
3.Makesurethattheventsonthebatterycharger
areclearofanydustanddebris.
4.Slidethebatterypackintothechargeruntilitis
fullyseated(Figure17).
5.Toremovethebatterypack,slidethebattery
backwardoutofthecharger.
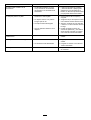
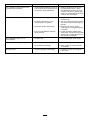
6.RefertothefollowingtabletointerprettheLED
indicatorlightonthebatterycharger.
Indicator
light
Indicates
Off
Nobatterypackinserted
Green
blinking
Batterypackischarging
Green
Batterypackischarged
Red
Batterypackand/orbatterychargerisoverorunder
theappropriatetemperaturerange
Red
blinking
Batterypackchargingfault*
*RefertoTroubleshooting(page22)formore
information.
17

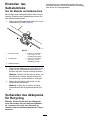
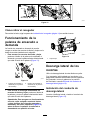
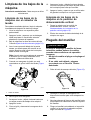
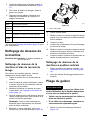
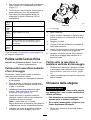
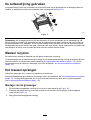
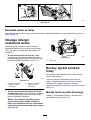
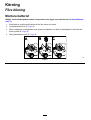
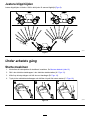
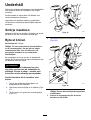
CleaningundertheMachine
ServiceInterval:Beforeeachuseordaily
CleaningundertheMachineUsing
theWashoutPort
Forbestresults,cleanthemachinesoonafteryou
havecompletedmowing.
1.Movethemachineontoaatpavedsurface.
2.Shutoffthemotorandwaitforallmovingparts
tostopbeforeleavingtheoperatingposition.
3.Lowerthemachinetoitslowestcutting-height
setting.RefertoAdjustingtheCuttingHeight
(page13).
4.Washouttheareaunderthereardoorwherethe
clippingsgofromtheundersideofthemachine
tothegrassbag.
Note:Washouttheareawiththe
bag-on-demand(ifequipped)inboththefully
forwardandfullyrearwardpositions.
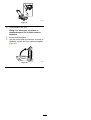
5.Attachagardenhosethatisconnectedtoa
watersupplytothewashoutport(Figure18).
g251300
Figure18
1.Washoutport
6.Turnthewateron.
7.Startthemotorandrunituntiltheclippingsno
longercomeoutfromunderthemachine.
8.Shutoffthemotor.
9.Shutoffthewateranddisconnectthegarden
hosefromthemachine.
10.Startthemotorandrunitforafewminutesto
drytheundersideofthemachinetopreventit
fromrusting.
11.Shutoffthemotorandallowittocoolbefore
storingthemachineinanenclosedarea.
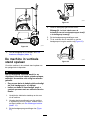
CleaningundertheMachineinthe
Vertical-StowPosition
1.Setthemachineinthevertical-stowposition;
refertoStoringtheMachineintheVertical-Stow
Position(page19).
2.Washouttheclippingsfromunderthemachine.
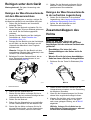
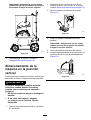
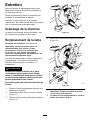
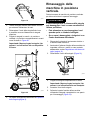
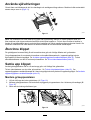
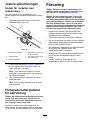
FoldingtheHandle
WARNING
Foldingorunfoldingthehandleimproperly
candamagethecables,causinganunsafe
operatingcondition.
•Donotdamagethecableswhenfoldingor
unfoldingthehandle.
•Ifacableisdamaged,contactan
AuthorizedServiceDealer.
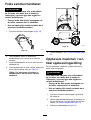
1.Removetheelectric-startbutton(Figure19).
g251571
Figure19
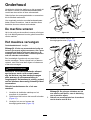
2.Holdthehandlewhiledisengagingthehandle
lockstoavoidpinchingyourhands.
3.Disengagethehandlelocksuntilyoucanmove
theupperhandlefreely.
4.Foldthehandleforwardeithertothevertical
positionorthefullyforwardpositionasshown
inFigure20.
Important:Routethecablestotheoutside
ofthehandlelocksasyoufoldthehandle.
18
La pagina si sta caricando...
La pagina si sta caricando...
La pagina si sta caricando...
La pagina si sta caricando...
La pagina si sta caricando...
La pagina si sta caricando...
La pagina si sta caricando...
La pagina si sta caricando...
La pagina si sta caricando...
La pagina si sta caricando...
La pagina si sta caricando...
La pagina si sta caricando...
La pagina si sta caricando...
La pagina si sta caricando...
La pagina si sta caricando...
La pagina si sta caricando...
La pagina si sta caricando...
La pagina si sta caricando...
La pagina si sta caricando...
La pagina si sta caricando...
La pagina si sta caricando...
La pagina si sta caricando...
La pagina si sta caricando...
La pagina si sta caricando...
La pagina si sta caricando...
La pagina si sta caricando...
La pagina si sta caricando...
La pagina si sta caricando...
La pagina si sta caricando...
La pagina si sta caricando...
La pagina si sta caricando...
La pagina si sta caricando...
La pagina si sta caricando...
La pagina si sta caricando...
La pagina si sta caricando...
La pagina si sta caricando...
La pagina si sta caricando...
La pagina si sta caricando...
La pagina si sta caricando...
La pagina si sta caricando...
La pagina si sta caricando...
La pagina si sta caricando...
La pagina si sta caricando...
La pagina si sta caricando...
La pagina si sta caricando...
La pagina si sta caricando...
La pagina si sta caricando...
La pagina si sta caricando...
La pagina si sta caricando...
La pagina si sta caricando...
La pagina si sta caricando...
La pagina si sta caricando...
La pagina si sta caricando...
La pagina si sta caricando...
La pagina si sta caricando...
La pagina si sta caricando...
La pagina si sta caricando...
La pagina si sta caricando...
La pagina si sta caricando...
La pagina si sta caricando...
La pagina si sta caricando...
La pagina si sta caricando...
La pagina si sta caricando...
La pagina si sta caricando...
La pagina si sta caricando...
La pagina si sta caricando...
La pagina si sta caricando...
La pagina si sta caricando...
La pagina si sta caricando...
La pagina si sta caricando...
La pagina si sta caricando...
La pagina si sta caricando...
La pagina si sta caricando...
La pagina si sta caricando...
La pagina si sta caricando...
La pagina si sta caricando...
La pagina si sta caricando...
La pagina si sta caricando...
La pagina si sta caricando...
La pagina si sta caricando...
La pagina si sta caricando...
La pagina si sta caricando...
La pagina si sta caricando...
La pagina si sta caricando...
La pagina si sta caricando...
La pagina si sta caricando...
La pagina si sta caricando...
La pagina si sta caricando...
La pagina si sta caricando...
La pagina si sta caricando...
La pagina si sta caricando...
La pagina si sta caricando...
La pagina si sta caricando...
La pagina si sta caricando...
La pagina si sta caricando...
La pagina si sta caricando...
La pagina si sta caricando...
La pagina si sta caricando...
La pagina si sta caricando...
La pagina si sta caricando...
La pagina si sta caricando...
La pagina si sta caricando...
La pagina si sta caricando...
La pagina si sta caricando...
La pagina si sta caricando...
La pagina si sta caricando...
La pagina si sta caricando...
La pagina si sta caricando...
La pagina si sta caricando...
La pagina si sta caricando...
La pagina si sta caricando...
La pagina si sta caricando...
La pagina si sta caricando...
La pagina si sta caricando...
La pagina si sta caricando...
La pagina si sta caricando...
La pagina si sta caricando...
La pagina si sta caricando...
La pagina si sta caricando...
La pagina si sta caricando...
La pagina si sta caricando...
La pagina si sta caricando...
La pagina si sta caricando...
La pagina si sta caricando...
La pagina si sta caricando...
La pagina si sta caricando...
La pagina si sta caricando...
La pagina si sta caricando...
La pagina si sta caricando...
La pagina si sta caricando...
La pagina si sta caricando...
La pagina si sta caricando...
La pagina si sta caricando...
La pagina si sta caricando...
La pagina si sta caricando...
La pagina si sta caricando...
La pagina si sta caricando...
La pagina si sta caricando...
La pagina si sta caricando...
La pagina si sta caricando...
La pagina si sta caricando...
La pagina si sta caricando...
La pagina si sta caricando...
La pagina si sta caricando...
La pagina si sta caricando...
La pagina si sta caricando...
La pagina si sta caricando...
La pagina si sta caricando...
La pagina si sta caricando...
La pagina si sta caricando...
La pagina si sta caricando...
La pagina si sta caricando...
La pagina si sta caricando...
La pagina si sta caricando...
La pagina si sta caricando...
La pagina si sta caricando...
La pagina si sta caricando...
La pagina si sta caricando...
La pagina si sta caricando...
La pagina si sta caricando...
La pagina si sta caricando...
La pagina si sta caricando...
La pagina si sta caricando...
La pagina si sta caricando...
La pagina si sta caricando...
La pagina si sta caricando...
La pagina si sta caricando...
La pagina si sta caricando...
La pagina si sta caricando...
La pagina si sta caricando...
La pagina si sta caricando...
La pagina si sta caricando...
La pagina si sta caricando...
La pagina si sta caricando...
La pagina si sta caricando...
La pagina si sta caricando...
La pagina si sta caricando...
La pagina si sta caricando...
La pagina si sta caricando...
La pagina si sta caricando...
La pagina si sta caricando...
La pagina si sta caricando...
La pagina si sta caricando...
La pagina si sta caricando...
La pagina si sta caricando...
La pagina si sta caricando...
La pagina si sta caricando...
La pagina si sta caricando...
La pagina si sta caricando...
La pagina si sta caricando...
La pagina si sta caricando...
La pagina si sta caricando...
La pagina si sta caricando...
La pagina si sta caricando...
La pagina si sta caricando...
La pagina si sta caricando...
La pagina si sta caricando...
La pagina si sta caricando...
La pagina si sta caricando...
La pagina si sta caricando...
La pagina si sta caricando...
La pagina si sta caricando...
La pagina si sta caricando...
La pagina si sta caricando...
La pagina si sta caricando...
La pagina si sta caricando...
La pagina si sta caricando...
La pagina si sta caricando...
-
 1
1
-
 2
2
-
 3
3
-
 4
4
-
 5
5
-
 6
6
-
 7
7
-
 8
8
-
 9
9
-
 10
10
-
 11
11
-
 12
12
-
 13
13
-
 14
14
-
 15
15
-
 16
16
-
 17
17
-
 18
18
-
 19
19
-
 20
20
-
 21
21
-
 22
22
-
 23
23
-
 24
24
-
 25
25
-
 26
26
-
 27
27
-
 28
28
-
 29
29
-
 30
30
-
 31
31
-
 32
32
-
 33
33
-
 34
34
-
 35
35
-
 36
36
-
 37
37
-
 38
38
-
 39
39
-
 40
40
-
 41
41
-
 42
42
-
 43
43
-
 44
44
-
 45
45
-
 46
46
-
 47
47
-
 48
48
-
 49
49
-
 50
50
-
 51
51
-
 52
52
-
 53
53
-
 54
54
-
 55
55
-
 56
56
-
 57
57
-
 58
58
-
 59
59
-
 60
60
-
 61
61
-
 62
62
-
 63
63
-
 64
64
-
 65
65
-
 66
66
-
 67
67
-
 68
68
-
 69
69
-
 70
70
-
 71
71
-
 72
72
-
 73
73
-
 74
74
-
 75
75
-
 76
76
-
 77
77
-
 78
78
-
 79
79
-
 80
80
-
 81
81
-
 82
82
-
 83
83
-
 84
84
-
 85
85
-
 86
86
-
 87
87
-
 88
88
-
 89
89
-
 90
90
-
 91
91
-
 92
92
-
 93
93
-
 94
94
-
 95
95
-
 96
96
-
 97
97
-
 98
98
-
 99
99
-
 100
100
-
 101
101
-
 102
102
-
 103
103
-
 104
104
-
 105
105
-
 106
106
-
 107
107
-
 108
108
-
 109
109
-
 110
110
-
 111
111
-
 112
112
-
 113
113
-
 114
114
-
 115
115
-
 116
116
-
 117
117
-
 118
118
-
 119
119
-
 120
120
-
 121
121
-
 122
122
-
 123
123
-
 124
124
-
 125
125
-
 126
126
-
 127
127
-
 128
128
-
 129
129
-
 130
130
-
 131
131
-
 132
132
-
 133
133
-
 134
134
-
 135
135
-
 136
136
-
 137
137
-
 138
138
-
 139
139
-
 140
140
-
 141
141
-
 142
142
-
 143
143
-
 144
144
-
 145
145
-
 146
146
-
 147
147
-
 148
148
-
 149
149
-
 150
150
-
 151
151
-
 152
152
-
 153
153
-
 154
154
-
 155
155
-
 156
156
-
 157
157
-
 158
158
-
 159
159
-
 160
160
-
 161
161
-
 162
162
-
 163
163
-
 164
164
-
 165
165
-
 166
166
-
 167
167
-
 168
168
-
 169
169
-
 170
170
-
 171
171
-
 172
172
-
 173
173
-
 174
174
-
 175
175
-
 176
176
-
 177
177
-
 178
178
-
 179
179
-
 180
180
-
 181
181
-
 182
182
-
 183
183
-
 184
184
-
 185
185
-
 186
186
-
 187
187
-
 188
188
-
 189
189
-
 190
190
-
 191
191
-
 192
192
-
 193
193
-
 194
194
-
 195
195
-
 196
196
-
 197
197
-
 198
198
-
 199
199
-
 200
200
-
 201
201
-
 202
202
-
 203
203
-
 204
204
-
 205
205
-
 206
206
-
 207
207
-
 208
208
-
 209
209
-
 210
210
-
 211
211
-
 212
212
-
 213
213
-
 214
214
-
 215
215
-
 216
216
-
 217
217
-
 218
218
-
 219
219
-
 220
220
-
 221
221
-
 222
222
-
 223
223
-
 224
224
-
 225
225
-
 226
226
-
 227
227
-
 228
228


Toro Flex-Force Power System 60V MAX 55cm Recycler Lawn Mower Manuale utente
- Categoria
- Tosa erba
- Tipo
- Manuale utente
in altre lingue
- français: Toro Flex-Force Power System 60V MAX 55cm Recycler Lawn Mower Manuel utilisateur
- español: Toro Flex-Force Power System 60V MAX 55cm Recycler Lawn Mower Manual de usuario
- Deutsch: Toro Flex-Force Power System 60V MAX 55cm Recycler Lawn Mower Benutzerhandbuch
- Nederlands: Toro Flex-Force Power System 60V MAX 55cm Recycler Lawn Mower Handleiding
- dansk: Toro Flex-Force Power System 60V MAX 55cm Recycler Lawn Mower Brugermanual
- polski: Toro Flex-Force Power System 60V MAX 55cm Recycler Lawn Mower Instrukcja obsługi
- svenska: Toro Flex-Force Power System 60V MAX 55cm Recycler Lawn Mower Användarmanual
Documenti correlati
-
Toro Flex-Force Power System 60V MAX 55cm Recycler Lawn Mower Manuale utente
-
-
-
-
Toro Heavy-Duty Proline 53cm Professional Cordless Mower Manuale utente
-
-
Toro Flex-Force Power System 60V MAX Snowthrower Manuale utente
-
Toro Flex-Force Power System 60V MAX 52cm Recycler Lawn Mower Manuale utente
-
-
