LAXIHUB B1 Guida utente

Tipo
Guida utente
QUICK GUIDE
powered by
B1
Compatible with Amazon Alexa
EN Smart Wi-Fi Video Doorbell
FR Sonnette vidéo Wi-Fi intelligente
DE Intelligente Wi-Fi Video Türklingel
IT Campanello video Wi-Fi intelligente
ES Timbre de video con Wi-Fi inteligente
12
Thank you for purchasing Arenti smart home product.
Get started using your new devices by downloading
Arenti, one convenient app that manages everything
straight from your phone or tablet. Easily connect to
your home WiFi and control multiple devices from the
touch of your fingertips.
1. Contents
B1 Battery box USB cable
x
x
x
8
8
2
Screws package Quick Guide
Pin
AC adaptor
Double sided tape
Doorbell button
Microphone
Status light
Speaker
SD card slot
Reset 1
2. Description
External
power port
Back of doorbell
Charging
indicator
Mini USB
Reset 2
Bayonet
lock
B1 main body
Battery box
12
EN EN
34
3. Download the App 4. Register an account
Open the Arenti App. If you are a new user, tap create new
account and follow the prompts to complete registration.
Note: Please agree with the Privacy Agreement.
In order to receive notification in time, please click “Allow”.
Scan and download Arenti App for free
Download the Arenti from App Store or Google Play.
EN EN
56
5. Pair your device Pair your device
Power on your doorbell, you will hear a welcome sound.
If the status light is red and blinking (once per second).
The doorbell is successfully powered on and ready for
pairing.
Click to add a new device, and select “Doorbell”.
EN EN
78
Pair your device Pair your device
Press “Next” after hearing a sound from your doorbell.
The Arenti App will start to connect to the doorbell
automatically as indicated by the status light blinking
rapidly and then staying solid blue.
Enter the Wi-Fi password and tap Next to proceed.
If needed, you can tap Change WiFi to switch to
another suitable WiFi network for your doorbell.
Scan
QR
Code
on screen
Press “Next” to scan QR code using your doorbell.
Keep 5~8inches away from your mobile screen.
EN EN
Pair your device Pair your device
910
Once the pairing process is complete, a page showing
Device Found!” will appear.
You may choose to edit the device name or assign the
device to a dedicated room before tapping Done to
finish the pairing process.
Once your camera is paired, your camera can be viewed
at anytime from your smartphone as long as there is
Internet access.
If no device is found and the pairing process failed, please
check below instructions:
1) WiFi network is 2.4GHz.
2) WiFi password entered is correct and the same WiFi
network is used for the mobile device.
3) Arenti device is in pairing mode.
4) Check your WiFi for network activity.
EN EN
11 12
6. Live viewing 7. History
Tap to enable talking
Tap to enable motion detection
Select a data to review your playback
from SD card
Tap to search video clips by date
Tap to capture a photo/video
during live view or playback
Note: the photo and video
are saved to the internal
memory of your smartphone
Return
Setting menu
Volume on/off Notification history
Battery status
HD/SD switch Cloud storage service
Full screen display
WiFi signal strength
Stream bit rate


EN EN
13 14
8. Installation
Before choosing your preferred location, check the WiFi
strength/coverage to ensure the doorbell is fully functional.
Step 1 Remove the bracket from
B1.
Bracket
Step 1 Remove the bracket from
B1.
Bracket
Battery powered mode
Step 2 Fix the bracket on the wall
with screws and insert the
doorbell into the bracket.
Step 3 Insert the battery box into
the doorbell.
Side
view
AC powered mode
Step 2 Connect AC power with
your wires.
12~24V AC
Step 3 Fix the bracket on the wall
with screws and insert the
doorbell into the bracket.
Side
view
Installation
EN EN
Status Light
Solid on: Camera running correctly
Blink: Currently connecting
Solid on: The camera or network is
abnormal
Blink: Awaiting WiFi connection and
Currently connecting (faster
blinking)
What can I
do if I fail to
pair my
Arenti device
?
1. Check your mobile device is connected to
a 2.4GHz WiFi network.
Does our
current
Arenti device
support
5GHz
wireless?
No - Arenti device currently do not support
5GHz wireless connection.
15 16
3. Check Arenti device is in pairing mode,the
status light blinks red slowly. (1 time/s)
2. Check WiFi password entered is correct and
the same WiFi network is used both for mobile
and pairing.
Double sided tape mode
Installation
9. Trouble shooting
tape
Step 1 Attach the double sided tape to both sides of the
bracket
Step 2 Stick the doorbell to a clean flat tightly.
EN EN
17
Trouble shooting
How to
change the
camera
network to
another
router?
First reset the device or remove it on the
Arenti App, then configure the device again
by the App.
Why doesn’t
the device
identify the
SD card?
It’s recommended to plug SD card after
power cut. Confirm whether the SD card is
normally available and the format is FAT32.
And the SD card can’t be identified when
the Internet environment is not good.
Please visit our official website for further assistance.
www.arenti.com
EN
12
18 19
Merci d'avoir acheté un produit pour maison intelligente
Arenti. Commencez à utiliser vos nouveaux appareils en
téléchargeant Arenti, une application pratique qui gère
tout directement depuis votre téléphone ou votre tablette.
Connectez-vous facilement à votre Wi-Fi domestique et
contrôlez plusieurs appareils depuis toucher du bout des
doigts.
1. Contenu
B1 Boîtier de batterie cable USB
x
x
x
8
8
2
Paquet de vis Guide rapideÉpingle
adaptateur secteur
Ruban adhésif double face
Bouton de
sonnette
Microfono
Voyant d'état
Orateur
Emplacement
pour carte SD
Réinitialiser 1
2. Description
Port
d'alimentation externe
Arrière de la sonnette
Indicateur
de charge
Mini USB
Réinitialiser 2
Serrure à
baïonnette
B1 corps principal
Boîtier de batterie
FR FR
20 21
3. Téléchargez l'application 4. Enregistrez un compte
Ouvrez l'application Arenti. Si vous êtes un nouvel
utilisateur, appuyez sur créer un nouveau compte et s
uivez les invites pour terminer l'enregistrement.
Remarque: veuillez accepter l'accord de confidentialité.
Pour recevoir une notification à temps, veuillez cliquer sur
«Autoriser».
Scannez et téléchargez gratuitement l'application Arenti
Téléchargez Arenti depuis l'App Store ou Google Play.
FR FR
22 23
5. Jumelez votre appareil Associez votre appareil
Allumez votre sonnette, vous entendrez un son de
bienvenue. Si le voyant d'état est rouge et clignote (une
fois par seconde). La sonnette est allumée avec succès et
prête pour appariement.
Cliquez pour ajouter un nouvel appareil et sélectionnez
«Sonnette».
FR FR
24 25
Associez votre appareil Associez votre appareil
Appuyez sur "Suivant" après avoir entendu un son de
votre sonnette.
L'application Arenti commencera à se connecter à la
sonnette automatiquement comme indiqué par le
voyant d'état clignotant rapidement puis en restant
bleu fixe.
Saisissez le mot de passe Wi-Fi et appuyez sur Suivant
pour continuer. Si nécessaire, vous pouvez appuyer sur
Changer WiFi pour basculer sur un autre réseau WiFi
adapté à votre sonnette.
Scan
QR
Code
on screen
Appuyez sur "Suivant" pour scanner le code QR à l'aide
de votre sonnette. Gardez 5 ~ 8 pouces loin de votre
écran mobile.
FR FR
26 27
Associez votre appareil Associez votre appareil
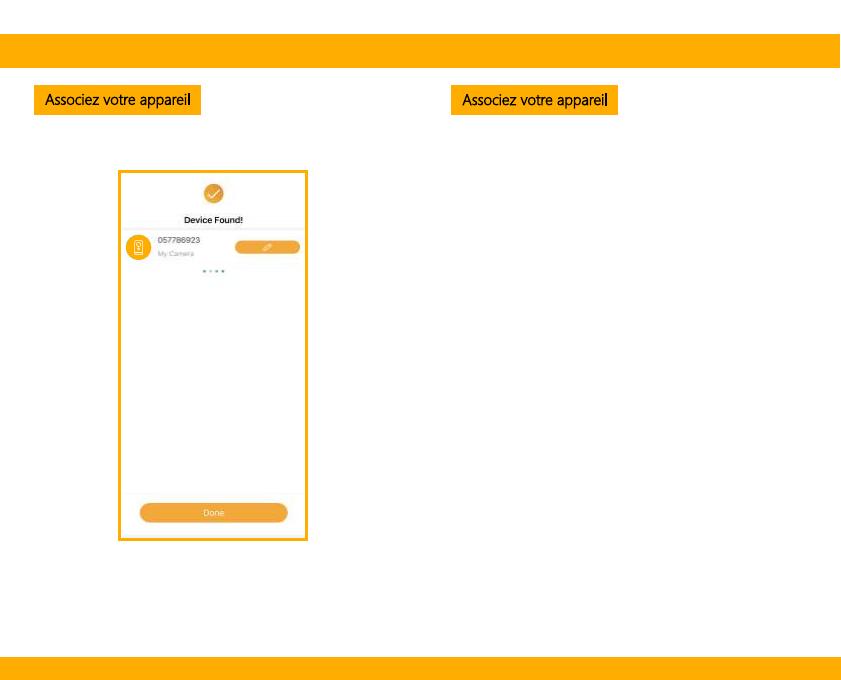
Une fois le processus de couplage terminé, une page
affichant «Device Found!» apparaîtra.
Vous pouvez choisir de modifier le nom de l'appareil ou
d'affecter l'appareil à une pièce dédiée avant de taper
sur Terminé pour terminer le processus d'appairage.
Une fois votre caméra couplée, votre caméra peut être
visualisée à tout moment depuis votre smartphone tant
qu'il y a Accès Internet.
Si aucun appareil n'est trouvé et que le processus de
jumelage a échoué, veuillez consultez les instructions
ci-dessous:
1) Le réseau WiFi est de 2,4 GHz.
2) Le mot de passe WiFi entré est correct et le même
WiFi réseau est utilisé pour l'appareil mobile.
3) L'appareil Arenti est en mode d'appairage.
4) Vérifiez votre WiFi pour l'activité du réseau.
FR FR
28 29
6. Visualisation en direct 7. Histoire
Appuyez pour capturer une photo / vidéo
pendant la visualisation en direct ou la lecture
Remarque: la photo et la vidéo sont enregistrés dans la
mémoire interne mémoire de votre smartphone
Retrun Affichage plein écran
Menu de réglage
Activation/désactivation d
u volume Historique des notifications
État de la batterie
Commutateur HD/SD Service de stockage cloud
Puissance du signal WiFi
Débit binaire Appuyez pour activer la conversation
Sélectionnez une donnée pour revoir votre
lecture depuis la carte SD
Appuyez pour rechercher des clips vidéo par
date
Appuyez pour activer la détection de
mouvement


FR FR
30 31
8. Installation
Avant de choisir votre emplacement préféré, vérifiez la
puissance / couverture WiFi pour vous assurer que la
sonnette est entièrement fonctionnelle.
Step 1 Retirez le support de.
Supporto
Step 1 Retirez le support de.
Supporto
Mode alimenté par batterie
Step 2 Fixez le support au mur avec
des vis et insérez la sonnette
dans le support.
Step 3 Insérez le boîtier de la batterie
dans la sonnette.
Vue de côté
Mode alimenté en courant alternatif
Step 2 Connectez l'alimentation CA à
vos fils.
12~24V AC
Step 3 Fixez le support au mur avec des
vis et insérez la sonnette dans le
support.
Installation
Vue de côté
FR FR
32 33
Que puis-je
faire si je
n'arrive pas à
coupler mon
appareil Arenti?
Notre appareil
Arenti actuel
prend-il en
charge le sans
fil 5 GHz?
Non - Le périphérique Arenti ne prend
actuellement pas en charge Connexion sans fil
5 GHz.
1. Vérifiez que votre appareil mobile est connecté à
un réseau WiFi 2,4 GHz.
3. Vérifiez que l'appareil Arenti est en mode
d'appairage, le voyant d'état clignote lentement en
rouge. (1 fois)
2. VVérifiez que le mot de passe WiFi entré est
correct et que le même réseau WiFi est utilisé à la
fois pour le mobile.
Mode ruban double face
Installation 9. Dépannage
ruban
Step 1 Fixez le ruban adhésif double face des deux côtés du support.
Step 2 Collez bien la sonnette sur un plat propre.
Voyant d'état
Allumé: l'appareil photo fonctionne
correctement
Clignotement: connexion en cours
Allumé: la caméra ou le réseau est anormal
Clignotement: en attente de connexion WiFi
et en cours de connexion (plus rapide
clignotant)
FR FR
34
Dépannage
Comment
changer le
réseau de
caméras sur
un autre
routeur?
Réinitialisez d'abord l'appareil ou supprimez-le
sur l'application Arenti, puis configurez à
nouveau l'appareil par l'application.
Pourquoi l'
appareil
n'identifie-t-il
pas la carte
SD?
Il est recommandé de brancher la carte SD
après une coupure de courant. Vérifiez si la
carte SD est normalement disponible et si le
format est FAT32. Et la carte SD ne peut pas
être identifiée lorsque l'environnement Internet
n'est pas bon.
Veuillez visiter notre site officiel pour plus d'assistance.
www.arenti.com
FR
12
35 36
Vielen Dank, dass Sie sich für das Smart Home-Produkt
von Arenti entschieden haben. Beginnen Sie mit dem
Verwenden Ihrer neuen Geräte, indem Sie sie
herunterladenArenti, eine praktische App, die alles
verwaltet direkt von Ihrem Telefon oder Tablet. Einfach
verbinden mit Ihr Heim-WLAN und steuern Sie mehrere
Geräte von der Berührung Ihrer Fingerspitzen.
1. Inhalt
B1 Batteriefach USB-Kabel
x
x
x
8
8
2
Schraubenpaket Kurzanleitung
Stift
AC-Adapter
Doppelseitiges Klebeband
Türklingelk
nopf
Mikrofon
Statusleuchte
Lautsprecher
SD-Kartenste
ckplatz
1 zurückset
zen
2. Beschreibung
Externer
Stromanschluss
Rückseite der Türklingel
Ladean
zeige
Mini USB
Zurückset
zen 2
Bajonettv
erschluss
B1 Hauptkörper
Batteriefach
DE DE
  • Page 1 1
  • Page 2 2
  • Page 3 3
  • Page 4 4
  • Page 5 5
  • Page 6 6
  • Page 7 7
  • Page 8 8
  • Page 9 9
  • Page 10 10
  • Page 11 11
  • Page 12 12
  • Page 13 13
  • Page 14 14
  • Page 15 15
  • Page 16 16
  • Page 17 17
  • Page 18 18
  • Page 19 19
  • Page 20 20
  • Page 21 21
  • Page 22 22
  • Page 23 23
  • Page 24 24
  • Page 25 25
  • Page 26 26
  • Page 27 27
  • Page 28 28
  • Page 29 29
  • Page 30 30
  • Page 31 31
  • Page 32 32
  • Page 33 33
  • Page 34 34
  • Page 35 35
  • Page 36 36
  • Page 37 37
  • Page 38 38
  • Page 39 39
  • Page 40 40
  • Page 41 41
  • Page 42 42
  • Page 43 43
  • Page 44 44
  • Page 45 45
  • Page 46 46
  • Page 47 47

LAXIHUB B1 Guida utente

Tipo
Guida utente

Documenti correlati