Alto Professional Stealth 1 Wireless Stereo System Guida utente
- Tipo
- Guida utente

Español
Contenido de la caja
(1) Stealth 1 transmisor, (1) Stealth 1 receptor, (2) cables micro
USB a USB-A, guía del usuario.
Encendido del Stealth 1
Utilice los cables micro USB incluidos para conectar el Stealth 1
a un adaptador de alimentación USB (que se vende por
separado) conectado a una toma de corriente o a su ordenador
(encendido). También puede alimentar el Stealth 1 con una pila
AA por unidad.
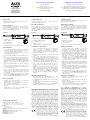
Controles
UHF PLL
Wireless
System
SET
BATT
READY
1
2
4
5
1. Botón Set (Encendido y ajuste)
2. LED Battery/Ready (Pila/Listo)
3. Visor LED de canal
4. Puerto micro USB
5. Salida XLR (Receptor) o entrada (Transmisor)
Configuración y apareamiento
1. Conecte la entrada XLR del transmisor a la salida de un
micrófono, mezclador, etc. Mantenga el volumen del
dispositivo conectado en sus ajustes mínimos, si se aplica.
2. Conecte la salida XLR del receptor a la entrada de un altavoz
alimentado, mezclador, etc.
3. Mantenga pulsado el botón Set del transmisor para
encenderlo.
4. Pulse y suelte el botón Set del transmisor para recorrer y
seleccionar uno de los 16 canales de UHF disponibles (0–9 y
A–F). El visor LED de canal se encenderá y mostrará el canal
de ese momento cuando pulsa el botón. Si este botón Set no
se pulsa durante 3 segundos, la pantalla se apagará.
5. Mantenga pulsado el botón Set del receptor para encenderlo.
6. Pulse y suelte el botón Set del receptor para recorrer y
seleccionar el mismo canal de UHF que se seleccionó en el
transmisor.
7. Encienda sus dispositivos de entrada y salida, y ajuste el
volumen para oír la señal de audio. Si oye ruido en la señal,
cambie a un canal diferente hasta que oiga una señal limpia.
8. Para apagar el transmisor y el receptor, pulse el botón Set de
modo que se encienda el visor LED de canal y luego
mantenga pulsado el botón Set hasta que se apague el
dispositivo.
LED Battery/Ready (Pila/Listo)
• Azul permanente: El receptor/transmisor se apareó
exitosamente con otro dispositivo en el mismo canal.
• Azul parpadeante: El receptor/transmisor se desconectó de
otro dispositivo.
• Rojo: Baja energía. Conecte el Stealth 1 al suministro eléctrico
o reemplace la pila.
• Rojo parpadeante: Muy baja energía. Conecte inmediatamente
el Stealth 1 al suministro eléctrico o reemplace la pila.
AVISO SOBRE LAS REGULACIONES DEL FCC (Federal Communications
Commission): Este equipo genera y usa energía de radiofrecuencia y puede
causar interferencia en la recepción de radio y de televisión si no la opera
estrictamente según los procedimientos detallados en este manual de
operación. Esta unidad cumple con las reglas de aparatos informáticos de
Clase B en conformidad con las especificaciones en la Subparte J o Parte 15
de las Reglas FCC, que están diseñadas para proporcionar una protección
razonable contra tal interferencia en una instalación residencial. Sin embargo,
no existen garantías de que no ocurrirá una interferencia en una instalación
específica. Si la unidad causa interferencia en alguna recepción de radio o de
televisión, intente reducirla realizando uno o más de los siguientes métodos: (a)
reposicione la otra unidad y/o su antena ; (b) mueva esta unidad ; (c) deje más
espacio entre esta unidad y la(s) otra(s) unidad(es); (d) enchufe esta unidad a
una toma de corriente alterna diferente para que esté en un circuito diferente al
de los demás equipos ; (e) asegúrese que todos los cables estén blindados
correctamente, usando un inductor o ferrite cuando sea adecuado. Esta nota
está en conformidad con la Sección 15.838 de las Reglas de FCC.
Declaración sobre exposición a las radiaciones de RF según normas de la
FCC: Este equipo cumple los límites de exposición a la radiación establecidos
por la FCC para un ambiente no controlado. Los usuarios finales deben seguir
las instrucciones de operación específicas para satisfacer las normas sobre
exposición a la RF. Este transmisor no debe colocarse en el mismo lugar ni
operarse en conjunto con ninguna otra antena o transmisor.
Observación general sobre la declaración de conformidad:
Por el presente declaramos que este dispositivo se encuentra en
conformidad con los requisitos esenciales de la Directiva
Europea 2014/53/UE o 2014/30/UE (LVD [Directiva de bajo
voltaje]: 2014/35/UE; GPSD [Directiva de seguridad general de
los productos]: 2001/95/CE). La declaración de conformidad
completa de la UE se puede solicitar a la dirección que se
muestra aquí o a altoprofessional.com/safety
inMusic GmbH, Harkortstr. 12 – 32, 40880 Ratingen, ALEMANIA
altoprofessional.com/support
For technical support.
Para soporte técnico.
Pour obtenir de l’assistance technique.
Per assistenza tecnica.
Für technischen Support.
User Guide
Guía del usuario
Guide d'utilisation
Guida per l'uso
Benutzerhandbuch
v1.0
Français
Contenu de la boîte
(1) Émetteur Stealth 1, (1) Récepteur Stealth 1, (2) câbles micro-
USB vers USB-A, guide d'utilisation.
Alimentation du Stealth 1
Utilisez les câbles micro-USB inclus pour brancher le Stealth 1
à un adaptateur d’alimentation USB (vendu séparément)
branché à une prise secteur ou à un ordinateur (sous tension).
Vous pouvez également alimenter le Stealth 1 en utilisant une
pile AA pour chaque appareil.
Commandes
UHF PLL
Wireless
System
SET
BATT
READY
1
2
4
5
1. Touche Set
2. Indicateur de charge/Prêt
3. Affichage LED du canal
4. Port micro-USB
5. Sortie XLR (récepteur) ou entrée XLR (émetteur)
Installation et jumelage
1. Connectez l'entrée XLR de l'émetteur à la sortie d'un
microphone, d'une console de mixage, etc. Réglez le volume
de l'appareil connecté au réglage minimum, le cas échéant.
2. Connectez la sortie XLR du récepteur à l'entrée d'une
enceinte amplifiée, d'une console de mixage, etc.
3. Maintenez la touche Set de l'émetteur enfoncée pour l'allumer.
4. Appuyez puis relâchez la touche Set de l'émetteur pour
faire défiler et sélectionner l'un des 16 canaux UHF
disponibles (0-9 et A-F). L'affichage LED du canal
s'allumera et affichera le canal actuel lorsque vous appuyez
sur la touche. Si la touche Set n'est pas enfoncée pendant
3 secondes, l'affichage s'éteint.
5. Maintenez la touche Set du récepteur enfoncée pour l'allumer.
6. Appuyez puis relâchez la touche Set du récepteur pour faire
défiler et sélectionner le même canal UHF que celui de
l'émetteur.
7. Allumez vos appareils d'entrée et de sortie et réglez le volume
de manière à entendre le signal audio. Si vous entendez des
bruits indésirables dans le signal, changez de canal jusqu'à ce
que vous en trouviez un avec un signal clair.
8. Pour éteindre l'émetteur et le récepteur, appuyez sur la
touche Set pour que l'affichage LED du canal s'allume,
puis maintenez la touche Set enfoncée jusqu'à ce que
l'appareil s'éteigne.
Indicateur de charge/Prêt
• Bleu fixe = Le récepteur/l’émetteur est jumelé à un autre
appareil sur le même canal.
• Clignote bleu = Le récepteur/l’émetteur a été déconnecté
d'un autre appareil.
• Rouge = Pile faible. Branchez le Stealth 1 à une prise
secteur ou remplacez la pile.
• Clignote rouge = Pile très faible. Branchez immédiatement
le Stealth 1 à une prise secteur ou remplacez la pile.
AVIS CONCERNANT LA RÉGLEMENTATION FCC (Commission
Fédérale américaine des Communications ou CCE) : Cet équipement
génère et utilise de l’énergie sur des fréquences radio et peut causer des
interférences à la réception des programmes radio et télévision si vous ne
l’utilisez pas dans une stricte concordance avec les procédures détaillées
dans ce guide de fonctionnement. Cette unité est conforme aux normes de
Classe B en accord avec les spécifications des sous paragraphe J ou de
l’article 15 de la réglementation FCC, qui sont désignées à offrir une
protection raisonnable contre de telles interférences dans une installation
résidentielle. Toutefois, il n’est pas garanti qu’aucune interférence
n’apparaisse dans des installations particulières. Si l’unité cause des
interférences avec la réception de la radio ou de la télévision, vous pouvez
essayer de les corriger en utilisant une ou plusieurs des mesures suivantes :
(a) repositionnez l’autre appareil et/ou son antenne; (b) déplacez cet appareil
; (c) éloignez cet appareil le plus loin possible de l’autre appareil ; (d)
branchez cet appareil dans une autre prise AC, de cette façon, ils seront sur
des circuits différents; (e) assurez vous que tous les câbles soient blindés à
l’aide d’une bobine d’arrêt ou ferrite, où nécessaire. Cet avis est conforme à
l’article 15.838 de la réglementation FCC.
Énonce sur l’exposition au rayonnement de fréquence radio de la FCC :
Cet équipement est conforme aux limites d’exposition au rayonnement de
fréquence radio de la FCC établies pour un environnement non contrôlé.
L’utilisateur final doit suivre les instructions de fonctionnement spécifiques
afin d’être conforme aux exigences d’exposition au rayonnement de
fréquence radio. Cet émetteur ne doit pas être placé ou utilisé avec une
autre antenne ou un autre émetteur.
Note générale sur la déclaration de conformité : Nous
déclarons par la présente que cet appareil est conforme à toutes
les exigences essentielles de la Directive 2014/53/UE ou
2014/30/UE (LVD [Directive basse-tension] : 2014/35/UE ; GPSD
[Directive sécurité générale des produits] : 2001/95/CE) du
Parlement européen et du Conseil. Une copie du texte intégral
de la déclaration de conformité UE est disponible sur demande à
l’adresse indiquée ici ou à altoprofessional.com/safety
inMusic GmbH, Harkortstr. 12
–
32, 40880 Ratin
ge
n, A
L
LEMAGN
E
English
Box Contents
(1) Stealth 1 Transmitter, (1) Stealth 1 Receiver, (2) Micro-USB
to USB-A Cables, User Guide.
Powering Stealth 1
Use the included micro-USB cables to connect Stealth 1 to a
USB power adapter (sold separately) connected to a power
outlet or your computer (powered on). You can also power
Stealth 1 using one AA battery per unit.
Controls
UHF PLL
Wireless
System
SET
BATT
READY
1
2
4
5
1. Set Button
2. Battery / Ready LED
3. Channel LED Display
4. Micro-USB Port
5. XLR Output (Receiver) or Input (Transmitter)
Setup and Pairing
1. Connect the XLR Input of the Transmitter to the output of a
microphone, mixer, etc. Keep the volume on the connected
device to its minimum settings, if applicable.
2. Connect the XLR Output of the Receiver to the input of a
powered loudspeaker, mixer, etc.
3. Press and hold the Set button on the Transmitter to power
it on.
4. Press and release the Set button on the Transmitter to
cycle through and select one of 16 available UHF channels
(0–9 and A–F). The Channel LED Display will li
g
ht up and
display the current channel as you press the button. If this
Set button is not pressed for 3 seconds, the display will go
dark.
5. Press and hold the Set button on the Receiver to power it
on.
6. Press and release the Set button on the Receiver to cycle
through and select the same UHF channel that has been
selected on the Transmitter.
7. Turn on your input and output devices and adjust the
volume to hear the audio signal. If you hear noise in the
signal, change to a different channel until a clean signal
comes through.
8. To power the Transmitter and Receiver off, press the Set
button so the Channel LED Display turns on, and then
press and hold the Set button until the device powers off.
Battery / Ready LED
• Solid Blue = The receiver/transmitter is successfully paired
to another device on the same channel.
• Blinking Blue = The receiver/transmitter has been
disconnected from another device.
• Red = Low power. Connect Stealth 1 to power or replace
the battery.
• Blinking Red = Very low power. Immediately connect
Stealth 1 to power or replace the battery.
Technical Specifications
Dimensions (width x depth x height):
RX: 0.87” x 4.0” x 0.9” / 22.0 x 102.5 x 22.9 mm
TX : 0.87” x 4.5” x 0.9” / 22.0 x 114 x 22.9 mm
Weight:
RX: 0.057 lbs. / 26 g
TX: 0.07 lbs. / 32 g
UHF Channels: 542-566 MHz (US/CA/AU/NZ), 863-865 MHz
(EU/UK)
Wireless Range: 200 feet (61 m) (line of sight)
Battery Type: 1x AA battery per unit
Battery Life: Up to 5 hours
USB Power: 5V, 150 mA
3
altoprofessional.com/warranty
For complete warranty information.
Para información completa sobre la garantía.
Pour obtenir toutes les informations relatives à la garantie.
Per informazioni complete in merito alla garanzia.
Für komplette Garantieinformationen.
33

Italiano
Contenuti della confezione
(1) Trasmettitore Stealth 1, (1) Ricevitore Stealth 1, (2) cavi da
Micro-USB a USB-A, guida per l'uso.
Alimentazione dello Stealth 1
Servirsi dei cavi micro-USB in dotazione per collegare lo
Stealth 1 a un adattatore di alimentazione USB (venduto
separatamente) collegato a una presa elettrica o al computer
(acceso). Si può anche alimentare lo Stealth 1 con una batteria
AA.
Comandi
UHF PLL
Wireless
System
SET
BATT
READY
1
2
4
5
1. Tasto Set
2. LED Batteria / Ready
3. Display a LED di canale
4. Porta micro-USB
5. Uscita XLR (ricevitore) o ingresso (trasmettitore)
Configurazione e collegamento
1. Collegare l’ingresso XLR del trasmettitore all’uscita di un
microfono, mixer, ecc. Mantenere il volume del dispositivo
connesso al minimo, se applicabile.
2. Collegare l’uscita XLR del ricevitore all’ingresso di un
altoparlante, mixer, ecc.
3. Tenere premuto il tasto Set sul trasmettitore per
accenderlo.
4. Premere e rilasciare il tasto Set sul trasmettitore per
scorrere e selezionare uno dei 16 canali UHF disponibili (0–
9 e A–F). Il display a LED di canale si accende e mostra a
display il canale corrente quando si preme il tasto. Se il
tasto Set non è premuto per 3 secondi, il display diventa
nero.
5. Tenere premuto il tasto Set sul ricevitore per accenderlo.
6. Premere e rilasciare il tasto Set sul ricevitore per scorrere e
selezionare lo stesso canale UHF che è stato selezionato
sul trasmettitore.
7. Accendere i dispositivi di ingresso e di uscita e regolare il
volume per sentire il segnale audio. Se si sente rumore a
livello del se
g
nale, passare a un altro canale fino al
passaggio di un segnale pulito.
8. Per spegnere il trasmettitore e il ricevitore, premere il tasto
Set per far accendere il display a LED di canale, quindi
tenere premuto il tasto Set fino a quando il dispositivo non
si spegne.
LED Batteria / Ready
• Blu fisso = il ricevitore/trasmettitore è collegato a un altro
dispositivo sullo stesso canale.
• Blu lampeggiante = il ricevitore/trasmettitore è stato
scollegato da un altro dispositivo.
• Rosso = batteria scarica. Collegare lo Stealth 1
all’alimentazione o sostituire la batteria.
• Rosso lampeggiante = batteria molto scarica. Collegare
immediatamente lo Stealth 1 all’alimentazione o sostituire la
batteria.
NOTA RIGUARDANTE LE REGOLAMENTAZIONI FCC: Quest’attrezzatura
genera e utilizza energia in radiofrequenza e può causare interferenze nella
ricezione della radio o della televisione nel caso in cui non venga utilizzata
nello stretto rispetto delle procedure specificate in questo manuale di
istruzioni. Questa unità è conforme ai limiti relativi ai dispositivi digitali di
Classe B in conformità con le specifiche indicate nel Capitolo J o Parte 15
delle Regolamentazioni FCC, designati al fine di fornire una ragionevole
protezione contro le interferenze dannose nelle installazioni domestiche.
Comunque, non esiste alcuna garanzia che le interferenze non si
verificheranno in un’installazione particolare. Se questa apparecchiatura
causa interferenze dannose alla ricezione della radio o della televisione, si
consiglia di provare a ridurle utilizzando una o più delle seguenti procedure:
(a) riposizionare l’altra unità e/o la sua antenna; (b) spostare questa unità; (c)
aumentare la distanza tra i due apparecchi; (d) collegare l’apparecchiatura
alla spina utilizzando un circuito diverso da quello al quale è attaccato l’altro
equipaggiamento; (e) assicurarsi che tutti i cavi siano debitamente
schermati, servendosi di un dispositivo d’impedenza o di ferrite laddove
appropriati. Questa nota è conforme alla Sezione 15.838 delle
Regolamentazioni FCC.
Dichiarazione FCC relativa all’esposizione alle radiazioni RF: Questa
attrezzatura è conforme con i limiti per l’esposizione a radiazioni stabiliti dalla
normativa FCC per un ambiente non controllato. Gli utenti finali devono
rispettare le istruzioni operative specifiche per rispettare la conformità
all’esposizione alle radiazioni RF. Questo trasmettitore non deve essere situato
nei pressi né utilizzato congiuntamente ad altre antenne o trasmettitori.
Nota generica in merito alla dichiarazione di conformità:
Con il presente documento si dichiara che il dispositivo è
conforme con i requisiti essenziali contenuti nella Direttiva
Europea 2014/53/UE o 2014/30/UE (LVD [Direttiva Bassa
Tensione]: 2014/35/UE; GPSD [Direttiva sicurezza generale
dei prodotti]: 2001/95/CE). La dichiarazione completa di
conformità UE può essere richiesta all’indirizzo qui riportato o
altoprofessional.com/safety
inMusic GmbH, Harkortstr. 12 – 32, 40880 Ratingen,
GERMANIA
Deutsch
Lieferumfang
(1) Stealth 1 Sender, (1) Stealth 1 Empfänger, (2) Micro-USB auf
USB-A Kabel, Benutzerhandbuch.
Inbetriebnahme des Stealth 1
Verwenden Sie die mitgelieferten Micro-USB-Kabel, um den
Stealth 1 an einen mit einer Steckdose oder Ihrem Computer
(eingeschaltet) verbundenen USB-Netzadapter (separat erhältlich)
anzuschließen. Sie können den Stealth 1 auch mit einer AA-
Batterie pro Gerät betreiben.
Steuerelemente
UHF PLL
Wireless
System
SET
BATT
READY
1
2
4
5
1. Set-Taste
2. LED Batterie / Bereit
3. Kanal-LED-Anzeige
4. Micro-USB-Anschluss
5. XLR-Ausgang (Empfänger) oder Eingang (Sender)
Einrichtung und Kopplung
1. Verbinden Sie den XLR-Eingang des Senders mit dem
Ausgang eines Mikrofons, Mixers usw. Stellen Sie die
Lautstärke des angeschlossenen Geräts ggf. auf das Minimum
ein.
2. Verbinden Sie den XLR-Ausgang des Empfängers mit dem
Eingang eines Aktivlautsprechers, Mixers usw.
3. Drücken und halten Sie die Set-Taste am Sender, um ihn
einzuschalten.
4. Drücken Sie die Set-Taste am Sender und lassen Sie sie
wieder los, um einen der 16 verfügbaren UHF-Kanäle (0–9 und
A–F) zu wählen. Die Kanal-LED-Anzeige leuchtet beim
Drücken der Taste auf und zeigt den aktuellen Kanal an. Wenn
die Set-Taste 3 Sekunden lang nicht gedrückt wird, wird das
Display dunkel.
5. Drücken und halten Sie die Set-Taste am Empfänger, um ihn
einzuschalten.
6. Drücken Sie die Set-Taste am Empfänger und lassen Sie sie
wieder los, um die Kanäle durchzuschalten und denselben
UHF-Kanal auszuwählen, der am Sender ausgewählt wurde.
7. Schalten Sie Ihre Ein- und Aus
g
abe
g
eräte ein und stellen Sie
die Lautstärke so ein, dass Sie das Audiosi
g
nal hören können.
Wenn Sie Rauschen im Signal hören, wechseln Sie zu einem
anderen Kanal, bis Sie ein störungsfreies Signal empfangen.
8. Um den Sender und den Empfänger auszuschalten, drücken
Sie die Set-Taste, bis die Kanal-LED-Anzeige aufleuchtet,
und halten Sie dann die Set-Taste gedrückt, bis sich das Gerät
ausschaltet.
LED Batterie / Bereit
• Dauerhaft blau = Der Empfänger/Sender ist erfolgreich mit
einem anderen Gerät auf demselben Kanal gekoppelt.
• Blinkt blau = Der Empfänger/Sender wurde von einem anderen
Gerät getrennt.
• Rot = Niedriger Batteriestand. Schließen Sie den Stealth 1 an
die Stromversorgung an oder tauschen Sie die Batterie aus.
• Blinkt rot = Sehr niedriger Batteriestand. Schließen Sie den
Stealth 1 sofort an die Stromversorgung an oder tauschen Sie
die Batterie aus.
HINWEIS IM ZUSAMMENHANG MIT FCC-VORSCHRIFTEN: Dieses Gerät
produziert und verwendet Radiofrequenzwellen und kann den Empfang von Radio
und Fernsehen beeinträchtigen, falls es nicht genau den in dieser Betriebsanleitung
geschilderten Verfahren zufolge betrieben wird. Dieses Gerät geht mit den Regeln
der Klasse B für Computer-Geräte konform, in Übereinstimmung mit den
Spezifikationen in Unterabschnitt J oder Teil 15 der FCC-Vorschriften, welche zum
angemessenen Schutz vor solchen Beeinträchtigungen in einer Wohngegend
entworfen wurden. Es gibt jedoch keine Garantie, dass eine Beeinträchtigung bei
einer bestimmten Installation nicht auftritt. Falls das Gerät den Empfang von Radio
oder Fernsehen beeinträchtigt, versuchen Sie, die Beeinträchtigung durch eine der
folgenden Maßnahmen zu vermindern: (a) stellen Sie das Gerät an einen anderen
Platz und/oder richten Sie seine Antenne anders aus; (b) stellen Sie dieses Gerät an
einen anderen Platz; (c) vergrößern Sie den Abstand zwischen diesem und anderen
Geräten; (d) stecken Sie dieses Gerät in eine andere Steckdose, so dass es sich in
einem von den anderen Geräten verschiedenen Stromkreis befindet; (e) achten Sie
darauf, dass Sie ein durch ein Eisendrahtnetz abgeschirmtes Kabel verwenden.
Dieser Hinweis ist im Einklang mit Abschnitt 15.838 der FCC-Vorschriften.
FCC-Strahlenbelastungserklärung: Dieses Gerät entspricht den FCC-
Strahlenbelastungsgrenzwerten für eine unkontrollierte Umgebung. Die
Endbenutzer müssen die spezifischen Bedienhinweise befolgen, um die
Bedingungen für die HF-Belastung entsprechend einzuhalten. Dieser Sender
darf nicht in der Nähe von - oder in Verbindung mit - einer anderen Antenne
oder einem Sender betrieben bzw. aufgestellt werden.
Allgemeinhinweis zur Konformitätserklärung: Hiermit erklären
wir, daß sich dieses Gerät in Übereinstimmung mit den
grundlegenden Anforderungen der europäischen Richtlinie
2014/53/EU oder 2014/30/EU (LVD [Niederspannungs-Richtlinie]:
2014/35/EU; GPSD [Allgemeine Produktsicherheit-Richtlinie]:
2001/95/EC) befindet. Die vollständige EG Konformitätserklärung
kann unter angeführten Adresse oder altoprofessional.com/safety
angefordert werden.
inMusic GmbH, Harkortstr. 12 – 32, DE - 40880 Ratingen
Safety Instructions (English)
Please note: Alto Professional and inMusic are not responsible for the use of
its products or the misuse of this information for any purpose. Alto Professional
and inMusic are not responsible for the misuse of its products caused by
avoiding compliance with inspection and maintenance procedures.
NOTICE CONCERNING FCC REGULATIONS: You are cautioned that
changes or modifications not expressly approved by the part responsible
for compliance could void the user’s authority to operate the equipment.
This equipment has been tested and found to comply with the limits for a
Class B digital device, pursuant to part 15 of the FCC rules. These limits
are designed to provide reasonable protection against harmful
interference in a residential installation. This equipment generates uses
and can radiate radio frequency energy and, if not installed and used in
accordance with the instructions, may cause harmful interference to radio
communications. However, there is no guarantee that interference will not
occur in a particular installation. If this equipment does cause harmful
interference to radio or television reception, which can be determined by
turning the equipment off and on, the user is encouraged to try to correct
the interference by one or more of the following measures: Reorient or
relocate the receiving antenna. Increase the separation between the
equipment and receiver. Connect the equipment into an outlet on a
circuit different from that to which the receiver is connected. Consult the
dealer or an experienced radio/TV technician for help
RF Warning Statement: The device has been evaluated to meet general
RF exposure requirement. The device can be used in portable exposure
condition without restriction. Avoid using this device in a high RF-radiated
environment.
This device contains licence-exempt transmitter(s)/receiver(s) that comply
with Innovation, Science and Economic Development (ISED) Canada’s
licence-exempt RSS(s). Operation is subject to the following two
conditions: (1) this device may not cause interference, and (2) this device
must accept any interference, including interference that may cause
undesired operation of the device.
Français : Cet appareil contient des émetteurs / récepteurs exemptés de
licence qui sont conformes aux RSS exempts de licence d'Innovation,
Sciences et Développement économique (ISDE) Canada. Son
fonctionnement est soumis aux deux conditions suivantes : (1) cet
appareil ne doit pas provoquer d'interférences, et (2) cet appareil doit
accepter toute interférence, y compris les interférences pouvant entraîner
un fonctionnement indésirable de l'appareil.
This device operates on a no-interference, no-protection basis. Should
the user seek to obtain protection from other radio services operating in
the same TV bands, a radio licence is required. For further details, consult
Innovation, Science and Economic Development Canada’s Client
Procedures Circular CPC-2-1-28, Voluntary Licensing of Licence-Exempt
Wireless Microphones in the TV Bands.
Français : Ce dispositif fonctionne selon un régime de non-brouillage et
de non-protection. Si l’utilisateur devait chercher à obtenir une certaine
protection contre d’autres services radio fonctionnant dans les mêmes
bandes de télévision, une licence radio serait requise. Pour en savoir
plus, veuillez consulter la Circulaire des procédures concernant les clients
CPC-2-1-28, Délivrance de licences sur une base volontaire pour les
microphones sans fil exempts de licence exploités dans les bandes de
télévision d’Innovation, Sciences et Développement économique Canada.
Radiation Exposure Statement: This equipment complies with ISED
radiation exposure limits set forth for an uncontrolled environment.
Français : Déclaration d’exposition aux radiations : Cet équipement est
conforme aux limites d’exposition aux rayonnements ISDE établies pour
un environnement non contrôlé.
ESD/EFT Warning: This unit may contain a microcomputer
for signal processing and control functions. In very rare
situations, severe interference, noise from an external source,
or static electricity may cause it to lock up. In the unlikely
event that this should happen, turn off the unit, wait at least
five seconds, and then turn it back on again.
Correct Disposal of This Product: This marking indicates
that this product should not be disposed with other
household wastes throughout the EU. To prevent possible
harm to the environment or human health from uncontrolled
waste disposal, recycle it responsibly to promote the
sustainable reuse of material resources. To return your used
device, please use the return and collection systems or
contact the retailer where the product was purchased. They
can take this product for environmentally safe recycling.
Disposal of Batteries: Never dispose of any types of batteries in fire or
near excessive heat or direct sunlight. Overheated batteries can rupture
or explode. If you are unsure of how or where to dispose of a battery,
refer to your local ordinances for the proper location, method, etc.
Caution: Danger of explosion if battery is incorrectly replaced. Replace
only with the same or equivalent type.
General Note on the Declaration of Conformity: We hereby
declare that this device is in accordance with the essential
requirements of the European Directive 2014/53/EU or
2014/30/EU (LVD: 2014/35/EU; GPSD: 2001/95/EC). The full
EU declaration of conformity can be requested at the address
shown here or at altoprofessional.com/safety
inMusic GmbH, Harkortstr. 12 – 32, 40880 Ratingen,
GERMANY
General Note on the Declaration of Conformity: We hereby
declare that this device is in accordance with the UK
Legislation as Electromagnetic Compatibility Regulations
2016, Electrical Equipment (Safety) Regulations 2016 or
Radio Equipment Regulations 2017. Please note that the
applicable regulation differs according to the specification of
the product. The full UK declaration of conformity can be
provided upon request.
inMusic Europe Limited, GU12 5QE, Hampshire, Great Britain
Alto Professional is a trademark of inMusic Brands, Inc., registered in the
U.S. and other countries. The Bluetooth word mark and logos are
registered trademarks owned by Bluetooth SIG, Inc. and any use of such
marks by Alto Professional is under license. All other product or company
names are trademarks or registered trademarks of their respective
owners.
33
-
 1
1
-
 2
2


Alto Professional Stealth 1 Wireless Stereo System Guida utente
- Tipo
- Guida utente
in altre lingue
Documenti correlati
Altri documenti
-
Alto TXP9 Guida utente
-
Alto Radius 200L Manuale utente
-
DRIFT Stealth 2 Manuale utente
-
 Gemini Industries UX-1620 Manuale utente
-
iON IT103 Istruzioni per l'uso
-
Shure SLX Wireless System Quick Setup Manual
-
Fender Passport UHF Wireless Systems Manuale del proprietario
-
Samson Headphones Concert 88 Manuale utente
