Philips GC9650/80 Manuale utente

Categoria
Stazioni di stiratura a vapore
Tipo
Manuale utente
GC9600 series
1
GC9600 series
ENGLISH 6
ESPAÑOL 14
FRANÇAIS 22
ITALIANO 30
PORTUGUÊS 38
6
Introduction
This iron has been approved by The Woolmark Company Pty Ltd for
the ironing of wool only products provided that the garments are ironed
according to the instructions on the garment label and those issued by the
manufacturer of this iron. R1501. In United Kingdom, Eire, HongKong and
India, the Woolmark trademark is a Certication trademark.
Product overview (Fig. 1)
1 Steam supply hose
2 Iron platform
3 First supply hose storage compartment
4 Mains cord with plug
5 ECO button with light
6 On/off button with safety auto off light and TURBO setting
7 ’Water tank empty’ light
8 EASY DE-CALC light
9 EASY DE-CALC knob
10 Cord storage compartment
11 Second supply hose storage compartment
12 Detachable water tank
13 Carry lock
14 Carry lock release button
15 Soleplate
16 Steam trigger
17 ‘Iron ready’ light
18 Filling hole
19 Protective glove for vertical ironing (specic types only)
Important
Read the separate important information leaet and the user manual
carefully before you use the appliance. Save both documents for future
reference.
Using your appliance
Filling the water tank
Fill the water tank before every use and when the ‘water tank empty’ light
ashes.
Do not add perfume, water from the tumble dryer, vinegar, starch,
descaling agents, ironing aids, chemically descaled water or other
chemicals, as they may cause water spitting, brown staining or damage
to your appliance.
ENGLISH
1 Removethewatertankfromtheapplianceandllitwithtapwater
up to the MAX indication.
Tip: Your appliance has been designed for use with tap water. If you live
in an area with very hard water, scale builds up quickly. In this case it is
recommended to use distilled water to prolong the life of your appliance.
2 Put the water tank back into the appliance by sliding in the bottom
partrst.Thenpushthetoppartuntilitlocksintoplace.
’Water tank empty’ light
When the water tank is almost empty, the ‘water tank empty’ light goes on.
Fill the water tank and press the steam trigger to let the appliance heat up
again. When the ‘iron ready’ light lights up continuously, you can continue
steam ironing.
Temperature setting
The Optimal Temp technology enables you to iron all types of ironable
fabrics, in any order, without adjusting the iron temperature setting.
Fabrics with these symbols are ironable, for example linen, cotton, polyester,
silk, wool, viscose and rayon.
Fabrics with this symbol are not ironable. These fabrics include synthetic
fabrics such as Spandex or elastane, Spandex-mixed fabrics and polyolens
(e.g. polypropylene), but also prints on garments.
ENGLISH 7
Ironing
1 Place the steam generator on a stable and even surface.
2 Make sure that there is enough water in the water tank (see section
‘Filling the water tank’).
3 Put the mains plug in an earthed wall socket and press the on/off
buttontoswitchonthesteamgenerator.Thebluepower-onlighton
theapplianceandthe‘ironready’lightstarttoashtoindicatethat
the appliance is heating up (this takes approx. 2 minutes).
, When the appliance is ready for use, the ‘iron ready light’
andthepower-onlightstopashingandlightupcontinuously.
Additionally you hear a short beep.
4 Press the carry lock release button to unlock the iron from the iron
platform.
5 Press and hold the steam trigger to start ironing.
Never direct steam at people.
Steam boost function
The steam boost function is designed to help tackle difcult creases.
- Double press the steam trigger for a continuous shot of steam. It is not
necessary to press and hold the steam trigger continuously when the
steam boost function is activated. To stop the steam boost function,
press the steam trigger once.
2x
ENGLISH8
Vertical ironing
Hot steam is emitted from the iron. Never attempt to remove creases
from a garment that someone is wearing. Do not apply steam near your
or someone else’s hand.
You can use the iron in vertical position to remove wrinkles from hanging
fabrics.
1 Specictypesonly:putontheglove.
2 Hold the iron in vertical position, press the steam trigger and touch
the garment slightly with the soleplate.
Putting down the iron during ironing
- During ironing, you can place the iron either on the iron platform
or horizontally on the ironing board. Thanks to the OptimalTemp
technology, the soleplate will not damage the ironing board cover.
ECO setting
During ironing, you can use the ECO setting to save energy but still have
sufcient steam to iron all your garments.
Note: For the best results, we advise you to use the ‘Optimal Temp’ setting.
1 Press the ECO button.
, TheECObuttonlightsupgreen.
2 Toswitchbacktothe‘OptimalTemp’setting,presstheECObutton
again.
, ThegreenlightintheECObuttongoesout.
ENGLISH 9
TURBO setting
You can use the TURBO setting for faster ironing and a higher amount of
steam. You can also use it for vertical ironing.
Note: As the TURBO function produces a high amount of steam, the supply
hose may become hotter than at the OptimalTemp and ECO settings.
This is normal.
1 Press and hold the on/off button for 2 seconds until the light turns
white.
, The‘ironready’lightontheironandthewhiteTURBOlightinthe
on/offbuttonstarttoashtoindicatethattheironisheatingupto
theTURBOsetting.Thistakesupto2minutes.
2 Toswitchbacktothe‘OptimalTemp’setting,pressandholdthe
on/off button for 2 seconds until the light turns blue again.
Safety auto-off mode
- To save energy, the appliance switches off automatically when it has not
been used for 10 minutes. The auto-off light in the on/off button starts
to ash.
- To activate the appliance again, press the on/off button. The appliance
then starts to heat up again.
Note: The appliance is not switched off completely when it is in auto-off mode.
To switch off the appliance, press the on/off button.
Cleaning and maintenance
To properly maintain your appliance, clean the iron and the appliance
regularly.
1 Cleantheappliancewithamoistcloth.Toremovestubbornstains,
youcanuseasmallamountofwashing-upliquid.
2 Toeasilyandeffectivelyremovestainsfromthesoleplate,switchon
the appliance and let it heat up. When the appliance has heated up,
move the iron over a moist cloth while you press the steam trigger.
Tip: Clean the soleplate regularly to ensure smooth gliding.
2 sec.
ENGLISH10
IMPORTANT - DESCALING
It is very important to perform the descaling procedure as
soon as the EASY DE-CALC light starts to ash and the
appliance beeps continuously.
The EASY DE-CALC light ashes and the appliance beeps continuously
after about a month or 10 ironing sessions to indicate that the appliance
needs to be descaled. Perform the following descaling procedure
before you continue ironing.
To avoid the risk of burns, unplug the appliance and let it cool
down for atleast two hours before you perform the descaling
procedure.
1 Remove the plug from the wall socket.
2 Place the appliance on the edge of the tabletop.
3 Hold a cup (with a capacity of at least 350ml) under the EASY
DE-CALCknobandturntheknobanticlockwise.
4 RemovetheEASYDE-CALCknobandletthewaterwithscale
particlesowintothecup.
5 When no more water comes out of the appliance, reinsert the
EASYDE-CALCknobandturnitclockwisetofastenit.
ENGLISH 11
Storage
1 Switch off the appliance and unplug it.
2 Remove the water tank and empty it.
3 Put the iron on the iron platform. Push the carry lock to lock the
iron onto the platform.
4 Fold the supply hose and mains cord. Put them in their respective
storage compartments.
5 You can carry the appliance with one hand by the handle of the iron.
Do not carry the appliance by holding the water tank release lever.
Troubleshooting
This chapter summarises the most common problems you could encounter
with the appliance. If you are unable to solve the problem with the
information below, visit www.philips.com/support for a list of frequently
asked questions or contact the Consumer Care Centre in your country.
Problem Possible cause Solution
The ironing board
cover becomes
wet or there are
water droplets on
the garment during
ironing.
Steam has condensed on the
ironing board cover after a long
ironing session.
Replace the ironing board cover if the foam
material has worn out. You can also add an
extra layer of felt material under the ironing
board cover to prevent condensation on
the ironing board. You can buy felt in a fabric
shop.
You have an ironing board cover
that is not designed to cope
with the high steam rate of the
appliance.
Put an extra layer of felt material under
the ironing board cover to prevent
condensation on the ironing board. You can
buy felt in a fabric shop.
Water droplets
come out of the
soleplate.
The steam that was still present
in the hose has cooled down and
condensed into water. This causes
water droplets to come out of
the soleplate.
Steam away from the garment for a few
seconds.
Steam and/or water
come out from
under the EASY DE-
CALC knob.
The EASY DE-CALC knob is not
tightened properly.
Switch off the appliance and let the
appliance cool down for 2 hours.
Unscrew the EASY DE-CALC knob and
screw it back onto the appliance properly.
Note: Some water may escape when you
remove the knob.
The rubber sealing ring of the
EASY DE-CALC knob is worn.
Contact an authorised Philips service centre
for a new EASY DE-CALC knob.
ENGLISH12
Problem Possible cause Solution
Dirty water and
impurities come out
of the soleplate or
the soleplate is dirty.
Impurities or chemicals present
in the water have deposited in
the steam vents and/or on the
soleplate.
Clean the soleplate with a damp cloth.
Too much scale and minerals have
accumulated inside the appliance.
Descale the appliance regularly (see chapter
‘Important - DESCALING’).
The iron leaves a
shine or an imprint
on the garment.
The surface to be ironed was
uneven, for instance because
you were ironing over a seam or
a fold in the garment.
PerfectCare is safe on all garments.
The shine or imprint is not permanent
and will come off if you wash the garment.
Avoid ironing over seams or folds or you
can place a cotton cloth over the area to be
ironed to avoid imprints at seams and folds.
The appliance does
not produce any
steam.
There is not enough water in
the water tank (the ‘water tank
empty’ light ashes).
Fill the water tank (see chapter ‘Using your
appliance’, section ‘Filling the water tank’).
The appliance is not hot enough
to produce steam.
Wait until the ‘iron ready’ light on the iron
lights up continuously.
You did not press the steam
trigger.
Press the steam trigger and keep it pressed
while you iron.
The water tank is not placed in
the appliance properly.
Slide the water tank back into the appliance
rmly (‘click’).
The appliance is not switched on. Insert the plug in the wall socket and press
the on/off button to switch on the appliance.
The appliance has
switched off. The
light in the on/off
button ashes.
The auto-off function is activated
automatically when the appliance
has not been used for more than
10 minutes.
Press the power on/off button to switch on
the appliance again.
The appliance
produces a pumping
sound.
Water is pumped into the boiler
inside the appliance. This is
normal.
If the pumping sound continues nonstop,
switch off the appliance and remove the
plug from the wall socket. Contact an
authorised Philips service centre.
Technical information
- Rated voltage: 220-240V
- Rated frequency: 50-60 Hz
ENGLISH 13
14
Introducción
Esta plancha ha sido aprobada por The Woolmark Company Pty Ltd para
el planchado de productos elaborados solo con lana, siempre que las
prendas se planchen según las instrucciones de la etiqueta de la prenda y
las proporcionadas por el fabricante de esta plancha. R1501. En el Reino
Unido, Irlanda, Hong Kong y la India, la marca registrada Woolmark es una
marca registrada certicada.
Descripción del producto (g. 1)
1 Manguera de vapor
2 Plataforma de la plancha
3 Primer compartimiento para guardar la manguera
4 Cable de alimentación con clavija
5 Botón ECO con piloto
6 Botón de encendido/apagado con piloto de desconexión automática
de seguridad y posición turbo
7 Piloto ‘depósito de agua vacío’
8 Piloto EASY DE-CALC
9 Rueda EASY DE-CALC
10 Compartimento para el cable
11 Segundo compartimento para guardar la manguera
12 Depósito de agua extraíble
13 Bloqueo para transporte
14 Botón de liberación del bloqueo para transporte
15 Suela
16 Botón de vapor
17 Piloto de “plancha lista”
18 Abertura de llenado
19
Guante protector para planchado vertical (solo en modelos especícos)
Importante
Lea el folleto de información importante independiente y el manual
de usuario con atención antes de utilizar el aparato. Guarde ambos
documentos para consultarlos en el futuro.
Uso del aparato
Llenado del depósito de agua
Llene el depósito de agua antes de cada uso y cuando parpadee el piloto
“depósito de agua vacío”.
No añada perfume, agua de una secadora, vinagre, almidón, productos
desincrustantes,productosqueayudenalplanchando,productos
desincrustantesniotrosproductosquímicos,yaquepuedenprovocar
fugas de agua, manchas marrones o daños en el aparato.
ESPAÑOL
1 Extrauga el depósito de agua del aparato y llénelo con agua del grifo
hasta la indicación MAX.
Consejo: El aparato se ha diseñado para utilizarse con agua del grifo.
Si vive en una zona con agua muy dura, la cal se puede acumular
rápidamente. En ese caso, se recomienda utilizar agua destilada para
prolongar la vida útil del aparato.
2 Vuelva a colocar el depósito de agua en el aparato deslizando
primero la parte inferior. A continuación, presione la parte superior
hastaqueencajeensusitio.
Piloto ‘depósito de agua vacío’
Cuando el depósito de agua esté casi vacío, el piloto “depósito de agua
vacío” se ilumina. Llene el depósito de agua y pulse el botón de vapor
para que el aparato vuelva a calentarse. Cuando el piloto de “plancha lista”
permanezca encendido, puede continuar planchando con vapor.
Posición de temperatura
La tecnología OptimalTemp le permite planchar toda clase de tejidos que
lo admitan, en cualquier orden, sin ajustar la temperatura de la plancha.
Los tejidos con estos símbolos se pueden planchar, por ejemplo, el lino,
el algodón, el poliéster, la seda, la lana, la viscosa y el rayón.
Los tejidos con este símbolo no se pueden planchar. Estos tejidos incluyen
tejidos sintéticos como el Spandex o el elastano, tejidos mezclados con
Spandex y poliolena (por ejemplo, el polipropileno). Tampoco se puede
planchar la ropa con impresiones.
ESPAÑOL 15
Planchado
1 Coloqueelgeneradordevaporsobreunasupercieplanayestable.
2 Asegúresedequehayasucienteaguaeneldepósitodeagua
(consulteelapartado“Llenadodeldepósitodeagua”).
3 Conecte la toma de alimentación a un enchufe de pared con toma
de tierra y pulse el botón de encendido/apagado para encender el
generador de vapor. El piloto azul de encendido del aparato y el
pilotode“planchalista”comienzanaparpadearparaindicarqueel
aparato se está calentando (esto tarda aproximadamente 2 minutos).
, Cuandoelaparatoestálistoparasuuso,elpilotode“planchalista”
yelpilotodeencendidodejandeparpadearyseiluminandeforma
continua. Además, se oye un pitido breve.
4 Pulseelbotóndeliberacióndelbloqueoparatransportepara
desbloquearlaplanchadesuplataforma.
5 Mantenga pulsado el botón de vapor para comenzar a planchar.
Nodirijanuncaelvaporhacialaspersonas.
Función supervapor
La función supervapor está diseñada para ayudarle a planchar las arrugas
difíciles.
- Pulse dos veces el botón de vapor para un golpe de vapor continuo.
No es necesario mantener pulsado el botón de vapor de forma
continua cuando la función supervapor está activada. Para detener la
función supervapor, pulse el botón de vapor una vez.
2x
ESPAÑOL16
Planchado vertical
Laplanchaemitevaporcaliente.Nuncaintenteeliminararrugasdeuna
prendaquealguienllevapuesta.Noapliquevaporcercadesumanoni
de la de otra persona.
Puede utilizar la plancha en posición vertical para eliminar las arrugas en
prendas colgadas.
1 Soloenmodelosespecícos:coloqueenelguante.
2 Sostenga la plancha en posición vertical, pulse el botón de vapor
ytoquelaprendaligeramenteconlasuela.
Cómo dejar la plancha durante el planchado
- Mientras plancha, puede colocar la plancha en su plataforma u
horizontalmente en la tabla de planchar. Gracias a la tecnología
OptimalTemp, la suela no dañará la funda de la tabla de planchar.
Posición ECO
Durante el planchado, puede utilizar la posición ECO para ahorrar energía,
además de conseguir el suciente vapor para planchar todas sus prendas
de vestir.
Nota: Para obtener los mejores resultados, le aconsejamos que utilice el ajuste
“OptimalTemp”.
1 Pulse el botón ECO.
, El botón ECO se ilumina en verde.
2 Paravolveralajuste“OptimalTemp”,vuelvaapulsarelbotónECO.
, El piloto verde del botón ECO se apaga.
ESPAÑOL 17
Posición TURBO
Puede utilizar la posición turbo para un planchado más rápido y una mayor
cantidad de vapor. También se puede utilizar para el planchado vertical.
Nota: La función turbo produce una gran cantidad de vapor, lo que puede
provocar que la manguera se ponga a una temperatura superior a la de los
ajustes OptimalTemp y ECO. Esto es normal.
1 Mantenga pulsado el botón de encendido/apagado durante
2segundoshastaqueelpilotoseilumineenblanco.
, Elpilotode“planchalista”yelpilotoblancodelaposiciónTURBO
comienzan a parpadear en el botón de encendido/apagado para
indicarquelaplanchaseestácalentandoalaposiciónTURBO.
Esta operación puede tardar hasta 2 minutos.
2 Paravolveralajuste“OptimalTemp”,mantengapulsadoelbotónde
encendido/apagadodurante2segundoshastaqueelpilotoseilumine
en azul.
Modo de desconexión automática de seguridad
- Para ahorra energía, el aparato se apaga automáticamente si no se
utiliza durante 10 minutos y el piloto de desconexión automática del
botón de encendido/apagado comienza a parpadear.
- Para volver a activar el aparato, pulse el botón de encendido/apagado.
El aparato empieza a calentarse de nuevo.
Nota: El aparato no se paga completamente cuando está en el modo de
apagado automático. Para apagarlo, pulse el botón de encendido/apagado.
Limpieza y mantenimiento
Para mantener el aparato en buenas condiciones, limpie la plancha y el
aparato con regularidad.
1 Limpieelaparatoconunpañohúmedo.Paraeliminarlasmanchas
másdifíciles,puedeutilizarunapequeñacantidaddedetergente
líquido.
2 Paraeliminarlasmanchasdeformasencillayecazdelasuela,
enciendaelaparatoydejequesecaliente.Cuandosehayacalentado,
mueva la plancha sobre un trapo húmedo mientras pulsa el botón
de vapor.
Consejo: Limpie la suela con regularidad para garantizar un deslizamiento suave.
2 sec.
ESPAÑOL18
IMPORTANTE: ELIMINACIÓN DE LOS DEPÓSITOS DE CAL
Es muy importante eliminar los depósitos de cal en cuanto el
piloto EASY DE-CALC parpadee y el aparato emita un pitido
continuo.
El piloto EASY DE-CALC parpadea y el aparato comienza a emitir un
pitido continuo después de aproximadamente un mes o 10 sesiones de
planchado para indicar que debe eliminar los depósitos de cal del aparato.
Realice el siguiente procedimiento de eliminación de los
depósitos de cal antes de seguir planchando.
Para evitar riesgos de quemaduras, desenchufe el aparato y
déjelo enfriar durante al menos dos horas y antes de realizar el
procedimiento de eliminación de depósitos de cal.
1 Desenchufelaclavijadelatomadecorriente.
2 Coloqueelaparatosobreelbordedelamesa.
3 Coloqueunvaso(conunacapacidaddealmenos350ml)debajo
delaruedaEASYDE-CALCygireelbotónenelsentidocontrario
aldelasagujasdelreloj.
4 QuitelaruedaEASYDE-CALCydejequeelaguaconpartículasde
caluyahaciaelvaso.
5 Cuando no salga más agua del aparato, vuelva a colocar la rueda
EASYDE-CALCygírelaenelsentidodelasagujasdelrelojpara
jarla.
ESPAÑOL 19
Almacenamiento
1 Apague el aparato y desenchúfelo.
2 Extraigaeldepósitodeaguayvacíelo.
3 Coloquelaplanchaensuplataforma.Pulseelbloqueodetransporte
parabloquearlaplanchaenlaplataforma.
4 Doblelamanguerayelcabledealimentación.Colóquelosensus
respectivos compartimentos.
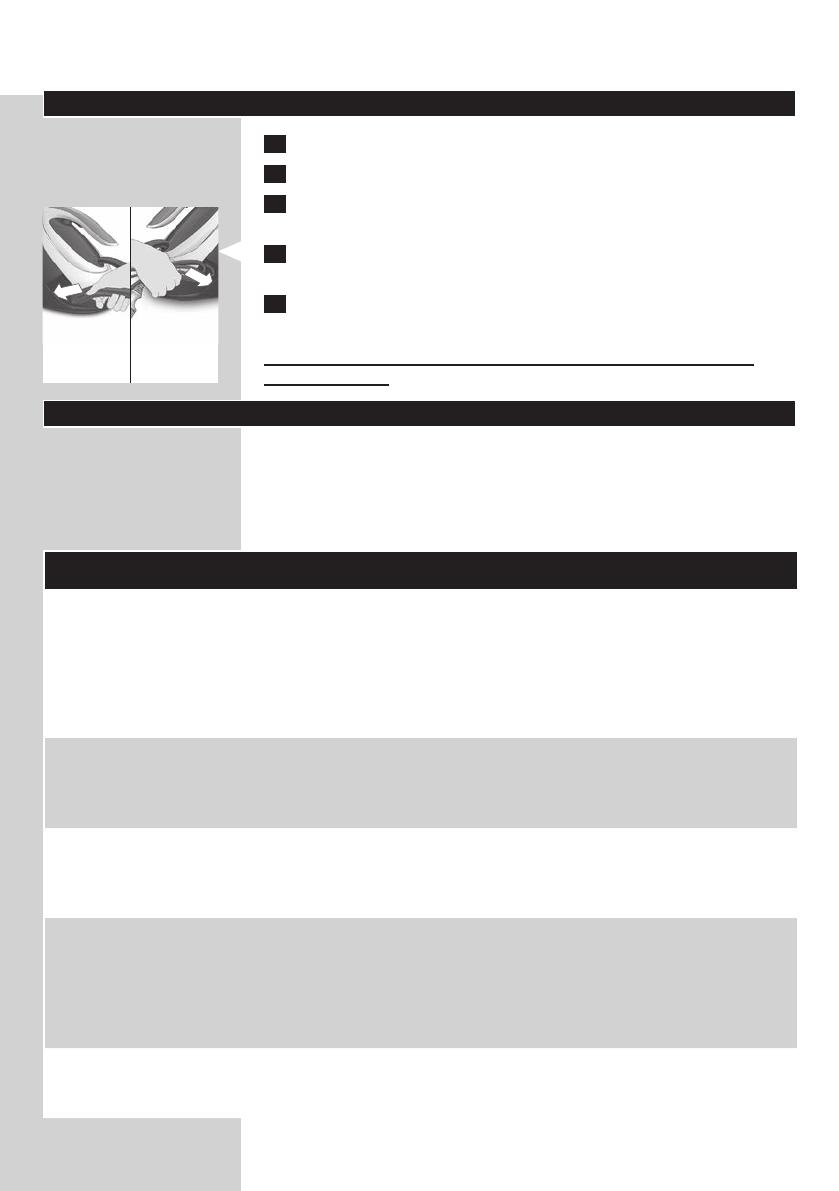
5 Puede transportar el aparato con una mano mediante la empuñadura
de la plancha.
Notransporteelaparatosujetándoloporlapalancaparaliberarel
depósito de agua.
Guía de resolución de problemas
En este capítulo se resumen los problemas más frecuentes que pueden
surgir con el aparato. Si no puede resolver el problema con la siguiente
información, visite www.philips.com/support para consultar una lista
de preguntas más frecuentes o póngase en contacto con el Servicio de
Atención al Cliente en su país.
Problema Posible causa Solución
La funda de la
tabla de planchar
se moja o
aparecen gotas
de agua en la
prenda durante el
planchado.
Se ha condensado vapor en la
funda de la tabla de planchar
después de una sesión larga
de planchado.
Sustituya la funda de la tabla de planchar
si el material de espuma se ha desgastado.
También puede añadir una capa adicional
de eltro debajo de la funda de la tabla de
planchar para evitar la condensación en la
tabla de planchar. Puede adquirir eltro en
una tienda de telas.
Puede que la funda de su tabla de
planchar no esté diseñada para
soportar el elevado ujo de vapor
del aparato.
Coloque una capa adicional de eltro debajo
de la funda de la tabla de planchar para evitar
la condensación en la tabla de planchar. Puede
adquirir eltro en una tienda de telas.
Salen gotitas de
agua por la suela.
El vapor que había en la manguera
se enfría y se condensa en forma
de agua. Esto es lo que hace que
salgan gotitas por la suela.
Expulse el vapor lejos de la prenda durante
unos segundos.
Sale vapor o agua
por debajo de
la rueda EASY
DE-CALC.
La rueda EASY DE-CALC no se
ha apretado correctamente.
Apague el aparato y deje que se enfríe
durante 2 horas. Desenrosque la rueda
EASY DE-CALC y vuelva a enroscarla
correctamente en el aparato. Nota: Puede
que salga un poco de agua cuando extraiga
la rueda.
La junta de goma de la rueda
EASY DE-CALC está desgastada.
Póngase en contacto con un centro de
servicio autorizado por Philips para obtener
una rueda EASY DE-CALC nueva.
ESPAÑOL20
  • Page 1 1
  • Page 2 2
  • Page 3 3
  • Page 4 4
  • Page 5 5
  • Page 6 6
  • Page 7 7
  • Page 8 8
  • Page 9 9
  • Page 10 10
  • Page 11 11
  • Page 12 12
  • Page 13 13
  • Page 14 14
  • Page 15 15
  • Page 16 16
  • Page 17 17
  • Page 18 18
  • Page 19 19
  • Page 20 20
  • Page 21 21
  • Page 22 22
  • Page 23 23
  • Page 24 24
  • Page 25 25
  • Page 26 26
  • Page 27 27
  • Page 28 28
  • Page 29 29
  • Page 30 30
  • Page 31 31
  • Page 32 32
  • Page 33 33
  • Page 34 34
  • Page 35 35
  • Page 36 36
  • Page 37 37
  • Page 38 38
  • Page 39 39
  • Page 40 40
  • Page 41 41
  • Page 42 42
  • Page 43 43
  • Page 44 44
  • Page 45 45
  • Page 46 46

Philips GC9650/80 Manuale utente

Categoria
Stazioni di stiratura a vapore
Tipo
Manuale utente