Electrolux EN6084JOX Manuale utente
- Categoria
- Scatole fresche
- Tipo
- Manuale utente

Refrigerator
Sügavkülmik
Réfrigérateur
Frigorifero
Ledusskapis
Šaldiklis
Chłodziarko-zamrażarka
Frigoríco
Frigider
Холодильник
Frigoríco
Køleskab
Jääkaappi
Kylskåp
Kjøleskap
Soğutucu
User Manual
Kasutusjuhend
Notice d’utilisation
Libretto di istruzioni
Lietotāja rokasgrāmata
Naudotojo instrukcija
Instrukcja obsługi
Manual do Utilizador
Manual de utilizare
Руководство пользователя
Manual de instrucciones
Brugsanvisning
Käyttöohje
Bruksanvisning
Bruksanvisning
Kullanma Kılavuzu
EN
ET
FR
IT
LV
LT
PL
PT
RO
RU
ES
DK
FI
SV
NO
TR
EN6084JOX
2
24
46
68
90
112
134
156
178
200
226
248
270
292
314
336

CONTENTS
1. SAFETY INFORMATION ....................................................................................3
2. SAFETY INSTRUCTIONS .................................................................................4
3. ENVIRONMENT CONCERNS ............................................................................5
4. DESCRIPTION OF THE APPLIANCE .................................................................6
5. INSTALLING YOUR NEW APPLIANCE ..............................................................8
6. DISPLAY CONTROLS ......................................................................................10
7. USING YOUR APPLIANCE ...............................................................................12
8. HELPFUL HINTS AND TIPS .............................................................................16
9. CLEANING AND CARE .....................................................................................17
10. TROUBLESHOOTING ......................................................................................18
11. DISPOSAL OF THE APPLIANCE .....................................................................19
12. TECHNICAL DATA ............................................................................................20
13. NOISES .............................................................................................................20
FOR PERFECT RESULTS
Thank you for choosing this Electrolux product. We have created it to give you
impeccable performance for many years, with innovative technologies that help make life
simpler features you might not nd on ordinary appliances. Please spend a few minutes
reading to get the very best from it.
Visit our website to:
Get usage advice, brochures, trouble shooter, service information:
www.electrolux.com
Register your product for better service:
www.electrolux.com/productregistration
Buy Accessories, Consumables and Original spare parts for your appliance:
www.electrolux.com/shop
CUSTOMER CARE AND SERVICE
Always use original spare parts.
When contacting our Authorised Service Centre, ensure that you have the following
data available: Model, PNC, Serial Number.
The information can be found on the rating plate.
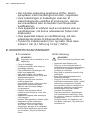
Warning / Caution-Safety information.
General information and tips
Environmental information.
Subject to change without notice.

3 ENGLISH
Before the installation and use of the appliance, carefully
read the supplied instructions. The manufacturer is not
responsible if an incorrect installation and use causes in-
juries and damages. Always keep the instructions with the
appliance for future reference.
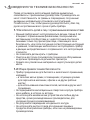
1.1 Children and vulnerable people safety
• This appliance can be used by children aged from 8
years and above and persons with reduced physical,
sensory or mental capabilities or lack of experience and
knowledge if they have been given supervision or instruc-
tion concerning use of the appliance in a safe way and
understand the hazards involved.
• Do not let children play with the appliance.
• Cleaning and user maintenance shall not be made by
children without supervision.
• Keep all packaging away from children.
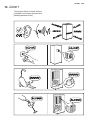
1.2 General Safety
• This appliance is intended to be used in household and
similar applications such as:
– Farm houses; staff kitchen areas in shops, ofces and
other working environments
– By clients in hotels, motels, bed and breakfast and
other residential type environments
• Keep ventilation openings, in the appliance enclosure or
in the built-in structure, clear of obstruction.
• Do not use mechanical devices or other means to ac-
celerate the defrosting process, other than those recom-
mended by the manufacturer.
• Do not damage the refrigerant circuit.
• Do not use electrical appliances inside the food storage
compartments of the appliance, unless they are of the
type recommended by the manufacturer.
• Do not use water spray and steam to clean the appliance.
• Clean the appliance with a moist soft cloth. Only use neu-
tral detergents. Do not use abrasive products, abrasive
cleaning pads, solvents or metal objects.
• Do not store explosive substances such as aerosol cans
with a ammable propellant in this appliance.
1. SAFETY INFORMATION

4 www.electrolux.com
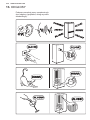
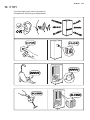
2.1 Installation
WARNING!
Only a qualied person must
install this appliance.
• Remove all the packaging.
• Do not install or use a damaged
appliance.
• Obey the installation instruction
supplied with the appliance.
• Always be careful when you move the
appliance because it is heavy. Always
wear safety gloves.
• Make sure the air can circulate around
the appliance.
• Wait at least 4 hours before
connecting the appliance to the power
supply. This is to allow the oil to ow
back in the compressor.
• Do not install the appliance close to
radiators or cookers, oven or hobs.
• The rear of the appliance must stand
against the wall.
• Do not install the appliance where
there is direct sunlight.
• Do not install this appliance in areas
that are too humid or too colds, such
as the construction appendices,
garages or wine cellars.
• When you move the appliance, lift it
by the front edge to avoid scratching
the oor.
2.2 Electrical connection
WARNING!
Risk of re and electrical shock.
• The appliance must be earthed.
• Make sure that the electrical informa-
tion on the rating plate agrees with
the power supply. If not, contact an
electrician.
• Always use a correctly installed shock-
proof socket.
• Do not use multi-plug adapters and
extension cables.
• Make sure not to cause damage to
the electrical components (e.g. mains
plug, mains cable, compressor).
Contact the Service or an electrician to
change the electrical components.
• The mains cable must stay below the
level of the mains plug.
Connect the mains plug to the mains
socket only at the end of the installa-
tion. Make sure that there is access to
the mains plug after the installation.
Do not pull the mains cable to discon-
nect the appliance. Always pull the
mains plug.
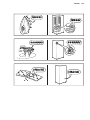
2.3 Use
WARNING!
Risk of injury, burns, electrical
shock or re.
• Do not change the specication of this
appliance.
• Do not put electrical appliances (e.g.
ice cream makers) in the appliance
unless they are stated applicable by
the manufacturer.
• Be careful not to cause damage to the
refrigerant circuit. It contains isobutane
(R600a), a natural gas with a high
level of environmental compatibility.
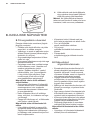
2. SAFETY INSTRUCTIONS
• If the supply cord is damaged, it must be replaced by the
manufacturer, its service agent or similarlyqualied per-
sons in order to avoid a hazard.
• If the appliance is equipped with an Ice maker or a water
dispenser, ll them with potable water only.
• If the appliance requires a water connection, connect it to
potable water supply only.
• The inlet water pressure (minimum and maximum)must
be between 1 bar (0,1 MPa) and 10 bar (1 MPa)

5 ENGLISH
This gas is ammable.
• If damage occurs to the refrigerant
circuit, make sure that there are no
ames and sources of ignition in the
room. Ventilate the room.
• Do not let hot items to touch the plas-
tic parts of the appliance.
• Do not put soft drinks in the freezer
compartment. This will create pressure
on the drink container.
• Do not store ammable gas and liquid
in the appliance.
• Do not put ammable products or
items that are wet with ammable
products in, near or on the appliance.
• Do not touch the compressor or the
condenser. They are hot.
• Do not remove or touch items from the
freezer compartment if your hands are
wet or damp.
• Do not freeze again food that has
been thawed.
• Obey the storage instructions on the
packaging of frozen food.
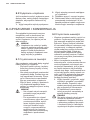
2.4 Internal light
• The type of lamp used for this appli-
ance is not suitable for household
room illumination.
2.5 Care and cleaning
WARNING!
Risk of injury or damage to the
appliance.
• Before maintenance, deactivate the
appliance and disconnect the mains
plug from the mains socket.
• This appliance contains hydrocarbons
in the cooling unit. Only a qualied
person must do the maintenance and
the recharging of the unit.
• Regularly examine the drain of the
appliance and if necessary, clean it. If
the drain is blocked, defrosted water
collects in the bottom of the appliance.
2.6 Disposal
WARNING!
Risk of injury or suffocation.
• Disconnect the appliance from the
mains supply.
• Cut off the mains cable and discard it.
• Remove the door to prevent children
and pets to be closed inside of the
appliance.
• The refrigerant circuit and the insula-
tion materials of this appliance are
ozone-friendly.
• The insulation foam contains am-
mable gas. Contact your municipal
authority for information on how to
discard the appliance correctly.
• Do not cause damage to the part of
the cooling unit that is near the heat
exchanger.
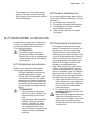
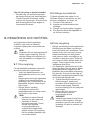
3. ENVIRONMENT CONCERNS
Recycle the materials with the symbol .
Put the packaging in applicable con-
tainers to recycle it. Help protect the
environment and human health and to
recycle waste of electrical and electronic
appliances. Do not dispose appliances
marked with the symbol
with the
household waste. Return the product to
your local recycling facility or contact your
municipal ofce.

6 www.electrolux.com
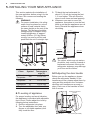
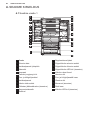
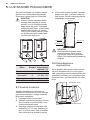
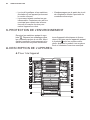
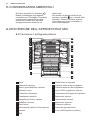
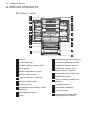
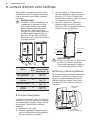
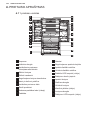
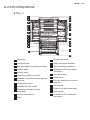
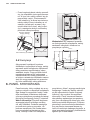
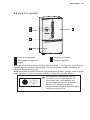
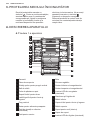
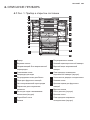
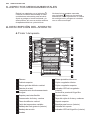
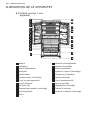
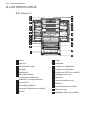
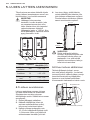
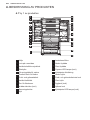
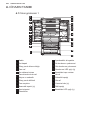
4.1 View 1 of the appliance
Cabinet
Top cover
Vertical bafe guide block
Glass shelf
Water storage box
Flexible pop can rack
Fruit and vegetables crisper
Vertical bafe part
My fresh choice
Twistable ice tray (inside)
Serving tray
Rollers
Adjustable bottom feet
Lower freezer drawer
Upper freezer drawer
Freezer LED light (inside)
Refrigerator door seal
Lower rack
Crisper cover
Upper rack
Egg tray (inside)
Rack cover
Refrigerator LED light (inside)
4. DESCRIPTION OF THE APPLIANCE
1
2
3
4
5
6
7
8
9
10
11
12
13
14
15
16
17
18
19
20
21
22
23

7 ENGLISH
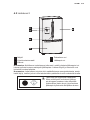
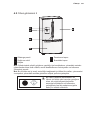
24
25
26
27
28
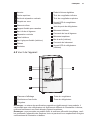
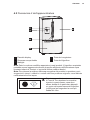
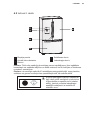
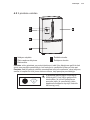
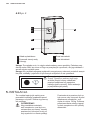
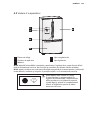
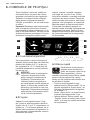
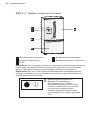
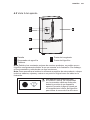
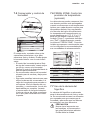
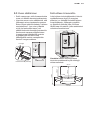
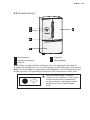
4.2 View 2 of the appliance
Display board
Cold water dispenser
Handles
Freezer door
Refrigerator door
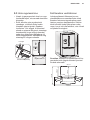
Note: Due to constant improvement of our products, your refrigerator may be slightly
different from the above illustration, but its functions and using methods remain the
same.
Note: To get the best energy efciency of this product, please place all shelves, draw-
ers and baskets on their original position as the illustration above.
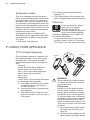
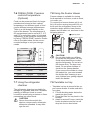
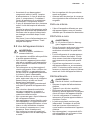
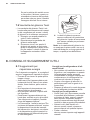
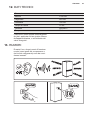
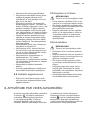
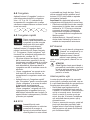
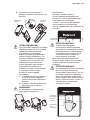
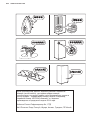
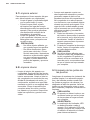
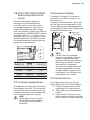
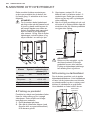
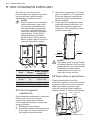
This appliance is sold in France. In
accordance with regulations valid in
this country it must be provided with a
special device (see gure) placed in
the lower campartment of the fridge to
indicate the coldest zone of it.

8 www.electrolux.com
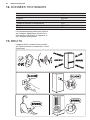
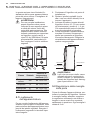
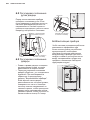
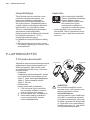
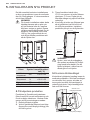
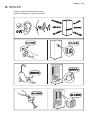
5. INSTALLING YOUR NEW APPLIANCE
This section explains the installation of
the new appliance before using it for the
rst time. We recommend reading the
following
WARNING!
For proper installation, this refrig-
erator must be placed on a level
surface of hard material that is
the same height as the rest of the
ooring. This surface should be
strong enough to support a fully
loaded refrigerator, or approxi-
mately 266 lbs. (120 kg).When
moving, be sure to pull out and
push back the unit in straight. tips.
Class Symbol
Ambient
Temperature
rage(°C)
Extend
Temperate
SN +10 to +32
Temperate N +16 to +32
Subtropical ST +16 to +38
Tropical T +16 to +43
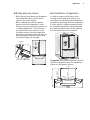
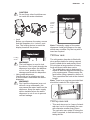
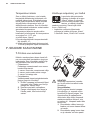
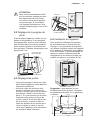
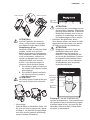
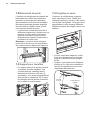
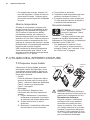
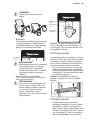
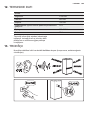
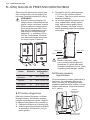
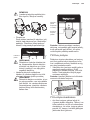
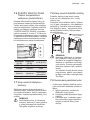
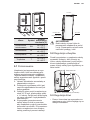
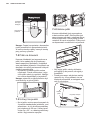
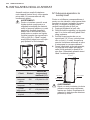
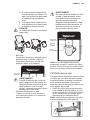
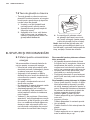
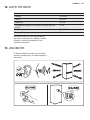
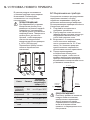
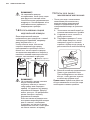
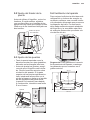
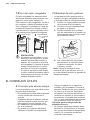
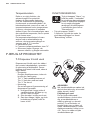
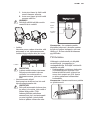
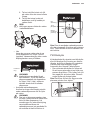
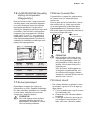
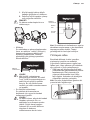
5.1 Leveling of appliance
For proper leveling and avoid vibration,
this appliance is provided with adjustable
feet in front. Please adjust the level by
following below instructions:
1. Roll the refrigerator into place.
2. Turn the adjustable feet (with your
ngers or a suitable spanner) until
they touch the oor.
3. Tilt back the top backwards for
about 10-15 mm by turning the feet
1~2 turn further. This will allow the
doors to self-close and seal properly.
4. Whenever you want to move the
appliance, remember to turn the feet
back up so that the appliance can roll
freely. Reinstall the appliance when
relocating.
WARNING!
The rollers, which are not castors,
should be only used for forward or
backward movement. Moving the
refrigerator sideways may damage
your oor and the rollers.
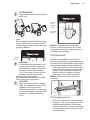
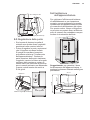
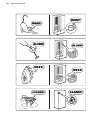
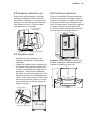
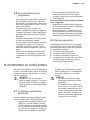
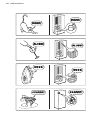
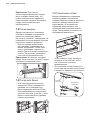
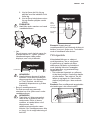
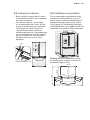
5.2 Adjusting the door handle
Before you use the appliance, please
check the refrigerator handles. If the
handles are loose, please adjust them by
using an Allen wrench in the clockwise
direction until handles are securely in
place. Each one of the handles is tted
with 2 screws.
10-15mm
Rear roller
Front roller
Adjustable foot
Hexagon socket set
screws
Allen wrench (Provided)

9 ENGLISH
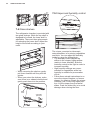
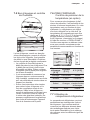
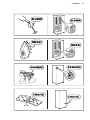
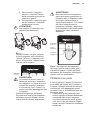
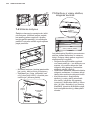
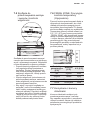
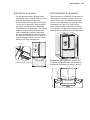
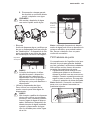
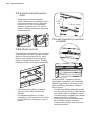
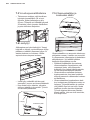
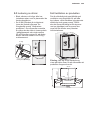
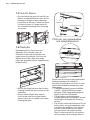
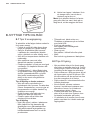
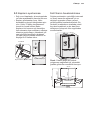
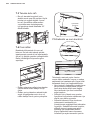
5.3 Adjusting the doors
• Both left and right doors are equipped
with adjustable axes, which are lo-
cated in the lower hinges.
• Before adjusting its doors, please
ensure that the refrigerator is level.
Please review the previous section on
“Leveling appliance”. If you nd the
top of the doors are uneven, insert
the Allen wrench into the hinge axis,
and turn it clockwise torise the door or
anticlockwise to lower the door, and
insert an E Ring into the gap.
E Ring
Allen wrench (Provided)
Adjustable part
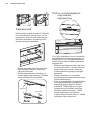
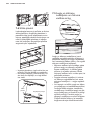
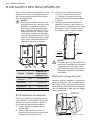
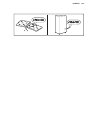
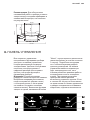
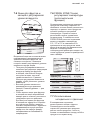
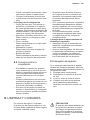
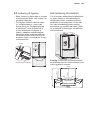
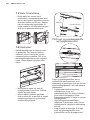
5.4 Ventilation of appliance
In order to improve efciency of the
cooling system and save energy, it is
necessary to maintain proper ventilation
around the appliance for heat dissipation.
For this reason, sufcient space should
be provided around the refrigerator and
the area should be clear of any obstruc-
tion that affects the air circulation.
Suggestion: to ensure a proper function-
ing of the appliance keep the distances
shown on the graphic above.
908mm
1720mm
1140mm
600mm
765mm

10 www.electrolux.com
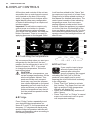
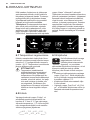
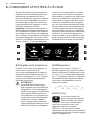
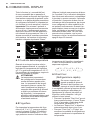
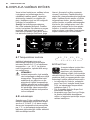
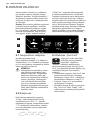
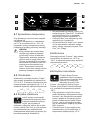
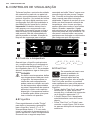
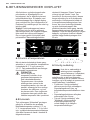
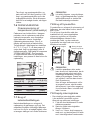
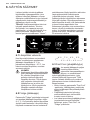
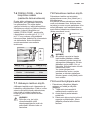
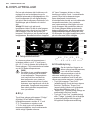
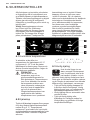
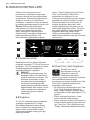
6. DISPLAY CONTROLS
All functions and controls of the unit are
accessible from a control panel conveni-
ently located on the door of the refrig-
erator. A keypad of touch buttons and a
digital display allow easy conguration
of features and settings in a simple and
intuitive manner.
Important! Touch buttons require only
a short press on a button to operate.
The operationoccurs when releasing
your nger from the button, not while the
button is pressed. There is no need for
applying pressure on the keypad. Child
Lock function related to the “Alarm” but-
ton requires a long touch of a least 3 sec.
Please refer to those related sections of
this Manual for detailed instructions. The
control panel consists of two indicating
temperature areas, ve icons repre-
senting different modes and six touch
buttons. When the appliance is powered
on for the rst time, the backlight of the
icons on display panel turns on. If no but-
tons have been pressed and the doors
remains closed, the backlight will turn off
after 60 sec.
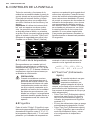
6.1 Controlling the temperature
We recommend that when you start your
refrigerator for the rst time, the tem-
perature for the refrigerator is set to 5°C
and the freezer to -18°C. If you want
to change the temperature, follow the
instructions below.
CAUTION!
When you set a temperature, you
set an average temperature for the
whole refrigerator cabinet. Tem-
peratures inside each compart-
ment may vary from the tempera-
ture values displayed on the panel,
depending on how much food you
store and where you place them.
Ambient temperature may also af-
fect the actual temperature inside
the appliance.
6.2 Fridge
Press “Fridge” button repeatedly to set
your desired fridge temperature be-
tween 8°C and 2°C, the temperature will
decrease 1°C degrees with each press
and the fridge temperature indicator will
display corresponding value according to
the following sequence.
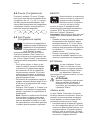
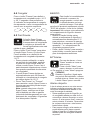
6.3 Fast Cool
If you need to insert a large
amount of warm food, for
example after doing the
grocery shopping, we suggest
activating the Fast Cool to chill the
products more rapidly and to avoid
warming the other food which is already
in the refrigerator.
• Press “Fast Cool” button to activate
this function. The Super Cool icon will
light up and the Fridge temperature
indicator will display 2°C.
• Super cool automatically switches off
after 6 hours.
• Press “Fast Cool” or “Fridge” to cancel
super cool mode and revert to previ-
ous temperature settings.
8°C 7°C 6°C 5°C
2°C 3°C 4°C

11 ENGLISH
6.4 Freeze
Press “Freezer” button to set the freezer
temperature between -14°C and -24°C
to suit your desired temperature, and the
freezer temperature indicator will display
corresponding value according to the
following sequence.
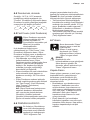
6.5 Fast Freeze
Super Freeze can rapidly
lower frozen temperature and
freeze your food substant
substantially faster than
usual.
Press “Fast Freeze” button to activate
the super freeze function. The Super
Freeze icon will be illuminated and the
freezer temperature setting will display
-24°C.
• For rst time use, or after a period
of inactivity, allow 6 hours of normal
operation before using Super Freeze
mode. This is particularly important if
a large amount of food is placed in the
freezer.
• Super freeze automatically switches
off after 26 hours of usage and the
freezer temperature goes to below
-20°C.
• Press “Fast Freeze” or “Freezer” to
cancel Super Freeze mode and revert
to previous temperature settings.
Note: When selecting the Super
Freeze function, ensure there are
no bottled or canned drinks (espe-
cially carbonated drinks) in the freezer
compartment. Bottles and cans may
explode.
6.6 ECO
This function is designed to
minimise the energy
consumption and electricity
bills while the Fridge is not in
use for a long period of time.
-14°C -15°C -16°C -17°C -18°C -19°C
-24°C -23°C -22°C -21°C -20°C
You can activate this function by pressing
“ECO” button for a short until the Holiday
light icon is illuminated.
Important! Do not store any food in the
refrigerator chamber during this time.
• When the holiday function is activated,
the temperature of the refrigerator
is automatically switched to 15°C to
minimise the energy consumption.
The refrigerator temperature setting
displays “-” and the freezer compart-
ment remains on.
• Press “Holiday” button to cancel
Holiday mode and revert to previous
temperature settings.
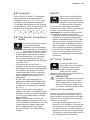
6.7 Alarm
In case of alarm, “Alarm” icon
will light up and a buzzing
sound will start.
Press “Alarm” button to stop
alarm and buzzing then
“Alarm” icon will turn off.
CAUTION!
When the refrigerator is turned
on after a period of inactivity, the
Alarm may be activated. In this
case, press “Alarm” button to
cancel it.
Door Alarm
The alarm light on and a buzzing sound
indicate abnormal conditions, such as ac-
cidentally a door left open or that a power
interruption to the unit has occurred.
• Leaving any door of refrigerator or
freezer open for over 2 minutes will
activate a door alarm and buzzer.
The buzzer will beep 3 times per min-
ute for 10 minutes. Closing the door
cancels the door alarm and buzzer.
• To save energy, please avoid keeping
doors open for a long time when using
refrigerator. The door alarm can also
be cleared by closing the doors.

12 www.electrolux.com
Temperature alarm
This is an important feature that alerts
users of potential damage to stored food.
If a power failure occurs, for example a
blackout in your area of residence while
you are away, the temperature alarm will
memorize the temperature of the freezer
when power was restored to the unit; this
is likely to be the maximum temperature
reached by frozen items.
A temperature alarm condition will be
indicated by Alarm light and buzzer when
the temperature reading is warmer than
-9ºC, then
a- The Alarm icon lights up;
b- The freezer temperature indicator
displays “H”;
c-
The buzzer beeping 10 times when the
alarm is triggered and stop automatically.
Child Lock
Press and hold the “Alarm”
button for 3 seconds to
activate the child lock.
This will disable the display to
prevent accidental changes
to settings. Meanwhile, the “Child Lock”
icon will be illuminated.
• To turn the child lock off, press and
hold the “Alarm” button for 3 seconds.
The “Child Lock” icon will be turned off.
7. USING YOUR APPLIANCE
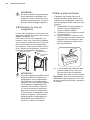
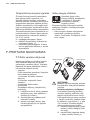
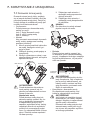
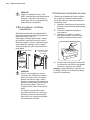
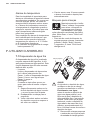
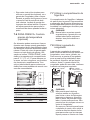
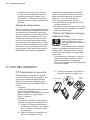
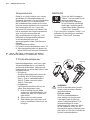
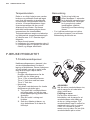
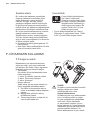
7.1 Cold water dispenser
The cold water dispenser, located in the
left refrigerator door, is used for storing
drinking water. This feature provides
chilled water easily without opening the
door.
• Cleaning
Please clean the water dispenser
before using it for the rst time.
step 1: pull out the water dispenser
step 2: wash with clear water
step 3: dry it
• Assembling
Please refer to the following instruction
to reassemble the dispenser.
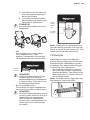
1. Hold tightly both sides of the water
container then lift it up and put it
out from the door.
2. Unscrew the head in counterclock-
wise direction.
3. Insert them back on the door and
push the container until you hear a
click sound.
WARNING!
When inserting the water contain-
er, ensure the head sits correctly
into the hole rst.
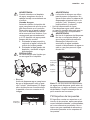
Filling water
Before you ll the drinking water
into the water container, ensure
that the water container is steady
and placed into a correct position.
To prevent water from overowing
and spilling, ll the water container
below the maximum level mark
which is approximately about 4.0L.
There are two ways to ll the water
container:
1. By removing the small lid and
ll water from the inlet of the
large lid.
2. By removing the large lid of the
tank, and then ll water directly.
Small lid
Head
Large lid

13 ENGLISH
CAUTION!
Do not ll any other liquid than wa-
ter inside the water container.
• Lock
Before you dispense the water, ensure
that the dispenser is in “unlock” posi-
tion. The locking device is under the
display board as the picture:
D
WARNING!
The lock feature is used to lock
the device. Don’t push strongly the
dispenser lever when the dispens-
er is in “lock” position, this may
damage and break the dispenser.
• Using water dispenser
You should use a suitable cup size
to ll the water underneath the water
dispenser.
WARNING!
Don’t pull the dispenser lever out
without a cup underneath; this
may cause the water leak from the
dispenser. Keep the water supply
device installed when the water
dispenser is out of use to prevent
cold air leakage.
D
Note: Frequently usage of the water
dispenser could spill drops on the tray
which may overow. Dry the tray with a
towel as required.
7.2 Door rack
The refrigerator chamber is tted with
door racks suitable for storing canned
liquid, bottled drinks and packed food.
Do not place a large amount of heavy
food and items inside door racks.
• The middle door rack is designed to
adjust at different heights according to
your requirements. Please empty the
rack before lifting upward to remove it.
Then reposition the rack at the desired
height.
Note: There is an egg tray provided that
should be located in the upper rack.
7.3 Pop can rack
• This rack stores up to 4 cans of stand-
ard size, but it is not suitable for cans
with diameter smaller than 50mm.
The rack also can rotate 25°along the
shelf if required, to facilitate storing or
taking drinks.
Locking
device
Locking
device
Press
lever
Suggested
position
About 50mm

14 www.electrolux.com
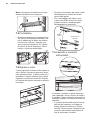
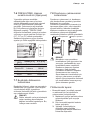
7.4 Glass shelves
The refrigerator chamber is provided with
two glass shelves. While the top shelf is
designed to be xed, the lower shelf is
adjustable. There are three placements
for relocating the lower shelf. Adjust the
height of the shelf according to your
need:
• When removing the shelves, gently
pull them forward until they exit the
guides.
• When you return the shelves, make
sure there is no obstacle behind and
gently push them into the position.
7.5 Crisper and humidity control
The crisper, mounted on telescopic
extensionslides, is for storing vegetables
and fruits. You can adjust the humidity
inside by using the sliding block.
• The humidity control adjusts the
airow in the crisper; higher airow
results in lower humidity. Slide the
humidity control to the right in order to
increase humidity.
• High humidity settings are recom-
mended for vegetables, while low
humidity is suitable for preservation
of fruit.
• Follow these simple instructions to re-
move the crisper chamber, or freezer
drawer, for cleaning. Empty the crisper
chamber; pull it out to fully open posi-
tion. Lift the crisper from the lateral
slides. Push the slides fully in to avoid
damage when closing the door.
Glass
Shelf
Adjustable
plecement
Sliding block
Fruit and vegetable crisper

15 ENGLISH
7.6 FRESH ZONE. Precision
controlof temperature
(Optional)
Food can be preserved fresh for longer
periods when stored at their optimal
temperature, but different types of food
require different storage temperatures.
There is a chill drawer display on the
right of the drawer. The temperature of
the compartment can be set at 0°C, 3°C
and 5°C to suit either meat, or fruits and
vegetables, or deli products respectively
by using “FRESH ZONE” buttons. Please
refer to the table below for the recom-
mended settings to suit your storage
needs.
Deli [5°C] Vege. [3°C] 0°C [0°C]
Cheese Cucumber Steaks
Ham Lettuce Fish
Salami Oranges Cold cuts
Olives Corn Poultry
7.7 Using the refrigerator
chamber
The refrigerator chamber is suitable for
storage of vegetable and fruits. Separate
packing of different foods is recom-
mended to avoid losing moisture or avor
permeating into other foods.
CAUTION!
Never close doors while the
shelves, crisper and/or telescopic
slides are extended. It may dam-
age the unit.
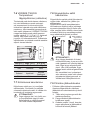
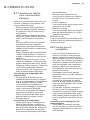
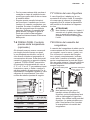
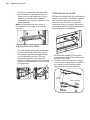
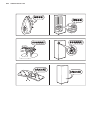
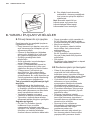
7.8 Using the freezer drawer
Freezer drawer is suitable for storing
food required to be frozen, such as meat,
ice cream, etc.
To remove the freezer drawer pull it out
fully, tilt up the serving tray and lift it out,
then open the refrigerator doors to the
maximum angle and the lower freezer
drawer can be taken out, as shown in the
following pictures.
CAUTION!
Do not allow babies or children
go inside the refrigerator, as they
could injure themselves or dam-
age the refrigerator. Do not sit on
the freezer door. The door may
break. Do not allow children to
climb into the freezer basket.
If you remove the divider to clean
the basket bin, you must reinstall
the divider after cleaning to pre-
vent children from getting trapped
inside the basket.
7.9 Twistable ice tray
• Twistable ice tray is placed in the up-
per freezer drawer to make and store
ice cubes.
1. Fill with drinking water below the
maximum level mark.
2. Place the lled ice tray back to the
bracket.
3. Await for around 3 hours, twist the
knobs clockwise and the ice will
drop into the ice box below.
Closing door Opening door
Serving tray
Lower freezer drawer

16 www.electrolux.com
4. Ice cubes can be stored in the ice
box, if you need them, you can pull
out the ice box and take them out.
Note: If the ice tray is used for the rst
time or has not been used for a long
time, please clean it before using.
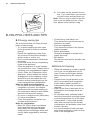
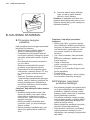
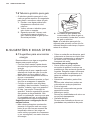
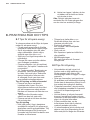
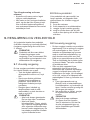
8. HELPFUL HINTS AND TIPS
8.1 Energy saving tips
We recommend that you follow the tips
below to save energy.
• Try to avoid keeping the door open
for long periods in order to conserve
energy.
• Ensure the appliance is away from
any sources of heat (Direct sunlight,
electric oven or cooker etc).
• Don't set the temperature colder than
necessary.
• Don't store warm food or evaporating
liquid in the appliance.
• Place the appliance in a well ventilat-
ed, humidity free, room. Please refer to
Installing your new appliance chapter.
• View 1 under the “Description of the
appliance” section shows the correct
arrangement for the drawers, crisper
and shelves, do not adjust the com-
bination as this is designed to be the
most energy efcient conguration.
Hints for fresh food refrigeration
• Do not place hot food directly into the
refrigerator or freezer, the internal
temperature will increase resulting in
the compressor having to work harder
and will consume more energy.
• Do cover or wrap the food, particularly
if it has a strong avor.
• Place food properly so that air can
circulate freely around it.
Hints for refrigeration
• Meat (All Types) Wrap in polythene
food: wrap and place on the glass
shelf above the vegetable drawer.
Always follow food storage times and
use by dates suggested by manufac-
turers.
• Cooked food, cold dishes, etc.:
They should be covered and may be
placed on any shelf.
• Fruit and vegetables:
They should be stored in the special
drawer provided.
• Butter and cheese:
Should be wrapped in airtight foil or
plastic lm wrap.
• Milk bottles:
Should have a lid and be stored in the
door racks.
8.2 Hints for freezing
• When rst starting-up or after a period
out of use, let the appliance run at
least 2 hours on the higher settings
before putting food in the compart-
ment.
• Prepare food in small portions to en-
able it to be rapidly and completely
frozen and to make it possible to
subsequently thaw only the quantity
required.
• Wrap up the food in aluminum foil or
polyethylene food wraps which are
airtight.
• Do not allow fresh, unfrozen food to
touch the food which is already frozen
to avoid temperature rise of the latter.
• Iced products, if consumed immedi-
ately after removal from the freezer
compartment, will probably cause frost
burns to the skin.
• It is recommended to label and date
each frozen package in order to keep
track of the storage time.

17 ENGLISH
Hints for the storage of frozen food
• Ensure that frozen food has been
stored correctly by the food retailer
• Once defrosted, food will deteriorate
rapidly and should not be re-frozen.
Do not exceed the storage period indi-
cated by the food manufacturer.
8.3 Switching off your appliance
If the appliance needs to be switched
off for an extended period, the following
steps should be taken to prevent mould
on the appliance.
1. Remove all food.
2. Remove the power plug from the
mains socket.
3. Clean and dry the interior thoroughly.
4. Ensure that all the doors are wedged
open slightly to allow air to circulate.
9. CLEANING AND CARE
For hygienic reasons the appliance
(including exterior and interior accesso-
ries) should be cleaned regularly at least
every two months.
CAUTION!
The appliance must not be
connected to the mains during
cleaning. Danger of electrical
shock! Before c leaning switch the
appliance off and remove the plug
from the mains socket.
9.1 Exterior cleaning
To maintain good appearance of your ap-
pliance, you should clean it regularly.
– Wipe the digital panel and display
panel with a clean, soft cloth.
– Spray water onto the cleaning cloth
instead of spraying directly on the
surface of the appl iance. This
helps ensure an even distribution of
moisture to the surface.
– Clean the doors, handles and cabi-
net surfaces with a mild detergent
and then wipe dry with a soft cloth.
CAUTION!
– Don’t use sharp objects as
they are likely to scratch the
surface.
– Don’t use Thinner, Car de-
tergent, Clorox, ethereal oil,
abrasive cleansers or organic
solvent such as Benzene for
cleaning. They may damage
the surface of the appliance
and may cause re.
9.2 Interior cleaning
• You should clean the appliance interior
regularly. It will be easier to clean
when food stocks are low. Wipe the
inside of the fridge freezer with a
weak solution of bicarbonate of soda,
and then rinse with warm water using
a wrung-out sponge or cloth. Wipe
completely dry before replacing the
shelves and baskets. Thoroughly dry
all surfaces and removable parts.
• Although this appliance automatically
defrosts, a layer of frost may occur
on the freezer compartment’s interior
walls if the freezer door is opened
frequently or kept open too long. If the
frost is too thick, choose a time when
the supply of food stocks are low and
proceed as follows:
1. Remove existing food and acces-
sories baskets, unplug the appli-
ance from the mains power and
leave the doors open. Ventilate the
room thoroughly to accelerate the
thawing process.
2. When defrosting is completed,
clean your freezer as described
above.
CAUTION!
Don’t use sharp objects to remove
frost from the freezer compart-
ment. Only after the interior is
completely dry should the appli-
ance be switched back on and
plugged back into the mains
socket.

18 www.electrolux.com
9.3 Door seals cleaning
Take care to keep door seals clean.
Sticky food and drinks can cause seals
to stick to the cabinet and tear when you
open the door. Wash seal with a mild
detergent and warm water. Rinse and dry
it thoroughly after cleaning.
CAUTION!
Only after the door seals are com-
pletely dry should the appliance be
powered on.
WARNING!
The LED light must not be re-
placed by the user! If the LED light
is damaged, contact the customer
helpline for assistance.
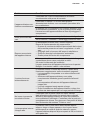
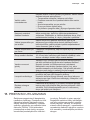
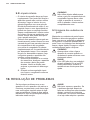
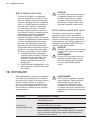
10. TROUBLESHOOTING
If you experience a problem with your
appliance or are concerned that the ap-
pliance is not functioning correctly, you
can carry out some easy checks before
calling for service, please see below.
You can carry out some easy checks
according to this section before calling
for service.
WARNING!
Don’t try to repair the appliance
yourself. If the problem persists
after you have made the checks
mentioned below, contact a quali-
ed electrician, authorized service
engineer or the shop where you
purchased the product.
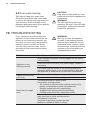
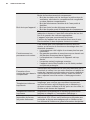
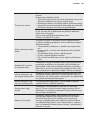
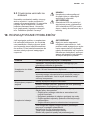
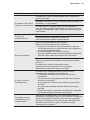
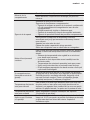
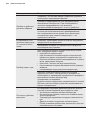
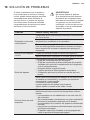
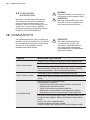
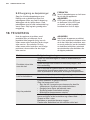
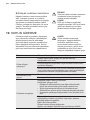
Problem Possible cause & Solution
Appliance is not
working correctly
Check whether the power cord is plugged into the power
outlet properly.
Check the fuse or circuit of your power supply, replace if
necessary.
It is normal that the freezer is not operating during the
automatic defrost cycle, or for a short period of time after
the appliance is switched on to protect the compressor.
Odours from the com-
partments
The interior of the refrigerator may need to be cleaned.
Some food, containers or wrapping cause odours.
Noise from the appli-
ance
The sounds below are quite normal:
Compressor running noises.
• Air movement noise from the small fan motor in the
freezer compartment or other com-partments.
• Gurgling sound similar to water boiling.
• Popping noise during automatic defrosting.
• Clicking noise before the compressor starts.
Other unusual noises are due to the reasons below and
may need you to check and take action:
The cabinet is not level.
The back of appliance touches the wall.
Bottles or containers fallen or rolling.

19 ENGLISH
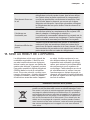
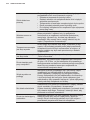
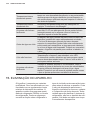
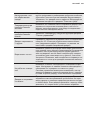
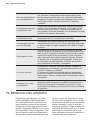
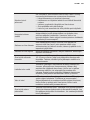
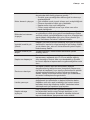
The motor runs con-
tinuously
It is normal to frequently hear the sound of the motor, it
will need to run more when in following circumstances:
• Temperature setting is set colder than necessary
• Large quantity of warm food has recently been stored
within the appliance.
• The temperature outside the appliance is too high.
• Doors are kept open for a long period.
• After your installing the appliance or it has been
switched off for a long time.
A layer of frost occurs
in the compartment
Check that the air outlets are not blocked by food and en-
sure food is placed within the appliance to allow sufcient
ventilation. Ensure that door is fully closed. To remove the
frost, please refer to “cleaning and care” section.
Temperature inside is
too warm
You may have left the doors open too long or too fre-
quently or the doors are kept open by some obstacle; or
the appliance is located with insufcient clearance at the
sides, back and top.
Temperature inside is
too cold
Increase the temperature by following the “Display con-
trols” chapter.
Doors can’t be closed
easily
Check whether the top of the refrigerator is tilted back by
10-15mm to allow the doors to self close or if something
inside is preventing the doors from closing.
Water drips on the oor
The water pan (located at the rear bottom of the cabinet)
may not be properly leveled, or the draining spout (located
underneath the top of the compressor depot) may not be
properly positioned to direct water into this pan, or the
water spout is blocked. You may need to pull the refrigera-
tor away from the wall to check the pan and spout.
The light is not working
The LED light may be damaged. Refer to replace LED
lights in cleaning and care chapter.
The control system has disabled the lights due to the door
being kept open too long, close and reopens the door to
reactivate the lights.
Doors does not open
smoothly
Check the door seal, and if it is necessary clean the rub-
ber gasket seal around the edges of the door using dish
soap and warm water. Dirt and grime can collect here and
cause door stick to the fridge.
11. DISPOSAL OF THE APPLIANCE
The refrigerator is built from reusable
materials. It must be disposed of incom-
pliance with current local waste disposal
regulations. The appliance contains a
small quantity of refrigerant (R600a) in
the refrigerant circuit. For your safety
please refer to the section of “the refrig-
erant and risk of re” in this Instruction
Manual before scrapping the appliance.
Please cut off the power cord to make
the refrigerator unusable and remove the
door seal and lock. Please be cautious of
the cooling system and do not damage
it by puncturing the refrigerant con-
tainer and/or bending the tubing, and/or
scratching of the surface coating.

20 www.electrolux.com
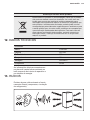
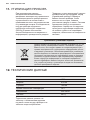
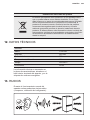
Correct Disposal of this product
This symbol on the product or in its packing indicates that this
product may not be treated as household waste. Instead, it
should be taken to the appropriate waste collection point for the
recycling of electrical and electronic equipment. By ensuring this
product is disposed of correctly, you will help prevent potential
negative consequences for the environment and human health,
which could otherwise be caused by the inappropriate waste
handling of this product. For more detailed information about
the recycling of this product, please contact your local council
your household waste disposal service, or the shop where you
purchased the product.
12. TECHNICAL DATA
Dimension
Height 1766 mm
Width 912 mm
Depth 765 mm
Rising Time 12 h
Voltage 220-240 V
Frequency 50 Hz
The technical information are situated in
the rating plate on the internal left side of
the appliance and in the energy label.
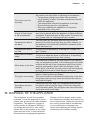
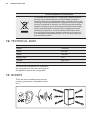
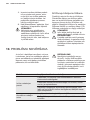
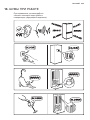
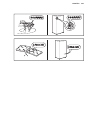
13. NOISES
There are some sounds during normal
running (compressor, refrigerant circula-
tion).
La pagina si sta caricando...
La pagina si sta caricando...
La pagina si sta caricando...
La pagina si sta caricando...
La pagina si sta caricando...
La pagina si sta caricando...
La pagina si sta caricando...
La pagina si sta caricando...
La pagina si sta caricando...
La pagina si sta caricando...
La pagina si sta caricando...
La pagina si sta caricando...
La pagina si sta caricando...
La pagina si sta caricando...
La pagina si sta caricando...
La pagina si sta caricando...
La pagina si sta caricando...
La pagina si sta caricando...
La pagina si sta caricando...
La pagina si sta caricando...
La pagina si sta caricando...
La pagina si sta caricando...
La pagina si sta caricando...
La pagina si sta caricando...
La pagina si sta caricando...
La pagina si sta caricando...
La pagina si sta caricando...
La pagina si sta caricando...
La pagina si sta caricando...
La pagina si sta caricando...
La pagina si sta caricando...
La pagina si sta caricando...
La pagina si sta caricando...
La pagina si sta caricando...
La pagina si sta caricando...
La pagina si sta caricando...
La pagina si sta caricando...
La pagina si sta caricando...
La pagina si sta caricando...
La pagina si sta caricando...
La pagina si sta caricando...
La pagina si sta caricando...
La pagina si sta caricando...
La pagina si sta caricando...
La pagina si sta caricando...
La pagina si sta caricando...
La pagina si sta caricando...
La pagina si sta caricando...
La pagina si sta caricando...
La pagina si sta caricando...
La pagina si sta caricando...
La pagina si sta caricando...
La pagina si sta caricando...
La pagina si sta caricando...
La pagina si sta caricando...
La pagina si sta caricando...
La pagina si sta caricando...
La pagina si sta caricando...
La pagina si sta caricando...
La pagina si sta caricando...
La pagina si sta caricando...
La pagina si sta caricando...
La pagina si sta caricando...
La pagina si sta caricando...
La pagina si sta caricando...
La pagina si sta caricando...
La pagina si sta caricando...
La pagina si sta caricando...
La pagina si sta caricando...
La pagina si sta caricando...
La pagina si sta caricando...
La pagina si sta caricando...
La pagina si sta caricando...
La pagina si sta caricando...
La pagina si sta caricando...
La pagina si sta caricando...
La pagina si sta caricando...
La pagina si sta caricando...
La pagina si sta caricando...
La pagina si sta caricando...
La pagina si sta caricando...
La pagina si sta caricando...
La pagina si sta caricando...
La pagina si sta caricando...
La pagina si sta caricando...
La pagina si sta caricando...
La pagina si sta caricando...
La pagina si sta caricando...
La pagina si sta caricando...
La pagina si sta caricando...
La pagina si sta caricando...
La pagina si sta caricando...
La pagina si sta caricando...
La pagina si sta caricando...
La pagina si sta caricando...
La pagina si sta caricando...
La pagina si sta caricando...
La pagina si sta caricando...
La pagina si sta caricando...
La pagina si sta caricando...
La pagina si sta caricando...
La pagina si sta caricando...
La pagina si sta caricando...
La pagina si sta caricando...
La pagina si sta caricando...
La pagina si sta caricando...
La pagina si sta caricando...
La pagina si sta caricando...
La pagina si sta caricando...
La pagina si sta caricando...
La pagina si sta caricando...
La pagina si sta caricando...
La pagina si sta caricando...
La pagina si sta caricando...
La pagina si sta caricando...
La pagina si sta caricando...
La pagina si sta caricando...
La pagina si sta caricando...
La pagina si sta caricando...
La pagina si sta caricando...
La pagina si sta caricando...
La pagina si sta caricando...
La pagina si sta caricando...
La pagina si sta caricando...
La pagina si sta caricando...
La pagina si sta caricando...
La pagina si sta caricando...
La pagina si sta caricando...
La pagina si sta caricando...
La pagina si sta caricando...
La pagina si sta caricando...
La pagina si sta caricando...
La pagina si sta caricando...
La pagina si sta caricando...
La pagina si sta caricando...
La pagina si sta caricando...
La pagina si sta caricando...
La pagina si sta caricando...
La pagina si sta caricando...
La pagina si sta caricando...
La pagina si sta caricando...
La pagina si sta caricando...
La pagina si sta caricando...
La pagina si sta caricando...
La pagina si sta caricando...
La pagina si sta caricando...
La pagina si sta caricando...
La pagina si sta caricando...
La pagina si sta caricando...
La pagina si sta caricando...
La pagina si sta caricando...
La pagina si sta caricando...
La pagina si sta caricando...
La pagina si sta caricando...
La pagina si sta caricando...
La pagina si sta caricando...
La pagina si sta caricando...
La pagina si sta caricando...
La pagina si sta caricando...
La pagina si sta caricando...
La pagina si sta caricando...
La pagina si sta caricando...
La pagina si sta caricando...
La pagina si sta caricando...
La pagina si sta caricando...
La pagina si sta caricando...
La pagina si sta caricando...
La pagina si sta caricando...
La pagina si sta caricando...
La pagina si sta caricando...
La pagina si sta caricando...
La pagina si sta caricando...
La pagina si sta caricando...
La pagina si sta caricando...
La pagina si sta caricando...
La pagina si sta caricando...
La pagina si sta caricando...
La pagina si sta caricando...
La pagina si sta caricando...
La pagina si sta caricando...
La pagina si sta caricando...
La pagina si sta caricando...
La pagina si sta caricando...
La pagina si sta caricando...
La pagina si sta caricando...
La pagina si sta caricando...
La pagina si sta caricando...
La pagina si sta caricando...
La pagina si sta caricando...
La pagina si sta caricando...
La pagina si sta caricando...
La pagina si sta caricando...
La pagina si sta caricando...
La pagina si sta caricando...
La pagina si sta caricando...
La pagina si sta caricando...
La pagina si sta caricando...
La pagina si sta caricando...
La pagina si sta caricando...
La pagina si sta caricando...
La pagina si sta caricando...
La pagina si sta caricando...
La pagina si sta caricando...
La pagina si sta caricando...
La pagina si sta caricando...
La pagina si sta caricando...
La pagina si sta caricando...
La pagina si sta caricando...
La pagina si sta caricando...
La pagina si sta caricando...
La pagina si sta caricando...
La pagina si sta caricando...
La pagina si sta caricando...
La pagina si sta caricando...
La pagina si sta caricando...
La pagina si sta caricando...
La pagina si sta caricando...
La pagina si sta caricando...
La pagina si sta caricando...
La pagina si sta caricando...
La pagina si sta caricando...
La pagina si sta caricando...
La pagina si sta caricando...
La pagina si sta caricando...
La pagina si sta caricando...
La pagina si sta caricando...
La pagina si sta caricando...
La pagina si sta caricando...
La pagina si sta caricando...
La pagina si sta caricando...
La pagina si sta caricando...
La pagina si sta caricando...
La pagina si sta caricando...
La pagina si sta caricando...
La pagina si sta caricando...
La pagina si sta caricando...
La pagina si sta caricando...
La pagina si sta caricando...
La pagina si sta caricando...
La pagina si sta caricando...
La pagina si sta caricando...
La pagina si sta caricando...
La pagina si sta caricando...
La pagina si sta caricando...
La pagina si sta caricando...
La pagina si sta caricando...
La pagina si sta caricando...
La pagina si sta caricando...
La pagina si sta caricando...
La pagina si sta caricando...
La pagina si sta caricando...
La pagina si sta caricando...
La pagina si sta caricando...
La pagina si sta caricando...
La pagina si sta caricando...
La pagina si sta caricando...
La pagina si sta caricando...
La pagina si sta caricando...
La pagina si sta caricando...
La pagina si sta caricando...
La pagina si sta caricando...
La pagina si sta caricando...
La pagina si sta caricando...
La pagina si sta caricando...
La pagina si sta caricando...
La pagina si sta caricando...
La pagina si sta caricando...
La pagina si sta caricando...
La pagina si sta caricando...
La pagina si sta caricando...
La pagina si sta caricando...
La pagina si sta caricando...
La pagina si sta caricando...
La pagina si sta caricando...
La pagina si sta caricando...
La pagina si sta caricando...
La pagina si sta caricando...
La pagina si sta caricando...
La pagina si sta caricando...
La pagina si sta caricando...
La pagina si sta caricando...
La pagina si sta caricando...
La pagina si sta caricando...
La pagina si sta caricando...
La pagina si sta caricando...
La pagina si sta caricando...
La pagina si sta caricando...
La pagina si sta caricando...
La pagina si sta caricando...
La pagina si sta caricando...
La pagina si sta caricando...
La pagina si sta caricando...
La pagina si sta caricando...
La pagina si sta caricando...
La pagina si sta caricando...
La pagina si sta caricando...
La pagina si sta caricando...
La pagina si sta caricando...
La pagina si sta caricando...
La pagina si sta caricando...
La pagina si sta caricando...
La pagina si sta caricando...
La pagina si sta caricando...
La pagina si sta caricando...
La pagina si sta caricando...
La pagina si sta caricando...
La pagina si sta caricando...
La pagina si sta caricando...
La pagina si sta caricando...
La pagina si sta caricando...
La pagina si sta caricando...
La pagina si sta caricando...
La pagina si sta caricando...
La pagina si sta caricando...
La pagina si sta caricando...
La pagina si sta caricando...
La pagina si sta caricando...
La pagina si sta caricando...
La pagina si sta caricando...
La pagina si sta caricando...
La pagina si sta caricando...
La pagina si sta caricando...
La pagina si sta caricando...
La pagina si sta caricando...
La pagina si sta caricando...
La pagina si sta caricando...
La pagina si sta caricando...
La pagina si sta caricando...
La pagina si sta caricando...
La pagina si sta caricando...
La pagina si sta caricando...
La pagina si sta caricando...
La pagina si sta caricando...
La pagina si sta caricando...
La pagina si sta caricando...
La pagina si sta caricando...
La pagina si sta caricando...
La pagina si sta caricando...
La pagina si sta caricando...
La pagina si sta caricando...
-
 1
1
-
 2
2
-
 3
3
-
 4
4
-
 5
5
-
 6
6
-
 7
7
-
 8
8
-
 9
9
-
 10
10
-
 11
11
-
 12
12
-
 13
13
-
 14
14
-
 15
15
-
 16
16
-
 17
17
-
 18
18
-
 19
19
-
 20
20
-
 21
21
-
 22
22
-
 23
23
-
 24
24
-
 25
25
-
 26
26
-
 27
27
-
 28
28
-
 29
29
-
 30
30
-
 31
31
-
 32
32
-
 33
33
-
 34
34
-
 35
35
-
 36
36
-
 37
37
-
 38
38
-
 39
39
-
 40
40
-
 41
41
-
 42
42
-
 43
43
-
 44
44
-
 45
45
-
 46
46
-
 47
47
-
 48
48
-
 49
49
-
 50
50
-
 51
51
-
 52
52
-
 53
53
-
 54
54
-
 55
55
-
 56
56
-
 57
57
-
 58
58
-
 59
59
-
 60
60
-
 61
61
-
 62
62
-
 63
63
-
 64
64
-
 65
65
-
 66
66
-
 67
67
-
 68
68
-
 69
69
-
 70
70
-
 71
71
-
 72
72
-
 73
73
-
 74
74
-
 75
75
-
 76
76
-
 77
77
-
 78
78
-
 79
79
-
 80
80
-
 81
81
-
 82
82
-
 83
83
-
 84
84
-
 85
85
-
 86
86
-
 87
87
-
 88
88
-
 89
89
-
 90
90
-
 91
91
-
 92
92
-
 93
93
-
 94
94
-
 95
95
-
 96
96
-
 97
97
-
 98
98
-
 99
99
-
 100
100
-
 101
101
-
 102
102
-
 103
103
-
 104
104
-
 105
105
-
 106
106
-
 107
107
-
 108
108
-
 109
109
-
 110
110
-
 111
111
-
 112
112
-
 113
113
-
 114
114
-
 115
115
-
 116
116
-
 117
117
-
 118
118
-
 119
119
-
 120
120
-
 121
121
-
 122
122
-
 123
123
-
 124
124
-
 125
125
-
 126
126
-
 127
127
-
 128
128
-
 129
129
-
 130
130
-
 131
131
-
 132
132
-
 133
133
-
 134
134
-
 135
135
-
 136
136
-
 137
137
-
 138
138
-
 139
139
-
 140
140
-
 141
141
-
 142
142
-
 143
143
-
 144
144
-
 145
145
-
 146
146
-
 147
147
-
 148
148
-
 149
149
-
 150
150
-
 151
151
-
 152
152
-
 153
153
-
 154
154
-
 155
155
-
 156
156
-
 157
157
-
 158
158
-
 159
159
-
 160
160
-
 161
161
-
 162
162
-
 163
163
-
 164
164
-
 165
165
-
 166
166
-
 167
167
-
 168
168
-
 169
169
-
 170
170
-
 171
171
-
 172
172
-
 173
173
-
 174
174
-
 175
175
-
 176
176
-
 177
177
-
 178
178
-
 179
179
-
 180
180
-
 181
181
-
 182
182
-
 183
183
-
 184
184
-
 185
185
-
 186
186
-
 187
187
-
 188
188
-
 189
189
-
 190
190
-
 191
191
-
 192
192
-
 193
193
-
 194
194
-
 195
195
-
 196
196
-
 197
197
-
 198
198
-
 199
199
-
 200
200
-
 201
201
-
 202
202
-
 203
203
-
 204
204
-
 205
205
-
 206
206
-
 207
207
-
 208
208
-
 209
209
-
 210
210
-
 211
211
-
 212
212
-
 213
213
-
 214
214
-
 215
215
-
 216
216
-
 217
217
-
 218
218
-
 219
219
-
 220
220
-
 221
221
-
 222
222
-
 223
223
-
 224
224
-
 225
225
-
 226
226
-
 227
227
-
 228
228
-
 229
229
-
 230
230
-
 231
231
-
 232
232
-
 233
233
-
 234
234
-
 235
235
-
 236
236
-
 237
237
-
 238
238
-
 239
239
-
 240
240
-
 241
241
-
 242
242
-
 243
243
-
 244
244
-
 245
245
-
 246
246
-
 247
247
-
 248
248
-
 249
249
-
 250
250
-
 251
251
-
 252
252
-
 253
253
-
 254
254
-
 255
255
-
 256
256
-
 257
257
-
 258
258
-
 259
259
-
 260
260
-
 261
261
-
 262
262
-
 263
263
-
 264
264
-
 265
265
-
 266
266
-
 267
267
-
 268
268
-
 269
269
-
 270
270
-
 271
271
-
 272
272
-
 273
273
-
 274
274
-
 275
275
-
 276
276
-
 277
277
-
 278
278
-
 279
279
-
 280
280
-
 281
281
-
 282
282
-
 283
283
-
 284
284
-
 285
285
-
 286
286
-
 287
287
-
 288
288
-
 289
289
-
 290
290
-
 291
291
-
 292
292
-
 293
293
-
 294
294
-
 295
295
-
 296
296
-
 297
297
-
 298
298
-
 299
299
-
 300
300
-
 301
301
-
 302
302
-
 303
303
-
 304
304
-
 305
305
-
 306
306
-
 307
307
-
 308
308
-
 309
309
-
 310
310
-
 311
311
-
 312
312
-
 313
313
-
 314
314
-
 315
315
-
 316
316
-
 317
317
-
 318
318
-
 319
319
-
 320
320
-
 321
321
-
 322
322
-
 323
323
-
 324
324
-
 325
325
-
 326
326
-
 327
327
-
 328
328
-
 329
329
-
 330
330
-
 331
331
-
 332
332
-
 333
333
-
 334
334
-
 335
335
-
 336
336
-
 337
337
-
 338
338
-
 339
339
-
 340
340
-
 341
341
-
 342
342
-
 343
343
-
 344
344
-
 345
345
-
 346
346
-
 347
347
-
 348
348
-
 349
349
-
 350
350
-
 351
351
-
 352
352
-
 353
353
-
 354
354
-
 355
355
-
 356
356
-
 357
357
-
 358
358
-
 359
359
-
 360
360


Electrolux EN6084JOX Manuale utente
- Categoria
- Scatole fresche
- Tipo
- Manuale utente
in altre lingue
Documenti correlati
Altri documenti
-
LG Bottom freezer refrigerator Manuale utente
-
Hisense RD-43WC4SBA/CSA2 Manuale del proprietario
-
ROSIERES RMNV 6182XMCN Manuale utente
-
Whirlpool ADN 140 Manuale del proprietario
-
Kimberly-Clark ICON Automatic Roll Towel Narrow Recessed Dispenser Guida utente
-
Kimberly-Clark Kimberly-Clark 58724 Automatic Soap and Sanitizer Dispenser Guida utente
-
Kimberly-Clark Kimberly-Clark ICON Automatic Roll Towel Recessed Dispenser Housing Guida utente
-
-
Kimberly-Clark Kimberly-Clark ICON Automatic Roll Towel Dispenser Guida utente
-
Kimberly-Clark Kimberly-Clark Standard Roll Toilet Paper Dispenser 2 Roll Vertical Guida utente