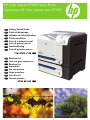
HP Color LaserJet CP3520 Printer Series Manuale utente
- Categoria
- Stampa
- Tipo
- Manuale utente
Questo manuale è adatto anche per
La pagina si sta caricando...
La pagina si sta caricando...

1
EN
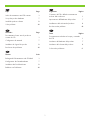
Topic Page
In-box documentation and CD contents 3
Set up the product hardware 7
Install the product software 14
Solve problems 40
FR
Sommaire Page
Documentation livrée avec le produit et
contenu du CD 3
Conguration du matériel 7
Installation du logiciel du produit 14
Résolution des problèmes 40
DE
Themen Seite
Beiliegende Dokumentation und CD-Inhalt 3
Kongurieren der Gerätehardware 7
Installieren der Produktsoftware 14
Beheben von Problemen 40
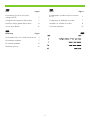
IT
Argomento Pagina
Contenuto del CD e della documentazione
acclusa alla confezione 3
Impostazione dell'hardware del prodotto 7
Installazione del software del prodotto. 14
Risoluzione dei problemi 40
ES
Tema Página
Documentación incluida en la caja y contenido
del CD 3
Instalación del hardware del producto 7
Instalación del software del producto 14
Solución de problemas 41
La pagina si sta caricando...

3
EN
In-box documentation
HP Support Flyer
Software CD contents:
• User Guide
• Job Aids
• Software drivers
• Installer
• Embedded Web Server Guide
FR
Documentation livrée avec le produit
Prospectus d’assistance HP
Contenu du CD du logiciel :
• Guide de l’utilisateur
• Aide pour les tâches
• Pilotes du logiciel
• Programme d’installation
• Guide du serveur Web intégré
DE
Beiliegende Dokumentation
Faltblatt zum HP Support
Software-CD-Inhalt:
• Benutzerhandbuch
• Jobanleitungen
• Softwaretreiber
• Installationsprogramm
• Handbuch für den integrierten Webserver
IT
Documentazione acclusa alla confezione
Pieghevole dell'assistenza HP
Contenuto del CD del software:
• Guida dell'utente
• Procedure di supporto
• Driver del software
• Programma di installazione
• Guida del server Web incorporato
ES
Documentación incluida en la caja
Folleto de asistencia de HP
Contenido del CD de software:
• Guía del usuario
• Ayuda sobre trabajos
• Controladores de software
• Instalador
• Guía del servidor Web incorporado
CA
Documentació que hi ha a la caixa
Prospecte d'ajuda d'HP'ajuda d'HPajuda d'HP'HPHP
Contingut del CD del programari:
• Guia de l'usuari'usuariusuari
• Guies de tasques
• Controladors de programari
• Instal·lador
• Guia del servidor web incrustat
NL
Documentatie in de doos
Ondersteuningsbrochure van HP
Inhoud van de software-cd:
• Gebruikershandleiding
• Hulp bij taken
• Softwaredrivers
• Installatieprogramma
• Handleiding voor de geïntegreerde
webserver
PT
Documentação contida na caixa
Folheto de suporte da HP
Conteúdo do CD do software:
• Guia do usuário
• Ajuda para trabalho
• Drivers de software
• Instalador
• Guia do servidor da Web incorporado
HE

4
1
NJ
OE
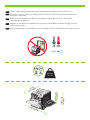
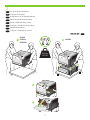
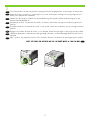
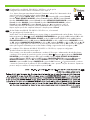
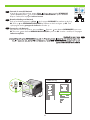
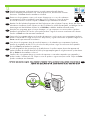
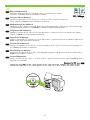
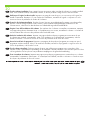
10% - 80%
10° - 30°C
(50° - 86°F)
358 mm
822 mm
739 mm
29.1 inches
63.7 inches
14.1 inches
520 mm
20.5 inches
EN
Select a sturdy, well-ventilated, dust-free area, away from direct sunlight to position the product.
FR
Choisissez un support solide et un endroit propre, bien aéré et à l’abri du rayonnement direct du soleil
pour placer votre produit.
DE
Stellen Sie das Gerät an einem stabilen, gut durchlüfteten und staubfreien Ort auf, der direktem
Sonnelicht nicht ausgesetzt ist.
IT
Scegliere un'area piana, ben ventilata, priva di polvere e lontana dalla luce diretta dei raggi solari per
posizionare il prodotto.
ES
Busque un lugar sólido, bien ventilado, sin polvo y alejado de la luz solar directa para colocar el producto.
La pagina si sta caricando...

6
2
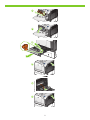
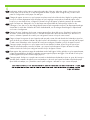
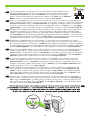
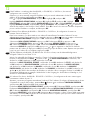
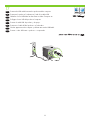
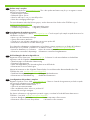
(CP3525x)
EN
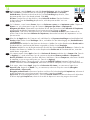
Unpack the product.
FR
Déballez le produit.
DE
Packen Sie das Gerät aus.
IT
Disimballare il prodotto.
ES
Desempaquete el producto.
CA
Desempaqueteu el producte.
NL
Pak het apparaat uit.
PT
Retire o produto da embalagem.
HE

7
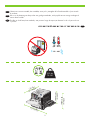
3
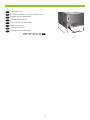
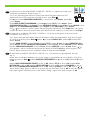
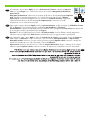
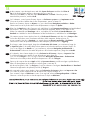
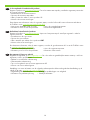
CP3525
CP3525n
CP3525dn
2
3
1
NJ
OE
CP3525x
1
EN
Set up the product hardware.
FR
Congurez le matériel.
DE
Kongurieren Sie die Gerätehardware.
IT
Impostare l'hardware del prodotto.
ES
Instale el hardware del producto.
CA
Congureu el maquinari del producte.
NL
Installeer de hardware.
PT
Congure o hardware do produto.
HE
La pagina si sta caricando...

9
4
EN
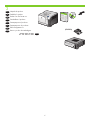
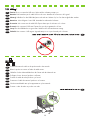
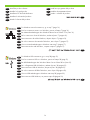
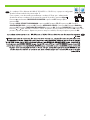
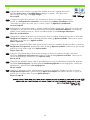
Connect the power.
FR
Branchez l’imprimante sur une prise d’alimentation.
DE
Schließen Sie das Netzkabel an.
IT
Collegare l'alimentazione.
ES
Conecte el cable de alimentación.
CA
Endolleu el producte.
NL
Sluit het netsnoer aan.
PT
Conecte o cabo de alimentação.
HE

10
EN
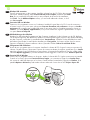
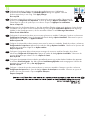
Caution! Do not connect the USB now. Wait until the software prompts you.
EN
Connect the network cable to the product and to the network.
FR
Attention ! Ne branchez pas le câble USB tout de suite. Attendez les instructions du logiciel.
FR
Reliez le produit au réseau à l’aide du câble réseau.
DE
Achtung! Schließen Sie das USB-Kabel jetzt noch nicht an. Warten Sie, bis Sie dazu aufgefordert werden.
DE
Schließen Sie das Netzwerkkabel an das Gerät und das Netzwerk an.
IT
Attenzione. Non collegare il cavo USB. Attendere la richiesta del software.
IT
Collegare il cavo di rete al prodotto e alla rete.
ES
Precaución: No conecte aún el cable USB. Espere hasta que el software se lo solicite.
ES
Conecte el cable de red al producto y a la red.
CA
Precaució: No connecteu l'USB ara. Espereu ns que el programari ho sol·liciti.
CA
Connecteu el cable de xarxa al producte i a la xarxa.
NL
Let op! Sluit de USB-kabel nu nog niet aan. Wacht tot de software daarom vraagt.
NL
Sluit de netwerkkabel aan op het apparaat en op het netwerk.
PT
Cuidado! Não conecte o USB agora. Aguarde até que isso seja solicitado pelo software.
PT
Conecte o cabo de rede ao produto e à rede.
HE
HE

11
5
EN
Turn on the product. On the control panel, if prompted, select a language and a country/region for the product.
FR
Mettez le produit sous tension. Si un message vous y invite, sélectionnez une langue et un pays/région pour le
produit sur le panneau de commande.
Schalten Sie das Gerät ein. Wählen Sie nach Aufforderung eine Sprache und ein Land/eine Region für das
Gerät auf dem Bedienfeld aus.
DE
IT
Accendere il prodotto. Sul pannello di controllo, se richiesto, selezionare una lingua e un paese/regione per il
prodotto.
ES
Encienda el producto. En el panel de control, si se le solicita, seleccione un idioma y un país/una región para el
producto.
CA
Engegueu el producte. Al tauler de control, si se us demana, seleccioneu la llengua i el país/regió per al producte.
NL
Schakel het apparaat in. Indien hierom wordt gevraagd, selecteert u op het bedieningspaneel een taal voor het
apparaat.
PT
Ligue o produto. No painel de controle, se for solicitado, selecione um idioma e um país/região para o produto.
HE

12
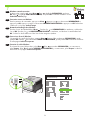
6
EN
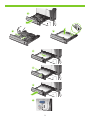
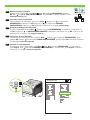
Load paper. Make sure the paper is against the right edge of the tray. Adjust the guides so they point to the
correct paper size in the tray or so they are against the stack of paper. After closing the tray, use the control
panel to congure the correct paper size and type.
FR
Chargez du papier. Assurez-vous que le papier est placé contre le bord droit du bac. Réglez les guides papier
pour qu’ils touchent légèrement la pile de papier et que le réglage corresponde au format de papier utilisé.
Lorsque vous avez fermé le bac, congurez le format et le type de papier à l’aide du panneau de commande.
DE
Legen Sie Papier ein. Überprüfen Sie, ob das Papier am rechten Rand des Fachs anliegt. Stellen Sie die
Führungen so ein, dass sie für das richtige Papierformat im Fach eingerichtet sind bzw. am Papierstapel anliegen.
Verwenden Sie nach dem Schließen des Fachs das Bedienfeld, um die richtigen Einstellungen für Papierformat
und -sorte zu kongurieren.
IT
Caricare la carta. Vericare che la carta sia appoggiata al lato destro del vassoio. Regolare le guide in base
al formato corretto della carta nel vassoio o in modo che aderiscano alla risma di carta. Dopo aver chiuso il
vassoio, utilizzare il pannello di controllo per congurare il formato e il tipo di carta corretti.
ES
Cargue el papel. Asegúrese de que el papel quede apoyado contra el borde derecho de la bandeja. Ajuste las
guías de modo que señalen el tamaño de papel correcto de la bandeja o que se apoyen contra la pila de papel.
Cuando cierre la bandeja, utilice el panel de control para congurar el tamaño y el tipo de papel correctos.
CA
Carregueu paper. Assegureu-vos que el paper toca la vora dreta de la safata. Ajusteu les guies per tal que
marquin la mida de paper correcta a la safata o que toquin la pila de paper. Després de tancar la safata,
utilitzeu el tauler de control per congurar la mida i el tipus de paper correctes.
NL
Plaats papier. Het papier moet tegen de rechterkant van de lade liggen. Stel de geleiders in op het papierformaat,
volgens de aanduiding in de lade. De geleiders moeten tegen het papier aan liggen. Sluit de lade en stel op het
bedieningspaneel het juiste formaat en type papier in.
PT
Carregue papel. Verique se o papel está encostado na borda direita da bandeja. Ajuste as guias de forma que
apontem para o tamanho de papel correto na bandeja ou de modo que quem encostadas na pilha de papel.
Após fechar a bandeja, use o painel de controle para congurar o tamanho e o tipo corretos de papel.
HE
La pagina si sta caricando...

14
EN
Install the product software.
EN
For Windows USB connections, go to step 10 (page 21).
EN
For Windows network connections, go to step 7 (page 16).
FR
Installez le logiciel produit.
FR
Pour les connexions USB sous Windows, passez à l’étape 10 (page 21).
FR
Pour les connexions réseau sous Windows, passez à l’étape 7 (page 16).
DE
Installieren Sie die Produktsoftware.
DE
Bei USB-Verbindungen über Windows fahren Sie mit Schritt 10 fort (Seite 21).
DE
Bei Netzwerkverbindungen über Windows fahren Sie mit Schritt 7 fort (Seite 16).
IT
Installare il software del prodotto.
IT
Per i collegamenti USB di Windows, andare al punto 10 (pagina 21).
IT
Per le connessioni di rete di Windows, andare al punto 7 (pagina 16).
ES
Instale el software del producto.
ES
Para conexiones USB de Windows, diríjase al paso 10 (página 21).
ES
Para conexiones de red de Windows, diríjase al paso 7 (página 16).
CA
Instal·lació programari del producte
CA
Per a les connexions USB del Windows, aneu al pas 10 (pàgina 22).
CA
Per a les connexions de xarxa del Windows, aneu al pas 7 (pàgina 17).
NL
Installeer de apparaatsoftware.
NL
Ga voor USB-verbindingen in Windows naar stap 10 (pagina 22).
NL
Ga voor netwerkverbindingen in Windows naar stap 7 (pagina 17).
PT
Instale o software do produto.
PT
Para conexões USB Windows, vá para a etapa 10 (página 22).
PT
Para conexões de rede Windows, vá para a etapa 7 (página 17).
HE
HE
HE

15
EN
For Macintosh USB connections, go to step 16 (page 32).
EN
For Macintosh network connections, go to step 11 (page 23).
FR
Pour les connexions USB sous Macintosh, passez à l’étape 16 (page 32).
FR
Pour les connexions réseau sous Macintosh, passez à l’étape 11 (page 23).
DE
Bei USB-Verbindungen über Macintosh fahren Sie mit Schritt 16 fort (Seite 32).
DE
Bei Netzwerkverbindungen über Macintosh fahren Sie mit Schritt 11 fort (Seite 23).
IT
Per i collegamenti USB di Macintosh, andare al punto 16 (pagina 32).
IT
Per le connessioni di rete Macintosh, andare al punto 11 (pagina 23).
ES
Para conexiones USB de Macintosh, diríjase al paso 16 (página 32).
ES
Para conexiones de red de Macintosh, diríjase al paso 11 (página 23).
CA
Per a les connexions USB del Macintosh, aneu al pas 16 (pàgina 32).
CA
Per a les connexions de xarxa del Macintosh, aneu al pas 11 (pàgina 24).
NL
Ga voor USB-verbindingen voor Macintosh naar stap 16 (pagina 32).
NL
Ga voor netwerkverbindingen voor Macintosh naar stap 11 (pagina 24).
PT
Para conexões de rede Macintosh, vá para a etapa 11 (página 24).
PT
Para conexões de rede USB Macintosh, vá para a etapa 16 (página 32).
HE
HE

16
7
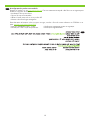
+3&RORU/DVHU-HW&33ULQWHUV
(PEHGGHG-HWGLUHFW3DJH
EN
Windows network connection
At the product control panel, press Menu . Press to highlight INFORMATION, and press
OK. Press to highlight PRINT CONFIGURATION, and press OK. Locate the IP address on the
Embedded Jetdirect page.
FR
Connexion réseau sous Windows
Dans le panneau de commande, appuyez sur Menu . Appuyez sur pour sélectionner INFORMATIONS et
appuyez sur OK. Appuyez sur pour sélectionner IMPRIMER CONFIGURATION et appuyez sur OK. Recherchez
l’adresse IP sur la page Jetdirect intégré.
DE
Netzwerkverbindungen über Windows
Drücken Sie auf dem Bedienfeld auf Menü . Drücken Sie , um INFORMATIONEN zu markieren, und drücken
Sie auf OK. Drücken Sie , um KONFIGURATION DRUCKEN zu markieren, und drücken Sie anschließend auf
OK. Suchen Sie die IP-Adresse auf der Seite für das integrierte Jetdirect.
IT
Connessione di rete di Windows
Sul pannello di controllo del prodotto, premere Menu . Premere per evidenziare INFORMAZIONI, quindi
premere OK. Premere per evidenziare STAMPA CONFIGURAZIONE, quindi premere OK. Individuare l'indirizzo
IP nella pagina Jetdirect incorporato.
ES
Conexión de red de Windows
En el panel de control del producto, pulse Menú . Pulse para resaltar INFORMACIÓN y, a continuación,
pulse Aceptar. Pulse para resaltar IMPRIMIR CONFIGURACIÓN y, a continuación, pulse Aceptar. Localice la
dirección IP en la página Jetdirect incorporado.

17
+3&RORU/DVHU-HW&33ULQWHUV
(PEHGGHG-HWGLUHFW3DJH
CA
Connexió de xarxa del Windows
Al tauler de control del producte, premeu Menú . Premeu per ressaltar INFORMACIÓ
i premeu D'acord. Premeu per ressaltar IMPRIMEIX CONFIGURACIÓ i premeu D'acord.
Busqueu l'adreça IP a la pàgina Jetdirect incrustat.
NL
Netwerkverbinding in Windows
Druk op het bedieningspaneel op Menu , druk op om INFORMATIE te markeren en druk op OK.
Druk op om CONFIGURATIE AFDRUKKEN te markeren en druk vervolgens op OK. Zoek op de pagina
van de geïntegreerde Jetdirect het IP-adres op.
PT
Conexão de rede Windows
No painel de controle do produto, pressione Menu , pressione para destacar INFORMAÇÕES
e pressione OK. Pressione para destacar IMPRIMIR CONFIGURAÇÃO e pressione OK. Localize o
endereço IP na página Jetdirect incorporado.
HE

18
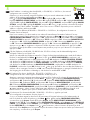
8
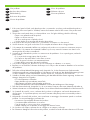
EN
If the IP address is something other than 0.0.0.0, or 192.0.0.192, or 169.254.x.x, the network
conguration was successful. Go to step 9.
Otherwise, you must manually assign the IP address. Ask your network administrator for the IP
address. At the product control panel, press Menu .
Press to highlight CONFIGURE DEVICE, and press OK. Highlight I/O, and press OK.
Highlight EMBEDDED JETDIRECT MENU, and press OK. Highlight TCP/IP, and press OK. Highlight IPV4 SETTINGS,
and press OK. Highlight CONFIG METHOD, and press OK. Highlight MANUAL, and press OK. Highlight MANUAL
SETTINGS, and press OK. Highlight IP ADDRESS, and press OK. Press or to increase or decrease the number
for the rst byte of the IP address. Press OK to move to the next set of numbers. Repeat this process until the IP
address is complete, and then press OK.
FR
Si l’adresse IP est différente de 0.0.0.0 ou 192.0.0.192 ou 169.254.x.x, la conguration du réseau est
terminée. Passez à l’étape 9.
Dans le cas contraire, vous devez attribuer une adresse IP manuellement. Demandez l’adresse IP à votre
administrateur réseau. Dans le panneau de commande, appuyez sur Menu . Appuyez sur pour sélectionner
CONFIGURATION PERIPHERIQUE et appuyez sur OK. Sélectionnez E/S et appuyez sur OK. Sélectionnez MENU
JETDIRECT INTEGRE et appuyez sur OK. Sélectionnez TCP/IP et appuyez sur OK. Sélectionnez PARAMETRES IPV4
et appuyez sur OK. Sélectionnez METHODE CONFIG. et appuyez sur OK. Sélectionnez MANUEL et appuyez
sur OK. Sélectionnez PARAMETRES MANUELS et appuyez sur OK. Sélectionnez ADRESSE IP et appuyez sur OK.
Appuyez sur ou pour augmenter ou diminuer le chiffre du premier octet de l’adresse IP. Appuyez sur OK
pour passer au groupe de chiffres suivant. Répétez cette procédure jusqu’à ce que l’adresse IP soit complète et
appuyez sur OK.
DE
Falls die IP-Adresse nicht 0.0.0.0, 192.0.0.192 oder 169.254.x.x lautet, war die Netzwerkkonguration
erfolgreich. Fahren Sie mit Schritt 9 fort.
Weisen Sie andernfalls die IP-Adresse manuell zu. Fragen Sie Ihren Netzwerkadministrator nach der IP-Adresse.
Drücken Sie am Bedienfeld auf Menü . Drücken Sie auf , um GERÄT KONFIGURIEREN zu markieren, und
drücken Sie auf OK. Markieren Sie I/O, und drücken Sie auf OK. Markieren Sie MENÜ FÜR INTEGR. JETDIRECT,
und drücken Sie auf OK. Markieren Sie TCP/IP, und drücken Sie auf OK. Markieren Sie IPV4-EINSTELLUNGEN,
und drücken Sie auf OK. Markieren Sie KONFIG.-METHODE, und drücken Sie auf OK. Markieren Sie MANUELL,
und drücken Sie auf OK. Markieren Sie MANUELLE EINSTELLUNGEN, und drücken Sie auf OK. Markieren Sie
IP-ADRESSE, und drücken Sie auf OK. Drücken Sie auf oder , um die Zahl für das erste Byte der IP-Adresse zu
erhöhen oder zu verringern. Drücken Sie auf OK, um zur nächsten Zahlengruppe zu springen. Wiederholen Sie
den Vorgang, bis die IP-Adresse vollständig ist, und drücken Sie anschließend auf OK.
IT
Se l'indirizzo IP è diverso da 0.0.0.0 o 192.0.0.192 o 169.254.x.x, la
congurazione di rete è stata eseguita correttamente. Andare al punto 9.
Altrimenti, è necessario assegnare manualmente l'indirizzo IP. Per l'indirizzo IP, rivolgersi all'amministratore di rete.
Sul pannello di controllo del prodotto, premere Menu . Premere per evidenziare CONFIGURA PERIFERICA,
quindi premere OK. Evidenziare I/O, quindi premere OK. Evidenziare MENU PERIFERICA INTERNA JETDIRECT,
quindi premere OK. Evidenziare TCP/IP, quindi premere OK. Evidenziare IMPOSTAZIONI IPV4, quindi premere
OK. Evidenziare METODO CONFIGURAZIONE, quindi premere OK. Evidenziare MANUALE, quindi premere OK.
Evidenziare IMPOSTAZIONI MANUALI, quindi premere OK. Evidenziare INDIRIZZO IP, quindi premere OK. Premere
o per aumentare o ridurre il numero della prima parte dell'indirizzo IP. Premere OK per passare al set di
numeri successivo. Ripetere questo processo nché l'indirizzo IP non è completo, quindi premere OK.
ES
Si la dirección IP es distinta de 0.0.0.0, 192.0.0.192 o 169.254.x.x, signica que la red
se ha congurado correctamente. Diríjase al paso 9.
Si no es así, deberá asignar la dirección IP de forma manual. Pregunte la dirección IP al administrador de
red. En el panel de control del producto, pulse Menú . Pulse para resaltar CONFIGURAR DISPOSITIVO y,
a continuación, pulse Aceptar. Resalte E/S y pulse Aceptar. Resalte MENÚ JETDIRECT INCORPORADO y pulse
Aceptar. Resalte TCP/IP y pulse Aceptar. Resalte CONFIGURACIÓN DE IPV4 y pulse Aceptar. Resalte MÉTODO DE
CONFIG. y pulse Aceptar. Resalte MANUAL y pulse Aceptar. Resalte CONFIGURACIÓN MANUAL y pulse Aceptar.
Resalte DIRECCIÓN IP y pulse Aceptar. Pulse o para aumentar o reducir el número del primer byte de la
dirección IP. Pulse Aceptar para ir al siguiente conjunto de números. Repita este proceso hasta que la dirección IP
esté completa y, a continuación, pulse Aceptar.
La pagina si sta caricando...
La pagina si sta caricando...

21
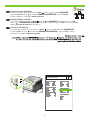
10
Windows USB connection
Quit all open programs on the computer. Install the software from the CD. Follow the onscreen
instructions. When prompted, select Connected directly to the computer, and then click Install
Now. Do not connect the USB cable until you are prompted. At the end of the installation,
click Finish. On the Additional Options screen, you can install additional software, or click
exit. Go to step 20.
EN
Connexion USB sous Windows
Fermez tous les programmes ouverts sur l’ordinateur. Installez le logiciel depuis le CD. Suivez les instructions
à l’écran. Lorsque vous y êtes invité, sélectionnez Connecté directement à un ordinateur et cliquez sur Installer
maintenant. Ne connectez pas le câble USB avant d’y être invité. Une fois l’installation terminée, cliquez sur
Terminer. Sur l’écran Options supplémentaires, vous pouvez installer des logiciels supplémentaires ou cliquer
sur quitter. Passez à l’étape 20.
FR
USB-Verbindungen über Windows
Beenden Sie alle laufenden Programme auf dem Computer. Installieren Sie die Software von der CD. Befolgen
Sie die Anweisungen auf dem Bildschirm. Wählen Sie nach Aufforderung die Option für die direkte Verbindung
mit dem Computer, und klicken Sie anschließend auf Jetzt installieren. Schließen Sie das USB-Kabel erst nach
Aufforderung an. Klicken Sie am Ende der Installation auf Fertig stellen. Sie können auf der Seite für weitere
Optionen zusätzliche Software installieren oder auf „Beenden“ klicken. Fahren Sie mit Schritt 20 fort.
DE
Collegamento USB di Windows
Uscire da tutti i programmi aperti sul computer. Installare il software dal CD. Seguire le istruzioni riportate sullo
schermo. Quando richiesto, selezionare l'opzione di connessione diretta al computer, quindi fare clic su Installa
ora. Non collegare il cavo USB nché non viene richiesto. Al termine dell'installazione, fare clic su Fine. Nella
schermata Opzioni aggiuntive, è possibile installare software aggiuntivi o fare clic su Esci. Andare al punto 20.
IT
Conexión USB de Windows
Cierre todos los programas abiertos en el equipo. Instale el software del CD. Siga las instrucciones en pantalla.
Cuando se le solicite, seleccione Conexión directa al equipo y, a continuación, haga clic en Instalar ahora.
No conecte el cable USB hasta que se le solicite. Cuando termine la instalación, haga clic en Finalizar. En la
pantalla Opciones adicionales puede instalar software adicional o hacer clic en Salir. Diríjase al paso 20.
ES
La pagina si sta caricando...

23
11
+3&RORU/DVHU-HW&33ULQWHUV
(PEHGGHG-HWGLUHFW3DJH
EN
Macintosh network connection
At the product control panel, press Menu . Press to highlight INFORMATION, and press
OK. Press to highlight PRINT CONFIGURATION, and press OK. Locate the IP address on the
Embedded Jetdirect page.
FR
Connexion réseau sous Macintosh
Dans le panneau de commande, appuyez sur Menu . Appuyez sur pour sélectionner
INFORMATIONS et appuyez sur OK. Appuyez sur pour sélectionner IMPRIMER
CONFIGURATION et appuyez sur OK. Recherchez l’adresse IP sur la page Jetdirect intégré.
DE
Netzwerkverbindungen über Macintosh
Drücken Sie am Bedienfeld auf Menü . Drücken Sie , um INFORMATIONEN zu markieren, und drücken Sie
auf OK. Drücken Sie , um KONFIGURATION DRUCKEN zu markieren, und drücken Sie auf OK. Suchen Sie die
IP-Adresse auf der Seite für das integrierte Jetdirect.
IT
Connessione di rete di Macintosh
Sul pannello di controllo del prodotto, premere Menu . Premere per evidenziare INFORMAZIONI, quindi
premere OK. Premere per evidenziare STAMPA CONFIGURAZIONE, quindi premere OK. Individuare l'indirizzo
IP nella pagina Jetdirect incorporato.
ES
Conexión de red de Macintosh
En el panel de control del producto, pulse Menú . Pulse para resaltar INFORMACIÓN y, a continuación,
pulse Aceptar. Pulse para resaltar IMPRIMIR CONFIGURACIÓN y, a continuación, pulse Aceptar. Localice la
dirección IP en la página Jetdirect incorporado.
La pagina si sta caricando...

25
12
EN
If the IP address is something other than 0.0.0.0, or 192.0.0.192, or 169.254.x.x, the network
conguration was successful. Go to step 13.
Otherwise, you must manually assign the IP address. Ask your network administrator for the IP
address. At the product control panel, press Menu .
Press to highlight CONFIGURE DEVICE, and press OK. Highlight I/O, and press OK.
Highlight EMBEDDED JETDIRECT MENU, and press OK. Highlight TCP/IP, and press OK. Highlight
IPV4 SETTINGS, and press OK. Highlight CONFIG METHOD, and press OK. Highlight MANUAL, and press OK.
Highlight MANUAL SETTINGS, and press OK. Highlight IP ADDRESS, and press OK. Press or to increase or
decrease the number for the rst byte of the IP address. Press OK to move to the next set of numbers. Repeat this
process until the IP address is complete, and then press OK.
FR
Si l’adresse IP est différente de 0.0.0.0 ou 192.0.0.192 ou 169.254.x.x, la conguration du réseau est
terminée. Passez à l’étape 13.
Dans le cas contraire, vous devez attribuer une adresse IP manuellement. Demandez l’adresse IP à votre
administrateur réseau. Dans le panneau de commande, appuyez sur Menu . Appuyez sur pour sélectionner
CONFIGURATION PERIPHERIQUE et appuyez sur OK. Sélectionnez E/S et appuyez sur OK.
Sélectionnez MENU JETDIRECT INTEGRE et appuyez sur OK. Sélectionnez TCP/IP et appuyez sur OK.
Sélectionnez PARAMETRES IPV4 et appuyez sur OK. Sélectionnez METHODE CONFIG. et appuyez sur
OK. Sélectionnez MANUEL et appuyez sur OK. Sélectionnez PARAMETRES MANUELS et appuyez sur OK.
Sélectionnez ADRESSE IP et appuyez sur OK. Appuyez sur ou pour augmenter ou diminuer le chiffre du
premier octet de l’adresse IP. Appuyez sur OK pour passer au groupe de chiffres suivant. Répétez cette procédure
jusqu’à ce que l’adresse IP soit complète et appuyez sur OK.
DE
Falls die IP-Adresse nicht 0.0.0.0, 192.0.0.192 oder 169.254.x.x lautet, war die Netzwerkkonguration
erfolgreich. Fahren Sie mit Schritt 13 fort.
Weisen Sie andernfalls die IP-Adresse manuell zu. Fragen Sie Ihren Netzwerkadministrator nach der IP-Adresse.
Drücken Sie am Bedienfeld auf Menü . Drücken Sie auf , um GERÄT KONFIGURIEREN zu markieren, und
drücken Sie auf OK. Markieren Sie I/O, und drücken Sie auf OK.
Markieren Sie MENÜ FÜR INTEGR. JETDIRECT, und drücken Sie auf OK. Markieren Sie TCP/IP, und drücken Sie
auf OK. Markieren Sie IPV4-EINSTELLUNGEN, und drücken Sie auf OK. Markieren Sie KONFIG.-METHODE,
und drücken Sie auf OK. Markieren Sie MANUELL, und drücken Sie auf OK. Markieren Sie MANUELLE
EINSTELLUNGEN, und drücken Sie auf OK. Markieren Sie IP-ADRESSE, und drücken Sie auf OK. Drücken Sie auf
oder , um die Zahl für das erste Byte der IP-Adresse zu erhöhen oder zu verringern. Drücken Sie auf OK, um
zur nächsten Zahlengruppe zu springen. Wiederholen Sie den Vorgang, bis die IP-Adresse vollständig ist, und
drücken Sie anschließend auf OK.
IT
Se l'indirizzo IP è diverso da 0.0.0.0 o 192.0.0.192 o 169.254.x.x, la congurazione di rete è stata eseguita
correttamente. Andare al punto 13.
Altrimenti, è necessario assegnare manualmente l'indirizzo IP. Per l'indirizzo IP, rivolgersi all'amministratore di rete.
Sul pannello di controllo del prodotto, premere Menu . Premere per evidenziare CONFIGURA PERIFERICA,
quindi premere OK. Evidenziare I/O, quindi premere OK.
Evidenziare MENU PERIFERICA INTERNA JETDIRECT, quindi premere OK. Evidenziare TCP/IP, quindi premere OK.
Evidenziare IMPOSTAZIONI IPV4, quindi premere OK. Evidenziare METODO CONFIGURAZIONE, quindi premere
OK. Evidenziare MANUALE, quindi premere OK. Evidenziare IMPOSTAZIONI MANUALI, quindi premere OK.
Evidenziare INDIRIZZO IP, quindi premere OK. Premere o per aumentare o ridurre il numero della prima parte
dell'indirizzo IP. Premere OK per passare al set di numeri successivo. Ripetere questo processo nché l'indirizzo IP
non è completo, quindi premere OK.
La pagina si sta caricando...
La pagina si sta caricando...

28
13
EN
Quit all open programs on the print server or on each computer that will share the
product. Install the software from the CD. Click the product icon, and follow the onscreen
instructions. Click Close when the installation is nished.
FR
Fermez tous les programmes ouverts sur le serveur d’impression ou sur tous les ordinateurs
qui partageront le produit. Installez le logiciel depuis le CD. Cliquez sur l’icône du produit
et suivez les instructions à l’écran. Cliquez sur Fermer lorsque l’installation est terminée.
DE
Beenden Sie alle laufenden Programme auf dem Druckerserver oder auf jedem Computer, der mit dem Gerät
verbunden ist. Installieren Sie die Software von der CD. Klicken Sie auf das Gerätesymbol, und befolgen Sie die
Anweisungen auf dem Bildschirm. Klicken Sie auf Schließen, sobald die Installation beendet wurde.
IT
Uscire da tutti i programmi aperti sul server di stampa o su ogni computer in cui verrà condiviso il prodotto.
Installare il software dal CD. Fare clic sull'icona del prodotto e seguire le istruzioni visualizzate sullo schermo.
Fare clic su Chiudi una volta terminata l'installazione.
ES
Cierre todos los programas abiertos en el servidor de impresión o en los equipos que compartirán el producto.
Instale el software del CD. Haga clic en el icono del producto y siga las instrucciones en pantalla. Haga clic en
Cerrar cuando haya terminado la instalación.
CA
Sortiu de tots els programes oberts al servidor d'impressió o als ordinadors que compartiran el producte.
Instal·leu el programari des del CD. Feu clic a la icona del producte i seguiu les instruccions de la pantalla.
Feu clic a Tanca quan nalitzeu la instal·lació.
NL
Sluit alle programma's die geopend zijn op de afdrukserver of op elke computer die met het apparaat zal
werken. Installeer de software vanaf de cd. Klik op het apparaatpictogram en volg de instructies op het scherm.
Klik op Sluiten als de installatie is voltooid.
PT
Saia de todos os programas abertos no servidor de impressão ou em cada computador que compartilhe o
produto. Instale o software pelo CD. Clique no ícone do produto e siga as instruções na tela. Clique em Fechar
quando a instalação tiver terminado.
HE

29
14
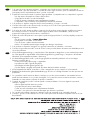
EN
At the computer, open the Apple menu and click System Preferences and then click Print &
Fax. click Add or +, and then select the connection type (Default Browser or IP Printer).
Default Browser: Select the product from the list. From the Print Using drop-down list, select
the printer model if one is not already selected. Click Add.
IP Printer: From the Protocol drop-down list, select Socket/HP Jet Direct. Enter the IP address
for the product. From the Print Using drop-down list, select the printer model if one is not
already selected.
FR
Sur l’ordinateur, ouvrez le menu Pomme, cliquez sur Préférences système et sur Imprimantes et fax. Cliquez sur
Ajouter ou +, puis sélectionnez le type de connexion (Navigateur par défaut ou Imprimante IP).
Navigateur par défaut : Sélectionnez le produit dans la liste. Dans la liste déroulante Utilisation de l’imprimante,
sélectionnez le modèle de l’imprimante si ce n’est pas encore fait. Cliquez sur Ajouter.
Imprimante IP : Dans la liste déroulante Protocole, sélectionnez Socket/HP Jet Direct. Entrez l’adresse IP du
produit. Dans la liste déroulante Utilisation de l’imprimante, sélectionnez le modèle de l’imprimante si ce n’est
pas encore fait.
DE
Rufen Sie das Apple-Menü des Computers auf, und klicken Sie auf Systemvoreinstellungen und anschließend auf
Drucken u. Fax. Klicken Sie auf Hinzufügen oder +, und wählen Sie den Verbindungstyp aus (Standard-Browser
oder IP-Drucker).
Standard-Browser: Wählen Sie das Gerät aus der Liste aus. Wählen Sie aus der Dropdown-Liste Drucken mit das
Druckermodell aus, wenn kein Modell bereits ausgewählt ist. Klicken Sie auf Hinzufügen.
IP-Drucker: Wählen Sie aus der Dropdown-Liste der Protokoll die Option Socket/HP Jet Direct aus. Geben Sie die
IP-Adresse des Geräts ein. Wählen Sie aus der Dropdown-Liste Drucken mit das Druckermodell aus, wenn kein
Modell bereits ausgewählt ist.
IT
Sul computer, aprire il menu Apple e fare clic su Preferenze di Sistema quindi fare clic su Stampa e Fax. Fare clic
su Aggiungi o +, quindi selezionare il tipo di connessione desiderata (Browser predenito o Stampante IP).
Browser predenito: selezionare il prodotto dall'elenco. Nell'elenco a discesa Stampa con, selezionare il modello
di stampante, se non ne è già selezionato uno. Fare clic su Aggiungi.
Stampante IP: nell
'
elenco a discesa Protocollo, selezionare Socket/HP Jet Direct. Immettere l'indirizzo IP per il
prodotto. Nell'elenco a discesa Stampa con, selezionare il modello di stampante, se non ne è già selezionato uno.
ES
En el equipo, abra el menú Apple, haga clic en Preferencias del sistema y, a continuación, haga clic en
Impresión y fax. Haga clic en Añadir o + y, a continuación, seleccione el tipo de conexión (Navegador
predeterminado o Impresora IP).
Navegador predeterminado: seleccione el producto en la lista. En la lista desplegable Imprimir con, seleccione el
modelo de impresora si aún no hay ninguno seleccionado. Haga clic en Añadir.
Impresora IP: en la lista desplegable Protocolo, seleccione Toma/HP Jet Direct. Introduzca la dirección IP del producto.
En la lista desplegable Imprimir con, seleccione el modelo de impresora si aún no hay ninguno seleccionado.
La pagina si sta caricando...

31
15
EN
Congure the product software to recognize the installed accessories. Highlight the
product and select Printer Setup. The Installable Options dialog box appears. Select the
product options that you are using. Click Apply Changes.
Go to step 20.
FR
Congurez le logiciel du produit pour qu’il reconnaisse les accessoires installés. Sélectionnez le
produit, puis Conguration de l’imprimante. La boîte de dialogue Options d’installation s’afche.
Sélectionnez les options du produit que vous utilisez. Cliquez sur Appliquer les modications.
Passez à l’étape 20.
DE
Kongurieren Sie die Gerätesoftware so, dass das installierte Zubehör erkannt wird. Markieren Sie das Produkt,
und wählen Sie die Option für die Druckereinrichtung. Das Dialogfeld Installierbare Optionen wird angezeigt.
Wählen Sie die Geräteoptionen aus, die Sie verwenden. Klicken Sie auf Änderungen übernehmen.
Fahren Sie mit Schritt 20 fort.
IT
Congurare il software del prodotto per riconoscere gli accessori installati. Evidenziare il prodotto e selezionare
Congurazione Stampante. Viene visualizzata la nestra di dialogo Opzioni Installabili. Selezionare le opzioni
del prodotto in uso. Fare clic su Applica modiche.
Andare al punto 20.
ES
Congure el software del producto para que reconozca los accesorios instalados. Resalte el producto y seleccione
Conguración de la impresora. Aparecerá el cuadro de diálogo Opciones instalables. Seleccione las opciones del
producto que va a utilizar. Haga clic en Aplicar cambios.
Diríjase al paso 20.
CA
Congureu el programari del producte perquè reconegui els accessoris instal·lats. Ressalteu el producte i
seleccioneu Conguració de la impressora. Apareix el quadre de diàleg Opcions instal·lables. Seleccioneu les
opcions del producte que utilitzeu. Feu clic a Aplica els canvis.
Aneu al pas 20.
NL
Congureer de apparaatsoftware zodat de geïnstalleerde accessoires worden herkend. Markeer het apparaat
en selecteer Printerconguratie. Het dialoogvenster Installatiemogelijkheden wordt weergegeven. Selecteer de
apparaten die u gebruikt. Klik op Pas wijzigingen toe.
Ga naar stap 20.
PT
Congure o software do produto para reconhecer os acessórios instalados. Destaque o produto e selecione
Conguração da impressora. A caixa de diálogo Opções de instalação será exibida. Selecione as opções do
produto que você está usando. Clique em Aplicar alterações.
Vá para a etapa 20.
HE
La pagina si sta caricando...
La pagina si sta caricando...
La pagina si sta caricando...
La pagina si sta caricando...
La pagina si sta caricando...
La pagina si sta caricando...
La pagina si sta caricando...
La pagina si sta caricando...
La pagina si sta caricando...
La pagina si sta caricando...
La pagina si sta caricando...
-
 1
1
-
 2
2
-
 3
3
-
 4
4
-
 5
5
-
 6
6
-
 7
7
-
 8
8
-
 9
9
-
 10
10
-
 11
11
-
 12
12
-
 13
13
-
 14
14
-
 15
15
-
 16
16
-
 17
17
-
 18
18
-
 19
19
-
 20
20
-
 21
21
-
 22
22
-
 23
23
-
 24
24
-
 25
25
-
 26
26
-
 27
27
-
 28
28
-
 29
29
-
 30
30
-
 31
31
-
 32
32
-
 33
33
-
 34
34
-
 35
35
-
 36
36
-
 37
37
-
 38
38
-
 39
39
-
 40
40
-
 41
41
-
 42
42
-
 43
43
-
 44
44


HP Color LaserJet CP3520 Printer Series Manuale utente
- Categoria
- Stampa
- Tipo
- Manuale utente
- Questo manuale è adatto anche per
in altre lingue
- English: HP Color LaserJet CP3520 Printer Series User manual
- français: HP Color LaserJet CP3520 Printer Series Manuel utilisateur
- español: HP Color LaserJet CP3520 Printer Series Manual de usuario
- Deutsch: HP Color LaserJet CP3520 Printer Series Benutzerhandbuch
- Nederlands: HP Color LaserJet CP3520 Printer Series Handleiding
- português: HP Color LaserJet CP3520 Printer Series Manual do usuário
Documenti correlati
-
HP LaserJet Enterprise P3015 Printer series Manuale utente
-
HP Accessibility Kit Guida d'installazione
-
HP Color LaserJet Enterprise CP4025 Printer series Guida d'installazione
-
-
-
-
-
-
-
HP LaserJet M3035 Multifunction Printer series Guida Rapida