LevelOne NVR-0316 Quick Installation Manual
- Categoria
- Accessori per mixer / robot da cucina
- Tipo
- Quick Installation Manual

NVR-0316
Network Video Recorder
Quick Installation Guide v1.0
English
Português
Deutsch
Svenska
Français
Slovenščina
Español
繁體中文
Nederlands
Русский
Dansk
Polski
Italiano
Ελληνικά
H/W: 1.0

2
NVR-0316 Quick Installation Guide
Table of Contents
English ....................................................................................... 4
Deutsch .................................................................................... 14
Français ................................................................................... 24
Español .................................................................................... 34
Nederlands ................................................................................ 44
Dansk ...................................................................................... 55
Italiano ..................................................................................... 66
Ελληνικά .................................................................................. 76
Português ................................................................................. 86
Svenska ................................................................................... 96
Slovenščina ............................................................................ 107
繁體中文 .................................................................................. 118
Русский ................................................................................. 129
Polski .................................................................................... 139
Package Contents
Network Video Recorder
Power cord/Power adapter
Quick Installation Guide
CD Manual/Utility
SATA cable x 2
HDD Case x 1
Screw for HDD case x 4
Screw for HDD x 8
Rubber foot pad x 1

NVR-0316 Quick Installation Guide
3
Default Settings
IP Address
DHCP address
Username
root
Password
root
If the NVR detects no DHCP server on the LAN environment,
then the NVR’s IP will be static IP [192.168.101.50]
This guide covers only the most common situations. All detailed
information is described in the user manual.

4
NVR-0316 Quick Installation Guide
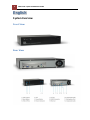
English
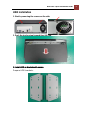
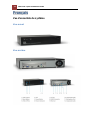
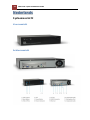
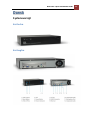
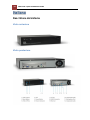
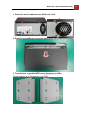
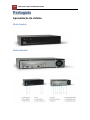
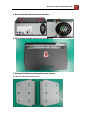
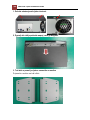
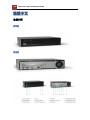
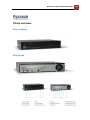
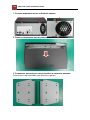
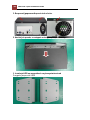
System Overview
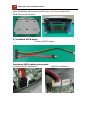
Front View
Rear View

NVR-0316 Quick Installation Guide
5
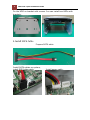
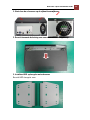
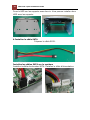
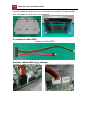
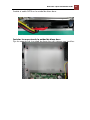
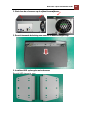
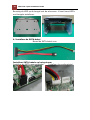
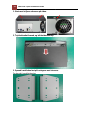
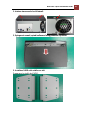
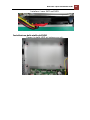
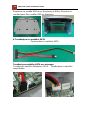
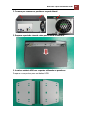
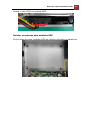
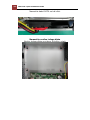
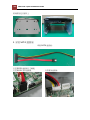
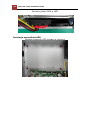
HDD Installation
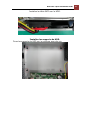
1. Start by removing the screws on the side.
2. Push the top housing forward then lift it up.
3. Install HDD on brackets with screws
Prepare HDD brackets.

6
NVR-0316 Quick Installation Guide
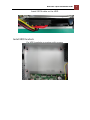
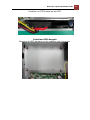
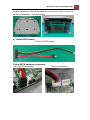
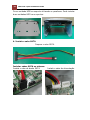
Fix the HDD on bracket with screws. You can install two HDDs with
brackets.
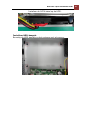
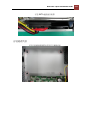
4.Install SATA Cable
Prepare SATA cable.
Install SATA cables on system,
install SATA data cable. Install power cable.

NVR-0316 Quick Installation Guide
7
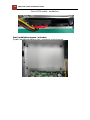
Install SATA cable on the HDD.
Install HDD brackets
Fix HDD brackets on system with screws.

8
NVR-0316 Quick Installation Guide
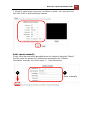
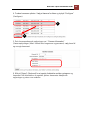
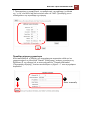
Connect to the NVR
There are various ways you can connect to the NVR and below are the
suggested methods for different network setup:
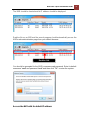
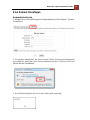
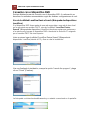
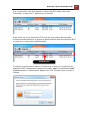
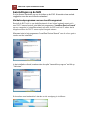
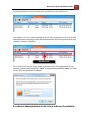
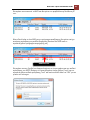
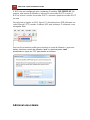
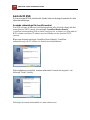
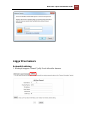
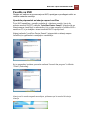
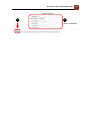
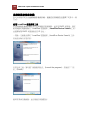
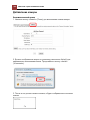
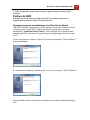
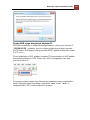
Use LevelOne Device Search Utility
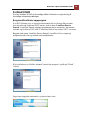
If the NVR is placed in a corporate network or a local area network where a
DHCP server is already presented, run the “LevelOne Device Search” utility
from a computer that is on the same network and locate the NVR with its IP
address that is assigned by the top-level DHCP server.
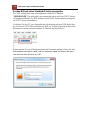
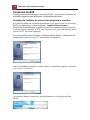
To begin, launch the “Device Search” utility from the CD and proceed with the
installation:
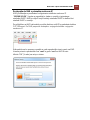
Once the installation is complete, check the “Launch the program” option and
click “Finish”.
The search should start automatically and its status should be displayed.

NVR-0316 Quick Installation Guide
9
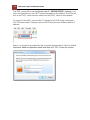
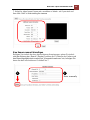
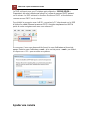
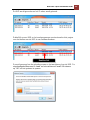
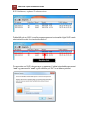
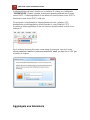
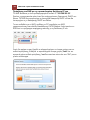
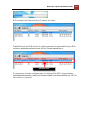
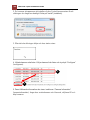
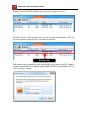
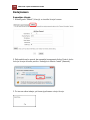
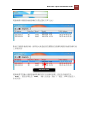
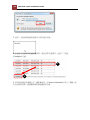
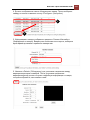
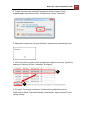
The NVR should be located and its IP address should be displayed.
Double-click on an NVR and the search program should automatically access the
NVR’s web administration page from your default browser.
You should be prompted for the NVR’s username and password. Enter its default
username “root” and password “root” and then click ”OK” to enter the system.
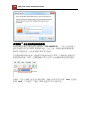
Access the NVR with its default IP address
Double-click

10
NVR-0316 Quick Installation Guide
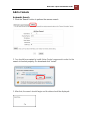
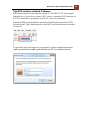
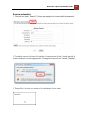
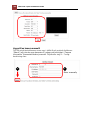
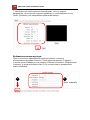
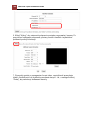
The NVR comes with a pre-configured static IP “192.168.101.50”. However, it is
only used when there is no DHCP server presented in the network. The NVR will
turn on its DHCP server function and act as the DHCP server in the network.
To connect to the NVR, connect the PC directly to the NVR using a crossover
CAT5 Ethernet cable. Simply access the NVR from your web browser with its IP
address.
Again, you should be prompted for the username and password. Enter its default
username “root” and password “root” and then click ”OK” to enter the system.

NVR-0316 Quick Installation Guide
11
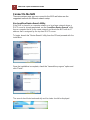
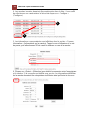
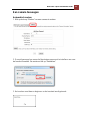
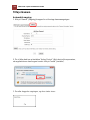
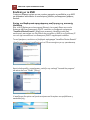
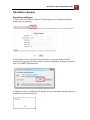
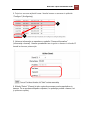
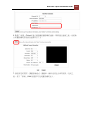
Add a Camera
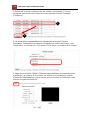
Automatic Search
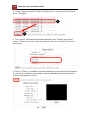
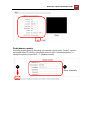
1. Click the “Search” button to perform the camera search.
2. You should be prompted to install Active Control component in order for the
search to function properly. Go ahead and click “Install”.
3. After that, the search should begin and its status should be displayed:

12
NVR-0316 Quick Installation Guide
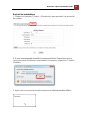
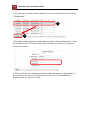
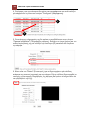
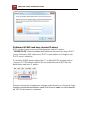
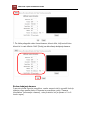
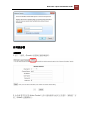
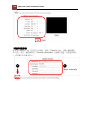
4. Found cameras should be listed and simply select a camera from the list and
press “Configure”.
5. The camera's information should be displayed in the “Camera Information”
section. Enter its username and password and select the channel ID and name
the camera.
6. Click on “Detect” to establish connection between the recorder and the camera.
If connection establishes successfully, camera’s detailed information should be
polled and displayed as below.
1
2

NVR-0316 Quick Installation Guide
13
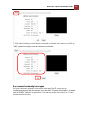
7. Adjust its video format, frame rate, resolution or bitrate...etc if you wish and
then click “Add” to finish adding the camera.
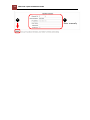
Add a camera manually
Simply follow the instruction described above but instead of using the “Search”
function, enter the camera’s IP address and credential in the “Camera
Information” manually, then follow steps 6 ~ 7 described above.
2
1
Enter manually

14
NVR-0316 Quick Installation Guide
Deutsch
Systeemoverzicht
Vooraanzicht
Achteraanzicht

NVR-0316 Quick Installation Guide
15
1. Start door de schroeven op de zijkant te verwijderen.
2. Duw de bovenste behuizing naar voor en til deze vervolgens op.
3. Installeer HDD op beugels met schroeven
Bereid HDD-beugels voor.

16
NVR-0316 Quick Installation Guide
Bevestig de HDD op de beugel met de schroeven. U kunt twee HDD's
met beugels installeren.
4. Installeer de SATA-kabel
Bereid de SATA-kabel voor.
Installeer SATA-kabels op het systeem
Installeer de SATA-gegevenskabel. Installeer de voedingskabel.

NVR-0316 Quick Installation Guide
17
Installeer de SATA-kabel op de HDD.
Installeer HDD-beugels
Bevestig de HDD-beugels op het systeem met schroeven.

18
NVR-0316 Quick Installation Guide
Mit dem NVR verbinden
Es gibt verschiedene Möglichkeiten, den NVR zu verbinden; nachstehenden
finden Sie die empfohlenen Methoden bei verschiedenen Netzwerkeinrichtungen:
LevelOne Device Search (LevelOne-Gerätesuche)-Programm nutzen
Falls sich der NVR in einem Unternehmensnetzwerk oder einem lokalen
Netzwerk mit vorhandenem DHCP-Server befindet, führen Sie das Programm
"LevelOne Device Search" (LevelOne-Gerätesuche) von einem Computer aus,
der sich im selben Netzwerk befindet; machen Sie den NVR mit der IP-Adresse,
die ihm über den übergeordneten DHCP-Server zugewiesen wurde, ausfindig.
Starten Sie zu Beginn das „LevelOne Device Search“ (LevelOne-Gerätesuche)-
Programm von der CD und führen Sie die Installation durch:
Sobald die Installation abgeschlossen ist, setzen Sie ein Häkchen bei der Option
„Launch the program“, klicken Sie dann auf „Finish“ (Fertigstellen).
Die Suche startet automatisch; der Status wird angezeigt.

NVR-0316 Quick Installation Guide
19
Der NVR sollte nun erkannt und die IP-Adresse angezeigt werden.
Doppelklicken Sie auf den NVR, das Suchprogramm greift daraufhin automatisch
über Ihren Standard-Browser auf die Web-Administrationsseite des NVR zu.
Sie werden aufgefordert, den Benutzernamen und das Kennwort des NVR
einzugeben. Geben Sie den Standardbenutzernamen „root“ und das Kennwort
„root“ ein, klicken Sie dann zum Aufrufen des Systems auf „OK“.
Double-click

20
NVR-0316 Quick Installation Guide
Auf den NVR mit seiner Standard-IP-Adresse zugreifen
Der NVR verfügt über eine vorkonfigurierte statische IP-Adresse
"192.168.101.50". Sie wird jedoch nur verwendet, wenn sich kein DHCP-Server
im Netzwerk befindet. Der NVR aktiviert seine DHCP-Serverfunktion und agiert
als DHCP-Server im Netzwerk.
Schließen Sie den PC zum Herstellen der Verbindung mit dem NVR direkt über
ein Crossover-CAT5-Ethernet-Kabel am NVR an. Greifen Sie einfach über Ihren
Webbrowser mit der entsprechenden IP-Adresse auf den NVR zu.
Erneut werden Sie nach Benutzernamen und Kennwort gefragt. Geben Sie den
Standardbenutzernamen „root“ und das Kennwort „root“ ein klicken Sie dann
zum Aufrufen des Systems auf „OK“.
La pagina si sta caricando...
La pagina si sta caricando...
La pagina si sta caricando...
La pagina si sta caricando...
La pagina si sta caricando...
La pagina si sta caricando...
La pagina si sta caricando...
La pagina si sta caricando...
La pagina si sta caricando...
La pagina si sta caricando...
La pagina si sta caricando...
La pagina si sta caricando...
La pagina si sta caricando...
La pagina si sta caricando...
La pagina si sta caricando...
La pagina si sta caricando...
La pagina si sta caricando...
La pagina si sta caricando...
La pagina si sta caricando...
La pagina si sta caricando...
La pagina si sta caricando...
La pagina si sta caricando...
La pagina si sta caricando...
La pagina si sta caricando...
La pagina si sta caricando...
La pagina si sta caricando...
La pagina si sta caricando...
La pagina si sta caricando...
La pagina si sta caricando...
La pagina si sta caricando...
La pagina si sta caricando...
La pagina si sta caricando...
La pagina si sta caricando...
La pagina si sta caricando...
La pagina si sta caricando...
La pagina si sta caricando...
La pagina si sta caricando...
La pagina si sta caricando...
La pagina si sta caricando...
La pagina si sta caricando...
La pagina si sta caricando...
La pagina si sta caricando...
La pagina si sta caricando...
La pagina si sta caricando...
La pagina si sta caricando...
La pagina si sta caricando...
La pagina si sta caricando...
La pagina si sta caricando...
La pagina si sta caricando...
La pagina si sta caricando...
La pagina si sta caricando...
La pagina si sta caricando...
La pagina si sta caricando...
La pagina si sta caricando...
La pagina si sta caricando...
La pagina si sta caricando...
La pagina si sta caricando...
La pagina si sta caricando...
La pagina si sta caricando...
La pagina si sta caricando...
La pagina si sta caricando...
La pagina si sta caricando...
La pagina si sta caricando...
La pagina si sta caricando...
La pagina si sta caricando...
La pagina si sta caricando...
La pagina si sta caricando...
La pagina si sta caricando...
La pagina si sta caricando...
La pagina si sta caricando...
La pagina si sta caricando...
La pagina si sta caricando...
La pagina si sta caricando...
La pagina si sta caricando...
La pagina si sta caricando...
La pagina si sta caricando...
La pagina si sta caricando...
La pagina si sta caricando...
La pagina si sta caricando...
La pagina si sta caricando...
La pagina si sta caricando...
La pagina si sta caricando...
La pagina si sta caricando...
La pagina si sta caricando...
La pagina si sta caricando...
La pagina si sta caricando...
La pagina si sta caricando...
La pagina si sta caricando...
La pagina si sta caricando...
La pagina si sta caricando...
La pagina si sta caricando...
La pagina si sta caricando...
La pagina si sta caricando...
La pagina si sta caricando...
La pagina si sta caricando...
La pagina si sta caricando...
La pagina si sta caricando...
La pagina si sta caricando...
La pagina si sta caricando...
La pagina si sta caricando...
La pagina si sta caricando...
La pagina si sta caricando...
La pagina si sta caricando...
La pagina si sta caricando...
La pagina si sta caricando...
La pagina si sta caricando...
La pagina si sta caricando...
La pagina si sta caricando...
La pagina si sta caricando...
La pagina si sta caricando...
La pagina si sta caricando...
La pagina si sta caricando...
La pagina si sta caricando...
La pagina si sta caricando...
La pagina si sta caricando...
La pagina si sta caricando...
La pagina si sta caricando...
La pagina si sta caricando...
La pagina si sta caricando...
La pagina si sta caricando...
La pagina si sta caricando...
La pagina si sta caricando...
La pagina si sta caricando...
La pagina si sta caricando...
La pagina si sta caricando...
La pagina si sta caricando...
La pagina si sta caricando...
La pagina si sta caricando...
La pagina si sta caricando...
-
 1
1
-
 2
2
-
 3
3
-
 4
4
-
 5
5
-
 6
6
-
 7
7
-
 8
8
-
 9
9
-
 10
10
-
 11
11
-
 12
12
-
 13
13
-
 14
14
-
 15
15
-
 16
16
-
 17
17
-
 18
18
-
 19
19
-
 20
20
-
 21
21
-
 22
22
-
 23
23
-
 24
24
-
 25
25
-
 26
26
-
 27
27
-
 28
28
-
 29
29
-
 30
30
-
 31
31
-
 32
32
-
 33
33
-
 34
34
-
 35
35
-
 36
36
-
 37
37
-
 38
38
-
 39
39
-
 40
40
-
 41
41
-
 42
42
-
 43
43
-
 44
44
-
 45
45
-
 46
46
-
 47
47
-
 48
48
-
 49
49
-
 50
50
-
 51
51
-
 52
52
-
 53
53
-
 54
54
-
 55
55
-
 56
56
-
 57
57
-
 58
58
-
 59
59
-
 60
60
-
 61
61
-
 62
62
-
 63
63
-
 64
64
-
 65
65
-
 66
66
-
 67
67
-
 68
68
-
 69
69
-
 70
70
-
 71
71
-
 72
72
-
 73
73
-
 74
74
-
 75
75
-
 76
76
-
 77
77
-
 78
78
-
 79
79
-
 80
80
-
 81
81
-
 82
82
-
 83
83
-
 84
84
-
 85
85
-
 86
86
-
 87
87
-
 88
88
-
 89
89
-
 90
90
-
 91
91
-
 92
92
-
 93
93
-
 94
94
-
 95
95
-
 96
96
-
 97
97
-
 98
98
-
 99
99
-
 100
100
-
 101
101
-
 102
102
-
 103
103
-
 104
104
-
 105
105
-
 106
106
-
 107
107
-
 108
108
-
 109
109
-
 110
110
-
 111
111
-
 112
112
-
 113
113
-
 114
114
-
 115
115
-
 116
116
-
 117
117
-
 118
118
-
 119
119
-
 120
120
-
 121
121
-
 122
122
-
 123
123
-
 124
124
-
 125
125
-
 126
126
-
 127
127
-
 128
128
-
 129
129
-
 130
130
-
 131
131
-
 132
132
-
 133
133
-
 134
134
-
 135
135
-
 136
136
-
 137
137
-
 138
138
-
 139
139
-
 140
140
-
 141
141
-
 142
142
-
 143
143
-
 144
144
-
 145
145
-
 146
146
-
 147
147
-
 148
148
-
 149
149


LevelOne NVR-0316 Quick Installation Manual
- Categoria
- Accessori per mixer / robot da cucina
- Tipo
- Quick Installation Manual
in altre lingue
- English: LevelOne NVR-0316
- français: LevelOne NVR-0316
- español: LevelOne NVR-0316
- Deutsch: LevelOne NVR-0316
- русский: LevelOne NVR-0316
- Nederlands: LevelOne NVR-0316
- português: LevelOne NVR-0316
- dansk: LevelOne NVR-0316
- polski: LevelOne NVR-0316
- svenska: LevelOne NVR-0316
Documenti correlati
Altri documenti
-
Digital Watchdog DW-VP16xT16P Manuale utente
-
Comelit IPNVR085A-B Quick Manual
-
-
D-Link DNS-726-4 Manuale del proprietario
-
Elvox 46241.F08 Manuale utente
-
-
Risco VUpoint RVNVR040020 Guida d'installazione
-
level one FCS-5212 Guida d'installazione