Crivit 273318 Instructions For Use Manual
- Tipo
- Instructions For Use Manual

IAN 273318
Klappen Sie vor dem Lesen die Seite mit den Abbildungen aus und machen Sie sich anschließend mit
allen Funktionen des Artikels vertraut.
Dépliez la page avec les illustrations avant la lecture et informez-vous ensuite au sujet des fonctions de
l‘appareil.
Prima di leggere ribaltare la pagina con le immagini e familiarizzare poi con tutte le funzioni
dell´apparecchio.
Before reading, fold out the illustration page and get to know all of the functions of your unit.
DE/AT/CH Gebrauchs- und Sicherheitshinweise Seite 07
FR/CH Instructions d‘utilisation et de sécurité Page 09
IT/CH Istruzioni d´uso e di sicurezza Pagina 11
G B I n s t r u c t i o n s a n d S a f e t y N o t i c e P a g e 1 3
IAN 273318
STRAND- UND TRANSPORTLIEGE
Gebrauchsanleitung
SDRAIO-TROLLEY DA SPIAGGIA
Istruzioni d‘uso
CHAISE LONGUE PLIANTE
Notice d’utilisation
LOUNGER AND TRANSPORT AID
Instructions for use
STRAND- UND TRANSPORTLIEGE
OWIM GmbH & Co. KG
Stiftsbergstraße 1 • D-74167 Neckarsulm
Version: 04/2016
Model No.: SL-2117

1c
1a
1b
1
3
2
4
5
98
6
7 10
11
A
1b 2
1b
B
6
2
1b
1b
6
6
C
1a
1
1b 2
1a 1b
D
I
10
F
6
1c
2
1
E
8 9
4
H
7
G
K
J

5
WICHTIG, FÜR SPÄTERE BEZUGNAHME
AUFBEWAHREN: SORGFÄLTIG LESEN!
IMPORTANT. LIRE ATTENTIVEMENT !
A CONSERVER POUR RÉFÉRENCE
ULTÉRIEURE.
IMPORTANTE, CONSERVARE PER POTER
CONSULTARE ANCHE IN FUTURO:
LEGGERE ATTENTAMENTE!
IMPORTANT: RETAIN FOR LATER
REFERENCE; PLEASE READ CAREFULLY!

6
Inhaltsverzeichnis/Table des matieres/Indice/Contents
Lieferumfang ......................................................... 7
Technische Daten ................................................. 7
Bestimmungsgemäße Verwendung .................... 7
Sicherheitshinweise .............................................. 7
Montage ..........................................................7 - 8
Verwendung als Transporthilfe ........................... 8
Neigungswinkel verstellen .................................. 8
Pflege, Lagerung, Wartung ................................. 8
Hinweise zur Entsorgung .................................... 8
3 Jahre Garantie ................................................. 8
Fornitura ............................................................. 11
Dati tecnici .......................................................... 11
Utilizzo corretto ................................................. 11
Indicazioni di sicurezza .................................... 11
Montaggio ..................................................11 - 12
Utilizzo quale ausilio per il trasporto ............... 12
Regolare l’inclinazione ..................................... 12
Cura, conservazione, manutenzione ...............12
Smaltimento ....................................................... 12
3 anni di garanzia ............................................ 12
Contenu de la livraison ....................................... 9
Caractéristiques techniques ................................ 9
Utilisation conforme ............................................. 9
Consignes de sécurité ......................................... 9
Montage ........................................................9 - 10
Utilisation en tant qu‘aide de transport ...........10
Régler l‘angle d‘inclinaison ..............................10
Entretien, rangement, maintenance ..................10
Mise au rebut .................................................... 10
3 ans de garantie ............................................. 10
Scope of Delivery ..............................................13
Technical Details ................................................ 13
Intended Use ...................................................... 13
Safety Notice ..................................................... 13
Assembly .................................................... 13 - 14
Using as a Transport Aid .................................. 14
Adjusting the Angle ...........................................14
Care, Storage, Maintenance ............................14
Notes on disposal ............................................ 14
3 Years Warranty ............................................. 14

7DE/AT/CH
Herzlichen Glückwunsch!
Mit Ihrem Kauf haben Sie sich für ein hochwer-
tiges Produkt entschieden. Machen Sie sich vor
der ersten Verwendung mit dem Produkt vertraut.
Lesen Sie hierzu aufmerksam die nachfolgende
Gebrauchsanleitung. Benutzen Sie das Produkt
nur wie beschrieben und für die angegebenen
Einsatzbereiche. Bewahren Sie diese Anleitung
gut auf. Händigen Sie alle Unterlagen bei Wei-
tergabe des Produkts an Dritte ebenfalls mit aus.
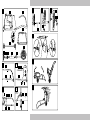
Lieferumfang (Abb. A)
(1) Hauptgestänge 1 x
(2) Fußrahmen 1 x
(3) Sonnendach 1 x
(4) Rad 2 x
(5) Stange 2 x
(6) Schraube lang 2 x
(7) Schraube kurz 2 x
(8) Unterlegscheibe 2 x
(9) Hutmutter 2 x
(10) Stift 2 x
(11) Schraubschlüssel 1 x
Gebrauchsanleitung 1 x
Technische Daten
Gewicht: ca. 4,3 kg
Maße: ca. 147 x 67 x 58 cm (L x B x H)
Max. Belastung: 100 kg
Max. Nutzlast bei Verwendung als
Transporthilfe: 20 kg
Bestimmungsgemäße
Verwendung
Der Artikel ist nicht für den gewerblichen
Gebrauch bestimmt. Der Artikel ist für den
Gebrauch im Freizeit- und Campingbereich
(Außenbereich) konzipiert.
Sicherheitshinweise
WARNUNG!
• Erstickungsgefahr für Kinder!
• Lassen Sie Kinder nicht unbeaufsichtigt mit
dem Verpackungsmaterial.
Verletzungsgefahr!
• Belasten Sie die Strand- und Transportliege
maximal mit 100 kg.
• Prüfen Sie den Artikel vor jedem Gebrauch
auf Beschädigungen oder Abnutzungen.
Kontrollieren Sie stets den festen Sitz aller
Verbindungselemente. Der Artikel darf nur in
einwandfreiem Zustand verwendet werden!
• Verschrauben Sie die einzelnen Teile fest,
bevor Sie die Liege verwenden.
• Stellen Sie die Liege nur auf einen festen,
ebenerdigen Untergrund.
• Bei fehlerhafter Montage des Artikels besteht
Verletzungsgefahr!
Gefahr von Quetschungen
der Finger!
• Die Liege darf nur von Erwachsenen aufge-
baut werden. Achten Sie beim Aus- und Ein-
klappen des Artikels auf Quetschstellen.
Vorsicht!
• Lassen Sie Kinder nicht unbeaufsichtigt.
Die Liege ist kein Spiel- oder Klettergerät.
Achten Sie darauf, dass sich niemand auf das
Kopf- oder Fußteil der Liege stellt.
• Die Liege kann auch als Transporthilfe genutzt
werden. Für den Transport von Personen ist
die Liege nicht geeignet!
Montage
Montage des Fußrahmens
Hinweis: Während der Montage des Fußrah-
mens sollte die Liege zusammengeklappt bleiben.
1. Entfernen Sie die Kabelbinder und das
Verpackungsmaterial.
2. Ziehen Sie die Innenstange (1b) aus dem
Hauptgestänge (1a).
3. Stecken Sie die verjüngten Enden der Innen-
stangen in die Enden des Fußrahmens (2), bis
die Löcher übereinander liegen.
4. Fixieren Sie die Innenstangen und den Fuß-
rahmen mit den Schrauben (6).
5. Stecken Sie den Fußrahmen mit dem Winkel
nach unten in das Hauptgestänge.
6. Schrauben Sie die Querstange (1c) mit dem
Fußrahmen zusammen.
Hinweis: Achten Sie darauf, dass der Winkel
des Fußrahmens nach unten zeigt.

8 DE/AT/CH
Trocknen Sie den Artikel danach vollständig ab,
bevor Sie ihn erneut verwenden.
Wartung! Überprüfen Sie die Schraubverbin-
dungen regelmäßig.
Hinweise zur Entsorgung
Verpackung und Artikel bitte umweltgerecht und
sortenrein entsorgen! Entsorgen Sie den Artikel
über einen zugelassenen Entsorgungsbetrieb
oder über Ihre kommunale Gemeindeverwal-
tung. Beachten Sie die aktuell geltenden Vor-
schriften.
3 Jahre Garantie
Das Produkt wurde mit großer Sorgfalt und unter
ständiger Kontrolle produziert. Sie erhalten auf
dieses Produkt drei Jahre Garantie ab Kauf-
datum. Bitte bewahren Sie den Kassenbon auf.
Die Garantie gilt nur für Material- und Fabrika-
tionsfehler und entfällt bei missbräuchlicher oder
unsachgemäßer Behandlung. Ihre gesetzlichen
Rechte, insbesondere die Gewährleistungs-
rechte, werden durch diese Garantie nicht
eingeschränkt. Bei etwaigen Beanstandungen
wenden Sie sich bitte an die unten stehende
Service-Hotline oder setzen Sie sich per E-Mail
mit uns in Verbindung. Unsere Servicemitarbeiter
werden das weitere Vorgehen schnellstmöglich
mit Ihnen abstimmen. Wir werden Sie in jedem
Fall persönlich beraten. Die Garantiezeit wird
durch etwaige Reparaturen aufgrund der Ga-
rantie, gesetzlicher Gewährleistung oder Kulanz
nicht verlängert. Dies gilt auch für ersetzte und
reparierte Teile. Nach Ablauf der Garantie
anfallende Reparaturen sind kostenpflichtig.
IAN: 273318
Service Deutschland
Tel.: 0800-5435111
E-Mail: deltaspor[email protected]
Service Österreich
Tel.: 0820 201 222 (0,15 EUR/Min.)
E-Mail: deltaspor[email protected]
Service Schweiz
Tel.: 0842 665566 (0,08 CHF/Min.,
Mobilfunk max. 0,40 CHF/Min.)
E-Mail: deltaspor[email protected]
Sie können alle Artikel auch direkt in unserem Online-Shop
bestellen: www.delta-sport.info
Montage der Räder
1. Schieben Sie den Stift (10) in das Gelenk
(Abb. F). Achten Sie darauf, dass das Ge
windeloch des Stiftes nach oben zeigt.
Der Stift sollte soweit in das Gelenk gescho-
ben werden, dass das Gewindeloch und das
Loch der Achsenstange übereinander liegen.
2. Fixieren Sie nun die kurze Schraube (7) in
dem Gewindeloch (Abb. G).
3. Das Rad wird nun auf den Stift geschoben
und mit der Unterlegscheibe und der Hutmut-
ter fixiert (Abb. H). Verwenden Sie hierzu das
mitgelieferte Werkzeug.
Montage des Sonnendachs
1. Lösen Sie die vormontierten Feststellschrau-
ben und die Hülsen von der Stange.
2. Schieben Sie die längere Schraube von innen
nach außen durch das Hauptgestänge.
3. Setzen Sie die Hülse mit der breiteren Rohr-
aufnahme auf und befestigen Sie die Stange
mit der Feststellschraube (Abb. I).
4. Mit der kürzeren Schraube und der Hülse mit
der schmaleren Rohraufnahme wird auf
gleiche Weise das Sonnendach fixiert.
Verwendung als Transporthilfe
Um die Liege als Transporthilfe zu verwenden,
klappen Sie das Sonnendach so ein, dass es
direkt auf der Liegefläche aufliegt, und heben
Sie die Liege am Fußrahmen an (Abb. J).
Die maximale Nutzlast beträgt 20 kg.
Neigungswinkel verstellen
Die Neigung der Rückenlehne lässt sich indivi-
duell in 5 Stufen einstellen (Abb. K).
Klappen Sie hierfür die Rückenlehne einmal
ganz auf die Sitzfläche und anschließend in die
Waagerechte. Wenn Sie die Rückenlehne nun
wieder hochziehen, rastet Sie hörbar in den
einzelnen Stufen ein. Zum Zurückstellen klappen
Sie die Lehne über die Senkrechte hinaus nach
oben und anschließend wieder zurück.
Pflege, Lagerung, Wartung
Wischen Sie den Artikel bei Bedarf mit einem
feuchten Tuch und gegebenenfalls etwas mildem
Reinigungsmittel ab.

9
Félicitations !
Vous avez acquéri un produit de haute qualité.
Apprenez à connaître le produit avant sa pre-
mière utilisation. Lisez pour cela attentivement le
notice d’utilisation suivant.
N’utilisez le produit que comme décrit et pour
les zones d’application indiquées.
Veuillez conserver ce mode d’emploi.
Transmettez tous les documents en cas de cessa-
tion du produit à une tierce personne.
Contenu de la livraison (fig. A)
(1) 1 x cadre principal
(2) 1 x cadre de base
(3) 1 x pare-soleil
(4) 2 x roues
(5) 2 x barres
(6) 2 x vis longues
(7) 2 x vis courtes
(8) 2 x rondelles
(9) 2 x écrous chapeau
(10) 2 x chevilles
(11) 1 x clé à vis
1 x notice d’utilisation
Caractéristiques techniques
Poids : env. 4,3 kg
Dimensions : env. 147 x 67 x 58 cm (L x l x h)
Charge max. : 100 kg
Charge utile max. en cas d‘utilisation en tant
qu‘aide de transport : 20 kg
Utilisation conforme
L‘article n‘est pas destiné à un usage
professionnel. L‘article est conçu pour une
utilisation dans le domaine des loisirs et du
camping (en extérieur).
Consignes de sécurité
AVERTISSEMENT !
• Risque d‘asphyxie pour les enfants !
• Ne laissez pas les enfants sans surveillance
avec les emballages.
Risque de blessure !
• La charge maximale de la chaise longue de
plage et de transport est de 100 kg.
• Avant toute utilisation, contrôlez la présence
de dégradations ou d’usures sur l‘article.
Vérifiez toujours la bonne fixation de tous les
éléments de raccord. L‘article doit uniquement
être utilisé en parfait état !
• Vissez solidement les différentes pièces avant
d‘utiliser la chaise longue.
• Installez la chaise longue uniquement sur une
surface solide et plane.
• Risque de blessure en cas de montage
incorrect de l‘article !
Risque de se pincer les doigts !
• La chaise longue doit être uniquement montée
par des adultes. Lorsque vous dépliez et
repliez l‘article, faites attention aux zones de
pincement.
Attention !
• Ne laissez pas les enfants sans surveillance.
La chaise longue n‘est pas un jouet ni un
objet d‘escalade. Faites à attention à ce que
personne ne s‘installe sur la tête ou sur les
pieds de la chaise longue.
• La chaise longue peut être également utilisée
en tant qu‘aide de transport. Elle ne convient
pas au transport de personnes !
Montage
Montage du piètement
Indication : pendant le montage du piètement,
la chaise doit rester fermée.
1. Enlevez les attache-câbles et le matériel
d‘emballage.
2. Sortez la barre intérieure (1b) de l‘armature
principale (1a).
3. Placez les extrémités en biseau des barres
intérieures dans les extrémités du piètement
(2) jusqu‘à ce que les trous se trouvent les uns
sur les autres.
4. Fixez les barres intérieures et le piètement
avec les vis (6).
5. Placez le piètement avec l‘angle vers le bas
dans l‘armature principale.
6. Vissez la barre transversale (1c) au piète
ment.
FR/CH

10 FR/CH
Entretien, rangement,
maintenance
En cas de besoin, essuyez l‘article avec un chiffon
humide et, si nécessaire, avec un peu de produit
nettoyant doux. Ensuite, séchez intégralement
l‘article avant de l‘utiliser à nouveau. Maintenance
! Contrôlez régulièrement les raccords à vis.
Mise au rebut
L’emballage et l’article doivent être éliminés de
manière favorable à l’environnement. Eliminez
l’article par l’intermédiaire d’une entreprise de
recyclage autorisée ou via les services com-
pétents de votre commune. Veuillez tenir compte
des directives actuelles en vigueur.
3 ans de garantie
Le produit a été fabriqué avec le plus grand soin
et sous un contrôle permanent. Vous avez sur ce
produit une garantie de trois ans à partir de la
date d’achat. Conservez le ticket de caisse. La
garantie est uniquement valable pour les défauts
de matériaux et de fabrication, elle perd sa
validité en cas de maniement incorrect ou non
conforme. Vos droits légaux, tout particulière-
ment les droits relatifs à la garantie, ne sont pas
limitées par cette garantie. En cas d‘éventuelles
réclamations, veuillez vous adresser à la hotline
de garantie indiquée ci-dessous ou nous contacter
par e-mail. Nos employés du service client vous
indiqueront la marche à suivre le plus rapidement
possible. Nous vous renseignerons personnelle-
ment dans tous les cas. La période de garantie
n‘est pas prolongée par d’éventuelles réparations
sous la garantie, les garanties implicites ou le
remboursement. Ceci s‘applique également aux
pièces remplacées et réparées. Les réparations
nécessaires sont à la charge de l’acheteur à la fin
de la période de garantie.
IAN : 273318
Service Suisse
Tel. : 0842 665566
(0,08 CHF/Min.,
mobile max. 0,40 CHF/Min.)
E-Mail : deltaspor[email protected]
Tous les articles peuvent également être commandés sur notre
boutique en ligne : www.delta-sport.info
Indication : veillez à ce que l‘angle du piète-
ment soit dirigé vers le bas.
Montage des roues
1 Poussez le tenon (10) dans le joint (fig. F).
Veillez à ce que le trou taraudé du tenon
soit dirigé vers le haut. Le tenon doit être
poussé dans le joint jusqu‘à ce que le trou
taraudé et le trou de la barre de l‘essieu se
trouvent l‘un sur l‘autre.
2. Fixez alors la vis courte (7) dans le trou
taraudé (fig. G).
3. La roue est alors poussée sur le tenon et fixée
à l‘aide de la rondelle et de l‘écrou à cha-
peau (fig. H). Pour cela, utilisez l‘outil fourni.
Montage du pare-soleil
1. Dévissez les vis de serrage prémontées et les
douilles de la barre.
2. Poussez les vis plus longues de l‘intérieur vers
l‘extérieur à travers l‘armature principale.
3. Posez la douille avec le support pour tube
plus large et fixez la barre avec la vis de
serrage (fig. I).
4. De même, le pare-soleil se fixe avec la vis
plus courte et la douille ayant le support pour
tube plus mince.
Utilisation en tant qu‘aide de
transport
Pour utiliser la chaise longue en tant qu‘aide de
transport, pliez le pare-soleil de façon à ce qu‘il
se trouve directement sur la surface de coucha-
ge et soulevez la chaise longue par le cadre-
pied (fig. J).
La capacité de charge maximale est de 20 kg.
Régler l‘angle d‘inclinaison
L‘inclinaison du dossier est réglable sur 5
niveaux (fig. K).
Pour cela, rabattez entièrement le dossier sur
l‘assise et ensuite à l‘horizontale. Lorsque vous
remontez le dossier, il s‘enclenche de manière
audible sur différents niveaux.
Pour changer l‘inclinaison, relevez le dossier au-
delà de la verticale vers le haut, puis à nouveau
vers le bas.

11IT/CH
Congratulazioni!
Con il vostro acquisto avete scelto un prodotto
altamente qualitativo. Familiarizzate con il pro-
dotto prima di prenderlo in funzione.
Leggete attentamente le seguenti istruzioni
d‘uso. Utilizzate il prodotto soltanto per lo scopo
previsto e i campi d´impiego indicati.
Conservate bene queste istruzioni. In caso di
inoltro del prodotto a terzi, pregasi consegnare
tutta la documentazione.
Fornitura (imm. A)
(1) Asta principale 1x
(2) Telaio di base 1x
(3) Tendina parasole 1x
(4) Ruote 2x
(5) Asta 2x
(6) Vite lunga 2x
(7) Vite corta 2x
(8) Rondella 2x
(9) Dado a cappello 2x
(10) Spina 2x
(11) Chiave inglese 1x
Istruzioni d‘uso 1x
Dati tecnici
Peso: ca. 4,3 kg
Dimensioni: ca. 147 x 67 x 58 cm (L x L x A)
Carico massimo: 100 kg
Portata utile massima utilizzandola come ausilio
per il trasporto: 20 kg
Utilizzo corretto
L’articolo non è destinato all’utilizzo
commerciale. L’articolo è concepito per essere
utilizzato nel tempo libero e per il camping
(all’esterno).
Indicazioni di sicurezza
ATTENZIONE!
• Pericolo di soffocamento per i bambini!
• Non lasciare che i bambini giochino con il
materiale di imballaggio
.
Pericolo di lesioni!
• Caricare il lettino da spiaggia o da trasporto
con massimo 100 kg.
• Controllare danneggiamenti o usure
sull’articolo prima di utilizzarlo.
Controllare sempre il corretto posizionamento
di tutti gli elementi di fissaggio.
Questo articolo può essere utilizzato
solamente se si trova in condizioni perfette!
• Avvitare tutti i singoli componenti prima di
utilizzare il lettino.
• Posizionare il lettino solamente su una
superficie stabile a livello del terreno.
• Il montaggio non corretto dell‘articolo
provoca il rischio di ferimenti!
Rischio di schiacciamento
delle dita!
• Il lettino può essere montato solamente da
adulti. Quando si apre e si chiude l’articolo,
fare attenzione alle zone di schiacciamento.
Attenzione!
• Non lasciare i bambini incustoditi. Il lettino
non è un giocattolo o un attrezzo per
arrampicata. Assicurarsi che nessuno si poggi
nella zona della testa o dei piedi del lettino.
• Il lettino può anche essere utilizzato quale
ausilio per il trasporto. Il lettino non è adatto
per il trasporto di persone!
Montaggio
Montaggio del poggiapiedi
Avvertenze: Durante il montaggio del poggia-
piedi il lettino deve rimanere piegato.
1. Rimuovere le fascette di cablaggio e i materi-
ali d‘imballaggio.
2. Tirare fuori l‘asta interna (1b) dal telaio (1a).
3. Inserire le estremità più strette delle aste
interne in quelle del poggiapiedi (2), fino a
far sovrapporre i due fori.
4. Fissare l‘asta interna e il poggiapiedi con le
viti (6).
5. Inserire il poggiapiedi nel telaio con l‘angolo
rivolto verso il basso.
6. Avvitare insieme la parte laterale dell‘asta
(1c) con il poggiapiedi.
Avvertenze: Fare attenzione che l‘angolo del
poggiapiedi sia rivolto verso il basso.

12 IT/CH
Cura, conservazione,
manutenzione
Se necessario, pulire l’articolo con un panno
umido ed eventualmente con un detergente
delicato. Asciugare completamente l’articolo
prima di riutilizzarlo. Manutenzione! Controllare
regolarmente le bullonature.
Smaltimento
Smaltire l’imballaggio e l’articolo stesso ris-
pettando l’ambiente e le regole della raccolta
differenziata! Per lo smaltimento rivolgersi ad
un’azienda autorizzata o alle autorità compe-
tenti. Rispettare la normativa vigente.
3 anni di garanzia
Questo prodotto è stato fabbricato con grande
attenzione e sottoposto a costanti controlli.
La garanzia è di tre anni dalla data d’acquisto.
Conservi lo scontrino fiscale. La garanzia vale
solo su difetti di materiale o di fabbricazione e
decade in caso di uso errato o non conforme.
Questa garanzia non costituisce una limitazione
ai Suoi diritti legali e in particolare al diritto di
garanzia. Per eventuali reclami vi preghiamo di
contattare il seguente servizio hotline o mettervi
in comunicazione con noi via e-mail. I nostri
addetti all‘assistenza concorderanno con voi
come procedere nel modo più rapido possibile.
In qualsiasi caso vi consiglieremo per le vostre
esigenze specifiche. Il periodo di garanzia non
viene prolungato a seguito di riparazioni effet-
tuate in garanzia, secondo il diritto di garanzia
o per correntezza commerciale. Lo stesso vale
anche per le parti sostituite o riparate. Le ripara-
zioni dopo la scadenza della garanzia verranno
effettuate a pagamento.
IAN: 273318
Assistenza Svizzera
Tel.: 0842 665566
(0,08 CHF/Min.,
telefonia mobile
max. 0,40 CHF/Min.)
Potete ordinare gli articoli anche direttamente sul nostro online
shop: www.delta-sport.info
Montaggio delle rotelle
1. Spingere il perno (10) nello snodo centrale
(imm. F). Fare attenzione che la filettatura
del perno sia puntata verso l‘alto. Il perno
deve essere spinto nello snodo in maniera
tale che la filettatura del perno e il foro
nell‘asta si sovrappongano.
2. Fissare adesso la vite piccola (7) nella filetta
tura del perno (imm. G).
3. La rotella deve essere spinta sul perno e fissa-
ta con la rondella e il dado (imm. H). Utiliz
zare gli attrezzi forniti in dotazione.
Montaggio del tettuccio
1. Svitare dall‘asta le viti di serraggio e i dadi
preassemblati.
2. Spingere la vite più lunga dall‘interno verso
l‘esterno attraverso il telaio.
3. Posizionare il dado con la filettatura più lar-
ga e fissare l‘asta con la vite di fissaggio
(imm. I)
4. Fissare il tettuccio allo stesso modo con la
vite più corta e il dado con la filettatura più
sottile.
Utilizzo quale ausilio per il
trasporto
Per utilizzare il lettino quale ausilio per il traspor-
to, piegare il parasole in modo che si trovi sulla
superficie di appoggio e sollevare il lettino dal
telaio di base (imm. J).
Il carico massimo è di 20 kg.
Regolare l’inclinazione
L’inclinazione dello schienale è regolabile indivi-
dualmente in 5 posizioni (imm. K).
Per prima cosa piegare completamente lo
schienale sulla superficie di appoggio e successi-
vamente in posizione orizzontale.
Quando viene risollevato lo schienale, questo
scatta nelle singole posizioni. Per abbassare,
sollevare lo schienale fino a superare la posizio-
ne verticale e quindi riabbassare.

13GB
Congratulations!
With your purchase you have decided on a
high-quality product. Get to know the product
before you start to use it. Carefully read the
following instructions for use. Use the product
only as described and only for the given areas
of application. Keep these instructions safe.
When passing the product on to a third party,
always make sure that the documentation is
included.
Scope of Delivery (fig. A)
(1) main frame 1x
(2) footrest frame 1x
(3) sunroof 1x
(4) wheels 2x
(5) rod 2x
(6) screw long 2x
(7) screw short 2x
(8) washer 2x
(9) cap nut 2x
(10) pin 2x
(11) spanner 1x
Instructions for use 1x
Technical Details
Weight: approx. 4.3kg
Dimensions: approx. 147 x 67 x 58cm
(L x W x H)
Max. load: 100kg
Max. loading capacity when used as a transport
aid: 20kg
Intended Use
The article is not designed for commercial use.
The article is intended for use in the leisure and
camping sector (outdoor area).
Safety Notice
WARNING!
• Danger of suffocation for children!
• Never allow children to play with packaging
materials when unsupervised.
Danger of Injury!
• Do not place loads that exceed 100kg on the
article.
• Check the article before initial use for dam-
age or signs of wear and tear. Make sure that
all connecting elements are sufficiently tighten-
ed. The article may only be used when in
perfect condition!
• Tighten each individual screw before using
the article.
• Place the article only on solid, even ground.
• Risk of injury if article is incorrectly assem-
bled!
Danger of Bruised Fingers!
• The article may only be erected by
adults. Take care not to trap your fingers
when folding and unfolding the article.
Caution!
• Always supervise your children. The article is
not a toy or a climbing aid.
Make sure that nobody stands on the head or
foot sections of the article.
• The article can also be used as a transport
aid, although it is not designed for transpor-
ting people!
Assembly
Footrest frame assembly
Note: keep the lounger folded while assem-
bling the footrest frame.
1. Remove the cable binders and the packaging
material.
2. Pull the inside rod (1b) out of the main frame
(1a).
3. Insert the narrow end of the inside rods into
the end of the footrest frame (2) until the
holes are directly above one another.
4. Fix the inside rods and the footrest frame
using the screws (6).
5. Insert the footrest frame into the main frame
with the bracket facing downwards.
6. Screw the cross bar (1c) to the footrest frame.
Note: make sure that the bracket on the footrest
frame is facing downwards.

14 GB
Notes on disposal
Please dispose of the product and packaging in
an environmentally friendly manner, separating
different materials for recycling as required!
Dispose of this item through an authorised
disposal company or through your local waste
disposal facilities - ask your local authority for
information if further guidance is required.
Ensure that you comply with all regulations
currently in force.
3 Years Warranty
The product was produced with great care and
under constant supervision. You receive a three-
year warranty for this product from the date of
purchase. Please retain your receipt.
The warranty applies only to material and work-
manship and does not apply to misuse or impro-
per handling. Your statutory rights, especially
the warranty rights, are not affected by this
warranty.
With regard to complaints, please contact the
following service hotline or contact us by e-mail.
Our service employees will advise as to the
subsequent procedure as quickly as possible.
We will be personally available to discuss the
situation with you.
Any repairs under the warranty, statutory
guarantees or through goodwill do not extend
the warranty period. This also applies to re-
placed and repaired parts. Repairs after the
warranty are subject to a charge.
IAN: 273318
Service Great Britain
Tel.: 0871 5000 720
(£ 0.10/Min.)
E-Mail: deltaspor[email protected]
All items are also available for purchase directly from our
online shop: www.delta-sport.info
Wheel assembly
1. Insert the pin (10) into the hinge (fig. F).
Ensure that the threaded hole on the pin is
pointing upwards. The pin should be inserted
into the hinge so that the threaded hole and
the hole on the axle rod are exactly above
one another.
2. Now fix the short screw (7) in the threaded
hole (fig. G).
3. The wheel is now pushed onto the pin and
fixed using the washer and the cap nut (figure
H). Use the included tools for this task.
Sunroof assembly
1. Loosen the pre-mounted locking screws and
the sleeves from the rod.
2. Insert the longer screw through the main
frame from the inside to the outside.
3. Attach the sleeve with the wide pipe insert
and fix the rod with the locking screw (fig. I).
4. The sunroof is fixed in the same way using
the shorter screw and the sleeve with the
narrow pipe insert.
Using as a Transport Aid
To use the article as a transport aid, fold the sun
shade down so that it lies flat on the surface of
the article, and then raise the foot frame (fig. J).
The maximum carrying capacity is 20kg.
Adjusting the Angle
The angle of the backrest can be set to one of
5 levels (fig. K).
Fold the back support completely flat down onto
the seat and then pull up horizontally.
You will hear audible ratchet sounds as you pull
it up, enabling you to select the angle of incli-
nation in individual steps.
To reset the angle fold the backrest up past the
vertical and then back down again.
Care, Storage, Maintenance
When required, wipe the article with a damp
cloth and a little mild cleaning agent if necessa-
ry. Dry the article thoroughly before you use it
again.
Maintenance! Check the bolted connections
regularly.

15

16
-
 1
1
-
 2
2
-
 3
3
-
 4
4
-
 5
5
-
 6
6
-
 7
7
-
 8
8
-
 9
9
-
 10
10
-
 11
11
-
 12
12
-
 13
13
-
 14
14


Crivit 273318 Instructions For Use Manual
- Tipo
- Instructions For Use Manual
in altre lingue
- English: Crivit 273318
- français: Crivit 273318
- Deutsch: Crivit 273318
Documenti correlati
-
Crivit 274619 Manuale utente
-
Crivit 280573 Instructions For Use Manual
-
Crivit TB-2759 Instructions For Use Manual
-
-
-
-
-
-
