
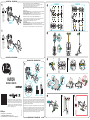
EN: (A) aluminium alloy Front frame, (B) aluminium alloy Back frame, (C) stainless steel
connecting shaft: (C1) sizes EU 37-43 and (C2) sizes EU 42-47, (D) stainless steel Binding
shaft (D1) front (for the semi-automatic version it is in PVC coated steel) and (D2) back, (E1)
Nylon Heel pad and stainless steel screw(E2), (F) Nylon safety loop with Aluminium buck,
(G) Polyamide Antibott, (H) Adjusting system: (H1) Stainless steel screw, (H2) Aluminium
Regulating Nut, (H3) Rubber Blocking Nut.
IT: (A) Parte anteriore in lega d’alluminio, (B) Parte posteriore in lega d’alluminio, (C) Astina di
collegamento in acciaio inossidabile: (C1) taglie EU 37-43 e (C2) taglie EU 42-47, (D) Staffe
di bloccaggio in acciaio inossidabile: (D1) anteriore e (D2) posteriore, (E1) Talloniera in Nylon
con vite in acciaio inossidabile (E2), (F) Fettuccia di sicurezza in Nylon con bbia in Alluminio,
(G) Antibott in Poliammide, (H) Sistema di regolazione: (H1) Vite in acciaio inossidabile, (H2)
Nottolino di regolazione in alluminio, (H3) Nottolino di bloccaggio in gomma.
EN: The Personal Protective Equipment Category II 8A4.10 RUTOR (g. 1) is:
- a crampon tted with 10 spikes, intended to provide grip on snow, ice, and mixed terrain;
- suitable for preventing the user from slipping when used in mountaineering;
- certied according to the standards EN 893:10 and UIAA 153:13.
Warning: aluminium alloy crampons are not recommended for climbing up frozen water-
falls.
Available versions:
- RUTOR AUTOMATIC 8A4.10A (g. 1A) - Automatic binding version to be used with hard-soled
suitable boots equipped with a compatible binding system both in front and back;
- RUTOR SEMI-AUTOMATIC 8A4.10S (g. 1B) - Semi-automatic binding version to be used with
hard-soled suitable boots equipped with a compatible binding system in the back.
IT: Il Dispositivo di Protezione Individuale di II categoria 8A4.10 RUTOR (g. 1) è:
- un rampone provvisto di 10 punte destinato a fornire presa su neve, ghiaccio e terreno misto;
- adatto a prevenire lo slittamento dell’utilizzatore quando utilizzato in alpinismo,
- certicato in accordo agli standard EN 893:10 e UIAA 153:13,
Versioni disponibili:
- RUTOR AUTOMATIC 8A4.10A (g. 1A) - Versione con allacciatura automatica, adatto per l’utiliz-
zo su scarponi ramponabili a suola rigida, con i bordi anteriore e posteriore compatibili;
- RUTOR SEMI-AUTOMATIC 8A4.10S (g. 1B) - Versione con allacciatura semi-automatica, adat-
to per l’utilizzo su scarponi ramponabili a suola rigida, con il bordo posteriore compatibile.
3
4
5 6
7
8 9 10
REMOVA LASSEMBLY
8A4.10A
CLACK!
8A4.10S
F
E1
E2
E1
H3 H1 H2
8A4.10S
8A4.10A
ZZV05549 rev.1
RUTOR
KONG s.p.a.
Via XXV Aprile, 4 - (zona industriale)
I - 23804 MONTE MARENZO (LC) - ITALY
Tel +39 0341630506 - Fax +39 0341641550 - [email protected]
8A4.10A • 8A4.10S
NOMENCLATURE • TERMINOLOGIE
NOMENCLATURE • NOMENCLATURA
Stáhněte si překlad ve vašem jazyce - Laden Sie die Übersetzung in
Ihrer Sprache herunter - Download the translation in your language
- Bájate la traducción en tu idioma - Télécharger la traduction dans
vostre langue - Scarica la traduzione nella tua lingua - Download
de vertaling in je eigen taal - Pobierz tłumaczenie w twoim języku
- Faça o download da tradução no seu idioma - Скачайте перевод
на ваш язык - 下载您语言版本的手册
2
H2
G
H1
H3
E1
E2
D2
C
G
A
F
8A4.10A
B
D1
8A4.10S
D1
SIZE
EU 37÷43 SIZE
EU 42÷47
C1
C2
DESCRIPTION • DESCRIZIONE
DESCRIPTION • BESCHREIBUNG
1A
1B
Kompatibilní
kompatibel
compatible
compatible
compatible
compatibile
compatibel
zgodne
compatível
совместимости
Kompatibilní
kompatibel
compatible
compatible
compatible
compatibile
compatibel
zgodne
compatível
совместимости
RUTOR
8A4.10A
WEIGHT: 240 g
RUTOR
8A4.10S
WEIGHT: 250 g

8 – SPECIFIC INFORMATION
Fig. 3 – Antibott (G) assembly and removal – Remove the antibott (G) to
change the connecting shaft (C) or to clean the device.
Fig. 4 – Change of the connecting shaft (C) – Choose the right connecting
shaft (C) according to the size of the crampon:
- remove the antibott (G) as described,
- adjust the crampon to the maximum size,
-detach the connecting shaft (C) from the front frame (A),
- slip off the rubber band,
- detach from the adjusting system (H) the connecting shaft (C), widening and
moving them.
Fig. 5 – Safety loop (F) adjustment – Adjust the safety loop (F) length to
properly tighten the heel pad:
- disassemble the heel pad (E1) screwing off the screw (E2),
- arrange the heel pad (E1) on the safety loop (F) with the chosen eye bolts,
- assemble the heel pad screwing back the screw (E2).
Fig. 6 - Size adjustment – Adjust the device to the size of the boot:
- unblock the screw (H1) moving the blocking nut (H3),
- spin the screw (H1),
- block the screw (H1) moving back the blocking nut (H3)
Fig. 7 - Fit the crampon – Connection of the device to the boot:
- adjust the size as described,
- t the anterior part in the front binding shaft (D1)
- move the heel pad (E1) to the boot,
- lace the safety loop (F).
Fig. 8 - Sharpening the spikes – Spikes must be sharpened at the side
using a smooth le.
Important:
- do not leave gap between the boot and the device (g. 9),
- very sharp points are good with hard ice but reduce the service life of the
device,
- before use do some t test, these same simple operations become more
complicated under the climatic conditions of the natural environments;
- while transporting the device use the special case to avoid cuts and damage
caused by the spikes, adopt storage precautions (point 3), avoid exposition to
direct sunlight and humidity.
Warning:
- wrong way to sharpen spikes (g. 10).
- never use an abrasive wheel to sharpen spikes,
- snow, under particularly conditions, will form a hard clump between
the spikes under the crampon. Such clump is extremely dangerous as
it reduces, until nullifying, penetration of the spikes into the snow. Em-
ploying the antibott (G) reduce this risk.
9 - PRE AND POST USE CONTROLS
Before and after use make sure that the device is in efcient condition and
working properly, particularly check that:
- points are not rounded,
- all screw and nut are tightened,
- the device has not been mechanically deformed and does not show any
signs of cracks or wear,
- textile parts do not show any signs of tear, burns, chemical residues,
excessive uff, wear. Pay special attention to the areas that contact metal
parts (buckles, rings, etc.),
- markings, labels included, are still readable.
8 – INFORMAZIONI SPECIFICHE
Fig. 3 - Montaggio e rimozione dell’antibott (G) – Rimuovere l’antibott (G)
per cambiare le astine o per pulire il dispositivo.
Fig. 4 – Cambio delle astine di collegamento (C) – Scegliere le astine di
collegamento (C) in accordo alla taglia dello scarpone:
- rimuovere l’antibott (G) come descritto,
- regolare il dispositivo alla taglia massima,
- slare le astine (C) dalla parte anteriore (A),
- slare il gommino,
- disimpegnare dal sistema di regolazione (H) le astine (C), allargandole e
spostandole.
Fig. 5 – Regolazione della fettuccia di sicurezza (F) – Regolare la lunghez-
za della fettuccia (F) per avvolgere meglio lo scarpone:
- smontare la talloniera (E1) svitando la vite (E2),
- riposizionare la talloniera (E1) sulla fettuccia (F) in combinazione all’occhiolo
scelto,
- rimontare la talloniera (E1) avvitando la vite (E2).
Fig. 6 - Regolazione della taglia – Per adattare il dispositivo alla taglia dello
scarpone:
- sbloccare la vite (H1) spostando il nottolino di bloccaggio (H3),
- ruotare la vite (H1),
- bloccare la vite (H1) rispostando il nottolino di bloccaggio (H3).
Fig. 7 – Allacciatura – Connessione del dispositivo allo scarpone:
- adattare la lunghezza come descritto,
- calzare la parte anteriore nella staffa di bloccaggio (D1),
- spingere la talloniera (E1) contro lo scarpone,
- allacciare il cinturino.
Fig. 8 - Aflatura delle punte – Aflare le punte lateralmente mediante una
lima a taglio ne.
Importante:
- non lasciare gioco tra lo scarpone ed il dispositivo (g. 9),
- punte molto aflate sono più efcaci nel ghiaccio duro, ma riducono la durata
del dispositivo,
- prima dell’utilizzo effettuate alcune prove di calzata, le stesse semplici ope-
razioni diventano più complicate quando effettuate nelle condizioni climatiche
dell’ambiente naturale,
- trasportare il dispositivo nell’apposita custodia per evitare che le punte pro-
vochino tagli o danneggiamenti, considerando le precauzioni previste al punto
3 per l’immagazzinamento, limitando l’esposizione diretta alla luce del sole e
all’umidità.
Attenzione:
- errata aflatura delle punte (g. 10),
- non utilizzate mai una mola abrasiva per aflare le punte,
- il manto nevoso, in particolari condizioni meteorologiche, forma uno
zoccolo di neve compatta tra le punte sotto al rampone. Tale zoccolo è
estremamente pericoloso poiché riduce, no ad annullare, la penetrazio-
ne delle punte nella neve. L’utilizzo dell’antibott (G) riduce tale rischio.
9 - CONTROLLI PRE E POST USO
Prima e dopo l’uso assicurarsi che il dispositivo sia in condizioni efcienti e
funzioni correttamente, in particolare controllare che:
- le punte non siano arrotondate,
- le viti e i dadi siano stretti,
- il dispositivo non abbia subito deformazioni meccaniche e non presenti cric-
che o segni di usura,
- le parti tessili non presentino tagli, bruciature, residui di prodotti chimici,
eccessiva peluria, usura, in particolare vericate le zone in contatto con i com-
ponenti metallici,
- le marcature, comprese le etichette, siano leggibili.
EN
Master text: ITALIAN Teste de référence: ITALIENNE Referenztext: ITALIENISCH
IT FR DE
NB n° 2008
DOLOMITICERT scarl
Zona Industriale Villanova
32013 Longarone (BL) – Italy
Download the declarance of conformity at:
Scarica la dichiarazione di conformità a :
Télécharger la déclaration de conformité à:
Laden Sie die Konformitätserlärung herunter zu:
www.kong.it/conformity
Conformity to European Norm
Conformità alla Norma Europea
Conforme à la norme européenne
Entspricht der Europäischen Norm
EN 893:10
CERTIFIED BY • CERTIFICATO DA
CERTIFIÉ PAR • ZERTIFIZIERT VON
MARKING • MARCATURA
MARQUAGE • MARKIERUNG
-
 1
1
-
 2
2


Kong Rutor (Automatic) Manuale utente
- Tipo
- Manuale utente
- Questo manuale è adatto anche per
in altre lingue
- English: Kong Rutor (Automatic) User manual
- français: Kong Rutor (Automatic) Manuel utilisateur
Altri documenti
-
Climbing Technology 3I894 Istruzioni per l'uso
-
Petzl LEOPARD LLF Technical Notice
-
-
-
-
 Burton 2009 Bindings Manuale utente
-
 Grivel 0123 Ghost Tech hammer ice axe Manuale utente
-

