
FRAMTID
HGC4T
GB
DE
FR
IT


ENGLISH 4
DEUTSCH 13
FRANÇAIS 24
ITALIANO 35

Contents
Safety information 4
Product description 5
Daily use 6
Helpful hints and tips 7
Care and cleaning 7
What to do if… 8
Technical data 9
Installation 9
Environment concerns 10
IKEA GUARANTEE 11
Subject to change without notice
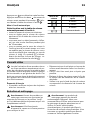
Safety information
For your safety and correct operation of
the appliance, read this manual carefully
before installation and use. Always keep these
instructions with the appliance even if you
move or sell it. Users must fully know the oper-
ation and safety features of the appliance.
Correct use
• Do not leave the appliance unattended dur-
ing operation.
• The appliance is designed exclusively for
domestic use.
• The appliance must not be used as a work
surface or as a storage surface.
• Do not place or store flammable liquids,
highly inflammable materials or fusible ob-
jects (e.g. plastic film, plastic, aluminium) in
or near the appliance.
• Watch out when connecting electric appli-
ances to sockets nearby. Do not allow con-
necting leads to come into contact with or to
catch underneath the appliance or hot cook-
ware.
• Do not do repairs yourself to prevent injury
and damage to the appliance. Always con-
tact your local After Sales Service (refer to
the Service chapter).
Child safety
• Only adults can use this appliance. Children
must get supervision to make sure that they
do not play with the appliance.
• Keep all packaging away from children.
There is a risk of suffocation.
• Keep children away from the appliance
when it is on.
Warning! Activate the child safety device
to avoid small children and pets
unintentionally switching the appliance on.
General safety
• This appliance is not intended for use by
persons (including children) with reduced
physical, sensory or mental capabilities, or
lack of experience and knowledge, unless
they have been given supervision or instruc-
tion concerning use of the appliance by a
person responsible for their safety.
Installation
• Make sure that the appliance is not dam-
aged because of transport. Do not connect
a damaged appliance. If necessary, contact
the After Sales Service (refer to the Service
chapter).
• Only an authorized service engineer can in-
stall, connect or repair this appliance. Use
only original spare parts.
• Built-in appliances can only be used after
they are built into suitable built-in units and
work surfaces that meet standards.
• Do not change the specifications or modify
this product. Risk of injury and damage to
the appliance.
Warning! Carefully obey the instructions
for electrical connections.
Safety during use
• Remove all packaging, stickers and film from
the appliance before the first use.
Warning! Fire hazard! Overheated fats
and oils can ignite very quickly.
• Switch the cooking zones off after each.
ENGLISH 4

• Risk of burns! Cooking zones and accessible
parts become hot during use.
Warning! If the surface is cracked, switch
off the appliance to avoid possibility of an
electric shock and call the After Sales Service
(refer to the Service chapter).
Warning! Do not operate the appliance
with wet hands and keep control panel
surface dry. Lot of water on control panel keys
will make them no longer operable.
How to avoid damage to the appliance
• The glass ceramic can be damaged by ob-
jects falling onto it, or knocked by the cook-
ware.
• Cookware made of cast iron, cast aluminum
or with damaged bottoms can scratch the
glass ceramic if slid on the surface.
• To avoid damaging cookware and glass ce-
ramics, do not allow saucepans or frying
pans to boil dry.
• Do not use the cooking zones with empty
cookware or without cookware.
• Never line any part of the appliance with
aluminium foil. Never place plastic or any
other material which may melt in or on the
appliance.
Information on acrylamides
Important! According to the latest scientific
knowledge, intensive browning of food,
especially in products containing starch, can
constitute a health risk due to acrylamides.
Therefore, we recommend cooking at the
lowest possible temperatures and not
browning foods too much.
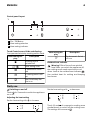
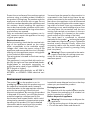
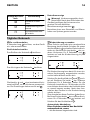
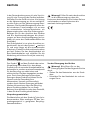
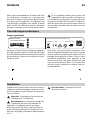
Product description
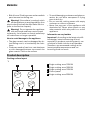
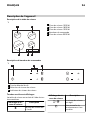
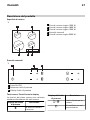
Cooking surface layout
1
1
2
145 mm
145 mm
180 mm
210 mm
4 35
1 Single cooking zone 1200 W
2 Single cooking zone 1800 W
3 Single cooking zone 1200 W
4 Control panel
5 Single cooking zone 2300 W
ENGLISH 5

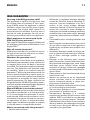
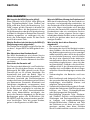
Control panel layout
1
1 32
1 On / Off Button
2 Heat setting selection
3 Heat setting indicator
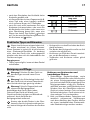
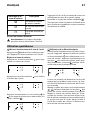
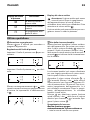
Touch Control sensor fields and displays
You operate the hob by touching sensor fields.
Heat setting dis-
play
Description
Cooking zone is
switched off
-
Heat setting is set
A malfunction occur-
red
A cooking zone is still
hot
The Child Safety De-
vice is on
Heat setting dis-
play
Description
The Automatic Switch
off is on
Residual heat indicator
Warning! Risk of burns from residual
heat! After you switch the appliance off,
the cooking zones need some time to cool
down. Look at the residual heat indicator
.
Use residual heat for melting and keeping
food warm.
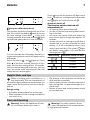
Daily use
Switching on and off
Touch
for 2 seconds to switch the appliance
on or off.
Adjusting the heat setting
Set the heat setting with
to increase.
Set the heat setting with to decrease.
Touch and of a respective cooking zone
simultaneously to switch off the cooking zone.
The settings will reverse to
.
ENGLISH 6

Using the child safety device
This function prevents unintentional use of the
hob. First, switch the hob on
and do not set
the heat settings. Touch both
of the front
cooking zones for 4 seconds and the
lights
up and child safety device is now activated.
You can override the child safety device for a
single cooking session and it will remain active
afterwards.
Switch the hob on
, and lights up. Touch
both
of the front cooking zones for 4 sec-
onds. Set the heat setting within 10 seconds.
Until the next switching off of the hob , you can
use it as normal. After switching off, the child
safety device is active again.
Touch
to switch this function off. Next, touch
both
of the front cooking zones for 4 seconds
and
lights up. Switch the hob off .
Automatic Switch off
The function switches the hob off
automatically if:
• all cooking zones are switched off.
• you do not set the heat setting after switch-
ing on the hob.
• you cover any sensor field with objects (a
pan, a cloth, etc.) for longer than approx. 10
seconds.
• you do not switch a cooking zone off after a
certain time, or you do not modify the heat
setting, or if the overheating occurs (e.g.
when a pan boils dry). The symbol
lights
up. Before using again, you must set the
cooking zone to
.
Heat setting Automatic switch off after
-
6 hours
-
5 hours
4 hours
-
1.5 hours
Helpful hints and tips
When a cooking zone is switched on, it
may hum briefly. This is a characteristic of
all ceramic glass cooking zones and does not
impair either the function or the life of the ap-
pliance.
Energy saving
• If possible, always place lids on the pans.
• Place cookware on the cooking zone before
you switch it on.
• The bottom of the cookware should be as
thick and flat as possible.
• Switch cooking zones off before the end of
the cooking time, to take advantage of re-
sidual heat
• Bottom of pans and cooking zones should
be the same size.
Care and cleaning
Warning! Switch the appliance off and
let it cool down before you clean it.
Warning! For safety reasons, do not
clean the appliance with steam blasters
or high-pressure cleaners.
ENGLISH 7

Warning! Sharp objects and abrasive
cleaning agents will damage the
appliance. Clean the appliance and remove
the residues with water and washing up liquid
after each use. Remove also the remnants of
the cleaning agents!
Scratches or dark stains on the glass ce-
ramic that cannot be removed do not af-
fect the functioning of the appliance.
Removing the residues and stubborn
residues:
1. Food containing sugar, plastics, tin foil res-
idues should be removed at once, best tool
for cleaning glass surface is a scraper (not
included with the appliance). Place a scra-
per on the glass ceramic surface at an an-
gle and remove residues by sliding the
blade over the surface. Wipe the appli-
ance with a damp cloth and a little washing
up liquid. Finally, rub the appliance dry us-
ing a clean cloth.
2. Limescale rings, water rings, fat splashes,
shiny metallic discolorations should be re-
moved after the appliance has cooled
down using cleaner for glass ceramic or
stainless steel.
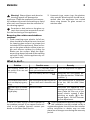
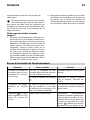
What to do if…
Problem Possible cause Remedy
The cooking zones will
not switch on or are not
functioning.
More than 10 seconds passed
since you switched on the hob.
Switch the appliance on again.
The child safety device is on
.
Deactivate the child safety de-
vice (See the section “Child safe-
ty device ”).
The residual heat indica-
tor is not displaying any-
thing.
The cooking zone was only on for
a short time and is therefore not
hot.
If the cooking zone is supposed
to be hot, call the After Sales
Service.
symbol plus a number
appears on the heat set-
ting display.
Electronics fault. Disconnect the appliance from
the electrical supply for a few mi-
nutes (Take the fuse out of the
house’s electric system) If after
switching on again,
is dis-
played again, call the customer
service department.
If there is a fault, first try to find a solution to
the problem yourself. If you cannot find a sol-
ution to the problem yourself, contact your
dealer or the After Sales Service.
If you operated the appliance wrongly, or
the installation was not carried out by a
registered engineer, the visit from the customer
service technician or dealer may not take
place free of charge, even during the warranty
period.
ENGLISH 8

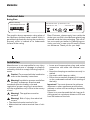
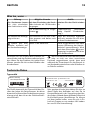
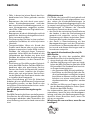
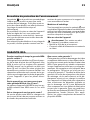
Technical data
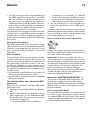
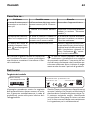
Rating Plate
901.560.49
Made in Germany
© Inter IKEA Systems B.V. 1999
21552
PQM
DGT
230 V
Model FRAMTID HGC4T Typ 55HAD64AO 6.5kW
PNC 949 593 108 S NO ...................... 220V-240V AC 50 Hz
The graphic above represents rating plate of
the appliance (without serial number which is
generated dynamically during the production
process), which is located at its underneath
surface of the casing.
Dear Customer, please apply here aside the
sticker you can find in the dedicate plastic bag
inserted inside the hob packaging. This will al-
low us to assist you better, by identifying pre-
cisely your hob, in case you will need in future
our assistance. Thank you for your help!
Installation
Manufacturer is not responsible for any injury
to persons and pets or damage to property
caused by failure to comply following require-
ments.
Caution! To proceed with the installation
refer to the assembly instructions.
Warning! Installation process must follow
the laws, ordinances, directives and
standards (electrical safety rules and
regulations, proper recycling in accordance
with the regulations, etc.) in force in the country
of use!
Warning! The appliance must be
earthed!
Warning! Risk of injury from electrical
current.
• The electrical mains terminal is live.
• Make electrical mains terminal free of volt-
age.
• Loose and inappropriate plug and socket
connections can make the terminal over-
heat.
• Have the clamping connections correctly in-
stalled.
• Use strain relief clamp on cable.
• Follow the connection diagram (it is located
on the underneath surface of the casting of
the hob).
Important! You must observe the minimum
distances to other appliances and furniture
cabinets or other units according to Assembly
Instruction.
If there is no oven beneath the hob insert a di-
viding panel at a minimum distance of 20 mm
from the bottom of the hob.
ENGLISH 9

Protect the cut surfaces of the worktop against
moisture using a suitable sealant included in
the product in fitting bag. The sealant seals the
appliance to the work top with no gap. Do not
use silicon sealant between the appliance and
the worktop. Avoid installing the appliance
next to doors and under windows as hot cook-
ware may be knocked off the rings when doors
and windows are opened.
Only an authorized service engineer can in-
stall, connect or repair this appliance. Use only
original spare parts.
Electrical connection
Before connecting, check that the nominal volt-
age of the appliance stated on the rating
plate, corresponds to the available supply
voltage. Also, check the power rating of the
appliance and ensure that the wire is suitably
sized to suit the appliance power rating (refer
to the Technical data chapter).
The rating plate is located on the lower casing
of the hob.
The appliance is not provided with mains ca-
ble. Buy the right one from specialized dealer.
Single-phase or two-phase connection re-
quires the mains cable of type H05BB-F Tmax
90°C (equal or higher).
The appliance works perfectly on AC 230 V,
AC220V~ or AC240V~ 50Hz electrical net-
work.
You must have the means for disconnection in-
corporated in the fixed wiring. Have the ap-
pliance connected to the mains using a device
that allows the appliance to be disconnected
from the mains at all poles with a contact open-
ing width of at least 3 mm, eg. automatic line
protecting cut-out, earth leakage trips or fuse.
You must have the connection and the con-
necting links carried out as shown in the con-
nection diagram (it is located on the under-
neath surface of the casting of the hob).
The earth lead is connected to terminal
marked with the symbol
and must be longer
than leads carrying electric current. Tighten the
terminal screws securely! Finally, secure the
connecting cable with the mains cable cleat
and the covering closed by pressing firmly
(lock into place).
Warning! Once connected to the mains
supply check that all cooking zones are
ready for use by briefly setting each to
maximum power.
Environment concerns
The symbol on the product or on its
packaging indicates that this product may not
be treated as household waste. Instead it
should be taken to the appropriate collection
point for the recycling of electrical and
electronic equipment. By ensuring this product
is disposed of correctly, you will help prevent
potential negative consequences for the
environment and human health, which could
otherwise be caused by inappropriate waste
handling of this product. For more detailed
information about recycling of this product,
please contact your local council, your
household waste disposal service or the shop
where you purchased the product.
Packaging materials
The materials with the symbol
are recycla-
ble. Dispose the packaging in a suitable col-
lection containers to recycle it.
Before disposal of appliance
Warning! Do these steps to dispose the
appliance:
• Pull the mains plug out of the mains socket.
• Cut off the mains cable and discard it.
ENGLISH 10

IKEA GUARANTEE
How long is the IKEA guarantee valid?
This guarantee is valid for five (5) years from
the original date of purchase of Your appli-
ance at IKEA, unless the appliance is named
LAGAN in which case two (2) years of guar-
antee apply. The original sales receipt is re-
quired as proof of purchase. If service work is
carried out under guarantee, this will not ex-
tend the guarantee period for the appliance,
Which appliances are not covered by the
IKEA five (5) years guarantee?
The range of appliances named LAGAN and
all appliances purchased in IKEA before 1st of
August 2007
Who will execute the service?
IKEA service provider will provide the service
through its own service operations or author-
ized service partner network.
What does this guarantee cover?
The guarantee covers faults of the appliance,
which have been caused by faulty construction
or material faults from the date of purchase
from IKEA. This guarantee applies to domestic
use only. The exceptions are specified under
the headline “What is not covered under this
guarantee?” Within the guarantee period, the
costs to remedy the fault e.g. repairs, parts, la-
bour and travel will be covered, provided that
the appliance is accessible for repair without
special expenditure. On these conditions the
EU guidelines (Nr. 99/44/EG) and the respec-
tive local regulations are applicable. Replaced
parts become the property of IKEA.
What will IKEA do to correct the problem?
IKEA appointed service provider will examine
the product and decide, at its sole discretion,
if it is covered under this guarantee. If consid-
ered covered, IKEA service provider or its au-
thorized service partner through its own serv-
ice operations, will then, at its sole discretion,
either repair the defective product or replace
it with the same or a comparable product.
What is not covered under this guarantee?
• Normal wear and tear.
• Deliberate or negligent damage, damage
caused by failure to observe operating in-
structions, incorrect installation or by con-
nection to the wrong voltage, damage
caused by chemical or electro-chemical re-
action, rust, corrosion or water damage in-
cluding but not limited to damage caused by
excessive lime in the water supply, damage
caused by abnormal environmental condi-
tions.
• Consumable parts including batteries and
lamps.
• Non-functional and decorative parts which
do not affect normal use of the appliance,
including any scratches and possible color
differences.
• Accidental damage caused by foreign ob-
jects or substances and cleaning or unblock-
ing of filters, drainage systems or soap
drawers.
• Damage to the following parts: ceramic
glass, accessories, crockery and cutlery bas-
kets, feed and drainage pipes, seals, lamps
and lamp covers, screens, knobs, casings
and parts of casings. Unless such damages
can be proved to have been caused by pro-
duction faults.
• Cases where no fault could be found during
a technician’s visit.
• Repairs not carried out by our appointed
service providers and/or an authorized
service contractual partner or where non-
original parts have been used.
• Repairs caused by installation which is faulty
or not according to specification.
• The use of the appliance in a non-domestic
environment i.e. professional use.
• Transportation damages. If a customer
transports the product to their home or other
address, IKEA is not liable for any damage
that may occur during transport. However,
if IKEA delivers the product to the customer's
delivery address, then damage to the prod-
uct that occurs during this delivery will be
covered by this guarantee.
ENGLISH 11

• Cost for carrying out the initial installation of
the IKEA appliance. However, if an IKEA
service provider or its authorized service
partner repairs or replaces the appliance
under the terms of this guarantee, the serv-
ice provider or its authorized service partner
will re-install the repaired appliance or in-
stall the replacement, if necessary.
This restriction do not apply to fault-free work
carried out by a qualified specialist using our
original parts in order to adapt the appliance
to the technical safety specifications of another
EU country.
How country law applies
The IKEA guarantee gives You specific legal
rights, which covers or exceed local demands.
However these conditions do not limit in any
way consumer rights described in the local
legislation
Area of validity
For appliances which are purchased in one EU
country and taken to another EU country, the
services will be provided in the framework of
the guarantee conditions normal in the new
country. An obligation to carry out services in
the framework of the guarantee exists only if
the appliance complies and is installed in ac-
cordance with:
• the technical specifications of the country in
which the guarantee claim is made;
• the Assembly Instructions and User Manual
Safety Information;
The dedicated After Sales Service for IKEA
appliances:
Please do not hesitate to contact IKEA After
Sales Service to:
1. make a service request under this guaran-
tee;
2. ask for clarification on installation of the
IKEA appliance in the dedicated IKEA
kitchen furniture. The service won’t provide
clarifications related to:
– the overall IKEA kitchen installation;
– connections to electricity (if machine
comes without plug and cable), to water
and to gas since they have to be execu-
ted by an authorized service engineer.
3. ask for clarification on user manual con-
tents and specifications of the IKEA appli-
ance.
To ensure that we provide you with the best
assistance, please read carefully the Assembly
Instructions and/or the User Manual section of
this booklet before contacting us.
How to reach us if You need our service
Please refer to the last page of this manual for
the full list of IKEA appointed contacts and rel-
ative national phone numbers.
Important! In order to provide You with a
quicker service, we recommend that You use
the specific phone numbers listed at the end of
this manual. Always refer to the numbers listed
in the booklet of the specific appliance You
need an assistance for. Before calling us,
assure that You have to hand the IKEA article
number (8 digit code) for the appliance of
which you need our assistance.
Important! SAVE THE SALES RECEIPT! It is
Your proof of purchase and required for the
guarantee to apply. Note that the receipt
reports also the IKEA article name and number
(8 digit code) for each of the appliances you
have purchased.
Do You need extra help?
For any additional questions not related to Af-
ter Sales of your appliances, please contact
our nearest IKEA store call centre. We recom-
mend you read the appliance documentation
carefully before contacting us.
ENGLISH 12

Inhalt
Sicherheitshinweise 13
Gerätebeschreibung 15
Täglicher Gebrauch 16
Praktische Tipps und Hinweise 17
Reinigung und Pflege 17
Was tun, wenn … 18
Technische Daten 18
Gerät aufstellen 19
Umwelttipps 20
IKEA GARANTIE 21
Änderungen vorbehalten
Sicherheitshinweise
Zur Gewährleistung der Sicherheit und
der richtigen Bedienung des Geräts lesen
Sie diese Anleitung vor der Installation und
Verwendung sorgfältig durch. Bewahren Sie
diese Bedienungsanleitung in der Nähe des
Geräts auf, auch wenn Sie dieses anderswo
aufstellen oder verkaufen. Alle Benutzer müs-
sen mit der Bedienung und den Sicherheitsei-
genschaften des Geräts vertraut sein.
Bestimmungsgemäße Verwendung
• Das Gerät während des Betriebes nicht un-
beaufsichtigt lassen.
• Das Gerät ist ausschließlich zur Verwen-
dung im Haushalt bestimmt.
• Das Gerät darf nicht als Arbeits- oder Ab-
stellfläche verwendet werden.
• Brennbare Flüssigkeiten, leicht entzündliche
Materialien oder schmelzbare Materialien
(z.B. Folien, Kunststoff, Aluminium) dürfen
nicht auf dem Gerät oder in dessen Nähe
abgestellt oder gelagert werden.
• Vorsicht bei Anschluss von Elektrogeräten
an Steckdosen in Gerätenähe. Die An-
schlussleitungen dürfen nicht unter dem Ge-
rät oder heißem Kochgeschirr eingeklemmt
werden oder damit in Berührung kommen.
• Versuchen Sie nicht, selbst Reparaturen aus-
zuführen. Andernfalls besteht Unfallgefahr
und das Gerät könnte beschädigt werden.
Wenden Sie sich stets an Ihren lokalen Kun-
dendienst (siehe hierzu den Abschnitt "War-
tung").
Sicherheit von Kindern
• Nur Erwachsene dürfen dieses Gerät bedie-
nen. Kinder müssen beaufsichtigt werden, so
dass sie nicht mit dem Gerät spielen können.
• Halten Sie das Verpackungsmaterial von
Kindern fern. Andernfalls besteht Ersti-
ckungsgefahr.
• Halten Sie Kinder von dem Gerät fern, wenn
es in Betrieb ist.
Warnung! Aktivieren Sie die
Kindersicherung, um ein versehentliches
Einschalten durch Kleinkinder und Haustiere
zu verhindern.
Allgemeine Sicherheit
• Personen (einschließlich Kinder), die auf-
grund ihrer physischen, sensorischen oder
geistigen Fähigkeiten oder ihrer Unerfah-
renheit oder Unkenntnis nicht in der Lage
sind, das Gerät sicher zu bedienen, sollten
dieses Gerät nicht ohne Aufsicht oder An-
weisung durch eine verantwortliche Person
benutzen.
Installation
• Vergewissern Sie sich, dass das Gerät beim
Transport nicht beschädigt wurde. Schließen
Sie ein beschädigtes Gerät nicht an. Wen-
den Sie sich bei Bedarf an den Kundendienst
(siehe hierzu den Abschnitt "Wartung").
• Das Gerät darf nur von einem Servicetech-
niker einer autorisierten Kundendienststelle
aufgestellt, angeschlossen oder repariert
werden. Dabei dürfen ausschließlich Origi-
nalersatzteile verwendet werden.
• Einbaugeräte dürfen nur nach dem Einbau
in normgerechte, passende Einbauschränke
und Arbeitsplatten betrieben werden.
DEUTSCH 13

• Nehmen Sie weder technische noch ander-
weitige Modifikationen am Gerät vor. An-
dernfalls besteht Unfallgefahr und das Ge-
rät könnte beschädigt werden.
Warnung! Beachten Sie genau sämtliche
Anweisungen zu den elektrischen
Anschlüssen.
Sicherheit während der Benutzung
• Entfernen Sie vor der ersten Benutzung des
Geräts sämtliches Verpackungsmaterial so-
wie alle Aufkleber und Folien.
Warnung! Brandgefahr! Überhitzte Fette
und Öle entzünden sich sehr schnell.
• Schalten Sie nach jedem Gebrauch die
Kochzonen aus.
• Verbrennungsgefahr! Kochzonen und zu-
gängliche Geräteteile werden beim Betrieb
sehr heiß.
Warnung! Schalten Sie das Gerät sofort
ab, wenn Sie Risse auf der
Glaskeramikfläche feststellen, um die Gefahr
eines Stromschlags zu vermeiden, und wenden
Sie sich an den Kundendienst (siehe hierzu den
Abschnitt "Wartung").
Warnung! Benutzen Sie das Gerät nicht
mit nassen Händen und achten Sie
darauf, dass die Oberfläche des Bedienfelds
stets trocken ist. Die Bedienelemente am
Bedienfeld verlieren ihre Funktionstüchtigkeit,
wenn sie mit viel Wasser in Berührung
kommen.
Vermeidung von Schäden am Gerät
• Die Glaskeramik kann durch herabfallende
Gegenstände oder durch das Kochgeschirr
beschädigt werden.
• Kochgeschirr aus Gusseisen, Aluguss oder
mit beschädigten Böden können beim Ver-
schieben die Glaskeramik verkratzen.
• Das Leerkochen von Töpfen und Pfannen
vermeiden. Es kann Beschädigungen am
Kochgeschirr oder der Glaskeramik verur-
sachen.
• Benutzen Sie die Kochzonen nicht mit lee-
rem oder ohne Kochgeschirr.
• Legen Sie nie einen Teil des Gerätes mit Alu-
Folie aus. Legen Sie keine Gegenstände aus
Kunststoff oder aus anderem Material, das
schmelzen kann, in oder auf auf das Gerät.
Hinweis zu Acrylamid
Wichtig! Nach neuesten wissenschaftlichen
Erkenntnissen kann eine intensive Bräunung
von Lebensmitteln, speziell bei stärkehaltigen
Produkten, eine gesundheitliche Gefährdung
durch Acrylamid verursachen. Daher
empfehlen wir, möglichst bei niedrigen
Temperaturen zu garen und die Speisen nicht
zu stark zu bräunen.
DEUTSCH 14

Gerätebeschreibung
Ausstattung Kochfeld
1
1
2
145 mm
145 mm
180 mm
210 mm
4 35
1 Einkreis-Kochzone 1.200 W
2 Einkreis-Kochzone 1.800 W
3 Einkreis-Kochzone 1.200 W
4 Bedienfeld
5 Einkreis-Kochzone 2.300 W
Ausstattung Bedienfeld
1
1 32
1 Ein-/Aus-Taste
2 Kochstufenauswahl
3 Kochstufenanzeige
Touch Control-Sensorfelder und Anzeigen
Das Kochfeld wird durch Berühren der Sensor-
felder bedient.
Anzeige der Koch-
stufe
Beschreibung
Kochzone ist ausge-
schaltet
Anzeige der Koch-
stufe
Beschreibung
-
bei einer eingestellten
Kochstufe
Fehlfunktion ist aufge-
treten
DEUTSCH 15

Anzeige der Koch-
stufe
Beschreibung
Kochzone ist noch
warm
Kindersicherung ist in
Betrieb
Die Abschaltautoma-
tik ist aktiv
Restwärmeanzeige
Warnung! Verbrennungsgefahr durch
Restwärme! Nach dem Ausschalten des
Gerätes benötigen die Kochzonen eine
gewisse Zeit zum Abkühlen.
Restwärmeanzeige beachten
.
Restwärme kann zum Schmelzen und Warm-
halten von Speisen genutzt werden.
Täglicher Gebrauch
Ein- und Ausschalten
2 Sekunden lang
berühren, um das Gerät
ein- oder auszuschalten.
Die Kochstufe einstellen
Zum Erhöhen der Kochstufe
berühren.
Zum Verringern der Kochstufe berühren.
Gleichzeitig und einer bestimmten Koch-
zone berühren, um die Kochzone auszuschal-
ten. Die Einstellungen kehren zurück auf
.
Kindersicherung verwenden
Diese Funktion verhindert eine versehentliche
Benutzung des Kochfelds. Schalten Sie zuerst
das Kochfeld ein
und stellen Sie keine Koch-
stufen ein. Berühren Sie jetzt beide
der vor-
deren Kochzonen für 4 Sekunden, und
leuchtet auf und die Kindersicherung ist jetzt
eingeschaltet.
Die Kindersicherung kann damit für einen ein-
zelnen Kochvorgang ausgeschaltet werden,
und sie bleibt danach weiter aktiv.
Schalten Sie das Kochfeld ein
und leuch-
tet auf. Berühren Sie beide
der vorderen
Kochzonen für 4 Sekunden. Stellen Sie die
Kochstufe innerhalb von 10 Sekunden ein. Bis
zum nächsten Ausschalten des Kochfelds kann
es normal benutzt werden. Nach dem Aus-
schalten des Gerätes ist die Kindersicherung
wieder aktiviert.
Zum Ausschalten dieser Funktion
berühren.
Berühren Sie jetzt beide
der vorderen Koch-
zonen für 4 Sekunden und
leuchtet auf.
Schalten Sie das Kochfeld aus
.
Automatische Abschaltung
Diese Funktion schaltet das Kochfeld
automatisch ab, wenn:
• alle Kochzonen abgeschaltet sind.
DEUTSCH 16

• nach dem Einschalten des Kochfelds keine
Kochstufe gewählt wird.
• ein Sensorfeld durch einen Gegenstand (z.B.
einen Topf oder einen Lappen) verdeckt
wird, und zwar länger als 10 Sekunden.
• wenn Sie nach einer bestimmten Zeit eine
Kochzone nicht ausschalten, oder wenn Sie
die Kochstufe nicht ändern, oder wenn es zu
einer Überhitzung kommt (d.h. wenn eine
Pfanne leer kocht). Das Symbol
leuchtet
auf. Vor der erneuten Benutzung müssen Sie
die Kochzone auf
stellen.
Kochstufe Automatische Abschal-
tung nach
-
6 Stunden
-
5 Stunden
4 Stunden
-
1,5 Stunden
Praktische Tipps und Hinweise
Wenn eine Kochzone eingeschaltet wird,
ertönt manchmal ein kurzes Summen.
Dieses Summen ist typisch für die Kochzonen
eines Glaskeramik-Kochfelds. Es bedeutet
nicht, dass das Gerät nicht ordnungsgemäß
arbeitet oder dass sich die Lebensdauer des
Gerätes verringert.
Energiesparen
• Töpfe, wenn möglich, immer mit dem Deckel
verschließen.
•Kochgeschirr vor dem Einschalten der Koch-
platte aufsetzen.
• Der Boden des Kochgeschirrs sollte so dick
und plan wie möglich sein.
• Kochzonen vor Ende der Garzeit ausschal-
ten, um die Restwärme zu nutzen
• Topfboden und Kochzone sollten gleich
groß sein.
Reinigung und Pflege
Warnung! Schalten Sie das Gerät vor
dem Reinigen aus und lassen Sie es
abkühlen.
Warnung! Aus Sicherheitsgründen darf
das Gerät nicht mit einem Dampfstrahl-
oder Hochdruckreiniger gereinigt werden.
Warnung! Scharfe Gegenstände und
scheuernde Reinigungsmittel
beschädigen das Gerät. Nach jedem
Gebrauch das Gerät mit Wasser und
Geschirrspülmittel reinigen und Rückstände
entfernen. Auch die Reste des
Reinigungsmittels entfernen!
Kratzer oder dunkle Flecken in der Glas-
keramik, die sich nicht mehr entfernen las-
sen, beeinträchtigen die Funktion des Gerätes
nicht.
Entfernen von Speiseresten und
hartnäckigen Flecken:
1. Zuckerhaltige Speiserückstände sowie
Reste von Kunststoffen oder Alufolie sofort
mit einem Reinigungsschaber entfernen
(wird nicht mit dem Gerät mitgeliefert). Den
Reinigungsschaber schräg zur Glaskera-
mikfläche ansetzen und Rückstände durch
Schaben über die Oberfläche entfernen.
Gerät mit einem feuchten Tuch und etwas
Spülmittel abwischen. Gerät zuletzt mit ei-
nem sauberen Tuch trockenreiben.
2. Kalk- und Wasserränder, Fettspritzer und
metallisch schimmernde Verfärbungen
nach dem Abkühlen des Gerätes können
mit einem handelsüblichen Glaskeramik-
oder Edelstahlreiniger entfernt werden.
DEUTSCH 17

Was tun, wenn …
Störung Mögliche Ursache Abhilfe
Die Kochzonen lassen
sich nicht einschalten
oder funktionieren nicht.
Seit dem Einschalten des Koch-
felds sind mehr als 10 Sekunden
vergangen.
Schalten Sie das Gerät wieder
ein.
Die Kindersicherung ist einge-
schaltet
.
Kindersicherung ausschalten
(siehe Kapitel "Kindersiche-
rung").
Die Restwärme-Anzeige
zeigt nichts an.
Die Kochzone ist nur kurz in Be-
trieb gewesen und daher noch
nicht heiß.
Sollte die Kochzone eigentlich
heiß sein, wenden Sie sich bitte
an Ihren Kundenbetreuer.
Symbol plus eine
Nummer erscheint auf
der Kochstufenanzeige.
Fehler in der Elektronik. Gerät einige Minuten vom Netz
trennen (Sicherung der Hausin-
stallation herausnehmen). Wird
nach dem Einschalten
erneut
angezeigt, kontaktieren Sie bitte
Ihren Kundendienst.
Versuchen Sie, die Ursache des Problems he-
rauszufinden und das Problem selbst zu behe-
ben. Wenn Sie das Problem nicht selbst lösen
können, wenden Sie sich an den Händler oder
Kundendienst.
Wenn Sie das Gerät falsch bedient haben
oder es nicht von einer autorisierten
Fachkraft angeschlossen wurde, kann auch
während der Garantiezeit für den Besuch ei-
nes Kundendiensttechnikers oder Händlers ei-
ne Gebühr anfallen.
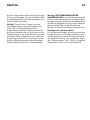
Technische Daten
Typenschild
901.560.49
Made in Germany
© Inter IKEA Systems B.V. 1999
21552
PQM
DGT
230 V
Model FRAMTID HGC4T Typ 55HAD64AO 6.5kW
PNC 949 593 108 S NO ...................... 220V-240V AC 50 Hz
Die Grafik oben stellt das Typenschild des Ge-
rätes dar (ohne die Seriennummer, da diese
dynamisch während des Produktionsvorgangs
erzeugt wird), das sich an der Gehäuseunter-
seite befindet.
Sehr geehrter Kunde: bitte kleben Sie hier an
dieser Stelle den Aufkleber auf, den Sie im
Kunststoffbeipack in der Verpackung des Her-
des finden. Anhand dieses Aufklebers lässt sich
Ihr Kochfeld genau identifizieren. So können
wir Ihnen besser helfen, wenn Sie sich in Zu-
kunft mit Fragen an uns wenden. Wir bedan-
ken uns für Ihre Unterstützung!
DEUTSCH 18

Gerät aufstellen
Der Hersteller übernimmt keinerlei Haftung für
Verletzungen von Personen oder Tieren oder
für Schäden an Eigentum, wenn dies auf die
Nichteinhaltung der folgenden Bedingungen
zurückzuführen ist.
Vorsicht! Beachten Sie bei der
Installation die Montageanleitung.
Warnung! Die Montage muss sich nach
den im Einsatzland geltenden Gesetze,
Verordnungen, Richtlinien und Normen
richten! (Sicherheitsbestimmungen und
Vorschriften für Elektrik/Elektronik, sach- und
ordnungsgemäßes Recycling etc.)!
Warnung! Das Gerät muss geerdet sein!
Warnung! Es besteht Verletzungsgefahr
durch elektrischen Strom.
• Die Netzanschlussklemme liegt an Span-
nung.
• Netzanschlussklemme spannungsfrei ma-
chen.
• Lockere und unsachgemäße Steckverbin-
dungen können die Klemme überhitzen.
• Die Klemmverbindungen müssen fachge-
recht ausgeführt werden.
• Kabel zugentlasten.
• Befolgen Sie die Anweisungen auf dem An-
schlussdiagramm (es befindet sich unter der
Gehäuseoberfläche des Kochfelds).
Wichtig! Die Mindestabstände zu anderen
Geräten und Küchenschränken oder anderen
Möbelstücken sind wie in der
Montageanleitung beschrieben einzuhalten.
Befindet sich unter dem Kochfeld kein Back-
ofen, setzen Sie eine Trennwand mit einem
Mindestabstand von 20 mm von der Untersei-
te des Kochfelds ein.
Schützen Sie die Schnittflächen der Arbeits-
platte mit einem geeigneten Dichtungsmateri-
al (ist im Beipack des Produktes enthalten) vor
Feuchtigkeit. Die Dichtung schließt das Gerät
spaltfrei mit der Arbeitsplatte ab. Tragen Sie
zwischen Gerät und Arbeitsplatte keine Sili-
kon-Dichtungsmasse auf. Installieren Sie das
Gerät nicht direkt neben Türen und unter Fen-
stern, da bei geöffneten Türen und Fenstern
heißes Kochgeschirr von den Kochfelder he-
runter gefegt werden kann.
Das Gerät darf nur von einem Servicetechniker
einer autorisierten Kundendienststelle aufge-
stellt, angeschlossen oder repariert werden.
Dabei dürfen ausschließlich Originalersatztei-
le verwendet werden.
Elektrischer Anschluss
Kontrollieren Sie vor dem ersten Einschalten,
dass die auf dem Typenschild des Gerätes an-
gegebene Nennspannung mit der aktuell ver-
fügbaren Spannung identisch ist. Prüfen Sie
auch die Leistungsaufnahme des Gerätes und
stellen Sie sicher, dass das Kabel für den An-
schluss des Gerätes korrekt ausgelegt ist (nä-
heres siehe den Abschnitt "Technische Da-
ten").
Das Typenschild ist unten am Kochfeldgehäu-
se angebracht.
Das Gerät wird ohne Netzkabel geliefert. Bitte
besorgen Sie sich das passende Kabel beim
Fachhandel. Bei einem ein- oder zweiphasi-
gen Anschluss muss das entsprechende Netz-
kabel des Typs H05BB-F Tmax 90°C (oder hö-
her) verwendet werden.
Das Gerät eignet sich ideal für den Anschluss
an eine Netzversorgung mit AC 230 V,
AC220V~ oder AC240V~ 50Hz.
DEUTSCH 19

In der Festverdrahtung muss sich eine Vorrich-
tung für eine Trennung des Gerätes befinden.
Schließen Sie das Gerät mit einer Vorrichtung
an die Netzversorgung an, die es ermöglicht,
an allen Polen von der Netzversorgung abzu-
klemmen. Die Kontaktöffnungsbreite muss da-
bei mindestens 3 mm betragen, d.h. es muss
ein automatischer Leitungs-Ausschalter, ein
Masseunterbrecher oder eine Sicherung sein.
Befolgen Sie für den Anschluss des Gerätes
und die Anschlussverbindungen die Anwei-
sungen auf dem Anschlussdiagramm (es be-
findet sich unter der Gehäuseoberfläche des
Kochfelds).
Das Erdungskabel ist an einen Anschluss an-
geschlossen, der mit dem Symbol
markiert
ist, und muss länger als die stromführenden
Kabel sein. Ziehen Sie die Anschlussschrauben
gut fest! Sichern Sie das Anschlusskabel mit
dem Netzkabelhalter und schließen Sie die
Abdeckung mit leichtem Druck (sie rastet ein).
Warnung! Prüfen Sie nach dem Anschluss
an die Netzversorgung, dass alle
Kochzonen betriebsbereit sind, indem Sie kurz
nacheinander an allen Kochzonen die
maximale Leistung einstellen.
Umwelttipps
Das Symbol auf dem Produkt oder seiner
Verpackung weist darauf hin, dass dieses
Produkt nicht als normaler Haushaltsabfall zu
behandeln ist, sondern an einem Sammelpunkt
für das Recycling von elektrischen und
elektronischen Geräten abgegeben werden
muss. Durch Ihren Beitrag zum korrekten
Entsorgen dieses Produkts schützen Sie die
Umwelt und die Gesundheit Ihrer
Mitmenschen. Umwelt und Gesundheit
werden durch falsches Entsorgen gefährdet.
Weitere Informationen über das Recycling
dieses Produkts erhalten Sie von Ihrem
Rathaus, Ihrer Müllabfuhr oder dem Geschäft,
in dem Sie das Produkt gekauft haben.
Verpackungsmaterialien
Die Materialien mit dem Symbol
sind wie-
derverwertbar. Bitte entsorgen Sie das Ver-
packungsmaterial in geeigneten Recycling-
Sammelbehältern.
Vor der Entsorgung des Gerätes
Warnung! Bitte führen Sie vor der
Entsorgung des Gerätes folgende Schritte
durch:
• Ziehen Sie den Netzstecker aus der Steck-
dose.
• Schneiden Sie das Netzkabel ab und ent-
sorgen Sie es.
DEUTSCH 20
La pagina si sta caricando...
La pagina si sta caricando...
La pagina si sta caricando...
La pagina si sta caricando...
La pagina si sta caricando...
La pagina si sta caricando...
La pagina si sta caricando...
La pagina si sta caricando...
La pagina si sta caricando...
La pagina si sta caricando...
La pagina si sta caricando...
La pagina si sta caricando...
La pagina si sta caricando...
La pagina si sta caricando...
La pagina si sta caricando...
La pagina si sta caricando...
La pagina si sta caricando...
La pagina si sta caricando...
La pagina si sta caricando...
La pagina si sta caricando...
La pagina si sta caricando...
La pagina si sta caricando...
La pagina si sta caricando...
La pagina si sta caricando...
La pagina si sta caricando...
La pagina si sta caricando...
La pagina si sta caricando...
La pagina si sta caricando...
-
 1
1
-
 2
2
-
 3
3
-
 4
4
-
 5
5
-
 6
6
-
 7
7
-
 8
8
-
 9
9
-
 10
10
-
 11
11
-
 12
12
-
 13
13
-
 14
14
-
 15
15
-
 16
16
-
 17
17
-
 18
18
-
 19
19
-
 20
20
-
 21
21
-
 22
22
-
 23
23
-
 24
24
-
 25
25
-
 26
26
-
 27
27
-
 28
28
-
 29
29
-
 30
30
-
 31
31
-
 32
32
-
 33
33
-
 34
34
-
 35
35
-
 36
36
-
 37
37
-
 38
38
-
 39
39
-
 40
40
-
 41
41
-
 42
42
-
 43
43
-
 44
44
-
 45
45
-
 46
46
-
 47
47
-
 48
48


in altre lingue
- English: IKEA FHGC4T User manual
- français: IKEA FHGC4T Manuel utilisateur
- Deutsch: IKEA FHGC4T Benutzerhandbuch
Documenti correlati
-
IKEA LHGC3K Manuale utente
-
IKEA FHIN4T Manuale utente
-
-
-
IKEA SMAKLIG Manuale utente
-
-
-
IKEA TYDLIG Manuale utente
-
IKEA FHGC4T Manuale utente
-