
CANDY HOOVER GROUP S.R.L. • Via Privata Eden Fumagalli • 20047 Brugherio Milano Italy
HOBS
USER INSTRUCTIONS
GB - IE
PIANI COTTURA
ISTRUZIONI D’USO E DI INSTALLAZIONE
IT
TABLE DE CUISSON
NOTICE D’EMPLOI ET D’INSTALLATION
FR
PLACAS
MANUAL DE INSTRUCCIONES
ES
HOBS
BRUKS - OG MONTERINGSVEILEDNING
NO
HOBS
INSTUKTIONER FÖR ANVÄNDNING OCH INSTALLATION
SE
HOBS
KÄYTT - JA ASENNUSOHJEETÖ
FI
HOBS
BRUGSANVISNING OG INSTALLATION
DK
KOCHMULDE
GEBRAUCHS - UND INSTALLATIONSANWEISUNGEN
DE
ИНСТРУКЦИИ ПО ЭКСПЛУАТАЦИИ И УСТАНОВКЕ
ВСТРАИВАЕМЫЕ ВАРОЧНЫЕ ПОВЕРХНОСТИ
RU
VARNÉ DESKY
NAVOD POUŽITĺ
CZ
NAVODILA ZA UPORABO
VGRADNJO IN PRIKLJUČITEV
SL
PLACAS
MANUAL DE INSTRUÇÕES
PT
PŁYTY
INSTUKCJE DLA UŻYTKOWNIKA
PL
NL
KOOKPLAATS
INSTALLATIE-EN GEBRUIKSINSTRUCTIES

CZ
OBSAH
VŠEOBECNÁ UPOZORNĚNÍ
1.
1.1.
2. ELEKTRICKÉ ZAPOJENÍ
3. VESTAVBA
4.PŘIPOJENÍ K ELEKTRICKÉ SÍTI
5.
6. DOPORUČENÍ K NÁVODÍ
7.
8. ÚDRŽBA A ČIŠTĚNÍ
9. ODSTRÁNÉNÍ MOŽNÝCH PROBLÉMŮ
10. SERVIS
11. PROHLÁŠENÍ O SHODĚ
PROHLÁŠENÍ O SHODĚ
INSTALACE
POPIS SPOTŘEBIČE
POUŽITÍ
..............................................42-43
......................................................43
......................................................................43
.......................................................43
..........................................................................43
......................................43-44
...........................................................44
....................................................44
..............................................................................45-46
...............................................................46
............................47
................................................................................47
..................................................47
CONTENIDO
ES
CONTENT
GB - IE
INDICE
IT
INHALT
DE
INDICE
PT
FR
CONTENU
SAFETY INSTRUCTIONS
1. General Warnings
2. Installation
3. Built-in
4. Electrical connexion
5. Presentation
6. Hob cookware advice
7. Use
8. C
Protection of the environment
leaning and maintenance
9. Problem solving
10. Aftercare
11
.
......................................................06-07
.....................................................................07
.................................................................................07
.......................................................................................07
............................................................07-08
.............................................................................08
................................................................08
......................................................................................09-10
.........................................................10
........................................................................11
.................................................................................11
.................................................11
Sicherheitshinweise
1. Konformitätserklärung
2. Installation
3. Einbau
4. Elektrischer Anschluß
5. Darstellung
6. Wahl des richtigen Kochgeschirrs
7. Nutzungsanweisungen
8. Pflege und Reinigung
9. Problemlösungen
10. Technischer Kundendienst
11. Umweltschutz
.................................................................24-25
..............................................................
.................................................................................25
........................................................................................25
...........................................................25-26
................................................................................26
.............................................26
..........................................................27-28
................................................................28
....................................................................29
......................................................29
.........................................................................29
25
Instrucciones de seguridad
1.1. Instrucciones generales
2.1. Instalacíon
3. Empotramiento
4. Conexion eléctrica
5. Presentación
6. La elección de los utensilios
7. Utilización
8. Mantenimiento
9. Resolución de problemas
10. Assistencia técnica
11. Protección del medioambiente
Instruções e recomendações de segurança
1. Instruções gerais
2. Instalação
3. Encastre
4. Ligação eléctrica
5. Descrição das placas
6. A selecção dos recipientes
7. Como utilizar a placa
8. Limpeza da placa vitrocerâmica
9. Detecção e resolução de problemas
10. Assistência Técnica
11. Protecção do meio ambiente
............................36-37
.......................................................................37
...................................................................................37
...................................................................................37
......................................................................37-38
..............................................................38
........................................................38
...........................................................39-40
................................................40
.........................................41
.................................................................41
...................................................41
VSEBINA
SL
SPLOŠNI VARNOSTNI NAPOTKI
1.
NAMESTITEV IN PRIKLJUČITEV
3 VGRADNJA
PRIKLJUČITEV NA ELEKTRIČNO OMREŽJE
OPIS KUHALNE PLOŠČE
. USTREZNA POSODA
. UPORABA
VZDRŽEVANJE IN ČIŠČENJE
ODPRAVLJANJE NEPRAVILNOSTI V DELOVANJU
SERVISIRANJE
VARSTVO OKOLJA
SPLOŠNI NAPOTKI
2
.
.
4
5.
6
7
8.
9.
10.
11.
......................................48-49
............................................................49
......................................49
.............................................................................49
.............49-50
...................................................50
...........................................................50
...........................................................................51-52
.............................................52
.......53
...................................................................53
............................................................53
02
.....................................................30-31
........................ ............................31
.............................................................................31
.........................................................................31
...............................................................31-32
...........................................................................32
.....................................................32
...........................................................................33-34
.........................................................................34
.........................................................35
................................................................35
...............................................35
..
PRESCRIZIONI DI SICUREZZA
1. Avvertenze generali
2. Installazione
3. Inserimento nel mobile
4. Collegamento elettrico
5. Presentazione
6. Consigli d’utilizzo
7. Utilizzo del piano
8. Manutenzione
Rispetto dell’ambiente
9. Problemi e soluzioni
10. Assistenza Post-vendita
11
.
..............................................12-13
...................................................................13
..............................................................................13
..............................................................13
........................................................13-14
...........................................................................14
.......................................................................14
..................................................................15-16
...........................................................................16
..................................................................17
.........................................................17
...........................................................17
CONSIGNES DE SECURITE
1. Instructions générales
2. Installation
3. Encastrement
4. Raccordement électrique
5. Présentation
6. Le choix des ustensiles
7. Utilisation
8. Entretien
Protection de l’environnement
9. Problèmes et solutions
10. Assistance technique
11
.
..............................................18-19
...................................................................19
..............................................................................19
..............................................................19
........................................................19-20
...........................................................................20
.......................................................................20
.......................................................................21-22
...........................................................................22
..................................................................23
.........................................................23
...........................................................23

INDHOLD
DK
SISÄLLYS
FI
INNHOLD
NO
INNEHÅLL
SE
03
SIKKERHETSINSTRUKSJONER
1.
2.
3.
4.
5.
6.
7.
RENGJØRING OG VEDLIKEHOLD
9. PROBLEMLØSNING
8. KUNDESENTER
10. MILJØVERN
GENERELLE ADVARSLER
INSTALLERING
ELEKTRISK TILKOBLING
RÅD OM KOKEKAR
INNEBYGD
PRESENTASJON
BRUKSANVISNING
8.
................................................90-91
..................................................
........................................................................91
................................................................................91
.......................................................91-92
.....................................................................92
.................................................................92
..................................................................93-94
..........................................94
.................................................................95
.......................................................................95
.......... ....................................95
..91
..............................
SÄKERHETSINSTRUKTIONER
ANVÄNDA GLASKERAMIKHÄLLEN
1. ALLMÄNNA VARNINGAR
3. INBYGGNAD
4. ELEKTRISK ANSLUTNING
5. PRESENTATION
6. REKOMMENDERADE KOKKÄRL
7.
8. UNDERHÅLL OCH RENGÖRING
9. PROBLEMLÖSNING
10. EFTERVÅRD
11. MILJÖSKYDD
2. INSTALLATION
..............................................72
.......................................................73
.......................................................................73
..........................................................................73
...............................................73-74
.....................................................................74
........................................74
................................75-76
..........................................76
...............................................................77
.........................................................................77
........................................................................77
YLEISIÄ TURVAOHJEITA
LASIKERAAMISEN LIEDEN KÄYTTÄMINEN
8.
1. HUOMAA
2. ASENNUS
3.
4. SÄHKÖLIITÄNTÄ
5.
. HUOLTO
11. YMPÄRISTÖNSUOJELU
ASENNUS KALUSTEISIINB
ESITTELY
6. KEITTOASTIAT
7.
PUHDISTUS JA KUNNOSSAPITO
9. VIANSELVITYS
10
......................................................78-79
.................................................................................79
................................................................................79
...................................................79
.............................................................79-80
................................................................................80
.......................................................................80
...............81-82
........................................82
.......................................................................83
...............................................................................83
...................................................83
SIKKERHEDSINSTRUKTIONER
GENERELLE ADVARSLER
INDBYGNING
ELTILSLUTNING
OVERSIGT
6. RÅD ANGÅENDE KOGEGREJ TIL PLADEN
INSTRUKTION I BRUG
VEDLIGEHOLDELSE OG RENGØRING
PROBLEMLØSNING
EBFLTEEMR SSOALLVGISNSGERVICE
MILJØHENSYN
1.
2.
3.
4.
5.
7.
8.
9.
10.
11.
INSTALLATION
........................................84-85
..................................................85
......................................................................85
..........................................................................85
...............................................................85-86
..............................................................................86
....................86
...................................................87-88
............................88
..............................................................89
.........................89
.....................................................................89
RU
СОДЕРЖАНИЕ
МЕРЫ ПРЕДОСТОРОЖНОСТИ
ЧИСТКА И ОБСЛУЖИВАНИЕ
. ИНСТРУКЦИИ ПО ВЫПОЛНЕНИЮ УСТАНОВКИ
3. ВСТРАИВАЕМАЯ БЫТОВАЯ ТЕХНИКА
4. ЭЛЕКТРИЧЕСКИЕ ПОДКЛЮЧЕНИЯ
5.
6. СОВЕТЫ ОТНОСИТЕЛЬНО ВЫБОРА КУХОННОЙ ПОСУДЫ
ДЛЯ ИСПОЛЬЗОВАНИЯ С ВАРОЧНОЙ ПОВЕРХНОСТЬЮ
7.
9. ВОЗМОЖНЫЕ ПРОБЛЕМЫ И ИХ УСТРАНЕНИЕ
1 .
1. ДЕКЛАРАЦИЯ СООТВЕТСТВИЯ
2
ПОСЛЕПРОДАЖНОЕ ОБСЛУЖИВАНИЕ
1
ОПИСАНИЕ
ЭКСПЛУАТАЦИЯ ПОВЕРХНОСТИ
8.
10.
ЗАЩИТА ОКРУЖАЮЩЕЙ СРЕДЫ
..............................................54-55
..................................................55
.........................55
........................................55
......................................55-56
..............................................................................56
............56
..........................................57-58
......................................................58
...............................59
............................................59
.........................59
INHOUD
NL
VEILIGHEIDSINSTRUCTIES
GEBRUIK VAN HET KOOKVLAK
SERVICE DIENST
1.
INSTALLATIE
3. INBOUW
4. ELEKTRISCHE AANSLUITING
5.
6.
7.
8. ONDERHOUD EN REINIGING
9. PROBLEMEN OPLOSSEN
10.
11. BESCHERMING VAN HET MILIEU
ALGEMENE AANWIJZINGEN
2.
PRESENTATIE - DE ZONES
SELECTIE VAN KOOKGERIEF
....................................................66-67
..................................................67
............................................................................67
....................................................................................67
...........................................67-68
....................................................68
................................................68
........................................69-70
.................................................70
......................................................71
..................................................................71
.........................................71
SPIS TREŚCI
PL
INSTRUKCJE BEZPIECZEŃSTWA
INSTALACJA
OPIS
6. WSKAZÓWKI ODNOŚNIE NACZYŃ
UŻYTKOWANIE
1.
ZABUDOWA
4. PODŁĄCZANIE DO INSTALACJI ELEKTRYCZNEJ
5.
7.
9. ROZWIĄZYWANIE PROBLEMÓW
10. SERWIS TECHNICZNY
11. OCHRONA ŚRODOWISKA
UWAGI OGÓLNE
2.
3.
UŻYTKOWANIE
8.
.....................................60-61
....................................................................61
............................................................................61
.............................................................................61
......61-62
.........................................................................................62
....................................62
................................................................63-64
.....................................................................64
.......................................65
......................................................65
.................................................65

Identification Plate (located under the hob's bottom casing)
Placca segnaletica ( situata sotto la cassetta inferiore del piano)
Plaque signalétique (située sous le caisson inférieur de la table)
Matrikelschild: (befindet sich auf der Unterseite des Gerätes)
Placa de características (está bajo el cajón inferior de la encimera)
Placa de identificação e de características (localizada por baixo da caixa do fundo da placa)
Tabliczka znamionowa (na spodzie plyty)
Identificatieplaatje (aan de onderkant van het kookvlak)
Identifikationsplåt (finns under hällen botten)
Laitekilpi (sijaitsee lieden pohjassa)
Mærkeplade (placeret under pladens bundbeklædning)
Merkeplate (plassert under toppens nedre del)
Identifikační štítek (umístěný pod deskou spodním krytu)
Identifikacijsko tablico (ki se nahaja v spodnjem kuhalne plošče v ohišje)
Идентификационной табличке (находится в нижней части корпуса плиты в)
LAYOUT
1
LAYOUT
2
LAYOUT
3
2300
W
1200
+
1000
W
1200
W
1200
W
1800
W
2500
W
1200
W
1200
W
1800
W
1800
W
1800
W
D
Seal-Guarnizione-Joint-Dichtungsstreifen-
Junta-Uszczelka-Junta- -Afdichtstrip-
Tätning-Tiiviste-Forsegling-Pakning
Печать
GB- It is forbidden to fit the hob above a non-ventilated oven.
IT- É vietato installare il piano su un forno non raffreddato.
FR- Il est interdit d'enchâsser un four non ventilé sous la plaque de cuisson.
DE- Der Einbau in Kombination mit einem Backofen ohne Abkühlventilator ist nicht
gestattet.
ES- Se prohibe el empotramiento de un horno sin ventilación por debajo la encimera.
PT- Não é permitida a instalação da placa por cima de um forno que não seja ventilado.
CZ -
PL - Zabrania sie instalowania plyty nad piekarnikiem nie majacym wentylacji
NL- Het is verboden een nietgen-ventileerde oven onder het werkbald in te bouwen.
SE- Spishällen får inte monteras ovanför en oventilerad ugn.
FI- Liettä ei saa asentaa sellaisen uunin päälle, jonka ilmanvaihdosta ei ole huolehdittu.
DK- Det er forbudt at montere kogepladen oven på en ovn uden ventilation.
NO- Platetoppen må ikke monteres over en stekeovn som ikke er ventilert.
Je zakázáno, aby se vešly na varnou desku nad non-sušárně.
SL - Prepovedano je, da se prilega kuhalno ploščo zgoraj brez peči z napo.
RU- Это запрещено в соответствии с плитой выше невентилируемых печи.
04
50
mm
10
mm
mini
500
X
50
500
X
10
PRODUCT CODE / CODE PRODUIT
SERIAL N° / NUMERO DE SERIE
Min.15 cm

05
E
According to model - Secondo modello - Selon modèle - Je nach Modell - Según el modelo - Dependendo do modelo - v závislosti na
modelu - v skladu z vzorcem - в зависимости от модели - Zaleznie od modelu Volgens model - Beroende på modell -
Mallikohtainen - Afhænger af modellen - I samsvar med modell -
1. ON / OFF
2. " + "
3. " - "
4. TIMER - MINUTENZÄHLER - RELOJ - CONTA-MINUTOS - ČASOVÝ SPÍNAČ - ČASOVNIK - REGULATOR CZASOWY -
TIMER - AJASTIN - TIMER - TIDTAKER
5. Additional cooking zone led - Spia della zona di cottura estesa - Diode de fonctionnement du foyer complémentaire - LED für die
zusätzliche Kochzone - Piloto de funcionamiento de la zona complementaria - Indicador luminoso da zona de cozedura adicional -
Další varné zóny vedlo - Dodatna kuhalno polje pod vodstvom- дополнительная площадь приготовления пищи привело -
Dodatkowa strefa gotowania doprowadziła - Symbool van uitgebreide kookzone - Lampa för extra tillagningszon-
Kuumennusalueen led-merkkivalo - LED-Indikator for udvidet kogezone - Lampe for tilleggssone
6. Cooking zone programming indicator - Spia programmazione zona di cottura - Repère de programmation du foyer - Anzeiger der
Kochzonenprogrammierung - Piloto de la zona programada - Indicador luminoso de programação - Varná zóna programování
ukazatel - kuhalno polje programiranje kazalnik - приготовление области программирования индикатор - Strefa wskaźnik
gotowania programowania - Programmatie-icoon van kookzone - Indikator för programmering av tillagningszoner -
Kuumennusalueen ohjelmoinnin merkkivalo - Indikator for programmering af kogezone - Programmeringsindikator for kokesone
7. Selection of the zone - Selezione della zona - Sélection de la zone - Auswahl des Bereichs - Selección de la zone - Selecção da
área - Výběr zóny - Izbor območja - Выбор области - Wybór strefy - Selectie van de zone- val av zonen - valinta vyöhykkeen-
Udvælgelse af zonen - Utvalg av sonen
-

READ THE INSTRUCTIONS BOOKLET CAREFULLY TO MAKE THE MOST
OF YOUR HOB.
We recommend you keep the instructions for installation and use for later
reference, and before installing the hob, note its serial number in case you
need to get help from the after sales service.
. Warning : the appliance and its accessible parts become hot during use.
Care should be taken to avoid touching heating elements.
. Childen under 8 Year of age must be kept away from the appliance unless
they are continuously supervised.
. This appliance can be used by children aged from 8 years and above and
persons with reduced physical, sensory or mental capabilities or lack of
experience and knowledge if they have been given supervision or instruction
concerning use of the appliance in a safe way and understand the hazards
involved.
. Children should be supervised to ensure that they do not play with the
appliance.
. Cleaning and user maintenance shall not be made by children without
supervision.
. Warning : unattended cooking on a hob with fat or oil can be dangerous and
may result in fire.
. Never try to extinguish a fire with water, but switch off the appliance and then
cover flame e.g. with a lid or a fire blanket.
. Warning : danger of fire: do not store items on the cooking surfaces.
. Warning : if the surface is cracked, switch off the appliance to avoid the
possibility of electric shock.
. Never use a steam or high pressure spray to clean the appliance.
. This appliance is not intended to be operated by means of an external timer
or separate remote-control system.
. If present do not to stare into halogen lamp hob elements.
. The means for disconnection must be incorporated in the fixed wiring in
accordance with the wiring rules.
. The instructions state the type of cord to be used, taking into account the
temperature of the rear surface of the appliance.
. If the supply cord is damaged, it must be replaced by manufacturer, its
service agent or similarly qualified persons in order to avoid a hazard.
. It is strongly recommended to keep children away from the cooking zones
while they are in operation or when they are switched off, so long as the
residual heat indicator is on, in order to prevent the risks of serious burns.
. Aluminium foil and plastic pans must not be placed on heating zones.
. After every use, some cleaning of the hob is necessary to prevent the
build up of dirt and grease. If left, this is recooked when the hob is used
and burns giving off smoke and unpleasant smells, not to mention the risks
of fire propagation.
SAFETY INSTRUCTIONS
06 GB- IE

. Do not touch the heat zones during operation or for a while after use.
. Never cook food directly on the glass ceramic hob. Always use the
appropriate cookware.
Always place the pan in the centre of the unit that you are cooking on.
Do not use the surface as a cutting board.
Do not slide cookware across the hob.
Do not store heavy items above the hob. If they drop onto the hob, they may
cause damage.
Do not use the hob as a working surface.
Do not use the hob for storage of any items.
1. GENERAL WARNINGS
We are constantly striving to improve product quality and as such may modify
appliances to incorporate the latest technical improvements.
Appliance complies with European Directives 73/23/EEC and
89/336/EEC, replaced by 2006/95/EC and 2004/108/EC, and
subsequent amendments.
07 GB- IE
2. INSTALLATION
Installing a domestic appliance can be a complicated operation which if not carried out correctly, can seriously affect
consumer safety. It is for this reason that the task should be undertaken by a professionally qualified person who will carry it
out in accordance with the technical regulations in force. In the event that this advice is ignored and the installation is carried
out by an unqualified person, the manufacturer declines all responsibility for any technical failure of the product whether or
not it results in damage to goods or injury to individuals.
3. BUILT-IN
The furniture in which your hob will be installed and all adjacent
furniture, should be made from materials that can withstand high
temperatures. In addition, all decorative laminates should be fixed
with heat-resistant glue.
Installation (Fig. B / D):
. A watertight seal is supplied with the hob.
Before fitting:
- turn the hob upside down, with the glass surface facing
downwards.
Make sure the glass is protected.
- fit the seal round the hob.
- make sure that it is correctly fitted to avoid any leakage into the
supporting cabinet.
. Leave a gap of at least 5 cm between the appliance and the
vertical sides of the adjacent furniture.
. If, when installing the hob, the lower hob face is adjacent to an
area normally accessible when handling or cleaning, fit a
partition 1 cm below the base of the hob to avoid any risk of
scorching or damage.
When installing the hood above a cooker top, please consult the
installation instructions advising on the correct distance required
from the cooker top.
If it is installed on a cabinet above a cooker top , the minimum
distance requires is 70 cm.
4. ELECTRICAL CONNECTION
"The installation must conform to the standard directives."
The manufacturer declines all responsibility for any damage that
may be caused by unsuitable or unreasonable use.
Warning:
we cannot be held responsible for any incident or its
consequences that may arise during the use of an appliance
not linked to the earth, or linked to an earth whose continuity
is defective.
. Always check before any electrical operation, the supply tension
shown on the electricity meter, the adjustment of the circuit-
breaker, the continuity of the connection to earth to the
installation and that the fuse is suitable.
. The electrical connection to the installation should be made via
a socket with a plug with earth, or via an omnipole cut-out switch.
If the appliance has a socket outlet, it must be installed so that
the socket outlet is accessible.
. The yellow/green wire of the power supply cable must be
connected to the earth of both power supply and appliance
terminals.
. Any queries regarding the power supply cord should be referred
to After Sales Service or a qualified technician.

08 GB- IE
ATTENTION:
should it be necessary to replace the supply cord, connect the wire
in accordance with the following colours/codes:
BLUE - NEUTRAL (N)
BROWN - LIVE (L)
YELLOW-GREEN - EARTH ( )
The hob is fitted with a power supply cord which allows it to be
connected only to a power supply of 220-240 V between phases
or between phase and neutral.
. Connect to a socket.
It is however possible to connect the hob to :
. Three phase 220-240 V3~
. Three phase 380-415 V2N~
To proceed to the new connection, you must adhere the
following instructions.
- Before making the connection, make sure that the installation is
protected by a suitable fuse, and that it is fitted with wires of a
large enough section to supply the appliance normally.
- Turn over the hob, glass side against the work top, taking
care to protect the glass.
Open the cover in the following sequence:
1 2 3
. unscrew the cable clamp "1",
. find the two tabs located on the sides,
. put the blade of a flat screw-driver in front of each tab "2" e "3",
push in and press,
. remove the cover.
To release the power supplying cord.
. remove the screws retaining the terminal block which contains
the shunt bars and the conductors of the supply cord,
. Pull out the supply cord.
Operations to be carried out to make a new connection :
- Choose the power supply cable in accordance with the
recommendations in the table.
- Pass the power supply cable into the clamp.
- Strip the end of each conductor of
the supply cord on a 10 mm length,
by taking in account the requested
length of the cord for the connection
to the terminal block.
- According to the installation
and with the help of shunt bars which
you should have recovered in the
first operation, fix the conductor as
shown on the chart.
- Fix the cover.
- Screw the cable clamp.
Note: make sure the terminal board screws are tight.
SHUNT
Connection to the terminals on the terminal block
LAY OUT
“ 3 ”
LAY OUT
“ 2 ”
Cable
HO5V2V2F
3x2,5
3x2,5 3x2,5
Cable
HO5V2V2F
4x1,5
4x1,5 4x1,5
Cable
HO5V2V2F
4x1,5
4x1,5 4x1,5
LAY OUT
“ 1 ”
N = Neutral T = Earth
Monophase 220-240 V~
Two phases 220-240 V2~
Three phases 220-240 V3~ Three phases 380-415 V2N~
5. PRESENTATION
• hilight zone :
a metallic conductor strip is spread uniformly over the whole
surface unit. It is effective within 3 seconds and is suitable for
steady, homogeneous and also sustained cooking.
The glass-ceramic hob benefits from greater heat output which is
generated by the hilight cooking zones thereby accelerating the
cooking process. Modifications to the design of the hob have not
affected the capacity of the glass to withstand high temperatures,
but they have improved controllability.
With the "Sprinter" facility, reduced cooking times of up to 15% can
be achieved, depending upon the method of cooking and the type
of saucepans being used.
6. HOB COOKWARE ADVICE
Using good quality cookware is critical for setting
the best performance from your hob.
Always use good quality cookware with perfectly flat and
thick bases :
using this type of cookware will prevent hot spots that cause
food to stick. Thick metal pots and pans will provide an even
distribution of heat.
Ensure that the base of the pot or pan is dry : when filling
pans with liquid or using one that has been stored in the
refrigerator, ensure that the base of the pan is completely dry
before placing it on the hob. This will help to avoid staining the
hob.
Use pans whose diameter is wide enough to completely
cover the surface unit : the size of the pan should be no
smaller than the heating area.
If it is slightly wider the energy will be used at its maximum
efficiency.
Ph = Phase

09 GB- IE
THE CHOICE OF COOKWARE - The following information will
help you to choose cookware which will give good performance.
Stainless Steel : highly recommended. Especially good with a
sandwich clad base. The sandwich base combines the benefits of
stainless steel (appearance, durability and stability) with the
advantages of aluminium or copper (heat conduction, even heat
distribution).
Aluminium : heavy weight recommended. Good conductivity.
Aluminium residues sometimes appear as scratches on the hob,
but can be removed if cleaned immediately.
Because of its low melting point, thin aluminium should not be
used.
Cast Iron : usable, but not recommended. Poor performance.
May scratch the surface.
Copper Bottom / stoneware: heavy weight recommended.
Good performance, but copper may leave residues which can
appear as scratches. The residues can be removed, as long as
the hob is cleaned immediately. However, do not let these pots
boil
dry. Overheated metal can bond to glass hobs. An overheated
copper pot will leave a residue that will permanently stain the hob.
Porcelain/enamel : Good perfomance only with a thiny smooth,
flat base.
Glass-ceramic : not recommended. Poor performance. May
scratch the surface.
7. USE
• After powering up the hob, wait some seconds to activate the
electronic controls.
- Press the button . The corresponding indicator lights.
Electronic control of the hob is activated :
- After 20 seconds whithout use, the electronic control goes off
and the starting operation has to be repeated.
in each display
zone, the heat level shows .
. STARTING A COOKING ZONE
- Press the selection button of the required cooking zone.
The "0" of the corresponding zone stays lighted when the
light of the others "0" is reduced.
- Press the - or + button to select a heat level between 1 and
9. Hold down the + or - button and the heat level increases
or decreases gradually.
The following examples are for information only. Personal
experience should then let you adapt these settings to your
taste and habits.
0 : Off
U -1 :
2 : Melting
3 : Keeping hot
4 : Heating up
5 : Thawing, stewing, full cooking, low temperature
cooking
6 : Cooking without lid
7 : Frying, meat browning and roasting
8 : High temperature cooking and roasting, seizing
9 : Frying, boiling large quantities of water.......
Dissolving
. STOPPING A COOKING ZONE
- Press the selection button of the required cooking zone.
- Press the "-" button to display heat level . Now the zone goes
off, the indicator goes off after 10 seconds.
-
The heat level automatically goes down to . The cooking
zone goes off.
To stop rapidly, press simultaneously the "-" and the
respective cooking zone selection.
. GENERAL STOP
The cooking zones and the timer can be stopped
at any moment by pressing the On-Off button.
. RESIDUAL HEAT INDICATOR
The control panel tells the user when the surface temperature of
the cooking zones exceeds about 60°C, by the following
displaying: . When the temperature goes back below 60°C, the
display goes off.
For ending the cooking, we advise switching off the cooking zone
and using the residual heat of the zone to finish cooking gently.
N.B. After a cut in the current, the residual heat indicator
disappears completely, even if the surface temperature exceeds
60°C.
. OPERATING THE ADDITIONAL COOKING ZONE
(TWO ZONES)
The cooking zone with two zones is
fitted certain models .............................
>
It is active in totality when the cooking zone is in function ; the
control led of the additional cooking is displayed.
To desactivate the additional cooking zone :
- Press again on the additional cooking zone touch. The Led goes
off when it is desactivated.
To re-activate the additional cooking zone :
- Press on the cooking zone button. The Led is active again.
. PROGRAMMING A COOKING ZONE (according to the model)
Every cooking zone can be programmed for a maximum time of
99 minutes.
- Start the required zone by following the previous instructions.
- Press on simultaneously the touch "-" and "+" to activate the
timer, " " is displayed.
- Press again on the "+" button to select a time in minutes
between 0 and 99 minutes or press on the "-" button to decrease
the time between 30 minutes and 0. The timer control led near
the level is displayed.
--> the programmed time can be modified at any moment.
When the time is run, the cooking zone goes off automatically and
an audible beep sounds for 1 minute, press a button to stop it.
--> If any zone is activated, the timer can be used alone, as
reminder, it will ring at the end of the programmed time.
Example
LED
TYPE
B
LED
TYPE
B
TYPE
B
77
7
7

. LOCKING BUTTON OPERATION
The locking function prevents the children from starting the hob.
It is also used for cleaning the hob.
To lock the hob :
- Press the on/off button .
4 zones 3 zones
. The hob is locked, the locking indicator " L " is displayed on all
zones for 20 seconds.
If a cooking zone is at stage "hot", " L " and " H " appear alternately.
To unlock the hob :
. For the hob with 4 zones, to unlock follow the same
procedure.
. For the hob with 3 zones, follow the same procedure but in
the last stage you must to press the "-" touch instead the "+"
touch.
The indication " L " disappears. The hob is unlocked and
returns on stand-by mode.
2 sec
. FAST HEATER OPERATION
Every cooking zone on the hob is equipped with a fast heater
for raising the cooking zone’s temperature faster.
Starting the fast heater
- Press the on/off button .
- Start the required zone, press the " + " button to obtain position
"9", release the button briefly and press again the " + " button ;
the display alternates showing "A" "fast heater" and "9" heat
level.
Cooking
position
Power
released
(%)
Time
of
fast
heater
(minutes)
Maximum
operating
time
before
automatic
cut
off*
0
:
0
%
:
0
:
0
H
: 2.5
% : 0 : 2
H
1
:
3
%
:
1
:
6
H
2
:
6
%
:
3
:
6
H
3
:
11
%
:
5
:
5
H
4
:
16
%
:
6,5
:
5
H
5
:
19
%
:
8,5
:
4
H
6
:
32
%
:
2,5
:
1,5
H
7
:
45
%
:
3,5
:
1,5
H
8
:
65
%
:
4,5
:
1,5
H
9
:
100
%
: 0
:
1,5
H
E.g. 1800 W zone at position 6 = 32% of 1800 W power released
When the "Fast heater" is on, the zone supplies 1800 W power for
2.5 minutes, and adjusts to 576 W after this time.
* For increased safety, the cooking zones cut off automatically if
they are left on too long. The cut off depends on the heat level
used.
To desactivate the fast heater
- Switch on the cooking zone, press the " - " button to come back
to a normal heat level, decrease to the heat level required or to
" 0 " to stop the cooking zone.
8. CLEANING AND MAINTENANCE
. Before carrying out any maintenance work on the hob, allow it
to cool down.
. Only products, (creams and scrapers) specifically designed for
glass ceramic surfaces should be used. They are obtainable
from hardware stores.
. Avoid spillages, as anything which falls on to the hob surface
will quickly burn and will make cleaning more difficult.
. It is advisable to keep away from the hob all substances which
are liable to melt, such as plastic items, sugar, or sugar-based
products.
MAINTENANCE:
- Place a few drops of the specialised cleaning product on the
hob surface.
- Rub any stubborn stains with a soft cloth or with slightly damp
kitchen paper.
- Wipe with a soft cloth or dry kitchen paper until the surface is
clean.
If there are still some stubborn stains:
- Place a few more drops of specialised cleaning fluid on the
surface.
- Scrape with a scraper, holding it at an angle of 30° to the hob,
until the stains disappear.
- Wipe with a soft cloth or dry kitchen paper until the surface is
clean.
- Repeat the operation if necessary.
A FEW HINTS:
Frequent cleaning leaves a protective layer which is essential to
prevent scratches and wear. Make sure that the surface is clean
before using the hob again. To remove marks left by water, use a
few drops of white vinegar or lemon juice. Then wipe with
absorbent paper and a few drops of specialised cleaning fluid.
The glass ceramic surface will withstand scraping from flat-
bottomed cooking vessels, however, it is always better to lift them
when moving them from one zone to another.
NB:
Do not use a sponge which is too wet.
Never use a knife or a screwdriver.
A scraper with a razor blade will not damage the surface,
as long as it is kept at an angle of 30°.
Never leave a scraper with a razor blade within the reach
of children.
Never use abrasive products or scouring powders.
. The metal surround : to safely clean the metal surround wash
with soap and water, rinse, then dry with a soft cloth.
30° Maxi
10 GB- IE

9. PROBLEM SOLVING
The cooking zones do not simmer or only fry gently
Only use flat-bottomed pans. If light is visible between the pan
and the hob, the zone is not transmitting heat correctly.
The pan bottom should fully cover the diameter of the selected
zone.
The cooking is too slow
Unsuitable pans are being used. Only use flatbottomed
utensils, that are heavy and have a diameter at least the same
as the cooking zone.
Small scratches or abrasions on the hob's glass surface
Incorrect cleaning or rough-bottomed pans are used; particles
like grains of sand or salt get between the hob and the bottom
of the pan. Refer to the "CLEANING" section; make sure that
pan bottoms are clean before use and only use smooth
bottomed pans. Scratches can be lessened only the cleaning is
done correctly.
Metal marks
Do not slide aluminium pans on the hob. Refer to the cleaning
recommendations.
You use the correct materials, but the stains persist.
Use a razor blade and follow the "CLEANING" section.
Dark stains
Use a razor blade and follow the "CLEANING" section.
Light surfaces on the hob
Marks from an aluminium or copper pan, but also mineral, water
or food deposits; they can be removed using the cream cleaner.
Caramelisation or melted plastic on the hob.
Refer to the "CLEANING" section.
The hob does not operate or certain zones don't work
The shunts are not positioned correctly on the terminal board.
Have a check made that the connection is done he control panel
is locked. Unlock the hob.
The hob does not cut off.
The control panel is locked. Unlock the hob.
The hob stops automatically
A spill covers at least two buttons for more than 10 seconds; the
hob switches to safety, and an audible beep sounds. Clean up
the spill or remove the object.
The cooking zones stop automatically if they are left
on for too long. Refer to the section, "operating time".
Frequency of on/off operations for cooking zones
The on-off cycles vary according to the required heat level:
- low level: short operating time,
- high level: long operating time.
"H" display, residual heat indicator, blinking.
The electronic temperature is too high. A technician should
verify the fitting in compliance with the recommendations.
10. AFTERCARE
Before calling out a Service Engineer please check the
following:
— that the plug is correctly inserted and fused;
If the fault cannot be identified switch off the appliance — do not
tamper with it — call the Aftercare Service Centre. The appliance
is supplied with a guarantee certificate that ensures that it will be
repaired free of charge at the Service Centre.
11. PROTECTION OF THE ENVIRONMENT
This appliance is marked according to the
European directive 2002/96/EC on Waste
Electrical and Electronic Equipment (WEEE).
By ensuring this product is disposed of
correctly, you will help prevent potential
negative consequences for the environment
and human health, which could otherwise be
caused by inappropriate waste handling of this
product.
The symbol on the product indicates that this product may not
be treated as household waste. Instead it shall be handed over
to the applicable collection point for the recycling of electrical
and electronic equipment Disposal must be carried out in
accordance with local environmental regulations for waste
disposal.
For more detailed information about treatment, recovery and
recycling of this product, please contact your local city office,
your household waste disposal service or the shop where you
purchased the product.
11 GB- IE

LEGGERE ATTENTAMENTE LE ISTRUZIONI INCLUSE IN QUESTO
LIBRETTO. Vi danno importanti indicazioni sulla sicurezza d'installazione,
d'impiego e di pulizia, ed anche qualche consiglio per un'ottimale utilizzo del
piano di cottura. Conservare con cura questo documento per consultazione
ulteriore e notare, prima dell'installazione del piano, il numero di serie
dell'apparecchio, nel caso di un ulteriore richiesta d'intervento del servizio di
assistenza.
.
.
.
.
.
.
.
.
. N
.
.
.
. L
.
. Tutti le parti accessibili sono calde durante il funzionamento del piano, tenere
lontano i bambini durante il funzionamento del prodotto e fino a quando non si
spegneranno le spie di calore residuo.
. La carta stagnola e i recipienti in materia plastica non devono essere
appoggiati sulle superfici calde.
. Si raccomanda, dopo ogni utilizzo, un minimo di pulizia dell'apparecchio,
per evitare l'accumulo di sporcizie e grassi. Questi, infatti, ricuocerebbero
ad ogni uso dell'apparecchio, carbonizzandosi e liberando fumi ed odori
sgradevoli, con il rischio di incendiarsi.
. ATTENZIONE: l'apparecchio e le parti accessibili diventano calde durante
l'uso. Prestare attenzione a non toccare le parti calde.
I bambini al di sotto di 8 anni dovrebbero essere tenuti a distanza se non
continuamente supervisionati.
L'apparecchio può essere usato da bambini dagli 8 anni in su e persone con
ridotte capacità fisiche, sensoriali o mentali o senza esperienza e conoscenza
del prodotto se supervisionate o dando loro istruzioni riguardo al
funzionamento dell'apparecchio in maniera sicura e coscente del rischio
possibile.
I bambini non dovrebbero giocare con l'apparecchio.
La pulizia e la manutenzione non dovrebbero essere fatte da bambini senza
supervisione.
ATTENZIONE: cucinare senza supervisione grasso o olio sul piano cottura
può essere pericoloso e può provocare incendi.
MAI provare a spegnere il fuoco con acqua. Prima spegnere l'apparecchio e
poi coprire le fiamme, ad esempio con un coperchio o un telo non
infiammabile.
ATTENZIONE: pericolo di incendio: non lasciare oggetti sul piano cottura.
ATTENZIONE: Se la superficie è incrinata, spegnere l’apparecchio per
evitare la possibilità di scosse elettriche.
on utilizzare un pulitore a vapore.
L'apparecchio non è progettato per funzionare con un timer esterno o con un
sistema di comando separato.
I piani di cottura che incorporano lampade alogene non devono essere
fissati intensamente.
Il mezzo di disconnessione deve essere incorporato nel cablaggio fisso in
accordo con le leggi di cablaggio.
e istruzioni devono indicare quale tipo di cavo debba essere utilizzato,
tenendo presente la temperatura della superficie posteriore dell’apparecchio.
Se il cavo di alimentazione è danneggiato, esso deve essere sostituito dal
costruttore o dal suo servizio assistenza tecnica o comunque da una persona
con qualifica similare, in modo da prevenire ogni rischio.
PRESCRIZIONI DI SICUREZZA
12 IT

. Quando la spia del calore residuo è accesa, non toccare il fuoco in
funzionamento o appena spento.
. Non cucinare mai direttamente sul piano, utilizzare sempre le pentole.
. Appoggiare sempre la pentola ben centrata sul bruciatore da utilizzare.
. Non utilizzare la superficie vetroceramica né come piano per tagliare né
come piano di lavoro.
. Non far scivolare le pentole sul piano: rischio di graffiature.
. Non appoggiare oggetti pesanti sul piano, potrebbero cascare e rovinare il
piano.
. Non lasciare oggetti depositati sul piano di qualunque tipo essi siano.
1. AVVERTENZE GENERALI
Perseguendo una politica di aggiornamento tecnico-qualitative, il produttore
si riserva il diritto di apportarvi modifiche migliorative, rispettando le norme
vigenti.
DICHIARAZIONE DI CONFORMITÀ: Questa apparecchiatura, nelle
parti destinate a venire a contatto con sostanze alimentari, É
conforme alla prescrizione della Direttiva CEE 89/109 e al D.L. di
attuazione n° 108 del 25.01.92. Apparecchio conforme
alle Direttive Europee 73/23/CEE e 89/336/CEE, sostituite
rispettivamente da 2006/95/CE e 2004/108/CE, e successive
modifiche.
Il collegamento e la messa in funzione degli apparecchi elettrodomestici nel loro ambiente è un'operazione
delicata che, se non viene effettuata correttamente, può causare delle conseguenze anche gravi per la sicurezza
dei consumatori. Per questo è importantissimo che l'operazione di collegamento venga svolta da un
professionista, che DEVE attenersi alle norme tecniche in vigore. Se nonostante questa raccomandazione, il
consumatore deciderà di realizzare personalmente il collegamento, il produttore non sarà ritenuto responsabile
per eventuali incidenti tecnici sul prodotto, e neppure per eventuali incidenti a cose o persone.
Il mobile o il supporto in cui deve essere incassato il piano e le
pareti dei mobili attigui devono essere di un materiale resistente
per sopportare una temperatura elevata. Inoltre è necessario che
il rivestimento che ricopre il mobile o il supporto sia fissato con
una colla resistente alle alte temperature affinché non si scolli.
Prima dell'installazione (Fig. B/D):
Una guarnizione di tenuta stagna è consegnata con il piano di
cottura.
- Girare il piano, parte in vetro verso il basso.
- Abbiate cura di proteggere il vetro.
- Mettere la guarnizione avvolta intorno al piano.
- Abbiate cura nell'eseguire il lavoro, in quanto tutto questo
eviterà qualsiasi infiltrazione dentro il mobile di supporto.
Prevedere uno spazio di 5 cm. tra l'apparecchio e le pareti
verticali adiacenti.
Prevedere un divisore orizzontale sotto il cassone del piano,
delle stesse dimensioni del vano. Lasciare almeno 1 cm di spazio
sotto il cassone del piano.
Qualora venga installata una cappa sopra il piano cottura,
consultare le istruzioni di montaggio della cappa nelle quali è
riportata la distanza corretta da rispettare.
Qualora venga installato un pensile sopra il piano cottura, la
distanza minima da tenere è di 70 cm.
4. COLLEGAMENTO ELETTRICO
L'installazione deve essere conforme alle norme vigenti del
Paese d'installazione. Il produttore declina ogni
responsabilità nel caso questa disposizione non venga
rispettata.
Attenzione : Non possiamo essere ritenuti responsabili per
incidenti o per le eventuali conseguenze di incidenti dall'uso
di un apparecchio non collegato a terra o cui la messa a terra
sia difettosa.
- Prima di effettuare il collegamento, controllare la tensione
d'alimentazione indicata sul contatore, la regolazione del
disgiuntore, il calibro del fusibile e la continuità della "terra".
- Il collegamento alla rete deve essere effettuato mediante una
presa di corrente munita di messa a terra o mediante dispositivo a
interruzione omnipolare conforme ai normi del paese
d'installazione.
Se l'unità è dotata di una presa, l'installazione deve essere
eseguita in modo tale che l'uscita della presa sia accessibile.
Il filo giallo/verde del cavo di alimentazione elettrica deve essere
collegato alla messa a terra sia dell'alimentatore che dei terminali
dell'unità.
Per qualsiasi domanda relativa al cavo di alimentazione, rivolgersi
al Servizio di Assistenza o ad un tecnico qualificato.
3. INSERIMENTO NEL MOBILE
2. INSTALLAZIONE
13 IT

ATTENZIONE:
Può essere necessario sostituire il cavo di alimentazione;
connettere il cavo seguendo i seguenti colori e codici:
Blu Neutro/ neutral (N)
Marrone Fase/ live (L)
Giallo-Verde Terra/ earth ( )
Il piano vetroceramica viene fornito con un cavo di alimentazione
e puó essere utilizzato con una tensione di 220-240 V tra 2 fasi o
tra fase e neutro.
Allaciarlo ad una presa di corrente.
É anché possibile collegare il piano con :
. Trifase 220-240 V3~
. Trifase 380-415 V2N~
Per procedere al nuovo collegamento, attenersi
scrupolosamente alle indicazioni di sotto indicate.
- Prima di realizzare il collegamento, verificare che
l'installazione sia protetta da un fusibile appropriato, controllare
la sezione dei fili dell'installazione.
- Girare il piano, con la parte del vetro contro il piano di lavoro,
facendo molta attenzione a proteggere il vetro!
Per aprire il coperchio della morsettiera:
1 2 3
1 2 3
- Svitare il passacavo "1",
- Individuare le due linguette situate ai lati,
- Inserire la punta di un cacciavite piatto davanti ad ogni
linguetta, "2" e "3", spingere e premere, sollevare il coperchio.
Per liberare il cavo di alimentazione:
- Svitare i viti della morsetteria per liberare il passacavo, ed
anche i ponticelli (shunt),
- liberare il cavo.
Per procedere al nuovo collegamento :
- Scegliere il cavo d'alimentazione attenendosi sempre alla
tabella.
- Posizionare il cavo nel passacavo.
- Spelare l'estremità dei conduttori e
collegarli ai terminali. Far riferimento
alle informazioni della tabella seguente
ed alla numerazione presente sulla
morsettiera, inserire i ponticelli
(shunt) - I ponticelli, che trovate nella
morsettiera, servono a collegare tra
loro diversi punti dei terminali.
- Chiudere il coperchio della
morsettiera,
- Avvitare il cavo nel passacavo.
Attenzione ! : un serraggio non corretto delle viti dei terminali
può comportare il rischio di surriscaldamento del cavo di
alimentazione.
SHUNT
LAY OUT
“ 3 ”
LAY OUT
“ 2 ”
HO5V2V2F
3x2,5
3x2,5 3x2,5
HO5V2V2F
4x1,5
4x1,5 4x1,5
HO5V2V2F
4x1,5
4x1,5 4x1,5
LAY OUT
“ 1 ”
5. PRESENTAZIONE
• La zona hilight :
Una striscia di conduzione metallica è distribuita uniformemente
per tutta la superficie dell'unità. È efficace in 3 secondi ed è adatta
per una cottura costante, omogenea e anche sostenuta.
Il piano cottura in vetroceramica garantisce, nelle zone di cottura
evidenziate, maggiore produzione di calore, accellerando così il
processo di cottura. Le modifiche al design del piano cottura non
influenzano la capacità del vetro di sopportare alte temperature,
ma anzi ne migliorano la controllabilità.
Con la modalità "Sprinter", si può raggiungere una diminuzione
fino al 15% del tempo di cottura, in base al metodo di cottura e il
tipo di pentole usate.
6. CONSIGLI D'UTILIZZO
Per ottenere dei buoni risultati di cottura, è necessario
utilizzare dei recipienti di buona qualità.
• Utilizzare recipienti di buona qualità con fondo piatto
espesso: il fondo assolutamente piatto elimina tutti i punti di
surriscaldamento sui quali si attaccano gli alimenti e lo spessore
del metallo permette una perfetta distribuzione del calore.
• Assicurarsi che il fondo del recipiente sia asciutto: al
momento di riempire il recipiente o quando viene utilizzata una
pentola che esce direttamente dal frigorifero, ad esempio,
assicurarsi che il fondo sia perfettamente asciutto; questa
precauzione eviterà che il piano di cottura si sporchi.
• Utilizzare recipienti di diametro sufficientemente grande
da coprire completamente il fuoco: è consigliabile assicurarsi
che il fondo sia grande almeno quanto la zona di cottura. Se il
fondo è leggermente più grande, l'energia viene utilizzata in
maniera ottimale.
Ph = fase N = Neutro T = Terra
Monofase 220-240 V~
Bifase 220-240 V2~
Trifase 220-240 V3~ Trifase 380-415 V2N~
Monofase 220-240 V~
Bifase 220-240 V2~
Trifase 220-240 V3~
Trifase 380-415 V2N~
Cavo
Cavo
Cavo
CONNESSIONI ELETTRICHE
14 IT
/

LA SCELTA DEI RECIPIENTI
Le informazioni seguenti vi aiuteranno a scegliere i recipienti più
adatti e migliori per ottenere dei buoni risultati.
Inox: consigliato.
Particolarmente buono con il fondo "Sandwich". Il fondo
"Sandwich" unisce le qualità dell'Inox (aspetto, durata estabilità)
con i vantaggi dell'alluminio o del rame (trasmissione del calore e
ripartizione uniforme).
Alluminio: raccomandato fondo spesso.
Buona conduttività. Tal volta i residui di alluminio possono
lasciare qualche macchia sul piano, che possono essere tolte se
pulite rapidamente. L'alluminio con poco spessore non deve
essere utilizzato.
Ghisa/Vetroceramica: sconsigliato.
Prestazioni scarse. Può rigare la superficie.
Fondo in rame: raccomandato fondo spesso.
Buona performance, ma il rame può lasciare delle macchie che
possono sembrare delle righe, che si possono togliere se il piano
viene pulito rapidamente. Tuttavia, non lasciare evaporare
l'acqua completamente dai recipienti, il metallo surriscaldato può
aderire alla superficie. Un recipiente in rame surriscaldato può
lasciare delle macchie che rischiano di sporcare definitivamente
il piano.
Porcellana/Acciaio smaltato: buone prestazioni.
Solamente con fondo piatto, poco spesso e liscio.
Attendere alcuni secondi dopo la prima accensione del piano
per permettere l'attivazione dei comandi elettronici.
- Trascorsi 20 secondi senza alcun utilizzo, i controlli elettronici
si spengono e la procedura di accensione deve essere ripetuta.
- Premere il tasto .
I comandi del piano sono attivi. Viene visualizzato il livello di
potenza per ogni zona di cottura.
Il LED di controllo lampeggia.
. STARTING A COOKING ZONE
- Premere il tasto di selezione della zona di cottura desiderata.
Lo "0" della zona corrispondente rimane illuminato mentre la
luce degli altri "0" è affievolita.
- Premere il tasto " - " o " + " e selezionare il livello di potenza da 1 a
9. Tenendo premuti il tasto " + " o " - " il livello di potenza aumenta o
diminuisce progressivamente.
Le seguenti indicazioni sono fornite solo a titolo indicativo. La
Vostra personale esperienza Vi permetterà di adattare le cotture
al Vostro gusto.
0 : Spento
U -1 : S
2 : ) ..... Sciogliere, fondere
3 : Mantenimento in caldo
4 : Riscaldamento
5 : Scongelamento, cotture lente
6 : Cotture senza coperchio
7 : Friggere, rosolare, arrostire
8 : Cotture a temperatura elevata, arrostire
9 : Friggere, portare ad ebollizione importanti quantità
di acqua
cioglimento
• SPEGNERE UNA ZONA DI COTTURA
- Premere il tasto della zona di cottura desiderata.
- Premere il tasto “-” fino a che il display indica . Ora la zona
di cottura è spenta, il display si spegne dopo 10 secondi.
- Per spegnere immediatamente premere contemporaneamente
i tasti “ - ” e il rispettivo tasto di selezione.
Il display scende subito a e la zona di cottura si spegne.
• SPEGNERE TUTTO IL PIANO
Le zone di cottura ed il timer possono essere
fermati quando si desidera premendo il tasto
On / Off.
• INDICATORE DI CALORE RESIDUO
Sul display compare la lettera quando la superficie della zona di
cottura supera la temperatura di 60°C. La lettera si spegne
quando la temperatura scende sotto i 60°C.
Suggerimento: utilizzare il calore residuo della zona di cottura per
completare la cottura in modo lento.
N.B. dopo una interruzione di corrente, la spia di calore residuo si
spegne, anche se la temperatura di superficie supera i 60°C.
• PROGRAMMAZIONE DI DUE ZONE DI COTTURA
ADDIZIONALI (secondo modello)
L’area di cottura con due zone è
compatibile con certi modelli
È totalmente attiva quando la zona di cottura è in funzione; il
comando LED della zona di cottura addizionale viene
visualizzato.
........................
>
Per disattivare la zona complementaria :
- Premere di nuovo sul tasto della zona addizionale Il Led
scompare.
Per attivare di nuovo la zona addizionale :
- Premere sul tasto della zona di cottura. Il led è di nuovo attivo.
• PROGRAMMAZIONE DI UNA ZONA (secondo modello)
Ogni zona di cottura può essere programmata per funzionare sino
ad un massimo di 99 minuti.
- Attivare la zona di cottura seguendo le indicazioni precedenti.
- Per attivare il timer premere contemporaneamente il tasto "-" e
"+"; " " compare nel display.
- Premere ancora il comando « + » per selezionare il tempo
da 0 a 99 min o « - » per ridurre il tempo da 30 minuti a 0. Il led di
controllo del timer vicino al livello indica che la zona é
programmata.
Il tempo programmato può essere modificato in ogni
momento, riattivando la zona cottura e poi il comando del timer.
Quando il tempo è finito, la zona di cottura si spegne
automaticamente e un segnale acustico suona per un minuto,
premere su un tasto per spegnerlo.
Il timer può essere utilizzato come promemoria, suonerà allo
scadere del tempo impostato.
-->
-->
LED
7. UTILIZZO DEL PIANO
15 IT
Esempio
LED
7
7
7

. BLOCCO DI SICUREZZA
La funzione di blocco previene l’accensione accidentale del piano
cottura. E’ utile anche durante la pulizia della zona dei comandi.
Se una zona di cottura è a livello "hot", "L" e "H" appaiono
alternativamente.
Per sbloccare :
i piani con 4 zone di cottura seguire la stessa procedura.
Per i piani con 3 zone di cottura seguire la solita procedura, ma
all'ultimo passaggio è necessario premere il tasto "-" anziché il
tasto "+".
L'indicazione "L" scompare. Il piano è sbloccato e ritorna nella
modalità stand-by.
Per bloccare il piano:
- Premere il tasto Acceso/Spento .
4 zones 3 zones
. Il display mostra " L" per ogni zona per 20 secondi; il pannello
comandi è bloccato.
2 sec
. BOOSTER
Ogni zona di cottura è equipaggiata con una funzione booster
che permette un aumento veloce della temperatura.
Attivare il booster :
- Premereil tasto .
- Attivare la zona di cottura desiderata, premere il tasto " + " sino
ad ottenere il livello di potenza " 9 ", rilasciare brevemente il
tasto e premerlo di nuovo ; sul display appaiono
alternativamente (booster) " A " e " 9 " il nuovo livello di
potenza.
- Se necessario ridurre la potenza al livello desiderato; sul
display appaiono alternativamente (booster) " A " e il nuovo
livello di potenza.
Esempio zona cottura da 1800 W in posizione 6 = 32% di 1800W
= 576 W forniti. Quando il booster è attivo, la zona funziona a
1800W per 2,5 minuti, poi si porta ai 576 W impostati.
* Per motivi di sicurezza le zone di cottura si spengono
automaticamente se fatte funzionare in continuo per un tempo
troppo lungo. Il tempo dipende dal livello di potenza impostato.
Per disattivare il booster:
- Accendere la zona di cottura. Premere il tasto "-" per tornare ad
un livello di cottura normale, ridurre il livello di calore richiesto,
oppure alla posizione "0" per spegnere la zona cottura.
8. MANUTENZIONE
E' importante prima di iniziare la pulizia della superficie in
vetroceramica, attendere che la stessa si sia completamente
raffreddata.
Per la pulizia della superficie in vetroceramica devono essere
utilizzati solo prodotti specifici: crema e lametta. I suddetti prodotti
si trovano facilmente in commercio, nei supermercati.
Evitare le fuoriuscite di liquido, le sostanze che cadono sul piano
di cottura si carbonizzano rapidamente e sono quindi più difficili
da pulire.
Si raccomanda di tenere lontano dal piano di cottura tutto quanto
possa fondere, come ad esempio, tutti gli oggetti di plastica, la
carta stagnola, lo zucchero……
MANUTENZIONE:
- Versare qualche goccia di un prodotto specifico per la pulizia
della superficie in vetroceramica.
- Strofinare con insistenza dove vi fossero delle macchie
insistenti, con l'aiuto di uno straccio asciutto, o di una spugna
leggermente umida.
- Asciugare con uno straccio asciutto fino a quando la superficie
non sia pulita.
Se dopo questa manutenzione le macchie persistono:
- Versare di nuovo qualche goccia di un prodotto specifico.
- Strofinare con l'aiuto di una lametta rispettando l'angolo di 30°
rispetto al piano, insistendo fino alla scomparsa delle macchie.
- Asciugare con uno straccio asciutto o della carta assorbente fino
a che la superficie non sia pulita.
- Ripetere l'operazione se necessario.
CONSIGLI:
Una pulizia frequente farà in modo di mantenere sempre lucido il
vostro piano.
Assicurarsi che la superficie sia pulita prima di riutilizzare il piano.
Per togliere le tracce d'acqua e di calcare, utilizzare qualche
goccia d'aceto bianco, o di succo di limone. Per concludere
asciugare con l'aiuto di un foglio di carta assorbente poi applicare
qualche goccia di prodotto specifico e asciugare.
Il vetro del piano in vetroceramica sopporta lo sfregamento degli
utensili da cucina a fondo piatto, ma è comunque consigliabile
sollevarli prima di appoggiarli.
NOTA :
- Evitare d'usare una spugna troppo bagnata.
- Non utilizzare mai utensili affilati.
- L'utilizzo di una lametta da barba non può danneggiare la
superficie, se la si tiene inclinata di 30° rispetto al piano.
-Tenere lontano dalla portata dei bambini la lametta.
- Non utilizzare dei prodotti abrasivi o delle pagliette metalliche.
. La cornice del piano (solo su alcuni modelli):
per pulire senza danneggiare la cornice del vostro piano, lavarla
con acqua e sapone ed asciugare con un panno pulito ed asciutto.
30° Maxi
0
:
0
%
:
0
:
0
H
: 2.5
% : 0 : 2
H
1
:
3
%
:
1
:
6
H
2
:
6
%
:
3
:
6
H
3
:
11
%
:
5
:
5
H
4
:
16
%
:
6,5
:
5
H
5
:
19
%
:
8,5
:
4
H
6
:
32
%
:
2,5
:
1,5
H
7
:
45
%
:
3,5
:
1,5
H
8
:
65
%
:
4,5
:
1,5
H
9
:
100
%
: 0
:
1,5
H
Livello
impostato
Potenza
fornita
(%)
Tempo
inserimento
booster
(minuti)
Massimo
Tempo
di
funzione
prima
dello
spegnimento
automatico*
16 IT

9. PROBLEMI E SOLUZIONI
I fuochi non mantengono i sughi o le fritture a fuoco basso.
. Utilizzare esclusivamente recipienti a fondo piatto. Se una luce
filtra tra il recipiente e il piano, il fuoco non trasmette il calore
correttamente.
. Il fondo del recipiente deve ricoprire interamente il diametro del
fuoco scelto.
Cotture troppo lente.
. Utilizzo dei recipienti non adatti. Utilizzare solo degli utensili a
fondo piatto pesante e con un diametro almeno uguale al fuoco.
Graffi o scalfitture sulla superficie in vetro del piano.
. Errato sistema di pulizia, utilizzo di recipienti con fondo ruvido,
presenza di particelle abrasive (sale, sabbia, zucchero) tra il
piano e il fondo del recipiente.
Consultare il capitolo relativo alla pulizia, assicurarsi che i fondi
dei recipienti siano adatti prima dell'utilizzo e utilizzare solo
recipienti con fondo liscio.
Segni di metallo (possono sembrare graffi)
. Non far scivolare dei recipienti di alluminio sul piano. Attenersi
alle istruzioni di pulizia.
. Se non vengono utilizzati dei materiali di buona qualità, le
macchie di qualsiasi tipo esse siano persisteranno. Aiutatevi con
una lametta da barba e seguite le istruzioni del capitolo
"MANUTENZIONE".
Macchie scure
. Utilizzare una lametta da barba e seguire il capitolo
"MANUTENZIONE".
Macchie sul piano
. Macchie causate da recipienti in alluminio, dall'acqua o da
alimenti, possono essere eliminate con una crema pulente.
Segni di caramello o di plastica fusa sul piano.
. Controllare il capitolo "MANUTENZIONE".
Il piano non funziona oppure alcuni fuochi non sono
funzionanti.
. I ponticelli (shunt) sulla morsettiera non sono posizionati
correttamente. Fate controllare da un professionista che il
raccordo sia stato effettuato conformemente alle
raccomandazioni.
. Un oggetto o residuo di cibo sta coprendo almeno due comandi
per almeno 10 secondi. Effettuare la pulizia o rimuovere l'oggetto
. Il pannello comandi è bloccato, sbloccarlo.
Il piano non si spegne
. Il pannello comandi è bloccato, sbloccarlo.
Il piano si spegne automaticamente
. Un residuo di cibo copre almeno due comandi per almeno 10
secondi; il piano si spegne per sicurezza ed un segnale sono
roviene emesso sino alla pulizia del residuo di cibo.
. Le zone di cottura si spengono automaticamente se vengono
fatte funzionare per un tempo troppo lungo. Vedere la tabella.
ON \ OFF frequenti delle zone di cottura
. I cicli ON \ OFF variano a seconda del livello di potenza scelto:
- bassa potenza: tempi di funzionamento brevi,
- alta potenza: tempi di funzionamento lunghi.
Simbolo "H" , indicatore del calore residuo, lampeggia
. La temperatura del modulo elettronico di comando è troppo
elevata. Un tecnico qualificato deve verificare le condizioni di
installazione; vedere capitulo di riferimento.
10. ASSISTENZA POST-VENDITA
Prima di rivolgersi al servizio di assistenza, verificare
quanto segue:
— La spina sia correttamente inserita e munita del fusibile
appropriato.
Se non è possibile identificare il problema:
Spegnere l'apparecchio – non manometterlo – rivolgersi al
Centro di Assistenza Post-vendita. L'apparecchio viene fornito
con un certificato di garanzia che assicura che sarà riparato
gratuitamente presso il Centro di assistenza.
11. RISPETTO DELL'AMBIENTE
Questo elettro domestico è marcato
conformemente alla Direttiva Europea
2002/96/CE sui rifiuti da apparecchiature
el ett ric he e d el ett ron iche (W EEE ).
Assicurandovi che questo prodotto sia smaltito
correttamente, aiuterete ad evitare possibili
conseguenze negative all'ambiente e alla
salute delle persone, che potrebbero verificarsi
a causa d'un errato trattamento di questo
prodotto giunto a fine vita. Il simbolo sul prodotto indica che
questo apparecchio non può essere trattato come un normale
rifiuto domestico; dovrà invece essere consegnato al punto più
vicino di raccolta per il riciclo delle apparecchiature elettriche ed
elettroniche. Lo smaltimento deve essere effettuato in accordo
con le regole ambientali vigenti per lo smaltimento dei rifiuti. Per
informazioni più dettagliate sul trattamento, recupero e riciclo di
questo prodotto, per favore contattare l'ufficio pubblico di
competenza (del dipartimento ecologia e ambiente), o il vostro
servizio di raccolta rifiuti a domicilio, o il negozio dove avete
acquistato il prodotto.
17 IT

LIRE ATTENTIVEMENT LA NOTICE POUR VOUS PERMETTRE DE TIRER
LE MEILLEUR PARTI DE VOTRE APPAREIL. Nous vous conseillons de
conserver la notice d'installation et d'utilisation pour toute consultation
ultérieure, et de noter, avant installation de la table, le numéro de série de
l'appareil en cas d'éventuelle demande d'intervention du service après-vente.
AVERTISSEMENT: L'appareil et les parties accessibles deviennent chauds
pendant l'utilisation. Des précautions doivent être prises pour éviter de
toucher les éléments chauffants.
Les enfants de moins de 8 ans doivent être tenus à l'écart à moins d'être
surveillés continuellement.
Cet appareil n'est pas destiné à être utilisé par des personnes (y compris les
enfants) dont les capacités physiques, sensorielles ou mentales sont
réduites, ou ayant un manque d'expérience et de connaissances, à moins
qu'elles n'aient été formées à l'utilisation de l'appareil, par une personne
responsable de leur sécurité.
. Surveillez les enfants pour être sûr qu’ils ne jouent pas avec l’appareil.
. Le nettoyage et l'entretien par l'utilisateur ne doit pas être faits par des
enfants sans surveillance.
Lorsque vous cuisinez avec des graisses ou de l'huile, prenez garde de
toujours surveiller le déroulement de la cuisson car les graisses ou l'huile
surchauffées peuvent s'enflammer rapidement.
Ne jamais tenter d'éteindre un incendie avec de l'eau, mais éteindre
l'appareil, puis couvrir la flamme par exemple avec un couvercle ou une
couverture anti-feu.
AVERTISSEMENT: Danger d'incendie: ne pas stocker des éléments sur les
surfaces de cuisson.
ATTENTION: Si la surface est fêlée, éteindre l'appareil pour éviter les risques
de choc électrique.
Ne jamais utiliser de nettoyeur vapeur ou à haute pression pour le nettoyage
de l'appareil.
'appareil n'est pas destiné à être utilisé avec une minuterie externe ou un
système de contrôle à distance.
. Le foyer halogène, selon modèle de table vitrocéramique, dégage une
lumière forte, ne pas regarder fixement les lampes de ce foyer.
Un système de déconnexion doit être incorporé dans le compteur
conformément aux règles de câblage.
Les instructions indiquent le type de cordon à utiliser, en tenant compte de la
température de la surface arrière de l'appareil.
Si le cordon d'alimentation est endommagé, il doit être remplacé par le
fabricant, une station de dépannage agréée ou une personne qualifiée afin
d'éviter un danger.
Pendant son fonctionnement ou dans le cas de l'extinction d'un foyer, tant
que l'indicateur de chaleur résiduelle est allumé, il est vivement conseillé de
tenir les enfants à l'écart de la plaque afin d'éviter les risques de brûlures
graves.
. Les feuilles d'aluminium et les récipients en matière plastique ne doivent pas
être placés sur les surfaces chaudes.
.
.
.
.
.
.
.
.
. L
.
.
.
.
CONSIGNES DE SECURITE
18 FR

. Après chaque utilisation, un petit nettoyage de la table est nécessaire, pour
éviter l'accumulation des salissures et des graisses. Celles-ci recuiraient à
chaque nouvel usage et se carboniseraient en dégageant une fumée et des
odeurs désagréables, sans compter les risques de propagation d'incendie.
. Ne jamais cuisiner directement sur la table, employer des récipients.
. Placer toujours la casserole bien centrée sur le foyer utilisé.
. Ne pas faire glisser les casseroles sur la table : risque de rayures.
. Ne pas utiliser la surface de la table comme planche à découper, ou plan de
travail.
. Ne pas stocker d'objets lourds au dessus de la table, ils pourraient tomber et
endommager la table.
. Ne pas entreposer sur la table des objets quels qu'ils soient.
. Ne pas toucher les zones de cuisson pendant le fonctionnement de la table
ou de suite après son utilisation.
..
1. INSTRUCTIONS GENERALES
Toutes ces caractéristiques sont données à titre indicatif. Soucieux de
toujours améliorer la qualité de sa production, le constructeur pourra apporter
à ses appareils des modifications liées à l'évolution technique en respectant
les conditions fixées à l'article R 132-2 du Code de la Consommation.
Cet appareil est conforme aux Directives Européennes 73/23/EEC et
89/336/EEC, remplacées par 2006/95/EC et 2004/108/EC, et les
modifications successives.
2. INSTALLATION
La mise en place fonctionnelle des appareils ménagers dans leur environnement est une opération délicate qui, si elle n'est
pas correctement effectuée, peut avoir de graves conséquences sur la sécurité des consommateurs. Dans ces conditions, il
est impératif de confier cette tâche à un professionnel qui la réalisera conformément aux normes techniques en vigueur. Si
malgré cette recommandation, le consommateur réalisait lui-même l'installation, le constructeur déclinerait toute
responsabilité en cas de défaillance technique du produit entraînant ou non des dommages aux biens et/ou aux personnes.
3. ENCASTREMENT
Le meuble ou le support dans lequel doit être encastrée la table,
ainsi que les parois du meuble qui pourraient juxtaposer celui-ci,
doivent être d'une matière résistant à une température élevée.
De plus, il est nécessaire que le revêtement qui recouvre le
meuble ou le support soit fixé par une colle résistant à la chaleur
afin d'éviter le décollement.
Installation (fig. B / D):
• Un joint d'étanchéité est livré avec la table de cuisson. Pour
procéder à sa mise en place,
- retourner la table, face verre vers le bas, en prenant soin de
protéger le verre.
- placer le joint tout autour de la table.
- veiller particulièrement à le placer correctement afin d'éviter
toute infiltration dans le meuble support.
• Prévoir un espace de 5 cm minimum entre l'appareil et les parois
verticales avoisinantes.
• Si, en fonction de l'installation de la table, la partie inférieure de
son caisson se trouve à proximité d'une zone normalement
accessible lors de manipulations et/ou de rangements, placer une
cloison à 1 cm du fond du caisson, pour éviter tous risques de
brûlure ou de détérioration.
• En cas d'installation d'une hotte au-dessus de la table de
cuisson, veuillez consulter les instructions d'installation fournies
avec la hotte pour connaître la bonne distance.
• Si vous installez un meuble au dessus de la table de cuisson, la
distance minimale devra être de 70cm.
4. RACCORDEMENT ELECTRIQUE
"L'installation recevant l'appareil cité en référence doit être
conforme à la norme en vigueur dans le pays d'installation". Le
constructeur décline toute responsabilité en cas de non respect
de cette disposition".
Attention : vérifier la continuité de la terre de l'installation avant de
procéder au raccordement. Notre responsabilité ne saurait être
engagée pour tout incident ou ses conséquences éventuelles qui
pourraient survenir à l'usage d'un appareil non relié à la terre, ou
relié à une terre dont la continuité serait défectueuse.
• Avant de procéder au raccordement, le technicien doit vérifier la
tension d'alimentation indiquée au compteur, le réglage du
disjoncteur, le calibre du fusible et la continuité de la terre de
l'installation.
• Le raccordement électrique au réseau doit être effectué par une
prise de courant avec prise de terre, ou par l'intermédiaire d'un
dispositif à coupure omnipolaire conforme à la norme en vigueur
dans le pays d'installation.
Si l'appareil comporte une prise de courant, il doit être installé de
telle façon que la prise de courant soit accessible.
• Le fil de protection vert/jaune doit être relié aux bornes de terre,
de l'appareil d'une part, et de l'installation d'autre part.
• Toute intervention se rapportant au câble d'alimentation doit
impérativement être réalisée par le Service après-vente ou une
personne de qualification similaire.
19 FR

ATTENTION:
Au cas où il serait nécessaire de remplacer le câble
d’alimentation, assurez vous de respecter les codes-couleur
suivants dans le branchement de chacun des fils:
BLEU - NEUTRE (N)
MARRON - PHASE (L)
VERT-JAUNE - TERRE ( )
Elle est livrée avec un câble d'alimentation sans prise permettant
le raccordement exclusivement sous une tension de 230V entre
phases ou entre phase et neutre:
Il est toutefois possible d'adapter l'appareil pour un raccordement
en :
. Triphasé 220-240 V3~
. Triphasé 380-415 V2N~
Pour procéder à un nouveau raccordement, il est impératif de
respecter les consignes citées ci-dessous.
• Tout d'abord, vérifier que l'installation est protégée par un fusible
approprié et que l'installation comporte des fils d'une section
suffisante pour alimenter normalement l'appareil.
• Retourner la table, face verre contre le plan de travail, en prenant
soin de protéger le verre.
- Ouvrir le capot en suivant les étapes suivantes :
• Dévisser la vis du serre-câble "1",
• repérer les deux languettes situées sur chaque côté,
• placer la lame d'un tournevis à l'avant de chaque languette "2"
et "3", enfoncer et presser,
• soulever le capot.
. Raccorder à une prise de courant.
1 2 3
- Libérer le câble d'alimentation :
• dévisser les vis de la plaque à bornes qui maintiennent les
barrettes shunts et les fils conducteurs du câble d'alimentation.
• Retirer le câble d'alimention.
- Opérations à effectuer pour réaliser le nouveau
raccordement:
- Choisir le câble d'alimentation en fonction des recomman-
dations du tableau.
- Passer le câble d'alimentation dans le serre-câble.
- Dénuder l'extrémité de chaque
conducteur du câble d'alimentation sur
une longueur de 10 mm, en tenant compte
de la longueur nécessaire du câble
d'alimentation pour le raccordement à la
plaque à bornes.
- Comme il est indiqué sur le tableau,
positionner les barrettes shunts que vous
aurez récupérées lors de la première
opération en respectant les marquages
sur la plaque à bornes (les barrettes
shunts permettent d'établir un pont entre
deux bornes), et fixer les conducteurs.
Veiller à l'efficacité du serrage sur les différentes bornes.
- Refermer le capot et revisser le serre-câble.
SHUNT
LAY OUT
“ 3 ”
LAY OUT
“ 2 ”
HO5V2V2F
3x2,5
3x2,5 3x2,5
HO5V2V2F
4x1,5
4x1,5 4x1,5
HO5V2V2F
4x1,5
4
x
1,5 4x1,5
LAY OUT
“ 1 ”
N = Neutral T = Earth
5. PRESENTATION
• Le foyer hilight : une lame métallique conductrice est répartie
uniformément sur toute la surface du foyer. Efficace en trois
secondes, il permet la réalisation de cuissons régulières,
homogènes, mais également les cuissons soutenues.
La table vitrocéramique permet de mieux tirer profit de la chaleur
élevée générée par les foyers hilight, accélérant ainsi la cuisson.
Les modifications structurelles maintiennent inaltéré les
propriétés de résistance du verre aux températures élevées et
améliorent la capacité de contrôle de la puissance distribuée.
Avec le principe du "Sprinter", on obtient une réduction du temps
de cuisson pouvant aller jusqu'à 15% suivant le type de cuisson et
les récipients utilisés.
6. LE CHOIX DES USTENSILES
L'utilisation de récipients de qualité est nécessaire pour
obtenir de bons résultats de cuisson :
• Utiliser des récipients de bonne qualité à fond plat : le fond
rigoureusement plat supprimera les points de surchauffe sur
lesquels les aliments attachent, et l'épaisseur du métal permettra
une parfaite répartition de la chaleur.
• Veiller à ce que le fond des récipients soit sec : lors du
remplissage du récipient ou lorsqu'on utilise une casserole
sortant du réfrigérateur, par exemple, s'assurer que l'ustensile est
bien sec; cette précaution évitera toute salissure sur le plan de
cuisson.
• Utiliser des récipients d'un diamètre suffisant pour
recouvrir entièrement le foyer : il convient de veiller à ce que le
fond soit au moins aussi grand que la zone de cuisson. Si le fond
est légèrement plus grand, l'énergie est utilisée de manière
optimale.
20 FR
Ph = Phase
220-240 V~
Monophasé
220-240 V3~
Triphasé
220-240 V2~
Biphasé
380-415 V2N~
Triphasé
Raccordement aux bornes de la plaque
Câble
Câble
Câble
La pagina sta caricando ...
La pagina sta caricando ...
La pagina sta caricando ...
La pagina sta caricando ...
La pagina sta caricando ...
La pagina sta caricando ...
La pagina sta caricando ...
La pagina sta caricando ...
La pagina sta caricando ...
La pagina sta caricando ...
La pagina sta caricando ...
La pagina sta caricando ...
La pagina sta caricando ...
La pagina sta caricando ...
La pagina sta caricando ...
La pagina sta caricando ...
La pagina sta caricando ...
La pagina sta caricando ...
La pagina sta caricando ...
La pagina sta caricando ...
La pagina sta caricando ...
La pagina sta caricando ...
La pagina sta caricando ...
La pagina sta caricando ...
La pagina sta caricando ...
La pagina sta caricando ...
La pagina sta caricando ...
La pagina sta caricando ...
La pagina sta caricando ...
La pagina sta caricando ...
La pagina sta caricando ...
La pagina sta caricando ...
La pagina sta caricando ...
La pagina sta caricando ...
La pagina sta caricando ...
La pagina sta caricando ...
La pagina sta caricando ...
La pagina sta caricando ...
La pagina sta caricando ...
La pagina sta caricando ...
La pagina sta caricando ...
La pagina sta caricando ...
La pagina sta caricando ...
La pagina sta caricando ...
La pagina sta caricando ...
La pagina sta caricando ...
La pagina sta caricando ...
La pagina sta caricando ...
La pagina sta caricando ...
La pagina sta caricando ...
La pagina sta caricando ...
La pagina sta caricando ...
La pagina sta caricando ...
La pagina sta caricando ...
La pagina sta caricando ...
La pagina sta caricando ...
La pagina sta caricando ...
La pagina sta caricando ...
La pagina sta caricando ...
La pagina sta caricando ...
La pagina sta caricando ...
La pagina sta caricando ...
La pagina sta caricando ...
La pagina sta caricando ...
La pagina sta caricando ...
La pagina sta caricando ...
La pagina sta caricando ...
La pagina sta caricando ...
La pagina sta caricando ...
La pagina sta caricando ...
La pagina sta caricando ...
La pagina sta caricando ...
La pagina sta caricando ...
La pagina sta caricando ...
La pagina sta caricando ...
La pagina sta caricando ...
-
 1
1
-
 2
2
-
 3
3
-
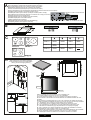 4
4
-
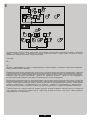 5
5
-
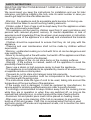 6
6
-
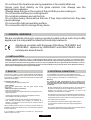 7
7
-
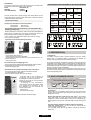 8
8
-
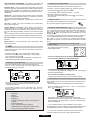 9
9
-
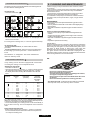 10
10
-
 11
11
-
 12
12
-
 13
13
-
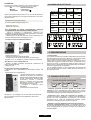 14
14
-
 15
15
-
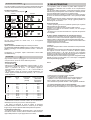 16
16
-
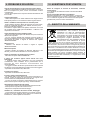 17
17
-
 18
18
-
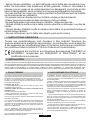 19
19
-
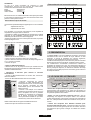 20
20
-
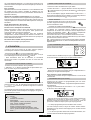 21
21
-
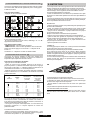 22
22
-
 23
23
-
 24
24
-
 25
25
-
 26
26
-
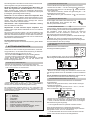 27
27
-
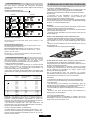 28
28
-
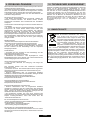 29
29
-
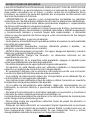 30
30
-
 31
31
-
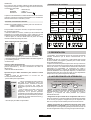 32
32
-
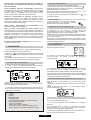 33
33
-
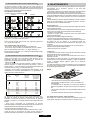 34
34
-
 35
35
-
 36
36
-
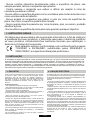 37
37
-
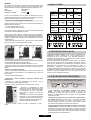 38
38
-
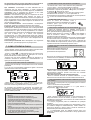 39
39
-
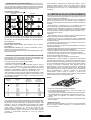 40
40
-
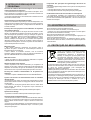 41
41
-
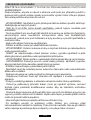 42
42
-
 43
43
-
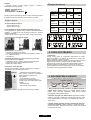 44
44
-
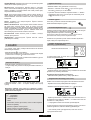 45
45
-
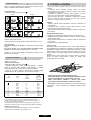 46
46
-
 47
47
-
 48
48
-
 49
49
-
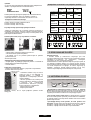 50
50
-
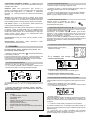 51
51
-
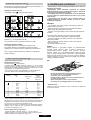 52
52
-
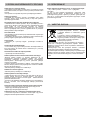 53
53
-
 54
54
-
 55
55
-
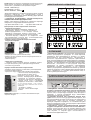 56
56
-
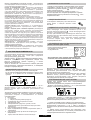 57
57
-
 58
58
-
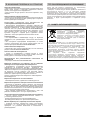 59
59
-
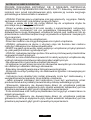 60
60
-
 61
61
-
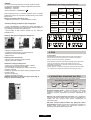 62
62
-
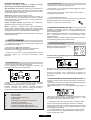 63
63
-
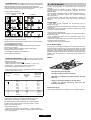 64
64
-
 65
65
-
 66
66
-
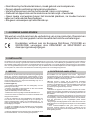 67
67
-
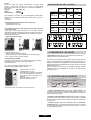 68
68
-
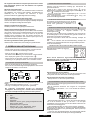 69
69
-
 70
70
-
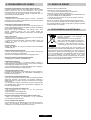 71
71
-
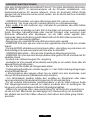 72
72
-
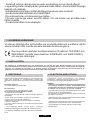 73
73
-
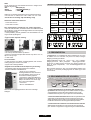 74
74
-
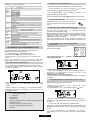 75
75
-
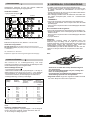 76
76
-
 77
77
-
 78
78
-
 79
79
-
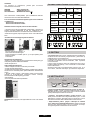 80
80
-
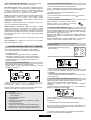 81
81
-
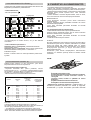 82
82
-
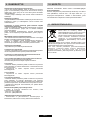 83
83
-
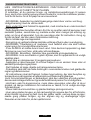 84
84
-
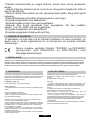 85
85
-
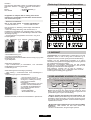 86
86
-
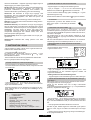 87
87
-
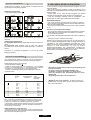 88
88
-
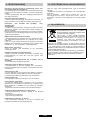 89
89
-
 90
90
-
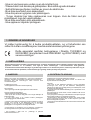 91
91
-
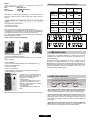 92
92
-
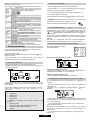 93
93
-
 94
94
-
 95
95
-
 96
96


