
EN Quick installation guide | Starter Pack - Smart Radiator Valves
FR Guide d’installation | Starter Pack - Têtes Thermostatiques Intelligentes
DE Installationsanleitung | Smarte Heizkörperthermostate Starterpaket
ES Guía de instalación | Starter Pack - Válvulas Inteligentes para Radiador
IT Guida all’installazione | Starter Pack - Valvole Termostatiche Intelligenti
PT Manual de instalação rápida | Starter Pack - Cabeças Termostáticas Inteligentes
Starter Pack - Smart
Radiator Valves

You can watch an installation tutorial video online
at the following address:
EN
FR
Une vidéo d’aide à l’installation est disponible
à l’adresse ci-dessous :
DE
Unter der folgenden Adresse können Sie ein
Tutorial-Video zur Installation online anschauen:
ES
Puedes ver un tutorial de instalación en línea en
la siguiente dirección:
IT
Puoi guardare online un video tutorial sull’installa-
zione al seguente indirizzo:
PT
Pode ver um vídeo online que explica o proces-
so de instalação, no seguinte endereço
https://starterpack.netatmo.com

Read these instructions carefully before starting the installation.
The Starter Pack is for indoor use only and must be protected
from damp and dust as well as solar radiation.
EN
!!
ES
Lee atentamente estas instrucciones antes de empezar
la instalación. El Starter Pack es solo para uso interior
y debe protegerse de la humedad y el polvo,
así como de la radiación solar.
IT
Leggi attentamente le seguenti istruzioni prima di cominciare
l’installazione. Il Starter Pack è destinato esclusivamente a un uso
per interni e deve essere protetto dall’umidità, dalla polvere
e dalle radiazioni solari.
FR
Lire attentivement cette notice avant l’installation.
Utilisez le Starter Pack uniquement à l’intérieur des pièces
et protégez-le de l’influence de l’humidité, de la poussière
et des rayons du soleil.
PT
Antes de começar a instalação, leia atentamente estas
instruções. O dispositivo foi concebido apenas para uso interior e
deve ser protegido da humidade e do pó, bem como da radiação
solar e do calor.
DE
Lesen Sie diese Anleitung aufmerksam durch, bevor Sie mit
der Installation beginnen. Das Gerät ist nur für die Verwendung
in Innenräumen gedacht und muss vor Feuchtigkeit, Staub,
Sonneneinstrahlung geschützt werden.

This Starter Pack is exclusively for district or collective heating.
If your heating installation includes an individual heating system
(such as a boiler) connected to a Netatmo Thermostat, buy
the Additional Smart Radiator Valves directly.
If you already own a central thermostat, first buy a Netatmo Smart
Thermostat then Additional Smart Radiator Valves.
For more information, please visit:
EN
Dieses Starterpaket ist ausschließlich für Gemeinschaftsanlagen
oder Fernwärme gedacht. Wenn Ihre Heizung mit einem
individuellen System für Ihren Haushalt versehen (etwa einem
Heizkessel) und mit einem Netatmo-Thermostat verbunden ist,
kaufen Sie die Zusätzlichen Smarten Heizkörperthermostate
direkt.
Wenn Sie bereits einen zentralen Thermostat besitzen, kaufen
Sie zuerst einen Netatmo Smart Thermostat und anschließend
die Zusätzlichen Smarten Heizkörperthermostate.
Für weitere Informationen besuchen Sie unsere Webseite:
DE
Il Starter Pack è destinato esclusivamente ai sistemi
di teleriscaldamento o di riscaldamento centralizzato.
Se il tuo impianto di riscaldamento comprende un sistema
di riscaldamento autonomo (ad esempio una caldaia) connesso
a un Termostato Netatmo, acquista direttamente le Valvole
Intelligenti Aggiuntive per Termosifoni.
Se possiedi già un termostato centrale, prima acquista
un Termostato Intelligente Netatmo, poi le Valvole Intelligenti
Aggiuntive per Termosifoni.
Per ulteriori informazioni visita il sito:
IT
Este Starter Pack destina-se exclusivamente a sistemas de
aquecimento urbano ou coletivo.
Se a sua instalação de aquecimento incluir um sistema de
aquecimento individual (como, por exemplo, uma caldeira) ligado
a um Termostato Netatmo, deve adquirir diretamente as Válvulas
Inteligentes adicionais.
Se já possui um termostato central, compre primeiro um
Termostato Inteligente Netatmo e, depois, as Válvulas Inteligentes
de Radiador.
Para mais informações, visite :
PT
FR
Starter Pack destiné uniquement aux installations
avec chauage collectif ou de ville.
Si votre installation de chauage comporte un chauage individuel
piloté par un Thermostat Netatmo, achetez directement
les Vannes Connectées Additionnelles Netatmo.
Si votre installation de chauage comporte un thermostat d’une
autre marque, remplacez votre thermostat par un Thermostat
Netatmo, puis achetez des Vannes Connectées Additionnelles
Netatmo.
Pour plus d’informations visitez le site:
Este Starter Pack es exclusivamente para calefacción colectiva o
urbana. Si tu instalación de calefacción incluye
un sistemade calefacción individual (como una caldera)
conectado a un Termostato Netatmo, compra directamente
las Válvulas Inteligentes Adicionales para Radiador.
Si ya posees un termostato central, compra primero
un Termostato Inteligente Netatmo y después las Válvulas
Inteligentes Adicionales para Radiador.
Para más información consulta:
ES
https://www.netatmo.com https://www.netatmo.com

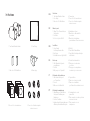
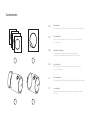
In the box:
1. Two Smart Radiator Valves
2. One Relay
3. Two sets of 2 AA batteries
4. Power plug
5. Two sets of colour adhesives
6. Two sets of radiator adaptors
and accessories
EN
In der Box:
1. Zwei Smarte
Heizkörperthermostate
2. Ein Relais
3. Vier Batterien vom Typ AA LR6
4. Netzteil
5. Zwei Sätze Farbauleber
6. Zwei Sätze Heizkörper-Adapter
mit Zubehör
En la caja:
1. Dos Válvulas Inteligentes
para Radiador
2. Un Relé
3. Dos juegos de 2 pilas AA
4. Enchufe de alimentación
5. Dos juegos de adhesivos
de colores
6. Dos juegos de adaptadores
de radiador y sus accesorios
Contenuto della confezione:
1. Due Valvole Intelligenti
per Termosifoni
2. Un relè
3. Due serie di batterie AA
4. Spina elettrica
5. Due serie di adesivi colorati
6. Due serie di adattatori
per Termosifoni e relativi accessori
Conteúdo da embalagem:
1. Duas Cabeças Termostáticas
Inteligentes Netatmo para
Radiadores
2. Um Relé Netatmo
3. Quatro pilhas AA: duas pilhas para
a Cabeça Termostática Inteligente
4. Um adaptador de setor
para o Relé.
5. Dois conjuntos de quatro películas
adesivas coloridas
6. Dois conjuntos de seis
adaptadores
Dans le pack :
1. Deux Têtes Thermostatiques
Intelligentes
2. Un Relais
3. 2 lots de 2 piles AA LR6
4. Adaptateur secteur
5. Deux lots de films adhésifs
de couleur
6. Deux lots d’adaptateurs
pour radiateurs et leurs accessoires
FR
DE
ES
IT
PT
2. One Relay
3. Two sets of 2 AA batteries
1. Two Smart Radiator Valves
4. Power plug
5. Two sets of colour adhesives 6. Two sets of radiator adaptors
and accessories
In the box
Danfoss RA
M28x1
Danfoss RAVL
Giacomini
Pettinaroli
Danfoss RAV
Vaillant
M28x1.5
M30x1
M30x1.5
Danfoss RA
M28x1
Danfoss RAVL
Giacomini
Pettinaroli
Danfoss RAV
Vaillant
M28x1.5
M30x1
M30x1.5
Danfoss RA
M28x1
Danfoss RAVL
Giacomini
Pettinaroli
Danfoss RAV
Vaillant
M28x1.5
M30x1
M30x1.5
Danfoss RA
M28x1
Danfoss RAVL
Giacomini
Pettinaroli
Danfoss RAV
Vaillant
M28x1.5
M30x1
M30x1.5
Danfoss RA
M28x1
Danfoss RAVL
Giacomini
Pettinaroli
Danfoss RAV
Vaillant
M28x1.5
M30x1
M30x1.5

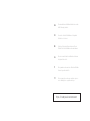
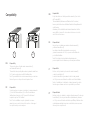
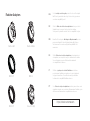
Compatibility
There are two types of radiator valves: manual valves (1),
and thermostatic valves (2).
Thermostatic valves (usually with numbered graduation marks from
1 to 5) can be easily replaced with the Netatmo Valve.
Note: If your installation also includes manual valves you can leave
them as they are or call a professional to replace them.
EN
Compatibilité
Il existe deux types de vannes de radiateur : les vannes manuelles
(1), et les têtes thermostatiques (2). Les têtes thermostatiques
(habituellement graduées de 1 à 5) peuvent être facilement
remplacées par une Tête Netatmo.
Note: Si votre installation comporte également des vannes
manuelles, vous pouvez les laisser telles quelles ou faire appel
à un professionnel pour les remplacer.
FR
Compatibility
DE
Kompatibilität
Es gibt zwei Arten von Heizkörperventilen: manuelle (1) und solche
mit Thermostat (2).
Thermostatventile (üblicherweise mit Skala von 1 bis 5 versehen)
können ganz leicht durch einen Netatmo Smarten Heizkörperthermostat
ersetzt werden.
Anmerkung: Ist Ihre Installation außerdem mit manuellen Ventilen
ausgestattet, so können Sie diese entweder belassen oder durch
einen Profi ersetzen lassen.
ES
Compatibilidad
Hay dos tipos de válvulas para radiador: válvulas manuales (1),
y válvulas termostáticas (2).
Las válvulas termostáticas (normalmente con marcas de
graduación numeradas del 1 al 5) se pueden sustituir fácilmente
por la Válvula Netatmo.
Nota: Si tu instalación incluye también válvulas manuales,
puedes dejarlas tal cual o llamar a un profesional para sustituirlas.
IT
Compatibilità
Esistono due tipi di valvole per termosifoni: valvole manuali (1)
e valvole termostatiche (2).
Le valvole termostatiche (generalmente dotate di scala graduata
da 1 a 5) possono essere facilmente sostituite con la Valvola Netatmo.
Nota: se l’installazione è dotata anche di valvole manuali, è possibile
lasciarle oppure chiamare un tecnico specializzato per sostituirle.
PT
Compatibilidade
Existem dois tipos de válvulas de radiador: válvulas manuais (1) e cabeças
termostáticas (2). As cabeças termostáticas (habitualmente graduadas
de 1 a 5) podem ser facilmente substituídas pela Cabeça Netatmo. Aviso:
as válvulas manuais também podem ser substituídas, mas requerem a
intervenção de um profissional.
1 2

Application
https://valve.netatmo.com
Before inserting the batteries into your Valves,
download the mobile application Energy Netatmo.
To find out how to remotely control your Valves from
your smartphone or tablet, go to:
EN
Avant d’insérer les piles dans vos Têtes,
télécharger l’application mobile Netatmo Énergie.
Pour piloter vos Têtes à distance et les programmer
depuis votre smartphone ou tablette, rendez-vous sur :
FR
DE
Vor dem Einlegen der Batterien in die Heizkörperthermostate
laden Sie bitte die Mobil-App herunter Energy Netatmo.
Um Ihre Heizkörperthermostate per Smartphone oder Tablet
steuern und programmieren zu können, besuchen Sie:
ES
Antes de introducir las pilas en las Válvulas, descárgate
la aplicación de móvil Energy Netatmo.
Para saber cómo controlar las Válvulas a distancia desde
tu smartphone o tableta, consulta:
IT
Prima di inserire le batterie nelle Valvole, scaricare
l’applicazione mobile Energy Netatmo.
Per scoprire come controllare a distanza le Valvole Netatmo
dal tuo smartphone o tablet, vai su:
PT
Antes de inserir as baterias, descarregue a aplicação móvel.
Para saber como controlar as Cabeças remotamente a partir do
seu smartphone ou tablet, vá para:

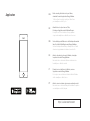
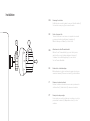
Relay
1. Connect the power plug to the Relay.
2. Plug the Relay in a central location in your home to ensure
connection to all Valves.
3. The light on the Relay blinks.
EN
Relais
1. Connectez l’adaptateur secteur sur le Relais.
2. Branchez le Relais dans une pièce centrale de votre habitation,
pour qu’il soit connecté à toutes vos Vannes.
3. La lumière du Relais clignote.
FR
The Relay
3
21
DE
ES
IT
PT
Relais
1. Schließen Sie das Relais an das Netzteil an.
2. Schließen Sie das Relais in einem möglichst zentral gelegenen
Raum an, um den Anschluss an alle Ventile sicherzustellen.
3. Die Lampe auf dem Relais blinkt.
El Relé
1. Conecta el enchufe de alimentación al Relé.
2. Enchufa el Relé en una ubicación central de tu casa
para garantizar la conexión a todas las Válvulas.
3. La luz del Relé parpadea.
Un relè
1. Collegare la spina elettrica al Relè.
2. Collega il Relè in una posizione centrale della tua abitazione
per assicurare il collegamento a tutte le Valvole.
3. La luce del Relè lampeggia.
Relé
1. Ligue a ficha de alimentação ao Relé.
2. Ligue o Relé numa localização central da sua casa
para garantir a conexão com todas as Cabeças.
3. A luz no Relé pisca.

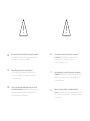
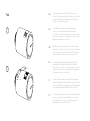
Batteries
Follow the steps below, only when required in the application
1. Open the front panel of the Valve using a small anti-clockwise rotation.
2. Open the metal battery cover.
3. Insert the batteries ensuring the positive and negative ends correspond.
4. Close the metal battery cover and replace the front panel.
EN
Suivez les instructions ci-dessous, uniquement lorsque précisé
dans l’application
1. Ouvrir la Tête en tournant la face avant dans le sens inverse
des aiguilles d’une montre.
2. Ouvrir la trappe à piles en métal.
3. Insérer les piles en respectant la polarité indiquée.
4. Refermer la trappe en métal et revisser la face avant.
FR
Folgen Sie dem unten beschriebenen Ablauf nur dann,
wenn die App Sie dazu auordert.
1. Önen Sie den Heizkörperthermostat, indem Sie die vordere
Abdeckung gegen den Uhrzeigersinn drehen.
2. Önen Sie die Batterieabdeckung aus Metall.
3. Legen Sie die Batterien ein. Achten Sie auf die richtige Polung.
4. Schrauben Sie die vordere Abdeckung wieder an.
DE
Sigue los pasos a continuación solo cuando la aplicación lo solicite
1. Abre el panel frontal de la Válvula realizando una pequeña rotación
en el sentido contrario a las agujas del reloj.
2. Abre la tapa metálica de las pilas.
3. Introduce las pilas asegurándote de que los polos positivo y negativo coincidan.
4. Cierra la tapa metálica de las pilas y vuelve a colocar el panel frontal.
ES
Seguire i passaggi riportati di seguito, solo quando richiesto nell’applicazione
1. Aprire il pannello frontale della Valvola con una piccola rotazione antioraria.
2. Aprire il copri batterie in metallo.
3. Inserire le batterie assicurandosi che i poli negativo e positivo corrispondano.
4. Chiudere il copri batterie in metallo e riposizionare il pannello frontale.
IT
Siga os passos abaixo, apenas quando necessário na aplicação
1. Abra o painel frontal da Cabeça, fazendo-o rodar ligeiramente para a esquerda.
2. Abra a tampa metálica das pilhas.
3. Insira as pilhas, certificando-se de que os lados positivos e negativos coincidem.
4. Feche a tampa metálica das pilhas e volte a colocar o painel frontal.
PT
1
2
3
4

Customisation
Customisation
You can customise each Valve using one of the colour adhesives provided.
EN
Personnalisation
Vous pouvez personnaliser chaque Tête avec l’un des films adhésifs
de couleur fournis.
FR
DE
ES
Personalización
Puedes personalizar cada Válvula utilizando uno de los adhesivos
de color suministrados.
IT
Personalizzazione
Puoi personalizzare ogni Valvola utilizzando uno degli adesivi colorati in dotazione.
PT
Personalização
Pode personalizar cada Cabeça, utilizando um dos autocolantes coloridos
fornecidos.
Individuelle Gestaltung
Sie können jedem Smarten Heizkörperthermostat mit einem
der mitgelieferten Farbauleber eine individuelle Note verleihen.
1 2
3 4

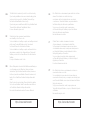
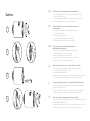
Installation
Removing the old valve
Rotate the valve counter-clockwise to remove it from the radiator (1).
Unscrew the securing ring (2) and remove the valve.
EN
Retirer l’ancienne tête
Tournez la tête dans le sens inverse des aiguilles d’une montre
pour pouvoir la retirer plus facilement du radiateur (1).
Dévissez la bague de fixation (2) et retirez la tête.
FR
DE
IT
PT
Abnehmen des alten Thermostatventils
Drehen Sie das Thermostatventil gegen den Uhrzeigersinn,
um ihn leichter von der Heizung abnehmen zu können (1).
Schrauben Sie den Befestigungsring (2) los und ziehen
Sie das Thermostatventil ab.
ES
Extracción de la válvula antigua
Gira la válvula en el sentido contrario a las agujas del reloj para
sacarla del radiador (1). Desenrosca el anillo (2) y retira la válvula.
Rimuovere la valvola esistente
Ruotare il contatore della valvola in senso orario per rimuoverla
dal termosifone (1). Svitare l’anello (2) e rimuovere la valvola.
Remoção da cabeça antiga
Rode a cabeça no sentido contrário ao dos ponteiros do relógio
para a retirar do radiador (1). Desaparafuse o anel (2) e retire
a válvula.
1 2 3
12

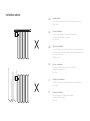
Radiator Adaptors
Use the adaptor selection guide provided to choose the adaptor
that fits onto your radiator valve body. For more help, you can use
our online compatibility tool at:
EN
Utilisez le Guide de sélection des adaptateurs inclus pour choisir
l’adaptateur qui correspond à votre robinet de radiateur.
Vous pouvez également consulter l’outil de compatibilité en ligne :
FR
DE
Benutzen Sie beiliegende Anleitung zur Adapterauswahl, um den
passenden Adapter für Ihren Heizkörperthermostat zu finden.
Sie können auch das online verfügbare Kompatibilitäts-Tool
verwenden:
ES
Utiliza la Guía de selección de adaptadores incluida para elegir
el adaptador que se ajuste al cuerpo de la válvula de tu radiador.
Si necesitas ayuda, puedes utilizar nuestra herramienta
de compatibilidad en línea en:
IT
Utilizzare la guida per la scelta dell’adattatore in dotazione
per individuare l’adattatore adeguato per il corpo della valvola
del proprio termosifone. Per un ulteriore aiuto, puoi utilizzare
lo strumento di compatibilità Netatmo online su:
PT
Use o Guia de seleção de adaptadores incluído para escolher o anel
adaptador adequado ao seu radiador. Para uma maior facilidade, pode
utilizar a nossa ferramenta de compatibilidade online, em:
https://check.netatmo.com
Danfoss RAVL
M30 x 1
Giacomini (GI)
Danfoss RA
M30 x 1.5
M28 x 1.5
Danfoss RA
M28x1
Danfoss RAVL
Giacomini
Pettinaroli
Danfoss RAV
Vaillant
M28x1.5
M30x1
M30x1.5
Danfoss RA
M28x1
Danfoss RAVL
Giacomini
Pettinaroli
Danfoss RAV
Vaillant
M28x1.5
M30x1
M30x1.5
Danfoss RA
M28x1
Danfoss RAVL
Giacomini
Pettinaroli
Danfoss RAV
Vaillant
M28x1.5
M30x1
M30x1.5
Danfoss RA
M28x1
Danfoss RAVL
Giacomini
Pettinaroli
Danfoss RAV
Vaillant
M28x1.5
M30x1
M30x1.5
Danfoss RA
M28x1
Danfoss RAVL
Giacomini
Pettinaroli
Danfoss RAV
Vaillant
M28x1.5
M30x1
M30x1.5

Valve installation
Valve installation
Fit the suitable adaptor (1) onto the valve body. Then, screw the Netatmo
Valve onto the adaptor (2) while turning it to ensure the display faces
the right direction. Do not use a wrench.
EN
Installation de la Tête
Vissez l’adaptateur (1) qui convient sur le robinet du radiateur.
Puis vissez la Tête Netatmo sur l’adaptateur (2) en orientant l’écran dans le sens
qui convient. Ne pas utiliser de pince.
FR
DE
ES
IT
PT
Installation des Heizkörperthermostats
Schrauben Sie den Adapter (1) auf den Anschluss des Heizkörpers.
Schrauben Sie dann den Netatmo-Heizkörperthermostat auf den Adapter (2)
und drehen Sie ihn, bis das Display in die richtige Richtung zeigt.
verwenden Sie keine Zange.
Instalación de la Válvula
Coloca el adaptador adecuado (1) en el cuerpo de la válvula.
Enrosca la Válvula Netatmo en el adaptador (2) mientras la giras para
asegurarte de que la pantalla mire en la dirección correcta. No utilizar alicate.
Installazione Valvola
Posizionare l’adattatore adeguato (1) sul corpo della valvola. Poi, avvitare
la Valvola Netatmo all’adattatore (2) ruotandolo per assicurarsi che il display
sia posizionato nella giusta direzione. Non utilizzare pinze.
Instalação da Cabeça
Encaixe o adaptador adequado (1) no corpo da válvula. Em seguida,
aparafuse a Cabeça Netatmo no adaptador (2) rodando-a de modo
a que o ecrã fique virado para o lado certo. Não usar alicate.
2
1

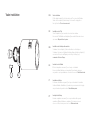
Test
The display shows the room temperature (1). To increase/
decrease the temperature setpoint on the Valve, twist the cylinder
clockwise/anticlockwise. The manual setpoint is temporarily
displayed on a black background (2).
EN
L’écran ache en permanence la température ambiante
de la pièce (1). Pour augmenter/diminuer la température
de consigne sur la Tête, tournez légèrement le cylindre extérieur
vers la droite ou la gauche. La température de consigne est alors
achée temporairement sur fond noir (2).
FR
DE
ES
IT
PT
Das Display zeigt die Raumtemperatur an (1). Um die Sollwert-
Temperatur zu erhöhen oder zu senken, drehen Sie den Zylinder
leicht nach rechts oder nach links. Die Sollwert-Temperatur wird
für einige Zeit auf schwarzem Hintergrund eingeblendet (2).
La pantalla muestra la temperatura de la habitación (1). Para
aumentar/reducir la temperatura establecida en la Válvula,
gira el cilindro en el sentido de las agujas del reloj/en el sentido
contrario a las agujas del reloj. La configuración manual aparece
temporalmente sobre un fondo negro (2).
Il display indica la temperatura della stanza (1). Per aumentare/
diminuire la temperatura impostata sulla Valvola, ruotare il cilindro
in senso orario/antiorario. La temperatura impostata manualmente
viene temporaneamente visualizzata su uno sfondo nero (2).
O ecrã mostra a temperatura ambiente (1). Para aumentar/diminuir
o ponto de ajuste da temperatura na Cabeça, rode o cilindro
para a direita/esquerda. O ponto de ajuste manual aparece
temporariamente sobre um fundo preto (2).
1
2
-
«clic»
+
«clic»

Installation advice
Installation advice
Do not block air ventilation next to the Valve (curtain, radiator cover…)
Do not cover.
EN
Conseils d’installation
Veillez à ne pas empêcher la circulation d’air à proximité
de la Vanne (rideau, tablette de radiateur…)
Ne pas couvrir.
FR
DE
Tipps für die Installation
Sorgen Sie dafür, dass die Luft in der Nähe des Heizkörperthermostat frei
zirkulieren kann und nicht durch Vorhänge, Heizungsabdeckungen oder
Ähnliches behindert wird.
Nicht abdecken.
ES
Consejo de instalación
No bloquees la ventilación de aire al lado de la Válvula
(cortina, tapa del radiador, etc.)
No cubrir..
IT
Consiglio per l’installazione
Non bloccare l’areazione vicino alla Valvola (tenda, copri termosifone, ecc.)
Non coprire.
PT
Conselho de instalação
Não obstrua a grelha de ventilação junto da Válvula
(cortina, cobertura de radiador…)
Não cubra.

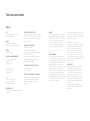
SIZE
Valve: 58 mm (diameter), 80 mm (L)
Relay: 83 x 83 x 24 mm
WEIGHT
Valve: 186 g (including batteries)
Relay: 110 g (excluding the power plug)
DESIGN
Designed by Starck
SENSORS AND MEASUREMENTS
Temperature (measurement):
Range: 0°C to 50°C
Accuracy: +/- 0.5°C
Temperature (setpoint):
Range: 5°C to 30°C
Increment: 0.5°C
Motor:
Linear motion: 8 mm max
Noise level: < 35 dBA
Spring force: 80 N max
E-PAPER DISPLAY
Energy ecient, longer battery life and optimal
readability.
FREE APP, LIFETIME SUPPORT
No subscription fee. App available on the App
Store and on Google Play. Free access to your
online personal dashboard. Accessible from
multiple devices.
WIRELESS SPECIFICATIONS
802.11 b/g/n compatible
(2.400-2.496 GHz @ 100mW).
Supported security: Open/WEP/WPA/ WPA2-
personal (TKIP and AES).
Wireless connection between Valves and
Relay: long-range radio (868.9-869.1 ,
869.7-869.9 MHz @16mW).
POWER AND BATTERIES ( PER VALVE)
Two 1.5V AA batteries.
Two year-battery life.
SETUP AND COMPATIBILITY ( PER VALVE)
6 radiator adaptors suitable for use with the
following valve bodies: M30x1.5, M30x1.0,
M28x1.5, Danfoss RAVL, Danfoss RA,
Giacomini.
HOMEKIT
Controlling this HomeKit-enabled accessory
automatically and away from home requires
an Apple TV with tvOS 10 or later or an iPad
with iOS 10 or later set up as a home hub.
Communication between iPhone, iPad,
or iPod touch and the HomeKit-enabled
Relay is secured by HomeKit technology.
-------------------------------------------------
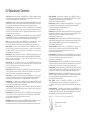
SAFETY WARNINGS
This device must be installed according to
the applicable norms. Use only with supplied
power plug adaptor. This device is for indoor
use only. Before inserting the batteries, check
that the contacts in the device and on the
batteries are clean, is necessary clean them.
Note the polarity (+/-) when inserting the
batteries. Do not throw the batteries into a fire,
short-circuit them or dismantle them. Keep
children away from batteries. Seek medical
attention immediately if a battery is swallowed.
Do not attempt to repair the device yourself;
customer service is available.
Any changes or modifications to this unit not
expressly approved by the party responsible
for compliance could void the user’s authority
to operate the equipment.
Relay insulation: class II devices.
This device is not intended for use by persons
(including children) with reduced physical,
sensory or mental capabilities, or lack of
experience and knowledge, unless they
have been given supervision or instruction
concerning use of the appliance by a person
responsible for their safety. Children should
be supervised to ensure that they do not play
with the appliance.
LEGAL NOTICE
Use of the Works with Apple HomeKit logo
means that an electronic accesory has
been designed to connect specifically to
iPod, iPhone or iPad, respectively, and has
been certified by the developer to meet
Apple performance standards. Apple is not
responsible for the operation of this device
or its compliance with safety and regulatory
standards.
Please note that the use of this accessory
with iPod, iPhone, or iPad may aect wireless
performance.
Technical specification
ENGLISH

DIMENSIONS
Tête : 58 mm (diamètre), 80 mm (L)
Relais : 83 x 83 x 24 mm
POIDS
Tête : 186 g (piles incluses)
Relais : 110 g (hors adaptateur secteur)
DESIGN
Dessinée par Starck
CAPTEURS ET MESURES
Température (mesurée) :
Plage de mesure : 0°C à 50°C
Précision : +/- 0,5°C
Température (consigne) :
Plage de réglage : 5°C à 30°C
Incrément : 0,5°C
Moteur :
Course linéaire : 8 mm max
Niveau sonore : < 35 dBA
Force de poussée : 80N max
ÉCRAN E-PAPER
économe en énergie, autonomie allongée et
lisibilité optimale.
HOMEKIT
Pour contrôler à distance et automatiquement
cet accessoire utilisant HomeKit, il est néces-
saire d’utiliser une Apple TV avec le logiciel
tvOS 10 ou supérieur, ou un iPad avec iOS 10
ou supérieur configuré comme concentrateur.
-------------------------------------------------
AVERTISSEMENTS
L’appareil doit être installé selon les normes
en vigueur. N’utilisez que l’adapteur secteur
fourni. Cet appareil est exclusivement conçu
pour un usage en intérieur. Avant d’insérer les
piles, vérifiez que les points de contact sur
l’appareil ainsi que sur les piles sont propres
et nettoyez-les, si nécessaire. Faites attention
à la polarité (+/-) lors de l’insertion des piles.
Ne pas jeter les piles au feu, les court-circuiter
ou les ouvrir. Tenez les enfants à l’écart des
piles. En cas d’ingestion, consultez immé-
diatement un médecin. Ne pas essayer de
réparer cet appareil vous même, un service
après-vente est à votre disposition.
APPLICATION GRATUITE, À VIE
Pas de frais d’abonnement. Application
disponible sur l’App Store et Google Play.
Accessible depuis plusieurs appareils et
plusieurs utilisateurs.
CARACTÉRISTIQUES SANS-FIL
Compatible WiFi 802,11 b/g/n
(2.400-2.496 GHz @ 100mW).
Sécurités supportées : ouvert/WEP/WPA/
WPA2-personal (TKIP et AES)
Connexion sans fil entre une Vanne et un
Relais : radio longue portée
(868.9-869.1 , 869.7-869.9 MHz @16mW)
ALIMENTATION ET PILES (PAR VANNE)
Deux piles alcalines AA 1,5 V
Deux ans d’autonomie.
COMPATIBILITÉ ET INSTALLATION
6 adaptateurs fournis pour les corps de vanne
suivants : M30x1.5, M30x1.0, M28x1.5,
Danfoss RAVL, Danfoss RA, Giacomini.
Tout changement ou toute modification non
approuvé expressément dans ce manuel peut
annuler votre droit relatif au fonctionnement et/
ou au service de garantie de cet appareil.
Isolation du relais : classe II.
Cet appareil n‘est pas fait pour être utilisé par
des personnes handicapées physiquement ou
mentalement ou par des personnes non com-
pétentes (y compris les enfants), sauf si ces
personnes sont surveillées ou supervisées par
une personne responsable de leur sécurité.
Les enfants doivent être surveillés afin de
s’assurer qu’ils ne jouent pas avec l’appareil.
MENTIONS LÉGALES
L’utilisation du logo HomeKit signifie qu’un
accessoire électronique a été conçu spécifi-
quement pour se connecter à un iPod, iPhone
ou iPad, et a été certifié par le développeur
pour atteindre les standards de performance
Apple. Apple n’est pas responsable du
fonctionnement de cet appareil ni de son
respect des normes de sécurité et standards
réglementaires. Veuillez noter que l’utilisation
de cet accessoire avec un iPod, iPhone ou
iPad pourrait aecter les performances sans-fil.
Caractéristiques techniques
FRANÇAIS

ABMESSUNGEN
Heizkörperthermostat: 58 mm (Durchmesser),
80 mm (L)
Relais: 83 x 83 x 24 mm
GEWICHT
Heizkörperthermostat: 186 g (einschließlich
Batterien)
Relais: 110 g (ohne Netzteil)
DESIGN
Design von Starck
SENSOREN UND MESSUNGEN
Temperatur (gemessen):
Messbereich: 0 °C bis 50 °C
Genauigkeit: +/- 0,5 °C
Temperatur (Sollwert):
Einstellbereich: 5 °C bis 30 °C
Schrittweite: 0,5 °C
Motor :
Linearer Hub, max. 8 mm
Geräuschpegel: < 35 dBA
Federkraft: max. 80 N
E-PAPER-DISPLAY
Sparsam, mit langer Batteriedauer und opti-
maler Lesbarkeit.
KOSTENLOSE APP, LEBENSLANGER
SUPPORT
Keine Abonnementgebühren. App im App
Store und auf Google Play erhältlich. Zugri
über verschiedene Geräte und durch mehrere
Nutzer.
MERKMALE FÜR DEN WLAN-BETRIEB
Kompatibel mit WLAN 802,11 b/g/n
(2.400-2.496 GHz @ 100mW).
Unterstützte Sicherheit: Oen/WEP/WPA/
WPA2-personal (TKIP und AES).
Drahtlose Verbindung zwischen Heizkör-
perthermostat und Relais: Funk mit großer
Reichweite (868.9-869.1 ,
869.7-869.9 MHz @16mW).
STROMVERSORGUNG UND BATTERIEN
(PRO HEIZKÖRPERTHERMOSTAT)
2 Alkaline-Batterien (AA 1,5 V)
Batterien halten 2 Jahre.
KOMPATIBILITÄT UND INSTALLATION
6 Adapterringe für folgende Thermostatkörper:
M30x1.5, M30x1.0, M28x1.5, Danfoss RAVL,
Danfoss RA, Giacomini.
HOMEKIT
Das automatische Steuern dieses HomeKit-fähi-
gen Zubehörs, wenn Sie nicht zuhause sind,
erfordert ein Apple TV mit tvOS 10 oder höher
oder ein iPad mit iOS 10 oder höher, konfiguriert
als Home Hub.
-------------------------------------------------
SICHERHEITSHINWEIS
Dieses Gerät muss gemäß den geltenden
Normen installiert werden. Verwenden Sie
nur den im Lieferumfang enthaltenen Netza-
dapter. Dieses Gerät ist nur zur Benutzung
im Innenbereich bestimmt. Bevor Sie die
Batterien einsetzen, kontrollieren Sie, ob die
Kontakte im Gerät und die Kontaktflächen
an den Batterien sauber sind. Reinigen Sie
sie nötigenfalls. Achten Sie beim Einsetzen
der Batterien auf die Polarität (+/-). Batterien
nicht in ein Feuer werfen, kurzschließen oder
auseinandernehmen. Halten Sie Kinder von
Batterien fern. Falls ein Kind eine Batterie
verschluckt hat, suchen Sie sofort einen Arzt
auf. Versuchen Sie nicht, das Gerät selbst zu
reparieren, sondern wenden Sie sich an den
Kundendienst.
Veränderungen, die nicht ausdrücklich von
der für die Übereinstimmung verantwortlichen
Partei genehmigt sind, können dazu führen,
dass die Betriebsgenehmigung des Benutzers
erlischt.
Relais isolierung: Geräte der Klasse II.
Dieses Gerät ist nicht dafür bestimmt,
durch Personen (einschließlich Kinder) mit
eingeschränkten physischen, sensorischen
oder geistigen Fähigkeiten oder mangels
Erfahrung und/oder mangels Wissen
benutzt zu werden, es sei denn, sie werden
durch eine für ihre Sicherheit zuständige
Person beaufsichtigt oder erhielten von ihr
Anweisungen, wie das Gerät zu benutzen
ist. Kinder sollten beaufsichtigt werden, um
sicherzustellen, dass sie nicht mit dem Gerät
spielen.
RECHTLICHER HINWEIS
Die Verwendung des HomeKit Logos bedeutet,
dass ein elektronisches Zusatzgerät speziell
für die Verbindung mit iPod, iPhone oder iPad
konzipiert wurde, und vom Entwickler zertifiziert
wurde, dass es den Apple Leistungsstan-
dards entspricht. Apple ist für den Betrieb
dieses Gerätes oder für seine Einhaltung der
Sicherheits- und regulatorischen Normen nicht
verantwortlich. Bitte beachten Sie, dass die
Benutzung dieses Zusatzgerätes mit iPod,
iPhone oder iPad die drahtlose Leistung beein-
trächtigen kann.
Technische Daten
DEUTSCH

DIMENSIONES
Válvula: 58 mm (diámetro), 80 mm (L)
Relé: 83 x 83 x 24 mm
PESO
Válvula: 186 g (incluyendo las pilas)
Relé: 110 g (excluyendo el enchufe de
alimentación)
DISEÑO
Diseñado por Starck
SENSORES Y MEDICIONES
Temperatura (medición):
Rango: 0 °C a 50 °C
Precisión: +/- 0,5 °C
Temperatura (prefijada):
Rango: 5 °C a 30 °C
Incremento: 0,5 °C
Motor:
Movimiento lineal: 8 mm máx
Nivel de ruido: < 35 dBA
Fuerza del resorte: 80 N máx
PANTALLA E-PAPER
Eficiencia energética, mayor duración de las
pilas y legibilidad óptima.
APLICACIÓN GRATUITA,
SOPORTE DE POR VIDA
Sin cuota de suscripción. Aplicación
disponible en la App Store y Google Play.
Acceso gratuito a tu panel de control personal
en línea. Accesible desde múltiples aparatos.
ESPECIFICACIONES INALÁMBRICAS
Compatible wifi 802.11 b/g/n
(2.400-2.496 GHz @ 100mW).
Protocolos de seguridad soportados: Abierto/
WEP/WPA/ WPA2-personal (TKIP y AES).
Conexión inalámbrica entre las Válvulas y el
Relé: radio de largo alcance (868.9-869.1 ,
869.7-869.9 MHz @16mW).
ALIMENTACIÓN Y PILAS (POR VÁLVULA)
Dos pilas AA 1.5V.
Duración de la pila: 2 años.
CONFIGURACIÓN Y COMPATIBILIDAD (POR
VÁLVULA)
6 adaptadores de radiador adecuados para
los cuerpos de válvulas siguientes: M30x1.5,
M30x1.0, M28x1.5, Danfoss RAVL, Danfoss RA,
Giacomini.
HOMEKIT
Controlar este accesorio con HomeKit
habilitado automáticamente y desde fuera
de casa requiere una Apple TV con tvOS 10
o posterior o un iPad con iOS 10 o posterior
configurado como hub doméstico.
-------------------------------------------------
ADVERTENCIAS DE SEGURIDAD
Este dispositivo se debe instalar en
conformidad con la normativa vigente. Utilizar
solamente con el adaptador de enchufe de
alimentación. Este dispositivo es para su uso
en interiores solamente. Antes de introducir
las baterías, compruebe que los contactos en
el dispositivo y en las baterías estén limpios,
si es necesario límpielos. Tenga en cuenta la
polaridad (+/-) cuando introduzca las baterías.
No arroje las baterías al fuego, las cortocircuite
o desmonte. Mantenga las baterías fuera del
alcance de los niños. Busque atención médica
inmediatamente si se traga una batería. No
intente reparar el dispositivo usted mismo,
existe a su disposición un servicio de atención
al cliente. Cualquier cambio o modificación
no aprobada expresamente en este manual
puede anular el derecho del usuario relativo al
funcionamiento y/o al servicio de garantía de
este aparato.
Aislamiento del relé: dispositivos de clase II.
Este dispositivo no ha sido diseñado para
que lo utilicen personas (incluidos niños)
con discapacidades físicas, sensoriales
o mentales, o falta de experiencia y
conocimiento, a menos que una persona
responsable de su seguridad les vigile o les
proporcione instrucciones sobre cómo utilizar
el aparato. Se debe vigilar a los niños para
garantizar que no jueguen con el aparato.
AVISO LEGAL
El uso del logotipo de HomeKit significa que
un accesorio electrónico ha sido diseñado
para conectarse específicamente a un iPod,
iPhone o iPad, respectivamente, y que ha
sido certificado por el desarrollador para
cumplir con los estándares de rendimiento
de Apple. Apple no se hace responsable
de la operación de este dispositivo ni de su
cumplimiento de los estándares de seguridad
y normativos.
Por favor, tenga en cuenta que el uso de
este accesorio con iPod, iPhone o iPad
podría afectar al rendimiento de la conexión
inalámbrica.
Especificaciones
ESPAÑOL

DIMENSIONI
Valvola: 58 mm (diametro), 80 mm (L)
Relè: 83 x 83 x 24 mm
PESO
Valvola: 186 g (comprese le batterie)
Relè: 110 g (esclusa la spina elettrica)
DESIGN
Disegnato da Starck
SENSORI E MISURAZIONI
Temperatura (misurazione):
Misure: da 0°C a 50°C
Precisione: +/- 0,5°C
Temperatura (valore impostato):
Misure: da 5°C a 30°C
Incremento: 0,5°C
Motore:
Movimento lineare: 8 mm max
Livello rumorosità: < 35 dBA
Forza elastica: 80 N max
DISPLAY E-PAPER
Ecienza energetica, durata batterie maggiore
e leggibilità ottimale.
APP GRATUITA, SUPPORTO TECNICO
A VITA
Senza costi di abbonamento. App disponibile
su App Store e su Google Play. Accesso
gratuito al tuo pannello di controllo personale
online. Accessibile da diversi dispositivi.
CARATTERISTICHE WIRELESS
compatibile con 802.11 b/g/n
(2.400-2.496 GHz @ 100mW).
Protocolli di sicurezza supportati: aperto/
WEP/WPA/WPA2-personal (TKIP e AES).
Connessione wireless tra Valvole e Relè:
radio a la lunga portata (868.9-869.1 ,
869.7-869.9 MHz @16mW).
ALIMENTAZIONE E BATTERIE
(PER VALVOLA)
Due batterie AA da 1,5V.
Durata della batteria: 2 anni.
IMPOSTAZIONE E COMPATIBILITÀ
(PER VALVOLA)
6 adattatori per termosifoni che possono
essere utilizzati con le seguenti valvole:
M30x1.5, M30x1.0, M28x1.5, Danfoss RAVL,
Danfoss RA, Giacomini.
HOMEKIT
Controllare gli accessori per HomeKit
automaticamente e lontano da casa
richiede una Apple TV con tvOS 10
o versione successiva e un iPad
con iOS 10 o versione successiva
configurato come hub abitazione.
-------------------------------------------------
AVVISI DI SICUREZZA
Questo dispositivo deve essere installato in
base alle norme applicabili. Utilizzare solo
con l’adattatore di alimentazione fornito.
Questo dispositivo può essere utilizzato solo
all’interno. Prima di inserire le pile, controllare
che i contatti nel dispositivo e nelle pile
siano puliti, se necessario pulirli. Rispettare
la polarità (+/-) durante l’inserimento delle
pile. Non gettare le pile nel fuoco, né
cortocircuitarle o smontarle. Tenere i bambini
lontano dalle pile. In caso di ingerimento
delle pile, contattare immediatamente un
medico. Non tentare di riparare il dispositivo:
è disponibile il servizio clienti. Qualsiasi
cambiamento o modifica a questa unità
non espressamente approvata dall’ente
responsabile della conformità può invalidare
il diritto del cliente a usare il dispositivo o a
far valere la garanzia sullo stesso.
Isolamento relè: dispositivi di classe II.
Questo dispositivo non è destinato all’uso
da parte di persone (compresi i bambini) con
ridotte capacità fisiche, sensorie o mentali, o
prive di esperienza o conoscenza, a meno
che non siano supervisionati o istruiti da una
persona responsabile della loro sicurezza
sull’uso dell’apparecchio. I bambini devono
essere controllati per assicurarsi che non
giochino con il dispositivo.
NOTA LEGALE
L’utilizzo del logo HomeKit significa che un
accessorio elettronico è stato progettato per
essere collegato specificatamente ad iPod,
iPhone o iPad, rispettivamente, ed è stato
certificato dallo sviluppatore per soddisfare
gli standard Apple. Apple non è responsabile
del funzionamento di questo dispositivo o
della sua conformità agli standard normativi e
di sicurezza. Si prega di notare che l’utilizzo
di questo accessorio con iPod, iPhone o iPad
può influire sulle prestazioni wireless.
Specifiche
ITALIANO
La pagina sta caricando ...
La pagina sta caricando ...
La pagina sta caricando ...
La pagina sta caricando ...
La pagina sta caricando ...
-
 1
1
-
 2
2
-
 3
3
-
 4
4
-
 5
5
-
 6
6
-
 7
7
-
 8
8
-
 9
9
-
 10
10
-
 11
11
-
 12
12
-
 13
13
-
 14
14
-
 15
15
-
 16
16
-
 17
17
-
 18
18
-
 19
19
-
 20
20
-
 21
21
-
 22
22
-
 23
23
-
 24
24
-
 25
25


Netatmo Kit Vanne connectée radiateur Manuale del proprietario
- Tipo
- Manuale del proprietario
- Questo manuale è adatto anche per
in altre lingue
- English: Netatmo Kit Vanne connectée radiateur Owner's manual
- français: Netatmo Kit Vanne connectée radiateur Le manuel du propriétaire
- español: Netatmo Kit Vanne connectée radiateur El manual del propietario
- Deutsch: Netatmo Kit Vanne connectée radiateur Bedienungsanleitung
- português: Netatmo Kit Vanne connectée radiateur Manual do proprietário
Documenti correlati
-
Netatmo Vanne additionnelle pour radiateur Manuale del proprietario
-
Netatmo Valve Adaptor Guida utente
-
Netatmo RAIN GAUGE (RG01-WW) Manuale del proprietario
-
-
Legrand DTGUS Manuale utente
-
-
-
-
-
Netatmo Smart Smoke Alarm NSD01 Manuale del proprietario
Altri documenti
-
-
Bticino FC80GT Istruzioni per l'uso
-
-
-
-
Giacomini R453 Istruzioni per l'uso
-
-
-
Honeywell HR80 Manuale del proprietario
-
Danfoss 014G0051 Guida d'installazione