Netatmo Pack Thermostat Intelligent+3 Tetes ther Manuale del proprietario
- Categoria
- Termostati
- Tipo
- Manuale del proprietario

EN – Replacing a wireless thermostat or installing your first thermostat | Smart Thermostat
FR – Vous remplacez un thermostat sans-fil ou vous installez votre premier thermostat | Thermostat Intelligent
IT – Sostituzione di un termostato wireless oppure installazione del primo termostato | Termostato Intelligente
ES – Sustitución de un termostato inalámbrico o instalación de un primer termostato | Termostato Inteligente
DE – Ersetzen eines drahtlosen Thermostats oder installation Ihres ersten Thermostats | Smart Thermostat
PT – Substituição de um termostato sem foi ou instalação de um termostato pela primeira vez | Termóstato Inteligente
Smart Thermostat
2

2 3
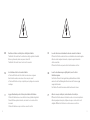
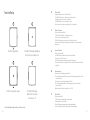
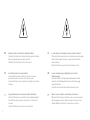
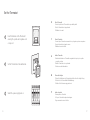
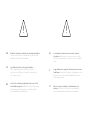
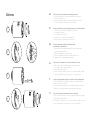
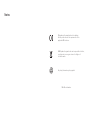
Read these instructions carefully before starting the installation.
The Netatmo Thermostat must be installed according to applicable standards.
Before any intervention, make sure power is turned o.
The Netatmo Thermostat cannot control electric converters.
Lea estas instrucciones detenidamente antes de comenzar la instalación.
El Termostato Netatmo se debe instalar en conformidad con la normativa vigente.
Antes de realizar cualquier intervención, compruebe que la alimentación
está desconectada.
El Termostato Netatmo no puede controlar transformadores eléctricos.
EN ES
Lire attentivement cette notice avant installation.
Le Thermostat Netatmo doit être installé selon les normes en vigueur.
Avant toute intervention, assurez-vous d’avoir coupé le courant.
Le Thermostat Netatmo n’est pas compatible pour le pilotage de convecteurs
électriques.
Lesen Sie diese Anweisungen sorgfältig durch, bevor Sie mit der
Installation beginnen.
Der Netatmo Thermostat muss gemäß den geltenden Normen installiert
werden. Vor der Durchführung aller Arbeiten muss die Stromversorgung
ausgeschaltet werden.
Das Netatmo Thermostat kann keine elektrischen Konverter steuern.
FR DE
IT PT
Leggere attentamente queste istruzioni prima di iniziare l’installazione.
Il Termostato Netatmo deve essere installato in base agli standard applicabili.
Prima di eettuare qualsiasi intervento, assicurarsi che la corrente elettrica
sia assente.
Il Termostato Netatmo non può controllare convertitori elettrici.
Antes de começar a instalação, leia atentamente estas instruções.
O Termostato Netatmo deve ser instalado de acordo com as normas aplicáveis.
Antes de qualquer intervenção, certifique-se de que a corrente elétrica está
desligada. O Termostato Netatmo não controla conversores elétricos.

4 5
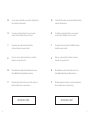
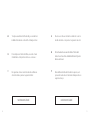
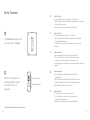
To replace a wireless thermostat, you can watch an installation tutorial
video online at the following address:
To install a first thermostat, you can watch an installation tutorial video
online at the following address:
EN EN
Pour remplacer un thermostat sans fil, vous pouvez regardez
une vidéo d’aide à l’installation à l’adresse ci-dessous :
Pour installer un premier thermostat, vous pouvez regardez
une vidéo d’aide à l’installation à l’adresse ci-dessous :
FR FR
IT IT
ES ES
Puedes ver en línea un tutorial de sustitución de un termostato
inalámbrico en la siguiente dirección:
Puedes ver en línea un tutorial de instalación de un primer
termostato en la siguiente dirección:
DE DE
Für den Austausch eines drahtlosen Thermostats können Sie sich eine
Video-Installationshilfe unter folgender Adresse anschauen:
Für die Installation eines ersten Thermostats können Sie sich eine
Video-Installationshilfe unter folgender Adresse anschauen:
PT PT
Para instalar um termostato sem fio, você pode assistir a um vídeo do
tutorial de instalação online no seguinte endereço:
Para instalar um primeiro termostato, você pode assistir a um vídeo do
tutorial de instalação online no seguinte endereço:
Può guardare online un video tutorial sulla sostituzione
di un termostato wireless al seguente indirizzo:
Può guardare online un video tutorial sull’installazione del primo
termostato al seguente indirizzo:
netatmo.com/video2 netatmo.com/video3

6 7
+
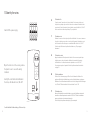
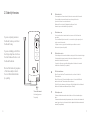
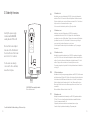
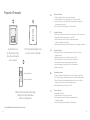
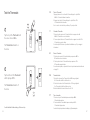
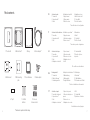
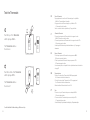
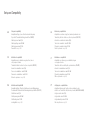
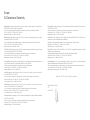
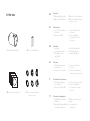
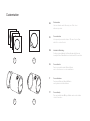
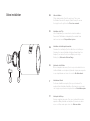
Pack contents
7. Color Adhesives
8. Mains adaptor*
1. Thermostat 3. Relay 4. Boiler adaptor2. Mobile stand
10. 3 AAA
batteries
* Not used or optional in this setup
5. Wall-bracket*
11. 4 screws
4 screw anchors
9. Tape
6. Wall mounting
plate*
Contenu du pack
1. Thermostat
2. Support mobile
3. Relais
4. Adaptateur chaudière
5. Support mural*
6. Plaque murale*
7. Adhésifs couleur
8. Adaptateur secteur*
9. Adhésif double face
10. 3 piles AAA
11. 4 vis & 4 chevilles
Packungsinhalt
1. Thermostat
2. Mobile Halterung
3. Verbindungsmodul
4. Adapter für den Heizkessel
5. Wandhalterung*
6. Montageplatte*
7. Farbige Auleber
8. Netzadapter*
9. Klebeband
10. 3 AAA-Batterien
11. 4 Schrauben und 4 Dübel
Conteúdo do pack
1. Termóstato Inteligente
2. Suporte móvel
3. Relé
4. Adaptador de caldeira
5. Suporte de parede*
6. Placa de instalação em
parede*
7. Adesivos de cor
8. Adaptador de corrente*
9. Fita
10. 3 pilhas AAA
11. 4 parafusos e 4 buchas
Contenido de la caja
1. Termostato
2. Soporte móvil
3. Relé
4. Adaptador de caldera
5. Soporte mural*
6. Placa de montaje*
7. Adhesivos de colore
8. Adaptador de red*
9. Cinta
10. 3 baterías AAA
11. 4 tornillos y 4 tacos
de plástico
Contenuto della confezione
1. Termostato
2. Supporto mobile
3. Relè
4. Adattatore per caldaia
5. Supporto a muro*
6. Piastra di montaggio*
7. Adesivi colorati
8. Alimentatore*
9. Nastro
10. 3 pile AAA
11. 4 viti e 4 tasselli
FR
IT
ES
DE
PT
*não utilizadas nesta configuração
*Bei dieser Installation nicht verwendet
*No se utiliza en esta instalación
*Non usato in questa configurazione
*Non utilisé dans cette configuration
+
+
+
+
+
+
+

8 9
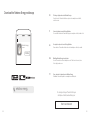
1/3 Identify the wires
See the Installation Troubleshooting p. 30 for more help.
1/3 Identifier les fils
Coupez le courant. Ouvrez la porte de votre chaudière. Si nécessaire, retirez le capot
de protection en plastique pour accéder à la borne de raccordement. Identifiez les deux
connecteurs de l’entrée thermostat de votre chaudière, souvent labellisés Ls-Lr, TA ou RT.
Voir les conseils de résolution de problème p. 31 pour plus d’aide.
FR
1/3 Individuare i cavi
Disattivare la corrente elettrica. Aprire il portellino della caldaia. Se necessario, rimuovere
il coperchio in plastica per accedere ai connettori di collegamento. Individuare i connet-
tori del termostato nella caldaia, spesso contraddistinti dalle etichette Ls-Lr, TA o RT.
Si veda il capitolo Risoluzione di problemi di installazione a p. 32 per maggiori
informazioni.
IT
ES
DE
1/3 Drähte identifizieren
Schalten Sie die Stromversorgung ab. Önen Sie die Heizkesseltür. Entfernen Sie
gegebenenfalls die Kunststoabdeckung, um zu den Anschlussklemmen zu gelangen.
Identifizieren Sie die Raumthermostatanschlüsse im Kessel, häufig mit den Bezeichnungen
Ls-Lr, TA oder RT. Weitere Installation Fehlersuche finden Sie auf S. 34.
PT
1/3 Identifique os fois
Abra a porta da caldeira (leia o manual da caldeira, se necessário). Identifique os terminais do
termostato na caldeira, frequentemente marcados LS-LR, TA ou RT. Podem ser identificados
graças a um shunt entre os dois terminais do termostato.
Consulte a Solução de problemas de instalação, p. 35 para mais ajuda.
1/3 Identificar los cables
Apague la alimentación. Abrir la puerta de la caldera. Si fuera necesario, quitar la tapa
de plástico para acceder a los terminales. Identificar los terminales del termostato
de la habitación en la caldera, frecuentemente etiquetados como Ls-Lr, TA o RT.
Si necesitas más ayuda, ve el apartado Solución de problemas durante la instalación
en la pág. 33.
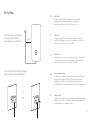
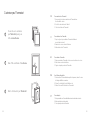
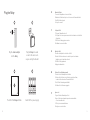
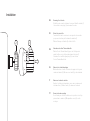
Open the boiler door. If necessary, remove
the plastic cover to access the wiring
terminals.
Identify the room thermostat terminals in
the boiler, often labelled Ls-Lr, TA or RT.
LS / LR
TA
RT
or
or
Switch o the power supply.

10 11
2/3 Identifier les fils
Si vous remplacez un thermostat sans-fil, retirez votre ancien relais de thermostat.
Si vous installez votre premier thermostat, vous devez peut-être retirer
le pont entre les deux connecteurs thermostat.
Branchez les fils noir et gris de l’adaptateur chaudière sur l’entrée
thermostat que vous avez identifiée (pas de polarité).
FR
2/3 Individuare i cavi
Se si sta sostituendo un termostato wireless, rimuovere il relè del termostato
precedente.
Se si sta installando il primo termostato, è necessario forse togliere prima il ponte
tra i due connettori termostato.
Collegare i cavi nero e grigio del cavo adattatore per caldaia ai connettori
del termostato (assenza di polarità).
IT
ES
DE
2/3 Drähte identifizieren
Wenn Sie einen drahtlosen Thermostat austauschen, entfernen Sie das alte
Thermostatrelais.
Wenn Sie Ihren ersten Thermostat installieren, müssen Sie eventuell die Brücke
zwischen den beiden Thermostatanschlüssen entfernen.
Schließen Sie den schwarzen und den grauen Draht des Adapter für den Heizkessel
kabels an die Raumthermostatklemmen an (keine Polarität).
PT
2/3 Identifique os fois
Se estiver a substituir um termostato sem fios, localize o relé do seu termostato antigo e
retire-o.
Se estiver a instalar um termostato pela primeira vez, retire o shunt entre os dois terminais do
mesmo. Ligue o fio preto e o fio cinzento do cabo do adaptador da caldeira aos terminais do
termostato (Sem polaridade).
2/3 Identificar los cables
Si está sustituyendo un termostato inalámbrico, extraiga el relé de su termostato antiguo.
Si estás instalando tu primer termostato, debes retirar la derivación entre los dos
terminales de habitación del termostato.
Conectar los cables negro y gris del cable adaptador de caldera a los terminales
de habitación del termostato (sin polaridad).
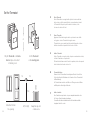
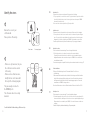
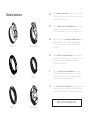
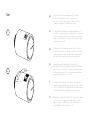
2/3 Identify the wires
If you are replacing a wireless
thermostat, remove your former
thermostat’s relay.
If you are installing your first ther-
mostat, you may have to remove
the shunt between the two room
thermostat terminals.
Connect the black and grey wires
of the boiler adaptor cable to
the room thermostat terminals
(no polarity).
LS / LR
TA
RT
or
or
Thermostat terminals
black and grey wires
No polarity

12 13
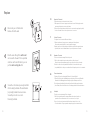
3/3 Identify the wires
Identify the power supply
terminals with 220/230V,
usually labelled P/N or L/N.
Connect the boiler adaptor’s
blue wire to the N terminal of
the boiler. Connect the brown
wire to the P or L terminal.
If some wires are already
connected to those terminal,
leave them in place.
220V/230V Power supply terminals
Blue and brown wires
See the Installation Troubleshooting p. 30 for more help.
3/3 Identifier les fils
Identifiez les connecteurs d’alimentation 220/230V ; ils portent généralement les
indications P/N ou L/N. Connectez le fil bleu de l’adaptateur chaudière au terminal
N de votre chaudière, puis connectez le fil marron au terminal P ou L. Si des fils sont
déjà connectés à ces terminaux, laissez-les en place.
Voir les conseils de résolution de problème p. 31 pour plus d’aide.
FR
3/3 Individuare i cavi
Individuare i connettori dell’alimentatore a 220/230V, generalmente
contraddistinti dalle etichette P/N o L/N. Collegare il cavo blu dell’adattatore
per caldaia al connettore N della caldaia. Collegare il cavo marrone dell’adattatore
per caldaia al connettore P o L della caldaia. Se alcuni cavi sono già collegati
a quei connettori, lasciarli nella posizione in cui si trovano.
Si veda il capitolo Risoluzione di problemi di installazione a p. 32 per maggiori
informazioni.
IT
ES
DE
3/3 Drähte identifizieren
Identifizieren Sie die Spannungsversorgungsklemmen mit 220/230V, üblicherweise
mit der Bezeichnung P/N oder L/N. Schließen Sie den blauen Draht des Adapter für
den Heizkessel an die N-Klemme des Heizkessels an. Schließen Sie den braunen
Draht des Adapter für den Heizkessel an die P- oder L-Klemme des Kessels an.
Wenn einige Drähte bereits an diese Klemme angeschlossen sind, lassen Sie sie
unverändert.
Weitere Installation Fehlersuche finden Sie auf S. 34.
PT
3/3 Identifique os fois
Identifique os terminais da fonte de alimentação com 220 / 230V, geralmente rotulados
P / N ou L / N. Conecte o fio azul do adaptador da caldeira ao terminal N da caldeira.
Conecte o fio marrom ao terminal P ou L.
Se alguns fios já estiverem conectados a esses terminais, deixe-os no lugar.
Consulte a Solução de problemas de instalação, p. 35 para mais ajuda.
3/3 Identificar los cables
Identificar los terminales de alimentación con 220/230V, normalmente etiquetados
como P/N o L/N. Conectar el cable azul del adaptador de caldera al terminal N de la
caldera. Conectar el cable marrón del adaptador de caldera al terminal P o L de la
caldera. Si ya hay cables conectados a ese terminal, déjalos como están.
Si necesitas más ayuda, ve el apartado Solución de problemas durante la instalación
en la pág. 33.
P / N
L / N
or

14 15
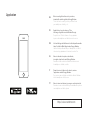
The boiler adaptor should be placed
as far as possible from metallic
items (wiring, pipes, electrical grid…)
The boiler adaptor can be fixed to the wall with
double-sided tape or the screws provided.
Set the Relay
or
Fixez le Relais
L’adaptateur chaudière doit être éloigné autant que possible d’éléments
métalliques (tableau électrique, tuyaux, câblages…). Vous pouvez fixer
l’adaptateur chaudière à l’aide de l’adhésif double face ou le visser.
FR
Fissare il Relè
L’adattatore della caldaia deve essere posizionato il più lontano possibile da
oggetti metallici (cablaggio, tubi, rete elettrica…). L’adattatore può essere fissato
alla parete con un nastro biadesivo o con le viti fornite.
IT
ES
DE
Verbindungsmodul befestigen
Der Adapter für den Heizkessel sollte so weit wie möglich entfernt von Metallge-
genständen aufgestellt werden (Verkabelung, Rohre, elektrische Leitungen…).
Der Adapter für den Heizkessel kann mit dem doppelseitigen Klebeband an
der Wand festgeklebt oder mit den mitgelieferten Schrauben festgeschraubt werden.
PT
Definições do Relé
O adaptador da caldeira deve ser colocado o mais afastado possível de elementos metálicos
(cablagens, tubos, rede elétrica…). O adaptador da caldeira pode ser fixo à parede com a fita
adesiva de dupla-face ou com os parafusos fornecidos.
Instalar el Relé
El adaptador de caldera debe colocarse lo más alejado posible de elementos metáli-
cos (cableado, tuberías, redes eléctricas...). El adaptador de caldera se puede fijar
a la pared con la cinta de doble cara o los tornillos suministrados.
30 cm

16 17
Connect the Relay into the
boiler adaptor.
Switch the power supply back on.
The LED of the Relay will blink.
See the Installation Troubleshooting p. 30 for more help.
Test the Relay
1
2
3
Testez le Relais
1. Connectez le Relais sur l’adaptateur chaudière.
2. Rétablissez le courant.
3. La LED du Relais clignote.
Voir les conseils de résolution de problème p. 31 pour plus d’aide.
FR
Testare il Termostato
1. Collegare il Relè all’adattatore della caldaia.
2. Riattivare la corrente elettrica.
3. Il LED del Relè lampeggia.
Si veda il capitolo Risoluzione di problemi di installazione
a p. 32 per maggiori informazioni.
IT
ES
DE
Thermostat testen
1. Stecken Sie das Verbindungsmodul in den Adapter für den Heizkessel.
2. Schalten Sie die Stromversorgung wieder ein.
3. Die Verbindungsmodul-LED blinkt.
Weitere Installation Fehlersuche finden Sie auf S. 34.
PT
Teste do Relé
1. Ligue o Relé ao adaptador da caldeira.
2. Ligue novamente a corrente elétrica.
3. O Relé pisca com uma luz branca
Consulte a Solução de problemas de instalação, p. 35 para mais ajuda.
Probar el Termostato
1. Conecte el Relé al adaptador de caldera.
2. Vuelva a conectar la alimentación.
3. El LED del Relé parpadeará.
Si necesitas más ayuda, ve el apartado Solución de problemas
durante la instalación en la pág. 33.

18 19
Push the relay button. The LED of the Relay will light up
and the boiler is switched on.
Push the relay button again. The LED of the Relay
will turn o to indicate
the boiler is o.
See the Installation Troubleshooting p. 30 for more help.
Test the Relay
7
4
5
6
Testez le Relais
4. Appuyez brièvement sur le bouton du Relais.
5. La LED du Relais émet une lumière et la chaudière s’allume.
6. Appuyez de nouveau sur le bouton du Relais.
7. La LED du Relais s’éteint et la chaudière s’arrête.
Voir les conseils de résolution de problème p. 31 pour plus d’aide.
FR
Testare il Termostato
4. Premere il pulsante del Relè.
5. Il LED del Relè si illumina, e la caldaia si accende.
6. Premere di nuovo il pulsante del Relè.
7. Il LED del Relè si spegne per indicare che la caldaia è spenta.
Si veda il capitolo Risoluzione di problemi di installazione a p. 32 per maggiori
informazioni.
IT
ES
DE
Thermostat testen
4. Drücken Sie die Verbindungsmodul-Taste.
5. Die Verbindungsmodul-LED leuchtet auf und das Verbindungsmodul es schaltet
den Heizkessel ein.
6. Drücken Sie erneut die Verbindungsmodul-Taste.
7. Die Verbindungsmodul-LED erlischt um anzuzeigen, dass der Heizkessel
ausgeschaltet ist.
Weitere Installation Fehlersuche finden Sie auf S. 34.
PT
Teste do Relé
4. Prima o botão do Relé.
5. O Relé acende com uma luz branca e liga a caldeira.
6. Prima novamente o botão do Relé.
7. A luz do Relé apaga-se indicando que a caldeira está desligada.
Consulte a Solução de problemas de instalação, p. 35 para mais ajuda.
Probar el Termostato
4. Pulse el botón del Relé.
5. La LED del Relé se iluminará, el Relé encenderá la caldera.
6. Pulse el botón del relé de nuevo.
7. La LED se apagará para indicar que la caldera está apagada.
Si necesitas más ayuda, ve el apartado Solución de problemas durante la instalación
en la pág. 33.

20 21
20
21
5
0
+
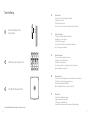
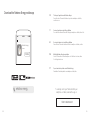
Insert the batteries in
the Thermostat ensuring
the positive and negative
ends correspond.
The Thermostat will display the start
screen and search for the Relay.
Prepare the Thermostat
When the Thermostat has found the Relay,
it displays the setpoint temperature
and the room temperature.
Measured temperature
Setpoint temperature
1
2
3
See the Installation Troubleshooting p. 30 for more help.
Préparez le Thermostat
1. Insérez les piles dans le Thermostat en respectant la polarité.
2. Le Thermostat a che l’écran de démarrage ci-contre, et recherche le Relais.
3. Quand le Thermostat a trouvé le Relais, il a che la température de consigne (haut)
et la température mesurée (bas).
Voir les conseils de résolution de problème p. 31 pour plus d’aide.
FR
Preparare il Termostato
1. Inserire le pile nel Termostato assicurandosi che i poli negativo e positivo corrispondano.
2. Il Termostato mostra la schermata di avvio e cerca il Relè.
3. Quando il Termostato rileva il Relè, mostra la temperatura desiderata
(in alto) e la temperatura rilevata (in basso).
Si veda il capitolo Risoluzione di problemi di installazione a p. 32 per maggiori informazioni.
IT
ES
DE
Thermostat vorbereitung
1. Setzen Sie die Batterien in den Thermostat ein. Achten Sie auf die richtige Polung.
2. Der Thermostat zeigt den Startbildschirm an und sucht nach dem Verbindungsmodul.
3. Wenn der Thermostat das Verbindungsmodul gefunden hat, zeigt er die Sollwert-
Temperatur (oben) und die Gemessene Temperatur (unten) an.
Weitere Installation Fehlersuche fi nden Sie auf S. 34.
PT
Prepare o termostato
1. Insira as pilhas no Termostato.
2. O Termostato mostra o ecrã de início e procura o Relé.
3. Se o Termostato tiver encontrado o Relé, indica a temperatura desejada
e a temperatura ambiente.
Consulte a Solução de problemas de instalação, p. 35 para mais ajuda.
Preparar el Termostato
1. Introduzca las baterías en el Termostato asegurándote de que los polos positivo
y negativo coincidan.
2. Aparecerá la pantalla de inicio en el Termostato y buscará el Relé.
3. Cuando el Termostato ha encontrado el Relé, aparece la temperatura
deseada (parte superior) y la temperature ambiente (parte inferior).
Si necesitas más ayuda, ve el apartado Solución de problemas durante
la instalación en la pág. 33.

22 23
Customise your Thermostat
2
3
1
You can choose to customize
your Thermostat by using one
of the colour adhesives.
Take o the outer frame of the adhesive.
Stick it on the back of your Thermostat.
Personnalisez votre Thermostat
1. Vous pouvez choisir de personnalisez votre Thermostat avec
l’un des adhésifs couleur.
2. Décollez le cadre extérieur de l’adhésif.
3. Collez-le sur l’arrière du Thermostat.
FR
Personalizzare il suo Termostato
1. Si può scegliere di personalizzare il Termostato utilizzando
uno degli adesivi colorati.
2. Rimuovere la cornice esterna dell’adesivo.
3. Attaccarla al retro del Termostato.
IT
ES
DE
Ihren Thermostat gestalten
1. Sie können Ihren Thermostat kundenspezifisch anpassen, indem Sie einen
der farbigen Auleber verwenden.
2. Ziehen Sie die farbige Folie des Aulebers ab.
3. Kleben Sie ihn auf die Rückseite des Thermostats.
PT
Personalização
1. Pode personalizar o seu Termostato utilizando um dos autocolantes coloridos.
2. Retire a parte exterior do autocolante.
3. Cole-o na parte posterior do Termostato.
Personalizar su Termostato
1. Puede personalizar el Termostato si lo desea con los adhesivos de colores.
2. Retire el marco exterior del adhesivo.
3. Péguelo en la parte posterior del Termostato.

24 25
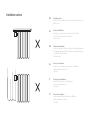
Clip the Thermostat on its mobile
stand and place it on a shelf
in the living room.
Set the Thermostat
on the mounting plate.
Set the Thermostat
More than 1 m from
the openings
Away from any cold
or heat source
A 1,5 m high
Fixez le Thermostat
Fixez le Thermostat sur son support mobile et placez-le sur un meuble dans
la pièce à vivre, ou fixez-le au mur à l’aide de son support mural en le vissant.
Le Thermostat doit être placé à plus d’un mètre des ouvertures, et loin
des sources de chaleur et de froid.
FR
Fissare il Termostato
Agganciare il Termostato al supporto mobile e posizionarlo su uno scaale
nel soggiorno o inserire il Termostato sul supporto a muro.
Il Termostato deve essere montato a più di un metro dalle aperture e lontano
dalla luce solare diretta e da qualsiasi fonte di calore e di freddo.
IT
ES
DE
Thermostat befestigen
Klemmen Sie den Thermostat auf seinem tragbaren Ständer fest und stellen
Sie ihn auf ein Regal im Wohnzimmer oder Schrauben Sie den Thermostat auf
die Wandhalterung.
Der Thermostat muss mehr als einen Meter von Önungen sowie von Wärme-
und Kältequellen entfernt aufgestellt werden.
PT
Instale o termostato
Fixe o Termostato ao suporte móvel e coloque-o numa prateleira na sala de estar.
Ou Coloque o Termostato na placa de montagem.
O termostato está localizado em afastado mais de 1 m das aberturas e afastado
de qualquer fonte de frio ou calor.
Instalar el Termostato
Sujete el Termostato en su soporte móvil y colóquelo en una estantería en el salón,
o instale el Termostato en el soporte mural.
El Termostato debe situarse a más de 1 metro de aperturas, no debe estar expuesto
a la luz solar directa ni a fuentes de calor o frío.
ou
1 m 1 m
1,5 m
22
18
5
+
or

26 27
Test the Thermostat
See the Installation Troubleshooting p. 30 for more help.
2
1
Tap the top of the Thermostat until
the screen shows « MAX ».
The Thermostat will switch on
the boiler.
Tap the bottom of the Thermostat
until it displays « OFF ».
The Thermostat will switch o
the boiler.
Testez le Thermostat
1. Appuyez plusieurs fois sur le haut du Thermostat jusqu’à ce qu’il a che
« MAX ». Le Thermostat allume la chaudière.
2. Appuyez sur le bas du Thermostat jusqu’à ce qu’il a che « OFF ».
Le Thermostat éteint la chaudière.
Voir les conseils de résolution de problème p. 31 pour plus d’aide.
FR
Collaudare il Termostato
1. Premere la parte superiore del Termostato fi nché non appare la scritta
« MAX ». Il Termostato accende la caldaia.
2. Premere la parte inferiore del Termostato fi nché non appare la scritta « OFF ».
Il Termostato spegne la caldaia.
Si veda il capitolo Risoluzione di problemi di installazione a p. 32 per maggiori
informazioni.
IT
ES
DE
Thermostat testen
1. Drücken Sie oben auf den Thermostat, bis « MAX » angezeigt wird.
Der Thermostat schaltet den Heizkessel ein.
2. Drücken Sie unten auf den Thermostat, bis « OFF » angezeigt wird.
Der Thermostat schaltet den Heizkessel aus.
Weitere Installation Fehlersuche fi nden Sie auf S. 34.
PT
Teste o termostato
1. Pressione o topo do Termostato até aparecer a indicação «MAX».
O Termostato liga a caldeira.
2. Pressione a base do Termostato até aparecer a indicação «OFF».
O Termostato desliga a caleira.
Consulte a Solução de problemas de instalação, p. 35 para mais ajuda.
Probar el Termostato
1. Pulse la parte superior del Termostato hasta que aparezca « MAX ».
El Termostato enciende la caldera.
2. Pulse la parte inferior del Termostato hasta que aparezca « OFF ».
El Termostato apaga la caldera.
Si necesitas más ayuda, ve el apartado Solución de problemas durante la instalación
en la pág. 33.
20
21
5
0
+
20
0
+
clic
20
0
+
20
0
+
clic
20
21
5
0
+
20
0
+
clic
20
0
+
20
0
+
clic

28 29
Netatmo
INSTALL
Netatmo Energy
To remotely control your Thermostat from your
smartphone or tablet, download the app on:
Download the Netatmo Energy mobile app
Téléchargez l’application mobile Netatmo Energie
Pour piloter votre Thermostat à distance depuis votre smartphone ou tablette,
rendez-vous sur :
FR
Scaricare l’applicazione mobile Energy Netatmo
Per controllare a distanza il Termostato dal proprio smartphone o tablet, visitare il sito:
IT
ES
DE
Mobil-App Netatmo Energy herunterladen
Um den Thermostat von Ihrem Smartphone oder Tablet aus zu steuern, laden
Sie die App herunter von:
PT
Faça o download do aplicativo móvel Netatmo Energy
Para utilizar o Termostato a partir do seu smartphone ou tablet, visite:
Descárgate la aplicación de móvil Energy Netatmo
Para controlar el Termostato a distancia desde tu smartphone o tableta, consulta:
therm.netatmo.com
netatmo energy

30 31
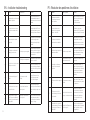
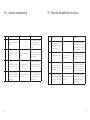
EN – Installation troubleshooting FR – Résolution des problèmes d’installation
Page Problem Possible causes Solutions
p. 8
I can’t identify the room thermostat
terminals of my boiler
Use your boiler manual. They
may be identifiable thanks to a
shunt between the two thermostat
terminals.
p. 8
My former thermostat is connec
-
ted to dierent terminals: eBus,
EMS…
Identify the right ON/OFF room
thermostat terminals to connect
the Relay of Netatmo Thermostat.
p. 12
I cannot identify the terminals
of my boiler.
Send a picture to photo@netatmo.
com and our support team
will help you identify the right
terminals.
p. 16
The Relay does not blink after
turning the power back on.
The Relay is not power supplied.
Check how the blue and brown
wires are wired. Do not forget to
switch o the power supply before
any intervention.
p. 18
The boiler doesn’t switch on when
the Relay starts to blink
The Relay is not correctly wired.
Check where the grey and black
wires are connected.
Some boilers can take up to 20
mn to respond after pushing the
Relay’s button. Check your boiler’s
manual.
p. 20
The Thermostat displays the “!”
symbol
The Thermostat can’t find
the Relay
Move the Thermostat closer
to the Relay and wait until
the “!” symbol disappears
p. 26
The Thermostat doesn’t switch
on and o the boiler
The control wires have been
incorrectly wired
Check your wiring using the
picture of your former thermostat’s
wiring to identify the right control
wires.
p. 26
The boiler does the opposite
of the Thermostat commands (it
switches o when the thermostat
displays MAX)
The polarity of the thermostat
is not respected
Once you will have finished the
setup, change the polarity of
the thermostat in the advanced
settings of the app.
Page Problème Causes possibles Solutions
p. 9
Je n’arrive pas à identifier
les connecteurs thermostat
de ma chaudière.
Utilisez le manuel de votre chau-
dière. Il est possible qu’un pont
soit présent entre
les deux connecteurs.
p. 9
Mon ancien thermostat est
connecté à des connecteurs
diérents: eBus, EMS…
Identifiez les connecteurs
thermostat ON/OFF permettant de
connecter le Relais du Thermostat.
p. 13
Je n’arrive pas à identifier les
connecteurs de ma chaudière.
Envoyez une photo à l’adresse
[email protected]. Notre
équipe d’assistance vous aidera
à identifier les bons connecteurs.
p. 17
Le Relais ne clignote pas une fois
l’alimentation rétablie.
Le Relais n’est pas alimenté.
Vérifiez le raccordement des fils
bleu et marron. N’oubliez pas de
couper l’alimentation électrique
avant toute intervention.
p. 19
La chaudière ne s’allume pas
lorsque le Relais commence
à clignoter.
Les fils du Relais ne sont pas
correctement raccordés.
Vérifiez le raccordement des fils
gris et noir.
Pour certaines chaudières, le
temps de réaction après que le
bouton du Relais a été enclenché
peut aller jusqu’à 20minutes.
Consultez le manuel de votre
chaudière.
p. 21
Le Thermostat ache le symbole
«!».
Le Thermostat ne trouve pas
le Relais.
Rapprochez le Thermostat du
Relais et attendez que le symbole
« ! » disparaisse.
p. 27
Le Thermostat ne contrôle
pas le démarrage et l’extinction
de la chaudière.
Les fils d’entrée thermostat ne
sont pas correctement raccordés.
Vérifiez le raccordement de
vos fils à l’aide de la photo du
raccordement de votre ancien
thermostat afin d’identifier les
fils correspondant à l’entrée
thermostat.
p. 27
La chaudière fait le contraire de
ce que lui demande le Thermostat
(s’éteint lorsque le Thermostat
ache MAX).
La polarité du Thermostat n’a
pas été respectée.
Une fois l’installation terminée,
modifiez la polarité du Thermostat
dans les paramètres avancés
de l’application.

32 33
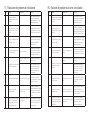
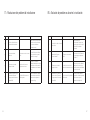
IT – Risoluzione dei problemi di installazione ES – Solución de problemas durante la instalación
Pagina Problema Possibili cause Soluzioni
p. 9
Non riesco a individuare i
connettori del termostato della
mia caldaia.
Usare il manuale della caldaia.
Possono essere identificabili
grazie ad un derivatore tra i due
terminabili del termostato.
p. 9
Il mio vecchio termostato è colle
-
gato a connettori diversi: eBus,
EMS, ecc.
Individuare i giusti connettori ON/
OFF del termostato per collegare
il Relè del Termostato Netatmo.
p. 13
Non riesco a individuare i connet
-
tori della mia caldaia.
Inviare una foto a photo@netatmo.
com e al nostro team assistenza
che ti aiuterà a individuare i
connettori corretti.
p. 17
Il Relè non lampeggia dopo avere
riacceso il dispositivo.
Il Relè non è alimentato
Controlla come sono collegati i
cavi blu e marrone. Non dimen
-
ticare di spegnere l’alimentatore
prima di qualsiasi intervento.
p. 19
La caldaia non si accende quando
il Relè inizia a lampeggiare.
Il Relè non è collegato corretta
-
mente.
Controlla dove sono collegati
i cavi grigio e nero.
Alcune caldaie hanno tempi di
risposta anche di 20 min dopo
aver premuto il pulsante Relè.
Consultare il manuale della
propria caldaia.
p. 21
Il Termostato visualizza il simbolo
«!».
Il Termostato non riesce a trovare
il Relè.
Spostare il Termostato vicino
al Relè e attendere fino a quando
il simbolo «!» scompare.
p. 27
Il termostato non accende
e spegne la caldaia.
I cavi di controllo sono stati colle-
gati in modo errato.
Controllare i collegamenti
utilizzando l’immagine dei collega-
menti del tuo vecchio termostato
per individuare i cavi di comando
corretti.
p. 27
De ketel doet het tegenoverges
-
telde van de Thermostaatbes-
turing (hij schakelt uit als de
thermostaat MAX weergeeft).
La polarità del termostato non
è stata rispettata.
Una volta terminata la configura-
zione, modificare la polarità del
termostato nelle impostazioni
avanzate dell’app.
Página Problema Posibles causas Soluciones
p. 9
No puedo identificar los terminales
de habitación del termostato de
mi caldera
Use el manual de la caldera.
Pueden ser identificables gracias
a la derivación entre los dos
terminales del termostato.
p. 9
Mi anterior termostato está
conectado a diferentes terminales:
eBus, EMS...
Identificar los terminales de
habitación del termostato de en
-
cendido y apagado para conectar
el Relé del Termostato Netatmo.
p. 13
No puedo identificar los termi
-
nales de mi caldera.
Enviar una imagen a photo@netat-
mo.com para que nuestro equipo
técnico te ayude a identificar los
terminales adecuados.
p. 17
El Relé no parpadea después
de volver a encenderlo.
El Relé no tiene suministro de
energía.
Ver cómo los cables azul y marrón
se conectan. No olvides apagar
la electricidad antes de comenzar.
p. 19
La caldera no se pone en marcha
cuando el Relé comienza a
parpadear.
El Relé no está correctamente
cableado.
Ver dónde se conectan los cables
gris y negro.
Algunas calderas pueden tardar
hasta 20 minutos en responder
después de pulsar el botón del
Relé. Verifícalo en el manual
de la caldera.
p. 21
La pantalla del Termostato
muestra el símbolo “!”.
El Termostato no encuentra el
Relé.
Acerca más el Termostato al Relé
y espera hasta que desparezca
el símbolo “!”.
p. 27
El Termostato no enciende
ni apaga la caldera.
Los cables de control se han
conectado de manera incorrecta.
Comprueba los cables utilizando
la imagen de los cables de tu
anterior termostato para identificar
los cables de control.
p. 27
La caldera hace lo contrario de
lo que le ordena el Termostato
(se apaga cuando el Termostato
muestra MAX).
No se ha respetado la polaridad
del Termostato.
Una vez que hayas finalizado
la instalación, cambia la polaridad
del Termostato en ajustes
avanzados de la aplicación.

34 35
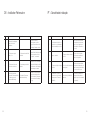
DE – Installation Fehlersuche PT – Conselho de instalação
Seite Problem Mögliche Ursachen Lösungen
S 9
Ich kann die Raumthermosta
-
tanschlüsse meines Heizkessels
nicht identifizieren.
Verwenden Sie dasKesselhand-
buch. Sie sind dank eines Shunts
zwischen den beiden Thermos-
tat-Anschlüssen identifizierbar.
S 9
Meine früheren Thermostate
sind an verschiedene Terminals
angeschlossen: eBus, EMS...
Wählen Sie die richtigen ON/
OFF-Raumthermostatklemmen
für den Anschluss des Relais des
Netatmo Thermostats.
S 13
Ich kann die Anschlüsse meines
Heizkessels nicht identifizieren.
Senden Sie ein Bild an photo@
netatmo.com. Unser Support-Team
wird Ihnen helfen, die richtigen
Terminals zu finden.
S 17
Das Relais blinkt nach dem
Wiedereinschalten nicht mehr.
Das Relais wird es nicht mit Strom
versorgt.
Überprüfen Sie, wie der blaue und
der braune Draht angeschlossen
ist. Vergessen Sie nicht, die
Stromversorgung vor jedem
Eingri abzuschalten.
S 19
Der Kessel schaltet sich nicht
ein, wenn das Relais zu blinken
beginnt.
Das Relais ist nicht richtig
verdrahtet.
Überprüfen Sie, wo das graue
und das schwarze Kabel
angeschlossen ist.
Bei einigen Kesseln kann es bis zu
20 Minuten dauern, bis sie nach
dem Drücken der Relaistaste rea
-
gieren. Schauen Sie im Handbuch
Ihres Heizkessels nach.
S 21
Der Thermostat zeigt das Symbol
„!“ an.
Il Termostato non riesce a trovare
il Relè.
Spostare il Termostato vicino
al Relè e attendere fino a quando
il simbolo «!» scompare.
S 27
Der Thermostat schaltet den
Kessel weder ein noch aus.
Die Steuerleitungen sind falsch
verdrahtet.
Überprüfen Sie Ihre Verdrahtung
anhand der Abbildung Ihres frühe
-
ren Thermostats, um die richtigen
Steuerleitungen zu ermitteln.
S 27
Der Heizkessel macht das Ge
-
genteil der Thermostatbefehle (er
schaltet ab, wenn der Thermostat
MAX anzeigt).
Die Polarität des Thermostats
wird nicht berücksichtigt.
Nachdem Sie die Einstellungen
abgeschlossen haben, ändern
Sie die Polarität des Thermostats
in den erweiterten Einstellungen
der App.
Página Problema Causas possíveis Soluções
p. 9
Não consigo identificar os
terminais do termostato da minha
caldeira
Use o manual da caldeira. Eles
podem ser identificáveis graças
a uma derivação entre os dois
terminais do termostato
p. 9
Alguns termostatos estão ligados
a terminais diferentes dos ilus
-
trados na lista do diagrama (por
exemplo, eBus, EMS…).
Nesse caso, terá de identificar os
terminais corretos do termostato
para ligar o Relé do Termostato
Netatmo.
p. 13
Se existirem mais de dois fios, os
restantes são fios de alimentação
elétrica sem utilização neste caso.
Em caso de dúvida, envie uma
fotografia para photo@netatmo.
com e a nossa equipa de assis
-
tência ajudá-lo-á a identificar os
fios certos.
p. 17
O Relé não piscar após a corrente
elétrica ter sido novamente
ligada.
Não se encontra alimentado
eletricamente.
Verifique que o fio azul e o fio
castanho se encontram ligados.
Não se esqueça de desligar a
alimentação elétrica antes de
qualquer intervenção.
p. 19
A caldeira não ligar quando a luz
branca está acesa.
O Relé pode estar incorretamente
ligado à caldeira.
Verifique se o fio cinzento e fio
preto estão ligados.
Atenção: algumas caldeiras
podem demorar até 20 minutos a
reagir depois de premido o botão
do Relé. Em caso de dúvida leia
o manual de instruções da sua
caldeira.
p. 21 Aparece o símbolo «!».
O Termostato não tiver encontra
-
do o Relé.
Coloque o relé mais próximo
do Termostato e aguarde até o
símbolo «!» desaparecer.
p. 27
O Termostato não ligar e desligar
a caldeira.
Os fios de controlo foram incorre
-
tamente ligados.
Verifique a cablagem utilizando
a fotografia da cablagem do seu
termostato antigo para identificar
os fios de controlo corretos.
p. 27
A caldeira fizer o contrário do
que está descrito (por exemplo,
desligar quando o Termostato
indica MAX).
Tem de alterar a polaridade do
Termostato.
Pode alterar a polaridade nas
configurações avançadas da
aplicação depois de ter terminado
a configuração.

Copyright Netatmo © 2020 All rights reserved. Reproduction and distribution prohibited without written authorization from Netatmo Apple
and the Apple logo are trademarks of Apple Inc., registered in the U.S. and other countries. App Store is a service mark of Apple Inc.,
registered in the U.S. and other countries. Google Play and the Google Play logo are trademarks of Google Inc
V9
support.netatmo.com

EN – Replacing a wall-mounted thermostat | Smart Thermostat
FR – Vous remplacez un thermostat filaire | Thermostat Intelligent
IT – Sostituire un termostato a parete | Termostato Intelligente
ES – Sustitución de un termostato montado en la pared | Termostato Inteligente
DE – Ersetzen eines wand-montierten Thermostat | Smart Thermostat
PT – Substituição de um termostato montado na parede | Termóstato Inteligente
Smart Thermostat
1
La pagina sta caricando ...
La pagina sta caricando ...
La pagina sta caricando ...
La pagina sta caricando ...
La pagina sta caricando ...
La pagina sta caricando ...
La pagina sta caricando ...
La pagina sta caricando ...
La pagina sta caricando ...
La pagina sta caricando ...
La pagina sta caricando ...
La pagina sta caricando ...
La pagina sta caricando ...
La pagina sta caricando ...
La pagina sta caricando ...
La pagina sta caricando ...
La pagina sta caricando ...
La pagina sta caricando ...
La pagina sta caricando ...
La pagina sta caricando ...
La pagina sta caricando ...
La pagina sta caricando ...
La pagina sta caricando ...
La pagina sta caricando ...
La pagina sta caricando ...
La pagina sta caricando ...
La pagina sta caricando ...
La pagina sta caricando ...
La pagina sta caricando ...
La pagina sta caricando ...
La pagina sta caricando ...
La pagina sta caricando ...
La pagina sta caricando ...
La pagina sta caricando ...
La pagina sta caricando ...
La pagina sta caricando ...
La pagina sta caricando ...
La pagina sta caricando ...
La pagina sta caricando ...
La pagina sta caricando ...
La pagina sta caricando ...
La pagina sta caricando ...
La pagina sta caricando ...
La pagina sta caricando ...
La pagina sta caricando ...
La pagina sta caricando ...
La pagina sta caricando ...
La pagina sta caricando ...
La pagina sta caricando ...
La pagina sta caricando ...
-
 1
1
-
 2
2
-
 3
3
-
 4
4
-
 5
5
-
 6
6
-
 7
7
-
 8
8
-
 9
9
-
 10
10
-
 11
11
-
 12
12
-
 13
13
-
 14
14
-
 15
15
-
 16
16
-
 17
17
-
 18
18
-
 19
19
-
 20
20
-
 21
21
-
 22
22
-
 23
23
-
 24
24
-
 25
25
-
 26
26
-
 27
27
-
 28
28
-
 29
29
-
 30
30
-
 31
31
-
 32
32
-
 33
33
-
 34
34
-
 35
35
-
 36
36
-
 37
37
-
 38
38
-
 39
39
-
 40
40
-
 41
41
-
 42
42
-
 43
43
-
 44
44
-
 45
45
-
 46
46
-
 47
47
-
 48
48
-
 49
49
-
 50
50
-
 51
51
-
 52
52
-
 53
53
-
 54
54
-
 55
55
-
 56
56
-
 57
57
-
 58
58
-
 59
59
-
 60
60
-
 61
61
-
 62
62
-
 63
63
-
 64
64
-
 65
65
-
 66
66
-
 67
67
-
 68
68
-
 69
69
-
 70
70


Netatmo Pack Thermostat Intelligent+3 Tetes ther Manuale del proprietario
- Categoria
- Termostati
- Tipo
- Manuale del proprietario
in altre lingue
- English: Netatmo Pack Thermostat Intelligent+3 Tetes ther Owner's manual
- français: Netatmo Pack Thermostat Intelligent+3 Tetes ther Le manuel du propriétaire
- español: Netatmo Pack Thermostat Intelligent+3 Tetes ther El manual del propietario
- Deutsch: Netatmo Pack Thermostat Intelligent+3 Tetes ther Bedienungsanleitung
- português: Netatmo Pack Thermostat Intelligent+3 Tetes ther Manual do proprietário
Documenti correlati
-
Netatmo NTH01 Manuale del proprietario
-
-
-
Netatmo Valve Adaptor Guida utente
-
-
Legrand Netatmo Smart Indoor Air Quality Monitor Guida utente
-
-
Netatmo Vanne additionnelle pour radiateur Manuale del proprietario
-
Netatmo NDL01 Manuale utente
-
Altri documenti
-
-
 smart things sDock Air Istruzioni per l'uso
-
Bticino XM8002 Istruzioni per l'uso
-
-
Rancilio SILVIA PRO Installation and User Manual
-
Giacomini R453 Istruzioni per l'uso
-
Rancilio Baby 9 Manuale utente
-
 ECOFLAM MAX GAS 350 PR Operating Instructions Manual
-
DELTA DORE TYBOX 157 Guida d'installazione
-
Sime RONDO Manuale del proprietario

