Foster 2451 000 Manuale utente
- Categoria
- Cappe da cucina
- Tipo
- Manuale utente
Questo manuale è adatto anche per

Foster spa
via M.S. Ottone, 18/20
42041 Brescello (RE) - Italy
tel. +39.0522.687425 - tel. Servizio Assistenza +39.0522.684450
fax +39.0522.686019 - fax Servizio Ricambi +39.0522.962166
e-mail: [email protected]
www.fosterspa.com
USER'S MANUAL FOR SCUTION HOOD
Domino S4000 Ghost, cod. 2451 000
cod. 9606801

3
FR
Le symbole sur le produit ou son emballage indique que ce produit ne peut être traité
comme déchet ménager. Il doit plutôt être remis au point de ramassage concerné, se chargeant
du recyclage du matériel électrique et électronique. En vous assurant que ce produit est éliminé
correctement, vous favorisez la prévention des conséquences négatives pour l’environnement et
la santé humaine qui, sinon, seraient le résultat d’un traitement inapproprié des déchets de ce
produit. Pour obtenir plus de détails sur le recyclage de ce produit, veuillez prendre contact avec
le bureau municipal de votre région, votre service d’élimination des déchets ménagers ou le ma-
gasin où vous avez acheté le produit. Cet appareil est commercialisé en accord avec la directive
européenne 2002/96/CE sur les dèchets del équipments èlectriques et èlctroniques (WEEE).
DE
Das Symbol auf dem Produkt oder seiner Verpackung weist darauf hin, dass dieses
Produkt nicht als normaler Haushaltsabfall zu behandeln ist, sondern an einem Sammelpunkt
für das Recycling von elektrischen und elektronischen Geräten abgegeben werden muss. Durch
Ihren Beitrag zum korrekten Entsorgen dieses Produkts schützen Sie die Umwelt und die Ge-
sundheit Ihrer Mitmenschen. Umwelt und Gesundheit werden durch falsches Entsorgen gefähr-
det. Weitere Informationen über das Recycling dieses Produkts erhalten Sie von Ihrem Rathaus,
Ihrer Müllabfuhr oder dem Geschäft, in dem Sie das Produkt gekauft haben. Dieses Elektro-
haushaltsgerät ist entsprechend der EU-Richtlinie 2002/96/CE Über Elektro- und Elektronik
– Altgeräte (WEEE).
EN
The symbol on the product or on its packaging indicates that this product may not
be treated as household waste. Instead it shall be handed over to the applicable collection point
for the recycling of electrical and electronic equipment. By ensuring this product is disposed of
correctly, you will help prevent potential negative consequences for the environment and hu-
man health, which could otherwise be caused by inappropriate waste handling of this product.
For more detailed information about recycling of this product, please contact your local city of-
fice, your household waste disposal service or the shop where you purchased the product. This
appliance is marked according to the European directive 2002/96/EC on waste electrical and
electronic equipment (WEEE).
ES
El símbolo en el producto o en su embalaje indica que este producto no se puede
tratar como desperdicios normales del hogar. Este producto se debe entregar al punto de re-
colección de equipos eléctricos y electrónicos para reciclaje. Al asegurarse de que este produc-
to se deseche correctamente, usted ayudará a evitar posibles consecuencias negativas para el
ambiente y la salud pública, lo cual podría ocurrir si este producto no se manipula de forma
adecuada. Para obtener información más detallada sobre el reciclaje de este producto, póngase
en contacto con la administración de su ciudad, con su servicio de desechos del hogar o con la
tienda donde compró el producto. Este electrodomestico està marcado conforme a la directiva
Europea 2000/96/CE sobre los residuos de aparatos elèctricos y electrònicos (WEEE).
IT
Il simbolo sul prodotto o sulla confezione indica che il prodotto non deve essere
considerato come un normale rifiuto domestico, ma deve essere portato nel punto di raccol-
ta appropriato per il riciclaggio di apparecchiature elettriche ed elettroniche. Provvedendo a
smaltire questo prodotto in modo appropriato, si contribuisce a evitare potenziali conseguenze
negative per l’ambiente e per la salute, che potrebbero derivare da uno smaltimento inadegua-
to del prodotto. Per informazioni più dettagliate sul riciclaggio di questo prodotto, contattare
l’ufficio comunale, il servizio locale di smaltimento rifiuti o il negozio in cui è stato acquistato il
prodotto. Questo elettrodomestico è marcato conformemente alla Direttiva Europea 2002/96/
CE sui rifiuti da apparecchiature elettriche ed elettroniche (WEEE).

15
CONTENTS
EN
1/ TO THE ATTENTION OF THE USER
- Safety instructions 16
- Description of the applianc 17
2 / INSTALLING THE HOOD
- Mounting the hood 18
- Removal of the filter cartridge 19
- Mounting the filter cartridge 19
- Electrical hook-up of the hood 20
3 / HOW THE HOOD WORKS 21
4 / CLEANING THE HOOD 23
5 / OPERATIONAL ANOMALIES 24
6 / AFTER SALES SERVICE 24

16
1/ TO THE ATTENTION OF THE USER
EN
Important: keep these instructions for use with the appliance. If the appliance should be
sold or passed on to others, make sure that the instructions are passed on with it. We thank
you for taking note of these suggestions before installing and using the appliance. They have
been written for your personal safety and the safety of others.
- SAFTEY INSTRUCTIONS
These hoods have been designed for personal use in the home. The appliance must be used
by adults. Make sure that children do not come into contact with the appliance and that they
do not use it to play with. Make sure that children do not operate the controls.
- When the appliance is delivered, check the overall appearance of the packaging.
Any remarks should be written on the delivery coupon, of which you keep a copy.
Your appliance is designed for normal domestic use.
It is not designed for commercial or industrial use, or for purposes other than those for which it
was designed.
- Any consequences of or damage from incorrect installation or incorrect use of the appliance will
not be covered by the manufacturer’s guarantee.
- Repairs must be performed only by an authorised specialist.
Always disconnect the hood before carrying out cleaning or maintenance operations.
- Adequately ventilate the area in case the hood is activated simultaneously with other appliances
powered from non-electrical sources so that the hood does not ventilate these combustion
fumes.
- It is prohibited to cook food over open flames or operate gas hobs without pots or pans on them
under the hood itself (the flames sucked into the hood might damage the appliance).
- Deep frying under the appliance must be done under constant supervision as hot oils and fats
may ignite.
Respect the guidelines for cleaning and replacement of the filters. Accumulated deposits of
grease are a fire hazard.
- This appliance must not be used over cook tops powered by wood or coal or in any case, over
cook tops with power levels that could damage the appliance.
Never use steam or high-pressure devices for cleaning your hood (regulations regarding electri-
cal safety).
- Never use the hood without the grease filters
NOTE: The minimum distance between the open down draft and the surface above it needs to be
400 mm
NOTE: When moving the down draft, never place hands inside the operating radius of the pull-out
carriage
Constantly seeking to improve our products, we reserve the right to modify their technical, func-
tional, or aesthetic characteristics as they evolve.
In the case of the version with external motor, for normal downdraft operation, it is necessary
to use an extraction unit (external motor) made by the same manufacturer.
The air collected must not be conveyed into a flue used for smoke or fumes from appliances
powered by anything other than electricity (central heating systems, etc.). As far as concerns
discharging air from the flue, respect the guidelines of the competent authorities.

17
1/ TO THE ATTENTION OF THE USER
EN
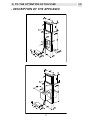
- DESCRIPTION OF THE APPLIANCE

18
2/ INSTALLING THE HOOD
EN
1) Before installing the appliance, make sure that none of the parts is damaged in any way. In case of
damaged parts, contact your retailer and do not proceed with installation.
Read all of the following instructions with care before installing the appliance.
- Use an air outlet pipe of the shortest possible length.
- Limit the number of pipe bends.
- Use a material approved by standards and regulations.
- Avoid any sudden changes in pipe section (recommended constant diameter: 150 mm or equal
surface area).
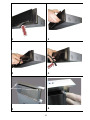
Before the installation of the Downdraft, please remove the security piece you can see in the picture
(Fig. 1-2-3-4).
The manufacturer will not be answerable for any capacity or noise problems caused by failure to com-
ply with the above instructions and the warranty will be rendered null and void.
2) Before making the opening, check that there are no structural or other parts inside the cabinet, where
the appliance is to be placed, which could hinder a proper installation. Check that the dimensions of
the Downdraft and the ones of the cooktop are compatible with the cabinet so that the installation can
be carried out properly.
3) Make a rectangular opening measuring 490 x 104 mm in the area chosen for the cook top.
For models with motor already fitted, remove the screws and the extraction unit to fit the downdraft in
the relevant hole. At this point, insert a seal (silicone) in the bottom section of the frame support (Fig.
18) and place in the relevant hole (Fig. 19-20), then proceed to insert the downdraft into the unit.
4) Put the Downdraft in the opening, inserting it from above as shown in Fig. 12.
5) The upper edge of the Downdraft must fit perfectly the cooktop.
6) Fix the Downdraft inside the cabinet. According to the dimensions of the cabinet and of the air outlet
duct, use the provided fixing brackets.
Attention: do not make any additional openings on the appliance in order to avoid to damage the
internal sliding and electrical components.
7) After completing the installation and connecting the appliance to the mains electricity, lift the down-
draft and remove the door block (Fig. 5-6-7). Then open the door (Fig. 8 - 9), remove the PVC grease
filter shield (Fig. 10), then place the filters as illustrated in Fig. 11
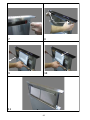
8) In the version of the Downdraft equipped with motor, install the motor group adjusting the air evacu-
ation direction as required, either downwards or upwards. After installing the motor, connect the air
ducts (Fig. 13).The motor can be fitted either on the front or back side of the downdraft..
9) For versions with outside motor, place the suction unit (outside motor) in a suitable area and fit the
exhaust air flue as illustrated in Fig. 13. Proceed to fit the air outlet ducts between the outside mo-
tor and the down draft. Select an air outlet from the five possibilities (Fig. 21) and fit the connection
provided.
10) Put the metallic box containing the electronic components in a place easy to be reached if a technical
assistance is needed Fig. 14). Connect the electrical connectors of the box to the Downdraft (Fig. 14).
11) For outside motors, connect the motor unit cable to the relevant connector on the electrical compo-
nents box.
12) Power the appliance.
Downdraft calibration
After the downdraft has been installed, the aspiration panel must be calibrated. This operation is neces-
sary to regulate the power exstraction of the aspiration panel. Connect the product to the power line,
making sure that it is conformed to the supply voltage indicated on the technical data tag. Pushing
the ON/1 button (Fig. 22B for SDD3 and 15H for SDD3 TC) the aspiration panel rises. After it has reached
a height of 180mm from the cooketop, press OFF, to stop the extraction then the Timer and after 2 sec.
the OFF button.
The downdraft will carry out the calibration of its aspiration panel rising and retracting for some centim-
eters. During this phase, the buttons on the pushbutton control panel blink. At the end of the calibration,
the aspiration panel get back to the previous position and the button end to blink. Wait until the aspiration
panel stops moving before re-activating the extraction.
After the self-calibration stage, close the filter unit completely using the OFF button.

19
UTILISATION
This product is intended to extract fumes, fats, and steam from cooking. It has been designed and made for use
either in the suction or filter versions.
VERSION EVACUATION exterieure
The hood is equipped with an air outlet to convey smoke outwards (the flue pipe and fixing flange are not sup-
plied).
Check valve blockage
Warning: Before connecting the air exhaust hose, make sure that the check valves are free to
turn over freely.
For hoods with outside air exhaust, fit a check valve to prevent wind and returning air from
entering.
Recirculation model
If it is not possible to fit an exhaust flue for smoke and fumes to be discharged outside, it is
possible to use the recirculation model. Carbon filters are required for this type of hood. The
recycled air is discharged back into the kitchen via a pipe that conveys it out through one side
of the unit (Fig. 14 bis).
Installation must conform to the regulations in force regarding the ventilation of en-
closed environments. In particular, discharged air must not be channelled into a conduit
used for exhaust discharge or discharge from devices that operate with gas or other com-
bustible materials. The use of unused conduits is not permissible without the approval of
a qualified technician.
The product can be installed at a distance of less than 65 cm from the cook top, according
to the standard EN60335-2-31:1997.
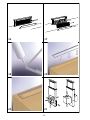
- REMOVAL OF THE FILTER ALUMINIUM CARTRIDGE
- MOUNTING THE CARBON FILTER
The removal and fitting of the grease and carbon filters need to be carried out with the down-
draft in the open position. To open the downdraft, push the ON/1 key. Then remove the front
panel, pushing the upper part of each side at the same time. The panel will rotate forwards to
make it possible to access the grease filters (Fig. 16). Remove the grease filters to access the
carbon filters (Fig. 17). The carbon filters should be changed according to the frequency of
downdraft use and in any case, once every 6 months.

20
- ELECTRIAL HOOK UP OF THE HOOD
WARNING: Place the metal box containing the electronic components at a distance of no
less than 65 cm from gas-operated cook tops or in any case, 65 cm from the extraction
point of the hood.
RECOMMENDATION: We recommend installing the metal box containing the electronic
components at least 10 cm above floor level and at a suitable distance from all heat
sources (e.g. oven sides or cook top).
This appliance is fitted with an H05 VVF 3 conductor, 0.75 mm2 (neutral, phase, and
ground) power cable. This can be hooked up to a 220 – 240 V mono-phase electrical net-
work by way of a CEI 60083 regulation power socket that must remain accessible after
installation, in conformity to installation regulations.
We decline all responsibility in case of accident caused by a lack of ground connection
or incorrect ground connection. The fuse used must be 10 or 16 A. If the power cable is
damaged, call the after-sales service to avoid any risk.
Attention
If the hood presents some form of anomaly, unplug the appliance or remove the fuse corre-
sponding to the appliance’s power line.
If the appliance has no plug or if the plug is not easily accessible, then a device needs to be fit-
ted to cut it off from the mains electricity; this device must have an opening distance between
contacts on all poles of at least 3 mm.
ELECTRIAL HOOK UP
This appliance conforms to the European Directives 2006/95/EC (Low Voltage Directive)
and 2004/108/EC (Electromagnetic Compatibility).
When you install the appliance and carry out maintenance, it must be unplugged from the
power source or the fuses must be disengaged or removed. Electrical hook up must be carried
out before the appliance is installed in the cabinet.
Check that:
- the power source is sufficient,
- power cords are in good condition,
- The diameter of the cables conforms to installation regulations.

21
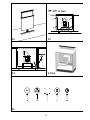
Model SDD3 STANDARD VERSION (Fig. 22)
A: Extraction panel down/OFF switch
This serves to close the extraction panel either completely or in intermediate positions above
180 mm from the cook top. When the extraction panel is being closed, it will remain in opera-
tion until it reaches 180 mm above the cook top. Below this height, the extraction function will
switch off automatically.
B: Extraction panel up ON/Speed 1
This serves to bring the extraction panel up to a maximum height of 300 mm and to auto-
matically set the first extraction speed when the panel reaches a height of 180 mm. Pressing
the button when this height is reached makes it possible to place the extraction panel in the
required intermediate positions, up to a maximum of 300 mm, while leaving the extraction
speed of the motor unchanged.
C: Speed 2 switch
D: Speed 3 switch
E: Speed 4 switch
These serve to set the respective suction speeds after the extraction panel has reached 180 mm
above the cook top and to set the height of the extraction panel to a maximum of 300 mm by
pressing the same button.
F: 10-minute timer
This is used to switch off the extraction system automatically as well as to close the extraction
panel 10 minutes after it has been enabled.
Model SDD3 TOUCH CONTROL VERSION (Fig. 15)
OFF switch: (Fig. 15) It is used to close the aspiration panel completely or to position it at inter-
mediate heights at least mm 180 above the cooktop. While closing the aspiration panel keeps
on working at the speed set up to the height of mm 180 from the cooktop. Below this height
the aspiration function is automatically cut out.
On switch/+: (Fig. 15) It is used to extract the aspiration panel up to the maximum height of
mm. 300 and to set automatically the first aspiration speed when reaching the height of mm
180 from the cooktop.
When pressing the button again after reaching this height, the aspiration motor speed can be
encreased.
If the aspiration panel is positioned at an intermediate height between mm 180 and mm 300, the
aspiration panel can start raising again by pressing first the OFF switch and then the On/+.
Switch.
Leds: (Fig. 15) The different speed levels are indicated by blue leds. (1. Speed level corresponds
to the led down on the left).
MINUS SWITCH: (Dis. 15) it is working only if the position reached by the aspiration panel
is higher than mm 180 from the cooktop. It is used to decrease the aspiration motor
speed.
TIMER SWITCH: (Fig. 15) : it is used to stop automatically the aspiration system and to close
automatically the aspiration panel ten minutes it has been set.
3/ HOW THE HOOD WORKS
EN

22
Other functions:
- After 30 hours of appliance operation, the pushbutton panel indicates saturation of the
grease filters by the buttons flashing. To reset, press the timer button.
- After 4 hours of continuous operation from the last setting, the appliance turns off and
closes automatically.
- When the front panel is removed for cleaning and maintenance operations, all the electronic
aspiration and movement functions are locked.
- Anti pinching safety device: if anything is obstructing the closure operation of the down-
draft, the operation will stop and the downdraft will move up again.

23
4/ CLEANING THE HOOD
EN
Careful maintenance helps guarantee proper operation and good results from an appliance
over time.
The hood must be unplugged from the electrical power source, both by unplugging
the appliance from the socket as well as de-activating the breaker, before removing the
metal filters. After cleaning, you must replace the metal filters as outlined in the instruc-
tions.
MAINTENANCE HOW TO PROCEED?
ACCESSORY PRODUCTS TO
USE
External surfaces and
accessories
Do not use metallic scrub-
bers, abrasive products, or
hard brushes.
To clean the external sur-
faces of the hood and the
light housing screen use
only commercially available
household detergents dilut-
ed in water. Then rinse with
clean water and dry with a
soft cloth.
Grease filter
After 30 hours’ operation,
the button pad will sig-
nal that the grease filter is
saturated by flashing the 4
speed LEDs. Press the timer
button to reset
.
The grease filters can be
washed by hand or in the
dishwasher. These filters
need to be cleaned on a reg-
ular basis because otherwise
they may present a fire risk.
Refit the grease filters and
front panel, making sure that
the panel is properly fitted at
the sides so that it does not
cause the downdraft to stop
operating.
Active carbon filter
In the recirculation mode,
you must substitute the ac-
tive carbon filter periodically.
To remove the carbon filter
it is necessary first of all to
remove the grease filter and
then to pull the plastic key of
the panel itself to remove it
from its seating.
Follow these steps in reverse
order to insert the active car-
bon filter.
Replace the used carbon fil-
ter on an average of every six
months.

24
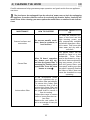
5/ OPERATIONAL ANOMALIES
EN
SYMPTOM SOLUTION
The hood does not
work...
Check that:
• there is not a power outage.
• a specific speed has actually been selected.
The hood has low
output...
Check that:
• the motor speed selected is sufficient for the quantity of fumes
steam present.
• the kitchen is ventilated well enough to allow for air intake.
• the carbon filter is not worn (hood n recirculation mode).
The hood stops in
the middle of ope-
ration
Check that:
• there is not a power outage.
• the omnipolar device has not tripped.
Any maintenance on your equipment should be undertaken by:
- either your dealer,
- or another qualified mechanic who is an authorized agent for the brand appliances.
When making an appointment, state the full reference of your equipment (model, type and
equipment). This information appears on the manufacturer’s nameplate attached to your
equipment.
6/ AFTER SALES SERVICE
EN

65
1
2
3
4
6
5

66
7
8
9
10
11
P
u
s
ch

67
12
13
14
14 bis
15

68
16
17
18
19
20
21

69
22
AB
C
DE
F
-
 1
1
-
 2
2
-
 3
3
-
 4
4
-
 5
5
-
 6
6
-
 7
7
-
 8
8
-
 9
9
-
 10
10
-
 11
11
-
 12
12
-
 13
13
-
 14
14
-
 15
15
-
 16
16
-
 17
17


Foster 2451 000 Manuale utente
- Categoria
- Cappe da cucina
- Tipo
- Manuale utente
- Questo manuale è adatto anche per
in altre lingue
- English: Foster 2451 000 User manual