Oversteel 24VF16K Krypto Series Gaming Monitor Manuale utente
- Tipo
- Manuale utente

KRYPTO
GAMING MONITOR SERIES
24 FULL HD RESOLUTION
1920×1080@165Hz
USER MANUAL
MANUAL DE USUARIO
MANUEL DE L'UTILISATEUR
BENUTZERHANDBUCH
MANUALE UTENTE
04
16
28
40
52
EN
ES
FR
DE
IT

The terms HDMI and HDMI High-Definition Multimedia Interface, and the HDMI Logo are
trademarks or registered trademarks of HDMI Licensing Administrator, Inc. in the United States
and other countries.
Los términos HDMI y HDMI High-Definition Multimedia Interface, y el logo de HDMI son
Marcas comerciales o marcas registradas de HDMI Licensing Administrator, Inc. en los Estados
Unidos Estados y otros países.
Les termes HDMI et HDMI High-Definition Multimedia Interface, ainsi que le logo HDMI sont
Marques commerciales ou marques déposées de HDMI Licensing Administrator, Inc. aux États-
Unis États et autres pays.
Die Begriffe HDMI und HDMI High-Definition Multimedia Interface sowie das HDMI-Logo
lauten Marken oder eingetragene Marken von HDMI Licensing Administrator, Inc. in den
Vereinigten Staaten Staaten und andere Länder.
I termini HDMI e HDMI High-Definition Multimedia Interface e il logo HDMI sono Marchi o
marchi registrati di HDMI Licensing Administrator, Inc. negli Stati Uniti Stati e altri paesi.
EN
ES
FR
DE
IT

KRYPTO
GAMING MONITOR SERIES
24 FULL HD RESOLUTION
1920 ×1080@165Hz

4
KRYPTO
GAMING MONITOR SERIES
EN Important Safety Precautions
1. Please read all the instructions carefully before using this product.
2. BE SURE TO unplug the power cord when cleaning LCD. Never clean it with liquid detergent or spraying detergent, but wipe it with
wet soft cloth. If it is still not clean, please use special detergent for LCD.
3. DO NOT use accessories not authorized by the manufacturer, other wise they may incur danger.
4. When disconnecting the power cord of display or power adapter, always remember to hold the plug instead of puling the wire to
unplug the power cord.
5. Keep the display away from water sources such as bath tub, washbasin, sink or washing machine.DO NOT place the display on wet
floor or near a swimming pool, or press LCD surface with fingers or hard objects.
6. The grooves and openings on the back and bottom of the shell are for ventilation purpose and also for guaranteeing the reliability
of the elements and preventing them from overheating; in order to prevent the vents from blocking; DO NOT place the display on
bed, sofa, carpet or other similar surfaces; DO NOT place the display near to or on heat radiator or heater; DO NOT put the display
into embedded device, unless it is provided with adequate ventilating equipment.
7. Only the type of power source indicated on the nameplate applies to this display. If you have any questions on the type of power
source you use, please consult the dealer of the display or local administration of power supply.
8. For safety, the display or the power adapter is equipped with three-pin plug power cord. The third pin of this plug is for grounding,
and only applicable to socket that is correctly grounded. In case that your socket is not available for the plug, please contact
electrician to replace the socket.
9. Since there is high voltage or other risks when the shell is opened or moved, please DO NOT repair the display by yourself, but
request qualified maintenance staff to carry out.
10. In one of the following cases, please unplug the display or the power adapter and ask qualified maintenance staff for help:
a. The power cord or the plug is impaired or worn.
b. The display falls off or the shell is damaged.
c. The display is obviously abnormal.
11. Please place the display in a cool, dry and well ventilated place.
12. Store the display in temperature range of -10°C~60°C, beyond which the display may be damaged permanently.
The monitor should be operated only from the type of power source indicated on the label. If you are not sure of the type of power supplied to
your home, consult your dealer or local power company.
The monitor is equipped with a three-pronged grounded plug, a plug with a third (grounding) pin. This plug will fit only into a grounded power
outlet as a safety feature. If your outlet does not accommodate the three-wire plug, have an electrician install the correct outlet, or use an
adapter to ground the appliance safely. Do not defeat the safety purpose of the grounded plug.
Unplug the unit during a lightning storm or when it will not be used for long periods of time. This will protect the monitor from damage due to
power surges.
Do not overload power strips and extension cords. Overloading can result in fire or electric shock.
To ensure satisfactory operation, use the monitor only with UL listed computers which have appropriate configured receptacles marked
between 100-240V AC, Min. 5A.
The wall socket shall be installed near the equipment and shall be easily accessible.
Power & Electrical Warnings

5
KRYPTO
GAMING MONITOR SERIES
EN
Read the safety instructions carefully and thoroughly.
All cautions and warnings on the device or user’s manual should be noted.
Refer servicing to qualified personnel only.
Keep the User’s Guide that comes with the package for future reference.
To prevent fire or shock hazard, keep this device away
from humidity and high temperature.
The ventilator on the device is used for air convection and to prevent the device
from overheating. Do not cover the ventilator.
Lay this device on a reliable flat surface before setting it
up.
Do not leave the device in an unconditioned environment with a storage
temperature above 60OC or below -20OC, which may damage the device.
NOTE: The maximum operating temperature is around 40OC.
Always keep strong magnetic or electrical objects away from the device.
Make sure that the power voltage is within its safety range and has been adjusted properly to the value of 100~240V before connecting the
device to the power outlet. Do not disable the protective earth pin from the plug. The device must be connected to an earthed mains socket-
outlet. Always disconnect the power cord or switch the wall socket off if the devicewould be left unused for a certain time to achieve zero
energy consumption.
Place the power cord in a way that people are unlikely to step on it. Do not place
anything on the power cord.
When cleaning the device, be sure to remove the power plug. Use a piece of soft
cloth rather than industrial chemical to clean the device. Never pour any liquid
into the opening; that could damage the device or cause electric shock.
If any of the following situations arises, get the device checked by service personnel:
The power cord or plug is damaged.
Liquid has penetrated into the device.
The device has been exposed to moisture.
The device does not work well or you can not get it work according to user’s manual.
The device has dropped and damaged.
The device has obvious sign of breakage
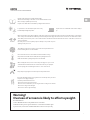
Recommendations:
1. Take a 10-minute break for every 30 minutes of screen time.
2. Children under 2 years of age should have no screen time. For children aged
2 years and over, screen time should be limited to less than one hour per day
Warning!
Overuse of screens is likely to affect eyesight.

6
KRYPTO
GAMING MONITOR SERIES
EN IMPORTANT SAFETY PRECAUTIONS
Do not place the monitor in rain, humid environment or open the monitor case to avoid any shock, electrical hazards, and/or mechanical hazards.
Operation
• Keep the monitor out of direct sunlight and away from stoves or any other heat source.
• Keep the monitor out of water source
• Remove any object that could fall into ventilation holes or prevent proper cooling of the monitor's electronics.
• Do not block the ventilation holes.
• Do not knock or drop the monitor during operation or transportation.
Maintenance Guidelines
CAUTION
• Do not place the monitor in rain, humid environment or open the monitor case to avoid any shock, electrical hazards, and/or mechanical hazards.
• Before cleaning the monitor, unplug the monitor power cable from the electrical outlet.
Caring for Your Monitor
• To clean your screen, slightly dampen a soft, clean cloth with water.
• If possible, use a special screen-cleaning tissue or solution. Do not use benzene, thinner, ammonia, abrasive cleaners, or compressed air.
• Use a slightly dampened, warm cloth to clean the frame. Avoid using detergent of any kind as some detergents might leave a milky film on the plastics.
• Unplug the monitor if you are not going to use it for an extendedperiod of time.
• To avoid the risk of shock or permanent damage to the set, do not expose the monitor to dust, rain, water, or excessive moisture environment. If your monitor gets wet,
wipe it with dry cloth as soon as possible.
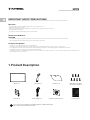
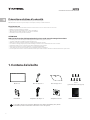
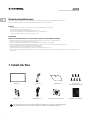
Monitor x1
DP Cable x1 Power Adaptor x 1 User manual x1Wall mounted adapter x1
Stand stem x 1 Stand base x 1 KM4*10x7 Screw Bolts
(for Stand Installation)
1. Product Description
The screws come in different sizes: NO.1 (11mmx4pcs), NO.2 (35mmx4pcs).
Extra screws may be included as backup.

7
KRYPTO
GAMING MONITOR SERIES
EN
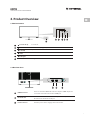
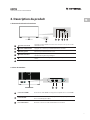
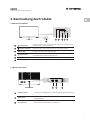
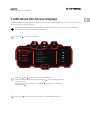
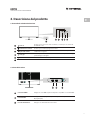
2. Product Overview
2.1 Monitor Buttons
2.2 Monintor Ports
Press Rocker up Scene mode.
Power Buon Turn o monitor (longpress).
Press Rocker
to the le Input selection.
Press Rocker
down Game Crosshair.
Press Rocker
to the right main menu.
LED Indicator Changes colors to indicate status.
HDMI Connectors Insert one end of the HDMI cable into the computer's HDMI output and
connect the other end to the monitor's HDMI port.
DP Connectors Insert one end of the DP cable into the computer's DP output and connect
the other end to the monitor's DP port.
Power Connector Insert the power cable to supply power to the monitor.
1
7 8 9
2 3 4 5
6
1
8
7
3
5
6
2
9
4

8
KRYPTO
GAMING MONITOR SERIES
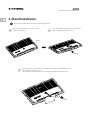
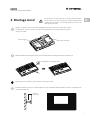
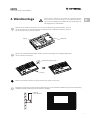
EN 3. Stand Installation
Keep the foam underneath the monitor before attaching the stand.
Open the package to take out foams and put
them on a flat tabletop.
Open the package and take out the product with the foam still a ached. Carefully place it on a
desk or table and shield the screen.
Take out the base, align it with the bottom of the stand and tighten them with 2 screws.
Take out the stand, install it on the rotary shaft 1 of the
monitor and tighten them with 2 screws.
1
3
2
Monitor
Screws
Screws

9
KRYPTO
GAMING MONITOR SERIES
EN
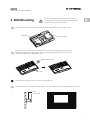
Open the package, take out the product with foam still attached, and gently place it on a desktop or table.
This monitor only includes screws which may be used when
aaching the monitor to a VESA 75*75mm type mount. No VESA
mount or mounting accessory is included.
Open the top cover of poly dragon, take out the film covering bag of the fuselage, and then place the
fuselage in the bottom cover of poly dragon. Take out the wall mounted adapter and 2 screws. Lock the
wall mounted adapter with two PM4 * 10mm screws.
Follow the directions received with your mount, stand, or accessory and install the monitor on the wall or fixture as desired.
Do not discard the original screws. These may be needed for future use.
4. Wall Mounting
1
2
3
Stand Base
Stand Stem
Wall mounted adapter
Screws
Mount
(not included)

10
KRYPTO
GAMING MONITOR SERIES
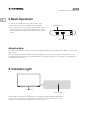
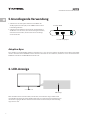
EN 5.Basic Operation
Adaptive-Sync
This feature is off by default. To activate, you must have hardware with Adaptive-Sync capability, a DP or HDMI cable, and the latest
graphic drivers.
After connecting your computer and monitor with a DP or HDMI cable, you may receive a prompt to enable the feature on your
computer. If you do not, you may need to enable the function in your graphics card menu. See your graphics card manufacturer’s
documentation for instructions.
1. Insert one end of the DP cable into your PC's graphics card. A
HDMI cable may also be used. A HDMI cables is not included.
2. Connect the power cable to your monitor, then connect the other
end to your power source. It is recommended that you use a surge
protector with adequate voltage if a wall outlet cannot be reached
directly.
DP Connectors
Indicator Light
HDMI Connectors
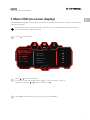
6. lndicator Light
Solid blue light indicates power is on and the monitor is operating nor mally. Flashing blue light indicates
no video source, no horizontal or vertical signal has been detected or voltage is low. Please ensure your
computer is on and all video cables are fully inserted and/or connected.

11
KRYPTO
GAMING MONITOR SERIES
EN
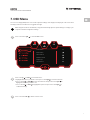
7. OSD Menu
When using the monitor for the first time, seings will automatically adjust to optimal settings according to your
computer's standard configuration settings.
The on-screen display (OSD) menu can be used to adjust the settings of the display and is displayed on the screen when
the display is turned on and the buon is toggled to the right.
Press rocker to the right to enter the OSD screen.
1
Press rocker up or down to browse functions.
a. Highlight the functions you want to set and press rocker right to enter the submenu.
b. Press rocker up or down to browse the sub-menu and press the rocker right to
highlight the functions you want to set.
c. Press rocker up or down to highlight the options and press the rocker right to
confirm the settings.
Press rocker to the left to exit the current screen.
2
3
Standard Mode On
On
RTS/RPG Mode
FPS Arena Mode
MOBA Arena Mode
Adaptive-Sync
Shadow Balance
165hz
1920
50
1080
XOFF

12
KRYPTO
GAMING MONITOR SERIES
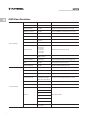
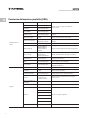
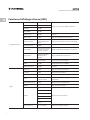
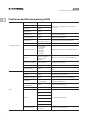
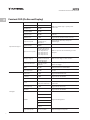
EN OSD Menu Functions
Game Seings
Standard Mode On, O Turn the Standard Mode function on/o
RTS/RPG Mode On, O Turn the RTS/RPG Mode function on/o
FPS Arena Mode On, O Turn the FPS Arena Mode function on/o
MOBA Arena Mode On, O Turn the MOBA Arena Mode function on/o
Adaptive-Sync On, O Turn the Adaptive-Sync function on/o
Shadow Balance 0~100 Adjust Shadow Balance levels
Response Time O, Normal, Fast,
Ultrafast Adjust response time
Rdfresh rate O, On,Position Turn the Rdfresh rate on/o
Game Crosshair
O, Crosshair1,
Crosshair2,
Crosshair3,
Crosshair4,
Crosshair5,
Crosshair6
Turn the Game Crosshair on/o
Game Time O, 15:00, 30:00, 45:00,
60:00, Position Turn the Game Time on/o
Dynamic Brightness O, Normal,Expert,
Elaboration
Compensate for gray scale display screen
and strengthen the expression of gray scale
MPRT On, O Moving Picture Response Time
Ambient Lighting On, O Turn the Ambient Lighting on/o
Picture Seings
Brightness 0~100 Adjust display brightness
Contrast 0~100 Adjust display contrast
DCR On, O Turn the DCR function on/o
Contextual Model
O, Movie Mode,
Reading-Mode,Night
Mode, Care Eyes Mode
Turn the Contextual Model function on/o
Low Blue Light 0~100 Set blue light filtering level
Sharpness 0~5 Set display sharpness
Gamma
1.8,
Set Gamma add-in
2.0,
2.2,
2.4,
2.6
S.curve
Aspect Ratio Wide Screen,
4:3, 1:1, Auto Select on-screen aspect ratio

13
KRYPTO
GAMING MONITOR SERIES
EN
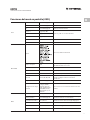
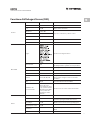
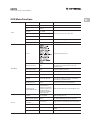
OSD Menu Functions
Color Seing
Warm On, O
Natural On, O
Cool On, O
User1 O, 0~100 Adjust hue levels
User2 O, 0~100 Adjust hue levels
User3 O, 0~100 Adjust hue levels
Hue 0~100 Adjust hue levels
Saturation 0~100 Adjust hue levels
OSD Seings
Language Set OSD language
OSD Time Out 5-60 Set how long the OSD remains open
a er non-use
OSD H-Position 0-100 Adjust the OSD’s horizontal position
OSD V-Position 0-100 Adjust the OSD’s vertical position
OSD Transparency 0-5 Set the OSD’s overall transparency
OSD Rotation Normal, 90, 180, 270 Adjust the OSD menu orientation
based on the monitor’s orientation
OSD Lock O, On
Hotkey1 Seing
Hotkey2 Seing
Hotkey3 Seing
Brightness,Contrast,
Shadow Balance,
Game Crosshair,
Refresh rate,Game Time,
Adaptive-
Sync,Contexual
Model,Input Source,
Splicing
Screen,Dynamic
Brightness,Ambient
Lighting
Other Seings
Input Source Auto,DP,HDMI Switch to Auto, DP, HDMI signal input
Splicing Screen On, O
Auto Power On, O
Eyeshield Remind On, O
Reset Reset monitor configurations
Information

14
KRYPTO
GAMING MONITOR SERIES
EN
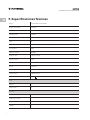
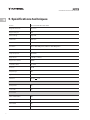
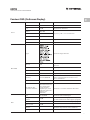
Model NAT-OV-KR24VF16 / NAT-OV-KR24VF16K
Screen Size 24"
Aspect Rstio 16:9
Backlight E-LED
Brightness 280cd/m²
Panel VA
Resolution DP1.2: 1920*1080 @165Hz, HDMI 1.4: 1920*1080@144Hz
Refresh Rate 165Hz
Response Time 1Ms MPRT
Viewing Angle ≥178°(H)°/ ≥178°(V)°
Contrast Ratio 3000:1
VESA Mounting 75*75mm
Colours 16.7M
Adaptive-Sync Yes
Signal Input HDMI 1.4*1, DP 1.2*1
Power Input DC 12V 2.5 A
Audio
Speakers No
Audio Out No
Accessories
Power Cable No
Power Adaptor Yes
HDMI Cable No
DP Cable Yes
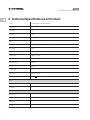
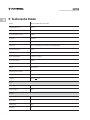
9. Technical Specifications of Product

15
KRYPTO
GAMING MONITOR SERIES
EN
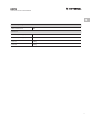
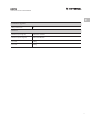
Additional Functions
Low Blue Light Yes
Physical Dimensions
Dimensions (w/ Stand) 616.2*445.7*212.8mm
Dimensions (w/o Stand) 616.2*367.2*100.7mm
Net Weight 4.85Kg
Gross Weight 6.27Kg

16
KRYPTO
GAMING MONITOR SERIES
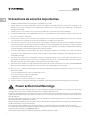
ES Precauciones de seguridad importantes
1. Por favor, lea todas las instrucciones cuidadosamente antes de usar este producto.
2. ASEGÚRESE de desenchufar el cable de alimentación cuando limpie la pantalla LCD. Nunca lo limpie con líquido o detergente en
aerosol, pero límpialo con un paño suave y húmedo. Si aún no está limpio, por favor, use un detergente especial para el LCD.
3. NO utilice accesorios no autorizados por el fabricante, de lo contrario podrían provocar fallo.
4. Cuando desconecte el cable de alimentación de la pantalla o del adaptador de corriente, recuerde siempre sostener el enchufe en
lugar de tirar del cable para desenchufar el cable de alimentación.
5. Mantenga la pantalla alejada de las fuentes de agua como la bañera, el lavabo, el fregadero o lavadora. NO coloque la pantalla en
el suelo mojado o cerca de una piscina, o presiona la superficie del LCD con los dedos o con objetos duros.
6. Las ranuras y aberturas en la parte trasera y la parte inferior de la cáscara son para la ventilación propósito y también para
garantizar la fiabilidad de los elementos y prevenirlos de sobrecalentamiento; para evitar que las rejillas de ventilación se
bloqueen, NO coloque el en la cama, el sofá, la alfombra u otras superficies similares; NO coloque la pantalla cerca de o en el
radiador o calentador de calor; NO ponga la pantalla en el dispositivo incorporado, a menos que está provisto de un equipo de
ventilación adecuado.
7. Sólo se aplica a esta pantalla el tipo de fuente de alimentación indicado en la placa de identificación. Si tiene alguna pregunta
sobre el tipo de fuente de energía que utiliza, por favor consulte al distribuidor de la pantalla o la administración local de la fuente
de alimentación.
8. Por seguridad, la pantalla o el adaptador de corriente está equipado con un enchufe de tres clavijas de alimentación cordón.
La tercera clavija de este enchufe es para la conexión a tierra, y sólo se aplica a la toma de corriente que es correctamente
conectado a tierra. En caso de que su enchufe no esté disponible para la clavija, por favor contacte con electricista para
reemplazar el enchufe.
9. a que hay alto voltaje u otros riesgos cuando se abre o se mueve la carcasa, por favor NO repare la pantalla usted mismo, pero
solicite personal de mantenimiento cualificado para llevar fuera.
10. En uno de los siguientes casos, por favor desenchufe la pantalla o el adaptador de corriente y pedir ayuda al personal de
mantenimiento cualificado:
a. El cable de alimentación o el enchufe está deteriorado o desgastado.
b. La pantalla se cae o la carcasa está dañada.
c. La pantalla es obviamente anormal.
11. Por favor, coloque la pantalla en un lugar fresco, seco y bien ventilado.
12. Almacene la pantalla en un rango de temperatura de -10°C~60°C, más allá la pantalla puede ser dañada permanentemente.
El monitor debe funcionar únicamente con el tipo de fuente de energía indicado en la etiqueta. Si no está seguro de la tipo de energía
suministrada a su casa, consulte a su distribuidor o a la compañía eléctrica local.
El monitor está equipado con un enchufe de tres puntas con conexión a tierra, un enchufe con una tercera clavija (con conexión a tierra).
Este enchufe encajará sólo en una toma de corriente con conexión a tierra como medida de seguridad. Si su toma de corriente no tiene
capacidad para el enchufe de tres cables, tenga un electricista instalar la toma de corriente correcta, o usar un adaptador para conectar el
aparato a tierra de forma segura. No anule el propósito de seguridad de el enchufe con conexión a tierra.
Desenchufe la unidad durante una tormenta eléctrica o cuando no vaya a ser utilizada durante largos períodos de tiempo. Esto protegerá el
monitorizar los daños debidos a las subidas de tensión.
No sobrecargue las regletas y los cables de extensión. La sobrecarga puede provocar un incendio o una descarga eléctrica.
Para garantizar un funcionamiento satisfactorio, utilice el monitor sólo con computadoras con certificación UL que tengan la configuración
adecuada receptáculos marcados entre 100-240V AC, Min. 5A.
El enchufe de la pared se instalará cerca del equipo y será fácilmente accesible.
Power & Electrical Warnings

17
KRYPTO
GAMING MONITOR SERIES
ES
Lea las instrucciones de seguridad con cuidado y detenidamente.
Se deben tener en cuenta todas las precauciones y advertencias del dispositivo o del manual del usuario.
Remita el mantenimiento a personal cualificado únicamente.
Guarde el manual del usuario que viene con el paquete para futuras referencias.
Para evitar el riesgo de incendio o de descarga
eléctrica, mantenga este dispositivo alejado de la
humedad y de las altas temperaturas. la temperatura.
El ventilador del dispositivo se utiliza para la convección de aire y para evitar que el dispositivo por el sobrecalentamiento. No cubra el
ventilador.
Coloque este dispositivo en una superficie plana y
fiable antes de colocarlo.
No deje el dispositivo en un ambiente no acondicionado con un almacenamiento
temperatura superior a 60OC o inferior a -20OC, lo que puede dañar el dispositivo.
NOTA: La temperatura máxima de funcionamiento es de alrededor de 40OC.
Mantenga siempre los objetos magnéticos o eléctricos fuertes alejados del dispositivo.
Asegúrese de que la tensión de alimentación está dentro de su rango de seguridad y ha sido ajustado correctamente al valor de 100~240V
antes de conectar el dispositivo a la toma de corriente. No deshabilite la clavija de tierra protectora del enchufe. El dispositivo debe estar
conectado a una toma de corriente con conexión a tierra.
Desconecte siempre el cable de alimentación o apague la toma de corriente si el aparato se dejaría sin usar durante cierto tiempo para
lograr un consumo de energía cero.
Coloca el cable de alimentación de manera que la gente no pueda pisarlo. No coloque
cualquier cosa en el cable de alimentación.
Cuando limpie el dispositivo, asegúrese de retirar el enchufe de alimentación. Utilice un trozo de papel suave en lugar de usar químicos
industriales para limpiar el dispositivo. Nunca vierta ningún líquido en la abertura; eso podría dañar el dispositivo o causar una descarga
eléctrica.
Si se presenta alguna de las siguientes situaciones, haga que el dispositivo sea revisado por el servicio técnico personal:
El cable de alimentación o el enchufe están dañados.
El líquido ha penetrado en el dispositivo.
El dispositivo ha sido expuesto a la humedad.
El dispositivo no funciona bien o no puede hacer que funcione según el usuario manual.
El dispositivo se ha caído y dañado.
El dispositivo tiene signos evidentes de rotura
Recomendaciones:
1. Tómese un descanso de 10 minutos por cada 30 minutos de tiempo de pantalla.
2. Los niños menores de 2 años no deben tener tiempo de pantalla. Para los niños de edad
A partir de los 2 años, el tiempo de pantalla debe limitarse a menos de una hora por día
¡Atención!
El uso excesivo de las pantallas
puede afectar a la vista.

18
KRYPTO
GAMING MONITOR SERIES
ES Precauciones de seguridad
No exponga el monitor a un entorno húmedo, a la lluvia ni a otros líquidos.
Para evitar descargas eléctricas debidas a riesgos eléctricos o mecánicos, no abra la carcasa del monitor.
Funcionamiento
• Mantenga el monitor alejado de la luz solar directa u otras fuentes de calor como puede ser una estufa.
• Mantenga el monitor alejado de cualquier líquido.
• Retire cualquier objeto que pueda caer en los orificios de ventilación.
• Para evitar el sobrecalentamiento, no bloquee los orificios de ventilación.
• No golpee ni deje caer el monitor.
PRECAUCIÓN
Desenchufe el cable de alimentación de la toma de corriente antes de limpiar el monitor.
• Para limpiar la pantalla, humedezca ligeramente un paño suave y limpio con agua.
• Si es posible, utilice una toallita especial para limpiar pantallas.
• No utilice benceno, diluyentes, amoníaco, limpiadores abrasivos o aire comprimido.
• Las soluciones de limpieza inadecuadas pueden dañar el monitor o dejar una película lechosa en la pantalla o la carcasa.
• Desenchufe el monitor si no la va a utilizar durante un prolongado período de tiempo.
• No exponga el monitor al polvo, a líquidos o a un entorno húmedo.
• En caso de que el monitor entre en contacto con líquidos, límpielo inmediatamente con un paño seco.
• Si se derrama líquido en los orificios de ventilación, no use más el monitor. Póngase en contacto con un técnico de servicio profesional.
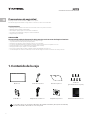
Monitor x1
Cable DP x 1 Adaptador de corriente x 1 Manual de instrucciones x 1
Brazo del soporte x 1 Base del soporte x 1 Tornillos x7
(para instalación de soporte)
1. Contenido de la caja
Los tornillos vienen en dos tamaños diferentes: No.1 (11mm x 4unidades), No.2 (35mm 4x unidades)
Puede incluir tornillos adicionales en caso de repuesto
Adaptador de pared x1

19
KRYPTO
GAMING MONITOR SERIES
ES
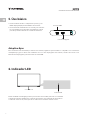
2. Descripción del producto
2.1 Panel de selección del monitor
2.2 Puertos del monitor
Botón arriba Presiona para avanzar hacia arriba en los menus, Atajo para acceder a los
modos de escena.
Botón de encendido Presiona para encender y apagar el monitor.
Botón izquierda Presiona para avanzar hacia atrás en los submenús. Atajo para seleccionar
la fuente.
Botón abajo Presiona para avanzar hacia abajo en los menus. Atajo para seleccionar las
mirillas integradas de juego.
Botón derecha Entra en el menú OSD. Presiona para avanzar a los submenús.
Indicador LED Indica el estado del monitor.
Conectores HDMI Conecta un cable HDMI a cualquier dispositivo compatible con salida
HDMI.
Conector DP Conecta un cable DisplayPort a cualquier dispositivo compatible con salida
DisplayPort (DP).
Puerto de alimentación Conecta el cable de alimentación al monitor.
1
7 8 9
2 3 4 5
6
1
8
7
3
5
6
2
9
4

20
KRYPTO
GAMING MONITOR SERIES
ES 3. Instalación del soporte
Mantén el monitor dentro de la espuma protectora durante la instalación del soporte.
Abra el paquete para sacar las espumas y
póngalas sobre una mesa plana.
Abra el paquete y saque el producto con la espuma todavía adolorida. Colócalo con cuidado en
un escritorio o mesa y protege la pantalla.
Saque la base, alinéela con la parte inferior del soporte y apriétela con 2 tornillos.
Saque el soporte, instálelo en el eje giratorio 1 del
monitor y apriételo con 2 tornillos.
1
3
2
Monitor
Tornillos
Tornillos
La pagina si sta caricando...
La pagina si sta caricando...
La pagina si sta caricando...
La pagina si sta caricando...
La pagina si sta caricando...
La pagina si sta caricando...
La pagina si sta caricando...
La pagina si sta caricando...
La pagina si sta caricando...
La pagina si sta caricando...
La pagina si sta caricando...
La pagina si sta caricando...
La pagina si sta caricando...
La pagina si sta caricando...
La pagina si sta caricando...
La pagina si sta caricando...
La pagina si sta caricando...
La pagina si sta caricando...
La pagina si sta caricando...
La pagina si sta caricando...
La pagina si sta caricando...
La pagina si sta caricando...
La pagina si sta caricando...
La pagina si sta caricando...
La pagina si sta caricando...
La pagina si sta caricando...
La pagina si sta caricando...
La pagina si sta caricando...
La pagina si sta caricando...
La pagina si sta caricando...
La pagina si sta caricando...
La pagina si sta caricando...
La pagina si sta caricando...
La pagina si sta caricando...
La pagina si sta caricando...
La pagina si sta caricando...
La pagina si sta caricando...
La pagina si sta caricando...
La pagina si sta caricando...
La pagina si sta caricando...
La pagina si sta caricando...
La pagina si sta caricando...
La pagina si sta caricando...
La pagina si sta caricando...
-
 1
1
-
 2
2
-
 3
3
-
 4
4
-
 5
5
-
 6
6
-
 7
7
-
 8
8
-
 9
9
-
 10
10
-
 11
11
-
 12
12
-
 13
13
-
 14
14
-
 15
15
-
 16
16
-
 17
17
-
 18
18
-
 19
19
-
 20
20
-
 21
21
-
 22
22
-
 23
23
-
 24
24
-
 25
25
-
 26
26
-
 27
27
-
 28
28
-
 29
29
-
 30
30
-
 31
31
-
 32
32
-
 33
33
-
 34
34
-
 35
35
-
 36
36
-
 37
37
-
 38
38
-
 39
39
-
 40
40
-
 41
41
-
 42
42
-
 43
43
-
 44
44
-
 45
45
-
 46
46
-
 47
47
-
 48
48
-
 49
49
-
 50
50
-
 51
51
-
 52
52
-
 53
53
-
 54
54
-
 55
55
-
 56
56
-
 57
57
-
 58
58
-
 59
59
-
 60
60
-
 61
61
-
 62
62
-
 63
63
-
 64
64


Oversteel 24VF16K Krypto Series Gaming Monitor Manuale utente
- Tipo
- Manuale utente
in altre lingue
Altri documenti
-
Itek ITMF24V075FHD Manuale utente
-
ViewSonic XG270QC Guida utente
-
Itek ITMF40I Monitor GGF UltraWide Manuale utente
-
PEAQ PMO G270-CQK Manuale del proprietario
-
ViewSonic XG270QG Guida utente
-
Dell S2722DGM Guida utente
-
ViewSonic XG2760 Guida utente
-
-
Asus TUF Gaming VG34VQL3A Guida utente
-
Asus TUF Gaming VG328QA1A Guida utente