SPEEDLINK Medusa 5.1 Add-On Manuale utente
- Categoria
- Cuffie
- Tipo
- Manuale utente

Medusa
5.1 Surround Headset
Bedienungsanleitung
User’s guide
Mode d’emploi
Instrucciones de manejo
Manuale di istruzioni
Art.nr. SL-8790/SL-8791/SL-8792
D
GB
F
E
I

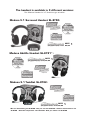
The headset is available in 3 different versions:
Das Medusa Headset ist in 3 Ausführungen erhältlich:
*Nur zur Verwendung mit SL-8790 *Only for use with SL-8790 *Utilizar exclusivamente con
SL-8790 *Utilisable uniquement avec SL-8790* Solo per utilizzo con SL-8790
NOTE
05/04 1
03/04
Medusa 5.1 TwinSet SL-8792:
03/04
NOTE
05/04 1
03/04
NOTE
05/04 1
Medusa Add-On Headset SL-8791*:
Medusa 5.1 Surround Headset SL-8790:

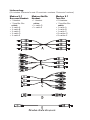
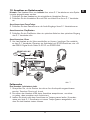
Lieferumfang:
(Kit includes: Éléments fournis: El suministro contiene: Contenuto fornitura:)
Medusa 5.1
Surround Headset
• 1 Headset
• 1 Amplifier Box
cables:
• 1x cable A
• 1x cable B
• 1x cable C
• 1x cable D
• 1x cable E
Medusa Add-On
Headset
• 1 Headset
cables:
• 1x cable D
• 1x cable E
Medusa 5.1
Twin Set
• 2 Headsets
• 1 Amplifier Box
cables:
• 1x cable A
• 1x cable B
• 1x cable C
• 2x cables D
• 2x cables E

4
D
GB
F
E
I
Bevor Sie dieses Produkt verwenden,
lesen Sie bitte die Sicherheits- und
Warnhinweise im Handbuch. Bewahren
Sie dieses Handbuch auf, um zu einem
späteren Zeitpunkt darauf zurückgreifen
zu können.
Fehlerbeseitigung/Reparatur:
• Versuchen Sie nicht, das Gerät selbst zu
warten oder zu reparieren. Überlassen Sie
jegliche Wartungsarbeiten dem zu-
ständigen Fachpersonal.
• Nehmen Sie keine Veränderungen am
Gerät vor. Dadurch verlieren Sie jegliche
Garantieansprüche.
Feuchtigkeit und Wärmequellen:
• Verwenden Sie das Gerät nicht in der
Nähe von Wasser (z.B. Waschbecken,
Badewannen oder Schwimmbecken), und
halten Sie es von Feuchtigkeit, tropfenden
oder spritzenden Flüssigkeiten sowie
Regen fern.
• Stellen Sie die Lautsprecher nicht in der
Nähe von Wärmequellen auf, um Schäden
am Gerät zu vermeiden.
Reinigung
• Benutzen Sie zum Reinigen des Gerätes
bitte ein weiches, trockenes Tuch. Lassen
Sie das Gerät nie mit Benzol, Verdünner
oder anderen Chemikalien in Berührung
kommen.
Standort:
• Die Lautsprecher müssen auf einer
stabilen Unterlage stehen, um zu
verhindern, dass sie herunterfallen und
dabei Personen oder das Gerät zu
Schaden kommen.
Belüftung:
• Verdecken Sie die Öffnungen der
Lautsprechergehäuse nicht, führen Sie
keine Gegenstände in die Öffnungen ein,
und achten Sie darauf, dass zwischen den
Lautsprechern und anderen Geräten bzw.
der Wand ein ausreichender Abstand
besteht.
Abwesenheit:
• Bei längerer Abwesenheit oder Nicht-
gebrauch sollten Sie das Stromkabel des
Systems aus der Steckdose ziehen.
Lautstärke:
• Zu große Lautstärke kann zu Hörschäden
führen.
Gewitter:
• Um die Lautsprecher bei einem Gewitter
zu schützen, ziehen Sie den Netzstecker
des Subwoofer, und schalten Sie den
Computer aus.
Bestimmungsgemäßer Gebrauch:
• Gerät zur privaten Nutzung
• Das Gerät darf nur mit den dafür
vorgesehenen Originalteilen verwendet
werden.
• Das Produkt darf nur in geschlossenen
und trockenen Räumen verwendet
werden.
• Die bestimmungsgemäße Verwendung
beinhaltet das Vorgehen gemäß der
Installationsanleitung. Für Schäden, die
durch unsachgemäßen Gebrauch
entstehen übernimmt der Hersteller keine
Haftung.
• Bei Verwendung von elektronischen
Geräten in der Nähe dieses Produktes
kann es sein, dass es zu Störungen der
Geräte kommt. Versuchen Sie in diesem
Fall die Distanz zwischen den Geräten zu
vergrößern.
• Betreiben Sie das Gerät nicht in der Nähe
von Funkgeräten (wie z.B. Handys,
etc.),um eventuelle Störungen mit diesen
Geräten zu vermeiden.
Sicherheitshinweise

5
D
GB
F
E
I
Einleitung
Vielen Dank für den Kauf des Medusa 5.1 Surround Headsets. Mit diesem
Surround Headset erleben Sie Surround-Effekte wie im Kino! Erleben Sie Ex-
plosionen hinter Ihnen als wären Sie mitten im Geschehen! Dieses Headset wurde
speziell für den Anschluss an 5.1 Soundkarten und DVD-/CD-Player konzipiert.
1. Produkteigenschaften
1. Gepolsterter Kopfbügel
2. Hochwertiges Mikrofon
3. Höhenverstellbarer Kopfbügel
4. Zusammenklappbare, gepolsterte Ohrpads aus samtartigem Material
5. Fernbedienung im Kabel integriert (Rear/Front/Center Volume, Bass)
6. Verstärker Box mit Lautstärkeregler, Ein/Ausschalter und zwei Kopfhörer-
buchsen.*
2. Systemanforderungen
• Eine 5.1 Soundquelle wie z.B. Soundkarten, DVD-Player, Decoder
3. Wichtige Hinweise zum Anschluss des Headsets:
• Dieses Headset wurde ausschließlich für den Anschluss an 5.1 Soundkarten
und DVD-/CD-Player konzipiert! Beim Anschluss an eine Stereoquelle wird kein
Surround-Klang ausgegeben.
• Es ist nur indirekt über einen 5.1 Verstärker zum Anschluss an Spielekonsolen
geeignet!
• Eine Treiber-Installation ist nicht notwendig!
• Das Headset kann nicht über den optischen Ausgang eines DVD-/CD-Players
oder Soundkarten betrieben werden!
4. Funktionen der Kabelfernbedienung
Lautstärkeregler:
In jeder Ohrmuschel des Headsets sind vier Lautsprecher zur Wiedergabe von
Raumklang integriert
Signalaufteilung:
a) Rear- Lautsprecher für Signale von hinten
b) Front-Lautsprecher für Signale von vorne
c) Center-Lautsprecher für Signale von vorne Mitte
d) Subwoofer für Tieftöne
Hinweise zur Lautstärkeregelung:
Sie können die Lautstärke auch direkt am PC regeln, indem Sie mit der rechten
Maustaste auf das Lautsprecher-Icon rechts unten in der Taskleiste klicken und
dann auf „Lautstärkeregelung öffnen“ klicken. In dem sich öffnenden Fenster
können Sie die Lautstärke individuell einstellen.
* nur SL-8790/8792

6
D
GB
F
E
I
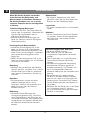
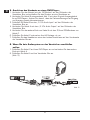
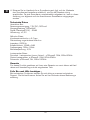
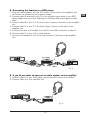
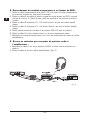
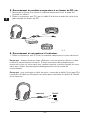
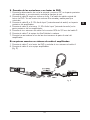
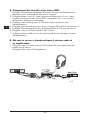
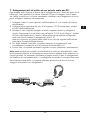
5. Anschluss des Headsets an einen DVD-Player :
1. Verbinden Sie das Netzteil mit der „DC-Buchse“ auf der Rückseite der
Verstärker Box und schließen Sie den Stecker an eine Steckdose an.
2. Verbinden Sie Kabel B entsprechend Abb. 2 mit dem Original Ausgangskabel
Ihres DVD-Players. Achten Sie darauf, dass die Farbmarkierungen an Eingang
und Ausgang jeweils übereinstimmen.
3. Schließen Sie Kabel B an den „5.1Ch Audio Input“ auf der Rückseite der
Verstärker Box an.
4. Verbinden Sie Kabel A mit dem „5.1Ch Audio Output“ auf der Rückseite der
Verstärker Box.
5. Verbinden Sie das andere Ende von Kabel A mit den 3,5mm RCA-Buchsen von
Kabel C.
6. Schließen Sie Kabel C optional an Ihre HiFi-Anlage o.ä. an.
7. Schließen Sie das Headset an einen der beiden Anschlüsse auf der Vorderseite
der Verstärker Box an.
6. Wenn Sie kein Audiosystem an den Verstärker anschließen
wollen:
1. Schließen Sie Kabel C an Ihren DVD-Player an und verbinden Sie das andere
Ende mit Kabel A.
2. Schließen Sie Kabel A an Ihre Verstärker Box an.
(Abb. 3)
Abb. 2

7
D
GB
F
E
I
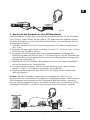
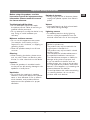
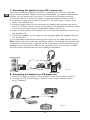
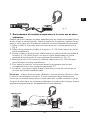
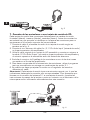
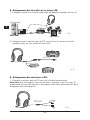
7. Anschluss des Headsets an Ihre PC-Soundkarte
Jede Soundkarte verfügt über unterschiedliche Anschlussarten für die Tonkanäle
Front (vorne), Rear (hinten), Center (Mitte). Vor Anschluss des Headsets sollten
Sie diese Anschlüsse an Ihrer Soundkarte identifizieren, um das Headset korrekt
anschließen zu können.
1. Schließen Sie Kabel A an den Sound-Ausgang Ihrer Soundkarte entsprechend
Abb. 4 an.
2. Schließen Sie das andere Ende von Kabel A an den „5.1 Ch Audio Input“ auf der
Rückseite der Verstärker Box an.
3. Verwenden Sie das Original-Kabel Ihrer angeschlossenen HiFi-Anlage und
schließen Sie das eine Ende an den „5.1Ch Audio Output“ auf der Rückseite der
Verstärker Box und das andere Ende an den Sound-Eingang Ihres Lautsprecher-
Systems an. (siehe Abb.4).
4. Stecken Sie den 9-Pin-Stecker des Headsets an einen der beiden Anschlüsse
auf der Vorderseite der Verstärker Box.
5. Um das Headset zu testen, können Sie das Testprogramm, dass normaler-
weise bei jeder 5.1 Soundkarte mitgeliefert wird, abspielen.
6. Gegebenenfalls müssen Sie den Sound über die Regler an der Kabelfernbe-
dienung einstellen.
Hinweis: Da jede Soundkarte unterschiedlich aufgebaut ist, kann hier nur
allgemein auf den Anschluss an Soundkarten eingegangen werden. Falls Probleme
beim Anschluss des Headsets an Ihre Soundkarte auftreten sollten, ziehen Sie
bitte die Bedienungsanleitung Ihrer Soundkarte zu Rate oder kontaktieren Sie den
Soundkarten-Hersteller, um nähere Informationen zum Anschluss zu erhalten.
Abb. 3
Abb. 4

8
D
GB
F
E
I
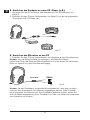
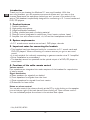
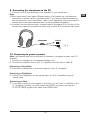
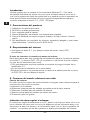
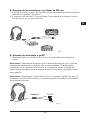
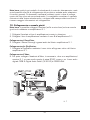
8. Anschluss des Headsets an einen CD –Player (o.Ä.):
1. Verbinden Sie den 9-Pin-Stecker des Headsets mit der 9-Pin-Buchse von
Kabel D.
2. Schließen Sie den 3.5mm Klinkenstecker von Kabel D nun an die gewünschte
Soundquelle (z.B. CD-Player) an.
9. Anschluss des Mikrofons an den PC
1. Schließen Sie den 3,5mm Klinkenstecker des Headsets an Ihre Soundkarte an.
Hinweis: Um das Mikrofon-Kabel zu verlängern, schließen Sie Kabel E
(siehe Seite 3) an das Ende des Mikrofonkabels an und verbinden Sie das andere
Ende von Kabel E mit dem Soundkarten-Eingang.
Hinweis: Da jede Soundkarte unterschiedlich aufgebaut ist, kann hier nur allge-
mein auf den Anschluss an Soundkarten eingegangen werden. Falls Probleme
beim Anschluss des Mikrofons an Ihre Soundkarte auftreten sollten, ziehen Sie
bitte die Bedienungsanleitung Ihrer Soundkarte zu Rate, um nähere Informationen
zum Anschluss zu erhalten.
Cable D
Abb. 5
Abb.6

9
D
GB
F
E
I
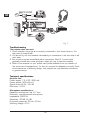
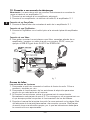
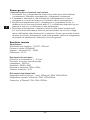
10. Anschluss an Spielekonsolen
Hinweis: Das Headset kann nur indirekt über einen 5.1 Verstärker an eine Spiele-
konsole angeschlossen werden.
1. Schließen Sie das Headset an die mitgelieferte Verstärker Box an.
2. Schließen Sie die Verstärker Box mit Hilfe von Kabel B an Ihren 5.1 Verstärker
an.
Anschluss eines GameCubes:
3. Schließen Sie den GameCube an die Audio-Eingänge Ihres 5.1 Verstärkers an.
Anschluss einer PlayStation:
3. Schließen Sie die PlayStation über ein optisches Kabel an den optischen Eingang
des 5.1 Verstärkers an.
Anschluss einer Xbox:
3. Um das Headset an die Xbox anschließen zu können, benötigen Sie zusätzlich
zu dem 5.1 Verstärker/Receiver ein Audiokabel mit SP-DIF-Anschluss, wie z.B.
das RGB & Digital Audio Cable SL-2016 von SPEED-LINK.
Fehlersuche
Das Headset funktioniert nicht.
1. Überprüfen Sie, ob die Stecker korrekt an Ihre Audioquelle angeschlossen
wurden. Tauschen Sie sie ggf. durch.
2. Sie sollten das Headset direkt beim Anschluss ausprobieren, um sicher
zu gehen, dass es später auch funktioniert.
3. Lassen Sie direkt nach dem Anschluss ein Testprogramm laufen. Normaler-
weise wird jede 5.1 Soundkarte mit einem Testprogramm ausgeliefert, mit
dem Sie das Headset testen können.
Abb. 7

10
D
GB
F
E
I
4. Schauen Sie im Handbuch Ihrer Soundkarte nach (ggf. auf der Webseite
des Soundkarten-Herstellers erhältlich), wie Sie das Headset richtig
anschließen. Da jede Soundkarte unterschiedlich aufgebaut ist, kann in dieser
Anleitung nur allgemein auf den Anschluss an Soundkarten eingegangen
werden.
Technische Daten
Verstärker Box:
Spannungsversorgung: 7,5V DC /500 mA
Ausgangsleistung: 500mWx6
Signal/Rauschen(S/N): - 60dB
Verzerrung: <0,5%
Mikrofon-Daten:
Kondensatormikrofon: φ 9,7mm
Richtwirkung ungerichtetes Mikrofon
Impedanz: 2200 Ω
Empfindlichkeit: -60dB ± 2dB
Frequenzgang: 30Hz~16kHz
Betriebsspannung: 4,5V
Lautsprecher-Daten:
Surround - Lautsprecher (vorne/hinten): φ 30mmx2, 32Ω, 20Hz-20KHz.
Center-Lautsprecher: φ 40mmx2, 64Ω, 20Hz-20KHz.
Subwoofer: φ32mmx2, 8Ω, 20Hz-120KHz.
Garantie
Für dieses Produkt gewähren wir Ihnen eine Garantie von zwei Jahren ab Kauf-
datum auf Verarbeitung und alle eingebauten Teile.
Falls Sie noch Hilfe benötigen...
Bei technischen Problemen wenden Sie sich bitte an unseren technischen
Support. Die Hotline-Nummer finden Sie auf der Rückseite dieser Bedienungs-
anleitung.

11
D
GB
F
E
I
Before using this product, read the
instruction manual for important safety
information. Please retain this manual
for future reference.
Troubleshooting& Servicing:
• Do not attempt to service or repair
the device yourself. Refer all servicing to
qualified service personnel.
• Do not attempt to modify the device in any
way. Doing so could invalidate your
warranty.
Moisture and heat sources:
• Do not use this apparatus near water
(for example, sinks, baths, pools) or
expose it to rain, moisture, or dripping or
splashing liquids.
• Place the speakers away from all heat
sources.
Cleaning:
• When cleaning the device, please use a
soft, dry cloth. Never use benzine, paint
thinner, or other chemicals on the device.
Location:
• Place the speakers in a stable location
so they will not fall causing damage to the
speakers or bodily harm
Ventilation:
• Do not block the openings in speaker
cabinets, never push objects into speaker
vents or slots because of fire or electric
shock hazards, and provide sufficient
space around the speakers for proper
ventilation
Periods of absence:
• During longer periods of absence please
unplug the speaker system from electric
power.
Volume:
• Prolonged listening at high volume levels
may cause hearing damage.
Lightning storms:
• For added protection during lightning
storms, unplug the speakers from the
elctrical outlet and turn off the computer
Intended use:
• Device for private use
• The product may only be used with the
original parts intended for it
• The product may only be used in closed
and dry rooms
• The intended use includes adherence to
the specified installation instructions.
The manufacturer accepts no liability for
damage arising due to improper use.
• If you use electronic devices such as
mobile phones, etc. close to the product,
you may experience problems with these
devices. If this happens, try increasing the
distance between the devices.
• To avoid problems with radio transmitting
or receiving devices, do not use the
product near such devices.
Important Safety Information

12
D
GB
F
E
I
Introduction
Thank you for purchasing the Medusa 5.1 surround headset. With this
surround headset, you will experience surround effects as if you were in the
cinema! Experience the explosions behind you as if you are in the midst of the
action! This headset is specifically designed for connecting to 5.1 sound cards and
DVD/CD players.
1. Product features
1. Padded headband
2. High-quality microphone
3. Height adjustable headband
4. Folding, padded ear pads of velvety material
5. Remote control integrated in cable (rear/front/centre volume, bass)
6. Amplifier box with volume control, on/off and two headphone sockets.*
2. System requirements
• A 5.1 sound source such as sound card, DVD player, decoder
3. Important notes for connecting the headset:
• This headset has been designed solely for connection to 5.1 sound cards and
DVD/CD players! When connecting to a stereo source you got no surround
sound.
• It is only suitable for indirectly connecting to games consoles via a 5.1 amplifier!
• Driver installation is unnecessary!
• The headset cannot be operated via the optical output of a DVD/CD player or
sound card!
4. Functions of the cable remote control
Volume control:
Four speakers are integrated into each earpiece of the headset for reproduction
of stereo sound.
Signal distribution:
a) Rear speakers for signals from behind
b) Front speakers for signals from the front
c) Centre speakers for signals from front centre
d) Subwoofer for bass tones
Notes on volume control:
You can also control the volume directly at the PC by right clicking on the speaker
icon at bottom right of the task bar and then clicking on “Open volume control”.
You can individually adjust the volume in the window that opens.
* Only SL-8790/8792

13
D
GB
F
E
I
5. Connecting the headset to a DVD player:
1. Plug the mains adapter into the “DC socket” on the back of the amplifier box
and insert the mains plug into a power socket.
2. Connect cable B as shown in fig. 2 to the original output cable of your DVD
player. Make sure the colour markings on the input and output agree in each
case.
3. Connect cable B to the “5.1 Ch Audio Input” socket on the back of the amplifier
box.
4. Connect cable A to the “5.1 Ch Audio Output” socket on the back of the
amplifier box.
5. Connect the other end of cable A to the 3.5 mm RCA connector of cable C.
6. Connect cable C to your hi-fi or other system.
7. Connect the headset to one of the two sockets on the front of the amplifier
box.
6. If you do not want to connect an audio system to the amplifier:
1. Connect cable C to your DVD player and connect the other end to cable A.
2. Connect cable A to your amplifier box.
Fig. 3
Fig. 2

14
D
GB
F
E
I
7. Connecting the headset to your PC’s sound card
Each sound card has different methods of connection for the front, rear and
centre sound channels. Before connecting the headset, you should identify these
sockets on your sound card to be sure of connecting the headset correctly.
1. Connect cable A to the sound output of your sound card as shown in fig.4.
2. Connect the other end of cable A to the “5.1 Ch Audio Input” socket on the
back of the amplifier box.
3. Use the original cable of your connected hi-fi system and connect one end to
the ”5.1 Ch Audio Output” socket on the back of the amplifier box and the other
end to the sound input of your loudspeaker system (see fig. 4)
4. Insert the 9-pin plug of the headset into one of the two sockets on the front of
the amplifier box.
5. To test the headset, you can play the test program generally supplied with any
5.1 sound card.
6. You may have to adjust the sound via the control on the cable remote control.
Note: Since each sound card has a different design, the manual can only describe
connection to sound cards in general terms. If you have problems connecting the
headset to your sound card, refer to the manual for your sound card or contact
the sound card manufacturer for more detailed information.
8. Connecting the headset to a CD player, etc.
1. Connect the 9-pin connector of the headset to the 9-pin socket of cable D.
2. Connect the 3.5 mm jack plug of cable D to the required sound source
(e.g. CD player).
Fig. 4
Cable D
Fig. 5

15
D
GB
F
E
I
9. Connecting the microphone to the PC
1. Connect the 3.5 mm jack plug of the headset to your sound card.
Note:
a) Since each sound card has a different design, the manual can only describe
connection to sound cards in general terms. If you have problems connecting
the microphone to your sound card, refer to the manual for your sound card or
contact the sound card manufacturer for more detailed information.
b) to extend the microphone cable, connect cable E (see page 3) to the end of the
microphone cable and connect the other end of cable E to the sound card input.
10. Connecting to games consoles
Note: the headset can only be indirectly connected to a games console via a 5.1
amplifier.
1. Connect the headset to the supplied amplifier box.
2. Connect the amplifier box to your 5.1 amplifier with the help of cable B.
Connecting a GameCube:
3. Connect the GameCube to the audio inputs of your 5.1 amplifier.
Connecting a PlayStation:
3. Connect the PlayStation to the optical input of the 5.1 amplifier using an
optical cable.
Connecting an Xbox:
3. To be able to connect the headset to the Xbox, you will need, in addition to the
5.1 amplifier/receiver, an audio cable with SP-DIF connector such as the
SL-2016 RGB & digital audio cable from SPEED-LINK.
Fig. 6

16
D
GB
F
E
I
Troubleshooting
The headset does not work.
1. Check whether the plugs are correctly connected to your sound source. You
may need to swap them.
2. You should try out the headset immediately on connection to be sure that it will
work later.
3. Run a test program immediately after connection. Each 5.1 sound card
generally comes with a test program, which you use to test the headset.
4. Refer to the manual for your sound card (often available from the website of
the sound card manufacturer), for how to connect the headset correctly. Since
sound cards are of differing design, this manual can only describe connection
in general terms.
Technical specifications
Amplifier box:
Power supply: 7.5 V DC /500 mA
Output power: 500 mW x 6
Signal/noise (S/N): - 60 dB
Distortion: <0.5%
Microphone specifications:
Capacitor microphone: dia. 9.7 mm
Directivity: omnidirectional microphone
Impedance: 2200 W
Sensitivity: -60 dB ± 2 dB
Frequency response: 30 Hz~16 kHz
Working voltage: 4.5 V
Fig. 7

17
D
GB
F
E
I
Loudspeaker specifications:
Surround sound loudspeakers (front/rear): dia. 30 mm x2, 32 W, 20 Hz-20 kHz.
Centre loudspeaker: dia. 40 mm x2, 64 W, 20 Hz-20 kHz.
Subwoofer: dia. 32 mm x2, 8 W, 20 Hz-120 kHz.
Guarantee
We guarantee this product for two years from the date of purchase in respect of
workmanship and all built-in components.
If you need help...
In case of technical problems, please contact our technical support. The hotline
number can be found on the back of this manual.

18
D
GB
F
E
I
Avant d‘utiliser ce produit, consultez le
manuel d‘instructions. Vous y trouverez
des informations importantes sur la
sécurité. Conservez ce manuel pour une
référence ultérieure.
Entretien:
• Ne tenez pas d‘effectuer vous-
même l‘entretien du dispositif ni de le
réparer. Pour les opérations d‘entretien,
adressez-vous à du personnel qualifié.
• N‘essayez jamais d‘apporter une
quelconque modification au dispositif. Cela
pourrait annuler votre garantie.
Humidité et sources de chaleur :
• Évitez d‘utiliser l‘appareil à proximité de
l‘eau (évier, baignoire ou piscine par ex.)
ou de l‘exposer aux intempéries, à
l‘humidité, ou à des écoulements ou des
projections de liquides.
• Eloignez les haut-parleurs de toute source
de chaleur.
Nettoyer l‘unité
• Pour nettoyer l‘unité, veuillez utilisez
un chiffon doux et sec. N‘appliquez jamais
de benzine, de diluant ou autre produit
chimique sur le dispositif.
Emplacement:
• Placez les haut-parleurs de manière à
ce qu‘ils soient stables, car toute chute
risquerait de les endommager ou de
cuser des dommages corporels.
Ventilation:
• Ne bloquez pas les ouvertures des haut-
parleurs. N‘enfoncez jamais d‘objets
dans les ouvertures ou les fentes
des haut-parleurs, du fait du risque
d‘électrocution ou d‘incendie, et laissez un
espace suffisant autour des haut-parleurs
pour assurer une ventilation correcte.
En cas d‘absence:
• En cas d’absence ou de non-utilisation
prolongée, débranchez le câble
d’alimentation électrique de la prise
Volume:
• Un volume trop élevé peut entraîner des
troubles de l’audition.
Foudre:
• Pour une meilleure protection contre la
foudre, débranchez les haut-parleurs de la
prise électrique et mettez l‘ordinateur
hors tension en cas d‘orage
Utilisation conforme:
• Unité destiné à une utilisation
privée.
• L’appareil ne doit être utilisé qu’avec les
pièces originales prévues à cet effet.
• Le produit ne doit être utilisé que
dans des locaux fermés et secs.
• L’utilisation conforme implique de
respecter les instructions d’installation.
Le fabricant décline toute responsabilité
en cas de dommages dus à une utilisation
incorrecte.
• En cas d’utilisation d’appareils
électroniques (tels que des téléphones
portables, etc.) à proximité de ce produit,
il est possible que le fonctionnement des
appareils en question soit perturbé. Dans
ce cas, essayez d’éloigner les appareils.
• N’utilisez pas l’appareil à proximité
d’appareils radio pour éviter d’éventuelles
interférences avec ces appareils.
Instructions de sécurité

19
D
GB
F
E
I
Introduction
Merci d’avoir choisi le combiné casque-micro surround Medusa 5.1. Ce combiné
vous permettra de retrouver les mêmes effets surround qu’au cinéma . Vous avez
l’impression que les explosions se produisent juste dans votre dos, comme si vous
étiez au cœur de l’action ! Ce combiné casque-micro a été spécialement conçu
pour être raccordé à des cartes son 5.1 et des lecteurs de DVD/CD.
1. Caractéristiques
1. Serre-tête matelassé
2. Microphone de qualité supérieure
3. Serre-tête à hauteur réglable
4. Écouteurs repliables et rembourrés en tissu velouté
5. Télécommande intégrée au cordon (volume arrière/avant/centre,
réglage des graves)
6. Boîtier amplificateur avec contrôle du volume, interrupteur marche/arrêt et
deux prises casque (*seulement SL-8790/8792).
2. Configuration système requise
• une source audio 5.1 (par exemple une carte son, un lecteur de DVD, un
décodeur)
3. Consignes importantes pour raccorder le combiné casque-micro :
• Ce combiné casque-micro est exclusivement conçu pour être raccordé à des
cartes son 5.1 et des lecteurs de DVD/CD ! En cas de raccordement à une
source stéréo vous n’entendrez pas le son surround.
• Il ne peut être utilisé qu’indirectement avec des consoles de jeu en le raccordant
à un amplificateur 5.1 !
• Pas de pilote à installer !
• Le combiné casque-micro ne peut pas être utilisé en le raccordant à la sortie
optique d’un lecteur de DVD/CD ou d’une carte son !
4. Fonctions de la télécommande filaire
Contrôle du volume :
Chaque oreillette du combiné est munie de quatre haut-parleurs restituant
l’espace sonore.
Répartition des signaux :
a) Haut-parleur arrière pour les signaux venant de l’arrière
b) Haut-parleur avant pour les signaux venant de l’avant
c) Haut-parleur central pour les signaux venant de l’avant au centre
d) Caisson de basses pour les graves
Remarques relatives au réglage du volume :
Vous pouvez également régler le volume directement sur votre ordinateur en
cliquant avec la touche droite de la souris sur l’icône du haut-parleur dans la barre
des tâches en bas à droite et en allant sur « Ouvrir le contrôle du volume ». Dans
la fenêtre qui s’ouvre alors à l’écran, vous pouvez régler le volume à votre
convenance.

20
D
GB
F
E
I
5. Raccordement du combiné casque-micro à un lecteur de DVD :
1. Reliez le câble d’alimentation à la prise « DC » au dos du boîtier amplificateur
et branchez la fiche sur une prise de courant.
2. Reliez le câble B au câble de sortie original de votre lecteur de DVD, comme
indiqué sur la Fig. 2. Veillez à bien relier les entrées et les sorties de même
couleur.
3. Reliez le câble B à la prise « 5.1 Ch Audio Input » au dos du boîtier amplifi-
cateur.
4. Reliez le câble A à la prise « 5.1 Ch Audio Output » au dos du boîtier amplifi-
cateur.
5. Reliez l’autre extrémité du câble A aux prises RCA 3,5 mm du câble C.
6. Reliez le câble C à votre chaîne stéréo ou à votre équipement audio.
7. Branchez le combiné casque-micro sur l’une des deux prises à l’avant du boîtier
amplificateur.
6. Si vous ne souhaitez pas raccorder de système audio à
l’amplificateur :
1. Branchez le câble C sur votre lecteur de DVD et reliez l’autre extrémité au
câble A.
2. Reliez le câble A à votre boîtier amplificateur. (fig. 3)
fig. 2
La pagina si sta caricando...
La pagina si sta caricando...
La pagina si sta caricando...
La pagina si sta caricando...
La pagina si sta caricando...
La pagina si sta caricando...
La pagina si sta caricando...
La pagina si sta caricando...
La pagina si sta caricando...
La pagina si sta caricando...
La pagina si sta caricando...
La pagina si sta caricando...
La pagina si sta caricando...
La pagina si sta caricando...
La pagina si sta caricando...
La pagina si sta caricando...
La pagina si sta caricando...
La pagina si sta caricando...
La pagina si sta caricando...
La pagina si sta caricando...
-
 1
1
-
 2
2
-
 3
3
-
 4
4
-
 5
5
-
 6
6
-
 7
7
-
 8
8
-
 9
9
-
 10
10
-
 11
11
-
 12
12
-
 13
13
-
 14
14
-
 15
15
-
 16
16
-
 17
17
-
 18
18
-
 19
19
-
 20
20
-
 21
21
-
 22
22
-
 23
23
-
 24
24
-
 25
25
-
 26
26
-
 27
27
-
 28
28
-
 29
29
-
 30
30
-
 31
31
-
 32
32
-
 33
33
-
 34
34
-
 35
35
-
 36
36
-
 37
37
-
 38
38
-
 39
39
-
 40
40


SPEEDLINK Medusa 5.1 Add-On Manuale utente
- Categoria
- Cuffie
- Tipo
- Manuale utente
in altre lingue
Documenti correlati
-
SPEEDLINK medusa 5 1 home sl 8796 Manuale del proprietario
-
-
-
-
-
SPEEDLINK MEDUSA 5.1 True Surround Manuale del proprietario
-
 Speed Link Ares 2 USB Manuale utente

